
Last Seen Blogs

leatherlust2001
leather_lust

mtanoida
MTA Noida

waywardwindd
Not just light, not just darkness. We decide what we are.

clarizzexx-blog
Untitled

cape-engineer
Untitled
Text
this is the secondary personal blog of @lustrous-globe. the purpose of this one is to be free of the negativity and discussion of real world matters that you would see on my primary blog. i also try to focus on mostly my hyperfixations on this blog. it likely won't be as active as my other blog, but i'll be trying to run a queue. i'll also post my writing on this blog so it doesn't get buried
7 notes
·
View notes
Note
Do you have any triggers?
Jello, Popsicles, Soup Broth.
167K notes
·
View notes
Text
Rping with ADHD
You either hyperfocus on a thread or ignore it. There is no in between
“…What was I typing again?”
Five tabs of drafts open. Half a sentence in each.
“I don’t need to draft that. I’ll remember it.” (Spoiler alert, you won’t. )
“Oh look an ask/im! Let’s just open that and leave and get distracted and forget to ever answer it”
“…No seriously, what was I typing again?”
Aggressively spamming partner in excitement in caps and scaring them away
*writes a word* Time for youtube.
Begs for starter. Never answers it.
“Like this post for a starter!!” Never writes starters.
It’s suddenly 5:am because you spent all night hyperfixating on one thread
“It’s not that I don’t like our thread, it’s just not my hyperfixation so I can’t focus on it.”
*can’t sleep because you can’t stop thinking of said hyperfixated thread*
*writing lines for said thread in your head when you should be sleeping*
*sweats nervously while staring at 467546 unanswered ims/asks*
*melt down because you can’t just answer drafts like a functional rper*
“Hey let’s rp! …I don’t know what but let’s rp!”
“Friend: So did you make the starter yet?” “…What starter?”
“What’s a queue?”
“I was about to tell you an idea but I spaced out”
“Can’t write, gotta wander the house”
*chewing things while writing*
“….WHAT THE FUCK WAS I TYPING??”
Feel free to add your own!
5K notes
·
View notes
Text
tumblr sweetie i appreciate it but i have school today

🤫 Quiet down — Tee's sleeping 😴!
And you should be too.
Today is World Sleep Day and we’re going all out for this celebration!
What is World Sleep Day?
World Sleep Day is an annual, global call to action about the importance of healthy sleep. The focus of World Sleep Day is to bring awareness to the importance of healthy sleep.
In partnership with World Sleep Society, we are asking you to pull out your self-care to-do list and check off “LOG OFF & GO TO SLEEP!”
How can you help to make this our biggest celebration YET?
It’s really easy to participate — TWO SIMPLE STEPS:
For Web users:
LOG OFF
GO TO SLEEP
For App users:
LOG OFF
GO TO SLEEP
Need a little sleep-spo?
Check out the #GoToSleepTumblr tag. We recommend moseying over to @music for some soothing sounds to put you in the mood to snooze and stay tuned to @gotosleep for the largest collection yawn-inducing content. Let’s count some sheep, Tumblr.
6K notes
·
View notes
Text

the legendary/2 generic team members squad rise up
#the egg in my party that i forgot to swap for my luxray carried#but fr uxie was the one who carried they killed fucking everything n they were underleveled too#they also went on to face both dialga and palkia and come out with over half hp#conclusion: my uxie is a god tier mon basically
2 notes
·
View notes
Text
How to Write Constructive Criticism

At some point in your life, you’re going to have to give someone constructive criticism. Whether it be on an original work, a fanfic, or if your English teacher forces you into peer editing, you’re going to have to find a way to state your opinion on a piece of literature in a manner that won’t dampen the spirits of the person being critiqued.
Note: These rules don’t really apply to beta reading and editing; in those cases the writer may be asking for your strict opinion and is prepared for the criticism that may come (though it can never hurt to be polite!)
1. If a Person Doesn’t Want Constructive Criticism, Don’t Give it

It could literally be the worst piece of writing you have ever read in your entire life. It could be riddled with grammar and spelling errors and have no paragraph spacing at all, but if someone EXPLICITLY STATES that they DO NOT WANT constructive criticism, DON’T GIVE CONSTRUCTIVE CRITICISM.
If they don’t want constructive criticism, it doesn’t mean they think they’re better than everyone else; people have a variety of reasons to deny constructive criticism.
It could be a throwaway fic that they just wrote on a whim, not something they wish to develop and improve.
They could be a new writer that is just getting a hold of the hobby and isn’t ready to be corrected yet
They could’ve recieved a ton of constructive criticism on it already; it’s really disheartening when you spend a ton of time and effort only to have your only comments be constructive criticism
This last reason comes as a result from poor constructive criticism etiquette; had the readers followed these rules, this probably wouldn’t have happened.
If someone doesn’t state that they don’t want constructive criticism, then it’s fair game; however, you still have to be polite about it, which I’m getting to next.
2. Follow This Format


(Yes, I know it’s Comic Sans)
The key here is providing a cushion; you want to let the writer know that you didn’t think the story was terrible and that you liked some parts and think others may need improvement.
Greeting
Introduce yourself. Be friendly. Tell the writer how you stumbled across this fic/work and, in the longer cases, tell them how long you’ve been reading/following it.
Doesn’t have to be long if you don’t want it to, a simple “hello!” will suffice.
Compliment(s)- Part One
Tell the writer what you liked. The characters, the plot, the setting, the description, the dialogue, and don’t spare the details! Writers love hearing compliments!
Constructive Criticism
Tell them what they think they should improve on. The grammar. The spelling.
(Note that you shouldn’t write a review for ONE spelling or grammar mistake; this should only be for consistent and numerous errors)
Tell them if the dialogue is stilted or if the description interrupted the flow of the story. If you yourself are a writer, suggest how they can fix it.
Don’t be too harsh! Your cushion compliments will do nothing if you phrase your criticism too meanly!
Compliments(s)- Part Two
Tell them some more things you liked. Tell them your predictions for the next chapters (I can assure you, writers LOVE this). Tell them specific sections and events that really made you get lost in the writing.
Farewell
Say goodbye and tell them you’ll be back for the next update! This is an optional step, but it’s nice to know when one of your readers will be coming back.

As you can see, it corrects the mistake without completely crushing the writer.
The point of constructive criticism is to help the writer improve and to inspire them to strive for better technique; if your “constructive” criticism makes them never want to write again, then you have failed as a reviewer (not to mention how you should be pretty damn ashamed of yourself for making people abandon what they love.)
Just follow these rules and you should be set to review any piece of writing you come across ! Happy reading!
2K notes
·
View notes
Text
"why the fuck do these people keep saying the name of their region to me as soon as they see me"
You know what I want? Culture clashes between the pokemon regions.
Someone from Unova travels to Kanto/Johto wearing a t-shirt with a big R on the chest. They get dirty looks for it and have no idea what’s going on.
A Kalosian meets someone from Sinnoh and keeps standing too close to them. The Sinnoh native keeps stepping back uncomfortably, but the Kalosian keeps stepping closer.
Someone from Johto goes to Unova and ????EVERYTHING IS SO BIG=????
A Hoennian meets up with a Kalosian and the Kalosian goes for cheek kisses while the Hoennian goes for a gentle head butt.
50K notes
·
View notes
Text
gonna try and boot up my pc and work tumblr later tonight. not gonna go full pc for reasons i'm not comfortable sharing, but i'll try to pop on and test some pc things at some point
0 notes
Text
How a D20 can Make RPing More Fun!
I wanted to share a roleplaying tip today that has helped me quite a bit when I’m not sure how well a muse will take something, how well they will do in a fight, whether or not they will notice an environmental change, etc: use a d20!
What’s a d20? A d20 is a twenty-sided die, often used in tabletop RPG’s such as DnD and Pathfinder. But we can use it in written roleplaying, too!
You roll the die and it lands on a number. You use that number to determine whether or not an action was successful. A 1 is considered a critical failure, with numbers below 10 typically being considered failures, whereas a 10 or above is typically considered a success, with a 20 being considered a critical success. If I roll a 2, my muse failed horribly, but if I roll a 10, my muse may have just barely succeeded. If you don’t own a physical d20, you can roll one online here.
Why would I use a d20 in my roleplays? It can help make things more fair, and more fun, for both you and your roleplay partner! Even the most powerful and skilled characters make mistakes sometimes, and don’t succeed in everything they do.
Great, but how the heck can I use a d20 in my written roleplays, meme-mun? I will provide two examples: one for fights, and one for more general purposes.
In a fight scene: Let’s say that in your reply to me, your muse takes a swing at my muse, but you didn’t say in your reply whether or not that hit lands. I can roll a d20 to determine whether or not my muse is able to dodge the attack. In this case, I rolled a 5. In the d20 system, this is a fail. So, in this example, the hit lands, and maybe my muse stumbles back with a bloody nose. If I had rolled a 15, on the other hand, that would be a success; my muse dodges just in time. But if I rolled a 10, maybe they got nicked. It’s up to you how you interpret the numbers!
In a non-fight scene, we can still use our trusty d20. Let’s say I want my muse to sneak past some NPC’s (non-player characters, like some background extras). I can use my trusty d20 to determine whether or not my muse is sneaky enough to get by undetected. I rolled a 19, so, yes, my muse does get by undetected! But if I’d rolled a 1, then, oh no, my muse tripped and yelped ‘oof’. Now they’re a sitting duck primed for the picking. Getting the picture now?
Remember, roleplaying is a hobby, so if something like this helps you make decisions, great! But if it doesn’t, that’s ok too. Please do give this post a reblog if you find it helpful. Happy RPing!
-M
137 notes
·
View notes
Photo


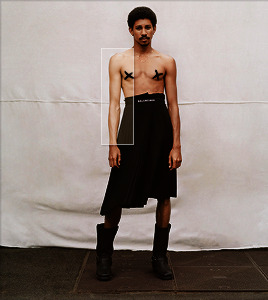
✧ ADJUSTMENT PSD 001: ANTI-WHITEWASHING — BY EVANSYHELP.
This is an adjustment PSD designed to correct whitewashing. It comes in four strengths and includes 3 add-on adjustments to fix possible issues caused by the main layers (ie. tomatowashing). It is not meant to be a complete PSD on its own; place it underneath your colouring PSD for optimal results. Please like or reblog if you download, and credit me if you use it in your icon/gif packs.
✧✧✧ ( DOWNLOAD. )
3K notes
·
View notes
Text
Quick PSA: Auto-dodging (dodging all of the other's attacks), auto-hitting/aimbotting (saying that all your hits are landing- that's not YOUR decision to make), metagaming (knowing and exploiting all of a character's weaknesses despite their first encounter being recent), unrealistic power play (power gaps with no explanations via bio or plotting beforehand), cheesing (suddenly developing a random ability or item with no prior knowledge just to deal with the situation at hand), invincibility (not having your character being taken down ever), overpowered characters (characters with tons of strengths and no weaknesses), and character control (controlling the other person's muses) are ALL forms of godmodding. Not just the last example. It's extremely frustrating to be on the recieving end of godmodding and just straight-up unfair. It's not hard to not godmod, just don't do it.
105 notes
·
View notes

Text
op: let ppl ship what they want, it’s fictional!
me: that’s fair
op: so it’s ok to ship inc*st and p*dophilia
me:

175K notes
·
View notes
Text
I Swear This Is An RP Blog: A Musical
Featuring such hits as
Maybe I’ll RP Today and its reprise No Wait Nevermind
What Was The Plot of This RP Again?
Fuck My Partner Deleted Their Blog
And the ever classic
I’m a Lazy Bastard
37K notes
·
View notes
Text
how to mass edit / save icons without an action script.
sweaterquccn:
Alright everyone ! ! So over the years here on tumblr, I’ve gained a rather LARGE collection of icons which I’ve, painstakingly made, hand by hand and one by one. I’m sure others can agree that they’re sick and tired of sitting in photoshop for HOURS with the same motions of cut + paste + save for each new icon (and when you make thousands of icons like I do, you go a little crazy) Personally, I’ve looked into how to mass edit these icons, I’ve tried everything from PHOTOSCAPE (which doesn’t let you slap psd’s on top) and action scripts (which if you don’t understand it like me, it fails all the time.) BUT FEAR NOT ! ! Somehow I’ve discovered how to mass edit and save icons WITHOUT AN ACTION SCRIPT. All you’ll need is one thing;
● Photoshop CS6 / portable (a link to download can be found here)
but if you’re able to figure out how to do this in the photoshop
version you’re comfortable with, please don’t feel forced to change.
Before I get into this tutorial I’m SORRY that I’m NOT placing it under a read more, the reasons are simply that if this blog is to ever be deleted or moved or changed URLS - no one would be able to read it under the read more, so please keep that in mind !
For those who want to save RAW icons; feel free to skip down to step six as it should explain what to do !
Instructions.
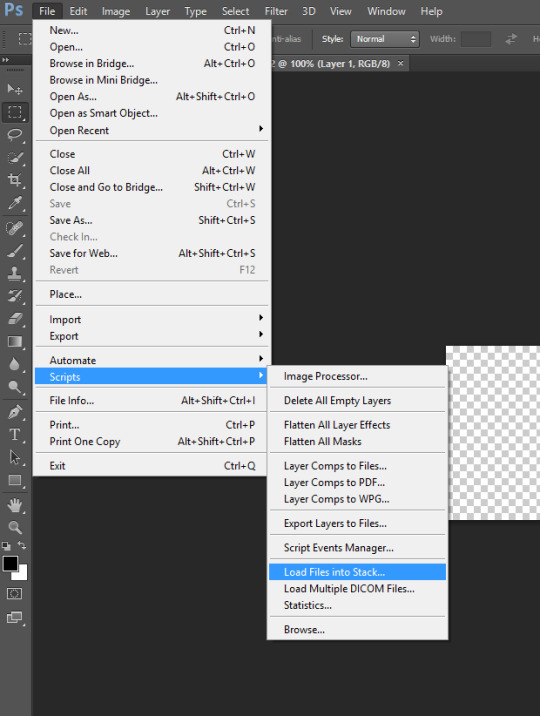
(step one.) so, first thing that you’re going to want to do, is load all of your icons into a STACK, this means that each icon you load will be a separate layer but in the one canvas. To do this, you’ll want to do the following. FILE » SCRIPTS » LOAD FILES INTO STACK
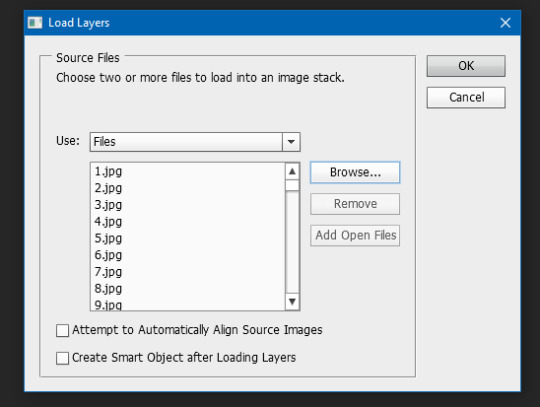
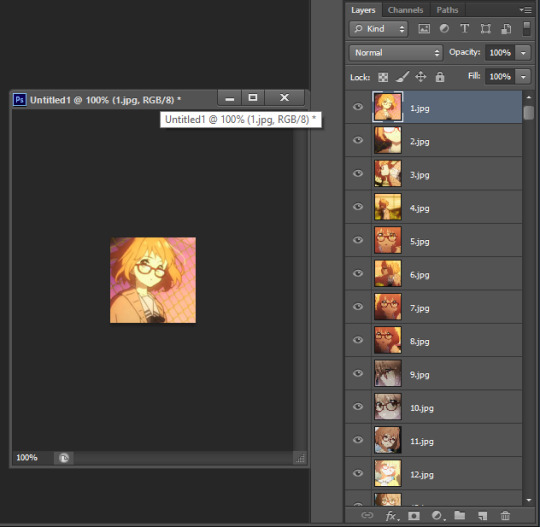
After clicking on this, a new popup will come onto the screen, what you want to do is click on BROWSE and it’s through this you’ll navigate to the icons you want to edit (for me I’ve chosen my mirai icons which are numbered into the 1500′s) you don’t need to worry about any of the other boxes, when the files are loaded into the grey box, hit OK. Note that pending on how many icons you have to edit, this process might take a while to run on photoshop (for me it took a good 15 mins or so to load up 1,500 icons) but you should end up with something like this; notice how all my icons are now in one canvas, but in multiple layers, that’s what you want.
also please be aware you’re computer MAY OVER HEAT - if you’re on an older computer or laptop I recommend that you just let this process be and to not touch anything else in the mean time.
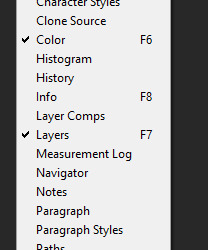
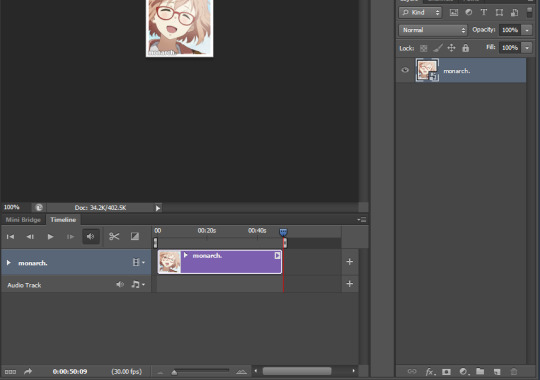
(step two.) Now, for the next step, you’ll want to open up your timeline, if you don’t already have it up, just go to WINDOW » TIMELINE as shown in the below image, this should then bring up what is given in the second image ( bigger resolution HERE )
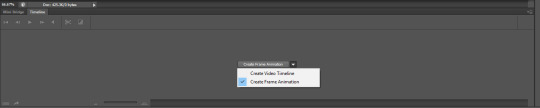
click on the CREATE FRAME ANIMATION and you should get the following in your time line bar; also SOME users may already have this automatically come up and this is OKAY, it’ll work the same even if you don’t go through the above step.
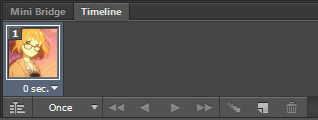
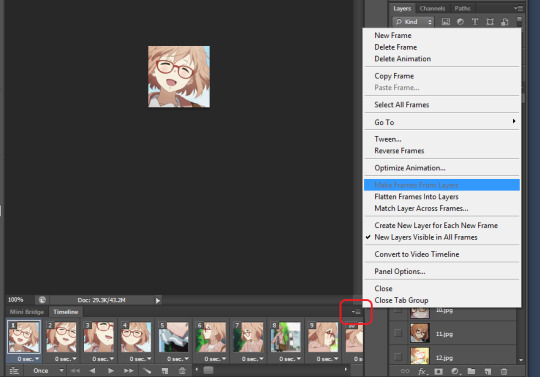
Now, what you’re going to do is go to the top, right hand corner of this timeline window, click on the little box and hit MAKE FRAMES FROM LAYERS. You should end up with the result below (which is also highlighting where the box that you need to do this is - it’s only greyed out because I already clicked the button.) also, for the sake of order, if you like your icons in chronological order - hit the REVERSE FRAMES button.
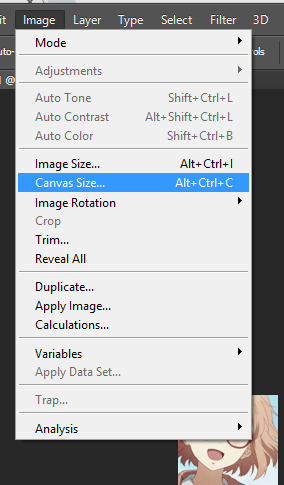
now, I almost forgot to do this and this is a step you can do before making the timeline animation / frames - if your icons need a bigger canvas size - due to borders, psds or whatever - MAKE SURE YOU CHANGE THE CANVAS SIZE, you can do this by IMAGE » CANVAS SIZE. which will pop up with what is given in the second image, use this to change the canvas size to whatever your edits take up, for me I need a canvas size of 108 x 108 pixels - please also note this will take some time to process in photoshop, so please be patient.

(step three.) so now, comes onto the more difficult part, but when you have this memorized it should be easy to continue for other icons which you make. First thing that you’re going to do; in the bottom LEFT hand corner of the timeline window, there’s a small button and you’re going to click that - it’s highlighted in the following image;
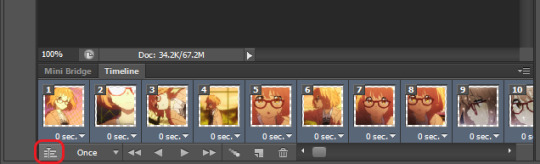
clicking this will cause your timeline to change into something that looks like this ; and i’m sure you’ve seen this with other tutorials but DON’T STRESS it doesn’t get complicated - once again however this is a lengthy process to convert.

When this is finished, you’re going to SELECT ALL OF YOUR LAYERS. After this, you’ll be going to FILTER » CONVERT FOR SMART FILTERS. Once you finish this, you should get what is in the second image;
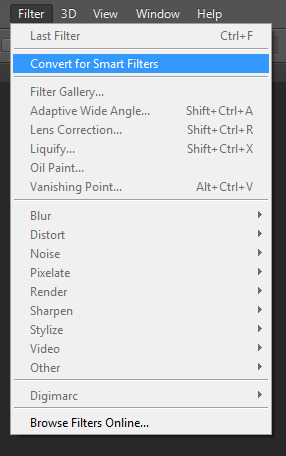
DO NOT STRESS ABOUT THIS AND THE FACT THAT ONLY ONE LAYER NOW SHOWS - THIS IS WHAT YOU WANT AND YOU HAVE NOT DELETED ANYTHING. If you simply move the slider around on the time line, you can see that all the layers are still there, think of the smart filter as fancy folder.
(step four.) Now comes to the FUN part of editing ; so, what you’ll need to do is open up the PSD file that you use for your icons, for me I have a few filters that I change depending on if I use manga, live action or anime - make sure to also drag this canvas out into a smaller one to make the next steps easier.
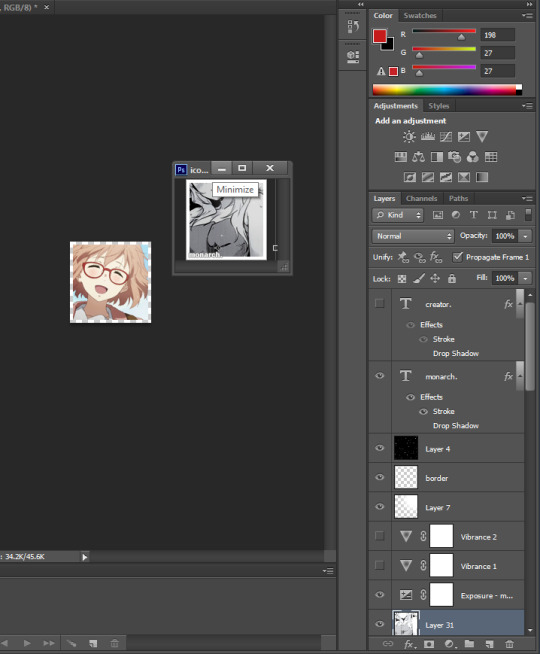
as you can see from the above, I have my icon psd selected and yet the icons I’d like to edit are still able to be seen, now, you’re going to drag the layers of your psd - what you usually place ontop of your icons, and DRAG THEM onto the icons you want to edit like the following;
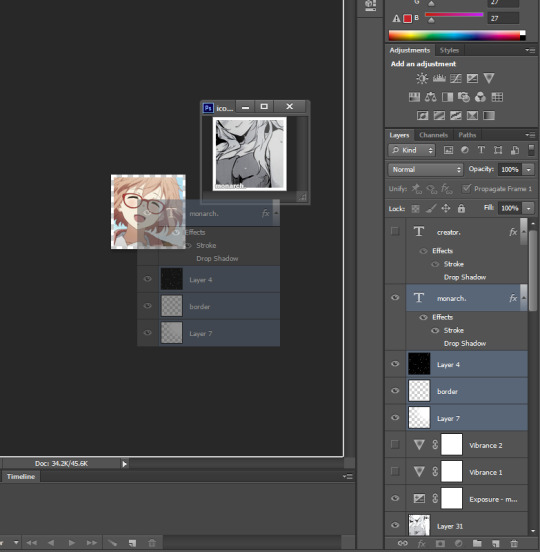
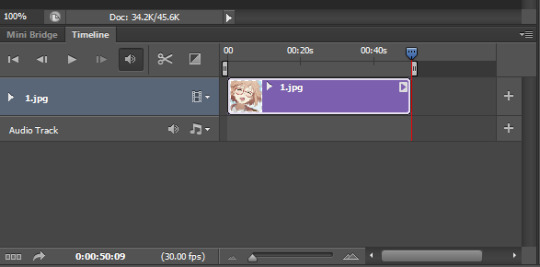
This should drop onto your icons all nice and neat and in frame, if not, simply move them around as you normally would until everything lines up all nice and neat, but HOLD ON A SECOND. there’s something VERY IMPORTANT that you need to take care of;
In the above image, there are these purple little sections now added in the timeline, what you want is for these to be lined up like the image below, they need to start where the longer purple section starts and, they need to END where they end (DO NOT EXTEND OR SHORTEN THE PURPLE SECTION WHERE YOUR ICONS ARE.)

So now, you should end up with the bottom image, everything is now neat and the same length. If you’ve done this, the hard part is now over and you can relax a little now, there are only a few more steps and you’re done !
Now, you’re going to repeat a step that you’ve already done, like before, you’re going to SELECT ALL LAYERS and convert them for a smart filter, so you’ll end up with just a single layer and a single, purple section like the following;
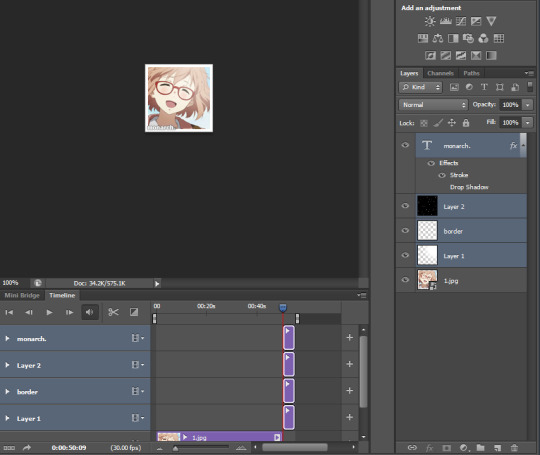
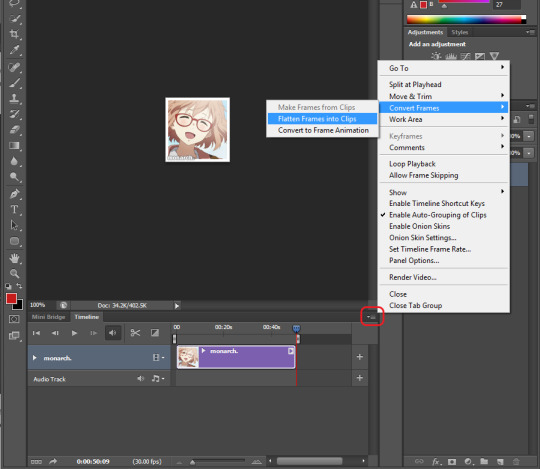
(step five.) Now we’re going to get onto how to save all of these icons, first what you’re going to want to do is click on the upper right box, like you did earlier and as show below. You’ll be going to CONVERT FRAMES » FLATTEN FRAMES INTO CLIPS.
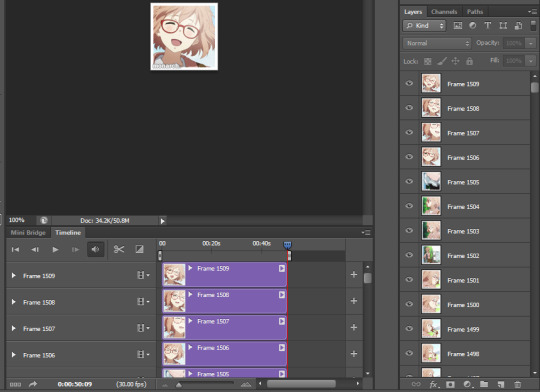
Now, your work space should look like the following; there’s frames for each icon and a layer for each icon, but you’ll notice that each icon is edited with your PSD, it’s a miracle ! and this means you’re on the right track. Keep going, you can do it.
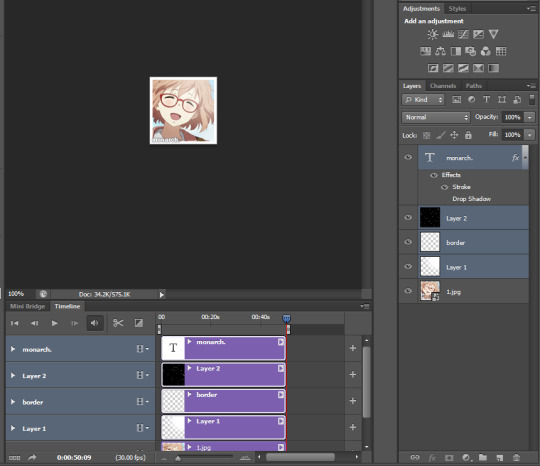
Now in the bottom left corner there should be three squares to click on, these will return you to the timeline you were familiar with before, it’s a more simplified version;
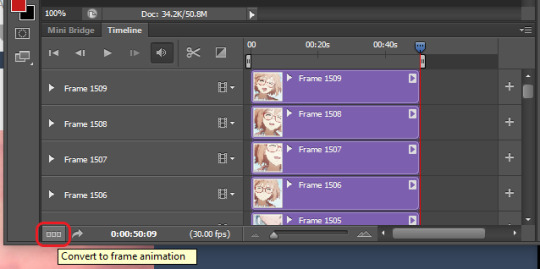
Now, you should get the following image after clicking that little button, but before you move onto the next step, there are two IMPORTANT THINGS you need to know before moving on.
In the first frame, the number HAS TO BE CHANGED TO ‘NO DELAY’ this is done by clicking the area highlighted in the picture - DO NOT SKIP THIS STEP by skipping this step, when you save your icon, you’ll end up with the same one repeated, so this needs to be changed.
You also need to scroll to he bottom of your layers and DELETE the one layer that isn’t visible, once again it’s highlighted in the image.

(step six.) [ this can be applied to raw icons if you make them in the same layer or canvas ]
Now, to save all of your icons you’re going to want to go to FILE » EXPORT » RENDER VIDEO. I know it seems strange, but this will save you all the time in the world, and best of all you don’t have to download any scripts !
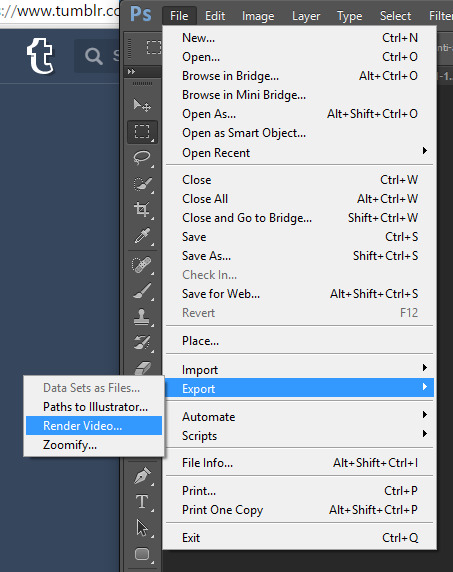
after clicking on this, the following will pop up and it’s with this, I’ll explain what details you need to change.
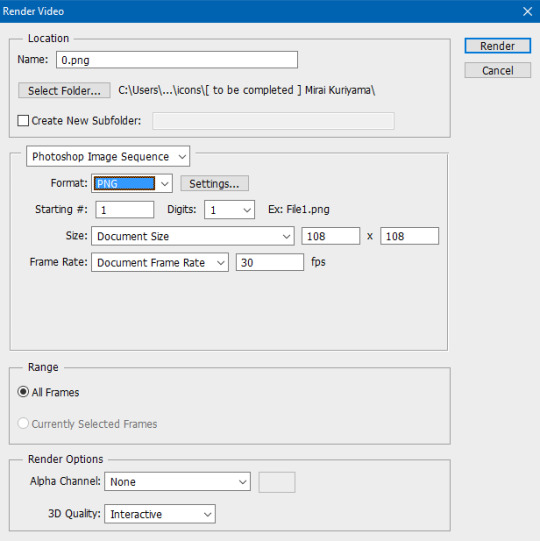
name: personaly, I like to number my icons numerically ; so I placed a ‘0′ these will save your icons in the sequence of ‘ 0001, 0002, 0003 … 0345, 0346, 0347 ‘ etc etc.
select folder: these will be where your icons save.
create new subfolder: i never use this, but this would save the icons in a new folder in the folder you’ve selected.
adobe media encoder box: ALWAYS CHANGE THIS TO ‘PHOTOSHOP IMAGE SEQUENCE’
format: whatever you save your icons as, change this, for icons with a transparent background, they should be saved to a PNG format.
starting: This is the number where the icons will save as; if you chose 0 for example, your first icon will save as ‘0′
digits: this is how many digits you want in the name, I always set this to 1
size: this should stay the same with your canvas size and you shouldn’t have to touch this.
Making sure ALL FRAMES are selected, simply hit the RENDER button and watch as your icons save in one place and you’re DONE.
I really hope that this tutorial makes sense, it’s the best I could do / how to explain things and I hope that it helps a lot of people who struggle making icons.
please feel free to reblog this if it has helped.
2K notes
·
View notes
Text
every pokemon protagonist except may/brendan wrote this

1K notes
·
View notes