
Don't wanna be here? Send us removal request.
Statistics
We looked inside some of the posts by shikhalal-blog and here's what we found interesting.
Average Info
Notes Per Post
1
Likes Per Post
1
Reblog Per Post
0
Reply Per Post
0
Time Between Posts
1 month
Number of Posts By Type
Link
1
Photo
1
Text
1
Last Seen Tumblr Blogs


Fun Fact
Mobile Tumblr US users spend an average of 4.04 minutes per session on the app.
Link
Learn how to migrate or upload PST file to Office 365 mailbox with the help of PST migration to Office 365 Tool.
#Import PST to Office 365#Import PST to Exchange Online#PST to Office 365 Migration#upload pst to exchange online#Migrate PST to Office 365#PST to Exchange Online#export pst to office 365#pst to office 365
0 notes
Photo


MailsDaddy PST to Office 365 Migration Tool is a standalone and professional software to comfortably import Outlook PST data file to Exchange Online mailboxes.
Know more: https://www.mailsdaddy.com/pst-to-office-365-migration-tool/
#PST to Office 365 Migration#pst to office 365#Import PST to Office 365#Migrate PST to Office 365#PST to Exchange Online#Import PST to Exchange Online#Upload PST to Office 365#upload pst to exchange online#pst to office 365 migration tool#Transfer PST to Office 365
0 notes
Text
How to Upload Outlook PST to Office 365 Exchange Online
Migrating Outlook data to Office 365?? Then you are in the correct place where you will get aware of the various methods to transfer the PST data to o365. You will learn How to Convert and Upload data from PST to Exchange Online with all emails, notes, calendar, contacts, and attachments.
Follow the below methods for PST to Office 365 Migration:
• Network Upload Method
• Third-party solution
Here, I am going to explain all the above three methods in the detail which is going to help you to choose the best way of PST to Office 365migration. Before, starting with the manual process give the Import and Export role to the o365 mailbox where you want to migrate the PST data.
Method 1: Network Upload Method to transfer PST file in Office 365
Step 1: Go to the Office 365 Admin center page and import the job
Login to o365 account and through Admin center go to Setup icon--> Data Migration--> Upload PST file--> import new job. Provide the job name-->Next. Hit on Upload PST file.
Step 2: Get the SAS URL copied to the clipboard for future use.
The Microsoft provides you with the destination link to transfer the PST file. This link allows importing the PST data remotely.
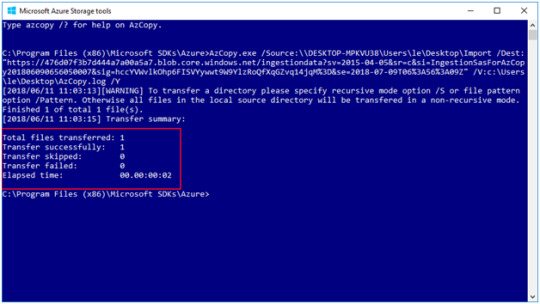
Step 3: Download and Install the Azure Tool
You need to download the AzCopy tool where you need to upload PST files using the commands. For this, you require the source path, SAS URL and the destination location to save the log file.
Step 4: Execute the commands to the Azure tool.
Run the given commands to the tool, it will Upload the PST data in the Azure storage tool.
AzCopy.exe /Source: network path /Dest: ”SAS URL” /V: give a location where you want to save the log file \AzCopy.log /Y
Step 5: Create the CSV file in a particular format and validate it.
We need to create the CSV file in a specific format and browse that CSV file to the process and validate it to check that all the data provided in the CSV file is correct.

Step 6: Filter the imported data
After validating the Azure tool make the PST file ready to import. Here, you need to click on Ready to import to Office 365. Then you can even filter the PST data and then move to Office 365.
Method 2: Upload the Outlook PST to Exchange Online Admin portal using a tool.
Here, I discuss how one can import single or the multiple PST files to MS Office 365 using MailsDaddy PST to Office 365 Migration Tool. This helps you to upload PST to Office 365 accounts without any issue.
Single PST file migration
Adds a single file and preview it. Click on the export to migrate in primary or the archive mailbox. If you want to create a new folder then you can mark check on the create folder option specifying its name. You can do this either for primary or the In-Place archive mailbox. After exporting data when you log in to the exchange online, you will find a new folder with the same specified name under the selected mailbox. You can also select the Date Range which allows you to export the data of a particular Date range. The most important part of it is creating a log file which is very helpful for any organizations especially in large organizations. But you can also uncheck it as it is optional. Then again click on Export. The tool exports the single PST file.
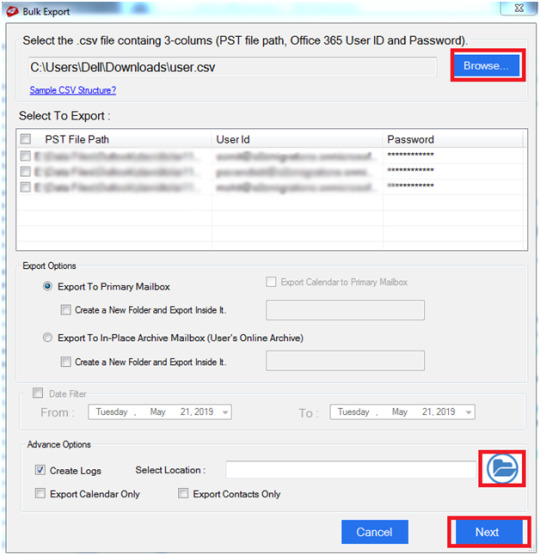
Bulk Export
To add multiple PST file you need to make the CSV file in Microsoft Excel containing PST file path, Username, and Password. You need to save it to .csv format. Now, click on Bulk Export, a window will open where you need to browse the comma separated value file. The tool takes all the PST files where you need to select it. After selecting the file you need to choose the mailbox of o365 and click on Export.
Impersonate Export
The tool import PST to Office 365 mailbox having the Impersonation rights. Here, you do not require to have a password. You just need to go to the Impersonate Export option and browse the CSV file with PST file path and username after clicking on Impersonate Export. Choose the exchange online mailbox and click on export.
Note: For this option, it is required that you should give the Impersonation rights and Full access to the o365 mailbox.

Conclusion: In this blog, I tried to explain how one can Convert and Upload data from PST to Exchange Online with different methods. If you have any query let me know by leaving a message in the comment section.
#PST to Office 365#Import PST to Office 365#Upload PST to Office 365#Migrate PST to Office 365#Convert PST to Office 365#Transfer PST to Office 365#Outlook PST to Ofice 365#PST to Office 365 Migration#PST to Office 365 Migration Tool#Office 365#Exchange Online#PST to Exchange Online#o365#PST to o365#PST to Office 365 conversion#Move PST to Office 365#Upload PST to Officxe 365 Primary or Archive mailbox#Import PST to Exchange Online#PST to Office 365 accounts#PST to Office 365 mailbox
1 note
·
View note