
Adventures in the audio of virtual worlds
Last active 60 minutes ago
Don't wanna be here? Send us removal request.
Statistics
We looked inside some of the posts by skyboxeye and here's what we found interesting.
Average Info
Notes Per Post
27
Likes Per Post
20
Reblog Per Post
7
Reply Per Post
0
Time Between Posts
13 days
Number of Posts By Type
Text
16
Note
1
Last Seen Tumblr Blogs


Fun Fact
In 2020, 44% of users from Denmark used Tumblr daily.
Text
Capturing the ambience of Titanfall (2014)
Playing the game
You'll want the Deluxe edition of this game so that you will have all maps and be able to play online. TF|1 is abandonware outside of unclaimed licenses remaining on:
Physical media (base game only - see Appendix 1)
Walmart (digital)
Various grey-market key sites
I expect these legitimate options will be surpassed by the r1delta project over time, as it offers a free download of the Deluxe edition and an open-source server browser.
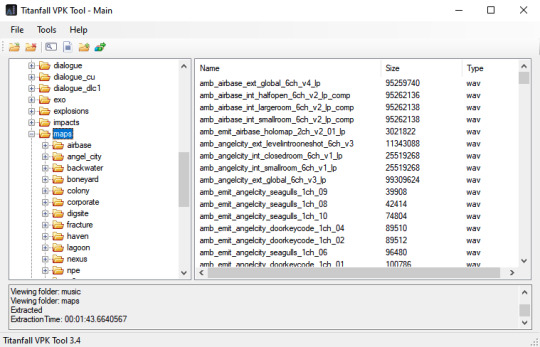
Extracting sounds
TF|1 infamously shipped digitally with OGG/MP3 files which are then decompressed into WAVs by the game's installer. This approach trades larger storage sizes for faster loading times.
We can access the WAVs directly using the PC DVD release - see Appendix 2. It's hard to say for certain but hopefully these assets were never compressed, unlike their digital-release counterparts.
Once extracted, we can explore VPK archives with Cra0kalo's VPK Tool or Harmony VPK Tool. You'll want to open the "mp_common" VPK to explore ambient map sounds.
Identifying sounds
We can extract and inspect each map's "SND" entity. For example mp_angel_city_snd.ent contains:
{ "origin" "-1679.55 4787.81 470.827" "soundName" "amb_angelcity_emitter_NeonSign" "targetname" "Red_Neon_Light_Room_14" "classname" "ambient_generic" }
Exploring maps
We can use the Black Market Edition mod to start single-player private matches.
Appendix 1: Obtaining Titanfall DLC in mid-2025
This appears to be impossible. Previously there were loopholes which relied on the now-sunsetted Origin client. The contents of the DLC have been archived, however.
Appendix 2: Extracting Titanfall content from DVD(s)
The PC version's installer relies on Origin, which has been completely sunsetted by EA. However we can still manually copy desired game data from the discs.
Put Titanfall.z01 and Titanfall.z02 (from discs 1 and 2 respectively) in the same directory as Titanfall.zip (from disc 3). Open the ZIP with 7-Zip - it will automatically concatenate the parts together. We can then ask the program to extract the vpk folder.
1 note
·
View note
Text
Extracting sounds from Frostbite v3 games
I recommend using Frosty Editor, rather than scripts, to extract these assets. However Frosty's sound plugin isn't well-equipped to bulk-extract sounds. Plus, we have two different mass-extraction tasks we need to perform:
Dumping many variants at once (example SW01_Planets_Sullust_Shared_Ambience_BigWorld_Frog_FrogCalls_VAR_02)
Serializing the chunks of a longer stream (example SW01_Planets_Sullust_Shared_Ambience_SoundArea_SulfurBrook_03) together into a single WAV.
We can edit the Frosty source (specifically the FrostySoundEditor plugin) to modify the sound exporter to do what we want.
Add a simple loop inside SoundExportMenuItem_Click to implement goal A:
for (int trackIndex = 0; trackIndex < tracksListBox.SelectedItems.Count; trackIndex++) { SoundDataTrack indexedTrack = (SoundDataTrack)tracksListBox.SelectedItems[trackIndex]; String indexedFilename = sfd.FileName.Replace(".wav", " " + trackIndex + ".wav"); SoundExportMenuItem_Export(indexedTrack, indexedFilename); logger.Log("Exported {0} to {1}", AssetEntry.Name, indexedFilename); }
To implement goal B, we're best served hacking together a couple of new functions.
0 notes
Text
Capturing the ambience of Battlefield 4 (2013)
Capturing multiplayer footage
The current best way to capture multiplayer maps is to spectate an empty server, and use the Free Camera mode. Keep in mind that maps scenery and boundaries will vary slightly across game modes.

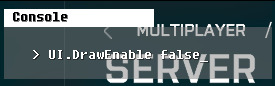
You can disable UI overlays via Battlefield's developer console. Press the ~ key and then enter UI.DrawEnable false.
Capturing campaign footage
In this mode, you can use Hattiwatti's Cinematic Tools for Battlefield 4 without fear of being banned. However, the tool was built for much older builds of BF4, so it may be unable to locate certain camera attributes in memory.
Extracting sounds
I recommend Frosty Editor. As with other Frostbite 3 games, we'll make some modifications to the sound plugin to facilitate extraction of chunked streams. Extract your desired "Big World" assets to overlay onto those streams.
2 notes
·
View notes
Text
Capturing the ambience of Blue's Birthday Adventure (1998)
This adventure game has four different quests, split across two discs.
We can use HEERip to dump all assets, namely WAV sounds and bitmaps. It took a little digging, but I found outdoor sounds dumped in at least room 13 and 18.
To identify sounds we can enable debugging and check the sound log. I found, however, that ambient sounds didn't map 1:1 to an asset, but rather a randomized set of sounds. The game runs on the SCUMM engine; we could investigate in more detail by placing breakpoints in ScummVM.
We can overlay background bitmaps to remove the player-character(s).
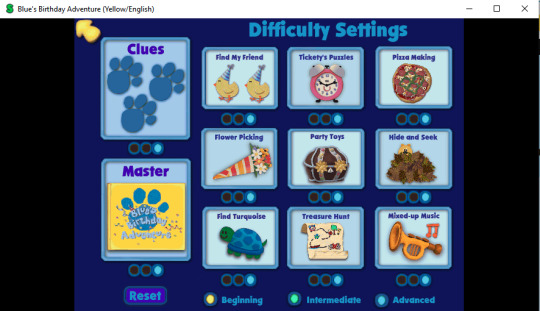
Appendix 0: Difficulty screen
Visit Room 26 for relevant options.
8 notes
·
View notes
Text
Capturing the ambience of Tony Hawk's Pro Skater 4 (2002)
This guide uses the PC and Gamecube versions.
Running the game
I recommend PARTYMOD for its widescreen display, controller support, and other fixes. Other widescreen patches are also available.
Hiding the player-character
We can minimize skater display quite a bit using an unmodified game. Create a skater without clothing or accessories, and then activate the Invisible (and optionally, Kid Mode and Snowboard) cheats.
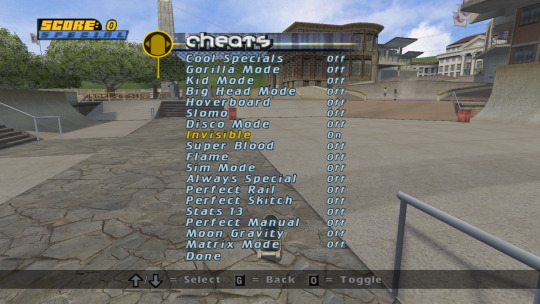
This will result in only your skateboard being rendered. You can then tilt your camera slightly to move it off-screen, but we can go further to prevent your 'board from being rendered altogether.
Hiding your board
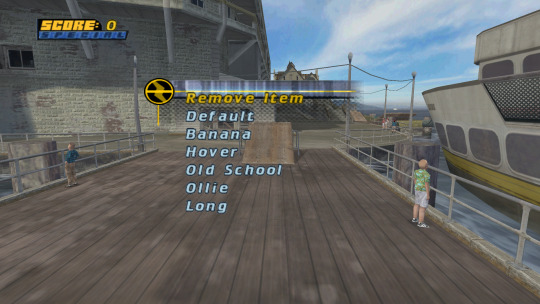
Enter the debug menu (see appendix for instructions) and navigate to the Create-a-Skater -> Board submenu. Choose Remove Item.
We can use Special K to toggle vertex shaders so that your skater's rendering is skipped altogether. This has the drawback of hiding NPCs, cars, and other level actors however.
For another tactic, we can exploit the fact that your skateboard disappears during certain "bail" animations. Try taking a screenshot while the board is gone and then overlaying the relevant pixels onto your captured footage.
Hiding the HUD
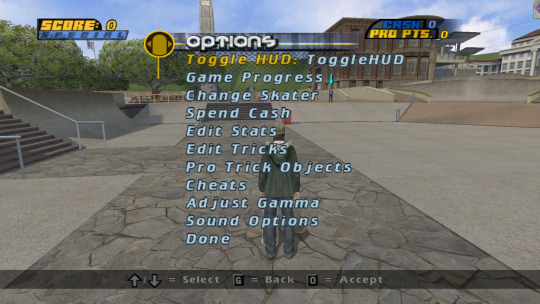
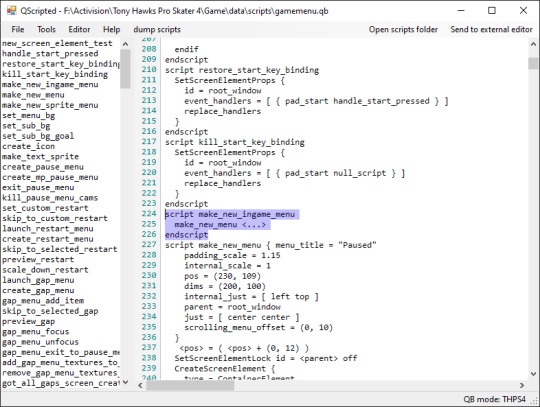
We can hide the HUD by modifying the gamemenu.qb script. Set the HIDEHUD global variable to 1. Then, you can add a HUD toggle to your options menu:
options_menu_add_toggle_item text = "Toggle HUD" id = menu_toggle_hud pad_choose_script = screen_setup_hide_hud on_off_text = "Toggle HUD"
It might be possible to remove the HUD via Reshade or Special K shader toggles as well - see above.
Capturing Gamecube footage
This is quite a bit simpler than PC, thanks to the Dolphin emulator. First, set 16:9 inside THPS4's options menu. Start a level in Free Skate mode, and position your skater in your desired spot(s) for a while. You can use Dolphin's Free Look feature to fine-tune angles and/or position the player-character out of frame.

After enough time has elapsed, start a Replay from the pause menu. This will remove your HUD and allow you to record the spot you witnessed earlier. Be sure to uncheck Enable Dual Core if you're using Dolphin's Dump Frames feature.
Capturing THPS4 via reTHAWed
This total-conversion mod for American Wasteland includes lots of faithfully-ported levels from earlier games. As of version 4.3, this includes THPS4. reTHAWed offers a robust free-camera suite for capturing footage, in high-resolution widescreen.
Extracting sounds
You can get ambient streams for each level by extracting from the THPS4 release of your choice. For simplicity and quality reasons I recommend the Gamecube DTK streams, which can be extracted via Dolphin and played via vgmstream.
Appendix 0: Enabling debug menu(s)
We can also re-enable developer menus by changing scripts such that create_debug_menu is invoked.
make_sprite_menu_item text = "Debug Menu" id = debug_menu pad_choose_script = create_debug_menu make_text_sprite texture = PA_model parent = debug_menu
These menus are expansive but ultimately offer little working functionality to help us capture footage. I also investigated debug_menu_create, found in debug.qb, but it seemingly does nothing. This is unfortunate because the script files make mention of alternate render modes which may have helped us e.g. freely move the camera.
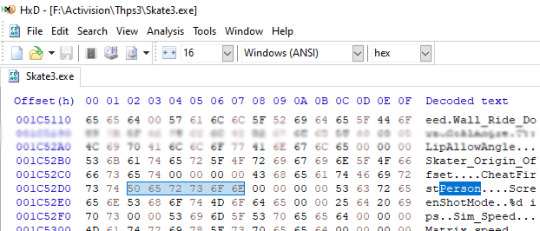
Appendix 1: (Not) porting THPS3's First Person cheat
I revisited THPS3 in hopes that we could port its First Person cheat to THPS4, but got stuck where scripts interact with the game's executable. All I could find was that the CHEAT_ON_11 flag (aliased to CHEAT_FIRST_PERSON in cheats.qb) gets set to 195 in goal_scripts.qb. There is no mention of these flags, or "first person" inside THPS4's scripts.
1 note
·
View note
Text
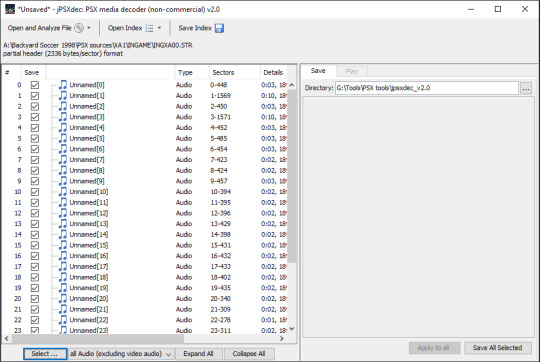
Capturing the ambience of Backyard Soccer (1998)
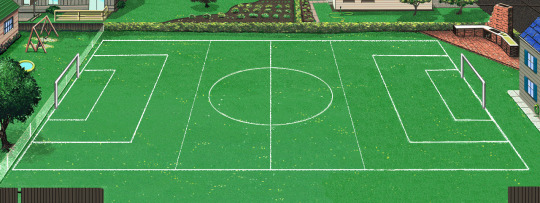
Choosing a version
The PSX release seemed promising as that system was capable of CD-quality audio. But sadly, this version has no ambience. I only realized this after extracting the ISO contents and converting the various STR files.
Extracting sounds
Baller and HEERip are both capable of perfectly extracting BS's wave files. Unlike other games in the series, BS seemingly has no weather or randomized ambient sound effects.
Extracting visuals
See my Backyard Football instructions for using Baller and HEERip. These tools can extract background graphics (1280x480) and what must be collision maps of each field.
Unlike BF, BS seemingly has no spectator graphics on its standard fields.
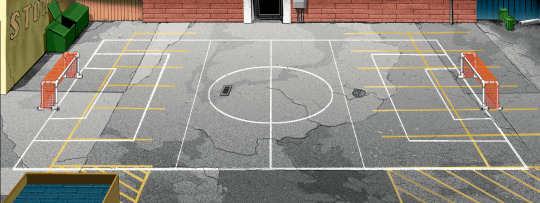
The most challenging aspect to capture is the goals. These are rendered via component sprites - including the nets and their dynamic physics. You could re-assemble these sprites into a goal but I made do with simply screenshotting them, in their initial state, during a match. There are a few goal variants to be aware of.
2 notes
·
View notes
Text
Editing Neversoft Q scripts in Tony Hawk's Pro Skater 4
THPS4 ships with compiled QB binaries. To edit them, we must first decompile them into plaintext source.
Because the Q language isn't public, outside of some accidental leaks, it isn't exactly known what syntax decompilations should follow. Therefore we can expect different community QB tools to generate differing source interpretations.
ThpsQScriptEd
The product of THPS modding maven DCxDemo, this tool offers decompilation, editing, and compilation. It can directly save the Q scripts it generates. It can compile edited THPS4 scripts - note that you may need to dismiss some warning messages in the process.
NeverScript
This project endeavors to create a NS scripting standard, and offers compilation to QB, with very limited decompilation support as well. It supports THPS4 as a target game.
This is promising - if we can get another decompiler (e.g. ThpsQScriptEd) working to our satisfaction, we could then edit the results into the NS language, and compile it to QB.
THQBEditor
THQBEditor is still available to download on the LegacyTHPS Discord. It successfully decompiles, and offers a basic text editor, but seemingly cannot re-compile. This may be because it was built for THPS3.

QBexplorer
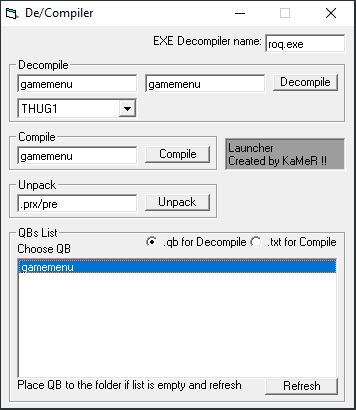
This tool seemingly dates from THUG1 modding. However, I found its outputs to be not quite human readable. I'm not sure if this is expected or not. It relies on the ROQ decompiler.
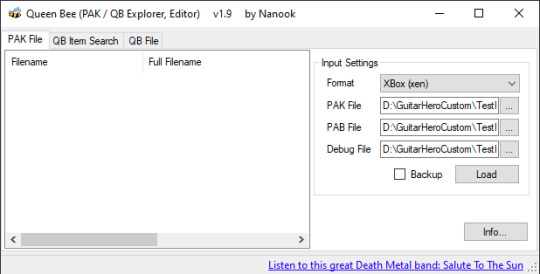
QueenBee
This program seems focused on exploring archives, with good support for QB files inside those archives. However it seemingly lacks standalone QB tooling.
Others
I found numerous other tools and utilities with "QB" in the name here.
0 notes
Text
Capturing the ambience of Deus Ex GO (2016)
DE is a Unity game and was released on multiple platforms; the easiest options are the Android version and Windows version. This guide will focus on the latter.
Running the game
Follow this post for instructions on fetching and side-loading the Windows Store assets for DE. You might find the relevant Reddit topic threads helpful for filling in knowledge gaps.
Extracting sounds
We can use AssetStudio, or one of its active forks, to extract DE's AudioClip assets into WAV format.
Capturing footage
I was planning on using Cinematic Unity Explorer to take free-camera screenshots, but I couldn't seem to get BepInEx to hook into DE. I tried BIE 5x and BIE 6x versions, but neither generated config/log files as documented after booting. I assumed that DE is a Mono Unity x64 game (I found MonoBehaviour assets inside), but this might be incorrect (the game lacks a "Managed" folder).
I have a feeling that injection didn't work because I wasn't running the DE EXE directly, but rather through the shortcut Windows creates for Store "apps". I tried to use the EXE, by copy-pasting the required DLLs (sourced from the dependency Appx archives) into the game directory; the game crashes on launch. The WER error reports label the faulty module as Windows.UI.Xaml.dll but don't provide crash details. I tried providing different versions of this DLL but still couldn't get the game to start.
My other theory is that the GO games include anti-tampering features which prevents tools like BIE or MelonLoader.
Presumably you can still follow my steps for Hitman GO to capture UI-free screenshots.
Appendix 1: Determining Unity version
By inspecting the BuildSettings asset inside the globalgamemanagers package, we see 5.4.1p4 under the m_version field. You can also find this information in your UnityPlayer.log file, found inside something like C:\Users\<Your Username>AppData\Local\Packages\39C668CD.DeusExGO_r7bfsmp40f67j\TempState.
0 notes
Text
Eliminating randomness in Hades Challenge
ScummVM added support for this game in version 2.6.0. We can modify the relevant engine emulation code in order to run HC in an altered way.
Compiling ScummVM from source
We'll largely follow the official guidance for compiling on Windows, using vcpkg.
However, the guide is slightly out-of-date as it is written for the "classic" era of vcpkg. On modern versions you'll reference a vcpkg.json file - which thankfully is already inside the repository. If it's your first time using vcpkg you'll need to create a manifest with a baseline as well: vcpkg new --application.
The guide will instruct you to pass the --vcpkg flag to your create_project executable; you can also hard-code it in the create_project source. Your command (run directly or via an edited create_msvc.bat) will look something like the below. Note also the absence of the documentation-suggested fluidlite flag as I found this didn't ultimately work with the vcpkg approach):
create_project ../.. --msvc --vcpkg
Finally, I also found I needed to manually alter the Use Vcpkg Manifest setting of several projects in the generated scummvm solution in order for them to integrate with vcpkg.json: fetch, and then link to, the contents of vcpkg_installed.
You can apparently set this globally by passing a command line argument, which would look something like:
msbuild scummvm.sln /p:Configuration="Release|x64" /p:VcpkgEnableManifest=true
Forcing a particular Cretan configuration
The room source file, crete.cpp, has a line like:
int ambientComposite = g_vm->getRnd().getRandomNumberRng(1, 8);
The result of which defines the actors in the scene. Current quest state is also incorporated into the decision.
0 notes
Text
Creating a runtime texture mod for Earthworm Jim 3D
In this post I'll share my struggles and successes with Special K and other wrapper tools in my attempts to prevent Jim's shadow from rendering. I'm running the GOG version of the game on Windows 10 with an Nvidia GeForce GTX 1070.
Running EWJ 3D with Special K
Special K is the self-appointed "Swiss Army Knife" of PC gaming in that it does "a bit of everything". In our case, this means texture modding and windowing fixes for EWJ 3D. Special K also offers upconversion of EWJ's DirectX 7 rendering calls via a DgVoodoo plugin.
Local versus global installation
We'll be using version 25.1.3.1, since (at the time of writing) subsequent releases contain input bugs impacting EWJ 3D.
Although the docs promote purely "local" Special K installations as an alternative to "global" injection performed through the Special K frontend UI, I couldn't get this working for EWJ.
I did however manage it by "converting" (a misnomer since installations created this way are actually partially global, and partially local) a global install to a local one - achieveable by holding Ctrl and Shift while click the Play button inside Special K's frontend.

This approach allows you to maintain per-game DLL and CONF files; you may prefer it if you're running other games with Special K. However I'll use a global installation throughout this guide, for simplicity.
Issues when customizing EWJ 3D's resolution via its menus
The game boots to an options menu which allows you to, among other things, change your display options: 1.) Color depth and 2.) Resolution. These settings will not persist unless we run the game in compatibility mode for Windows XP*, or thereabouts.
Oddly this menu wants to display at 640x480 no matter what resolution is selected. That is, EWJ only transitions to that resolution once it properly starts. This is typically harmless but seems to break Special K's injection of the game's process, resulting in the loss of Special K's on-screen display and possibly other things.
*This has the downside of requiring EWJ to be run as an administrator - which doesn't cooperate well with Special K, unless of course Special K frontend is also run as administrator (I don't recommend this). This is a possible motivation for running a "converted" local install, as that approach (along with purely local installs) does not require the Special K frontend.
Solution: Forcing EWJ 3D's resolution via DgVoodoo
To avoid this confounding resolution change, we can force EWJ to always run at our chosen resolution (example: 1920x1080) via DgVoodoo. First, set up DgVoodoo as a Special K plugin. Then, modify your CONF file in a text editor or via the control panel:
[DirectX] Resolution = h:1920, v:1080
This means we don't need to rely on Windows XP compability mode to both run the game in our desired resolution and reliably inject Special K. That's good news, as I (anecdotally) found EWJ crashes more often when in compability mode.
Other mandatory DgVoodoo configurations
Be sure to set the following options as well:
[GeneralExt] PresentationModel = flip_discard FullscreenAttributes = Fake
Dumping textures
Launch the game via Special K's frontend. Don't forget to insert an EWJ 3D disc before starting the game!
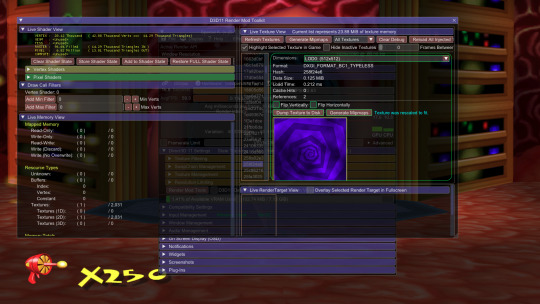
Thanks to our DgVoodoo setup, you should be able to edit the resolution and color depth in the options menu without losing Special K's injection. Once the game starts, open the overlay and click into Render Mod Tools.
You'll notice that for some reason, no assets are listed under Used Textures. This can apparently result from intrusive overlays, but I have a feeling that something else is going on. Highlight Selected Texture doesn't work either - presumably for the same reason.
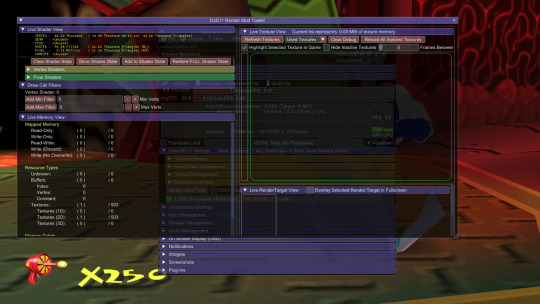
Anyway, you'll find that you're still able to switch over to All Textures, and click Refresh, to see what the game has loaded. Find the texture you're looking to modify, make note of its format details, and click Dump Texture to Disk.
Editing textures
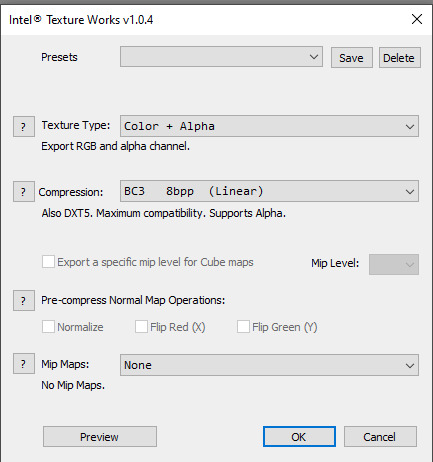
If you've been following this guide you'll find the DDS files inside a directory like <Special K path>\Profiles\Earthworm Jim 3D\SK_Res\dump\textures\EarthwormJim3D.exe. I tried two editing tools: Intel Texture Works (ITW) and Paint.NET. ITW doesn't Paint.NET offers support for a wide variety of formats but sadly doesn't seem to understand mipmaps.
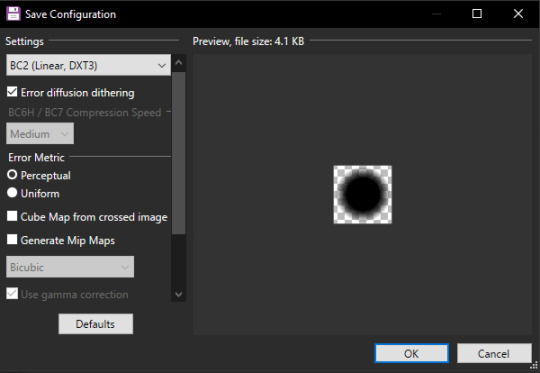
There is also Nvidia Texture Tools Exporter (NTTE) for saving/compressing, but not editing.

If no single tool offers all of the features you need, you can combine them - for example we can edit a BC2 texture in ITW, export it to BC3, and then re-encode it as a BC2 using NTTE.
Injecting textures
Move your edited textures into <Special K path>\Profiles\Earthworm Jim 3D\SK_Res\inject\textures\EarthwormJim3D.exe and click Reload All Injected Textures. Or, restart the game.
Appendix 1: Other texture injectors?
See if we can use another texture modding tool, such as uMod or TexMod, alongside standalone DgVoodoo* upconversion of DirectX 7 -> DirectX 11 (I couldn't find any that did DirectX 7 -> DirectX 9). Other API wrappers, namely DXWrapper and WineD3D, did not perform well:
DXWrapper boots but there are severe graphical issues. I tried customizing every available option for D7->D9 in dxwrapper.ini. All did nothing or crashed the game.
WineD3D crashed unless I combined with DxWnd. After which it was very slow, and did not work besides.
Appendix 2: Modifying game data?
Instead of injecting altered textures at runtime, we can try to modify the textures.dat archive which EWJ loads from.
Appendix 3: Other Stuff
We might also need DxWnd to improve windowing - we'll see. Might be able to set hotkeys via uMod templates s.t. we don't need to visit its window at all.
There is a successor for uMod build for Guild Wars call gMod. Presumably it would have the same problem of requiring D9.
7 notes
·
View notes
Text
Using generative AI to create QuickBMS scripts
In this post I'll share what I learned using Claude and ChatGPT to analyze Earthworm Jim 3D's textures.dat archive. To follow along, you'll need access to those tools, plus a hex editor and Windows PowerShell.
First impressions
Claude is much more competent at this type of task than ChatGPT. Before attempting to write a script, it asked for me details about the archive:
Does it have a header with file count/offsets?
Are the BMP files stored with their original headers or are they raw pixel data?
Is there any compression used?
It also prompted me asking whether the archive likely uses offset tables or sequential storage. Together, we concluded that the tree structure apparent in filenames (e.g. Visual FX\Jims_shadow.bmp) makes offset tables more likely.
Would you be able to check if you see any patterns of 4-byte values that could be offsets near the start of the file? Offset tables typically have sequences of increasing 32-bit numbers.
Claude was also curious about a "magic number" in the initial bytes, implying this is a common way to identify archive formats. And separately it searched for a file count in the foremost data of the archive.
Providing sample hex
This is where I got stuck because I wanted to provide at least 1250 characters in order to include the (presumed) offset table as well as some file names. Sadly this exceeds the conversation length afforded to Claude's free tier.
I will probably eventually work up the nerve to upgrade. But until then, for posterity, here PowerShell script to get that sample data:
format-hex "F:\GOG Galaxy\Games\Earthworm Jim 3D\textures.dat" | select -first 1250 | ForEach-Object { ($_ -split '\s{2,}')[1] -replace '\s+', ' ' }
1 note
·
View note
Text
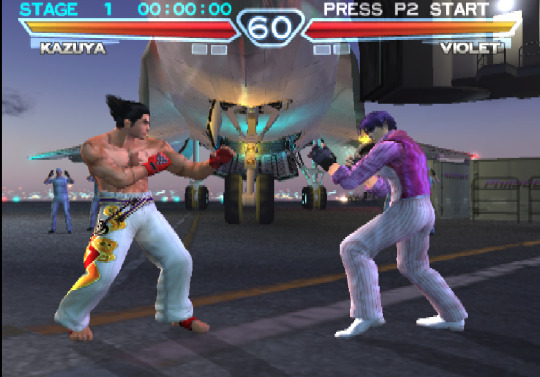
Capturing the ambience of Tekken 4 (2001)
We'll run the North American PS2 release for the wide variety of codes and patches available for it. I also explored the European PS2 and NA Naomi arcade versions - see the relevant appendices for more info. I didn't explore any Japanese versions.
Running on PCSX2
Modern builds of this emulator include a T4 widescreen patch. We should enable progressive display mode by holding Triangle and X while the game starts up.
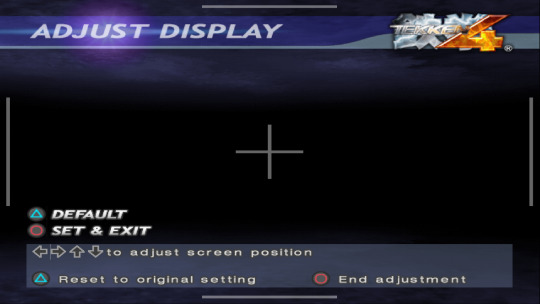
If done correctly, there will be no Display Mode options in the Adjust Display menu anymore.
Capturing footage
While there are cheats available to partially or completely hide fighters (see appendices below), I opted not to use them. Instead, I took advantage of the fact that pausing the game hides your fighters and their shadows.
Typically, we could hide menus like this by providing transparent texture replacements. However T4's pause menu includes a (grey semi-transparent) backdrop that is not drawn with a texture. Fortunately we can use ReShade's ShaderToggler to disable drawing that.

By hiding additional shaders, or providing texture replacements, we can complete hide the menu. Captures in this state can be overlaid onto with in-fight footage to effectively hide our HUD + characters.
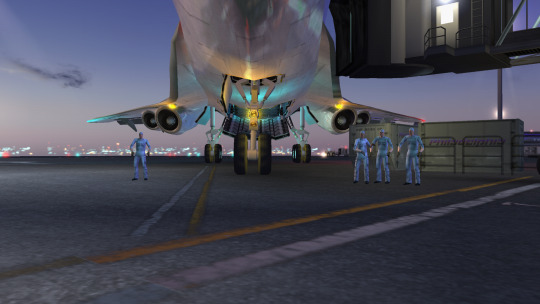
Be wary - the pause screen also eliminates some effects, namely lens flares.
Capturing audio
T4's sound menu allows to disable music, but doing so also disables each stage's ambient streams. We can extract MIB streams using VGMToolbox and play/convert these with vgmstream instead.
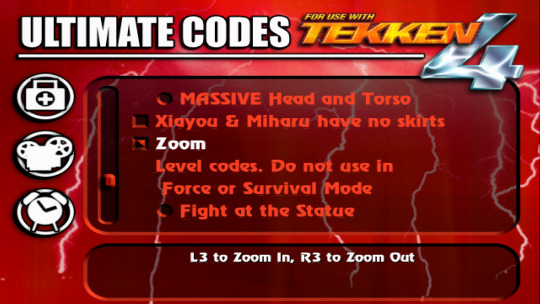
Appendix 0: Helpful USA PS2 cheats
I didn't use these because I was worried they would eliminate background geometry, as well as fighters.
[Invisible Head/Torso] patch=1,EE,1018D9E0,extended,00004060 [Invisible Legs] patch=1,EE,10186EE0,extended,00000000 [Invisible Lower Legs (About Knees Down)] patch=1,EE,1018726C,extended,00000000
Appendix 1: Non-working USA PS2 cheats
This disc has some neat codes but they are mostly irrelevant for us.
I couldn't get these USA cheats working:
Invisible Players - Creates glitchy character geometry 1AF2C6B4 00000000 Codebreaker v1-6 / Xploder v1-3
No Life Bars - Does nothing DEA97956 BCA99B83 Action Replay v1 / GameShark v1
Which is annoying, because together they would have given me the footage I'm looking for. Nothing found here, at least for US version.
Appendix 3: PAL PS2 cheats
I found some useful Action Replay MAX codes for this release. These can be converted into PNACH files for the PCSX2 emulator. Enable both, and then select either Paul or Combot as these will result in minimal character drawing.
[Only render hair/accessories] patch=1,EE,20357C8C,extended,3F800000
However, the cheat resulted in broken background rendering, especially noticeable with NPCs:

There is also a cheat for in-game FoV modification:
[Change FoV with R3 and L3] patch=1,EE,200FFEFC,extended,3C010035 patch=1,EE,200FFF00,extended,34228720 patch=1,EE,200FFF04,extended,80420001 patch=1,EE,200FFF08,extended,8C247C74 patch=1,EE,200FFF0C,extended,24030002 patch=1,EE,200FFF10,extended,14620002 patch=1,EE,200FFF18,extended,24847000 patch=1,EE,200FFF1C,extended,24030004 patch=1,EE,200FFF20,extended,14620002 patch=1,EE,200FFF28,extended,24848000 patch=1,EE,200FFF2C,extended,AC247C74 patch=1,EE,200FFF30,extended,24030070 patch=1,EE,200FFF34,extended,080A50EE patch=1,EE,202943B4,extended,0803FFBF
Appendix 4: Running T4 on the Play! emulator
This emulator can run Namco 246/256 games. I was able to compile* it from source to get the latest changes, and allow for custom modifications. First install Visual Studio, CMake, Qt, Vulkan, and MinGW. Now, run generate_vs2022_64**, included in the repository.
Once the generated solution is built***, you can paste the contents of your Source\ui_qt\Release folder over an existing Play! installation and run Play.exe.
I decided not to pursue capturing footage with Play! as I could not achieve a consistent framerate for T4. There is, however, a widescreen patch for this version.
*If we look at the GitHub actions it's actually building for Windows XP! It's also using Qt5 which is currently only installable unofficially.
**edit CMAKE_PREFIX_PATH if necessary
***if using Qt 6, you'll need to remove or update QDateTime code
Appendix 5: Other ways to configure and compile Play!
Qt Creator and CMake GUI are also capable of generating a Visual Studio solution, and there are README instructions for doing so from the command line, but I ultimately couldn't get the emulator to run this way:
cmake .. -G "Visual Studio 17 2022" -A "x64" -DCMAKE_PREFIX_PATH="F:\Qt\6.8.1\msvc2022_64" -DUSE_QT=YES
0 notes
Text
Capturing the ambience of Pikmin (2001)
Disclaimer: I only explored the Gamecube v1.0.1 release. The Wii and Switch ports may require different tooling.
Extracting audio sequences
We'll be using piki-tools for its dedicated Pikmin 1 support. It offers a BARC tool for extracting pikiseq.arc - but first, we'll need a HED file to pair with it. Download one or extract it yourself from the sys/main.dol file. It starts with "BARC----" and ends shortly after "result.jam".

Contrary to the README we won't install piki-tools executables through pip - instead, we'll just run them from source. First, move the executables (e.g piki_barc) to the repo root (i.e. from piki-root/piki-root -> piki-root). Now, place your HED and ARC pair in the same directory and run:
"C:\Program Files\Python\Python313\python.exe" piki_barc.py EXTRACT "F:\Pikmin GC dump\files\dataDir\SndData\Seqs\pikiseq.hed"
This gives us a collection of JAM files, also known as BMS files.
Playing audio sequences
We'll use the unreleased JaiSeqX for its Pikmin 1 support.

Before running JaiSeqX.exe, copy Pikmin's Banks folder from SndData to the same directory as JAISeqX.exe, and run something like:
jaiseqx.exe "A:\Pikmin 1\GC sources\SndData\Banks\pikibank.bx" visu "A:\Pikmin 1\GC sources\extracted pikiseq.arc\d_end2.jam" 0 -libjaudio.force_init_version bx -jdsp.forcemap_ibnk_bx 13 -transpose 12
Extracting audio samples
Use XAYRGA's toolkit for Pikmin 1. Extract the archive into Pikmin's "SndData" and run _jamt_initialize.bat. The AW soundbanks will be unpacked into the Audio_Modding\SoundEffects\wav folder.
Appendix 0: Capturing footage
This should be possible using Dolphin's free look mode, with either the GC or Wii versions, albeit with some drawbacks on screen-space effects. There is also Heebo's free camera hack for the Switch version running on emulator. For a weirder solution we can run Pikmin 1^2 and PikHacker's freecam Gecko code. To skip levels on the Wii release, we can re-enable debug mode using a patch.
Appendix 1: Other extraction tools
BrawlCrate can supposedly explore ARC and BARC but I couldn't get it working for Pikmin 1. I had no luck with LunaBoy's RARC tool, either.
Appendix 2: STX files
These are AFCs and can be played with vgmstream.
Appendix 3: H4M files
You can extract these with h4m_audio_decode.
3 notes
·
View notes
Text
Extracting sounds from Call of Duty: Modern Warfare Remastered (2016)
We'll use a combination of tools: Cordycep and Greyhound. The former will load MWR's game assets into memory, and the latter will read those assets and extract them into a usable format (e.g. WAV or FLAC for audio).
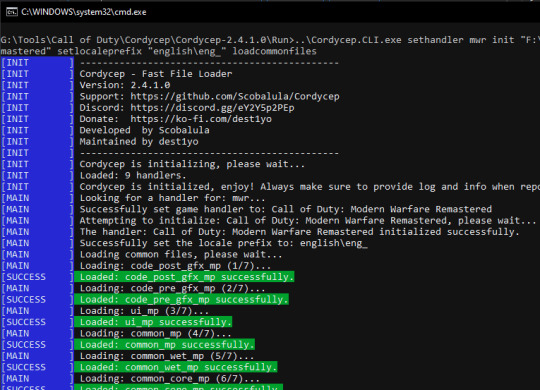
Initializing Cordycep for MWR
To set up Cordycep, we must first "dump" a Cordycep-friendly version of MWR's EXE. First, fully download MWR as Cordycep expects both singleplayer and multiplayer to be installed. Then, disconnect your computer from the internet and close your Steam/Battle.net clients*.
To create a "dump", run Cordycep.CLI.exe and execute:
dump "The full path to your h1_mp64_ship.exe"
Once complete, you should have a large EXE in your Cordycep's Data\Dumps folder.
We can now use Cordycep to load MWR assets into memory. Edit the included BAT file for MWR with your correct game directory path, and then execute it:
Cordycep.CLI.exe sethandler mwr init "F:\SteamClient\steamapps\common\Call of Duty Modern Warfare Remastered" setlocaleprefix "english\eng_" loadcommonfiles
This will load MWR's common assets, and start a common prompt session allowing us to load more.
*This step apparently prevents against anti-cheat programs triggering false-positives during extraction.
Loading a mission's assets into Cordycep
To load the assets for a given mission, we can use the load command:
load ac130
Note that doing this is very memory-intensive; you may only be able to load a few missions at a given time.
Extracting assets with Greyhound
With your Cordycep window still open, launch Greyhound and click Load Game. This should produce a list of assets - you can filter using the Search function. You may need to tweak your Settings to get sound assets to appear.
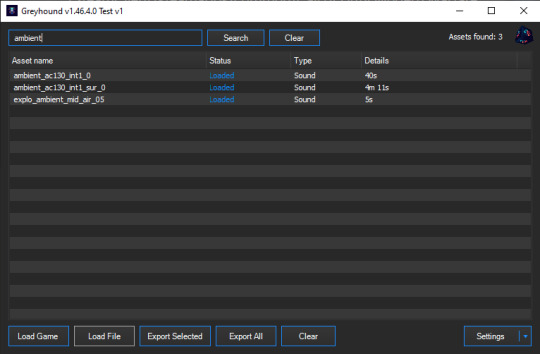
From here, we can select the desired assets and click Export Selected.
Batch loading mission assets
To write a full list of game files (and more) to Log.txt, we can use the listfiles command.
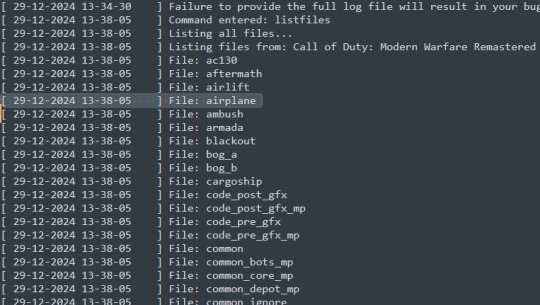
We can then narrow this list to mission files only, and store them in a dedicated file, which can subsequently be interpreted via the loadlist command. See Appendix 1 for an example TXT.
As noted above, this process will use an extremely large amount of memory; you may not be able to load the entire list!
Comparing MW (2007) and MWR (2017)
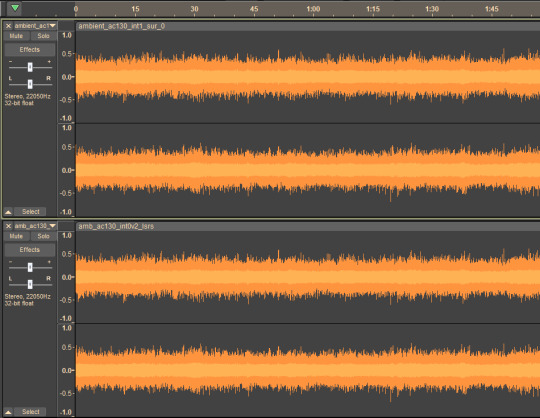
Most ambient assets are qualitatively different between releases - a sign that they were completely remade for MWR. For example, compare the waveforms for the MWR and MW ambient tracks, respectively:
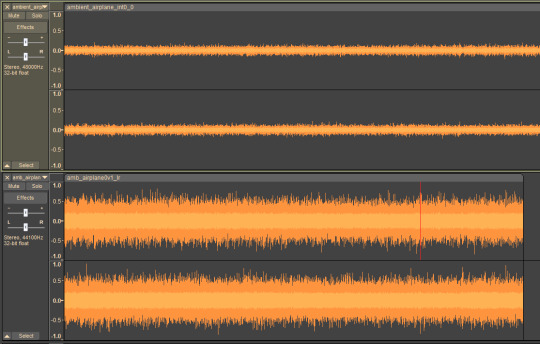
I found some that were identical, however. Compare the rear surround track for the AC-130 mission:
Identifying sounds
This is non-trivial because the drawSnd commands of the IW3 engine games seemingly do not work here. The closest I came was using GSC-Tool on the compiled scripts inside each FF:
gsc-tool.exe -m decomp -g h1 -s pc airplane_fx.gscbin
We can then inspect sound scripts and triggers for clues about emitters and other ambiences.
Appendix 0: Getting the latest Greyhound and Cordycep releases
dest1yo's public Discord channels contain outdated versions of these tools. To download the latest versions, first support the creator on Ko-Fi and connect with Discord to unlock access to the server's private #tools channel.
Once downloaded, we can generate our license for the tool by sending the Aple Cat bot a DM with the !license-cordycep macro. The resulting CCL file must go in your Cordycep root directory.
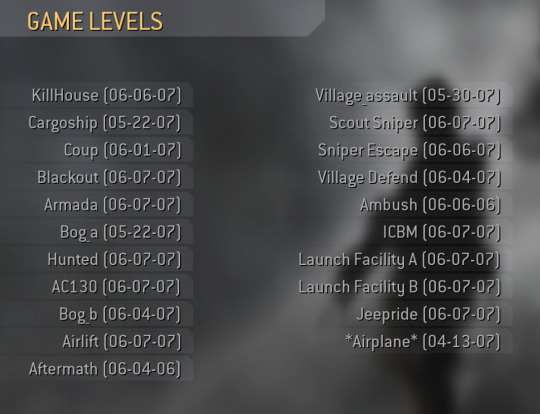
Appendix 1: Sample loadlist file for loading all mission assets
ac130 aftermath airlift airplane ambush armada blackout bog_a bog_b cargoship coup hunted icbm jeepride killhouse launchfacility_a launchfacility_b scoutsniper sniperescape village_assault village_defend
Appendix 2: Capturing footage
Use H1-mod. For advice on removing the watermark, see my post on MW2.
Appendix 3: Other extraction tools for H1
You can dump FF "zone" files with x64-zt.
1 note
·
View note
Text
Capturing the ambience of Call of Duty: Modern Warfare 2 (2009)
Running the game
We'll run MW2 with the iw4x client to access additional features, namely the developer console. It's strongly recommended to run this client via the Alterware platform - use it to set up iw4x rather than trying to do so yourself.
Once Alterware setup process is complete, clone and compile iw4x-sp on Gitea or GitHub, with the former being supposedly more up-to-date. Removing the following codes gives us an iw4x-sp.exe that won't draw the watermark* found in Alterware-distributed builds:
scheduler::loop(branding_loop, scheduler::pipeline::renderer);
The Alterware team suggests that you always launch MW2 via the relevant shortcuts that Alterware generates. In our case this is launch-iw4x-sp, which we can edit to enable more console commands:
"...\Call of Duty Modern Warfare 2\alterware-launcher.exe" iw4x-sp --pass "+set thereisacow 1337 +set developer 1 +set sv_cheats 1 +set monkeytoy 0"
I found that launching iw4x-sp.exe directly also works fine, provided you have already run Alterware's setup process:
"...\Call of Duty Modern Warfare 2\iw4x-sp.exe" +set thereisacow 1337 +set developer 1 +set sv_cheats 1 +set monkeytoy 0
*this watermark is to credit the developers but also assist in troubleshooting (when people send in reports, the watermark displays build info)
Capturing footage / Extracting sounds
See the relevant sections of my CoD4 guide.
Appendix 1: Other mods
X Labs is seemingly the predecessor to Alterware. It sounds like it was Cease-and-Desisted for facilitating piracy.
iw4cine is made for multiplayer video creators. It's built on top of iw4x.
Appendix 2: MW2 Campaign Remastered
I was able to extract the ambient streams from this release using the latest Cordycep and Greyhound (see Appendix 0). I found MW2CR's assets are either qualitatively different or identical to MW2's.
0 notes
Note
you're probably the only person on earth capturing game ambience properly. how did you get into this? is this just an interest/hobby or is it related to work experience or something? you go through a lot of steps to achieve the results, and it takes real know-how.
Thanks for the kind words! I have an engineering background but lack the nitty-gitty skills that most game devs would take for granted. That said - the technical stuff has kept me interested for all of these years, more so than taking screenshots per se.
It started when I downloaded a program to extract Splinter Cell's music, and noticed that it could dump SC's ambient tracks as well. I was surprised how rich those tracks were and wanted to share that discovery. To this day SkyboxEye is about spotlighting the underrated ambient sound design of various games.
0 notes
Text
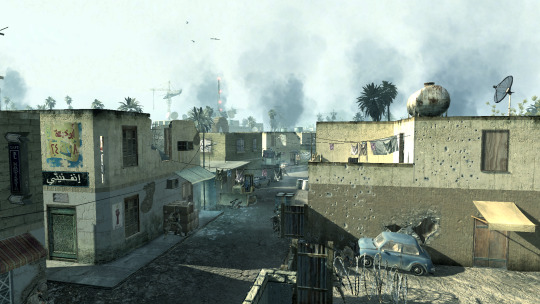
Capturing the ambience of Call of Duty 4 (2007)
This FPS set a high water mark for cinematic campaigns and addictive multiplayer progression. This guide will look at its Xbox 360 and PC versions (Steam and retail).
Enabling the developer console
First, add the following launch options to your executable shortcut:
+set thereisacow 1337 +set developer 1 +set sv_cheats 1 +set monkeytoy 0
Next, enable the console (AKA "monkey toy") inside CoD4's menus:

Running the game
As always, following the relevant PCGamingWiki entry for essential tips and troubleshooting.
We can explore the single-player offering more rapidly using a series of commands and tricks. Assuming we have the launch options in place above, we'll gain access to a "Dev. only" mission menu. This runs the selected level in developer mode, enabling the use of more console commands:
Alternatively, we can use the console to start a mission in dev mode:
spdevmap <Map Name (e.g. blackout)>
To speed through levels safely we should active the god and/or notarget commands. If we're feeling silly we can use g_ai 0 to disable AI, but it applies to both friendlies and enemies. To increase our sprint speed we can invoke the player_sprintSpeedScale 3 command; to increase our player-character's max velocity we can use g_speed <Integer>.
Optimizing visuals
We can edit our user CFG file or run console commands to ensure models and objects are drawn at the highest possible level of detail (LoD):
seta r_lodScaleRigid 1
seta r_lodScaleSkinned 1
seta r_lodBiasRigid -1000
seta r_lodBiasSkinned -1000
seta r_zfar 0
However, I noticed that certain foliage (e.g. palm trees) seems beholden to LoD no matter what these values are. There is a r_forceLod variable, but it doesn't seem to have any effect.
Capturing footage
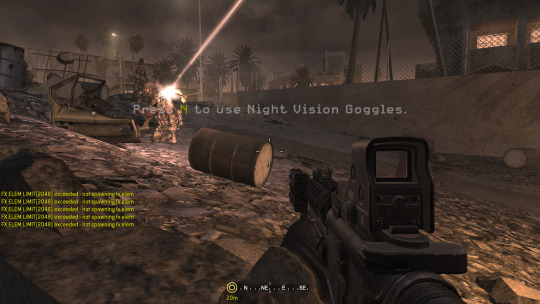
Use cg_drawGun 0 to hide your gun while in developer mode. To remove your HUD, try cg_drawHUD 0 and/or cg_draw2D 0. The latter also eliminates onscreen developer messages.
To move the camera freely, use noclip, or ufo. Each controls a little differently but both use WASD and its neighboring keys, plus the mouse. If desired, use cg_fov to adjust field of vision from its default of 65.
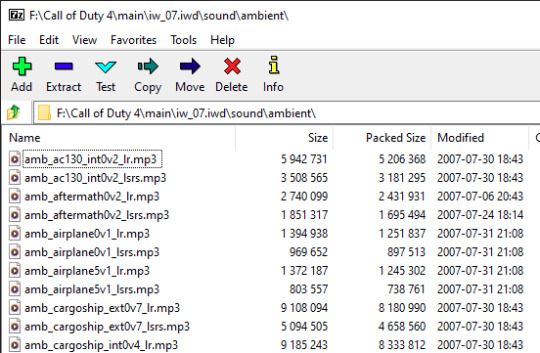
Extracting sounds from PC
CoD4's IWD archives are simply ZIPs in disguise, and can be opened with common programs like 7zip. For sound files, refer to iw_07 through iw_11.
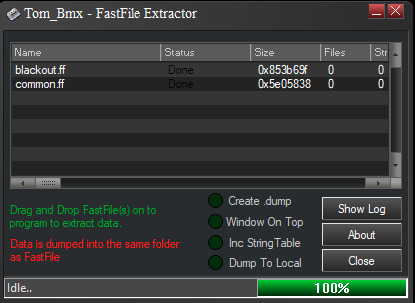
There are a handful of additional sound effects inside each mission's Fast File (FF). We can get at them via OpenAssetTools. I also had some luck with iw_ff_extractor or FastFile Extractor.
Extracting sounds from Xbox 360
I found these XMAs have a slightly higher bitrate than the corresponding MP3s on PC. Use PAKExtractor to decompress packfile1.pak. This will dump the contained XMAs, which we can then convert with vgmstream.
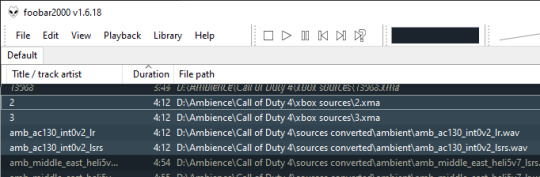
These lack names and metadata; we can use the track lengths to match them with their corresponding, named PC files.
Identifying sounds
To display an overlay detailed the sounds currently being played, and their parameters (volume, pitch, etc) we can use snd_drawInfo <0,1,2,3>. There is also snd_draw3D <Integer> which will render similar info but inside the 3D view.

From looking at this info it seems the engine typically plays a highly-detailed stereo track, and then randomly (i.e. start time and pitch) layers on detail sound effects, to create streamed ambience.
To determine the exact parameters of these detail sounds, you can look into each mission's FF files. You'll find GSC scripts (e.g. blackout\maps\blackout_amb.gsc) specifying the base sound environment and events.
As an example, let's examine the ambience defintion for the AC130 mission, defined in common\maps_ac130_amb.gsc. It declares that elm_ac130_rattles should be played four times as often as elm_ac130_hydraulics, and as often as no sound ("null") at all. An event is chosen every 3 to 6 seconds:
ambientDelay("ac130", 3.0, 6.0); // Trackname, min and max delay between ambient events ambientEvent("ac130", "elm_ac130_rattles", 4.0); ambientEvent("ac130", "elm_ac130_beeps", 0.3); ambientEvent("ac130", "elm_ac130_hydraulics", 1.0); ambientEvent("ac130", "elm_ac130_metal_stress", 0.3); ambientEvent("ac130", "null", 1.0);
Recording in-game
If extracting and mixing is too complex, we can simply record in-game.
To disable music, we can simply delete the relevant files from the IWD archives using 7Zip. We can then use noclip while in-game to fly out of "earshot" from any positional sounds and record only the ambience layer.
We can also use this approach to record complex ambient events in isolation (e.g. elm_ac130_rattles et al.) - just delete the ambient MP3s with 7Zip, instead.
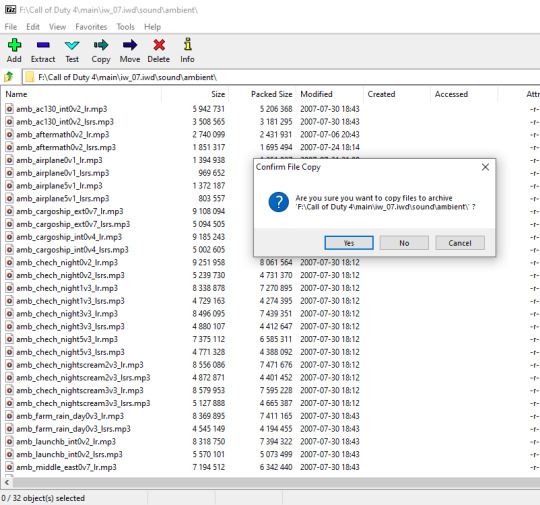
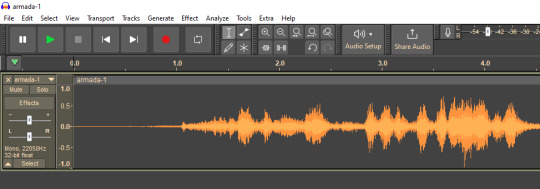
Appendix 0: Getting WAVs out of FF archives
When the FF extractors above don't work for us, we can try a hex-editing approach. First, decompress the FFs using Offzip:
offzip.exe -a armada.ff
Then, open the DAT dump in HxD and copy everything between the .wav filenames you are looking for.
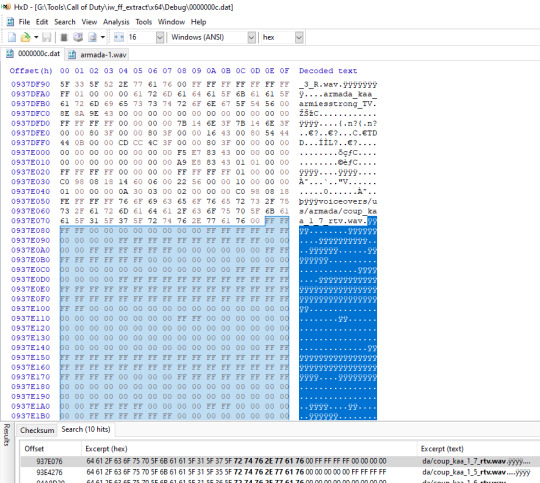
Paste this into a new file created within HxD, and save. You should then be able to open this as raw 16-bit PCM in Audacity.
Appendix 1: Extracting other assets
Greyhound, a successor to Wraith, can extract models from CoD4 at runtime.
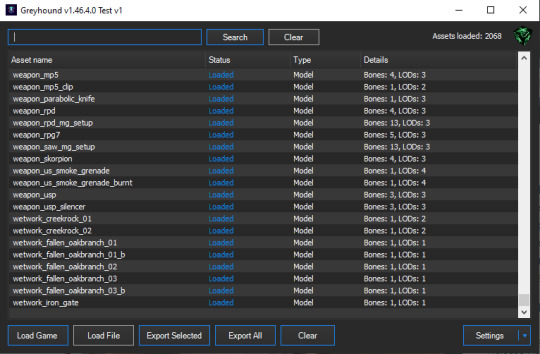
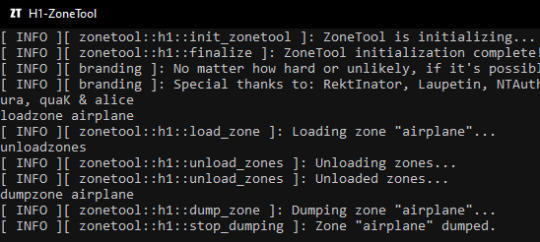
You can also try the IW3 toolchain for ZoneTool.
Appending 2: Popular mods that I couldn't try
Only supports Steam: https://gitea.com/JerryALT/iw3sp_mod/wiki/IW3SP-MOD%3A+Features.-. Presumably the resource limit increases would address issues like this:
For multiplayer only: https://github.com/Rex109/CoD4QOL
Official mod tools for building maps: https://www.moddb.com/games/call-of-duty-4-modern-warfare/downloads/mod-tools-sdk#membersform
Community enhancements and extensions for those tools: https://xoxor4d.github.io/projects/iw3xo-radiant/
Appendix 3: MW Remastered
I was able to extract the ambient streams from this release using Cordycep and Greyhound. I found MWR's assets are either qualitatively different or identical to MW's.
1 note
·
View note