
Don't wanna be here? Send us removal request.
Statistics
We looked inside some of the posts by splusblog215 and here's what we found interesting.
Average Info
Notes Per Post
1
Likes Per Post
1
Reblog Per Post
0
Reply Per Post
0
Time Between Posts
4 days
Number of Posts By Type
Text
7
Last Seen Tumblr Blogs


Fun Fact
Hackers stole 65M passwords from Tumblr in 2013.
Text
Free Agent Go Mac

Connect the GoFlex for Mac drive. Download the file Seagate GoFlex Software.mpkg.zip to your MacOS computer. Extract the contents of Seagate GoFlex Software.mpkg.zip to root of the GoFlex drive. Double-click Seagate GoFlex Software.mpkg.zip to start the installation. Follow the steps of the installation Wizard to. Hi, I bought a 160 gb Seagate FreeAgent Go 160gb a while back and it's formatted as Mac OS Extended (Journaled). It's working great but lately a lot of my friends have been wanting the files I have on my Mac and when I go to plug it into a PC it doesn't read the drive. Is there a format where I. Seagate FreeAgent Go Portable for Mac (500GB, FireWire, Silver) overview and full product specs on CNET.
Travel Agent is an Android Tools app developed by Holiday Triangle Travel Pvt Ltd and published on the Google play store. It has gained around 5000 installs so far, with an average rating of 4.0 out of 5 in the play store.
Travel Agent requires Android with an OS version of 4.1 and up. In addition, the app has a content rating of Everyone, from which you can decide if it is suitable to install for family, kids, or adult users. Travel Agent is an Android app and cannot be installed on Windows PC or MAC directly.
Android Emulator is a software application that enables you to run Android apps and games on a PC by emulating Android OS. There are many free Android emulators available on the internet. However, emulators consume many system resources to emulate an OS and run apps on it. So it is advised that you check the minimum and required system requirements of an Android emulator before you download and install it on your PC.
Free disk repair mac. Below you will find how to install and run Travel Agent on PC:

Free Agent Goflex Drive Mac
Firstly, download and install an Android emulator to your PC
Download Travel Agent APK to your PC
Open Travel Agent APK using the emulator or drag and drop the APK file into the emulator to install the app.
If you do not want to download the APK file, you can install Travel Agent PC by connecting your Google account with the emulator and downloading the app from the play store directly.

Seagate Freeagent Go Mac Not Recognized
If you follow the above steps correctly, you should have the Travel Agent ready to run on your Windows PC or MAC. In addition, you can check the minimum system requirements of the emulator on the official website before installing it. This way, you can avoid any system-related technical issues.
0 notes
Text
Automatic Transcription Software Mac Free
While audio and video files can provide a real-life feel, they do have some drawbacks. You can’t search for a certain phrase in an audio recording. It’s difficult to include a quote from a video file in an article you write.

Sonix automatically transcribes, translates, and helps you organize your audio and video files in over 40 languages. Fast, accurate, and affordable. Millions of users from all over the world. Upload a file to Sonix, and you'll have an online transcript in less than 5 minutes. Express Scribe Mac. This is one of the best transcription software, mac 2020, and it is designed for the need of mac users. With this tool, users are allowed to control audio playback by the use of a transcription foot pedal or by the use of the keyboard. Give a try to this software now!
Sometimes the text is better. But if you want to transcribe video or audio, you probably don’t want to do it by hand. First, we’ll walk you through recording audio and video using your Mac. Then we’ll show you our online transcription service that guarantees 99% accuracy.
Software and Equipment Needed for Audio Transcription on a Mac
Investing in better equipment can get you better sound quality. But it isn’t necessary to buy any new software or hardware to get a good transcription. As long as your Mac has a microphone you should have everything you need. Of course, if you are transcribing video, you will also need a camera. And if all you want to do is transcribe existing media files, you don’t even need those.
To record audio and video files, your Mac comes with QuickTime Player installed. Alternatives include Audacity, a free program for audio recording and editing. MacBooks come with a microphone and camera. A desktop Mac may need these added. But the better the sound quality, the more accurate your transcription will be. It may be worth it to upgrade to a better microphone.
Steps to Capturing your Audio and Video Files on a Mac
Before you begin, you should do your best to reduce any background noise where you are recording. This makes your sound more clear for audio transcription, giving you better results. If you are recording a lecture or meeting, there may not be much you can do about background noise. But placing your microphone near the people speaking and where it won’t be bumped or moved helps a lot. To record:QuickTime Player Audio Recording
Launch QuickTime Player
Select File > New Movie Recording (or New Audio Recording)
Click the arrow next to the Record button
Choose your camera, microphone, and quality
Set your volume slider if you want to monitor your audio as it records
Click the Record button to start and stop recording
If you want to edit your video file once you finish recording, you can do it all using QuickTime.
Best Transcription Software For Mac
How to Transcribe Audio or Video to Text on a Mac
It’s possible you already had your media files ready and didn’t need to create them yourself. Either way, you are now ready to get your transcription completed.
Rev.com offers human-powered audio transcription, which guarantees 99% accuracy and $1.25 per minute transcribed. To transcribe:
1. Go to https://www.rev.com/transcription and click “Get Started”
You can click here to get started as well.
2. Drag your file to the box with the red “Upload Files” button, or Paste a URL
3. Choose any additional options
You can choose things like verbatim transcription, adding timestamps, and Rush transcription.
Rush My Order delivers your transcribed audio faster
Timestamping shows the time each paragraph starts in the audio recording
Verbatim includes words such as um or ah as well as things like laughter or pauses
Instant First Draft gets you an automated transcription in just minutes
4. Check the total charge and click the red “Checkout” button
Enter your payment information and our team of 50,000 professional Rev transcriptionists will get to work! You can see your estimated turnaround time in the checkout screen.
Rev also offers automatic transcription, which is less accurate but only 25 cents per audio or video minute.
Other Uses for Transcription Services

Automatic Transcription Software Mac Free Online
Many people want media files transcribed for the ability to search or use the text. Some have other needs. Voice typing allows you to dictate and record, then have the text transcribed. Authors who prefer working outdoors or work in places where they can’t type could enjoy this. We offer automated speech recognition that reduces the price to just 25 cents per minute. This automated process can result in lower accuracy. You may need to use a text editor to edit the final product.
Video files can have captioning added rather than only getting a text file. This allows you to put the text in the video file exactly where the audio playback occurs. You can learn more about captioning at Rev.com.

Getting the Best Audio Transcription
To make the most of your transcription, you need to provide the best media files you can.
Dictation Software Mac
Reduce background noise as much as possible
Get clear audio recordings by placing the microphone close to the speakers
Use quality equipment for the best audio
Record using high sound quality media files
Turn Your Speech Into Text
You want to get the best quality transcript, no matter what your transcription needs are. Ld player for macbook.
Searchable files
Article quotes
Writer dictation
Lecture notes

Follow these steps on your Mac and turn the spoken word into the written word!
When we are dealing with a significant amount of audio or video data, it is not that easy to hear them out and then convert them into text. The transcription task gets complicated as we may be dealing with different dialects and at times noisy data. So in such instances, the various transcription software available come to rescue. This software mainly performs speech to text conversion making your job a whole lot easier. Here are Top 10 Transcription Software for Mac.
1. Express Scribe
Express Scribe is designed considering the needs of Mac users. The user can control the audio playback using a transcription foot pedal or by using the keyboard. Express Scribe also offers many other functionalities such as variable speed playback, multi-channel control, playing video, file management, and much more. Using the free version, you can use the standard audio formats such as wav, mp3, wma, and dct. By upgrading to the professional version, you can get proprietary format support. It supports both audio and video playback and plays formats including encrypted dictation files. You can also use professional USB foot pedals to control playback. This transcription software automatically receives and loads files by the internet (FTP), email or over a local computer network. It also works with speech recognition software to automatically convert speech to text. Using the plug and play foot pedal, you can make your foot control the playback as you type, which can help you increase your typing speed. You can also load CD audio and start working as the audio loads. Express Scribe Basic costs $29.99, and Professional version costs $34.99.
2. Inqscribe
You can download and install this transcription software for free, or register for a 14-day trial or get the paid version for lifetime use. You can play audio and video in almost all popular formats. Using USB foot pedal, the control playback is smoother. There are options to save the document and to insert shortcuts and snippets. Using snippets, you can add frequently used words in a single click. With Inqscribe, you can create a subtitled QuickTime movie or even print the transcripts. You can add time codes to jump to a particular point in the film clip. The single license costs $99, but students and staff can get a maximum of up to $60 off on discounts.
3. Dragon
Dragon is designed specifically to help you create documents, spreadsheets or presentations faster. It is useful for sending emails and for filling out forms. The transcription by Dragon is very accurate. You can also customize words for the terms you use every day, insert text or graphics that are often used and create command shortcuts for repetitive tasks. You can also transcribe voice memos from your smartphone or portable voice recorder, podcasts or audio files of any single speaker’s voice to text quickly. It is capable of advanced customization features so that it adapts well to even the most industry-specific terminology that you use every day. It can transcribe all commonly used formats like .mp3 aif, .aiff , .wav, .mp4, .m4a, .m4v. For accurate transcription, it can also capture notes.
4. VoxSigma Speech to Text
VoxSigma is equipped with extensive vocabulary multilingual speech-to-text capabilities. Keeping in mind the needs of professional users, it can transcribe even clips with slight noises. And it is useful in the text to speech conversion of large quantities of audio and video documents such as broadcast data, either in batch mode or in real-time. Data available from call centers can be analyzed using these. First, the audio segments that contain the speech are identified followed by the language. Then, the text to speech conversion is done. It has adaptive features that can distinguish voices even if some background music is playing and is capable of converting them into text. VoxSigma outputs an XML document with annotations including speech and non-speech segments, speaker labels, and words with time codes, high-quality confidence scores, and punctuation. This XML file can be converted into plain text.
5. Transcriva
The biggest charm of Transcriva is its usability. You can organize your transcripts all in one place. It also adjusts itself with variable speed audios for accurate transcription. You can further print your transcripts or export them as RTF or Word documents for editing, sharing, and publication. It allows you to play back your transcripts when you're done transcribing. It also comes with foot pedal support to ease things for you. And apart from this, there are so many customization features available to fit each user needs.
6. ATMac
ATMac can be used to write your emails, for chatting and for other text to speech needs. It is capable of identifying many English dialects and accents including American, Northern Ireland, Southern, Australian, British, Indian and much more.
7. iSay
iSay has a clean interface to give the users a positive transcription experience. You can use them for emails and other notes. And there are hotkeys to speed up transcription process. It was also compatible with cell phones.
8. Mac Speech Scribe
Mac Speech Scribe gives excellent accuracy in converting audio files. It avoids typos and misspelled words. Simply open the file and click on the Transcribe button. Your work is done! It supports up to six speech profiles and guarantees accuracy to six different voices. It also allows transcription from audio recordings on Mac, iPhone, and other digital voice recorders. It doesn't require much time to be spent on training as it quickly adapts to different sounds. It is also sensitive towards 13 different English dialects.
9. Hyper Transcribe
Hyper Transcribe supports all the major audio formats such as MP3, AIFF, WAV, MPEG, AVI, MOV, etc. It can export the output file as RTF or plain text. You can first install the trial version and then upgrade to paid version after purchase.
10. Seventh String
Seventh String transcribes Assistant is designed to help musicians. With the use of foot pedal, faster transcription can be done. This tool slows down the tracks which are not suitable for transcription thus making them fit for speech to text conversion. It slows down the music without changing the pitch so that you can analyze chords and notes that it represents.
Final Words
Transcription is now made easy with these tools. You have provisions to make smooth conversions even to even noisy data. And this software is highly dynamic in the sense that they adjust according to the user. So the experience gets better with use. Give it a try now!
0 notes
Text
The Best Android Emulator For Pc & Mac Andy Android

Looking for the best Android Emulators? Well, we have got your back. The internet is filled with plenty of Android emulators and picking the best one can be challenging. Therefore, to put your search at ease, we have handpicked the top 10 best Android emulators you can opt for in 2021.
6 Best Android Lightweight Emulators. Now, it is time to discuss the best android emulator for PC available in the market. Android emulator under 50MB. The following is the list of the best android emulator under 50MB that will help you choose a lightweight Android emulator for you. So, let’s have a view! 1 Droid4x (8.3 MB).
Some of these emulators require high ram and a good CPU to perform well. But do not worry, here is a list of top Android Emulators that can work on both high and low-end Windows systems. 6 Best Android Emulators For Windows PC. We have collected the 4 best android emulators with great features and performance for all types of PC, and the other.
The perfect Android emulator. Supports keyboard, gamepad, script recording and multiple instances. Every feature is perfect for your gaming experience only. Open keyboard mapping only with one-click, get the real PC like gaming experience by setting the controls on keyboard, mouse, or gamepad. Run multiple instances at the same time to play.
7) Ko Player: It is a powerful and free Android Emulator that can easily become your first choice for running Android games. It can help you download apk files from Google Play Store and run Android apps on your Windows PC. It built on x86 Architecture, support advanced features like OpenGL & hardware acceleration.
List of Top Android Emulators (2021):
1. Bluestacks
Bluestacks is known to be one of the best Android emulators and its prime focus is games. The design is well made and easy to use, as its front end is for installing games; although you can also install the games through the google play store. The quality of Bluestacks is top-notch.
Key Features:
Bluestacks are convenient for screen recording.
Bluestacks is compatible with both Mac and Windows platforms.
The emulator support multiple gaming features.
The interface is designed by keeping ease of use in mind.
Bluestacks also support the standalone APK file option as it lets you download games from another source.
2. Game Loop
Gameloop is just another platform that primarily focuses on the game; it is an official emulator for games such as call of duty: mobile, Fortnite, and even PUBG. Gameloop also hosts other games as well.
Key features:
Gameloop has a good range of releases and game support including Call of Duty.
Gives access to Android games on your computer.
Gameloop is compatible with PUBG on the computer.
Gameloop works well with a low configuration setting as well.
Pubg’s overlay can be customized.


3. Nox App Player
Just like Bluestacks, the Nox player is a quick android emulator compatible with both Windows and Mac. Again, the Nox player is designed by keeping games in mind, it gives Android’s stock version and you can also install games from the google play store. Nox player also supports gamepad compatibility.
Key features:
Nox Player has a quick and sleek interface.
Although Nox player is a free app, it still provides several extras that you can access from the top-right verticle toolbox.
Supports screen recording setting.
Nox player also lets your install games from another source.
Nox player is compatible with both Windows and Mac.
4. AndY
AndY is another game-centric Android emulator based on VMWare Player and it contains 3GB installation file. However, there can be unnecessary installations as well, so look out for it. Try this emulator once and get to know the features it. AndY is also supporting the gamepad.
Key features:
Compatible with both Mac and windows.
AndY provides a rooting option.
AndY has 3GB installation size.
It is compatible with Xbox, PlayStation controller, and the gamepad as well
5. MEmu
MEmu is one of the newest Android emulators. Due to its cool features, it is quite popular. MEmu provides virtualization for your CPU and is compatible with Intel and AMD chips, along with the graphics as well. MEMu has an advanced keyboard set to uplift your game.
Key features:
MEmu provides a virtualization setting for your CPU.
The support level of MEmu is very well as it also provides support to dedicated graphics as well.
MEmu is compatible with Intel and AMD chips.
The interface is designed by keeping ease to use in mind.
MEmu is only compatible with Windows PC.
6. Genymotion
Genymotion is another android emulator that supports multiple things. What Genymotion does is increase the speed of testing and even permits you on sharing life. Genymotion allows you to monitor the progress on various devices.
Key features:
Compatible with Android, Windows, Mac, and Linux as well.
Genymotion provides a multitouch setting and is even compatible with GPS.
There is much clarity on PC as Genymotions comes with high pixel compatibility.
Provides secure online surroundings to test your products.
Genymotion provides over 3k Android configurations.
7. PrimeOS

The Best Android Emulator For Pc & Mac Andy Android Emulator
PrimeOS is another operating system similar to Linux or Windows that gives you access to various applications on your Android device. This emulator also provides a full desktop experience. PrimeOS is mainly designed to give you the gist of both the Android and PC world in one.
Key features:
PrimeOS is compatible with dual boot.
To give you a better gaming experience, PrimeOS has fused the respective PC and Android worlds.
PrimeOS is compatible with Android, Mac, and Windows platforms.
Provides a full desktop experience.
Unlike the Windows budget system, PrimeOS performs surprisingly fast.
8. Phoenix OS
PhoenixOS is another multitask emulator which not only gives your wow gaming experience but its fast and reliable too. Phoenix OS is compatible with Google services, however, updating those services can be a bit tricky at times. You can download any game from the play store.
Key features:
Provides the dual experience of the desktop as well as gaming.
Phoenix OS is compatible with Windows, Mac, and Linux as well.
Supports Google services.
Phoenix OS is designed for easy use.
The emulator is good to boast for productivity.
9. Xamarin
Unlike Genymotion, the Xamarin emulator is not as powerful but it still works well to meet your basic needs. You can plug in Microsoft Development Studio for a better environment. Xamarin comes with an in-built app for testing games.
Key features:
Xamarin comes with an app that helps in-game testing.
For a larger development environment, you can plug Xamarin into the Microsoft studio.
Xamarin is compatible with Windows, Mac, and android as well.
Xamarin is inspired by the .NET framework.
It is all in one technology stock for each platform.
Conclusion:
The Best Android Emulator For Pc 2gb Ram Windows 10 Pc
Mobile devices have pretty much taken over the world as by the click of your finger, you can get done any work. Though, sometimes, the small screen may not be as effective, especially when it comes to gaming, because of which Android emulators are primarily created to give you better gaming experiences.
The Best Android Emulator For Pc Bluestacks
In the article above, we have listed the top 10 best Android emulators. We hope you like our recommendations, do let us know in the comment box which one worked the best for you.
0 notes
Text
Ld Player For Macbook

Ld Player 5.1 Download
Ldplayer Mac
Ld Player For Macbook 2020
Ldplayer Apple
Ld Player For Macbook Os
Ld Player For Windows 10 64 Bit
Ld Player For Mac
Nox is an Android Emulator designed for Windows and Mac. Nox Player App helps emulate the Android OS to run Android apps and games on computer. Quickbooks multi user mode. Nox Player App is one of the most popular android emulators in the world that you can get easily for your computer, install it and use android apps on your computer fast.
With LD Player, you can quickly move your favorite Android games to the Windows environment. You can enjoy the game that cannot be enjoyed on the smaller screen, on your computer, without limits.
Ld Player 5.1 Download
45,535 likes 271 talking about this. The perfect Android emulator to play mobile games on PC.
DivX Player for Mac. Compatibility: Mac OS X 10.5.0 or above. DivX Player delivers high-quality video playback for AVI, DIVX, MKV, MP4, and more. It is the best video player Mac to watch DivX, MKV, and HEVC up to 4K films. You can use its built-in TransferWizard to burn videos to DVD/USB/computer.
Ldplayer Mac
So much so that your computer supports a wide range of compatibility for running mobile games with high-performance features and high graphic designs. LD Player, which has user-friendly adjustments and versatile, functional design, the game you play in the computer environment will have a much higher performance than your mobile device.
You can set it up easily and quickly, even with basic internet user knowledge. With the help of stylish panels in the program, you can use many features such as fast navigation, just like the Android operating system. The most vital advice on using LD Player, emulator is the ability to use all games and applications with roots.
Ld Player For Macbook 2020
LDPlayer is a free Android emulator for users who want to play Android mobile games on PC. It is a program made especially for playing games. You can run LDPlayer on your PC. Go to the Google Play Store to download and install games. They want to play as well as play on mobile. The only difference is that the mouse and keyboard are used to control instead of touching the screen with your hands.
LD player one of the best android emulators we have tested so far. It is designed to play mobile games on your pc. The controlling system of this emulator is super cool. It supports both keyboard and mouse control. LD player lets you enjoy the game with smooth gameplay even in a multiplayer game.
You can install thousands of games from the Google play store. The most powerful feature of LD players is, you can play multiple games at a time without any lag and error.

Ldplayer Apple
You may also like -:
It is based on the Android lollipop. With a multi-functional design and user-friendly control, everyone will enjoy playing games on an LD player.
The top 10 list of games on LD players -:
PUBG Mobile
Garena free fire
Mobile legend
PUBG Lite
Epic seven
Call of duty mobile
Ragnarok M
Clash of clans
Dragalia Lost
Brawl Stars
This super cool android emulator is full of exciting games and apps. Here the games and apps are updated regularly. Also, you can find some popular games categories in this android emulator.
Minimum System Requirements
Ld Player For Macbook Os
2 GHz dual-core processor or above
2GB RAM
Minimum 8 GB of free hard drive space
Any updated graphics
What is an LD player?
Update mac os el capitan. LD player is an android emulator designed to play mobile games on PC or windows.
Does the LD player work on mac?
Ld Player For Windows 10 64 Bit
Yes, it works on both windows and mac.
As you can see, this is the best android emulator to those who have a low-end pc. You can enjoy unlimited gameplay without a single lag. You can download any games or apps from Google play store, or you can install an apk file from your pc.
That’s all for today. Let us know if you have any confusion related to this article. We will try our best to reply to all your messages and comments as soon as possible.
Ld Player For Mac
Nothing special about me. I am just a freelance writer who loves writing and updating all the latest information about IT, Blogging, Games and so on.
0 notes
Text
Free Disk Repair Mac

Free External Disk Repair Mac
Best Disk Utility Mac
Mac Os X Repair Disk
Sep 14, 2021 • Filed to: Answer Hard Drive Problems • Proven solutions
'I got my hard disk's software crashed. After that, it is still detecting and booting but cannot go up to the startup welcome screen. It's not working as a secondary drive too.'
Disk Analyzer Pro for Mac v.1.9.0 Disk Analyzer Pro for Mac is a disk cleanup tool which helps declutter your files to recover hard disk space on your Mac in seconds. The disk utility tool scans and displays the statistics of storage in terms of file count, percentage and size. DiskWarrior v.4.0 DiskWarrior is a disk repair utility. Mac OS X comes with an easy-to-use application, called Disk Utility, that allows users to verify and repair hard disks using a graphical user interface and it is recommended for most Mac users that are not comfortable using the terminal. However, this can also be performed using the command-line. Free Disk Drill can scan and recover data from virtually any storage device — including internal Macintosh hard drives, external hard drives, cameras, iPhones, iPads, iPods, Android devices, USB flash drives, Kindles, and memory cards.
Luckily, the hard drive software issue can be quite easy to cope with. You can get it fixed with the help of a hard disk repair tool. But if your hard drive gets damaged physically, it will be almost impossible to repair it using software or PC in-built programs. In this case, you are advised to seek a technician for help. Or you can buy a new hard drive.
In the article, you can find how to fix the corrupted hard drive and then recover data with hard disk data recovery software.
How to Repair Corrupted Hard Disk with CHKSDK?
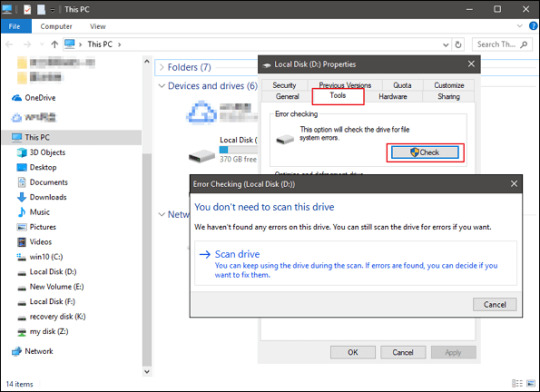
If you are trying to solve computer issues that you don’t understand, chances are that they are emanating from your hard drive. Whether you use Windows 10, Windows 8, or Windows 7, you can fix hard drive errors by running the Check Disk utility tool. The process will be over in just a few hours. So you need to leave your computer running and to run the Disk Utility feature when you don’t have a task to do. Here is how to do this work if you can still boot your Windows system.
Click on Start at the bottom corner of your computer. Righ-click on My Computer and choose Properties.
Choose the Tools tab and click Check Now.
Choose the two options and click on Start.
If asked, pick the option to schedule the disk check.
Restart your computer.
But what if you cannot open Windows? If so, here are easy steps to follow.
Restart your PC and press F8 many times. This will make the computer show you the Advanced Boot Options menu.
Choose Repair Your Computer
After logging in, open the Command Prompt. It is in your System Recovery Options. Then run this command: chkdsk /r /f
If your Windows system cannot load itself still, the best action to take is to run the Startup Repair utility. This is how you should do it:
Go on the Advanced Boot Options menu and choose Repair Your Computer. If you don’t see Startup Repair running, choose it from the menu.
If Step 1 doesn’t work, yet you think there is an issue with the PC boot configuration, open up a command prompt window. Enter this: BootRec.exe /FixMbr /FixBoot
Relevant Video Tutorial for Reference
How to Fix Corrupted Hard Drive with Software?
1. Recover a Corrupted Hard Disk with Wondershare Recoverit
Did you know that most computer problems are triggered by the hard drive? If some sectors of the disk drive get corrupted or damaged, a number of computer issues may arise, including the loss of important files. To recover hard disk files, all you need is a hard drive disk data recovery software. And our recommendation for you is Recoverit Data Recovery
Wondershare Recoverit data recovery software is a professional and best hard disk recovery software to recover all data loss problems due to accidental deletion, formatting, inaccessibility or raw, virus attacking, improper operation, or damage on the hard disk, etc. It recovers lost data from corrupted hard disk on Windows or Mac computers.
Wondershare Recoverit - The Best Hard Disk Recovery Software
Recover lost or deleted files, photos, audio, music, emails from any storage device effectively, safely and completely.
Supports data recovery from recycle bin, hard drive, memory card, flash drive, digital camera, and camcorders.
Supports to recover data for sudden deletion, formatting, lost partition, virus attack, system crash under different situations.
2. How to Recover Files from a Hard Drive
Download and install Recoverit hard drive recovery software on your computer, follow the next steps to get your data back.
Step 1. Select the corrupted disk
To recover hard disk files, you can start Recoverit Data Recovery on your computer. Then select a hard disk to scan your lost data, and click the 'Start' button to move on.
Step 2. Scan corrupted hard drive
Free External Disk Repair Mac
Recoverit data recovery will start scanning your hard disk quickly. Go to scan again with the 'All-around Recovery' mode if you can't find any file after the quick scan.
Step 3. Preview & recover hard disk files
After the scan completes, preview the recoverable files, select the wanted ones, and click 'Recover' to save them to a safe location.
Note: Don't save your retrieved data on the desktop, because you are under the boot environment and the files will not be saved when you switch to your own Windows.
What's Wrong with Drive
Recover Your Drive
Fix Your Drive
Format/Wipe Drive
Know Your Drive
At times, data stored in Mac’s internal or external hard drive gets corrupted or faces logical damage. To get rid of such issues, you need to take help from professional Mac disk repair software. In this blog, we have made an earnest attempt to list the top disk repair software for Mac users.
Table of Contents
Introduction
Free Mac Hard Drive Repair Software
Disk Utility
FSCK
Onyx
Paid Mac Hard Drive Repair Software
Stellar Data Recovery Professional for Mac
DiskWarrior
Drive Genius
TechTool Protogo
Conclusion

Introduction
A hard drive tends to fail due to usage, aging, and physical or logical damage. In case of logical damage to the hard drive, a Mac hard drive recovery software can help you retrieve your inaccessible data. But if the damage is physical, such as the presence of bad sectors or blocks, you need to use some advanced disk management methods to fix the issue from the storage drive. The following section describes free Mac hard drive repair software that can help you resolve hard-drive issues.
Free Mac Hard Drive Repair Software
A. Disk Utility
You might have used the Disk Utility functionality of Mac to diagnose and resolve problems encountered in your Mac hard drive. Disk Utility is a built-in macOS diagnostic tool to eliminate fundamental issues such as directory structure damage, file system permission problem, and so forth.
To repair Mac hard drive through Disk Utility, navigate to Applications > Utilities > Disk Utility. Or else, press Command + Space Bar to open Spotlight, type disk utility, and select it to launch the application. From the Disk Utility window, choose the hard drive (other than the startup drive), then click First Aid. Click Run to initiate the drive fixing. But if you require to fix the startup disk, restart your Mac and immediately press and hold Command + R keys. Release when the Apple logo appears. In the macOS Utilities window, select Disk Utility, then click Continue. Select the Startup disk from the sidebar, then click First Aid. Click Run to begin the startup drive repair process.
B. FSCK
Besides Disk Utility, Single User mode can also help you perform Mac hard disk repair on your iMac, Mac mini, or MacBook. macOS Mojave or later operating systems don’t have this mode enabled. Even when your Mac has a firmware password, this mode won’t load. For the rest, to open this boot mode, start your Mac, then immediately press and hold Command + S hotkey, release when some white character appears on a black screen. Single User Mode shows a UNIX-style command-line interface that can help fix startup disk issues. In the command prompt, type /sbin/fsck – fy, then press Return to run the file-system-consistency-check command. If the startup disk is healthy, the message “The Volume (name) appears to be OK” is displayed. Restart Mac usually; if a message “File System Was Modified” appears, rerun the fsck command till the OK message is displayed. Restart Mac normally.
Disk Utility and FSCK command lack comprehensive storage drive management features, repair functionality, and other advanced diagnostic & tech tools that are essential for you to run Mac smoothly. So, use a free third-party tool to augment advanced utilities catering to repair, diagnosis, and drive management. The following section shares such a free Mac hard drive repair software.
C. OnyX
OnyX is a personalization, optimization, and maintenance utility for Mac OS X. The software has advanced features to execute system maintenance, run storage drive diagnostics, configure system hidden features, and delete caches. Its repair utility helps you to repair hard disk drives for errors and inaccessibility. The software is excellent for keeping your Mac so that it functions without any glitch.
Paid Mac Hard Drive Repair Software
A. Stellar Data Recovery Professional for Mac
It is one of Mac’s best hard drive recovery software that recovers corrupt Mac hard disk data. Also, the software recovers lost APFS partitions, external hard disks, SSDs, Time Machine, password-enabled drive, and Fusion drives. The latest version of the software creates a recovery drive and performs file recovery from non-booting Mac systems.
Leverage this Mac Professional data recovery tool if the storage disk drive has logical corruption and the external drive is unmounted or not showing up on Mac. Stellar Data Recovery Professional for Mac scans the Mac storage disk drive to recover permanently deleted files as well.
You can connect an external hard drive and perform formatted recovery, partition recovery and restore lost data conveniently. The software has a built-in Drive Monitoring utility that monitors your start-up drive’s health and S.M.A.R.T. status. With the Professional version, you can run a Quick Scan to find out the bad blocks on Mac’s storage disk. The following section shares how to repair Mac hard drive and how data recovery works.
How does it work?
The working process of the software is relatively easy and intuitive. Free download the tool now:
Select: All you need to do is select the type of file you wish to recover, click Next, then select the storage drive from where you want to retrieve files.
Scan: Specify a type of scan — Quick or Deep Scan — then click the Scan button to initiate the scanning process. The software shows a dynamic scan-preview.
Recover: Once the hard drive scanning is over, preview and select all the required files, then click Recover. Click Browse, specify a distinct drive location, then click Save.
Wait till the recovery is over. That’s it. You’ve successfully recovered data from your Mac hard drive in 3-quick steps.
B. DiskWarrior
DiskWarrior is a useful disk repair utility for Mac with quite a different repairing functionality, unlike other disk repair tools. The software creates replacement data based on the original data instead of rebuilding damaged data. Subsequently, the software ensures there is no inaccuracy in creating the new data structure from the original one. The software can also be used as a preventive maintenance utility for Mac storage devices. When you execute the software, it rebuilds and optimizes the directory, thereby removing any data structure damage and improving drive performance.
C. Drive Genius
Drive Genius is a beneficial disk utility tool for your Macintosh computer. The tool can be used to repair a hard disk drive even if your Mac does not boot; a supplementary bootable DVD comes in handy to boot your computer from it and launch the tool. Some of the essential features of the tool include directory repair, repartitioning, cloning, surface scanning, defragmenting, executing bench tests, performing integrity checks, and above all, shredding data (which is generally not a consolidated feature of a repair utility).
D. TechTool Protogo
It is quite an excellent holistic Mac utility that is laden with advanced features. The volume rebuild tool examines, rebuilds, and repairs corrupted directories of hard drives. The utility can help you create a bootable Mac repair toolbox on your flash drive or external hard disk drive, which can be used when your Mac does not boot. The software can be used to run diagnostics, repair and recover data, optimize the hard disk drive’s performance, defragment the drive, and delete data securely.
Conclusion
Now you know that the built-in Disk Utility tool of your Mac and FSCK command in single-user mode isn’t sufficient to meet your advanced troubleshooting needs. Functionality beyond these free native repair tools is a must to get your Mac up and running. How to play roblox with a xbox one controller mac.
Best Disk Utility Mac
The top five Mac disk repair software presented in this blog can be used to perform hard disk bad block repair and fix hard disk drive for errors, inaccessibility, or system corruption. These five software are either free or can be availed as a trial. So, download the trial version of any repair software to recover your hard disk drive.
Mac Os X Repair Disk
And above all, do not forget to give Stellar Data Recovery Professional for Mac a considerate try, as its latest release excels in disk repair capability, appealing GUI, advanced features, and excellent technical support. Also, the software has a price advantage over other disk repair utilities. The tool is 100% safe & secure and has a 30-day money-back guarantee, in case you are not satisfied.
0 notes
Text
How To Play Roblox With A Xbox One Controller Mac
How to play roblox with xbox360 or ps3 controller updated 2013 2014 works with ps3 controller youtube, How To Connect Ps3 Controller To Mac Youtube How To Connect Your Ps4 And Xbox One Controller To An Ipad Or Iphone On Ios 13 Appleinsider Amazon Com Xbox One S 1tb Console Nba 2k20 Bundle Discontinued Electronics How To Play Roblox With A Ps3. Biggsyy said: Hi there, I have installed Roblox on the Shield TV and seems to have controller support however I cannot seem to jump. Am I missing something here? Thanks Andy I had the exact same problem. I temporarily solved it by pairing an xbox one controller to the shield. Then a game update broke that fix and I'm back to the same issue. In today's Roblox video; we play a few different fan made games with an Xbox One controller on my PC in Roblox + more funny moments! Follow me on Twitter! Tutorial on connecting your Xbox wireless controller to your Mac so that you can use it to play Roblox. I think Roblox is much more fun with a controller.
How To Play Roblox With A Xbox One Controller Macbook
How To Play Roblox With A Xbox One Controller Mac Os
Roblox Games With Controller Support
If you've got a newer Xbox One S controller with Bluetooth, you can use the controller with your Mac without any additional hardware or software: 1. Hold down the pair button on the top of the.
Gaming on a Mac is not what Apple is historically known for. However, with Apple delving into the fledgling virtual and augmented reality space, some traditional game interfaces and not so traditional interfaces (think HTC wands or Valve's knuckle controllers) now need to be supported on macOS to reap the VR/AR benefits to their fullest.
To ready you for some amazing VR pilot games such as Eve: Valkyrie that utilize a traditional game Xbox game controller, we're here to show you how to connect one to your Mac! In the past this method only applied to the Xbox 360 controller, but the latest version of the software you'll be using also now supports the Xbox One controller.
How to download and install the drivers
We're assuming that you already own a wired Xbox controller, but if you're needing to buy, a standard controller is about $50. You'll need to connect it to your Mac using a microUSB cable which, sadly, isn't included. If you buy a third-party wired controller you won't have to worry about this.
Next, follow these steps.
Launch Safari.
Navigate to https://github.com/360/Controller/360Controller/releases.
Download the latest release of the 360Controller driver. As of this writing, the latest release is 0.16.5.
Go to your Downloads folder in Finder.
Double-click the 360Controllerinstall_*.dmg file.
Double-click the Install360Controller.pkg that pops up in Finder.
Click Continue.
Again, click Continue.
Select to Agree the license agreement.
Click Install.
Agree to allow a restart of the computer by clicking Continue Installation.
Click Restart.
You can optionally have the downloaded file Moved to Trash.
Upon restarting the computer start System Preferences from the dock or the  menu.
Click on Xbox 360 Controllers.
How to connect your Xbox 360 controller
Once you've installed the drivers, you'll now logically see that there are No devices found, since we have yet to physically connect the game controller to the Mac.
Plug in your controller to your Mac. If you have a current model MacBook or MacBook Pro, you'll need a USB-C to USB-A adapter.
Click OK when the System Extension Blocked warning message pops up.
Go into System Preferences via the dock or  menu.
Click Security & Privacy.
Under the General tab click the Lock at the bottom left.
Enter your password and click Unlock.
Click Allow.
Your Xbox wired controller should now be connected!
Final thoughts
I am super stoked about developers climbing aboard the VR/AR hype train. As a mere consumer of VR, I can only hope for more and more creative minds to get on board. If you're a VR/AR developer, or even better yet, a macOS VR/AR developer, what other ways can Apple help promote virtual reality on their platform? Let us know in the comments!
Updated April 2018: Updated to reflect that this method also now supports the Xbox One controller.
We may earn a commission for purchases using our links. Learn more.
For all your USB-C needs
The HybridDrive is a USB-C dock with an SSD built in
You need more ports, right? And you probably need more storage, right? What you really need is the HybridDrive.
Whether you’re trying to no-scope that enemy on COD or score a last-minute slam-dunk on NBA, the touchpad just doesn’t do it.
So, we thought we’d share the best tips on how to connect an Xbox 360 controller to your Mac, to make them tense gaming moments a little easier.
Before you do: Clean up your Mac
BUT, before we get into all the juicy techy stuff, let’s remind you of how beneficial cleaning up your Mac can be.
Before installing any new hardware, it’s important to have an un-cluttered file space so the new software can run efficiently, and you can keep an eye on what’s where.
With CleanMyMac X, it’s easy. It’s one-click cleaning approach and powerful scanning means you can swiftly dispose of useless documents and apps which may be slowing your Mac down.
So, to get optimal controller connectivity, you should download CleanMyMac and tidy up your digital space – prior to any installations. Now, onto how to use an Xbox 360 controller on a Mac.
How to use the Xbox 360 controller on Mac
Not many of us know it, but there could be a handy use for all those old Xbox 360 or Xbox One controllers lying around. But, before you get set up, you need to have the correct hardware installed on your Mac to enable connectivity.
Here’s how.
First of all, you will need either a wired or wireless Xbox controller. Both work fine, but for all those passionate gamers with a tendency to erupt, a wireless device would be best to save any damages to wires (or opponents). These wireless receivers can be bought for around $20 on Amazon, and can handle up to 4 Xbox 360 controllers.
Free Drivers
Obviously, Macs don’t have an in-built driver for Xbox controllers as Apple are in no way affiliated with Microsoft. Similarly, Microsoft doesn’t supply drivers for Mac users for their hardware, which leaves us wanting users having to find our own way.
So back in 2006, it was music to gamer’s ears to hear that Tattie Bogle had developed their own driver free of charge to users across the gaming globe. However, this driver hasn’t been updated since 2012, and is therefore sticky when it comes to compatibility with MacOS X.
For a more streamlined approach to this conundrum, download GitHub’s free driver – it’s maintained and updated frequently and is free to all Mac users.
1. Install the driver
How To Play Roblox With A Xbox One Controller Macbook
After opening the GitHub link, double click on the DMG file visible under ‘Assets’. This will start the installing process, where you will have to follow the appropriate instructions.
Remember though, as with any new program installation, it will reboot your Mac, so don’t panic. After the restart, you should be able to find ‘Xbox 360 Controllers’ in the system preferences.
2. Connect the Xbox 360 Controller to your Mac
Now you’ve installed the driver, the next step is to connect the controller, which is simple and only needs to be done once.
Firstly, you need to plug the USB receiver into a free USB port on your Mac. Once plugged in, the USB receiver’s light should start blinking
Press the big Xbox logo button on the controller so it lights up green
Press the button on the USB receiver
Press the connect button on the controller, which can be found at the top - in-between the left and right toggles
The top left quarter of the circle around the Xbox button should now light up, indicating you are the first controller connected
Now the controller and Mac are linked - so in the future if you want to connect again, all you need do is press the big Xbox logo button to get going. Told you it was simple!
3. Test the Controller
As with all things techy, there’s always loopholes. So, it’s important to test the connections to ensure the controller works before we embark upon a mobile-gaming-gallivant.
Go to ‘System Preferences’, ‘Xbox 360 Controllers’ and you’ll see a screen like below.
Connect Your Microsoft Xbox One Controller To Mac For Roblox
This is a control pad, which indicates whether all the buttons on the controller are working properly. That’s about all you can do on this, as well as shutting the controller down by clicking ‘power off’.
4. Configuring for multiple games on your Mac
We all have different tastes in games - some of us like sports and some of us like military, there’s no right or wrong (asides from Half-Life, that’s just awesome and it’s not up for debate).
With these different games come different control configurations, which can get tedious when you only have one type of controller.
For full flexibility of use, there are many tools and apps available which allow you to play any game with any Mac compatible joystick or controller – even the ones that are not compatible with joysticks.
5. Use Joystick Mapper
Out of the many apps to choose from, Joystick Mapper is our pick. And at only $4.99 from the App Store, it’s real value for money – especially when considering the amount of effort it takes to develop such a complex tool.
Here’s how it works –
Once you download the Joystick Mapper app, you need to create a pre-set for your game preferences. To do this, open the app and click ‘Add new pre-set’.
Enter a name for future reference such as ‘My Game’, and for each joystick, click ‘Add a new joystick’.
Now that you’ve identified the joystick, you need to ‘bind’ joystick inputs to keyboard or mouse movements - which is easier than it sounds.
Click on ‘Add new bind’, and then ‘Scan’, and press the button of your game controller that you’d like to use. Next select a mouse or keyboard action, and that will ‘bind’ the chosen inputs.
Simply repeat this process until you’ve bound all the buttons you’d like to use.
If by chance you’re using a controller other than an Xbox 360 or Xbox One, you can replicate these actions and apply them to different controllers. To do this, simply click the ‘Clone’ icon in the top right corner. To put the pre-set into action, set a checkmark before the preferred pre-set/profile you’ve created for the game you’re about to play. Now, you’re good to go!
BUT – don’t close the Joystick Mapper app before starting the game, it needs to keep running to work. Simply select ‘cmd + H’ to hide the window.
Declutter your Mac to make more room for games
Remember, all of these processes won’t work as effectively if you have a messy Mac.
On average, there is a whopping 62GB of junk found on Macs, with jam-packed caches and folders full of useless documents cluttering the hard drive.
This considerably slows down the performance of your Mac, preventing quick and easy installations, and can even hinder the controller connectivity.
Connect Your Microsoft Xbox One Controller To Mac For Fortnite
CleanMyMac X is an app dedicated to cleaning your Mac head-to-toe. It scans everything on the computer - even old folders that have been evading your wrath for years - identifying what needs to be removed.
The Mac is inspected rigorously, and with its smart one-click clean-up, CleanMyMac sweeps away the unwanted rubbish to organize folders and speed up performance.
Furthermore, CleanMyMac X is free to download. So, what are you waiting for? Download it for free here.
Connect Your Microsoft Xbox One Controller To Mac Free
These might also interest you:
How To Use A Ps4 Controller On Your Pc Or Mac How To Use A Ps4 Or Xbox One Controller With Ios 13 And Ipados Ps4 Controller Charger Zmoon Playstation 4 Charging Station For walmart
Apple S Xbox And Ps4 Controller Support Turns An Ipad Into A
how to play roblox with ps4 controller on mac, treat tier3 xyz Explore Game Controllers For Mac Amazon Com Is Roblox Coming To Ps4 Latest Playstation News And Updates How To Use A Ps4 Controller On Your Pc Or Mac Controls Phantom Forces Wiki Fandom Can You Play Roblox On A Ps4 Controller can you play roblox on a ps4 controller Ios 13 Connect Your Xbox Or Ps4 Controller To Iphone Or Ipad connect your xbox or ps4 controller How To Use A Ps4 Controller On Mac how to use a ps4 controller on mac Explore Game Controllers For Mac Amazon Com explore game controllers for mac How To Play Roblox Ps4 Complete Guide how to play roblox ps4 complete guide How To Use An Xbox One Controller With A Mac an xbox one controller with a mac Controls Phantom Forces Wiki Fandom controls phantom forces wiki fandom Roblox Ps4 Unofficial Game Guide Ebook By Josh Abbott roblox ps4 unofficial game guide ebook by josh abbott rakuten kobo Best Roblox Games With Controller Support In 2020 Softonic best roblox games with controller How To Use A Nintendo Switch Pro Controller On A Pc nintendo switch pro controller on a pc How To Play Roblox With A Xbox One Controller Mac play roblox with a xbox one controller mac Explore Game Controllers For Mac Amazon Com explore game controllers for mac This Tiny Usb Adapter Lets You Use A Ps4 Controller With A this tiny usb adapter lets you use a

How To Use A Ps4 Controller On Roblox Mobile Bluetooth how to use a ps4 controller on roblox mobile bluetooth controllers roblox tutorial How To Play Roblox With A Ps4 Controller On Mac Youtube how to play roblox with a ps4 controller on mac How To Play Roblox With A Ps4 Controller Pc Youtube how to play roblox with a ps4 controller pc Can You Play Roblox On Pc With Ps4 Controller play roblox on pc with ps4 controller Playstation 1 Free Roblox playstation 1 free roblox How To Play Roblox With A Xbox One Controller Mac play roblox with a xbox one controller mac How To Connect A Playstation 3 Controller To A Mac In Macos Mojave playstation 3 controller to a mac
How To Play Roblox With A Xbox One Controller Mac Os
The Best Gaming Gift Cards From Actual Gamers Giftcards Com the best gaming gift cards from actual
Roblox Games With Controller Support
Related Posts
0 notes
Text
El Capitan Upgrade Download

To get the latest features and maintain the security, stability, compatibility, and performance of your Mac, it's important to keep your software up to date. Apple recommends that you always use the latest macOS that is compatible with your Mac.
Macos El Capitan Update Download
Learn how to upgrade to macOS Big Sur, the latest version of macOS.
Check compatibility

El Capitan Installer. Mac operating system’s twelfth major version is the El Capitan Installer (version 10.11). All the Mac computers which don’t have the privilege to upgrade to MacOS High Sierra or the computers that need to upgrade to El Capitan first, can download this twelfth version on the computer. If you looking on the internet a Mac OS X El Capitan 10.11.1 DMG Without app store So, you come to the right place now a day hares with you an El Capitan download dmg file OS upgrade is highly recommended is the latest release from OS X. It has been designed to improve the performance and usability of OS X Apple Inc.
Go to the App Store and open the El Capitan page there. Then you must click on the ‘Download; button on the El Capitan Page. If your Mac PC is compatible to perform this upgrade, a file named ‘Install OS X El Capitan’ will download to your Applications folder. The installer will open automatically after finishing the download process.
Follow the below guide to update to El Capitan with ease: #1. Download and Install Mac OS X from Mac App Store. Go to Mac App Store and search El Capitan. Click the Download button for El Capitan. Click Continue and follow the instructions to install El Capitan on your Mac. Manually Download El Capitan 10.11.6 from Apple.
The version of macOS that came with your Mac is the earliest version it can use. For example, if your Mac came with macOS Big Sur, it will not accept installation of macOS Catalina or earlier.
If a macOS can't be used on your Mac, the App Store or installer will let you know. For example, it might say that it's not compatible with this device or is too old to be opened on this version of macOS. To confirm compatibility before downloading, check the minimum hardware requirements:
macOS Catalina 10.15 hardware requirements
macOS Mojave 10.14 hardware requirements
macOS High Sierra 10.13 hardware requirements
macOS Sierra 10.12 hardware requirements
OS X El Capitan 10.11 hardware requirements
OS X Yosemite 10.10 hardware requirements
Download macOS using Safari on your Mac
Safari uses these links to find the old installers in the App Store. After downloading from the App Store, the installer opens automatically.
El Capitan Download
macOS Catalina 10.15 can upgrade Mojave, High Sierra, Sierra, El Capitan, Yosemite, Mavericks
macOS Mojave 10.14 can upgrade High Sierra, Sierra, El Capitan, Yosemite, Mavericks, Mountain Lion
macOS High Sierra 10.13 can upgrade Sierra, El Capitan, Yosemite, Mavericks, Mountain Lion
Safari downloads the following older installers as a disk image named InstallOS.dmg or InstallMacOSX.dmg. Open the disk image, then open the .pkg installer inside the disk image. It installs an app named Install (Version Name). Open that app from your Applications folder to begin installing the operating system.


macOS Sierra 10.12 can upgrade El Capitan, Yosemite, Mavericks, Mountain Lion, or Lion
OS X El Capitan 10.11 can upgrade Yosemite, Mavericks, Mountain Lion, Lion, or Snow Leopard
OS X Yosemite 10.10can upgrade Mavericks, Mountain Lion, Lion, or Snow Leopard
This content has been archived, and is no longer maintained by Indiana University. Information here may no longer be accurate, and links may no longer be available or reliable.
On this page:
Reinstall El Capitan on a computer alreadyrunning it


Upgrade from previous versions to OS X 10.11 (El Capitan)
From the Apple menu, select App Store....
When the App Store opens, search for and download El Capitan. If you don't already have an Apple ID, you'll need to create one. You can monitor the download process in the 'Purchased' section of the App Store.
Once the download is complete, the installer should automatically open.
If it doesn't, or you don't want to complete the installation at this time, you can come back later and double-click Install OS X El Capitan in your Applications folder.
Within the installer, click Continue, agree to the license agreement, and then choose the disk where you want to install El Capitan.
After you begin the installation, your computer may need to restart more than once before finishing, and then you may be asked to enter basic information.
From the Apple menu, select App Store..., and then install any available updates.
Reinstall El Capitan on a computer already running it
To reinstall or recover El Capitan, you must have an active internet connection. If you are on campus at IU, UITS recommends the wired Ethernet network instead of wireless. However, if IUSecure is your only option, see Connect to an IU wireless network in macOS if booted from your Recovery HD.
How To Upgrade El Capitan
Reinstall while keeping files, applications, and settings
Restart your computer, and immediately hold down command-r until the gray Apple logo appears.
If prompted, select your main language and then click the arrow.
Click Reinstall OS X, and then Continue. Follow the instructions on the screen, and then choose your hard disk. Click Install, and enter your Apple ID information if prompted.
When the installation is complete, select App Store... from the Apple menu, and install any available updates.
El Capitan Mac Upgrade
Reinstall while erasing everything on your computer
Update Mac Os El Capitan
Restart your computer, and immediately hold down command-r until the gray Apple logo appears.
If you see a screen asking you to select your main language, choose it, and then click the arrow.
Click Disk Utility, and then Continue.
In Disk Utility:
Click your hard disk in the left column, and then click the Erase tab.
Next to 'Format:', make sure OS X Extended (Journaled) is selected. In the 'Name:' field, give your disk a name. Click Erase.
Once it's completed, quit Disk Utility.
Click Reinstall OS X, and then Continue:
Follow the instructions on the screen, and then choose your hard disk.
Click Install. If prompted, enter your Apple ID information.
Once the installation is complete, you'll be asked to enter basic information, and have the option to transfer data from another computer or backup.
From the Apple menu, select App Store, and then install any available updates.
1 note
·
View note