
steeltowncosplays
Steel Town Cosplays
Olivia
27/F/US
A civil engineer, specializes in leather work, patterning
Julia
24/F/US
A chemical engineer, specializes in props, wig styling
Photo Credit
67 posts
Don't wanna be here? Send us removal request.
Last Seen Blogs

glamjp
Untitled

mmz-leviathan-is-trans
(She has the same DNA as X)

jonathan-nitanfotografo
Fotógrafo

porrahcaralhoo-blog
turbilhão..//...

lordy-lorde
A thousand girls that look like me...
Photo
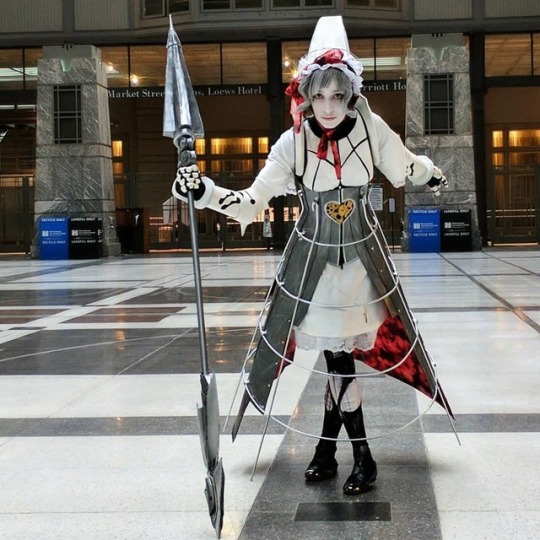
Throwback Thursday to #wizardworldphilly2017 Ashlotte Maedel, a bonus character from Soul Calibur IV. This is the most time intensive and difficult costume we've completed to date, and was super fun to wear! It's also the most uncomfortable costume we've made, with lots of layers and pieces that restricted movement. We learned a lot of new techniques and ideas from it! #wizardworldphilly #soulcaliburcosplay #soulcalibur4 #soulcalibur #ashlottemaedel #ashlottecosplay #evafoamarmor #throwbackthursday https://www.instagram.com/p/B2Ug6IXH3kX/?igshid=975ec606yqo6
#wizardworldphilly2017#wizardworldphilly#soulcaliburcosplay#soulcalibur4#soulcalibur#ashlottemaedel#ashlottecosplay#evafoamarmor#throwbackthursday
1 note
·
View note
Photo

Some more awesome pictures, and some more cool people from this weekend at #wizardworldphilly2019 #wizardworldphilly #wizardworldphiladelphia #hela #helacosplay #thorragnarok #thorcosplay #marvelcosplayer #loki #lokicosplay https://www.instagram.com/p/By0m5-ajwmm/?igshid=1d5ut2264wddj
#wizardworldphilly2019#wizardworldphilly#wizardworldphiladelphia#hela#helacosplay#thorragnarok#thorcosplay#marvelcosplayer#loki#lokicosplay
3 notes
·
View notes
Photo

Hela cosplay wip-making the pattern for the horns. We like to buy 36" wide rolls of both tracing paper and regular paper and make our patterns on that. #hela #helacosplay #thorragnarok #thor #thorcosplay #marvelcosplayer #marvel #marvelcosplay #cosplaywip #tracingpaper https://www.instagram.com/p/Bq0MmzlHVkM/?utm_source=ig_tumblr_share&igshid=yoid0mqu9mw5
#hela#helacosplay#thorragnarok#thor#thorcosplay#marvelcosplayer#marvel#marvelcosplay#cosplaywip#tracingpaper
1 note
·
View note
Photo
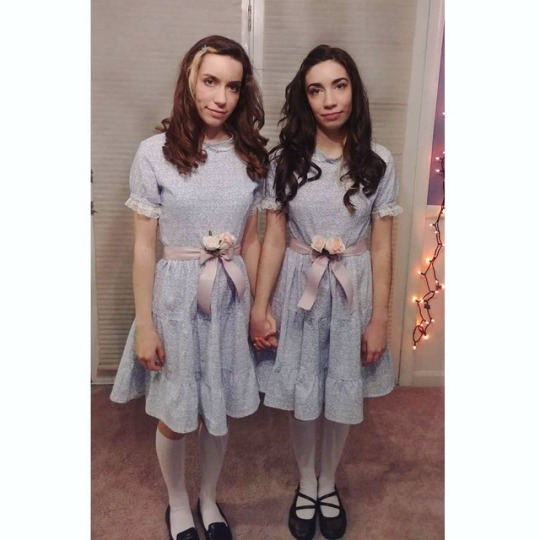
Looking super creepy for a Halloween night out🎃 (Even though we aren't actually twins) #halloween #halloweencostume #gradytwins #theshining #theshiningtwins #scary #comeplaywithus #comeplaywithusdanny #foreverandever https://www.instagram.com/p/BpdaK3UDLwZ/?utm_source=ig_tumblr_share&igshid=1sespc8b7t6is
#halloween#halloweencostume#gradytwins#theshining#theshiningtwins#scary#comeplaywithus#comeplaywithusdanny#foreverandever
1 note
·
View note
Photo

Throwback Thursday! - Wizard World Philly 2017
Love me some pie!
#lovemesomepie#soulcalibur#soulcaliburcosplay#ashlottemaedel#ashlottecosplay#soulcalibur4#yzma#yzmacosplay#theemperorsnewgroove#cosplay#throwbackthursday#wizardworld#wizardworldphilly#wizardworldphilly2017#supernatural#baby#impala#deanwinchester#samwinchester#savingpeoplehuntingthingsthefamilybusiness
2 notes
·
View notes
Text
Starbolt Tutorial
At this year’s Philly Wizard World we got a lot of questions on how we made the starbolts for our Starfire and Blackfire costumes. They’re actually pretty simple and don’t take a whole lot of time!
We designed them to be able to encompass our hands so they looked good from all angles, and to be able to light up.
Construction time could take up to three days, but most of that is waiting for paint to dry.

Tutorial under the cut!
Materials:
-Acrylic (plastic) light globe/cover. They’re lightweight and durable. I bought clear ones with no neck, with an 8” diameter and 4” opening. Depending on how big your hands are this size will change. You want it to engulf your whole hand, but not look overly large. A lot of these are glass so make sure you get plastic because glass will be a disaster on so many levels. They were about $15 from amazon.
-PVC pipe. For the handle. I used a ½” diameter because a smaller pipe was more comfortable to hold and easier to shove into the globe.
-Acrylic paint. For Starfire we used lime green, and for Blackfire we used neon purple and pink. Otherwise, use whichever color you’re making this to be. We mixed crackle acrylic paint in with this to see what would happen, and it sort of gave it a texture, but not really, so that’s your prerogative if you would like to try it.
-Matching tulle fabric and solid fabric. For stuffing/light diffusing and covering the handle.
-Push button LED lights. Simple and battery-powered. I bought some pretty cheap ones, and I recommend not doing that, because they broke pretty quickly. Now, they broke on, somehow, which really is the best way to break mid-con, but that did cause the batteries to be worn out by the end of the day and the lights to dim. You have been warned.
-Brillo pad
-Hot melt glue
-Cup of water
So step one is deciding about 10 days before you need them that you are, in fact, going to make these, buy your supplies, and thank God prime is a thing.
While you’re waiting for them to come in, you can contemplate your choices and wonder if, possibly, you made a bad time-management decision, before concluding nah, you totally got this.
(You totally do, no sarcasm)
(The Actual) Step 1: Sanding
The first thing you’re going to want to do is sand the plastic globes. Use a brillo pad (not sandpaper, you don’t want to scratch it up that much) and circular motions so it’s uniform. Make sure you sand both the outside and the inside. Sanding the outside will diffuse the light and help with the glare in pictures. Sanding the inside helps with the paint stick better.
Step 2: Painting
After you sand your globes, rinse them in the sink to get all the powder and whatever else is stuck to them off. You don’t want any of that junk in your paint.
You’ll want four hands for this step, since it’s messy and needs to be done quickly, so grab an unsuspecting (or suspecting) family member before you start.
Pour your paint into a cup and mix some water with it to make it more runny and easy to coat the inside. Then, with your extra set of hands holding the globe, tell them to spin it around while you pour your watered-down paint into the hole at the base. You’ll want to coat as much of the inside as possible, as evenly as possible, like so:

Add more water and paint as needed until the whole thing is coated (or as coated as you can get it, gravity will take care of the rest and the bottom is hard to get paint on without spilling everywhere). Dump out the excess paint and set it on a magazine topped with several paper towels. The paper towels will absorb all the paint that is going to slowly pour out of this thing, and the magazine will catch what bleeds through.
Let it dry overnight, and check back the next day. We gave it about 24 hours to really dry. By this time you’ll have a very thin, even coat on the entire inside, and a huge mess at the mouth, since it all pooled there and could not fully drain or dry.
What you don’t want to do at this point is try to swirl the ball again, since all that will do is streak the rest of the pristine paint job gravity has accomplished for you. What you do want to do is grab those extra set of hands again and have them hold it up for you while you take a paper towel and dab/wipe the inside and outside of the bottom lip where all the extra paint is resting.
“Julia!” you’re probably thinking right now, or maybe not, who knows, “Won’t that also streak the paint where you’re wiping it?” And the answer to that is yes, it will, but only a little. But it doesn’t matter since it’s the bottom by your hand and no one will see it. It’s also where you’ll be gluing the tulle on, so it won’t take away from the final look.
After this step, the paint i used was still a little sticky on the inside, and the bottom won’t be dry either, so prop your globe up on two pieces of something that are the same height but also let air circulate, so it can really dry up over the next 24 hours. Like so:

Step 3: Making and Installing your handle.
Unfortunately I don’t have many progress shots after the paint job because I sprinted to the finish line in maybe two hours late Friday night, so you’ll have to make due with pictures of the finished product.
Theoretically you can start this step while your paint is drying, but I recommend waiting because you’ll need to handle your globe to check for fit as you go, and if it’s not dry you can’t really do that.
I made these handles out of PVC I had lying around, but you can easily buy some at the Home Depot or Lowes or any home supply store. I used this type of pipe:

Because it’s a ½” OD, not ID, so it’s a bit thinner. As I said above it makes the handle nicer to hold and it’s easier to jam it through the hole at the bottom if its diameter is not as wide.
Since I had 8” diameter globes, I measured out an 8” piece, but did not cut it at this length. This is because 8” is the outer diameter. You’ll want to take some calipers and measure the thickness of the plastic at the mouth like so:

And double that (you have two walls). Subtract that from 8” (or however wide your globe is) and that is the absolute maximum your pipe can be. This will still not fit.
Mainly because you have to angle it through a 4” hole. So you’ll want to cut it slightly shorter (not too much shorter!) and test out if you can get it inside. Because it’s a little shorter than the inner diameter, it’ll be further forward than the exact center, and you’ll want to push it as far in as you can when you glue it, so the compression pressure will help hold it in and the globe will cover your hand up to your wrist.
I also found it extremely helpful to line it up with the seams on the side of the globe:

Once your pipe is cut to length and it fits (after a lot of finagling that is), you want to use your brillo pad again to rough up the surface of the pipe and make it more glue-friendly.
You’ll then want to plug up the ends. This gives the ends a bigger surface area to glue, which will make the handle more secure. I used EVA foam, which works well because it responds to every cosplayer’s best friend, Hot Glue, and is compressible (this allows you to stuff it in the end of the pipe AND press it down enough to get your handle in your globe when the EVA plugs inevitable stick out a little bit and make it slightly too long again).
The final step before wrestling your handle inside and gluing it in there is to cover it in fabric that matches your paint. PVC pipe and EVA foam are most definitely not the color you want, and you will most definitely see that from the outside. While spray painting is an option, the fabric has the added bonus of making the handle much more comfortable to hold all day.
This being midnight on Friday I used what I had available, which was leftover purple stretch fabric from starfire’s costume (for Blackfire), and lime green fleece (for Starfire).
The fleece, while a little bulkier, is really nice to hold, so if you want a cushy soft handle, that’s the way to go. It does get a little warmer than the stretch fabric, though. Sweaty palms will potentially be a thing.
Fabric also does pretty well with hot glue, so all you need to do for this is squeeze a line down your pipe and press the fabric to it, and roll the pipe until the seam meets. Glue down whatever didn’t get pressed into the first line of glue, and glue down your ends so the whole handle (EVA plugs included) is covered and now matches.
Now it’s time for install, which is, admittedly, pretty frustrating. The extra bulk of the plugs and fabric will make it dang difficult for you to get the handle inside, but it can be done, with enough tenacity. This is why EVA is great for the plugs, because it can and will be compressed enough to fit.
This next part is super important:
Put your handle into the globe BEFORE (BEFORE!!) you apply the glue.
There is no way you will be able to get it inside without a) having your glue dry before you do, b) getting glue everywhere, and c) probably burning yourself.
Once your handle is inside, push it forward as far as you can and line it up with the globe’s side-seams, to check the fit and get a handle (heh) on what its final position will be. Face your fabric seams towards the hole at the bottom.
When you’ve psyched yourself up enough to actually try gluing this thing, dislodge it from its position and angle one end towards the hole at a time, and apply the hot glue. Shove it back to where it was before, lined up and facing the right way, wait for the glue to solidify, and TADA.
The most stressful part of making this prop is done.
Step 4: Stuffing
This next bit is pretty easy and takes only a few minutes, though you are liable to burn yourself during it so be careful where you put those fingers.
Or maybe that’s just me.
We bought 2 yards of tulle, and I ended up using most of it. It really depends on how you want it to look, but there should be a balance. Too little tulle and you’ll just get a white light that’s too bright and not diffused enough, but too much tulle and the whole thing gets dull. Test how much tulle you’ll need by taking photographs of your starbolt to see how it looks in pictures.

To stuff these, all I did was shove the tulle inside and pull it around the handle, moving it until it was pretty evenly distributed throughout the globe and I liked how it looked, both with and without the light on.
I then cut off the excess tulle that was still hanging out of the bottom and then stuffed the ends back inside so they ring the lip:

Before you glue: make sure the tulle is not getting in the way of the handle!! As you can see here:

There is tulle covering the handle, but when i go to hold it, it does not prevent me from making a fist around the handle, nor does it pull, and is overall comfortable.
Take your glue gun once you’re ready and tack it down around the bottom lip. Make sure to catch whichever layers are there to make sure it’s secure. The tulle will pretty much stay put once you do this, so you don’t need to worry about gluing any other spots (which would show, anyway).
Once you’ve done this, you’re just about finished! It should look really cool and swirly now.
Step 5: Installing your lights
This took a bit of experimentation to figure out the best orientation for these, but lucky for you we’ve done all that experimentation already.
Because your hand inside this prop, it’s going to block light, and you will not get the “glow radiating from the center” look you want by mounting something near the front of your hand.
After some trial and error, we figured out that two lights, one above and one below your hand, provided enough light to light up the whole ball:

You’ll see shadows of them on the outside, but there’s really nothing you can do to avoid that. You could use smaller lights, but you might have to do some wiring if you do, since push button LEDs are normally this big.
Attaching the lights is pretty simple, you’ll just want to make sure you’ve installed your batteries beforehand. While the design of this allows you to change the batteries of your lights, it’s not as easy to do once they’re inside and you can’t use both hands.
Once we figured the position for these lights, all I did was put some hot glue on the back, and press it into the tulle inside the ball. If the tulle is glued down enough, this should hold them in there really well.
Once you’ve done that, TADA, you now have working starbolts!

#starfire#starfire cosplay#cosplay#teen titans#teen titans cosplay#steeltowntutorials#blackfire#blackfire cosplay
7 notes
·
View notes
Text
We now have an instagram!
Check it out! And make sure you follow :)
1 note
·
View note
Text


Had a blast at New York Comic Con this past weekend!
4 notes
·
View notes
Note
For the feathers and the yzma collar did you use a wand or regular curling iron?
I don't have a wand so I used a regular curling iron with a clip. I think the clip helped just so I didn't have to hold the feather next to the iron with my hands, I was just careful to not hold it in place for more than a couple seconds. I'm not sure how long it takes to burn a feather with a curling iron and I didn't want to find out 😄
0 notes
Note
Hey! Do you guys have a YouTube that might show how to make the yzma collar? I’m having a tough time trying to understand the pockets portion. Thanks!
Hello! Sorry, we don't have a YouTube video for that tutorial but I can try an explain it a bit better. So the felt stuff that I used for the base of the collar was maybe 4-5 mm thick (it's not felt exactly, it was some sort of super thick felt pad). So to make the pockets for the feathers, I figured out exactly where I wanted them to stick out of the collar and then I used scissors to snip a small slit part of the way through the felt pad. Then when I put the fabric over the felt pad I felt around for where those slits were and cut small holes in the fabric in the same spot. Then I could put a dab of hot melt glue on the base of the feather and stick it into that little slit at the angle I wanted and hold it until the glue dried. That way there was some kind of structural support for the feather, and I could have them sticking out of the collar instead of them sticking straight up, as they would have done if I had not cut little pockets and just glued them straight to the felt.If your felt isn't that thick and you can't cut slits without cutting straight though, I think it could still work, you would just have a lot more glue on the back side where the feather is poking through. Or maybe you could use two pieces of felt glued together so you cut through only one of them. If the feathers are still sticking up too much you can curl them more.I hope this helps you, feel free to ask more questions if you need more clarification!
0 notes
Photo
It was nice meeting you too! My sister and I were the Blackfire and Starfire.


met some amazing cosplayers at Wizard World philly today!
3 notes
·
View notes
Text
krnielk replied to your photoset: Soul Calibur IV: Ashlotte Maedel Cosplayer: Julia...
looks fantastic! wow!!!!!!
Thank you so much!!!
0 notes
Photo

The detail work on this fellow cosplayer’s armor was absolutely incredible! All those feathers are cast resin! You can find him here!
1 note
·
View note
Photo


Soul Calibur IV: Ashlotte Maedel
Cosplayer: Julia
Part 1, 2
More photos of my Ashlotte cosplay! And a bonus shot from the con floor that shows a lot of really good detail:

#ashlotte#soul calibur#soul calibur iv#cosplay#ashlotte maedel#philly comic con 2017#steelcons#steeltownshoots
26 notes
·
View notes
Photo


Soul Calibur IV: Ashlotte Maedel
Cosplayer: Julia
Part 1, 2
Here are some of the photos of my Ashlotte cosplay at Philly Comic Con this year! We took advantage of the empty room at the end of the day for some nice shots.
This is a cosplay I’ve been wanting to do since I started cosplaying, and I’ve been working on it on and off for about a year. It was amazing to finally wear it, and it wasn’t actually as uncomfortable as I thought it would be.
I did have to take almost the whole thing off to sit though:

#ashlotte#soul calibur#soul calibur iv#cosplay#ashlotte maedel#philly comic con 2017#steelcons#steeltownshoots
5 notes
·
View notes
Photo


More fantastic cosplayers!
If you see yourself, make sure to send us a message and we’ll credit you!
Cosplayers:
Patrick and Spongebob
Darth Negan
Grounder (the 100)
Invader Zim
3 notes
·
View notes
Photo


Check out these absolutely fantastic GOTG cosplayers! The Groot and Rocket won best team in the costume contest, and the Mary Poppins!Yondu got honorable mention along with me.
If you see yourself in these photos, let us know and we’ll credit you!
5 notes
·
View notes