
♥ Character Animator and Illustrator ♥
Last active 4 hours ago
Don't wanna be here? Send us removal request.
Statistics
We looked inside some of the posts by superbecky and here's what we found interesting.
Average Info
Notes Per Post
1M
Likes Per Post
432K
Reblog Per Post
678K
Reply Per Post
4K
Time Between Posts
6 days
Number of Posts By Type
Text
16
Photo
1
Last Seen Tumblr Blogs


Fun Fact
Average visit duration of Tumblr.com is 10 mins and 25 secs.
Text


wow I love toby fox's early contribution for soriel week 2025 day 3!!
62 notes
·
View notes
Text

Evil-Sama!!! 💗💗💗
This post is soooo long overdue. I had waited and waited for Evil to debut her new model so that I could draw her, just like I did with her sister. I just... my motivation this year has seriously mainly been on personal projects (which is not a bad thing...!) so I just did not have the drive to draw her yet. I realized only after finishing her that I accidently did not give her the new shirt design she has but... ehhhh it's fine it's fine. She still is cute either way! c:
For those of you who don't know, Evil (Evil Neuro/Evil-Sama) is an AI Vtuber who streams on Twitch, usually with her creator/dad Vedal (Vedal987) and many other VTubers.
✨Please do not re-post or use my work in any way without my permission! Re-blogging is ok. Reblogging helps me out! :D!✨
#evil neuro#neuro sama#vedal987#vtuber#chibi#kawaii#anime girl#I love her sm she is so baby#The screaming she does is so funny lol
1 note
·
View note
Text
way too much "i want to kill sans for banging my mom" and not enough "i want to kill asgore for harrassing and stalking my mom" and i truly cannot understand it
#I have yet to finish the chapter#but i got spoiled for this part in the game mainly from those kinds of posts#and its been deeply upsetting to see people treat sans and toriel this way#just to be clear i dont fall under the “i want to hurt asgore” group cuz my love for him in UT forbids it lol#but like yeah bro has been literally overstepping since chp1#toriel literally is divorced
1K notes
·
View notes
Text
Deltarune Chapter 3 Secret Boss, In Depth Guide! (Spoilers Below!)
I finally after several hours of trying managed to beat Deltarune's secret boss for chapter 3! Throughout fighting the boss many, many times, I discovered and developed some helpful tricks and tips that I thought might be cool to share for those who may still be (or have yet to be) struggling with the boss!
In this guide I will provide what I entered the fight with (Inventory/Stats/Armor), give general tips and provide visuals/explanations for each attack and how I went about them.
Spoilers below (including screenshots!)
PART 1: ITEMS
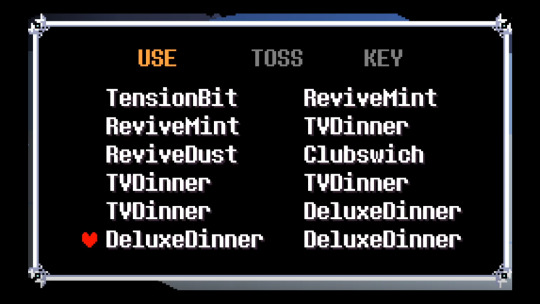
TVDinner, ReviveMint, and DeluxeDinner were essential for me during this boss fight. I highly recommend fully getting stocked up on these items because of how strong the healing is from them (they heal 100 and 140hp). If I remember correctly, the TVDinner and DeluxeDinner are available from the vending machine found in the Green Room. Having the Clubswich was also very helpful for me as this item gives a small amount of hp for your entire team.
PART 2: WEAPONS AND ARMOR
You should be using your best available weapons on all the characters. Even if you, like myself, are doing a "pacifist run", as far as I am aware this fight does not allow you to spare the enemy and you must fight the boss to win. Here are my main recommendations:
Kris
Saber10: I won this item for getting S-Rank, but there is also a vending machine that you can buy it from.
Put on the strongest items you have that help with either attack and/or defense. Make those numbers as strong as possible. I got the TennaTie (which gives you +5 DF) from doing the gotcha machine a few times. I have seen some people suggest putting on Kris the items Spike Band and Twin Ribbon (I did not have these items, but still won without them).

Susie
Shadow Mantle: This item is essential for winning this fight (unless you... wanna do the fight where you can get killed by 1 hit). I highly suggest that you put this item on Susie because she will be the main damage dealer. If you don't know, the Shadow Mantle helps protect against attacks from the boss.
Jevilstail: It gives you a +2 gain for attack, defense and magic.
Toxic Axe: You can get this weapon from a vending machine.

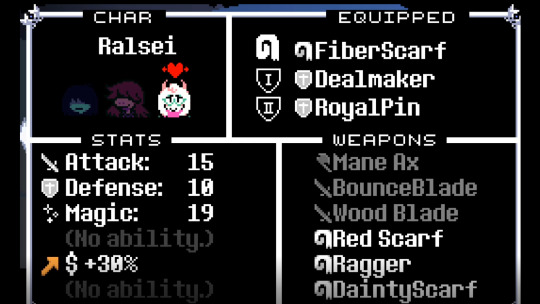
Ralsei
Dealmaker: This item helps with Ralsei's DF and Magic.
Flex Scarf: Notice how my Ralsei doesn't have it? Yeah, I either bought it and forgot to put it on, or I just never got one- oops! You should be able to find this weapon in a vending machine.
I have seen people suggest you give Ralsei the Twin Ribbon item, but I did not have that item and instead I used RoyalPin because it increases both defense and magic.
PART 3: INFORMATION AND STRATEGY
Ok, let's get into the action now!
Well... ok I firstly want to start off by going over some helpful information and general tips.
Both Susie's and Ralsei's hp will be dropped down to -999 if they are downed. Kris however only drops to -80. Because of this, if you find that Kris goes down then I suggest not using a ReviveMint on them and instead use a TVDinner or DeluxeDinner to bring them back to the fight. Yes, they will have a small amount of hp, but I found that it was just overall a waste to use the ReviveMint on them when I could instead use a less valuable item. Heal them and anyone for that matter on turns where you feel that you can basically not get hit by the boss.
Using Susie's Rude Buster attack is key to this fight. You need to try to use it whenever you can. It is very important that during this fight you try to build up your TP as much as you can so that you can use it every round or every other round. Also, remember that if you tap "Z" right before her Rude Buster attack hits an enemy, then the attack hits harder!
Do not waste your TP using Ralsei's heal unless you are completely out of heals or if you have enough TP to spare. For example, I found myself able to get the TP bar up to 100% a few times, which meant if I needed to I could use his healing and also manage to use Rude Buster the same turn.
Easier said than done, but obviously it is very important that you avoid getting hit as much as possible, especially during the beginning of the fight. If I found myself making little mistakes and ending up with too low of hp before the 4th attack (the line of swords), then I would sometimes just give up that run to get a new, fresh start again in preparation for the harder attacks that I knew I could not dodge perfectly. Basically, I was able to have runs where the first 3 attacks I was not getting hit at all, which then meant I knew I had hp to spare for the line of swords attack (which I knew I would get hit from a few times). This was important for me to having a good start into the fight.
You do not need Kris and Ralsei to hit every turn with Susie. Her Rude Buster does enough damage on its own. If there is a turn where you can not make Susie use her Rude Buster, and you feel comfortable enough to, then make Susie do a normal attack and have Ralsei attack with her. Ralsei does more damage than Kris does in this fight... unless Kris is the only one alive. Kris will deal much more damage if they are the only one standing, but I honestly don't think that matters too much because you want Susie alive for this fight and to be doing the fighting, not Kris.
Kris and Ralsei should be supporting Susie in this fight by either using healing items if needed or by defending to help build up TP for Susie. They can also be used to help attack if you think you won't get hit badly during an attack to where they would get downed. Make Kris and Ralsei defend during attacks you struggle with. I went too long in this fight not realizing how helpful them defending was to my survivability. You do not need to be a master at dodging everything- Kris and Ralsei can take a few hits if you make them defend.
For me I found that I needed to wait to heal and revive the team only when I knew the upcoming attack was one that I wouldn't get hurt from or if I knew I possibly would only get hurt a little bit. You run the risk of a teammate getting killed again if you revive/heal them before an attack that you are bad at dodging.
I found that skill and luck are big factors for this fight. You need to be good at dodging the attacks as best you can. There is room for small error, but not much. Luck plays a factor too because sometimes the way the attacks are thrown at you are easier to dodge in some runs than others.
I found that lots of the damage I was taking was from moving too quickly during the fight. Many of the attacks are much slower than they may first appear- remember to try not to rush too much and take your time with some of the attacks.
PART 4: THE FIGHT
Alrighty! Let us get into the real action now! I will do my best to explain how I went about each attack and tips I have for them.
Firstly, I found it was very helpful that I wrote down each attack/named it. This was helpful because not only after doing the fight so many times was it all starting to melt into my brain and I was forgetting everything, but it helped me to know when I had an easy attack coming up so that I could use heals if needed or attack with all 3 characters.
Here is how I wrote down the attack order/small descriptions for each:
Snow 1 (The first "snowflake" attack)
Sword Throw 1 (The swords that turn red and then are thrown at you)
Tooth 1 (The part where you have to dodge what looks like falling teeth or icicles)
Line Sword (The part where a line of swords on top and bottom go at you in a wavy motion)
Slash 1 (The red slashes. Easiest version of it.)
Snow 2 (The second "snowflake" attack. Is just like the first one)
Tooth 2 (Is like Tooth 1 but now the direction you are facing can be changed at any time)
Circle Sword (Is like the Line Sword attack but the swords come at you in a more circular motion)
Sword Throw 2 (The same attack but this time you also are surrounded by circling swords that block how much you can move)
Slash 2 (Harder than slash 1 but in general is the same)
Snow 3 (Starts off like snow 1 and 2 but at the end of the attack you have to dodge bullets that spawn and try to follow/hit you).
Tooth 3 (Is worse than tooth 2 as now you deal with the attack sometimes being diagonal)
Slash 3 (Harder than Slash 2 and at the end of it there is an attack that is a lot like one Sans has).
The Final Attack
In my winning run, this is the exact order of how attacks went, but in the runs where I was not dealing enough damage then sometimes this order would be different. From what I have seen watching other people fight this boss, Slash 3 should be the "final attack" before the actual big final attack as long as you have been dealing enough damage.
Ok, let's now finally move to my strategy (tips) for each attack and how my run went! As a heads up, I played this game on PC so I may be describing certain actions in regards to using a keyboard.
~~~~~~~~~~~~~~~~~~~~~~~~~~~~~
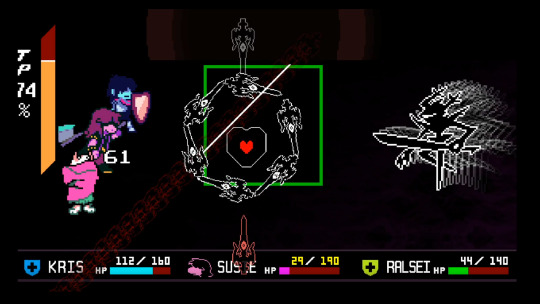
ATTACK 1: Snow 1
My Actions: I made everyone attack together because I knew I could dodge this attack easily. I viewed this attack as a freebie and not as a threat.
Strategy: Stay to the left of the box. Keep holding down your left arrow key to stay right against the box (you get moved otherwise) and simply move up and down as needed to avoid the "snowflakes". After the snowflakes start to slow down and turn red, try to get to as blank of a space as possible before they explode. After they explode I found I barely needed to move away from the bullets and that sometimes, even if they seemed to touched me, I was not damaged. I was very lucky because during this run my open space to run to before the explosion was um... very generous haha.
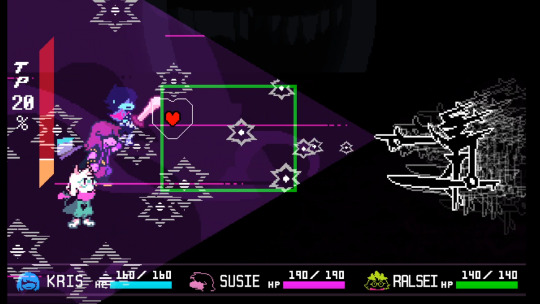
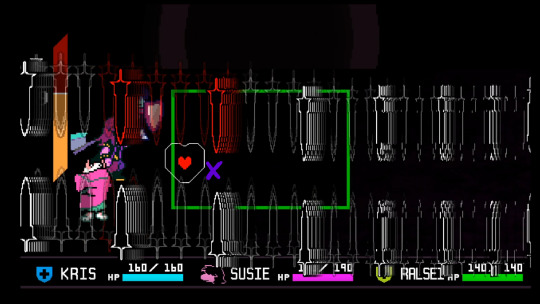
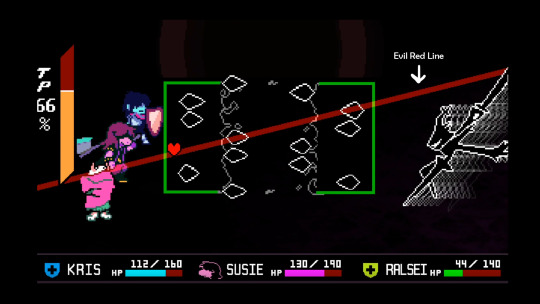
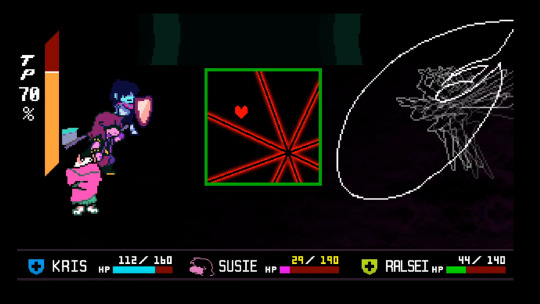
ATTACK 2: Sword Throw 1
My Actions: I made everyone attack because once again I knew I could easily dodge this attack, so I might as well try to get in the extra damage that I could before I had to switch to making Kris and Ralsei defend.
Strategy: During this attack it may feel like it comes at you fast, but it really doesn't. You do not want to move too quickly during this part. There should be enough time for you to observe which sword has spawned in and which direction you will need to move before the sword is thrown at you. Remember that the direction the sword is facing is the direction of which it is going to come at you.
It would be much more beneficial if I could provide a small video for this attack but... I can not do that right now so... take the image instead!
In this image I am currently moving left to avoid the attack from below, while also noticing the attacks to my right. After a while of attempting and learning how to dodge these, I learned that I would need to then move up to dodge the second sword, and then in a diagonal motion to avoid the third sword (though sometimes I went in the wrong diagonal motion and end up being directly hit).

ATTACK 3: Tooth 1
My Actions: This is around where I know now I will run the risk of taking damage (I struggle a little bit with this attack), so I stop making Kris and Ralsei attack with Susie and instead make them defend in order to build up TP and keep them alive as best I can. I have enough TP so now I start the motions of making Susie doing the main damage by doing Rude Buster.
Strategy: I mainly was getting hurt from this attack by either not having enough time to move out of the way of a "double tooth" coming at me, or because I was moving too fast. Once again, try not to move too fast because otherwise you run the risk of just running into the attack and not avoiding it. Seriously, just try to do little movements for the most part.

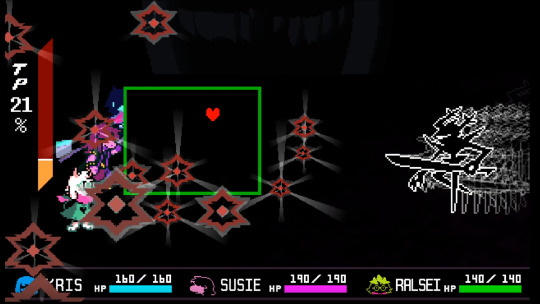
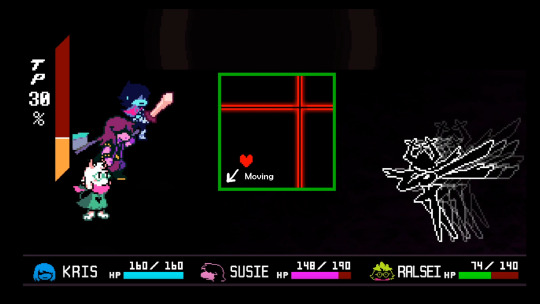
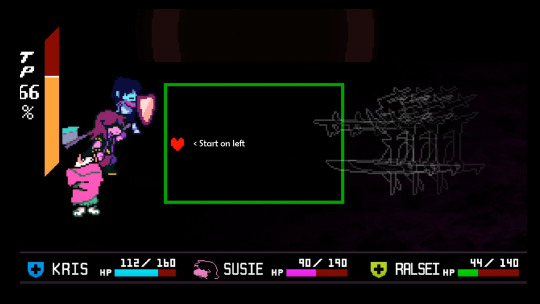
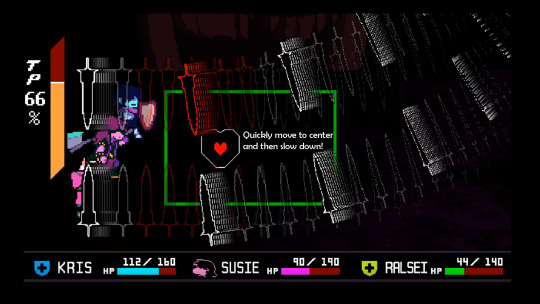
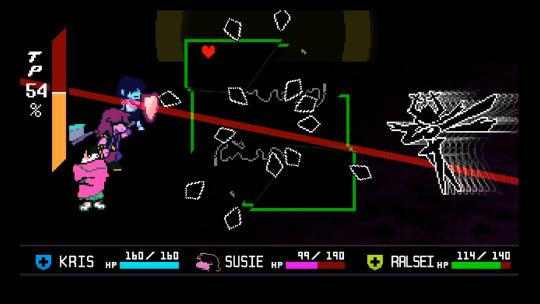
ATTACK 4: Line Sword
My Actions: Made Kris and Ralsei defend because I knew I would be getting hit a few times. Made Susie do Rude Buster.
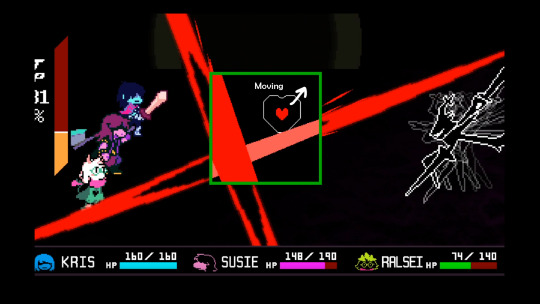
Strategy Part 1: I moved all the way to the left side so that way I had less to look at (this attack has lots of motion which makes it hard to see everything clearly). I have seen some people suggest to only look at your soul and not focus on the swords... but for me I found that it really helped to look slightly past my soul to the right. This helped me because then I was instead able to slightly make out the way the swords were moving and I could move then in accordance to that. The purple "X" I drew roughly shows where I was looking during this attack.
Strategy Part 2: After this is the part where a bunch of red lines show up and then swords are thrown at you. I hate this part. It is very unforgiving and even if you end up in a blank spot where you think you will be safe, the swords can still manage to hit you because they are so chunky. My main tip for this part is to try to go to as big of an empty spot as you can so you don't have to worry about that problem. Though... I often found myself struggling to do so because your reaction time has to be super quick during this part, and my brain just automatically is like "oh there is a blank space, hurry go to it!".
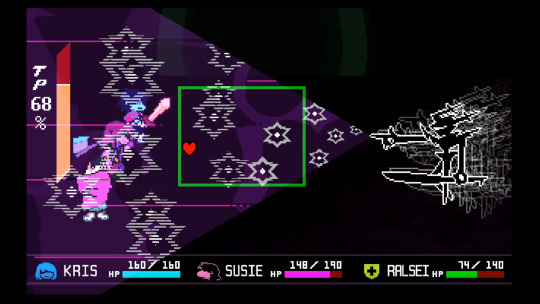
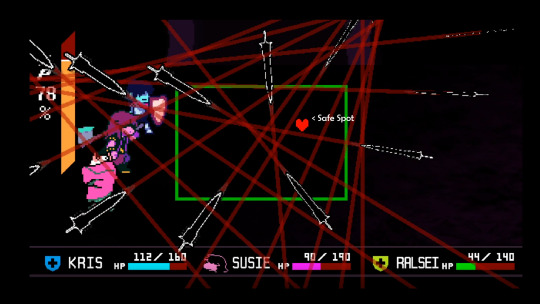
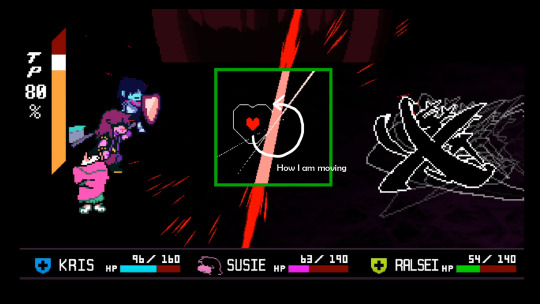
ATTACK 5: Slash 1
My Actions: Because my hp was in a very good spot and because I felt confident enough, I decided to make Kris and Ralsei attack. I also of course made Susie do Rude Buster. Low key I had the hardest time dodging these kind of slash attacks out of all of the attacks during the entire fight, but with this one being the easiest of them I knew that I had an opening to try to get some extra damage in.
Strategy: For dodging this attack, I found that I would mainly be getting hit from moving too much. Keep in mind the slash marks don't stay still, they move too a little bit after forming. Try not to move too much or too quickly. The biggest help I found was literally just moving diagonally up/right and then diagonally down/left for each slash. This helped because depending on where your soul is the next set of slashes spawn there. So, if you are far in one corner then the opening for dodging becomes bigger as you move to the other corner. Sometimes I would still get hit... but regardless I found that doing that had helped me. Hopefully the visual I provide shows what I am trying to explain better!

ATTACK 6: Snow 2
My Actions: Basically a freebie attack again for me because I had no problems for the most part dodging this one. That meant that if at this point I needed to revive or heal a team mate, now would be the time to do so. Because going into this attack I did not have enough TP for Susie's Rude Buster, and because Ralsei was the lowest on HP, I made Kris attack with Susie (to help deal more damage) and made Ralsei defend (to build TP easier and keep him alive easier).
Strategy: Same exact things as Snow 1. Stay to the left, don't move too quickly.
ATTACK 7: Tooth 2
My Actions: I made Susie do Rude Buster. Kris and Ralsei defend to help build TP and because I knew I was not as good at dodging during this attack.
Strategy Part 1: Basically the same as tooth 1, but the direction of which the teeth/icicles will come at you can change now. Just try to remember not to move too much or you run the risk of running right into the attacks. Also, try to stay snug against the green box.
Strategy Part 2: Oh, also important thing to know- the red slash that appears shows you which direction you will be moved to/how the box will be split. Also... the slash can hurt you if you get hit by it!
ATTACK 8: Circle Sword
My Actions: I made Susie do Rude Buster. The other two defend to try to keep them alive for this attack.
Strategy: Now honestly... I found this attack to be rather easy, though I know others find it really challenging. I start off this attack by moving all the way to the left of the green box and then as the attack spawns in I moved into it/go to the center and basically sit there. My biggest recommendation is to move in little increments. There were small moments during this attack where I literally didn't move at all. So yeah once again... move slowly! After the circling of the swords stops is then when you gotta try to dodge like you do in the Line Sword attack. Try to find as quickly as you can some sort of safe spot/blank space.
ATTACK 9: Sword Throw 2
My Actions: Susie does Rude Buster, others defend.
Strategy: This attack was one that kept killing me over and over for the longest time because like many of the other attacks and like I keep saying, I was moving too quick! This attack seems scary but it really isn't that bad as long as you just try to take your time with it and move semi slowly. It is literally just like Sword Throw 1 but you got swords circling around you. If you are moving slow and precise enough then those circling swords are basically not even a threat because you wont even end up near them (though in this run I actually did get hit by them, lol).
ATTACK 10: Slash 2
My Actions: Rude Buster, others defend. I think at this point I was getting nervous for if the run was about to fall apart due to this attack being one I struggle with, and because of Susie and Ralsei's hp.
Strategy: Same as Slash 1, but you gotta move much quicker this time. Important note: even though it may seem like the red lines are on you and you are about to get hurt... for some reason sometimes it does not actually hurt you? Not sure why that is.
ATTACK 11: Snow 3
My Actions: Unlike snow 1 and 2 basically being freebie rounds for me, this one I would proceed to be a little more cautious with because of the end of the attack. That being said though, I knew I would need to get Susie and Ralsei's hp up because after this attack I would not have any opening to be able to (I knew the next attacks I can not dodge as well). So, I made Kris use the ClubSwich healing item I had (to lightly heal everyone) because Kris has the most hp. I made Susie do Rude Buster and Ralsei defend. I knew that keeping Kris exposed was ok because even if they were to go down I would not need to waste a revive on them due to their hp only dropping to -80 on defeat.
Strategy: For trying to dodge the ending part of this attack, honestly I just tried to move around the green box as best as I could/as closely to the green lines and move along them. This did not always work, but for the most part I was lucky to not get hit by doing that motion.

ATTACK 12: Tooth 3
My Actions: Now this one is an attack that I kinda just prayed I wouldn't have anyone get killed to- so therefor same as before I made Susie Rude Buster and the other two defend.
Strategy: Honestly the only advice I can give for this is once again just try to remain calm and move semi slowly. I really just tried to tank my way through this attack as best as I could. The sudden quick switching of where you are in the box can be jarring. Try not to worry about the red slash hitting you and honestly just try to watch out for the "teeth" coming towards you.
ATTACK 13: Slash 3
My Actions: Susie does Rude Buster, the other two defend.
Strategy: As long as you have been able to do enough damage every turn from this point on, then this will be the last attack before the "big special attack". As I said before, these slash attacks are literally the ones I am the worst at. I was very lucky in that I managed to dodge everything during attack 12, so going into this attack I had enough hp to try to tank through the best I could. Try to do the diagonal movement's I mentioned, or whatever you have found works best for you for these slash attacks. At the end of the slashes the boss will pull a Sans Undertale move on you and begin to do tons of quick slashes in the middle of the box that will rotate quickly. Stay semi close to the slashes and just follow them around. You will need to move somewhat quickly during this part.
THE FINAL ATTACK!
Ok. Let us break the format I had going on now. Once the boss begins to glow you will know that the next round will be the big final attack. I had a round before this where the boss did not glow which gave me the opportunity to heal. I gave Susie a TVDinner (she has the shadow mantle, so if anyone was going to survive this attack is would be her). I made Ralsei defend (I should have healed him) and Susie do another Rude Buster (at this point I was not sure if I had met the threshold of how much damage I needed to do before the final attack initiates, so I just was like screw it and tried to throw in another attack not knowing what was coming my way next).

So yeah, at this point once you see the boss glowing- DEFEND. EVERYONE NEEDS TO DEFEND. This will help you as much as possible with the following attack.
I think I ended up attempting this final attack only 5 times throughout all of my runs before I finally won. The boss will try to suck you towards them, so try to make sure you are moving away from them the best you can while also dodging the upcoming attacks. I found that it was best if I stayed kinda in the center and below the boss in preparation for the next part of this attack. I was getting hit a LOT during this and I think the big reason being that I just literally had not gotten to this part that much enough to practice it? That and it's hard too... XD

Part of the reason why I tried to stay where I was at was due to the next part of the attack- the spiral. I don't think you take damage from touching the boss during this part and I found that I literally needed to get up close to them to try to spiral around and dodge this part. I wish I had better tips for this part... but just try your best!
After the spiral part... move FAR away from the boss! Get ready to dodge more of the snowflakes/stars! They will act like "snow 1" and eventually slow down, turn red and explode into little bullets! Just try to be careful and move semi slowly after the explosion!

😲 WOAH MAMA LOOK AT MY TEAM- *ahem*. Yeah I was shaking after seeing that. I could feel it within me that I had only one more hit before I was done for but wow... um, thanks Susie!
Now this is it... the end. You have won at this point. All you need to do is make whoever is alive attack and it's over with. And then... congrats you really did it!!! :D
~~~~~~~~~~~~~~~~~~~~~~~~~~~~~~~~~~~~
PHEW... ok welp that's the end of all that!
I hope this is maybe helpful for those who are going to attempt or are currently attempting this boss! I have a hard time sometimes explaining things... so if you read through this and have any questions then please feel free to ask! 💜
After having beat chp 1, chp 2, and now chp 3's secret bosses I honestly still think that Jevil may have been the worst for me. Like- I honestly think the only reason why this fight is so hard is just because the damage the boss does to you is so bad. The attacks themselves, though tough, I found them overall to not be that bad once I got the hang of them. Seriously I was starting to get to the point where I felt I could almost do a no hit run (not that I would want to though... I need a break, haha). Not with Jevil though... kinda never wanna do that guy again! <w<
Anyways.... if ya liked this post then maybe check out my other posts? 👀 I draw Undertale/Deltarune stuff... cute girly and magical things... uh, yeah! Bye bye~!
#deltarune#deltarune spoilers#deltarune chapter 3#deltarune chapter 3 boss#deltarune secret boss#deltarune chapter 3 guide#deltarune guide#deltarune secret boss guide#deltarune boss guide#the roaring knight#deltarune roaring knight
16 notes
·
View notes


Text
DELTARUNE TOMORROW
2 notes
·
View notes
Text
Hiiiiii~ It has been a while! 💜 I have been super duper busy with personal projects and just not really feeling like working on anything else other than those (which is a good thing, actually!) but this idea came to mind and I really wanted to draw it!
I noticed recently how there are many Disney characters who have the ability to contact the Disney Princesses, so I thought it would be fun to draw a few of them together showing off their respective items that help them to see the princesses!
From left to right we have Lily (Disney Princess Royal Adventure), Sofia (Sofia The First) and Isabelle (Disney Enchanted Journey). I decided to call the girl on the right Isabelle since she doesn't actually have a canon name, and to my knowledge her voice actor is Isabelle Fuhrman so... why not just go with that!
I was originally going to draw Kilala (Kilala Princess) instead of Isabelle, but I decided I would much rather draw characters from things that I have a personal connection to. Sorry Kilala fans! If I ever decide to make a sequel to this art then I will draw her there because believe it or not there are even more Disney characters that are able to meet with the Disney princesses other than just these 3!
Anyways... I got to draw cute girlies with sparkles and pink everywhere, so that was lots of fun! ✨💜(´▽`)
✨Please do not re-post or use my work in any way without my permission! Re-blogging is ok. Reblogging helps me out! :D!✨
#disney princess#magical girl#princess#sofia the first#disney princess enchanted journey#disney princess royal adventure#disney#aesthetic#magical#i wanna draw even more super cute and girly stuff grr
34 notes
·
View notes
Text
Ty for making this, it is literally so perfect.
the undertale fandom in 2016 for some reason
2K notes
·
View notes
Text
Cuuuteeeee <3
Your animations are so charming!
Undyne approaches...
933 notes
·
View notes
Text
mmmmm good content👏


you will NEVER be them
4K notes
·
View notes
Text


Charlie the Chinchilla and Ezra The Wisp
Character Description
Charlie's parents had suddenly gone missing not that long ago. Because of this tragedy, Charlie was now living with his aunt (whom he and his parents never got along with). Charlie just couldn't accept this idea and out of fear he ran away.
It was a dark and rainy night. While on the run Charlie stumbled across a tear-drop shaped creature that was being relentlessly attacked by badniks. Though the situation was scary and Charlie wanted to just run away from it, he felt deep down that he needed to try to help, so he rushed in to try to save this creature. This did not go too well though as Charlie himself had nothing to defend himself with and too was badly hurt by the badniks. Right when it seemed like the two of them were done for, suddenly the creature let Charlie absorb itself and then together they transformed into a powerful, liquid creature. The two of them then bashed the badniks enough to be able to flee. After finding somewhere to hide, Charlie and the creature then separated back to their original forms. They formed a bond that night and since then have been glued to each other, viewing one another as siblings.
The morning after the that fight, Bera, along with Blush and Landon came across the two who were found sleeping in a bush. After being carried over to the "Misfitz hideout", Charlie later on explained all that had happened. Bera insisted that Charlie, and the what was assumed to be a wisp, would stay with the group and be part of "Team Misfitz".
Character Traits (Charlie)
Loves to be pampered
Shy
Cowardly, but can be brave when needed
Has a fear of being left alone (doesn't like to be alone)
Curious
Caring
Very floofy
Character Traits (Ezra)
Loves being with Charlie and is very protective of him
Has a fear of lightning and electricity (worried of being zapped by it)
Adaptable
Caring
Cowardly, but can be brave when needed
Untrusting to most people
Fun Facts (Charlie + Ezra)
The Wisp (later named Ezra) is a unique wisp in that it is found out later on that Ezra was the result of a cruel science experiment and is the only turquoise wisp to exist.
Both Charlie and Ezra are on the younger side (Charlie is 7 years old)
Charlie loves veggie burritos
He/Him (Charlie) She/Her (Ezra)
Charlie uses a chewable necklace (silicone) for stimming/stress relief
Ezra's color power (Turquoise Liquid) lets Charlie transform... into a liquid! This makes it so that they can hide easily, squeeze into small or hollow areas and move around quickly. The blunt force that can come from being a strong liquid also helps with fighting!
Charlie can jump and climb rather well
Charlie and Ezra enjoy playing together and are always with one another
~~~~~~~~~~~~~~~~~~~
Finally here is the last sonic ocs I have created! (At least for now cause I technically have 1-2 more in mind but ehh...)
Designing these two was rather tricky. If it wasn't me going through the 100th color variation of Charlie, then it was me trying to just figure out how Ezra worked. There is plenty of Sonic lore that is still new to me, and so while I was making Ezra I was like "Does this make sense? How do wisps work? If I make a new wisp type(?) is that breaking canon or what?". I am happy with how it all turned out though! : D
Honestly I was surprised there isn't a wisp that has liquid related powers? Like ok you have sonic turning into a rocket, a drill, and a freaking cube but nothing liquid related??? I guess... maybe its cause of Sonic's history with water idk xD
Also yes the wisp has eyelashes idc let her slay~ ✨
(Thanks to midnight3wonder for the height chart template!)
✨Please do not re-post or use my work in any way without my permission! Re-blogging is ok. Reblogging helps me out! :D!✨
#sonic oc#sonic the hedgehog#sth oc#sonic fan character#charlie the chinchilla#ezra the wisp#team misfitz#sonic original character#sonic fanart#original character#they are babieesss!!!!! <3#i want a chinchilla irl so badly i love them
4 notes
·
View notes
Text
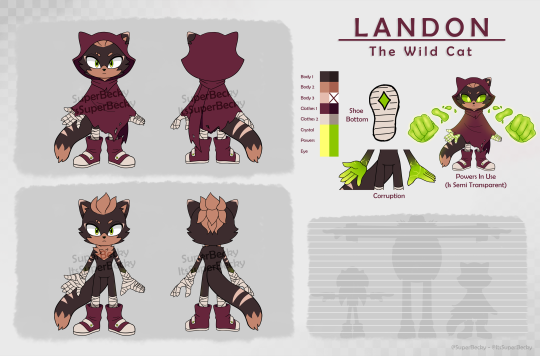
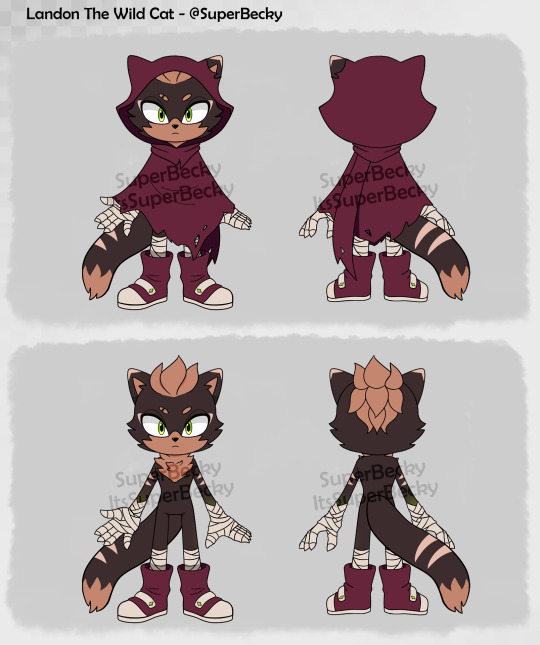
Landon (The Wild Cat)
Character Description
When he was a child, Landon used to live a happy and stable life with his parents in a small village as an orchard farmer. Landon became very ill one day and the local doctors did not know the cause of the pain he was experiencing. Though the doctors thought at first maybe we was poisoned by something, there was nothing that Landon had done or interacted with that could have led to that being the case.
Landon grew tired of spending his days indoors waiting for his "illness" to go away when it was clear to him that wouldn't happen. Despite his body aching, he forced himself go outside and be productive, but that's when everything changed. Suddenly Landon's eyes glowed a fierce green, his arms began to have a burning sensation and he lost control of his body and mind. When he finally regained consciousness, the village was in shambles and many of his fellow villagers laid frozen on the ground. The words "monster" and "murderer" were shouted, Landon realizing it was towards him. Though Landon tried to make sense of what had happened and apologize, the village banished him out of fear. Since then, Landon has come to the conclusion that he has been cursed/corrupted with something, and constantly fears that one day this curse will take over his body/mind again.
A few years later Landon meets Bera and Blush. Bera is quick to invite him into her found family known as "Team Misfitz". Though Landon declines at first, then again, and then again, he finally gets encouraged enough to join them on their travels/adventures.
Character Traits
Serious (when it matters)
Has a hard time letting his guard down
Protective
Introverted
Fears rejection
May look and come off as intimidating, but is a sweet heart
Anxious on the inside
Very strong physically
Fun Facts
Has a curse that visually and physically affects his arms/hands. It can cause physical discomfort (burning sensation).
When using powers provided from the curse his eyes change color and his hands/eyes will glow.
Has the ability (from the curse) to summon large hands that move according to his own hand movements. They can cause a "poisonous effect" to whoever gets hit by them. Visually they appear "ghost like" and are semi transparent.
Loves apple pie
Likes to read and hear stories
Eldest member of Team Misfitz
He/Him
Age is 21
~~~~~~~~~~~~~~~~~~~
Another sonic oc! This time it is my baby boy Landon ˋ( ° ▽、° )
He needs a hug </3 ... Luckily the members of Team Misfitz always give him some (even when he says not to!)
(Thanks to midnight3wonder for the height chart template!)
✨Please do not re-post or use my work in any way without my permission! Re-blogging is ok. Reblogging helps me out! :D!✨
#sonic oc#sonic the hedgehog#sth oc#sonic fan character#landon the wild cat#team misfitz#original character#sonic original character
3 notes
·
View notes
Text


Blush (The Lost Princess)
Character Description
Blush awoke on Earth one day struggling to remember things from her past and regarding who she is. All she could remember is that she is the princess of a planet that she doesn't even remember the name of, what it looks like, where its located... basically anything! She knows that she needs to get back home though as surely her subjects and planet need her! But the problem is... back to where?
After a few days of roaming Earth confused and alone, she ran into Bera who offered to help her out. Blush then officially became the second member of "Team Misfitz". Since teaming up with Bera (and the other members), Blush has been working hard to try to regain her abilities and memories. Though Blush wants nothing more than to "go back to how she used to be", a part of her deep down likes her new life with Team Misfitz and she feels guilty regarding this knowing that she has unfulfilled duties elsewhere.
Character Traits
Quiet
Cautious
Low Self Esteem (Worries About Messing Up)
Feminine
Peace Maker (Hates Fighting)
Planner
Polite
Fun Facts
Has amnesia regarding her past and who she is
Soft spoken, gentle voice
Can fly using her wings
Can summon a spear made of sturdy crystals that she uses to defend her friends with
Loves buttery popcorn
She/Her
Age is ???
~~~~~~~~~~~~~~~~~~~
Another sonic oc! Blush was 100% made as an excuse to make a new super feminine and magical oc because it's one of my favorite kinds of characters to design xD I also wanted to make a sonic oc that wasn't tied to any specific animal and is more of just a "other worldly" being.
(Thanks to midnight3wonder for the height chart template!)
✨Please do not re-post or use my work in any way without my permission! Re-blogging is ok. Reblogging helps me out! :D!✨
#sonic oc#sonic fan character#sonic the headgehog#sth oc#sonic original character#blush the lost princess#original character#oc#i want a fashion doll of her#team misfitz#princess#aesthetic
1 note
·
View note
Text


Bera (The Bear)
Character Description
Bera grew up in a wealthy household where many expectations were placed on her. One of these expectations was to become a serious business woman like her parents and one day take over the family business. Bera would spend most of her time at a prestigious (and boring) private school, along with taking many after school lessons. She had no friends and often found herself seeing the principal for being disruptive and unruly.
All Bera wants to do in life is to have fun. She has her own goals in mind with wanting to compete one day against the big league Extreme Gear Riders. Her parents always disapproved of this however and would scold her regarding her energetic and reckless personality. This led to Bera running away one day from home with the goal to become who she wished to be and live the life she always wanted to have. She has not been back home since running away several years ago.
Since running away, Bera has met a few individuals that she has created a found family with; fellow misfits and people in need of support. In honor of their shared troubles, she calls this group "Team Misfitz" (Bera decided the "z" at the end made it sound cooler!).
Character Traits
Sporty
Energetic
Loves having fun
Leader/Helpful
Cool/Confident
Reckless/Risktaker
Fun Facts
Loves honey (hard candy)
Has a physical disability that makes it so she can not walk for too long. Because of this, she often rides her hoverboard and uses it to aid herself.
She/Her
Age is 17
~~~~~~~~~~~~~~~~~~~
Heya, it has been a while! I have been drawing a lot behind the scenes but- just nothing to upload yet... well, until now I guess!
Early February I got sudden motivation to just go crazy and make a few sonic ocs simply because I like the art style of sonic characters. While I was hoping to finish the character sheets in February I um- lost motivation after working on 4 different character designs non stop...! Buuuut uh the important thing is that I finally finished them all and will be uploading the other 3 characters soon! c:
(Thanks to midnight3wonder for the height chart template!)
✨Please do not re-post or use my work in any way without my permission! Re-blogging is ok. Reblogging helps me out! :D!✨
#sonic oc#sonic fandom#sonic the hedgehog#sonic original character#original character#bera the bear#sth oc#sonic fan character#sonic characters kinda remind me of toon town idk#even though the only similarity between the two is that they are animals with white gloves#then again i think sonic would love the toon town universe ngl#anywayysss#team misfitz
3 notes
·
View notes
Photo
I remembered this year! >:3

You can only reblog this today.
1M notes
·
View notes
Text
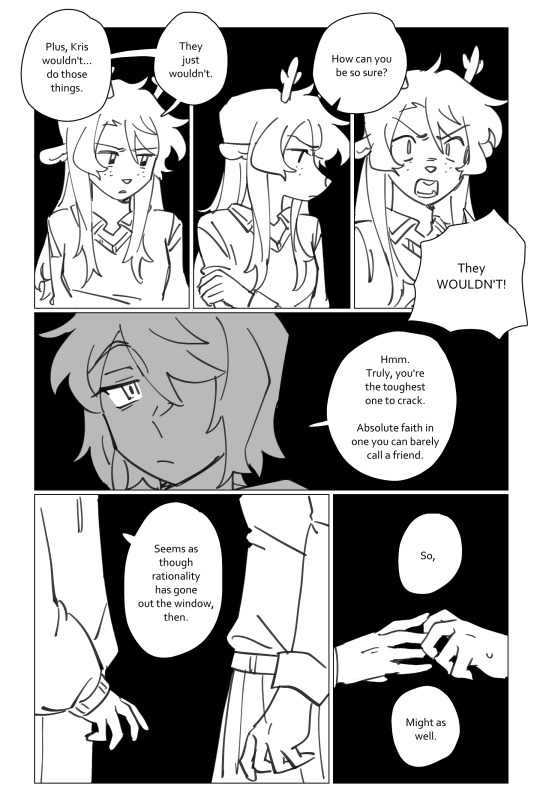
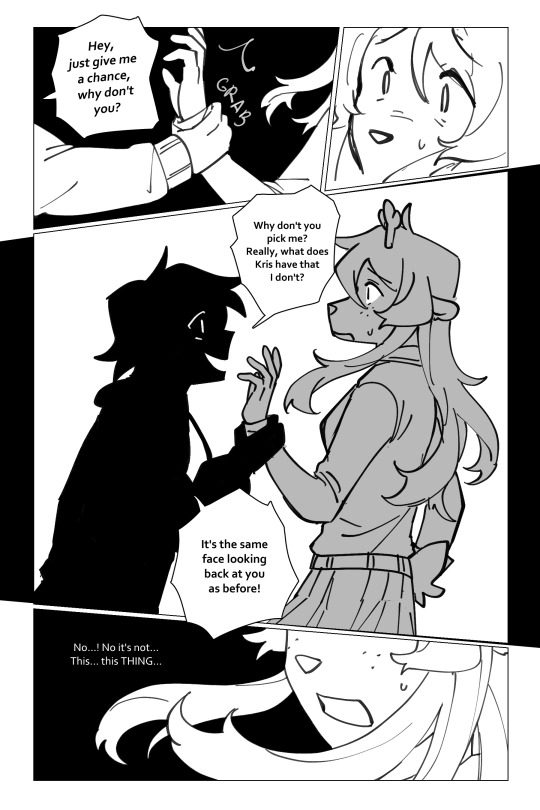
Poor babies! ;w; But lovely comic haha


ten is not a good age to have an identity crisis, can you guys play tag or something instead
7K notes
·
View notes