
Don't wanna be here? Send us removal request.
Statistics
We looked inside some of the posts by swolesanctum and here's what we found interesting.
Average Info
Notes Per Post
8
Likes Per Post
5
Reblog Per Post
3
Reply Per Post
0
Time Between Posts
14 days
Number of Posts By Type
Text
17
Last Seen Tumblr Blogs


Fun Fact
Tumblr is used by 21% of adults online aged 18-29 years.
Text
I exported all types of the platforms with two versions: one that is just the base with the crack node but no columns, and the other with the columns but the base is not cracked. I imported all of these into Zbrush so that I could switch the unchanged base into the worn down base. Then I dynameshed all the platforms with 704 res.
With these new dynameshed forms, I decimated the platforms into a low version (0.08%) and a high version (20%). Next step is to unwrap the low versions in blender to prep them for substance.
1 note
·
View note
Text
in the process of the single platform I realized that I accidentally gave the mesh an offset from the center. to fix this I used the default cube in blender and Align Object option to bring it back to the middle. I applied object transformation (ctrl+A shortcut) to zero the new alignment.
#gamedev progress report#new to blender so Im going to painstakingly doc every little thing#working on this on and off is a struggle bc I will quickly forget of I dont put in more practice
0 notes
Text
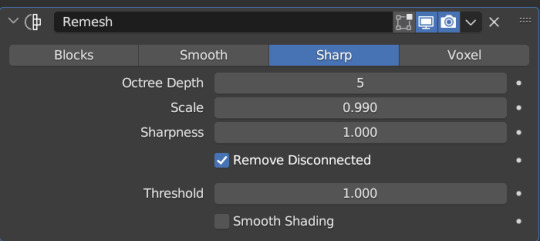
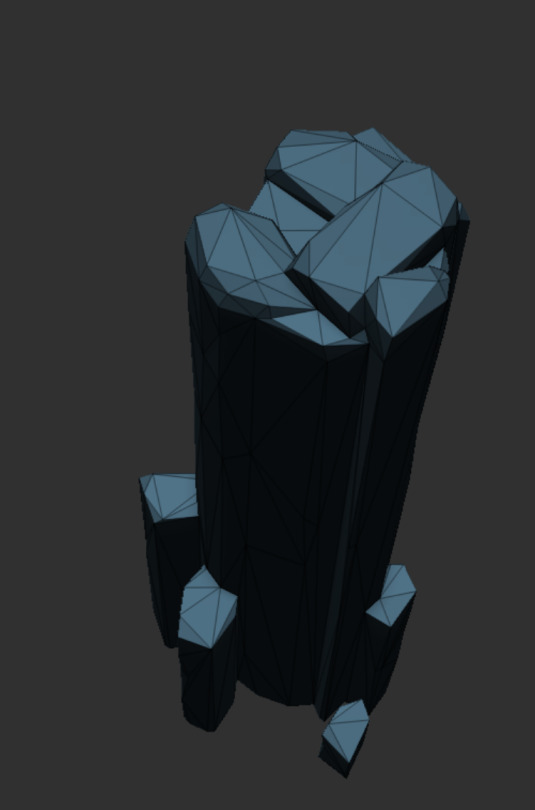
column process
(skipping several on and off work sessions) used blender nodes to create the wear and weathering of the column instances using method from this tutorial.

based off of the size of my geometry, I had to use the following remesh parameters

I applied this cracked node setup to the base of these platforms separately so that I could simply replace the uncracked base in zBrush. before importing to zbrush, I also applied a triangulate modifier to properly import the meshes.
below, left is dynameshed 1200 res, right is decimated of that to .02% of the original size.

after I unwrap this I will bring this into substance painter along with a High res decimated version and see how the paint setup I had before looks on this.
1 note
·
View note


Text
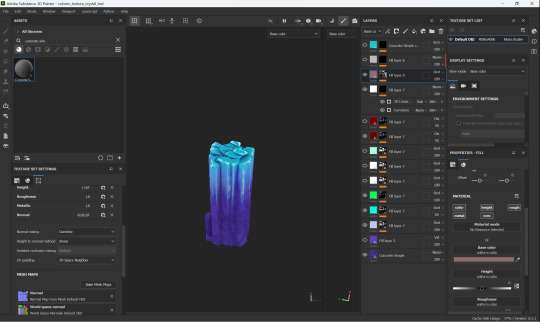
(I am combining two work sessions into one log) Learning a lot of substance on the way. It helps having a bit of art experience before starting, this is closer to learning CSP/Photoshop than it is w any 3D program thankfully.
I based the first pass off of some stylized crystals I found online. However the result was a lot more stylized than I wanted to go for. I basically used on of the concrete materials as the base texture, and gave it a similar saturated dark purple from the actual sol sanctum. I layered some gradients for the top color. I used the 3D linear generator with invert set to true to mask off the lower area of the column.
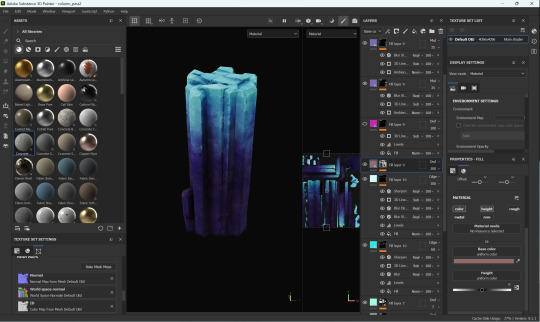
For this 2nd one, I did p much the same thing, except I used blur slope to give it a more painterly texture, and it worked out to make the column look more worn than my first pass did. For curvature I used the curvature map + levels, instead of a generator. I finished it with AO and one last color dodge gradient to give it a sort of unifying light.
A friend suggested to try making a kitbash instead of the idea I had where I would try to procedurally create the base mesh of the columns.
3 notes
·
View notes
Text
indigo and cyan sort of gradient
cyan on the "colder" parts of columns like edges, while indigo in warmer parts like the center
that's really all I've got. any decision on the wear and detail of it seems up to me, since there isn't a lot shown through the pixels. they seem pretty smooth actually, like crystals. will look at stylized crystals as refs maybe to consider some directions
I also need to start viewing the column in its context, how much of the color is through just a color map and how much will be from lighting, bc I know the lighting will be an integral part to it.
part of me wants to take liberties w the sanctum despite what the game shows, I always viewed sol sanctum to be inexplicably endless looking. garet initially mistakes it as the ocean, and that always gave me the mental image that even against all logic the water just keeps on going, with no end in sight. for magic reasons.
time for another breakdown as I research how I will go about doing the modeling for the platforms. I'm going to be using blender geometry nodes, something I've always wanted to learn so now's the time to bite the bullet. breaking down the ref to see how I'll tackle the geo:

very vertical, looks like it's made of smaller columns, with a few that are broken
top perimeters s are very worn, and give the impression that the platform dip down from the edges. the heights of the perimeter are slightly uneven, it's more stony/cobbled looking and not flat
the vertical columns that make up the platform look like they have angular geometry
the effect of them all together looks almost cross-hatchy at the top but in an extremely natural and not man made way
1 note
·
View note
Text
texture blob

I followed a tutorial very closely bc I'm unfamiliar with substance UI but I feel I've gotten the hang of it and can start molding the texture to more closely resemble the columns in the sanctum. I can't rly say much beyond that since it's not rly my own intentions being represented
instead I'm going to take another look at the ref img and break it down so I can start pushing it a direction, that'll be in a separate post though. this experience has also made me reconsider some tweaks in the process of making these columns since I will have to make a large batch of them. I def overthought the cracks and bumps in the zbrush part of this whole thing. going to have to rearrange what parts I want to be sculpted in zbrush and what part achieved thru substance
0 notes
Text
bringing column into substance

tweaked the column a bit more. exported decimated versions of the column into blender where I decimated even more until I got a lowpoly enough column

for uv unwrapping Im lazy and I know given how I'll need to make several variations of columns I want to automate this step. uvpackmaster looks like it works incredibly, but it costs $$ so I learned abt a free alternative called uvpacker. it's also an add-on for blender that arranges/lays out the uv shells for u. it took me an embarrassingly long amount of time to figure out how to install it bc I didn't realize u literally import the whole ass zip file without unzipping it. I have maya 2020 as well and I tested how both uv packing tools looked. I think uvpacker won a tiny bit over maya, but uvpackmaster is a whole different level from what I've seen from others. I might buy it if I run into issues w texturing.
finally brought the lowpoly and hipoly into substance where I baked the following maps
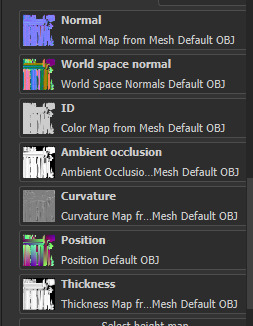
I have no idea what ID stands for though, I just did these bc Im sorta skimming that other rock sculpture pipeline process. it's annoying how long this all took and it was all just trying to figure out the right way to bring it in. next I'm gonna try to figure out how to finally start painting this thing.
0 notes
Text
SCREAM
god I did not intend for this much time to have passed since my last progress report. I swear I on-and-off did some finagling w the column but never enough that I felt warranted a new post. since late october I feel I had so many social obligations. and there's still more left.
I know I said I settled on the last pass. I lied. I don't like how the cracks looked tacked on while the rest of the column looked flat and smooth as hell. thankfully I completely forgot that I even said that I was "done". bc yeah I just kinda worked more on it as if I didn't cross that off the checklist. can't escape ur feelings inside u.
did some more work. this genuinely is closer to how I envisioned it. my only gripe is that I sorta overworked that gash on the bottom. overall though the vibe I wanted was for wear on the columns, with no point looking too flat. I think they looked too man made w my previous iterations as well. I def think this is the closest I'll get. this is the prototype that'll be the basis for how the other pillars will look. gonna move on now. closing this chapter.


0 notes
Text
fuggedaboudit
after several experimental attempts i have settled w a pass on sculpting the cracks on the pillar. wanted it to look organic but still stylized. I just really wanna move on from this. the process of how I did this was pretty much using a combo of the custom alpha brush to scatter indents across the sides and from those indents I sculpted cracks with the trim orb brush. that's it but it took so long for me to feel comfortable to do it that way. I debated if i wanted to also sculpt in cracks on the top, but I feel that's smth better left for when I add additional cracks via substance painter. gotta stop focusing too much on tiny details that don't matter.


before I move onto it though I wanna see if i can add some more very soft bumps across it. similar to how this one just had very light dips and so when you generate the maps it looks more organic

0 notes
Text
on god give me the strength to finish this stupid fucken cliff tonight
0 notes
Text
cracking the cliffs
(the photos r NOT how I want the cracks to eventually look, it's all just experimental for now) had a bit trouble finding time to work on the Thing today. a lot of the time was spent figuring out how I wanted to form crack details on the cliffs. I initially played around w all the orb brush pack. I considered using one of their cracks alphas (specifically a rock trim). it would be super easy and I feel 2-3 of them would do the trick. But I know it would look monotonous, and also felt a bit like cheating.

I think using these rock trim alphas could work if I was really strapped on time. I found also a way to make more cleaner stylized cracks by seeing a process video of a blender rock being made by just making a jagged gradient alpha to try to dragrect but the dragrect is not as flexible as I'd hoped in positioning.
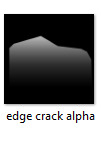
however there's another way that would achieve the same thing and it would be to literally just mask out sharp edges and form these cracks exclusively w brushes. it would take a lot more time but I have more control this way than w dragrect the edge crack alpha. I'm leaning towards the look of how this test turned out

tomorrow I hope to sculpt these cracks proper and maybe add a few pebbles and finally start texturing this thing. so mad at how slow I am sometimes
1 note
·
View note
Text
more more cliffs
without meaning to I had taken a break from working on this. practiced some drawing again. I really need to find a balance in finding time to do both in my day rather than devote weeks to one and weeks to another.
I used the geo nodes to generate the columns together. I made it so that using the same space, the columns are more larger but fewer, rather than be thinner and much more. Less to sculpt but also I think visually it's better.
hoping tomorrow I can get this done. this is going to be the prototype that sets the style for how all the other columns are going to look.

0 notes
Text
cliffs
no pic bc I s2g nothing visibly has changed but I had yet another realization that I've been doing this all wrong. I have been insistently trying to make the cliffs procedurally pretty much exclusively in the geometry nodes. and I'm just so unhappy with the look bc well duh. it is so hard to let math try to produce the results I want as an artist. I realized geometry nodes are supposed to be a tool to help me. the main reason why I was even trying to only use nodes was bc I wanted to be realistic w the amt of work, I'm not gonna hand sculpt every cliff. but I think I absolutely can, geometry nodes are just helping me cut down on time. if I had taken a step back much earlier to think abt it I should've known.
so new plan of attack: procedurally generate the primitive meshes for all of the cliffs. then remesh them and sculpt them. it'll take a lot of work. but like, I've wasted so much time researching and learning the reins of geo nodes (which rock btw) but yeah. I tunnel vision p easily.
0 notes
Text
hmmm more cliffs
I took some time playing around with settings and I think the thing bothering me with the shorter outlier columns of the pillars is that some overlap and it finally occurred to me that before I delete geometry I should equalize all the positions of the scatter points to the bottom. I keep running into an issue where no matter what min max distance settings I can't eliminate some outlier columns that totally overlap each other. note to self to test tomorrow. below pic as an example. it's not a high prio but I will test it out before I move on completely. im so tired that Im not thinking straight

I also finally achieved damage on the pillars by modifying each instance. unfortunately it reallly slows down blender. so I think I'm going to have to settle with the simplest poly columns for now and leave the detailed damage in the backburner.

0 notes
Text
cliffs pass

I finally settled on a first pass for the cliffs. I need to settle on it before burning out. just using instances from a collection of basic varied columns, making them into one large cluster, then scattering a few broken shorter sparse clusters as the outlier. my next step is to how to make it less hard surface and more rough/damaged looking, but a tutorial I've checked out that makes it seem so simple has been a real pain in the ass as well. pretty glad that I'm done having to beg on my knees on stack exchange, and the person who offered the answer genuinely nice. in retrospect, most of them were polite. maybe I won't shun it forever
0 notes
Text
I've got kinda something going on, but the problem is that I've run into a single issue that I need to fix before I can go forward with it.

1 note
·
View note