
Don't wanna be here? Send us removal request.
Statistics
We looked inside some of the posts by syedmajorstudies and here's what we found interesting.
Average Info
Notes Per Post
0
Likes Per Post
0
Reblog Per Post
0
Reply Per Post
0
Time Between Posts
1 day
Number of Posts By Type
Text
17
Last Seen Tumblr Blogs


Fun Fact
Tumblr.com is the 103rd most visited website in the world.
Text
Feedbacks
While working on my project I communicated many people over discord and reddit and people I knew for feedback and advice. From how to make connections in the industry to feedback on how my work looks and how it can be improved.


In this post, I asked advice on making connections in the industry or just social platforms. A lot of these comments were very helpful and I got to learn a lot about the animations community, events and how and when they are held and how I can particiapte in them.
Then there was a post of mine asking for feedback on the running animation in the animation sub-reddit.


I think the advice makes a lot of sense because people in the industry like people who can animate faster so in my guess I think that is one the things I need to be focusing on first.
0 notes
Text
Learning Outcome – Project Experience
In this project, I learned a lot of different tools and techniques of Gameplay animations. Time management was a key part in this project. You need to realize where you need to invest your time and how much. You should do your best in the given time and then move on to the next asset. If, in the end, you have time to spare, you can always come back and polish your work even more. You have to make a list of which things will take more time and which things will take less time and then always start with the thing that takes the most time, unless you are requested to work on priority base.
I also learned a lot about animation in unreal engine. How to save poses, how to apply constraints, how to add a reference video so you can animate along each second, render the animation and export the fbx file. I also learned how to apply animation inside the blueprint of the game and assign keys to check the animation inside the game. I also learned how to create a control rig manually on a skeleton mesh inside of Unreal Engine.
I became more familiar with how to avoid making the body rigid. How to make subtle motions in the spine or feet for add anticipation and secondary motion to avoid rigidity and robotic animation. The weight shifting can use a little work but I’m still working on it. I will keep working on gameplay animations and will continue to learn.
For asset modeling, I learned how to use Marmoset and render assets in real-time. This is great to show case my work for portfolio and to check texture quality. At first, I used to make textures in photoshop, but this time I used Substance Painter for my assets as that is the industry standards and I learned how to play with layers and opacity to use different materials to create a new one. It was tricky to export all maps, but I did well for my first try.
0 notes
Text
Learning Outcome – Group Experience
During my project, I learned how to communicate your work with your group. Give me daily report, or at least once every 2 days. If there is work dependencies, communicate and arrange a time so both of you can work without interfering with one another.
Meeting at least twice every week is a must. It lets you brainstorm problems together and find a solution more quickly than alone. Also, it lets you communicate things you are unable to communicate online and check assets in games together and comment on changes in a more effective way.
You are responsible for your work. Group members can help you organize and brainstorm but it’s you who must do your own research trouble shoot and communicate with the team. No one can read your mind. It’s not like they won’t help you, it’s that they might not have the understanding enough to help you or have a lot of work themselves. I think this is one of the best things I learned in this project.
Group projects can be stressful especially when other’s work is dependent on you or vice versa. This is why you have to effectively communicate with the people so you’re all on the same page. This not only helps understand each other but also gives both sides of the people a little relieve knowing where you are and what they can do in the meantime. One example is the vaulting animations I did. When I was making the vaulting animations, my unreal engine updated. This created a new problem in my project where the character’s join was on the (0,0,0) axis for all the keyframes. This took a little time to solve but I instantly communicated with my groupmate about the situations and used a mixamo vault animation to use as a place holder and show it to our instructor to get the feedback on the environment. I kept him updated on the situation and asset and we met each other every week to discuss the progress and brainstorm ideas.
0 notes
Text
Process management – Improving the run Animation:
While reviewing the animations, my groupmate and I discussed the run animation and how his arms were still stiff. So, I took a day, sat with him and talked to my instructor to adjust the run animation. I only spent 1 day on this as I had blogs to finish and work on the promotional video and presentation.
0 notes
Text
Run animation 6 – Adjustment
I tried the run animation again inside of the game, but I didn’t feel like it was good enough. So, I took some time and adjusted the animation to make it more suitable for the game and character’s weight.
Now this looks more realistic.
0 notes
Text
Process management – Asset Designing:
I only took 4 days to complete the power-up assets. I did my modeling in 1 day. For the textures, I created all the texture maps inside photoshop and then tested them first in Marmoset tool bag and then checked them inside Unreal Engine.
For the other 3 objects, I used Substance painter to generate and import all the maps. I worked for 2 days on learning the basics and exporting and creating materials for glass and luminosity in substance painter, as I have not used the tool before.
I know you can create materials inside Marmoset tool bag as well but while doing my research, I found that substance painter is the most used in the industry.
0 notes
Text
Forefront Blog – Javad Rajabzade
Javad Rajabzade is a freelance material artist from Dubai, UAE. He creates materials and customized textures for video games. His best work involves base skin smart materials. These materials include skin materials that involve scars or threads or zombie-like skin.
I was searching on how to create glass material for the power-up bottle. I searched a lot of videos and online posts and threads, but I think the video Javad Rajabzade made on glass and how to add tint and color was the simplest and very informative. He shows how adding different materials along with solid colors can make such a refine new material. Not only that, but the newly created material can also be made into a new material by changing the opacity, roughness and metallic properties.
Reference:
Rajabzade. J. (2024). Substance Painter Tutorial | Glass Jar Texturing Breakdown. [online] Available at: https://www.artstation.com/artwork/zD8v1d
0 notes
Text
Game Assets 5 – Tube and Beaker texturing
For the tube, I used the metal and glass texture. I used the Glassviscor material for the blue color. It is important to unwrap the UVs before going in substance painter. I actually thought Substance painter will unwrap the UVs for me but it was a mistake.
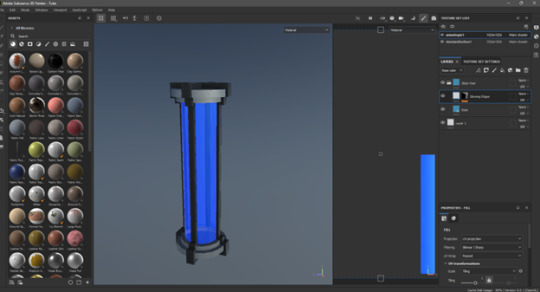
While for the beaker, I watched a video that makes a beaker transparent texture. In the video, he did a very simple technique of using a material and then control its metallic map and opacity to create a glass like texture.
youtube

After that, I rendered both of these and sent it to my groupmate.


0 notes
Text
Forefront - Substance painter in Game Industries
It’s not a surprise that Substance Painter is the go-to tool when it comes to texturing and creating texture maps. It is being used in every 3D profession from advertisement to gaming. In the past, I was using photoshop to create texture maps and was using them in Maya. It was very time consuming. For this project, I used substance painter as I wanted to learn and start using it since I’m going to graduate soon so I need to upgrade myself to software that are used in the industries. Playground games used Substance painter 3D for their Forza Horizon 4 to create almost all the textures in it and honestly the game looks so good and well-polished
With substance painter, I was able to make the texture maps like Normal, Ambient Occlusion, Metallic and Roughness without a problem, just click of a few buttons. After that, I had a variety of texture options to choose from. If I wanted to add scars or scratches, the material comes with it. I can easily choose to make the scar visible or not. Also, you can import your won textures in the substance painter and then use the other materials to complement and enhance your model’s textures. Substance painter, while exporting the textures, gives the user a variety of presents to choose from. Each present is made according to the specific tool where you want to use the textures in. There is a present for blender, unreal and maya. This comes in handy, especially if you’re new to texturing.
One of the best things about Substance painter that I found is the plugin it has for Unreal Engine. With the plugin, you can easily use the substance painter materials inside unreal and watch the material in real time instead of making it in substance painter, bringing it to unreal and then going back to change it. I found this very useful for model texturing, especially things like glass as we needed to keep the opacity and metallic just high enough, so the glass does not go invisible.
youtube
To export Ambient Occlusion (AO) maps from Substance Painter, you need to manually add the ambient occlusion map. To do that, click on file>export, go into the template tab, select a present and then create a gray map.

After that, click on the dollar sign ‘$’ and choose “$textureset” and add ‘_’. Write AO map after that.

After that, you need to drag the Ambient occlusion map from the left and then drag it to the “Gr” button and select “grey channel”. After that, export it how you normally work. This would export all the maps and including the AO map.

youtube
References:
Jigsaw 24 (2021). Adobe Substance for gaming | Jigsaw24. [online] Jigsaw24.com. Available at: https://store.jigsaw24.com/brands/adobe/adobe-substance-gaming
Oblee (2023). How to export ONLY an AO map from Substance Painter. [online] YouTube. Available at: https://www.youtube.com/watch?v=yQTnYLNt6R4
Adobe Substance 3D. (2022). Using Substance Materials in Unreal Engine. [online] Available at: https://www.youtube.com/watch?v=ZhbCD-GuLJw.
0 notes
Text
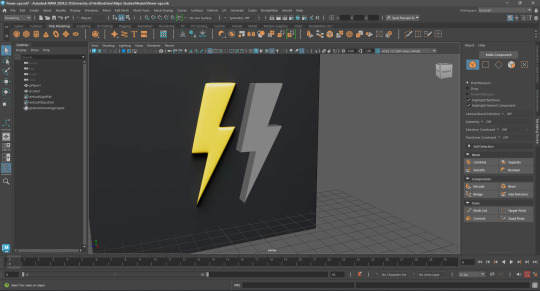
Game Assets 6 – Bolt Texturing
After the box, I textured the bolt which did not take much time as I only used 2 colors and made a gradient of it.


0 notes
Text
Game Assets 5 – Box Texturing
For the other assets, I used Substance Painter to texture and generate maps. This is my first-time using substance painter, so I needed to watch a few videos to me started but in the end, it was quite easy to navigate and choose your own textures. For the first asset, I textured the space box.


The textures were easily exported through substance painter as well.

0 notes
Text
Forefront Blog - Marmoset Toolbag
Marmoset toolbag is a tool that allows artists to render their models and assets in real time and show case their work either for presentation or portfolio purposes. It not only allows the artists to not only add texture maps on the models, but it also allows them to add lighting, adjust them, add cameras and create animations and render them to show case. It is a very good tool if you’re creating a portfolio or show casing your work.
The rookies posted an article on about how marmoset is a great tool for showcasing by displaying how the competitors used Marmoset to render real time assets and environments. The reason of using marmoset is that it’s very simple and easy to use and you don’t need to go to big ram consuming game engines just to try out 1 or two assets. You can check the assets in Marmoset and then either make changes to the textures there or go back to your tool.
Marmoset Toolbag also allows you to fix UVs and bake textures and lightings to the character to export them in the game engines. Marmoset is a very versatile tool and should be a must for all artists whether they are Character artists or Environmental artist.
References:
Scalfari, S. (n.d.). Marmoset Toolbag: The Must-Have 3D Art Production Tool. [online] therookies.co. Available at: https://discover.therookies.co/2023/05/31/marmoset-toolbag-the-must-have-real-time-rendering-software-for-3d-artists
Levine, G. (2023). Marmoset Toolbag 4.06 Fully Released. [online] 80.lv. Available at: https://80.lv/articles/marmoset-toolbag-4-06-fully-released/
0 notes
Text
Game Assets 4 – Texturing the Keycard
The keycard modeling was not required as its just a box but made rectangle.
For the Keycard, I used this picture of the asset made by “Gaurav Jhamb” on artstation.

Keeping this as a reference, I made a few albedo/diffuse maps to check and see how they look.


I sent these to my instructor, and he suggested the last one that I went with. But I still made some changes to it to make it look more “ready.” The final diffuse map is the following.

After creating the Diffuse map, I created the texture maps inside of photoshop. Normal, Roughness, Metal and Emission maps.

After that, I imported the Keycard in Marmoset tool bag and apply textures on it and rendered it in 4k.

References:
Jhamb, G. (2023). Key Card. [online] Artstation. Available at: https://www.artstation.com/artwork/xDJ3XO
0 notes
Text
Game Assets 3 - Chemical Power-up
For the chemical power-up, I had 2 different versions in mind. One being the test tube to also go with the fact that he is in an actual laboratory. in this way, the test tube makes a lot more sense.

The 2nd version was the beaker one. This was the first version my groupmate and I thought of. I personally leaned on the test tube version but since we're both working together, I just made both of them.

0 notes
Text
Game Assets 2 - Bolt Power-up
For the bolt icon, I found a reference image on iStock.

I used this image as a reference and created the bolt icon power-up.

References:
Istockphoto.com. (2024). iStock. [online] Available at: https://www.istockphoto.com/photos/strict-level?page=16
0 notes
Text
Game Assets 1 – Space Box Modeling
Apart from character animations, I am also responsible for creating custom assets for the environment and player. One of the assets is a metallic box. This box will be places over the map for the player to hide behind it. It will also be able to break. Then we have a keycard. A keycard that the player needs to open the gate and proceed further into the level.
Apart from these two environmental assets, I am also making two power-ups. First being a “Bolt” icon. This will allow player to get a dash ability that they will be able to use to escape sticky situations. The second power-up is a beaker. The beaker, with chemical in it, is a power-up that will allow the player to teleport from one place to another.

This is the reference for the box. I took a cube created a model that is as similar as to this.

Making the triangles poking out because these will have a glow affect that will make it look like a space object.

References:
Konnor. (2015). Sci-fi crate | 3D model. [online] CGTrader. Available at: https://www.cgtrader.com/3d-models/architectural/decoration/sci-fi-crate-4cb26682-90b5-40ce-a4bc-03aa85429190
0 notes
Text
Process Management – Vent Animation:
For the vent animation, there are 2 animations. Entering the vent and exiting the vent. Due to the extra time spent on the Vaulting animation, I was behind schedule and decided on making 1 animation, “entering the vent”, and then duplicating and reversing it for “exiting the vent”.
Due to the time constraints, I had to create the animation in a way that looks good both entering and exiting the vent. This is the idea I got from Batman Arkham series. In the Batman game, the vent animation for entering and exiting are the same just in reverse.
I spent 2 weeks making the animation. Week 1 was spent creating the animation, and week 2 was spent on polishing. In week 2 it was tested it inside the game to adjust accordingly.
0 notes