
sylvia5308760
Sylvia Musel
Communications 2 personal blog :)
13 posts
Don't wanna be here? Send us removal request.
Last Seen Blogs

littlegalerion
Homesteading Galerion Spawn

dasniichts
HERRSCHER

zealouspatrolponyspy
題名未設定

aphroditelovesu
aphrodite's lovers

calmsoft
Negócios Online de Sucesso
Text
Week 10 - Final Course Reflection
This course has been a roller coaster but in a really good way. I did not expect to enjoy learning so many fundamental skills in only 10 weeks. I would have never expected to see a significant improvement in my drawing abilities and practical workmanship using modelling materials and tools.
The techniques and tools which I learnt in this course equipped me with the basic fundamental skills needed to proceed further in this degree. Words cant express how much I have learnt and developed over these mere 10 weeks but I am proud to say that I feel more confident in my abilities and better equipped to tackle future projects. Working on these basic skills throughout the weeks allowed me to apply them to other classes and ultimately helped me in achieved higher marks and better results.
The weekly tasks were an amazing way to work step by step on techniques and processes which would normally be taken in a real design process. From concept sketching to drawing, planning, rendering, modelling and 3d printing this class has really given me an insight into the amount of work and steps needed to come up with a single concept design.
What really stood out to me was using Photoshop as a way of sketching and rendering ideas. I have always been unsure in how to do this and therefore limited myself to using only pencil and paper. Now I have been opened up to a new skill I never knew I was able to do. This is one of the many skills I will take with me to future projects.
Not only that but this class served as a great way to pace myself and work on my time management. Having the tasks due every Monday/Tuesday motivated me to use my weekends wisely and spend time reflecting on my work. It became a sort of weekly routine.
Especially now during online education this way of communicating my ideas, work and designs was very successful. I really felt most students grew in their abilities and took on the job of giving feedback well. It was great to see students reassured me that I didn't face problems alone. That they too struggled in certain situations. I was great to receive and give tips on how to overcome these barriers and therefore learn from each other mistakes. The interactions with various students and looking at the different styles and approaches really inspired me. When I was stuck on something (such as presentation layouts, processes, or how something needed to look like) I took inspiration form others. I just loved seeing the diversity in work.
Overall this class was super useful this term. This is what I wanted from this course, to get me out of my comfort zone and open my eyes to the amount processes and skills I can utilise in future projects and design.
Thank you Rob and Miles for helping with everyone’s journey through this course :)
3 notes
·
View notes
Text
Week 10 - Model finishing
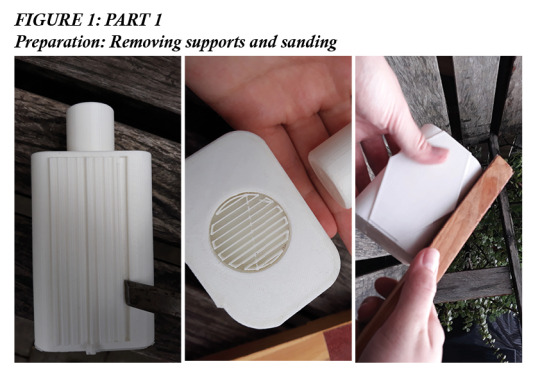
PART 1: PREPARATION
Figure 1: Before applying sprays I made sure I removed all supports using chisels. The made it easy to remove the plastic without any parts being left on 3D print. I used sand sticks to remove rough and bumpy sides and edges created from 3D printer. It was quite difficult to remove the plastic. I needed to replace the sandpaper halfway for a smoother finish.
PART 2: PRIMING
Figure 2: I created a small spray booth using a cardboard beer box. I used a toilet roll to make a high platform so the spray can be held vertically when spraying. This was the perfect size for my model but for the future project will need to upgrade for larger models. In regards to PPE I wore gloves and a 3M dust mask to reduce the risk of inhalation of fumes. I made sure I sprayed during the day in an open area outside.
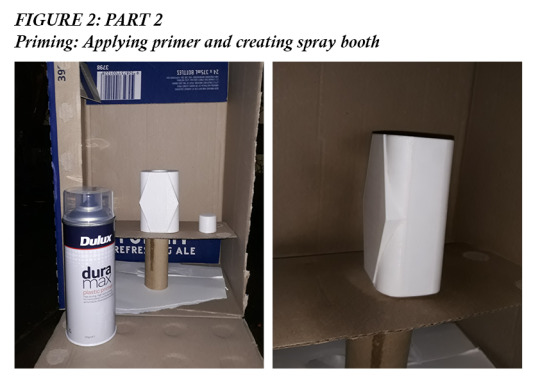
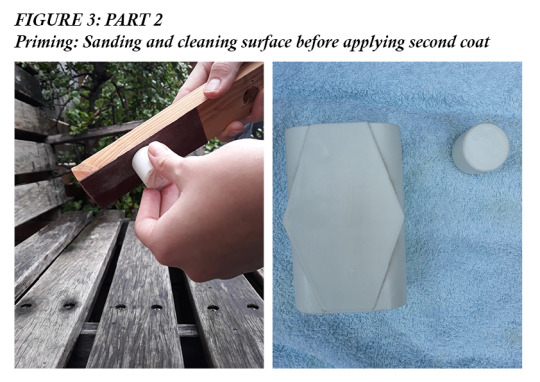
Figure 3: I made sure I sanded between each coat. This made the model more smooth. After applying the second coat and sanding it down The model felt less like cheap plastic and more like a solid, practical project. It seemed like the primer got into the small scratches and gaps making the entire bottle feel whole.
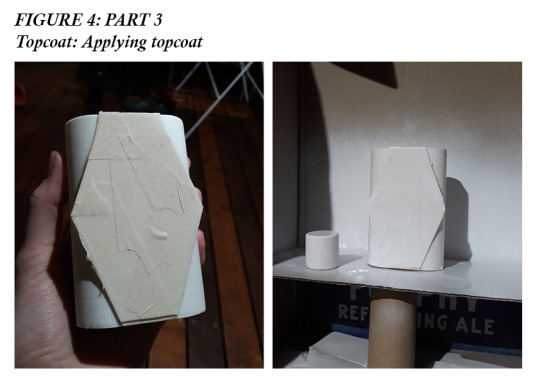
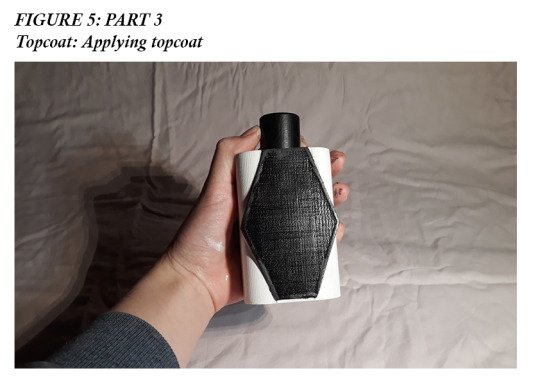
PART 3: TOPCOAT
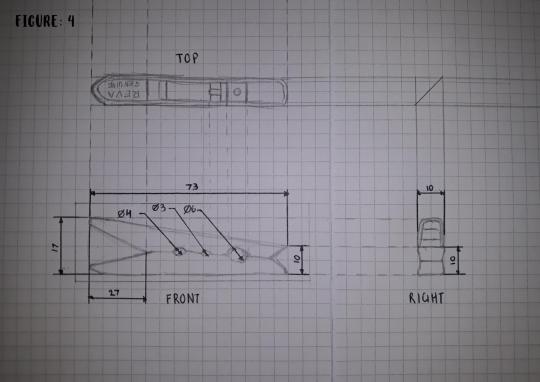
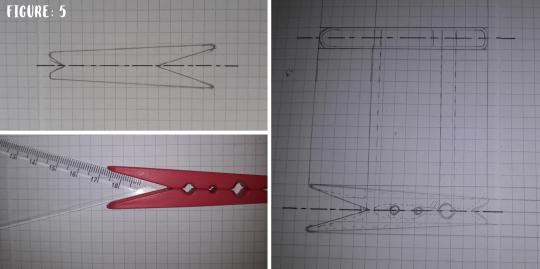
Figure 4 & 5: I used an oil-based topcoat after being recommended by others. I needed to spray two coats and sanded between each application. I used masking tape to cover the appropriate area.
Tip: Remove tape will the paint is still wet. Will reduce the risk of flaky paint coming off plastic.
Tip: Keep a steady spray and speed when covering the model.
For future application, I will try to use a water-based spray to compare which worked better.
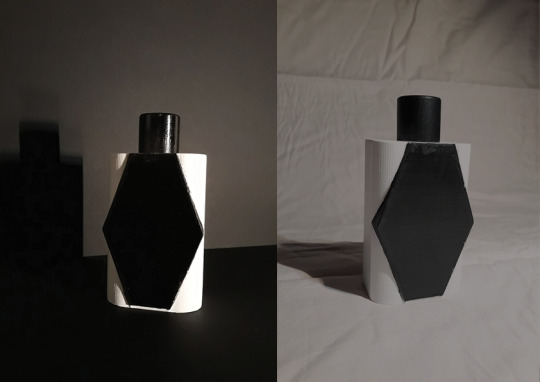
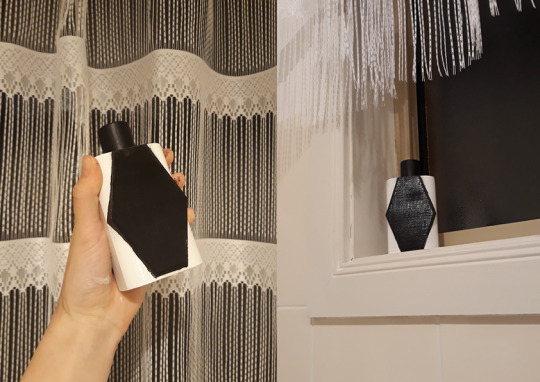
PART 5: PHOTOGRAPHY
Playing around with different backgrounds (colours and materials) and locations where the bottle would be found (bathroom).

14 notes
·
View notes
Text
Week 9- Digital Iteration & 3d Printing
PRE-CLASS ACTIVITY: Model making case study - Cup
When watching Andrew’s video regarding his experience two main points stood out to me.
POINT ONE: Andrews spoke about how when making sketch models which inform his design gave him more freedom compared to presentation models. As stated in previous blog posts sketch models shouldn't be perfect rather a way to focus on and single (or more) features of the design to inform you about it. For me working with physical and digital modelling I really related to this. As this course is a sketch modelling course it allowed me to be more open with the way I expressed and idea.
When working with the blue foam model I was able to use the tools to take a little more material off to see a further transition of the form which I didn't see in sketching.
When working with Fusion 360 I had the freedom to try different ideas and tools to the extreme to see where that took the form. I was easily able to reset and take another route to create something which informed my design of a form which felt comfortable in the hand.
POINT TWO: For Andrew, he stated that he worked with other materials during this project, namely timber. Timber allowed him to mimic the weight of what is to be a ceramic cup to give information as to how to hold it and gesturing of work.
For me and most students, we were limited to using foam and 3d printing which won’t quite mimic the weight which is one downfall of these materials. Instead, these materials are amazing at informing the form of the design and how it may appear in someone’s hand or in a room.
PART 1: Testing and trying out features of 3ds Max (on a sphere)
Figure 1: Since 3ds Max was new to me I was initially terrified on the initial interface of the software. My first thoughts when learning the navigation and manoeuvring I slowly became more comfortable with the views and basic tools. The class tutorial allowed me to understand and have a better grasp of these selections of tools.
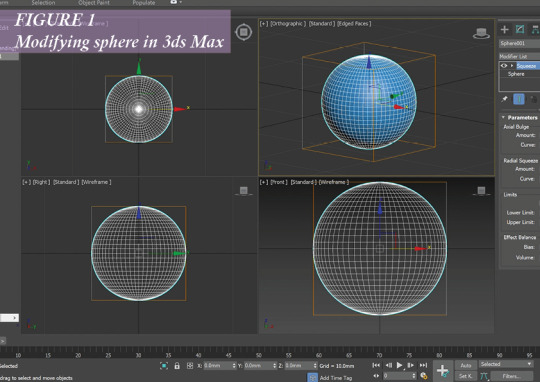
Figure 2 & 3: I further expanding my experimentation on the sphere using the ‘Squeeze’ tool. A simple tool which created significant modifications. Next, I spent lots of time to test the ‘Edit Poly’ tool. This allowed me to select individual sections and slightly tweak them to make slight adjustments. I tested this tool’s ability creating some extreme modifications and then I slowly toned done. This allowed me to see the capabilities of this tool. Made me see how this tool is great to tweak a small section of a model where it would be difficult to do in Fusion 360.


Figure 4 & 5: It was truly amazing how a couple of adjustments such as the ‘bend’, ‘stretch’, ‘squeeze’ tools could have a significant impact on the form of the model. How something as simple as a sphere can turn into a twisted diamond quite quickly. This software showed me how initial ideas can easily be made with a collection of shapes with different modifiers. I tried to experiment with a variety of other tools to see how crazy my form could become. (this, unfortunately, crashed my computer multiple times).


PART 2: Testing and trying out features of 3ds Max (on olay bottle model)
Figure 6: When I imported my fusion model I was amazed to see all the lines and meshing along each surface. It reminded me of the contour lines were drew in week 5 and just by those I gave me a better idea of the form compared to Fusion 360.
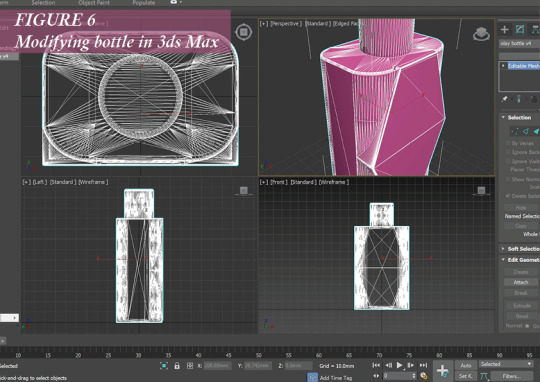
Figure 7 & 8: My overall goal during this modification stage was to see how 3ds Max could allow me to make the curves which I struggled to create in Fusion 360. I mainly focused on using the ‘Edit Poly’ tool slowly adjusting the points (figure 7) and edges (figure 8). This took a long time to do. I wanted to find a way to shorten the editing of the entire bottle. After looking at tools, the ‘Symmetry’ tool would allow me to make one side and easily edit the other. This is extremely useful to save time and be more efficient especially when creating sketch models.
Overall the poly tool took me a while to get a hold of. Even though I was pleased with the results I was happier with my initial Fusion 360 model which I was keen to 3d print.
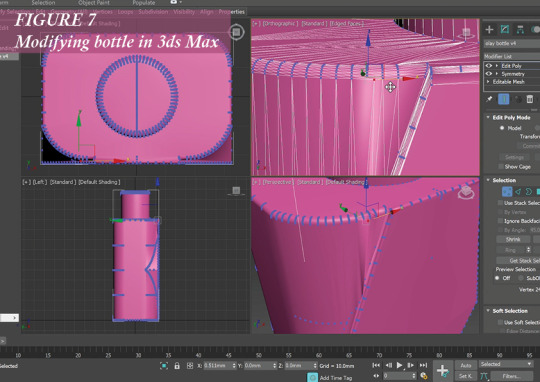
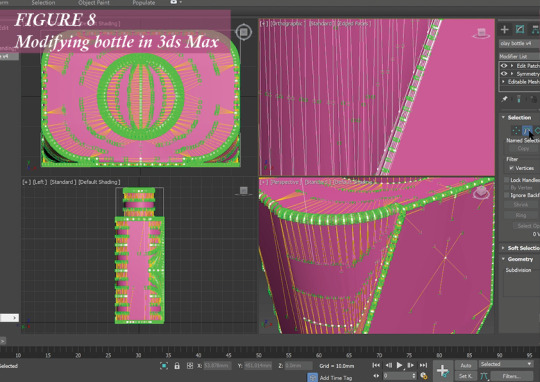
Figure 9: To further expand my ability using this software I played around with more tools and their capabilities. Using the ‘Edit Poly’ tool I was able to use the soft selection function. This allowed me to select sides and sections and pull them out instead of individually pulling each one one by one. This would save me more time in modifying and adjusting my model. This will definitely be a function I will return to in the future.

Overall I was confused about the reasoning of learning new software. Especially just after being introduced to Fusion 360. After playing around with the tools and features I understood that the program allowed for effective quick modifications which would otherwise require multiples steps, and attempts in Fusion 360. These skills that I learnt and experimented with can be applied to future projects of mine.
I learnt the benefits of using 3ds Max and where I can further expand my ability to use this powerful program. I will differently be looking at tutorials and continue exploring the software so I can become more confident in my abilities. More practice now in a variety of programs will help me save more time in future projects.
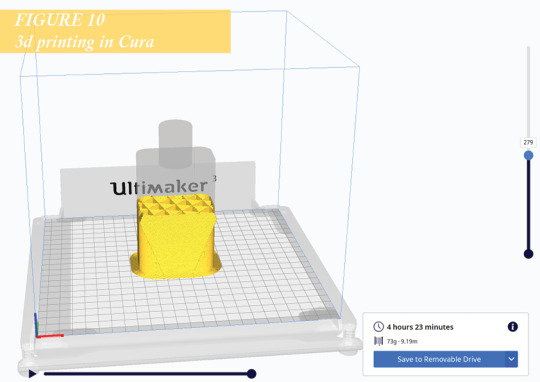
PART 3: 3D printing final model
Using Cura was very simple. The instructions given allowed me to easily implement my final Fusion 360 model and print it.
Let's see how it will turn out in the final stretch of this project.
3 notes
·
View notes
Text
Week 8 - Digital Model Making
PRE-CLASS ACTIVITY: Andrew Simpson: Razor Handle
Models allow for a range of ideas to come to life in the three-dimensional environment and be tested and held by a user as it is intended for. Sketches alone can not provide this luxury in developing these ides. As through modelling you can persevere value of aspects and see how it works.
For Andrew and his team models played a essential role in informing elements of weight, grip, size, shape, form, ergonomics aesthetics and function of the razor blade handles. He states that he made about 100 quick models to check different elements and features of each handles. They looked at physical size and the users interactions with them in their hands. They really focused on materiality to persevere value by using different methods of modeling such as foam, 3D printing, etc. He continued to explain that different methods are selected according to what is being informed, example: 3D print allows to look at scale and form but has misinformation of grip and weight. Where as looking at weight a aluminium model would be made a tested while being held in water and in other suitable environments.
Low-fidelity refers to simple, cheaper and low-tech concepts where as high-fidelity models are highly functional, detailed, and interactive. Andrews explains that his personal process was less linear (low fidelity to high fidelity). Instead he created different models of different fidelity levels according to what is being investigated and what aspects are being tested.
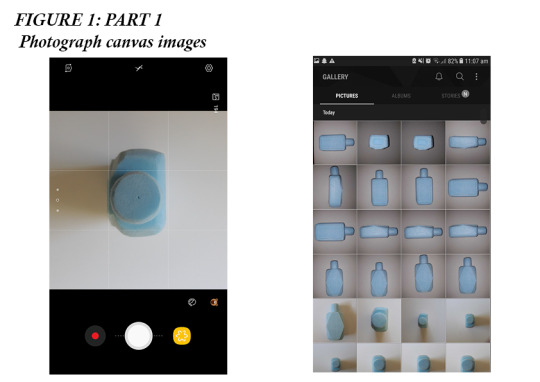
PART 1: Photography of canvas images
Figure 1: This process took a while. It was very hard for me to centre my model at first. I did not have a tripod to attach my photo to, nor did I have a proper DSLR camera. I used my phone and used the grid setting to line up each face the best I could. My model laid flat on some white foam core so that no other unnecessary background was used to confuse me during the digital modelling process. I also figured out that using the phone’s flash gave a nice even light to the sides so all edges could be easily seen.
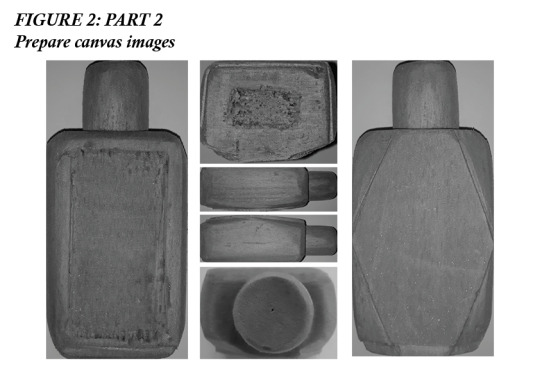
PART 2: Prepare canvas images
Figure 2: During this preparing stage I took my images into Photoshop. I cropped them and applied a black and white filter. In addition to this I played with the contrast of the colours to make sure the model each side and detail of the model was visible and clear to make it easy to work with in Fusion 360. I selected the blues in the adjustment section and made them darker.
PART 3: Model bottle using Fusion 360
Figure 1 & first half of video 1: I began by working from the photo of the model’s front face. I went into this task not really planning out my approach but this proved to be a mistake as I really struggled with creating the rounded and curved sides like I had with my blue foam model. Instead of using the easiest process and tools I experimented and played around using a variety of different methods.
I began by using the draft tool. This was ultimately unsuccessful as it did not edit the section I wanted to make sloped. To try to fix this issue I tried creating a new plane at an angle, but still not successful. Next, I used the fillet tool, but once I added the diamond face it was not what I pictured it to look like.
This stage took me an extremely long time so I resorted to have a break for a couple days and return back, starting from scratch and plan out on a piece of paper what would work best.

Figure 4 & second half of video 1: This was a much more successful approach. I remembered that Miles stated that having paper and pen with you while modelling helps you with planning the approach and taking note of dimensions, etc. This time I worked with the top view. This was a great approach as I was able to easily edit the sketch and just simply extract the form when I was happy.
Firstly I tried to use the sketching fillet tool. This created a result which was close to what I wanted but I fell a little short. Next, I created a circle sketch and extracted that. This created a curved front face which is not what I had in mind. Lastly, I used the arch/arc tool. This was a great tool as unlike the fillet tool I was able to change the length of the sides of the curve. The fillet tool is equal on both lengths of the curve.

Figure 5: I also played around with the shell tool to hollow out the bottle. This video helped me to have a better understanding of how to use the shell tool with different forms and in different situations. https://www.youtube.com/watch?v=NNPPcCx2Jqc
I tried to look for a way to hollow out the bottle without deleting the top and bottom faces. Unfortunately, I was unable to find a way to do this. Instead, I redrew the faces and extracted them. I played around the sectional analysis tool to look inside.
Additionally, I used the fillet tool to create curved edges just as I had in my foam model. Creates a safer and more comfortable form to fit in a person’s hand. Great tool and really brings the model together very well.
Overall the tools made available in Fusion 360 allows for the creation of more accurate models. It allows for more detailed modification which is something that is very hard to achieve with foam modelling.

Video 1: A short timelapse of my design process and the issues I came to overcome.
Video 1: Time-lapse of Fusion model making
youtube
Figure 6: I was quite happy with my final digital model. Adding materials such as textured plastic and transparent plastics really brings the model together and I can really see how it may look like as a real product in the real environment. First making a physical model than creating a digital model I makes it easier to create the model as I knew how I should look like. If I were to go from sketching straight to Fusion it would be difficult to figure out how each component would work and overall would take a long time to complete.

If I was to do this again I would try and find more approached in creating the curved sides, possibly quicker or more efficient ways.
I felt a sense of achievement and pleasure when I was able to rotate around the bottle. I was able to see how a simple design which was created on paper has been transformed into a refined-looking digital model.
Creating a digital model in Fusion 360 I was able to work more accurately, I was able to re-try and fix my mistakes just by deleting and creating a new component. I was able to get a symmetrical design which was something I struggled to achieve with my foam model.
4 notes
·
View notes
Text
Week 7 - Foam Model Making
PART 1: Construct your profile templates
Image 1 of figure 1: Being a design with a simple front and side faces I found it easy to draw out a orthographic drawing. I was able to easily visualize the faces using the cut-outs on paper. Transferring this onto thin cardboard made it solid and easy to work with when marking out each side.
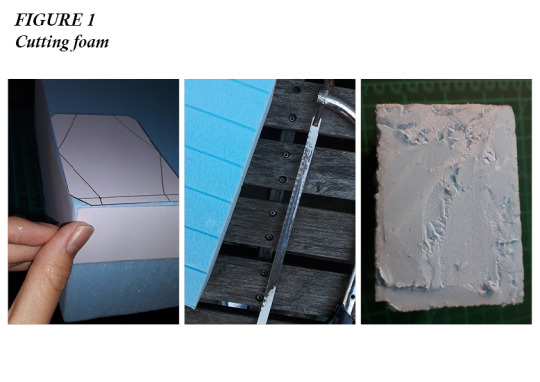
PART 2: Cut out blocks of foam blocks (blanks) from which to sculpt your bottle
Figure 1: When working with the blue foam I used a portable workbench outside. This was effective as I was able to be more aggressive with the material without worrying about the mess. To clean up I used a old vacuum cleaner and a brush to remove dust and excess material off my tools and workbench. wore a mask to prevent the inhalation of dust.
This stage of the design process was quite fiddly. I used a variety of different tools to see which one would create a better cut. Initially, I used a large hack saw, unfortunate the blade was dirty from previous projects, next time when I use this tool I will either replace the blade with a new one or clean it. Overall this was a somewhat effective tool so in combination with a utility knife. I got a pretty uneven finish but this was okay as I could easily rough in the shape of the bottle and therefore get rid of unflattering sides.
PART 3: Rough-in your bottle form
Figure 2: I was able to rough in a mark out the sides using a pencil which dented into the foam. I used these lines as a guideline to where I needed to remove or leave the material. During this stage of the foam building, I was able to add more details and features which I did not visualize originally. While working with a physical object in my hands I was able to change the shape from the original stencil and adjust my concept as I was now able to feel it fit in my hand.
PART 4. Refine your bottle form
Figure 2: This part of the making I thoroughly enjoyed, gave me a sense of achievement as I literally saw an idea which developed in my mind slowly transform into a three-dimensional form. I tried to get more aggressive with the material using a range of different tools and see how each they react with the material.
I used different tools for different tasks:
(1) Triangle file: Used to etch in sharp edges
(2) Semi-circular file: Flat side of file was used to remove large amounts of material at an angle
(3) 80 grit sandpaper: Used to remove material and give edges a smoother finish
(4) 120 grit sandpaper: Used to smooth offsides, edges and corners further. Used to create a sense of radius control of edges and avoid boxy foamie.
Overall using a larger variety of tools allowed me to have a better and nicer finish.
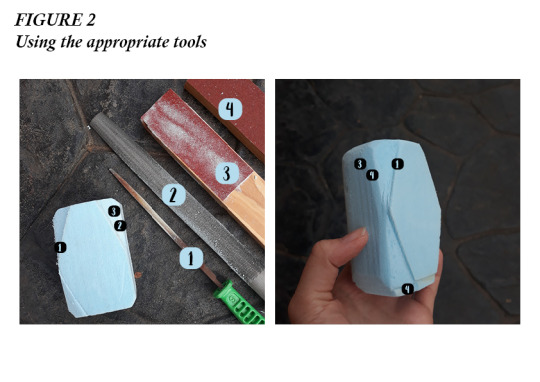
Figure 3: In these images, I used a variety of different tools to cut and hollow out the sections of my foam bottle. I used a pencil to outline the section. To create this negative space I resorted to used sandpaper and a sand stick in a different way. I taped the strip of sandpaper onto the end of the stick (5) which allowed me to sand out perfectly 90-degree edges and corners.
I was happy with my exploration of more unique uses of tools to fix my issue but ultimately the foam was quite chipped and ugly. I figured out that this depends on which direction on moved the sandpaper. I will differently be keeping this in mind when creating future models out of foam.
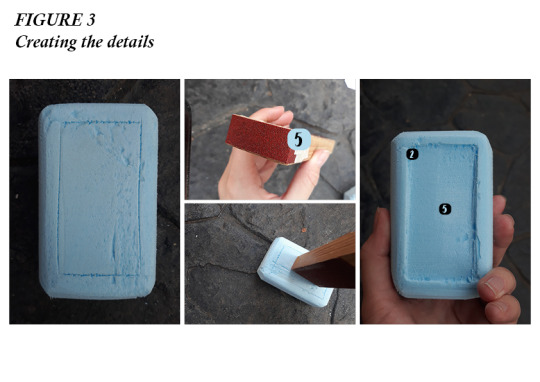
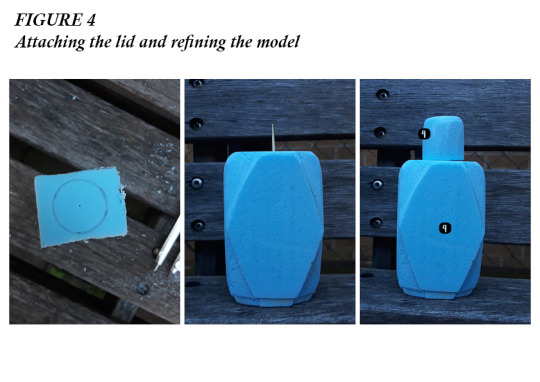
Figure 4: Using the same techniques in PART 3 and PART 4 I was able to rough in the shape of the lid and smooth it out with sandpaper. Makes the soft curves or the lid was very therapeutic as the amount of material the sandpaper removed was extremely satisfying.
From looking at other student’s work from other years and online I noticed people use materials such as toothpicks to connect and combined elements of blue foam together without using glue. This overall saved a lot of time which would have been spent waiting for glue to dry. This is also an effective trick if I was deciding on different lid designs, I would be able to remove and replace the lids when necessary.
Video 1: Creating a short video showing all the views is a good way to express my ideas. Personally, I feel like it is difficult to show a three-dimensional model only through pictures, a video gives a better understanding to the viewer of the essence of the form, the relationship of the model and the hand and the material flow.
Video 1: Final blue foam model
youtube
PART 4: Post Class Activity
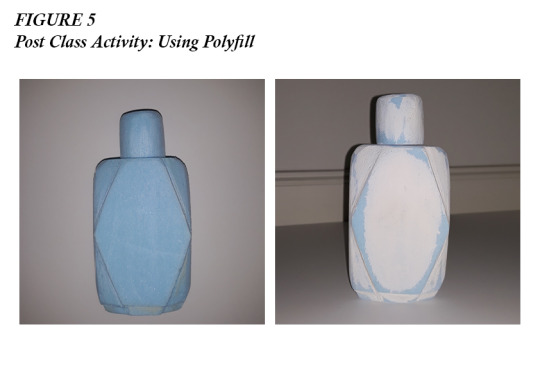
Figure 5: As recommend by Rob I purchased a multi-purpose interior filler to coat my final model with. To apply the filler I used my fingers and water to thin out the material and easily cover my model. I finished off with a paintbrush for a smoother coat. I used light sandpaper (120 grit) to create a smooth and clean finish.
This was a great way to cover holes and scratches which appeared during the modelling process. I only used one thin coat and sanded it down once dried. Sanding it down removed lots of the material. Now I know for next time to use multiple thinner layers to not have this problem again.
Overall this week’s task was a great introduction to the ideas of foam modelling and it has shown me on how I can improve (such as using more tools and being more open-minded). My result was pretty good for a first attempt and for a sketch model I work on it for 1.5 hours. When drawing you don't really release elements with work in a real three-dimensional environment. Modelling allows you to see the design in real life and modify or adjust it so it works better, this is something you can’t achieve with sketching alone.
The modelling allowed me to see how it would look in a suitable environment. It allowed me to answer the question of how the curves would interact with my hand. When I released that the edges were too sharp I was able to round them off to make it feel more comfortable and safer in my hand.
If I was to do this again I would try creating a more organic shaped bottle to see what tools I can make to achieve each unique task. I would also try to use better cutting tools such as a smaller hack saw to create cleaner cuts.
0 notes
Text
Week 6: Non-Teaching Week
PART 1: Andrew Simpson’s video on Model Making
What really stood out to me in Andrew Simpson’s video was his constant statement about the importance of how modelling making in informs the design. In past experiences, I’ve spent extended periods of time working to make a single model to look amazing for others when it was made just to help me with a specific element of the design. Not all models are about communicating with others rather a way to inform your design and check the important aspects of the design. Making a distinction between these two allows for more models for cheaper and time-saving.
Another statement which relates to designers “happy accidents”. Through experimentation, playing around with materials and using different materials and tools can spontaneously create an idea which was not possible with just a pen and paper. I have definitely experienced this with working with clay models.
Overall these understanding of modelling making is essential for designers and their design process. In order for a designer to have a successful product model making is essential during their process to inform their designs, test specific elements (such as scale, marker reaction, etc), communicate ideas to the target market, etc. If model making is not considered the process to make a final product would be longer, and more expensive.
PART 2: Home Maker Set Up
Figure 1: During the current situations it is essential to have a suitable home maker set up to allow for the making of models, designs and ideas. Personally my set up is broken down into three sections. This is essential for a organised layout.
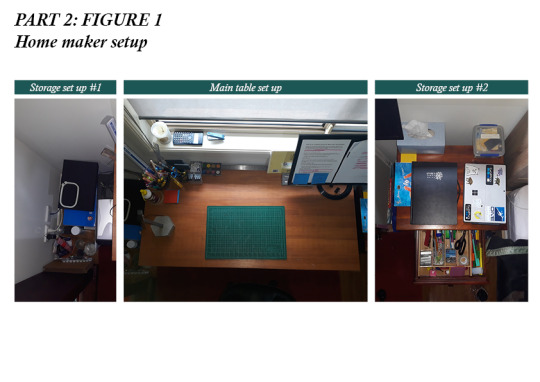
Figure 2: Over a few years of doing design in high school I have developed a setup which has helped me with organisation which overall improves my work ethic and designs. Following the ‘Design Future Lab Making from Home’ video I gain some more insights into improving my workspace.
Overall on my desk have my main, essential tools and equipment their given spaces. This allows me to easily find the required tool, use it and place it back in its spot.
Having an adjustable light has really helped me during projects as I can direct the light closer or further away according to what I am doing.
Another tool I have on my table are sticky notes. I love having these close by so I can note down any ideas which randomly come about, insights, tricks and issues I encounter along the way during a project or task. This reduces the likelihood of me forgetting a spontaneous thought as I frantically look for a note pad to note it down. They are also helpful way to plan out simple dimensions, measurements, etc.
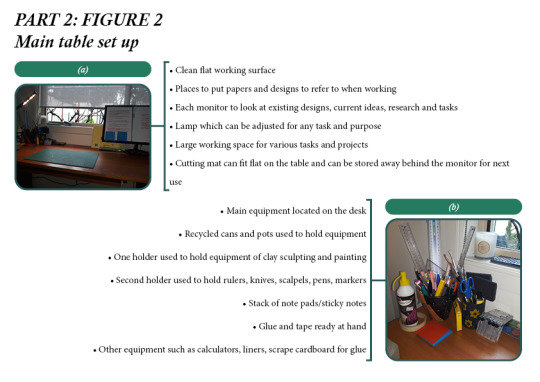
Figure 3: In conjunction with my table layout I have a small collection of other equipment, tools and materials which can help me with model making and designing. I love having these tools at hand so I can easily grab what I need the begin creating without the hassle of trying to find what I need.
My workspace is heavy based on organisation and a great thing I have to help me with organisation is a A3 folder. Having this at hand is great to not have larger drawings and sketches get damaged, dirty or lost around the house.
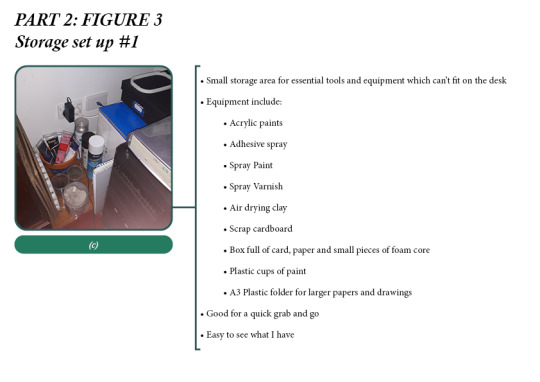
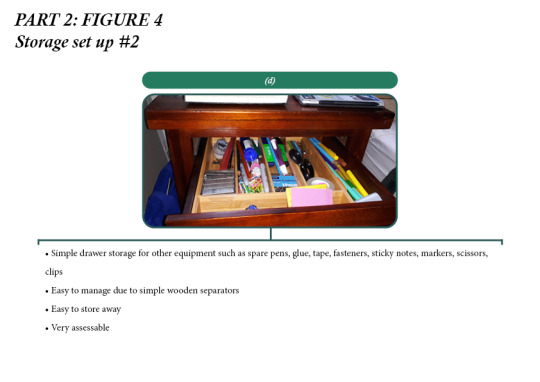
Figure 4: In addition I have other pieces of equipment in a drawer of the right side of my desk. This can be easily hidden away when necessary.
PART 3: Model Making Task
Figure 1: After making sure my working space was set up I began working on my box. Using this new and improved space was very successful. I was able to choose out the equipment I needed, have the video tutorial in front of me, cutting mat, adjusted light and extra arm space. I used sticky notes to make note of important dimensions of my box according to the amount of scrap foam core I had.
In regards to cutting the sides I used the larger cutting knife with a steel ruler to cut the edges. Placing the ruler over my work reduced the chance of me cutting into the material I wanted to use for my final cube.
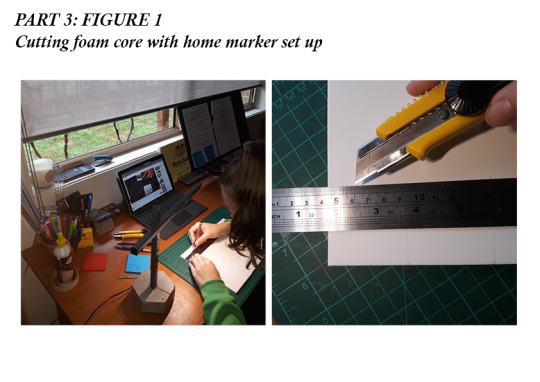
Figure 2: Cutting the main squares were successful no issue there (10cmx10cm). Now came the part of cutting the edges at a 45 degree angle. This was a time consuming effort. I decided to use smaller scrap pieces of foam core to practice on. After trying to follow the tutorial I found my ability to cut at this angle extremely underwhelming.
Following this I found a video to helped me create a device which can allow me to make clean cuts (https://www.youtube.com/watch?v=149ZXze_JOo).
I also found a 3D printable model which can also help with these cuts https://www.thingiverse.com/thing:1358344 unfortunately due to my inability to travel to the campus to use the 3D printers I was unable to use this alternative.
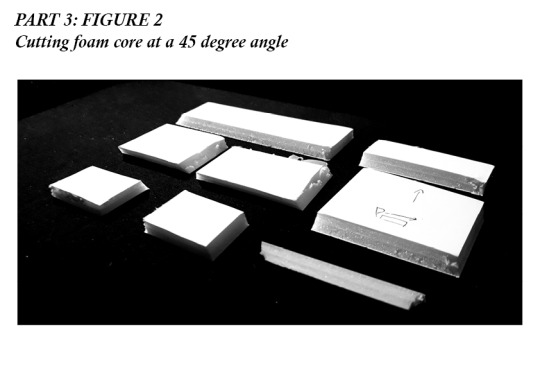
Figure 3: Following numerous of attempts and fails of cutting foam core I decided to make a simple, quick device to create accurate 45 degree angled cuts. I used a pieces of wood, washer, screw and blade. Overall this was a great decision as I was able to create accurate cuts quick and easy with a simple push of the device. IN combination with a steel ruler I was able to create straight cuts. I will definitely be using this for future projects.
(Safety note: Once done using the blade should be unscrewed and turned horizontally or removed to avoid injury)
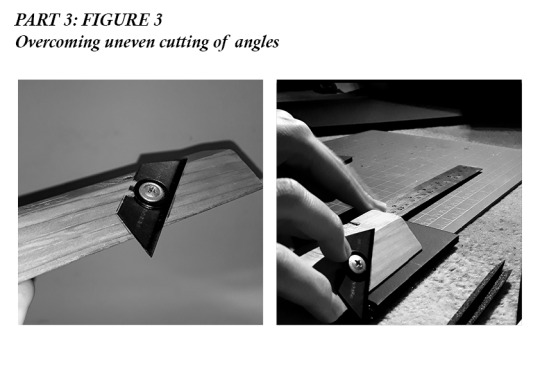
Figure 4: Overall the device worked really well. Following the cutting step I followed the video using tape and glue to connect the sides together. This taping technique was very helpful in keeping the sides together whilst the drying period.
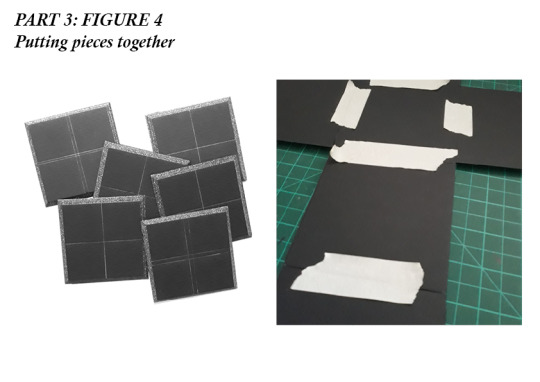
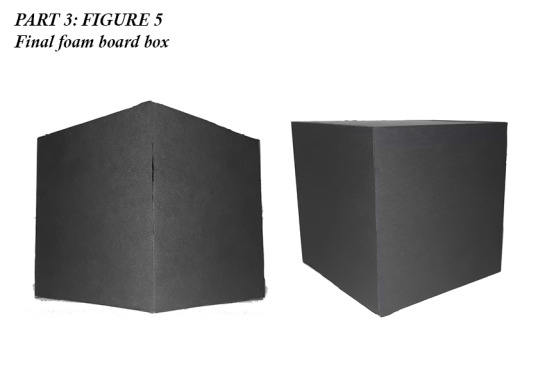
Figure 5: Ultimately I was happy with my final result. This design process has taught me more about problem solving mindset is essential to overcome a task is difficult. If I was to do this task again I would try and make a smaller box to save more material.
8 notes
·
View notes
Text
Week 5: Hand and Digital Sketching
PART ONE (WARM UP ACTIVITIES)
Figure 1: To begin the class we were told to complete simple warm-up activities to practice drawing straight lines. Before this I wasn't confident in my ability to freehand straight lines. Following the wise words of Rob I used my shoulder rather than my wrist, I focused on where the lines need to end. These strategies allowed me to focus deeply on my work and honestly allowed me to produce a not bad of a result.

Figure 2: This task was more difficult. I struggled to end on the dots but the lines were quite straight. I will certainly be practising this activity to further develop my free hand drawing skills.

Figure 3: I have never been confident in my skill in drawing free hand circles but this task helped me. Once again following the tips given by Rob I was really surprised by the final result. If I was to do this task again I would have spread the circles out better on the page to work on creating a more cohesive drawing and layout.

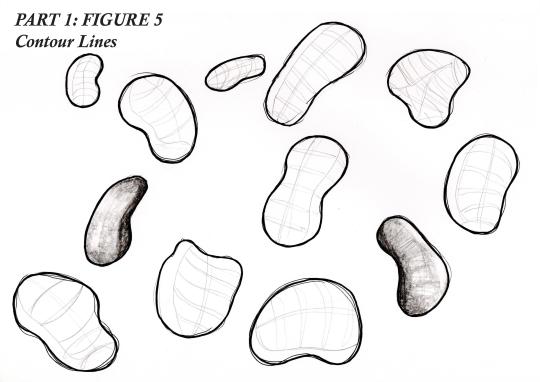
Figure 4: Out of all the warm-up tasks this was the most enjoyable and insightful. Completing this activity was quite meditative, it relaxed me. Something about freely sketching boxes and shading them made me feel relaxed and confident in my work (even though the results weren't perfect). This taught me that simple, rough sketches don’t need to be perfect and that the process of sketching should be taken with ease to create nice conceptual designs.
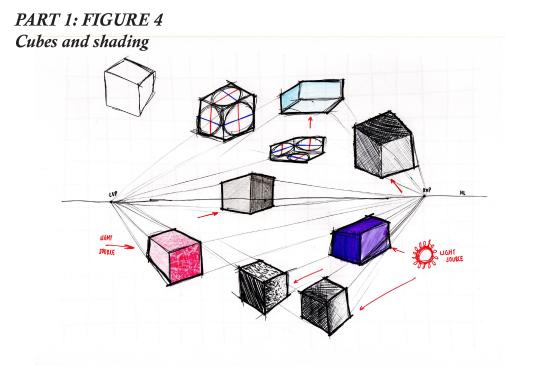
Figure 5: When undertaking this task I was not confident in my ability to use contour lines to show form. I really struggled with the placement of the lines to effectively show the form and depth of each shape. Following th completion of this warm-up task I investigated futher into the process of drawing contour lines. I found this video which helped me on how to look at a form and how to evaluate its direction. https://www.youtube.com/watch?v=5ueqSrUbSXk . If I were to have done this warm-up task again I would use these insights to have a better result. I will be practising these techniques as a warm-up for future sketch tasks.
I learnt through experimenting with different tools (liners, pencils, etc) that outlining, contour lines and shading gave the illusion of three dimensional depth. These skills are important for creating concept designs quickly and effectively. I took these skills with me into part 2 of this week.
PART TWO (PHOTOSHOP SKETCHING)
Figure 1: Before jumping straight into the Photoshop drawing I began by creating quick concept sketches using skills learnt during Part 1. I used a loose arm and utilized contour lines, thick outlines and shading in the form of cross hatching to create a illusion of three dimensions. This planning stage was a good way to get ideas on a page and therefore make the next stage easier to complete. Having the main shape down on paper allowed me to focus more on the shading and outlining of the concepts. This was a great way to begin practising my personal style in concept art and sketches. Overall this stage helped me in the next stages of the task.
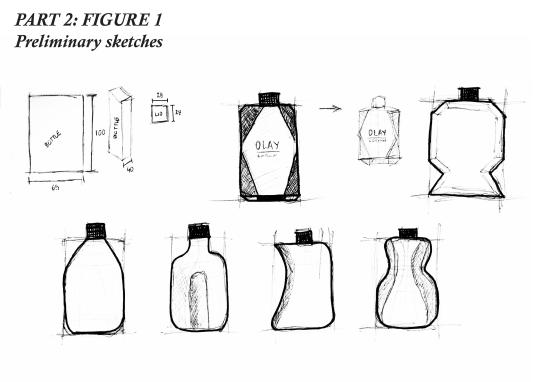
Figure 2: A trick which helped me stay organised was using the ‘create a new group tool’ in Photoshop to sort the layers into their appropriate group. I decided to do this once the layers got out of hand and where confusing to identify. Overall technique assisted in my workflow and develop my personal style and I will definitely be using this strategy in future Photoshop projects.
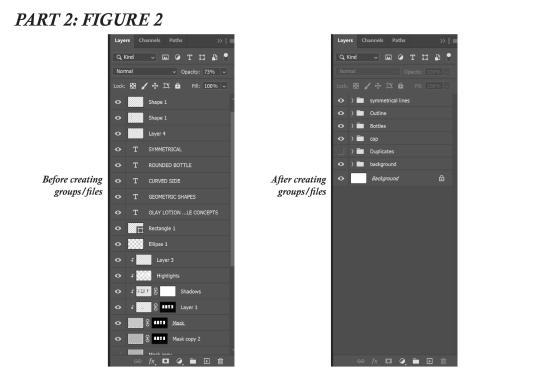
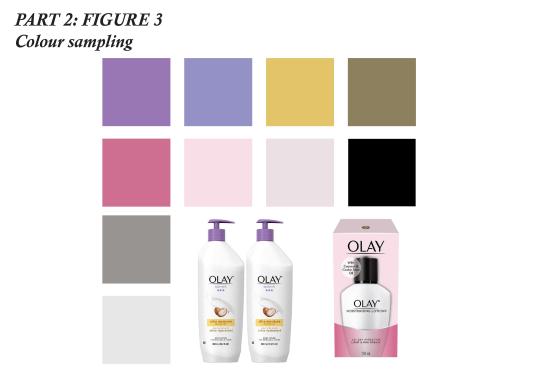
Figure 3: When deciding on the colours I was going to use looked for existing products and company to find a palette which would work and relate to Olay. I used the eyedropper tool and Photoshop to collect specific colours so I could use in my final digital concept sketches. This is a technique I have been using to gain inspiration and is definitely apart of my personal style.
Video 1: (I decided to use a video as it is a different way to document my process and so I can refer back to during future projects and digital sketches)
Time lapse video of my process as explained during class. As seen in the video I combined different layers and shading. It therefore helped me in creating ideas quickly and efficiently which would overall help in the design process. Being simple initial sketches I knew that these didn't need to be perfect, rather a set of quick, rough drawings which convey simple ideas on the shape of the bottles.
youtube
Figure 4: Ultimately I was extremely pleasured with the final result, although not perfect I really enjoyed learning new concepts and new processes in using resources such as Photoshop to explore ideas and develop designs. I learnt how underlays and overlays (masking tools) can assist in rapid conceptual sketches and ideas. This task has truly helped in my personal development as a designer and I will continue to improve on my own style and process.

11 notes
·
View notes
Text
Week 4: Perspective Drawing
This week we focused on the elements of perspective drawing; makings a 3-dimensional object into a 2-dimensional form. This was very enjoyable but time challenging task.
PART ONE
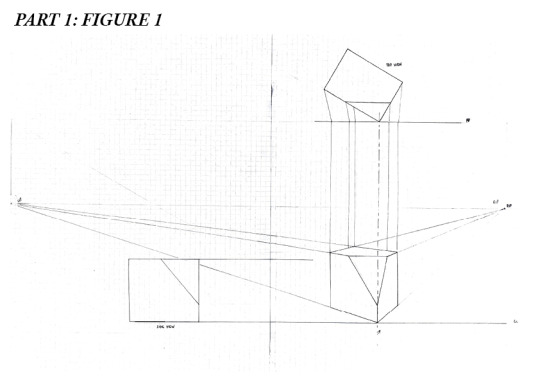
Figure 1: This was a simple task to follow. Following the lecture, I was able to follow the steps of creating a perspective drawing. Using large amounts of paper (connecting two A3 sheets of paper) made it harder to line up straight lines and create a cohesive drawing. Ultimately I found this task to be enjoyable and a great way to introduce me to perspective drawings of 3-dimensional objects.
PART TWO
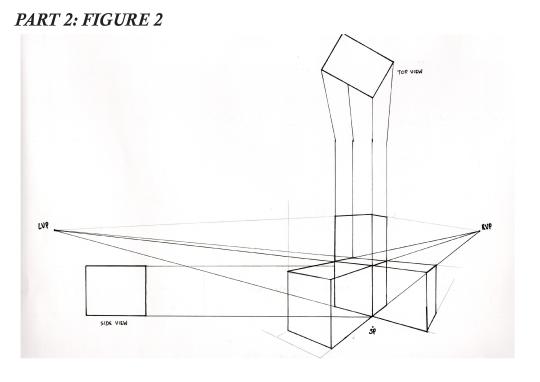
Figure 2-3: Following the steps given in part one I was able to continue to create a very simple perspective drawing of a box. I began by creating a perspective drawing and adding boxes after. When approaching this step I sat at my desk and observed my sketch model I noticed that when the box is closer the larger it appears. This gives the allusion that the dimensions of the box are larger and longer. I used this observation in my drawing. Overall this was a gruelling and long process but I was extremely happy with the success of my final result.
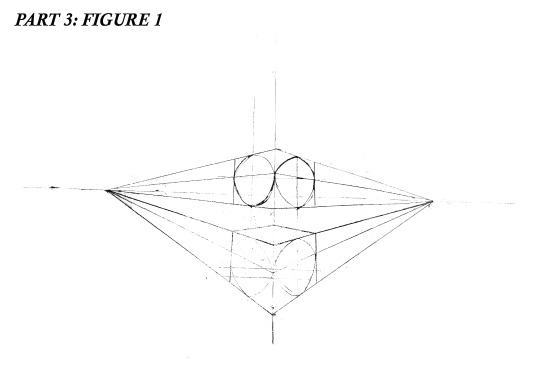
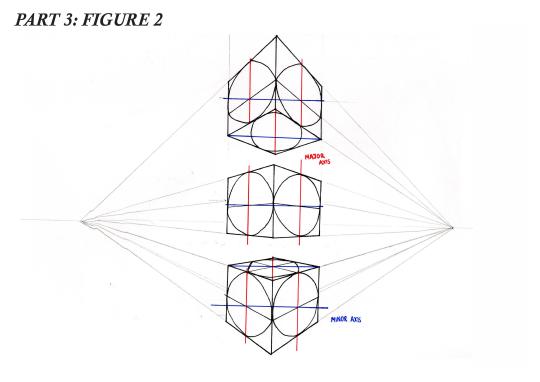
PART THREE
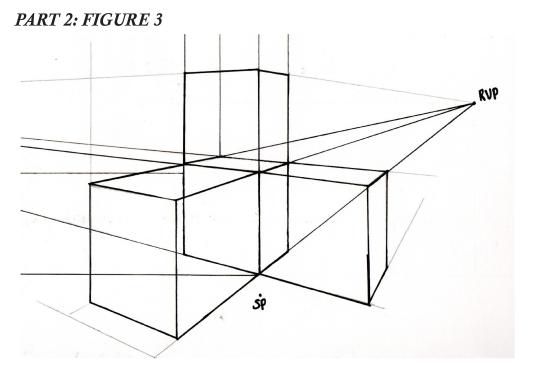
Figure 1-2: This part was by far the most difficult activity since beginning the class. I really struggled with drawing the circles precisely. Before attempting this part I took inspiration from other students to gain a better understanding of what is required in this task. Other students used video resources to assist them in their process. Personally, I think that I benefit and work better when referring to other student’s work. It allows me to improve on my work, learn new insights and create a final result which I satisfied with. To further expand my understanding I found an additional video which helped me with my drawings (https://www.youtube.com/watch?v=zPDbca83V5Y).
Taking inspiration from other students I wanted to not just complete the task for the sake of it but improve and practice using different perspectives and angles to overall assist in my improvement with drawings. Creating these boxes and major, minor axis were very helpful and overall I gained a better insight into the importance of perspective drawings to clearly communicate ideas and shapes. Overall I was ecstatic with my final drawing but I know I can improve on these techniques in the further.
I will definitely use these refer to this task the tricks in future projects when it comes to perspective drawings.
2 notes
·
View notes
Text
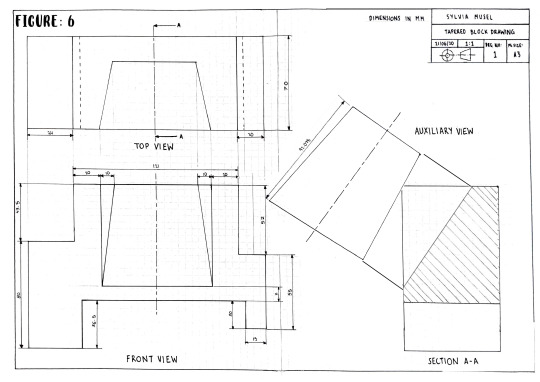
Week 3 (part ii): Section and Auxiliary Views
Figure 1: For this second part of Week 3′s activities, we were assigned to create orthogonal drawing and sketch model. I really struggled during this activity as I was quite confused about how to approach this drawing. I managed to create the top, side and front view easily. Using projection lines really helped with creating a cohesive layout.
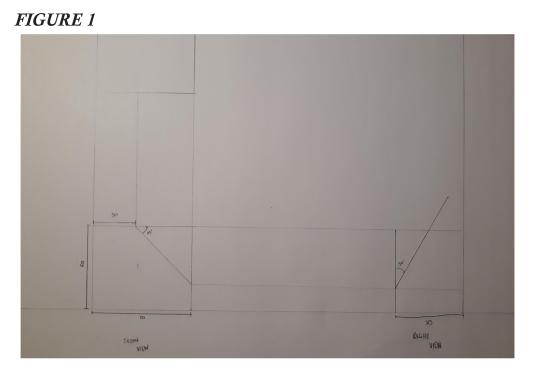
Figure 2: I wanted to challenge myself by using non-grided paper and instead uses a steel ruler and set square to create accurate and straight lines and angles. I lined the ruler along the border and placed the set square along the edge. This trick really helped with creating a drawing quickly and accurately.
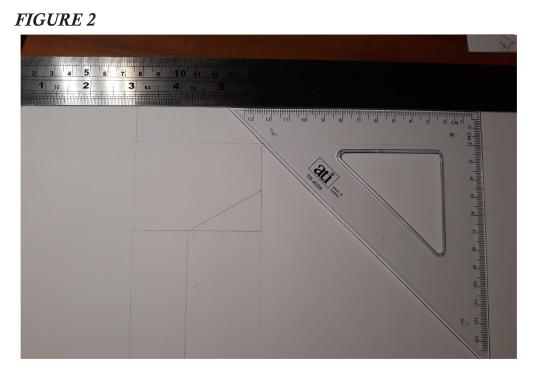
When working with the set squares dark smugges appear on the page this resorted to me to constantly wipe the back of them to ensure my page didn't have unwanted marks.
After creating a free handed sketch I noticed that the more I drew the same shapes I had a better understanding of where the lines needed to go and therefore results in less error and restarts.
Figure 3: I didn't really understand what secondary auxiliary view as seen in figure 3. After the following lesson, Rob went through what the final drawing should look like and explained the process of how to achieve it. After comparing my drawing to Rob’s I understood where I went wrong. I plan to return to the task and complete the final drawing better than my last so I can have a better grasp on how to draw these views.
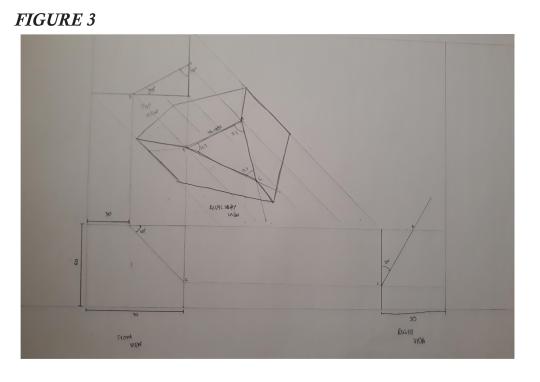
Figure 3.1 (this section was completed on the 11th July): This was my second attempt at completing this task. I followed Rob’s solutions and explanation to complete a result that I was happy with and that truly depicts my ability to understand the reasons for using secondary auxiliary views. The secondary auxiliary is essential to have an edge so a primary auxiliary view can be projected.
I feel like it is important to learn from my past mistakes and come back to work with a fresh mind, to implement new techniques learnt and create a better result.
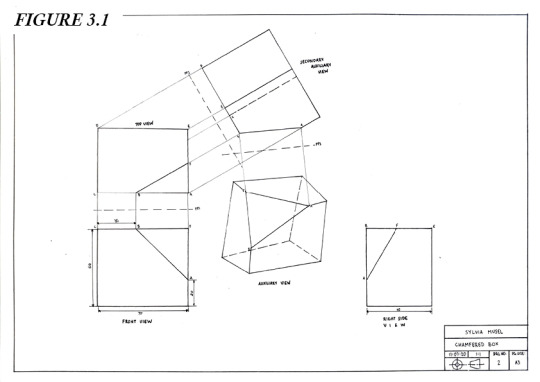
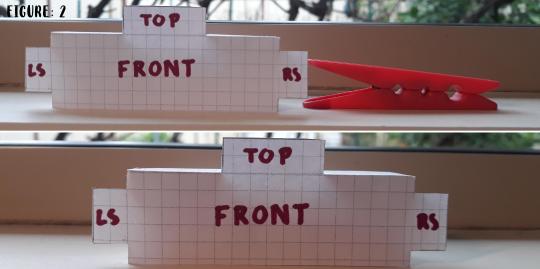
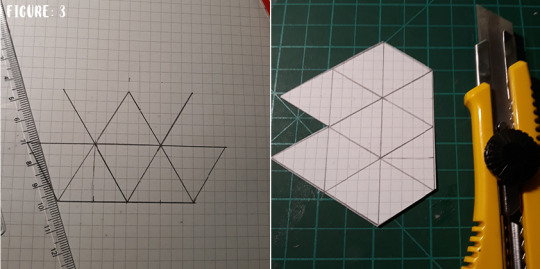
Figure 4: When creating the sketch model I decided to take a different approach by cutting each side out and using folds to connect each side. If I were to have done this task again I would have created a net which nicely folds together to save glue and time. Otherwise it was a sketch model meaning quick rough and not required to be perfect. I used 200gsm card to ensure the folds solid and the entire shape didn't fall apart.
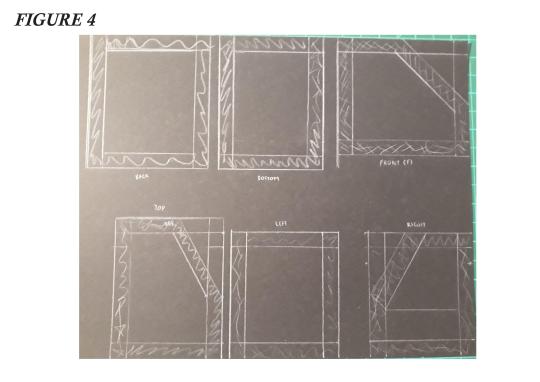
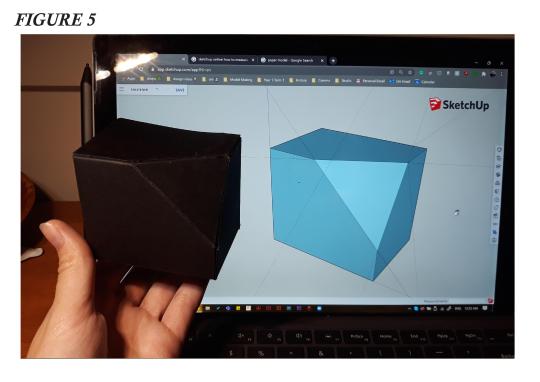
Figure 5: I compared my final result with a CAD model I made using the dimensions given in the task. Overall I was happy with my final results and have learnt the importance of auxiliary views as they show the true size of a side which would not normally be displayed using the traditional orthographic drawing.
2 notes
·
View notes
Text
Week 3 (part i) - Section and Auxiliary Views
This week we were required to create an engineering drawing using the AS1100 standards on a form we were given in class. Initial I thought this task would be easy and would take a short time to complete. Ultimately I came to the conclusion that this would be more complicated than I thought. Although it took lots of time and caused frustration I was extremely pleased with the final result and the skills I have learnt.
Initially after a quick inspection of the tapered block I noted dimensions of a rectangle which would be able to encapsulate the front face (similar to week 2′s box activity) (figure 1). This was a technique I used to plan out my layout and placement of the views.
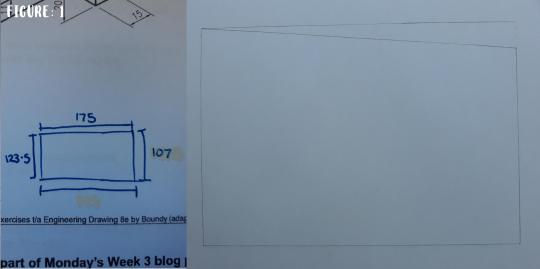
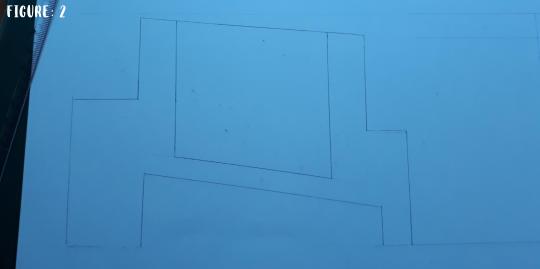
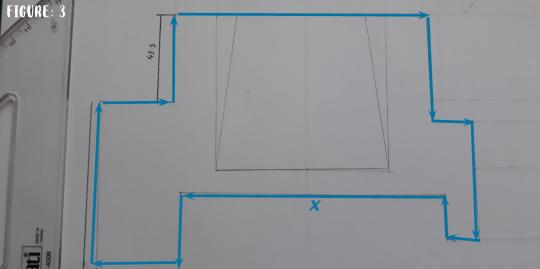
When I first began inspecting the shape I misunderstood the shape. I initially made the block flat on the bottom and sloped on the top (figure 2). After making this horrible mistake I released that I rushed myself and needed to take it slower and plan better. After getting a fresh sheet of paper I took my time and looked at ever side carefully. I found that drawing the basic outline in order was a good way to approach this drawing. I decided to draw the final line (line x in figure 3) last as the measurements weren't given.
A insight which really stood out to me during this task was when I was creating a initial free handed style sketch (figure 4). Once I thought I was ready to begin my final drawing I decided to add dimensions to make it as easy for me to reduce mistakes for my final drawing. Looking at the free handed draft I found many mistakes and errors which were initially looked over (missing hidden lines, too many lines). I came to the conclusion that it is important to check your drawing extensively to ensure for less mistakes in the final drawing.

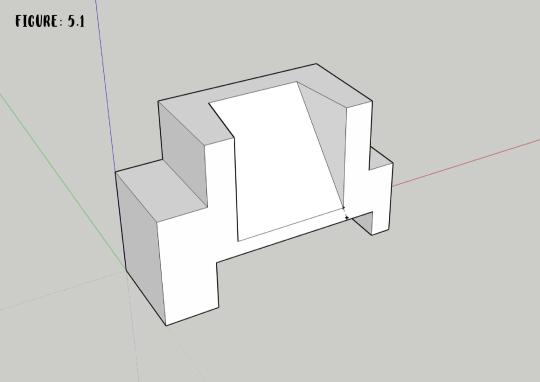
I had no issue with the sectional view but I struggled with the finding the length of the sloe in the auxiliary view. I experimented with the given dimensions (figure 5) but I was curious on the shape. I create a very simple quick model using sketch up to see how close I was with the actual length (using measurement tool) (figure 5.1). During this it made me realise that I shouldn't be restricted on the type of tools given but expand my skills and use other resources to solve a problem.
Overall I was pleasured with the final drawing (figure 6) as it shows development in my hand drawing skill from previous weeks. I followed the AS1100, focusing on dimensioning, line types, views and line wights. I learnt how to drawing appropriate auxiliary and sectional views in detail through free handing and practice. I developed the fundamental skills of visualisation the shape 2-dimensionally and laid it out in a clearly and cohesively manner.
If I were to complete this task again I would take a much slower initial approach in inspecting the shape to reduce error and mistakes. I would also try another way to scan my work as Adobe Scan sometimes create slanted lines which were intended to be straight.
4 notes
·
View notes
Text
Week 2 - Orthogonal Projection & AS1100 Standards
This week’s activities involved the development of the fundamental skills of engineering drawings. I was satisfied with my final results as I believe that it reflected my intent and the techniques I used to complete a cohesive drawing.
An aspect which went well for me is the final refined engineering drawing (in figure 6) Completing a freehand sketch (figure 4) really made it easy to plan out the third angle layout and the shapes of sides before attempting my final drawing, this allowed for less error and mistakes. Overall I focused on the placement of dimensions and the thickness of these lines. I followed the key aspects which were presented to the class during the lecture.
I gained some insights during the development of my engineering drawings. Initially, I didn’t know how to begin, I decided to take my time and focus mainly on planning and creating simple sketches. I chose to start by planning the dimensions of the object, I first laid the peg down flat on the paper to better visualise the sides (seen in figure 1). Following this, I noted the dimensions and developed a simple sketch of the box labelling each side appropriately. To create a box with sharp folds I resorted to using thicker paper (of around 180gsm) with the use of double-sided tape the box was able to hold its shape easily.


Another interesting insight was discovered when I was struggling to measure out the angle of the end of the peg. I was playing around with this part and discovered that one of the set squares fit perfectly and therefore I was able to see that the angle was 30° (seen in figure 5). Next time when working with different objects I will use the tools around me to assist in deciding the angels and dimensions of the object.
When using the Adobe scan app for my final orthogonal drawing it removed the grid lines. This is great for having a clean, neat final result and allows the viewer to focus on the drawing and not be distracted by the grid lines.
After completing these activities I had a better understanding of the standards used in engineering drawings including line types, scales, dimensioning, layouts and other and their importance in conveying a cohesive drawing. I know I can find the AS1100 standards using online resources so I can memorise standards such as line weights and scales. I can now describe the first angle and third angle views to turn a 3-dimensional form/object into a 2-dimensional drawing as seen in this weeks exercises (figure 6).

If I were to approach this task differently I would try using a slightly more complex object may be a stapler or hole puncher. Choosing an object with many angles would challenge me and I may have developed further insights and tricks in drawing such objects. Another thing I would do is to purchase and use more accurate sized fine liners (0.35 and 0.7) I was limited to what I already had which included 0.3 and 0.8. Otherwise, I was happy with the process and final results.
11 notes
·
View notes
Text
Week 1 - Drawing Instrument Exercises
During this week’s in-class activities we were intended to use a compass and set squares to practise our skills with engineering drawings. I was overall pleased with the final result and processes of completing it. In high school, I was exposed to many of these types of sketches and activities so I found this task easy to finish and had l almost no difficultly completing it.
I enjoyed retouching on my skills again as it allowed me to practice using various equipment and tools. I enjoyed using different objects such as 5 cent pieces and glue sticks to improvise and create circular shapes. This inspired creativity and I will definitely use this for future drawing and projects when appropriate.
During this task, I learnt that these drawings take extreme amounts of time and precision in order to have a quality finish. The use of light construction lines allowed me to plan out the entire drawing and was easy to erase once I added the darker, thicker line work.
I found out that good technique follows the concentration on precision.
I was able to focus on the initial placement of construction lines allowed me to develop my techniques of utilizing equipment and line work.
I learnt these fundamental insights through experimenting and practising using different paper, equipment and techniques before beginning the final drawing.
If I were to complete this task again I would focus on the intersection of the lines, many lines don’t connect well and overlap where they shouldn’t (as seen in Figures 1 and 2). After conversation with other students and tutors next time I with use liners with a compass which will result in a perfect circle.
I believe that I have successfully accomplished the learning objectives this week. I have gained the knowledge of what is required of this course. I developed an understanding of what sketch modelling is and that the concepts of brainstorming and how quickly create simple, inexpensive modelled assists in workflow saving money, time and resources. After creating these simple drawings with tools I built a familiarity with the concept of engineering drawings and the importance of accuracy using different techniques.


7 notes
·
View notes
Text
Introduction
Hey I’m Sylvia Musel. I am a scuba diving enthusiast who loves to document her adventures with her tiny camera. I love making some of the most random stuff around the house and love to learn new practical design techniques.
As a design student my goal is to finish university with the skills that can assist me in helping people in the future!
This blog with consist of all my weekly class activities and I hope I can successfully present my progress and weekly improvements throughout this term :))

0 notes