#ides1262 2020 week7
Text
Week7-EPS foam bottle model
This week’s exercise is to use blue-foam to make an actually model about the moisturiser bottle we designed in week5.
I first went to the design future lab to buy the materials I need. Follow the instructions I bought a big EPS-blue foam, 3x60 grit sandpaper and 3x120 grit sandpaper. After I got back home I start to trying make the model.
First thing first, I need to cut out the general shape of the bottle. So I traced down the shape of my bottle on a white paper then cut it out and use pencil to trace again but this time is on the blue foam. To make life easier I first cut out a cuboid form big huge foam. Then I start to further detail the shape. I used a wood saw to cut the foam. It’s a bit hard and took some time but overall it’s fine. The hardest part for me to to use sandpaper. It sounds strange but yes I was struggling with the sanding paper. My original design of the bottle is mainly a geometric style however after I use sandpaper it smoothen all the edges and the bottle get to more organic now. But that’s not what I want so it’s quite annoying. Also when I using the sandpaper I think I might did to hard cause I got a few more small scratches on my model and it definitely affect the final looks.


13 notes
·
View notes
Text
Week 7 - Foam Model Making
PART 1: Construct your profile templates
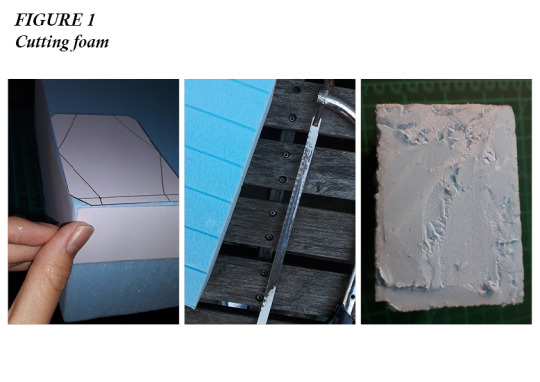
Image 1 of figure 1: Being a design with a simple front and side faces I found it easy to draw out a orthographic drawing. I was able to easily visualize the faces using the cut-outs on paper. Transferring this onto thin cardboard made it solid and easy to work with when marking out each side.
PART 2: Cut out blocks of foam blocks (blanks) from which to sculpt your bottle
Figure 1: When working with the blue foam I used a portable workbench outside. This was effective as I was able to be more aggressive with the material without worrying about the mess. To clean up I used a old vacuum cleaner and a brush to remove dust and excess material off my tools and workbench. wore a mask to prevent the inhalation of dust.
This stage of the design process was quite fiddly. I used a variety of different tools to see which one would create a better cut. Initially, I used a large hack saw, unfortunate the blade was dirty from previous projects, next time when I use this tool I will either replace the blade with a new one or clean it. Overall this was a somewhat effective tool so in combination with a utility knife. I got a pretty uneven finish but this was okay as I could easily rough in the shape of the bottle and therefore get rid of unflattering sides.
PART 3: Rough-in your bottle form
Figure 2: I was able to rough in a mark out the sides using a pencil which dented into the foam. I used these lines as a guideline to where I needed to remove or leave the material. During this stage of the foam building, I was able to add more details and features which I did not visualize originally. While working with a physical object in my hands I was able to change the shape from the original stencil and adjust my concept as I was now able to feel it fit in my hand.
PART 4. Refine your bottle form
Figure 2: This part of the making I thoroughly enjoyed, gave me a sense of achievement as I literally saw an idea which developed in my mind slowly transform into a three-dimensional form. I tried to get more aggressive with the material using a range of different tools and see how each they react with the material.
I used different tools for different tasks:
(1) Triangle file: Used to etch in sharp edges
(2) Semi-circular file: Flat side of file was used to remove large amounts of material at an angle
(3) 80 grit sandpaper: Used to remove material and give edges a smoother finish
(4) 120 grit sandpaper: Used to smooth offsides, edges and corners further. Used to create a sense of radius control of edges and avoid boxy foamie.
Overall using a larger variety of tools allowed me to have a better and nicer finish.
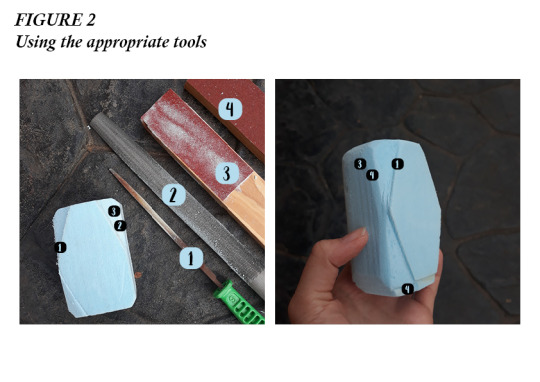
Figure 3: In these images, I used a variety of different tools to cut and hollow out the sections of my foam bottle. I used a pencil to outline the section. To create this negative space I resorted to used sandpaper and a sand stick in a different way. I taped the strip of sandpaper onto the end of the stick (5) which allowed me to sand out perfectly 90-degree edges and corners.
I was happy with my exploration of more unique uses of tools to fix my issue but ultimately the foam was quite chipped and ugly. I figured out that this depends on which direction on moved the sandpaper. I will differently be keeping this in mind when creating future models out of foam.
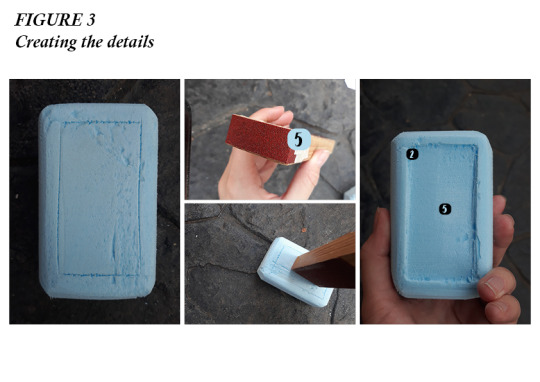
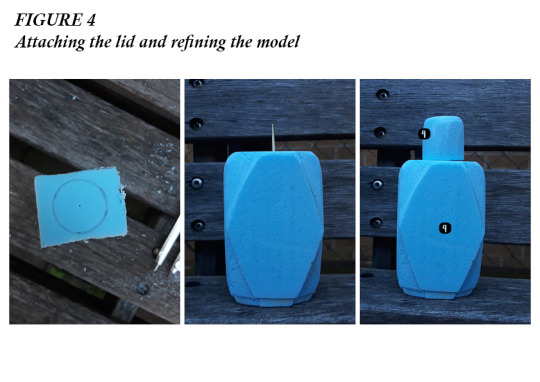
Figure 4: Using the same techniques in PART 3 and PART 4 I was able to rough in the shape of the lid and smooth it out with sandpaper. Makes the soft curves or the lid was very therapeutic as the amount of material the sandpaper removed was extremely satisfying.
From looking at other student’s work from other years and online I noticed people use materials such as toothpicks to connect and combined elements of blue foam together without using glue. This overall saved a lot of time which would have been spent waiting for glue to dry. This is also an effective trick if I was deciding on different lid designs, I would be able to remove and replace the lids when necessary.
Video 1: Creating a short video showing all the views is a good way to express my ideas. Personally, I feel like it is difficult to show a three-dimensional model only through pictures, a video gives a better understanding to the viewer of the essence of the form, the relationship of the model and the hand and the material flow.
Video 1: Final blue foam model
youtube
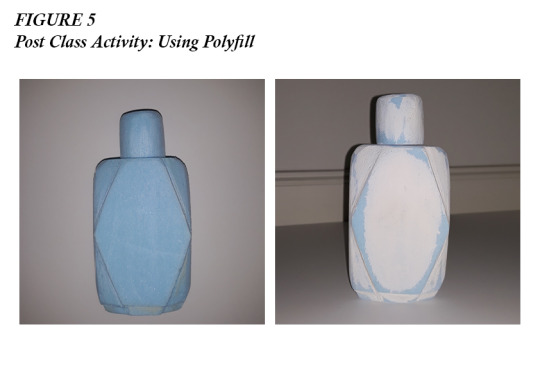
PART 4: Post Class Activity
Figure 5: As recommend by Rob I purchased a multi-purpose interior filler to coat my final model with. To apply the filler I used my fingers and water to thin out the material and easily cover my model. I finished off with a paintbrush for a smoother coat. I used light sandpaper (120 grit) to create a smooth and clean finish.
This was a great way to cover holes and scratches which appeared during the modelling process. I only used one thin coat and sanded it down once dried. Sanding it down removed lots of the material. Now I know for next time to use multiple thinner layers to not have this problem again.
Overall this week’s task was a great introduction to the ideas of foam modelling and it has shown me on how I can improve (such as using more tools and being more open-minded). My result was pretty good for a first attempt and for a sketch model I work on it for 1.5 hours. When drawing you don't really release elements with work in a real three-dimensional environment. Modelling allows you to see the design in real life and modify or adjust it so it works better, this is something you can’t achieve with sketching alone.
The modelling allowed me to see how it would look in a suitable environment. It allowed me to answer the question of how the curves would interact with my hand. When I released that the edges were too sharp I was able to round them off to make it feel more comfortable and safer in my hand.
If I was to do this again I would try creating a more organic shaped bottle to see what tools I can make to achieve each unique task. I would also try to use better cutting tools such as a smaller hack saw to create cleaner cuts.
0 notes
Last Seen Blogs

weasleyshouseelf
One of these days Gandalf will knock on my door ..

5thra7tk
5thra7tk

chalklineapparel
CHALK LINE APPAREL

myradicora
"Ah, the sweet taste of power."

framemakerswtvl
The Framemakers