#/opt/maven/bin
Explore tagged Tumblr posts
Visit Tumblr Blog
Explore Tumblr blogs with no restrictions, modern design and the best experience.
Last Seen Tumblr Blogs


Fun Fact
There are dozens of funny blogs to kill time on Tumblr.
Text
Instalar Apache Maven en Debian 10
Instalar Apache Maven en Debian 10. Apache Maven es una herramienta especializada en la creación y gestión de proyectos Maven es una herramienta de software para la gestión y construcción de proyectos Java. Su principal beneficio es que estandariza la configuración de nuestro proyecto en todas sus fases, desde la compilación y empaquetado hasta la instalación y administración de las librerías necesarias. Maven fue creado en el 2002 por Jason van Zyl, y es la base de los compiladores IDES actuales, como Eclipse, NetBeans, etc. Antes de comenzar su instalación vemos sus principales características. Excelente sistema de gestión dependencias. Mecanismo de distribución de librerías desde el repositorio local de Maven, hacia los repositorios publicados en Internet o red local. Permite la creación de plugins customizables. Es multi-plataforma. Open Source, el código está disponible para que lo modifiques si es necesario. Los repositorios oficiales y públicos de software libre, ofrecen librerías que toda la comunidad de desarrolladores pueden utilizar. Es compatible con muchos IDEs.
Instalar Apache Maven en Debian 10
Actualizamos el sistema. apt upgrade apt upgrade -y Necesitamos instalar el paquete de desarrollo de java (OpenJDK 11), la herramienta wget y GIT. apt install -y default-jdk apt install -y wget git Apache Maven necesita la variable de entorno $JAVA_HOME, la incluimos en nuestro sistema. echo "export JAVA_HOME=/lib/jvm/default-java" >> /etc/profile
Instalar Apache Maven Bien, ya tenemos nuestro sistema listo para la instalación, comenzamos importando las keys publicas. cd /tmp wget https://www.apache.org/dist/maven/KEYS gpg --import KEYS && rm KEYS Ahora descargamos el archivo binario de la aplicación y el de la firma. Actualmente la ultima versión estable es la 3.6.3, puedes comprobar si existe alguna actualización en su pagina oficial. wget -O maven.tgz https://www-eu.apache.org/dist/maven/maven-3/3.6.3/binaries/apache-maven-3.6.3-bin.tar.gz wget -O maven.tgz.asc https://www.apache.org/dist/maven/maven-3/3.6.3/binaries/apache-maven-3.6.3-bin.tar.gz.asc Verificamos el paquete con el archivo de firmas. gpg --verify maven.tgz.asc maven.tgz Descomprimimos el archivo y lo movemos a su directorio final. tar -xzf maven.tgz rm maven.tgz* mv apache-maven* /opt/maven Agregamos /opt/maven/bin a la variable de entorno. echo "export PATH=$PATH:/opt/maven/bin" >> /etc/profile Como punto final debes recargar las variables de entorno. ./etc/profile Verifica que la instalación es correcta. mvn -v ejemplo de salida... Apache Maven 3.6.3 (81f7586969310zs1dc0d5t7yc0dc55gtrd0p519; 2019-12-05T19:17:21+01:00) Maven home: /opt/maven Java version: 11.0.5, vendor: Debian, runtime: /usr/lib/jvm/java-11-openjdk-amd64 Default locale: en_US, platform encoding: UTF-8 OS name: "linux", version: "4.19.0-6-amd64", arch: "amd64", family: "unix" Ya puedes ejecutar Maven. Si tienes dudas te recomiendo revisar su guía oficial, es muy buena. Espero que este articulo te sea de utilidad, puedes ayudarnos a mantener el servidor con una donación (paypal), o también colaborar con el simple gesto de compartir nuestros artículos en tu sitio web, blog, foro o redes sociales. Read the full article
#/opt/maven/bin#ApacheMaven#Debian10#Eclipse#git#InstalarApacheMaven#JasonvanZyl#java_home#maven#netbeans#opensource#OpenJDK11#wget
0 notes
Text
Jak v Arch Linux nastavit JAVA_HOME a Maven Proměnné.
Pokud začínáte programovat v Jave do budoucna se vám bude hodit jak nastavit JAVA_HOME a ušetříte si případně starosti s tím proč vám něco nefunguje.
Návod je psán pro Arch Linux, ale měl by být použitelný i v jiných distribucích ( jen bude některé příkazy nutno přizpůsobit).
Nejprve začneme instalací Maven, tak nám nabídne rovnou instalaci Javy.
V terminálu se přihlásíme pomocí su a zadáme:
pacman -S maven
Instalátor nabídne ke stažení Javu. Já zvolil java-17-openjdk. Pak potvrdíme vše a nainstalujeme Maven a případně i javu.
Že máme vše nainstalované ověříme příkazem:
mvn -v Maven
Nastavíme proměnné tím že do konzole zadáme:
sudo nano /etc/profile.d/maven.sh
Otevře se textový editor v konzoli a tam zadáme toto:
export JAVA_HOME=/usr/lib/jvm/default-java export M2_HOME=/opt/maven export MAVEN_HOME=/opt/maven export PATH=${M2_HOME}/bin:${PATH}
Pomocí CTRL+O vše zapíšeme a CTRL+X ukončí textový editor. Editor Nano
Zadáme příkaz:
$ sudo chmod +x /etc/profile.d/maven.sh
a
source /etc/profile.d/maven.sh
Tím máme nastavené Maven a nastavíme java proměnné.
V terminálu zadáme tento příkaz abychom zjistili jakou máme verzi javy:
java –version
Číslo verze si poznamenejte a v terminálu zadejte:
nano ~/.bashrc
Znovu se otevře textový editor a nakonec přidáte tyto dva řádky (verze javy se může lišit):
export JAVA_HOME=/usr/lib/jvm/java–17-openjdk
export PATH=$PATH:$JAVA_HOME/bin
Vše uložíme a ukončíme nano.
Do terminálu vložíme:
source ~/.bashrc
A ověříme že je proměnná nastavena tímto příkazem:
echo $JAVA_HOME
Pokud je vše dobře uvidíte podobný výstup: echo $JAVA_HOME
Pokud se vám v kořenovém adresáři nevytvořila složka .m2 a potřebujete ji použijte tento příkaz:
mkdir -p ~/.m2 https://lukan.cz/2023/01/jak-v-arch-linux-nastavit-java_home-a-maven-promenne/
0 notes
Text
This guide will walk you through steps used to install JFrog Artifactory on CentOS 7. JFrog Artifactory is the world’s most advanced repository manager which fully supports software created in any language or using any tool. JFrog Artifactory is designed to integrate with the majority of continuous integration and delivery tools to deliver an end to end automated solution for tracking artifacts from development to production. A number of open source plugins are available to give you an easy way to extend the capabilities of Artifactory and integrate with other tools. Examples are Jenkins, TeamCity, Bamboo, Maven, Bower and Gradleand much more. For Ubuntu, use: How to Install JFrog Artifactory on Ubuntu There are different editions of JFrog Artifactory available, check the Comparison Matrix. There two ways of installing Artifactory on CentOS 7: Using Docker Installing from RPM packages Method 1: Install JFrog Artifactory using Docker For Docker installation, here are the steps to use: Step 1: Install Docker Engine Install Docker using our previous guide: How to install Docker CE on Ubuntu / Debian / Fedora / Arch / CentOS Step 2: Download JFrog Artifactory Docker image Pull the latest Docker image of JFrog Artifactory. docker pull docker.bintray.io/jfrog/artifactory-oss:latest For CE edition: docker pull docker.bintray.io/jfrog/artifactory-cpp-ce Confirm Docker images: $ docker images REPOSITORY TAG IMAGE ID CREATED SIZE docker.bintray.io/jfrog/artifactory-cpp-ce latest 24d943a892ac 43 hours ago 582MB docker.bintray.io/jfrog/artifactory-oss latest 58d49856785f 43 hours ago 582MB Step 3: Create Data Directory Create data directory on host system to ensure data used on container is persistent. sudo mkdir -p /jfrog/artifactory sudo chown -R 1030 /jfrog/ Step 4: Start JFrog Artifactory container To start an Artifactory container, use the command: docker run --name artifactory -d -p 8081:8081 -p 8082:8082 \ -v /jfrog/artifactory:/var/opt/jfrog/artifactory \ docker.bintray.io/jfrog/artifactory-oss:latest You can pass Java system properties to the JVM running Artifactory using EXTRA_JAVA_OPTIONS. Check more on Docker setup link. See example below. docker run --name artifactory -d -p 8081:8081 -p 8082:8082 \ -v /jfrog/artifactory:/var/opt/jfrog/artifactory \ -e EXTRA_JAVA_OPTIONS='-Xms512m -Xmx2g -Xss256k -XX:+UseG1GC' \ docker.bintray.io/jfrog/artifactory-oss:latest Use docker ps command to view container information. Step 5: Running JFrog Artifactory container with Systemd Systemd is the default init system for CentOS 7. We can use it to manage JFrog Artifactory container. Create Artifactory service unit file. sudo vim /etc/systemd/system/artifactory.service Add: [Unit] Description=Setup Systemd script for Artifactory Container After=network.target [Service] Restart=always ExecStartPre=-/usr/bin/docker kill artifactory ExecStartPre=-/usr/bin/docker rm artifactory ExecStart=/usr/bin/docker run --name artifactory -p 8081:8081 -p 8082:8082 \ -v /jfrog/artifactory:/var/opt/jfrog/artifactory \ docker.bintray.io/jfrog/artifactory-oss:latest ExecStop=-/usr/bin/docker kill artifactory ExecStop=-/usr/bin/docker rm artifactory [Install] WantedBy=multi-user.target Reload systemd. sudo systemctl daemon-reload Then start Artifactory container with systemd. sudo systemctl start artifactory Enable it to start at system boot. sudo systemctl enable artifactory Status can be checked with: systemctl status artifactory Sample output: Also check service binding with: ss -tunelp | grep 8081 Step 6: Access Artifactory Web Interface Artifactory can be accessed using the following URL: http://SERVERIP_OR_DOMAIN:8081/artifactory Follow setup instructions that follows. Select the package type(s) you want to create default repositories for.
You can skip to set later. Click “Finish” button to complete installation. Step 7: Configure Nginx reverse proxy (Optional) If you want to use Nginx as Proxy with SSL, check out the guide below: Configure JFrog Artifactory behind Nginx and Let’s Encrypt SSL Method 2: Install JFrog Artifactory using RPM Here are the steps you need to install JFrog Artifactory on CentOS 7 from RPM packages. Step 1: Install Java Use the commands below to install Java on CentOS: sudo yum -y install java-1.8.0-openjdk java-1.8.0-openjdk-devel sudo alternatives --config java java -version Step 2: Set JAVA_HOME After installing Java, Set JAVA_HOME environment variable. Set JAVA_HOME on CentOS / RHEL / Fedora Step 3: Install and Configure Database Server Install MariaDB Database Server: Install MariaDB Server on CentOS 7 Step 4: Add JFrog Artifactory RPM repository The JFrog Artifactory packages are available on official repository. Add it by running: curl -sL https://bintray.com/jfrog/artifactory-rpms/rpm | sudo tee /etc/yum.repos.d/bintray-jfrog-artifactory-rpms.repo This repository works for both Artifactory CE and Artifactory OSS editions. Step 5: Install JFrog Artifactory on CentOS 7 Installing JFrog Artifactory is a matter of running yum command and specifying Artifactory edition to install. Install JFrog Artifactory OSS: sudo yum -y install jfrog-artifactory-oss wget Install JFrog Artifactory CE: sudo yum -y install jfrog-artifactory-cpp-ce wget Set ARTIFACTORY_HOME. echo "export ARTIFACTORY_HOME=/opt/jfrog/artifactory" | sudo tee -a /etc/profile source /etc/profile env | grep ARTIFACTORY_HOME Files and Folders Locations: When installed from an RPM distribution, Artifactory retains the FHS (Filesystem Hierarchy Standard) format: File/Folder Location Ownership Tomcat home /opt/jfrog/artifactory/tomcat artifactory (root for sub dirs) Artifactory startup script /etc/init.d/artifactory root Artifactory logs /var/opt/jfrog/artifactory/logs artifactory Artifactory home /var/opt/jfrog/artifactory artifactory Artifactory etc /etc/opt/jfrog/artifactory artifactory Artifactory env variables /etc/opt/jfrog/artifactory/default artifactory Artifactory binary /opt/jfrog/artifactory root Step 6: Configuring Artifactory to use MariaDB 1. Copy Artifactory database configuration template. sudo mkdir /var/opt/jfrog/artifactory/etc sudo cp /opt/jfrog/artifactory/misc/db/mariadb.properties /var/opt/jfrog/artifactory/etc/db.properties 2. Run MariaDB configuration script. sudo /opt/jfrog/artifactory/bin/configure.mysql.sh Provide root password and set Artifactory user password then Agree to download Artifactory. ######################################################## # Welcome to the Artifactory MySQL configuration tool! # ######################################################## Please enter the MySQL server admin username [root]: Please enter the MySQL server admin password: Please enter the Artifactory database username [artifactory]: Please enter the Artifactory database password [password]: Creating the Artifactory MySQL user and database... No MySQL JDBC connector found. Download or copy one needed. Does the current server has access to the Internet? [Y/n] y Downloading mysql-connector-java-5.1.24.jar to /opt/jfrog/artifactory/tomcat/lib... Configuration completed successfully! You can now start up the Artifactory service to use Artifactory with MySQL. Press enter to exit... Start Artifactory service: sudo systemctl start artifactory.service sudo systemctl enable artifactory.service Check service status: $ systemctl status artifactory.service ● artifactory.service - Setup Systemd script for Artifactory in Tomcat Servlet Engine Loaded: loaded (/usr/lib/systemd/system/artifactory.service; enabled; vendor preset: disabled) Active: active (running) since Wed 2019-04-10 10:31:16 CEST; 36s ago
Process: 5091 ExecStop=/opt/jfrog/artifactory/bin/artifactoryManage.sh stop (code=exited, status=0/SUCCESS) Process: 5164 ExecStart=/opt/jfrog/artifactory/bin/artifactoryManage.sh start (code=exited, status=0/SUCCESS) Main PID: 5213 (java) CGroup: /system.slice/artifactory.service ‣ 5213 /usr/bin/java -Djava.util.logging.config.file=/opt/jfrog/artifactory/tomcat/conf/logging.properties -Djava.util.logging.manager=or… Apr 10 10:31:16 artifactory artifactoryManage.sh[5164]: + runReplicator Apr 10 10:31:16 artifactory artifactoryManage.sh[5164]: + '[' '' == true ']' Apr 10 10:31:16 artifactory artifactoryManage.sh[5164]: + return 1 Apr 10 10:31:16 artifactory artifactoryManage.sh[5164]: + startMetadata Apr 10 10:31:16 artifactory artifactoryManage.sh[5164]: + runMetadata Apr 10 10:31:16 artifactory artifactoryManage.sh[5164]: + '[' '' == true ']' Apr 10 10:31:16 artifactory artifactoryManage.sh[5164]: + return 1 Apr 10 10:31:16 artifactory artifactoryManage.sh[5164]: + '[' 0=0 ']' Apr 10 10:31:16 artifactory artifactoryManage.sh[5164]: + exit 0 Apr 10 10:31:16 artifactory systemd[1]: Started Setup Systemd script for Artifactory in Tomcat Servlet Engine. Step 7: Access Artifactory Web Interface Artifactory can be accessed using the following URL: http://SERVERIP_OR_DOMAIN:8081/artifactory You should see Artifactory welcome page. Check Artifactory Documentation for more features and usage guides.
0 notes
Text
How to install maven on api linux aws

#How to install maven on api linux aws zip#
Mvn -versionIf it works, hooray! you have successfully installed the latest Apache Maven on your computer. Logout and login to the computer and check the Maven version using the following command. Sudo wget -output-document /etc/bash_completion.d/mvn Credits to Juven Xu: maven-bash-completion Sudo update-alternatives -set mvn /opt/apache-maven-$maven_version/bin/mvnĪdd Bash completion to mvn so that you can complete complex Maven commands by hitting Tab multiple times. Sudo update-alternatives -install "/usr/bin/mvn" "mvn" "/opt/apache-maven-$maven_version/bin/mvn" 0 The utility only requires Python to execute, so that's the only. It's a great tool for managing everything in AWS. M2_HOME="/opt/apache-maven-$maven_version"After the modification, press Ctrl + O to save the changes and Ctrl + X to exit nano. AWS CLI allows users to control different AWS services via the command line. PATH="/usr/local/sbin:/usr/local/bin:/usr/sbin:/usr/bin:/sbin:/bin:/usr/games:/usr/local/games:/usr/lib/jvm/jdk-10.0.2/bin:/opt/apache-maven-$maven_version/bin"
#How to install maven on api linux aws zip#
Notice the end of PATH variable and the M2_HOME variable. &0183 &32 Select the Link option apache apache-maven-3.6.0-bin.zip to download the zip file. The data passes from the API endpoint to the Lambda function and is handled by the API-Gateway. It makes it super easy for the developers to create https endpoints and integrate it with Lambda function. My Maven installation is located at /opt/apache-maven-3.5.4, so to add that to my /. &0183 &32 Amazon API-Gateway is one of a networking service provided by AWS that allows developers to easily build and deploy API endpoints. This will override any of these environment variables set system wide by /etc/environment. The framework allows to work with applications that engage the following AWS services: API Gateway. sudo nano /etc/environment WARNING: Do not replace your environment file with the following content because you may already have different environment variables which are required by other applications to function properly. &0183 &32 First of all, to have M2HOME set between terminal restarts youll have to add the export statement to /.bashrc (assuming your shell is bash). aws-syndicate is an Amazon Web Services deployment framework written in Python, which allows to easily deploy serverless applications using resource descriptions. Execute the following command and modify the content as given below. You can use nano to edit the file in the terminal itself.
0 notes
Text
jenkins: mvn: 未找到命令
jenkins 执行 build 时,总是报错找不到 mvn 命令,原来是因为 The execute shell does not know about the Maven settings; only the maven job type or step does. 可以设置
export MAVEN_HOME=/opt/maven export PATH=$PATH:$MAVEN_HOME/bin
或者调用mvn命令时使用绝对路径
0 notes
Text
%news%
New Post has been published on %http://paulbenedictsgeneralstore.com%
News Killing a top Iranian military leader was a whack-for-tat move - The Washington Post

News
Bask in the killing of Osama bin Encumbered, the strike on Iranian Maj. Gen. Qasem Soleimani in Baghdad on Thursday appears to be to be a intellectual confirmation of U.S. defense force and intelligence capabilities. Bask in bin Encumbered, Soleimani used to be to blame for many American deaths; the Quds Power he led focused and killed American citizens, as bin Encumbered’s al-Qaeda did.
But there the similarities discontinuance. Soleimani used to be no stateless outlaw. He used to be a decorated public figure in a nation of larger than 80 million folk. He used to be the most successfully-known of the Iranian generals, hugely fashioned within Iran — and in Iraq, where supporters of an Iranian-backed militia stormed the U.S. Embassy in Baghdad early this week.
If the killing of Soleimani used to be a response to that assault, it used to be clearly disproportionate: We suffered no casualties in the embassy standoff. Proportionality may maybe well just want been some diplomatic stress on Iranian authorities in Iraq or someplace else or, a notch up, seizing but every other Iranian ship. That makes what comes next extremely unpredictable. And failing to deem forward to the seemingly Iranian next steps is extremely dangerous.
International coverage, in particular defense force circulate, is the responsibility of the president. Even though it commonly shows the regarded as as options of security mavens, it's some distance additionally a fabricated from the fashion and temperament of the president. This goes double for President Trump, who has continuously rejected defense force and diplomatic advice, discounted U.S. intelligence experts and carved out his dangle idiosyncratic insurance policies. Since early 2017, Trump has danced around the perimeters of crises — first in Syria, then in North Korea and now with Iran. With the strike on Soleimani, he has in a roundabout procedure been drawn fully into the dance — but does he know the steps?
Undoubtedly the assault used to be intended to be preemptive as successfully as punitive. Soleimani and his crew had been completely planning responses to U.S. actions. But right here the query is whether or now not or now not this strike prevented additional Iranian strikes or simply made escalation inevitable. No matter Soleimani’s charisma or strategic genius, it’s now not going that the loss of a race-setter will so cripple Iran’s skill to strike succor that the escalatory cycle will be broken.
The circulate puts grave stress on the authorities of Iraq. Did Iraq present key intelligence? Did Iraq authorize the strike? Did Iraq permit U.S. resources in its airspace? An Iraqi authorities torn by tribal and sectarian tensions and thoroughly penetrated by Iranian agents — and heavily dependent politically and economically on Iran — will be additional shaken. (The Iraqi top minister mentioned the strike would “gentle the fuse of a negative war.”) Divided loyalties contained in the safety forces will intensify, as will public outcry against the US. Iran is terribly seemingly to make use of these stresses to buttress its pursuits within Iraq, tense concessions, forcing pro-American officers out of energy and additional undercutting U.S. pursuits and efforts.
Historical past additionally suggests that Iran will hit succor and hit noteworthy, at a time and station of its choosing. Iran has already demonstrated that it'll shoot down U.S. drones, take dangle of merchant ships, bombard U.S. running bases with rockets and mobilize an assault on the U.S. Embassy in Baghdad with passive give a enhance to from the Iraqi authorities. Surely Iran has more devastating responses in the market, including assaults initiate air Iraq and maybe even contained in the US.
Meanwhile, what is the U.S. procedure in the continuing fight, and does this circulate reach it? This must be the overriding query. Pointless to impart the US must act decisively to give protection to its forces and voters, but nothing in the 40 years of American fight with Iran has indicated that it could maybe maybe well succor down from a defense force speak. When the US stepped some distance from the Iran nuclear agreement in 2018 and opted as a replacement to crush Iran with financial sanctions to gawk a more favorable diplomatic agreement, the administration must possess anticipated a long, now not easy fight. Iran has been wound, small doubt, and has been fighting succor by fastidiously managed defense force escalation — which till now the US had properly shunned joining.
The war enters a fresh piece now: Reciprocal, escalating defense force actions are a magnificent bet. When Iran retaliates, can the US retain an additional response? Will it originate additional preemptive strikes to preclude Iranian circulate? Wider components come into play. Saudi Arabia and diversified Persian Gulf states will truly feel some affect. Israel may maybe well just be subjected to greater threat. And the perfect procedure will Russia and China react?
Most effective farsighted leadership and unparalleled statesmanship can head off a course to a war that neither aspect desires. This emerging disaster poses the most excessive test but of whether or now not the “The US First” president has it.
0 notes
Text
How to Install Maven on fresh Unix server
Download:
wget http://apache.mirror.anlx.net/maven/maven-3/3.6.1/binaries/apache-maven-3.6.1-bin.zip
Extract:
unzip apache-maven-3.6.1-bin.zip
Move the extracted contents to /opt/ directory.
mv apache-maven-3.6.1/ /opt/maven
Make a symlink to maven/bin folder as shown below.
ln -s /opt/maven/bin/mvn /usr/bin/mvn
Setup Maven environment variable
Create a file called maven.sh under /etc/profile.d/ directory.
vi /etc/profile.d/maven.sh
Add the following contents:
#!/bin/bash MAVEN_HOME=/opt/maven PATH=$MAVEN_HOME/bin:$PATH export PATH MAVEN_HOME export CLASSPATH=.
Save and close the file. Make it executable using the following command.
chmod +x /etc/profile.d/maven.sh
Then, set the environment variables permanently by running the following command:
source /etc/profile.d/maven.sh
Log out or reboot your system.
Now, check the ant version using command:
mvn -version
Source: https://www.unixmen.com/install-apache-ant-maven-tomcat-centos-76-5/
0 notes
Text
15 Natural Odor Eliminators to Freshen Up Your Home
MariaBobrova/iStock
If you’re having trouble achieving a fresh, clean smell in your house, rest assured—doing so generally does not require industrial-strength chemicals. Unless you’re dealing with a mold infestation, all you need to get the job done is some natural odor eliminators. Go natural! Smell great!
But first you need to identify the source of the stink. Take a step back and look at your cleaning habits: If your bathroom smells musty more often than not, it probably means you’re not cleaning enough.
We tapped the expertise of cleaning maven Marla Cilley for her tips on deodorizing every inch of your home from the fridge to the cat litter box. Here are her simple suggestions to slay odors using green products that you probably already have in your pantry.
1. Don’t use heavy-duty scented cleaners
We might associate “clean” with the strong smell of certain products. But Cilley assured us that soap is soap.
“We don’t need heavy-duty cleaners to clean our homes,” she says. Opt instead for unscented, green cleaners that don’t leave behind a signature scent. Or make your own all-purpose cleaner using 1 part castile soap to 8 parts distilled water.
2. Swish and swipe your toilets daily
Relax, no one is suggesting that you get down on your hands and knees to deep clean your toilets every single day. Just make a habit of giving the bowl a quick swipe with your toilet brush to keep mildew from building up.
3. Visit your unused bathroom
If you have a bathroom you don’t use very often, make sure you flush the toilet and run the sink for a few seconds every day. Cilley says when water dries in the trap, it can start smelling. So once you refresh the water in that powder room or basement bathroom daily, you’ll have a fresher environment for guests.
4. Kill the mildew
To banish mildew from grout in your shower, spray directly with 3% hydrogen peroxide, let it sit a few minutes, and then scrub it away. Oxygen bleach is another good option—but not chlorine bleach, which is too toxic to clean with. If you’ve done this and your home still smells dingy, you might want to look at some of the places where mold can hide.
5. Clean the cat litter box daily
We know, it’s a hassle. But hey, you wanted a cat, right? It goes without saying that you should clear the box daily. But you should also change the litter and wash out the container at least once a week. Keep it in a well-ventilated area, uncovered. Alternatively, consider getting a dog.
6. Clean your pets’ beds
If you can, use bedding with removable covers you can wash regularly. Wash the cushion itself, too, a couple of times a year. Run it through a cycle with vinegar to kill bacteria first, then another cycle with unscented detergent. If that doesn’t work, try soaking the bedding in a tub of hot water and detergent for 20 minutes and then washing. Dry your pet’s bedding outside in the sun, if possible.
7. Keep the really smelly stuff in the garage
Your kids’ soccer cleats, sweaty uniforms, etc. ”There’s not a whole lot you can do with those,” Cilley says. So don’t let them enter your home.
Instead, reserve a special spot in your garage for your family’s stinkiest shoes ‘n’ stuff, and keep a laundry bin nearby.
8. Keep activated charcoal in the refrigerator
Charcoal has been shown to reduce odors better than the classic box of baking soda. No, we’re not talking about those charcoal briquettes you used on your barbecue last weekend. Activated charcoal pellets can be found at your local pet store. Put about 2 cups pellets in an open container, and change it out every two months.
9. Pour baking soda down the garbage disposal
Here’s a better way to use that baking soda to remove stale food odors. Put a couple of spoonfuls in the garbage disposal and then run it.
Another idea: Cilley says you can put small bits of lemon peel down the garbage disposal.
10. Declutter
We hate to mention this because it’s probably the most time-consuming of all of these tips. But all that random stuff you have lying around kind of smells.
“Get rid of surface clutter,” Cilley advises. “Stop leaving things out.”
Stagnant clutter will attract dust.
11. Spritz your sheets
You’re laundering your sheets weekly, right? For an extra refreshing smell in your bedroom, skip the fabric softener. Instead, Cilley recommends adding a few drops of essential oil (e.g., mint, jasmine, eucalyptus, or lavender) to water in a spray bottle and spritzing your sheets.
12. Keep your trash clean
Hear us out on this one. If your garbage—especially the kitchen garbage—smells gross, it could be due to how you’re cleaning your trash can, not just what happens to be in it.
Keep the insides of your garbage cans clean. Use sturdy bags that don’t leak. Avoid letting liquids into the trash. If you’re tossing something truly rank like fish, put it in a separate bag and then throw it quickly into the garbage. And take out that kitchen garbage every day, even if it’s not full. But you knew that already, right?
13. Serve coffee in the closet
If you like to make coffee a home, here’s another idea. Fill a (clean) sock with ground coffee and hang it in your closet. The scent of coffee will neutralize the stale odors in the closet.
14. Open the windows once a day
Let your home air out once a day, even if just for a few minutes. Yes, even in the dead of winter.
15. Let plants clean the air
NASA’s Clean Air Study suggests that certain indoor plants provide a natural way of removing toxins. As such, why not add a few plants like a Boston fern, devil’s ivy, weeping fig, or bamboo palm throughout your home. Just make sure the soil is well-drained so that it doesn’t create another stinky situation.
The post 15 Natural Odor Eliminators to Freshen Up Your Home appeared first on Real Estate News & Insights | realtor.com®.
0 notes
Link
(DIRIYAH, Saudi Arabia) — Supermodels and social media mavens, their makeup artists and hair stylists in tow, posed at a concert in leather pants, chunky sweaters and trendy black combat boots. What was unusual about these Instagram posts was that they were all deliberately tagged in Riyadh, Saudi Arabia.
The bevy of Instagram stars, former Victoria’s Secret models, including Alessandra Ambrosio, and Hollywood actors like Ryan Phillipe, Ed Westwick and Wilmer Valderrama were invited to Saudi Arabia over the weekend to promote the kingdom’s most eye-popping effort yet at showcasing the dramatic changes taking hold in this country, where more than half of its 20 million citizens are under 25 years old.
The efforts are aimed at boosting the economy while polishing Saudi Arabia’s image abroad and appealing to the young. It’s a staggering pivot from just three years ago, when religious police would storm restaurants playing music and harass women in malls for showing their face or wearing red nail polish.
Now, the kingdom has movie theaters and concerts. Women are allowed to drive and travel without male permission, and they can sit with men, unsegregated at restaurants. The kingdom began issuing tourist visas this year. Female visitors are not required to wear the conservative black-flowing robe known as the abaya and headscarves in public.
At Riyadh airport, a booth welcomes tourists with pamphlets on etiquette in Saudi Arabia, labeled “Our Code of Conduct.”
“Both men and women are asked to dress modestly in public, avoiding tight fitting clothing,” it explains. “Women should cover their shoulders and knees in public.”
Apparently, not all the V.I.P. guests flown to Saudi Arabia on private jets got the memo — some opted for stomach-baring bralettes under open coats.
The blast of glossy social media posts helped draw attention to the visit’s purpose — to promote MDL Beast, a three-day musical extravaganza in Riyadh that drew more than 130,000 visitors on its first day alone, according to the General Entertainment Authority. Ticket prices started at just 75 riyals ($20), but organizers were eager to ensure a big turnout so tickets were also handed out for free to some government employees.
More than 70 world-renowned DJs were invited to perform across five stages to the backdrop of surrealist performances — including one with a woman in a skintight sky blue leotard writhing from a hot air balloon over a crowd of young Saudi men.
Men and women cut loose and danced at the unprecedented rave-like event. Thousands waited for hours to get in.
A popular social media account, Diet Prada, named and shamed some of the celebrities present, accusing them of allegedly accepting six-figure sums for attendance and geo-tagged posts to “rehabilitate the image of Saudi Arabia.”
Earlier this year, hip-hop star Nicki Minaj pulled out of performing in the kingdom over concerns about women’s rights, gay rights and freedom of expression.
When asked by The Associated Press, the entertainment authority that licensed MDL Beast said some people had been compensated for promoting the event, but denied such high sums were paid to individuals.
While the social changes ushered in by Crown Prince Mohammed bin Salman have been sweeping, so too is his crackdown on criticism and political expression. The prince has overseen the country’s war in Yemen, which has led to the world’s worst humanitarian crisis, and the arrest of women’s rights activists, clerics and writers.
He’s also drawn international condemnation for the killing of Saudi writer and Washington Post columnist Jamal Khashoggi in Turkey, slaughtered by Saudi agents inside the Saudi Consulate in Istanbul last year.
The incident tarnished Prince Mohammed’s international image though his popularity is undeniable at home.
“The changes are really incredible and, God willing, we are heading toward even more,” said Mona Hassan, a mother out with her grown daughters at a family-friendly carnival in Diriyah, near Riyadh. “We are with Mohammed bin Salman wherever he takes us and whatever happens.”
The fully veiled Hassan said she wasn’t raised on this kind of entertainment, but has no problem with her kids enjoying it.
Saad al-Otaibi, who traveled 300 kilometers (186 miles) from al-Duwaidmi to attend the Diriyah festival, wanted to ensure it was family-friendly and affordable before bringing his wife and kids.
“All the changes are positive, not negative,” he said. “But one comment is that the prices are expensive,” he said, repeating a refrain others have quipped about on Twitter.
The Diriyah festival, which opened a month ago, has included sporting events like the world’s heavyweight boxing championship.
Families skated on an ice-rink, ziplined across the park, ride on a Ferris wheel and played galactic bowling. At the other end of the site, a younger crowd of Saudi elites smoked shisha — the bubbling waterpipe — and dined at pop-up restaurants where prices range from $100 to $1,200 a person for a meal.
Couples sat on park benches under the stars, listening to a Saudi musician playing the oud, a stringed instrument popular in the Middle East.
“No one could have imagined everything that’s happening,” said Abdullah Abulkheir, a 28-year-old Saudi visiting Diriyah. “We never thought we could reach this point in 30 years’ time. It’s been a huge transformation in a short period of time.”
Not all are happy with the crown prince’s style of governance or the changes. Yet Saudi clerics, many of whom had spoken out in the past against these changes, appear unwilling or unable to publicly criticize the moves. Those who dared have been detained and their social media accounts shuttered. In this absolute monarchy, the king holds final say on major decisions.
Only one major incident has so far marred the festivities. Last month, a Yemeni man stabbed two Spanish dancers and a guard at a live show in Riyadh. State media reported this week that he had allegedly acted on the orders of a senior al-Qaida leader in Yemen, according to evidence submitted during his trial.
Still, it’s clear most Saudis are ready for the changes.
“I don’t feel like I need to travel abroad like before because everything is here now,” Sarah Muteiri, 28, said. “We want these things and more.”
0 notes
Text
How to run AWS CloudHSM workloads on Docker containers
AWS CloudHSM is a cloud-based hardware security module (HSM) that enables you to generate and use your own encryption keys on the AWS Cloud. With CloudHSM, you can manage your own encryption keys using FIPS 140-2 Level 3 validated HSMs. Your HSMs are part of a CloudHSM cluster. CloudHSM automatically manages synchronization, high availability, and failover within a cluster.
CloudHSM is part of the AWS Cryptography suite of services, which also includes AWS Key Management Service (KMS) and AWS Certificate Manager Private Certificate Authority (ACM PCA). KMS and ACM PCA are fully managed services that are easy to use and integrate. You’ll generally use AWS CloudHSM only if your workload needs a single-tenant HSM under your own control, or if you need cryptographic algorithms that aren’t available in the fully-managed alternatives.
CloudHSM offers several options for you to connect your application to your HSMs, including PKCS#11, Java Cryptography Extensions (JCE), or Microsoft CryptoNG (CNG). Regardless of which library you choose, you’ll use the CloudHSM client to connect to all HSMs in your cluster. The CloudHSM client runs as a daemon, locally on the same Amazon Elastic Compute Cloud (EC2) instance or server as your applications.
The deployment process is straightforward if you’re running your application directly on your compute resource. However, if you want to deploy applications using the HSMs in containers, you’ll need to make some adjustments to the installation and execution of your application and the CloudHSM components it depends on. Docker containers don’t typically include access to an init process like systemd or upstart. This means that you can’t start the CloudHSM client service from within the container using the general instructions provided by CloudHSM. You also can’t run the CloudHSM client service remotely and connect to it from the containers, as the client daemon listens to your application using a local Unix Domain Socket. You cannot connect to this socket remotely from outside the EC2 instance network namespace.
This blog post discusses the workaround that you’ll need in order to configure your container and start the client daemon so that you can utilize CloudHSM-based applications with containers. Specifically, in this post, I’ll show you how to run the CloudHSM client daemon from within a Docker container without needing to start the service. This enables you to use Docker to develop, deploy and run applications using the CloudHSM software libraries, and it also gives you the ability to manage and orchestrate workloads using tools and services like Amazon Elastic Container Service (Amazon ECS), Kubernetes, Amazon Elastic Container Service for Kubernetes (Amazon EKS), and Jenkins.
Solution overview
My solution shows you how to create a proof-of-concept sample Docker container that is configured to run the CloudHSM client daemon. When the daemon is up and running, it runs the AESGCMEncryptDecryptRunner Java class, available on the AWS CloudHSM Java JCE samples repo. This class uses CloudHSM to generate an AES key, then it uses the key to encrypt and decrypt randomly generated data.
Note: In my example, you must manually enter the crypto user (CU) credentials as environment variables when running the container. For any production workload, you’ll need to carefully consider how to provide, secure, and automate the handling and distribution of your HSM credentials. You should work with your security or compliance officer to ensure that you’re using an appropriate method of securing HSM login credentials for your application and security needs.
Figure 1: Architectural diagram
Figure 1: Architectural diagram
Prerequisites
To implement my solution, I recommend that you have basic knowledge of the below:
CloudHSM
Docker
Java
Here’s what you’ll need to follow along with my example:
An active CloudHSM cluster with at least one active HSM. You can follow the Getting Started Guide to create and initialize a CloudHSM cluster. (Note that for any production cluster, you should have at least two active HSMs spread across Availability Zones.)
An Amazon Linux 2 EC2 instance in the same Amazon Virtual Private Cloud in which you created your CloudHSM cluster. The EC2 instance must have the CloudHSM cluster security group attached—this security group is automatically created during the cluster initialization and is used to control access to the HSMs. You can learn about attaching security groups to allow EC2 instances to connect to your HSMs in our online documentation.
A CloudHSM crypto user (CU) account created on your HSM. You can create a CU by following these user guide steps.
Solution details
On your Amazon Linux EC2 instance, install Docker:
# sudo yum -y install docker
Start the docker service:
# sudo service docker start
Create a new directory and step into it. In my example, I use a directory named “cloudhsm_container.” You’ll use the new directory to configure the Docker image.
# mkdir cloudhsm_container
# cd cloudhsm_container
Copy the CloudHSM cluster’s CA certificate (customerCA.crt) to the directory you just created. You can find the CA certificate on any working CloudHSM client instance under the path /opt/cloudhsm/etc/customerCA.crt. This certificate is created during initialization of the CloudHSM Cluster and is needed to connect to the CloudHSM cluster.
In your new directory, create a new file with the name run_sample.sh that includes the contents below. The script starts the CloudHSM client daemon, waits until the daemon process is running and ready, and then runs the Java class that is used to generate an AES key to encrypt and decrypt your data.
#! /bin/bash
# start cloudhsm client
echo -n "* Starting CloudHSM client ... "
/opt/cloudhsm/bin/cloudhsm_client /opt/cloudhsm/etc/cloudhsm_client.cfg &> /tmp/cloudhsm_client_start.log &
# wait for startup
while true
do
if grep 'libevmulti_init: Ready !' /tmp/cloudhsm_client_start.log &> /dev/null
then
echo "[OK]"
break
fi
sleep 0.5
done
echo -e "\n* CloudHSM client started successfully ... \n"
# start application
echo -e "\n* Running application ... \n"
java -ea -Djava.library.path=/opt/cloudhsm/lib/ -jar target/assembly/aesgcm-runner.jar --method environment
echo -e "\n* Application completed successfully ... \n"
In the new directory, create another new file and name it Dockerfile (with no extension). This file will specify that the Docker image is built with the following components:
The AWS CloudHSM client package.
The AWS CloudHSM Java JCE package.
OpenJDK 1.8. This is needed to compile and run the Java classes and JAR files.
Maven, a build automation tool that is needed to assist with building the Java classes and JAR files.
The AWS CloudHSM Java JCE samples that will be downloaded and built.
Cut and paste the contents below into Dockerfile.
Note: Make sure to replace the HSM_IP line with the IP of an HSM in your CloudHSM cluster. You can get your HSM IPs from the CloudHSM console, or by running the describe-clusters AWS CLI command.
# Use the amazon linux image
FROM amazonlinux:2
# Install CloudHSM client
RUN yum install -y https://s3.amazonaws.com/cloudhsmv2-software/CloudHsmClient/EL7/cloudhsm-client-latest.el7.x86_64.rpm
# Install CloudHSM Java library
RUN yum install -y https://s3.amazonaws.com/cloudhsmv2-software/CloudHsmClient/EL7/cloudhsm-client-jce-latest.el7.x86_64.rpm
# Install Java, Maven, wget, unzip and ncurses-compat-libs
RUN yum install -y java maven wget unzip ncurses-compat-libs
# Create a work dir
WORKDIR /app
# Download sample code
RUN wget https://github.com/aws-samples/aws-cloudhsm-jce-examples/archive/master.zip
# unzip sample code
RUN unzip master.zip
# Change to the create directory
WORKDIR aws-cloudhsm-jce-examples-master
# Build JAR files
RUN mvn validate && mvn clean package
# Set HSM IP as an environmental variable
ENV HSM_IP <insert the IP address of an active CloudHSM instance here>
# Configure cloudhms-client
COPY customerCA.crt /opt/cloudhsm/etc/
RUN /opt/cloudhsm/bin/configure -a $HSM_IP
# Copy the run_sample.sh script
COPY run_sample.sh .
# Run the script
CMD ["bash","run_sample.sh"]
Now you’re ready to build the Docker image. Use the following command, with the name jce_sample_client. This command will let you use the Dockerfile you created in step 6 to create the image.
# sudo docker build -t jce_sample_client .
To run a Docker container from the Docker image you just created, use the following command. Make sure to replace the user and password with your actual CU username and password. (If you need help setting up your CU credentials, see prerequisite 3. For more information on how to provide CU credentials to the AWS CloudHSM Java JCE Library, refer to the steps in the CloudHSM user guide.)
# sudo docker run --env HSM_PARTITION=PARTITION_1 \
--env HSM_USER=<user> \
--env HSM_PASSWORD=<password> \
jce_sample_client
If successful, the output should look like this:
* Starting cloudhsm-client ... [OK]
* cloudhsm-client started successfully ...
* Running application ...
ERROR StatusLogger No log4j2 configuration file found. Using default configuration: logging only errors
to the console.
70132FAC146BFA41697E164500000000
Successful decryption
SDK Version: 2.03
* Application completed successfully ...
Conclusion
My solution provides an example of how to run CloudHSM workloads on Docker containers. You can use it as a reference to implement your cryptographic application in a way that benefits from the high availability and load balancing built in to AWS CloudHSM without compromising on the flexibility that Docker provides for developing, deploying, and running applications. If you have comments about this post, submit them in the Comments section below.[Source]-https://aws.amazon.com/blogs/security/how-to-run-aws-cloudhsm-workloads-on-docker-containers/
Beginners & Advanced level Docker Training Course in Mumbai. Asterix Solution's 25 Hour Docker Training gives broad hands-on practicals. For details, Visit :
0 notes
Text
Original Post from Amazon Security Author: Mohamed AboElKheir
AWS CloudHSM is a cloud-based hardware security module (HSM) that enables you to generate and use your own encryption keys on the AWS Cloud. With CloudHSM, you can manage your own encryption keys using FIPS 140-2 Level 3 validated HSMs. Your HSMs are part of a CloudHSM cluster. CloudHSM automatically manages synchronization, high availability, and failover within a cluster.
CloudHSM is part of the AWS Cryptography suite of services, which also includes AWS Key Management Service (KMS) and AWS Certificate Manager Private Certificate Authority (ACM PCA). KMS and ACM PCA are fully managed services that are easy to use and integrate. You’ll generally use AWS CloudHSM only if your workload needs a single-tenant HSM under your own control, or if you need cryptographic algorithms that aren’t available in the fully-managed alternatives.
CloudHSM offers several options for you to connect your application to your HSMs, including PKCS#11, Java Cryptography Extensions (JCE), or Microsoft CryptoNG (CNG). Regardless of which library you choose, you’ll use the CloudHSM client to connect to all HSMs in your cluster. The CloudHSM client runs as a daemon, locally on the same Amazon Elastic Compute Cloud (EC2) instance or server as your applications.
The deployment process is straightforward if you’re running your application directly on your compute resource. However, if you want to deploy applications using the HSMs in containers, you’ll need to make some adjustments to the installation and execution of your application and the CloudHSM components it depends on. Docker containers don’t typically include access to an init process like systemd or upstart. This means that you can’t start the CloudHSM client service from within the container using the general instructions provided by CloudHSM. You also can’t run the CloudHSM client service remotely and connect to it from the containers, as the client daemon listens to your application using a local Unix Domain Socket. You cannot connect to this socket remotely from outside the EC2 instance network namespace.
This blog post discusses the workaround that you’ll need in order to configure your container and start the client daemon so that you can utilize CloudHSM-based applications with containers. Specifically, in this post, I’ll show you how to run the CloudHSM client daemon from within a Docker container without needing to start the service. This enables you to use Docker to develop, deploy and run applications using the CloudHSM software libraries, and it also gives you the ability to manage and orchestrate workloads using tools and services like Amazon Elastic Container Service (Amazon ECS), Kubernetes, Amazon Elastic Container Service for Kubernetes (Amazon EKS), and Jenkins.
Solution overview
My solution shows you how to create a proof-of-concept sample Docker container that is configured to run the CloudHSM client daemon. When the daemon is up and running, it runs the AESGCMEncryptDecryptRunner Java class, available on the AWS CloudHSM Java JCE samples repo. This class uses CloudHSM to generate an AES key, then it uses the key to encrypt and decrypt randomly generated data.
Note: In my example, you must manually enter the crypto user (CU) credentials as environment variables when running the container. For any production workload, you’ll need to carefully consider how to provide, secure, and automate the handling and distribution of your HSM credentials. You should work with your security or compliance officer to ensure that you’re using an appropriate method of securing HSM login credentials for your application and security needs.
Figure 1: Architectural diagram
Prerequisites
To implement my solution, I recommend that you have basic knowledge of the below:
CloudHSM
Docker
Java
Here’s what you’ll need to follow along with my example:
An active CloudHSM cluster with at least one active HSM. You can follow the Getting Started Guide to create and initialize a CloudHSM cluster. (Note that for any production cluster, you should have at least two active HSMs spread across Availability Zones.)
An Amazon Linux 2 EC2 instance in the same Amazon Virtual Private Cloud in which you created your CloudHSM cluster. The EC2 instance must have the CloudHSM cluster security group attached—this security group is automatically created during the cluster initialization and is used to control access to the HSMs. You can learn about attaching security groups to allow EC2 instances to connect to your HSMs in our online documentation.
A CloudHSM crypto user (CU) account created on your HSM. You can create a CU by following these user guide steps.
Solution details
On your Amazon Linux EC2 instance, install Docker:
# sudo yum -y install docker
Start the docker service:
# sudo service docker start
Create a new directory and step into it. In my example, I use a directory named “cloudhsm_container.” You’ll use the new directory to configure the Docker image.
# mkdir cloudhsm_container # cd cloudhsm_container
Copy the CloudHSM cluster’s CA certificate (customerCA.crt) to the directory you just created. You can find the CA certificate on any working CloudHSM client instance under the path /opt/cloudhsm/etc/customerCA.crt. This certificate is created during initialization of the CloudHSM Cluster and is needed to connect to the CloudHSM cluster.
In your new directory, create a new file with the name run_sample.sh that includes the contents below. The script starts the CloudHSM client daemon, waits until the daemon process is running and ready, and then runs the Java class that is used to generate an AES key to encrypt and decrypt your data.
#! /bin/bash # start cloudhsm client echo -n "* Starting CloudHSM client ... " /opt/cloudhsm/bin/cloudhsm_client /opt/cloudhsm/etc/cloudhsm_client.cfg &> /tmp/cloudhsm_client_start.log & # wait for startup while true do if grep 'libevmulti_init: Ready !' /tmp/cloudhsm_client_start.log &> /dev/null then echo "[OK]" break fi sleep 0.5 done echo -e "n* CloudHSM client started successfully ... n" # start application echo -e "n* Running application ... n" java -ea -Djava.library.path=/opt/cloudhsm/lib/ -jar target/assembly/aesgcm-runner.jar --method environment echo -e "n* Application completed successfully ... n"
In the new directory, create another new file and name it Dockerfile (with no extension). This file will specify that the Docker image is built with the following components:
The AWS CloudHSM client package.
The AWS CloudHSM Java JCE package.
OpenJDK 1.8. This is needed to compile and run the Java classes and JAR files.
Maven, a build automation tool that is needed to assist with building the Java classes and JAR files.
The AWS CloudHSM Java JCE samples that will be downloaded and built.
Cut and paste the contents below into Dockerfile.
Note: Make sure to replace the HSM_IP line with the IP of an HSM in your CloudHSM cluster. You can get your HSM IPs from the CloudHSM console, or by running the describe-clusters AWS CLI command.
# Use the amazon linux image FROM amazonlinux:2 # Install CloudHSM client RUN yum install -y https://s3.amazonaws.com/cloudhsmv2-software/CloudHsmClient/EL7/cloudhsm-client-latest.el7.x86_64.rpm # Install CloudHSM Java library RUN yum install -y https://s3.amazonaws.com/cloudhsmv2-software/CloudHsmClient/EL7/cloudhsm-client-jce-latest.el7.x86_64.rpm # Install Java, Maven, wget, unzip and ncurses-compat-libs RUN yum install -y java maven wget unzip ncurses-compat-libs # Create a work dir WORKDIR /app # Download sample code RUN wget https://github.com/aws-samples/aws-cloudhsm-jce-examples/archive/master.zip # unzip sample code RUN unzip master.zip # Change to the create directory WORKDIR aws-cloudhsm-jce-examples-master # Build JAR files RUN mvn validate && mvn clean package # Set HSM IP as an environmental variable ENV HSM_IP <insert the IP address of an active CloudHSM instance here> # Configure cloudhms-client COPY customerCA.crt /opt/cloudhsm/etc/ RUN /opt/cloudhsm/bin/configure -a $HSM_IP # Copy the run_sample.sh script COPY run_sample.sh . # Run the script CMD ["bash","run_sample.sh"]
Now you’re ready to build the Docker image. Use the following command, with the name jce_sample_client. This command will let you use the Dockerfile you created in step 6 to create the image.
# sudo docker build -t jce_sample_client .
To run a Docker container from the Docker image you just created, use the following command. Make sure to replace the user and password with your actual CU username and password. (If you need help setting up your CU credentials, see prerequisite 3. For more information on how to provide CU credentials to the AWS CloudHSM Java JCE Library, refer to the steps in the CloudHSM user guide.)
# sudo docker run --env HSM_PARTITION=PARTITION_1 --env HSM_USER=<user> --env HSM_PASSWORD=<password> jce_sample_client
If successful, the output should look like this:
* Starting cloudhsm-client ... [OK] * cloudhsm-client started successfully ... * Running application ... ERROR StatusLogger No log4j2 configuration file found. Using default configuration: logging only errors to the console. 70132FAC146BFA41697E164500000000 Successful decryption SDK Version: 2.03 * Application completed successfully ...
Conclusion
My solution provides an example of how to run CloudHSM workloads on Docker containers. You can use it as a reference to implement your cryptographic application in a way that benefits from the high availability and load balancing built in to AWS CloudHSM without compromising on the flexibility that Docker provides for developing, deploying, and running applications. If you have comments about this post, submit them in the Comments section below.
Want more AWS Security how-to content, news, and feature announcements? Follow us on Twitter.
Mohamed AboElKheir
Mohamed AboElKheir joined AWS in September 2017 as a Security CSE (Cloud Support Engineer) based in Cape Town. He is a subject matter expert for CloudHSM and is always enthusiastic about assisting CloudHSM customers with advanced issues and use cases. Mohamed is passionate about InfoSec, specifically cryptography, penetration testing (he’s OSCP certified), application security, and cloud security (he’s AWS Security Specialty certified).
#gallery-0-5 { margin: auto; } #gallery-0-5 .gallery-item { float: left; margin-top: 10px; text-align: center; width: 33%; } #gallery-0-5 img { border: 2px solid #cfcfcf; } #gallery-0-5 .gallery-caption { margin-left: 0; } /* see gallery_shortcode() in wp-includes/media.php */
Go to Source Author: Mohamed AboElKheir How to run AWS CloudHSM workloads on Docker containers Original Post from Amazon Security Author: Mohamed AboElKheir AWS CloudHSM is a cloud-based hardware security module (HSM) that enables you to generate and use your own encryption keys on the AWS Cloud.
0 notes
Text
Instalar Gradle en Ubuntu, CentOS y derivados

Instalar Gradle en Ubuntu, CentOS y derivados. Gradle es una herramienta de compilación automatizada basada en los principios de Apache Ant y Apache Maven, pero a diferencia de estos que ofrecen un formulario tradicional basado en XML para representar la configuracion del proyecto, Gradle nos proporciona DSL en los lenguajes de programación Groovy y Kotlin. Otras diferencias importantes que nos llaman la atención: Apache Maven, se basa en el concepto del ciclo de vida del proyecto; Apache Ant, en el orden que se ejecutan las tareas determinado por la relación de las dependencias. En el lado opuesto tenemos a Gradle que utiliza un grafo acíclico dirigido (DAG) para determinar el orden en el que se deben hacer las tareas. Gradle fue diseñado para ensamblajes extensibles de proyectos múltiples y, además admite ensamblajes incrementales al determinar automáticamente qué componentes del árbol ensamblador no han cambiado y, qué otras tareas dependientes de estas partes no necesitan reiniciar otra vez. En el articulo de hoy veremos cómo instalar Gradle en CentOS 7 / 8, y en Ubuntu 18.04 y superiores (se incluyen sus derivados y Debian 10).
Instalar Gradle en Ubuntu, CentOS y derivados
El único requisito previo para instalar Gradle, es tener Java JDK o JRE en su versión 8 (o superior) instalada en el sistema. Nosotros instalaremos OpenJDK y un par de herramientas necesarias. Instalar OpenJDK en Ubuntu, Linux Mint y derivados: sudo apt update sudo apt install -y default-jdk-headless sudo apt install -y wget unzip Instalar OpenJDK en CentOS y derivados: sudo yum update sudo yum install -y java yum install -y wget unzip El resto de la instalación es igual en CentOS y Ubuntu.

Instalar Gradle en linux
Instalar Gradle en Linux
Nosotros instalaremos la última versión, en este caso Gradle 6.3. Puedes verificar si existe alguna actualización en su página oficial. Descargamos Gradle. cd /tmp wget https://services.gradle.org/distributions/gradle-6.3-bin.zip Extraemos el paquete y movemos su contenido al directorio de la herramienta. unzip gradle-*.zip mkdir /opt/gradle cp -pr gradle-*/* /opt/gradle Comprobamos que los archivos se han movido correctamente. ls /opt/gradle/ ejemplo de salida... LICENSE NOTICE bin getting-started.html init.d lib media Ahora debes incluir el /bin de Gradle en las variables de entorno PATH. echo "export PATH=/opt/gradle/bin:${PATH}" | tee /etc/profile.d/gradle.sh El archivo gradle.sh debe contener lo siguiente... export PATH=/opt/gradle/bin:${PATH} Le concedes los permisos de ejecución necesarios. sudo chmod +x /etc/profile.d/gradle.sh Cargamos las variable para la sesión actual. source /etc/profile.d/gradle.sh Como punto final del articulo, verificamos la instalación de Gradle. gradle -v ejemplo de salida correcta... Welcome to Gradle 6.3! Here are the highlights of this release: - Java 14 support - Improved error messages for unexpected failures For more details see https://docs.gradle.org/6.3/release-notes.html ------------------------------------------------------------ Gradle 6.3 ------------------------------------------------------------ Build time: 2020-04-12 20:32:04 UTC Revision: bacd40b727b0130eeac8855ae3f9fd9a0b207c60 Kotlin: 1.3.70 Groovy: 2.5.10 Ant: Apache Ant(TM) version 1.10.7 compiled on September 1 2019 JVM: 11.0.6 (Ubuntu 11.0.6+10-post-Ubuntu-1ubuntu118.04.1) OS: Linux 5.0.0-1026-gcp amd64 Canales de Telegram: Canal SoloLinux – Canal SoloWordpress Espero que este articulo te sea de utilidad, puedes ayudarnos a mantener el servidor con una donación (paypal), o también colaborar con el simple gesto de compartir nuestros artículos en tu sitio web, blog, foro o redes sociales. Read the full article
#ApacheAnt#ApacheMaven#Centos#Gradle#Gradle6.3#grafoacíclicodirigido#groovy#InstalarGradle#instalarGradleenCentOS#InstalarGradleenLinux#instalarGradleenUbuntu#JavaJDK#OpenJDK#Variablesdeentorno
0 notes
Link
Learn how Spark 2.3.0+ integrates with K8s clusters on Google Cloud and Azure.
Do you want to try out a new version of Apache Spark without waiting around for the entire release process? Does running alpha-quality software sound like fun? Does setting up a test cluster sound like work? This is the blog post for you, my friend! We will help you deploy code that hasn't even been reviewed yet (if that is the adventure you seek). If you’re a little cautious, reading this might sound like a bad idea, and often it is, but it can be a great way to ensure that a PR really fixes your bug, or the new proposed Spark release doesn’t break anything you depend on (and if it does, you can raise the alarm). This post will help you try out new (2.3.0+) and custom versions of Spark on Google/Azure with Kubernetes. Just don't run this in production without a backup and a very fancy support contract for when things go sideways.
Note: This is a cross-vendor post (Azure's Spark on AKS and Google Cloud's Custom Spark on GKE), each of which have their own vendor-specific posts if that’s more your thing.
Warning: it’s important to make sure your tests don’t destroy your real data, so consider using a sub-account with lesser permissions.
Setting up your version of Spark to run
If there is an off-the-shelf version of Spark you want to run, you can go ahead and download it. If you want to try out a specific patch, you can checkout the pull request to your local machine with git fetch origin pull/ID/head:BRANCHNAME, where ID is the PR number, and then follow the directions to build Spark (remember to include the -P components you want/need, including your cluster manager of choice).
Now that we’ve got Spark built, we will build a container image and upload it to the registry of your choice, like shipping a PXE boot image in the early 90s (bear with me, I miss the 90s).
Depending on which registry you want to use, you’ll need to point both the build tool and spark-submit in the correct location. We can do this with an environment variable—for Docker Hub, this is the name of the registry; for Azure Container Registry (ACR), this value is the ACR login server name; and for Google Container Registry, this is gcr.io/$PROJECTNAME.
export REGISTRY=value
For Google cloud users who want to use the Google-provided Docker registry, you will need to set up Docker to run through gcloud. In the bash shell, you can do this with an alias:
shopt -s expand_aliases && alias docker="gcloud docker --"
For Azure users who want to use Azure Container Registry (ACR), you will need to grant Azure Container Service (AKS) cluster read access to the ACR resource.
For non-Google users, you don’t need to wrap the Docker command, and just skip that step and keep going:
export DOCKER_REPO=$REGISTRY/spark export SPARK_VERSION=`git rev-parse HEAD` ./bin/docker-image-tool.sh -r $DOCKER_REPO -t $SPARK_VERSION build ./bin/docker-image-tool.sh -r $DOCKER_REPO -t $SPARK_VERSION push
Building your Spark project for deployment (or, optionally, starting a new one)
Spark on K8s does not automatically handle pushing JARs to a distributed file system, so we will need to upload whatever JARs our project requires to work. One of the easiest ways to do this is to turn our Spark project into an assembly JAR.
If you’re starting a new project and you have sbt installed, you can use the Spark template project:
sbt new holdenk/sparkProjectTemplate.g8
If you have an existing SBT-based project, you can add the sbt-assembly plugin:
touch project/assembly.sbt echo 'addSbtPlugin("com.eed3si9n" % "sbt-assembly" % "0.14.6")' >> project/assembly.sbt
With SBT, once you have the SBT assembly plugin (either through creating a project with it included in the template or adding it to an existing one), you can produce an assembly JAR by running:
sbt assembly
The resulting JAR not only will have your source code, but all of the requirements as well. Note that this JAR may have multiple entry points, so later on, we’re going to need to tell Spark submit about the entry point we want it to use. For the world standard wordcount example, we might use:
export CLASS_NAME=org.apache.spark.examples.JavaWordCount
If you have a maven or other project, there are a few different options for building assembly JARs. Sometimes, these may be referred to as “fat jars” in the documentation.
If starting a new project sounds like too much work and you really just want to double check that your Spark on K8s deployment works, you can use the example JAR that Spark ships with (e.g., examples/target/spark-examples).
Uploading your JARs
One of the differences between Spark on K8s and Spark in the other cluster managers is that there is no automatic tool to distribute our JARs (or other job dependencies). To make sure your containers have access to your JAR, the fastest option is normally to upload it.
Regardless of platform, we need to specify which JAR, container / bucket, and the target:
export FOLDER_NAME=mybucket export SRCJAR=target/scala-2.11/... export MYJAR=myjar
With Azure:
RESOURCE_GROUP=sparkdemo STORAGE_ACCT=sparkdemo$RANDOM az group create --name $RESOURCE_GROUP --location eastus az storage account create --resource-group $RESOURCE_GROUP --name $STORAGE_ACCT --sku Standard_LRS export AZURE_STORAGE_CONNECTION_STRING=`az storage account show-connection-string --resource-group $RESOURCE_GROUP --name $STORAGE_ACCT -o tsv` az storage container create --name $FOLDER_NAME az storage container set-permission --name $FOLDER_NAME --public-access blob az storage blob upload --container-name $FOLDER_NAME --file $SRCJAR --name $MYJAR
With Google Cloud:
gsutil cp $SRCJAR gs://$JARBUCKETNAME/$MYJAR
For now though, we don’t have the JARs installed to access the GCS or Azure blob storage, and Spark on K8s doesn’t currently support spark-packages, which we could use to access those, so we need to make our JAR accessible over http.
With Azure:
JAR_URL=$(az storage blob url --container-name $FOLDER_NAME --name $MYJAR | tr -d '"')
With Google Cloud:
export PROJECTNAME=boos-demo-projects-are-rad gcloud iam service-accounts create signer --display-name "signer" gcloud projects add-iam-policy-binding $PROJECTNAME --member serviceAccount:signer@$PROJECTNAME.iam.gserviceaccount.com --role roles/storage.objectViewer gcloud iam service-accounts keys create ~/key.json --iam-account signer@$PROJECTNAME.iam.gserviceaccount.com export JAR_URL=`gsutil signurl -m GET ~/key.json gs://$JARBUCKETNAME/$MYJAR | cut -f 4 | tail -n 1`
Starting your cluster
Now you are ready to kick off your super-fancy K8s Spark cluster.
For Azure:
az group create --name mySparkCluster --location eastus az aks create --resource-group mySparkCluster --name mySparkCluster --node-vm-size Standard_D3_v2 az aks get-credentials --resource-group mySparkCluster --name mySparkCluster kubectl proxy &
For Google cloud:
gcloud container clusters create mySparkCluster --zone us-east1-b --project $PROJECTNAME gcloud container clusters get-credentials mySparkCluster --zone us-east1-b --project $PROJECTNAME kubectl proxy &
On Google Cloud, before we kick off our Spark job, we need to make a service account for Spark that will have permission to edit the cluster:
kubectl create serviceaccount spark kubectl create clusterrolebinding spark-role --clusterrole=edit --serviceaccount=default:spark --namespace=default
Running your Spark job
And now we can finally run our Spark job:
./bin/spark-submit --master k8s://http://127.0.0.1:8001 \ --deploy-mode cluster --conf \ spark.kubernetes.container.image=$DOCKER_REPO/spark:$SPARK_VERSION \ --conf spark.executor.instances=1 \ --class $CLASS_NAME \ --conf spark.kubernetes.authenticate.driver.serviceAccountName=spark \ --name wordcount \ $JAR_URL \ inputpath
And we can verify the output with:
kubectl logs [podname-from-spark-submit]
Handling dependencies in Spark K8s (and accessing your data/code without making it public):
What if we want to directly read our JARs from the storage engine without using https? Or if we have dependencies that we don’t want to package in our assembly JARs? In that case, can the necessary dependencies to our docker file as follows:
mkdir /tmp/build && echo “FROM $DOCKER_REPO/spark:$SPARK_VERSION # Manually update Guava deleting the old JAR to ensure we don’t have class path conflicts RUN rm \$SPARK_HOME/jars/guava-14.0.1.jar ADD http://central.maven.org/maven2/com/google/guava/guava/23.0/guava-23.0.jar \$SPARK_HOME/jars # Add the GCS connectors ADD https://storage.googleapis.com/hadoop-lib/gcs/gcs-connector-latest-hadoop2.jar \$SPARK_HOME/jars # Add the Azure Hadoop/Storage JARs ADD http://central.maven.org/maven2/org/apache/hadoop/hadoop-azure/2.7.0/hadoop-azure-2.7.0.jar ADD http://central.maven.org/maven2/com/microsoft/azure/azure-storage/7.0.0/azure-storage-7.0.0.jar ENTRYPOINT [ '/opt/entrypoint.sh' ]” > /tmp/build/dockerfile docker build -t $DOCKER_REPO/spark:$SPARK_VERSION-with-deps -f /tmp/build/dockerfile /tmp/build Push to our registry: docker push $DOCKER_REPO/spark:$SPARK_VERSION-with-deps
For Azure folks wanting to launch using Azure Storage rather than https:
export JAR_URL=wasbs://$FOLDER_NAME@$STORAGE_ACCT.blob.core.windows.net/$MYJAR
For Google folks wanting to launch using GCS rather than https:
export JAR_URL=gs://$JARBUCKETNAME/$MYJAR
And then run the same spark-submit as shown previously.
Wrapping up
Notably, each vendor has a more detailed guide to running Spark jobs on hosted K8s focused on their own platforms (e.g., Azure’s guide, Google’s guide, etc.), but hopefully this cross-vendor version shows you the relative portability between the different hosted K8s engines and our respective APIs with Spark. If you’re interested in helping join in Spark code reviews, you can see the contributing guide and also watch Karau’s past streamed code reviews on YouTube (and subscribe to her YouTube or Twitch channels for new livestreams). You can also follow the authors on their respective Twitter accounts: Alena Hall and Holden Karau.
Continue reading How to run a custom version of Spark on hosted Kubernetes.
from All - O'Reilly Media https://ift.tt/2Hz2rrk
0 notes
Text
Visualising IOT Data on a Pi Cluster using Mesos, Spark & Kafka
The sensorpi repo on GitHub holds various ramblings, scripts and code put together for and experiment to visualise realtime sensor data processed on a cluster of Raspberry Pis. Not dissimilar to https://www.circuits.dk/datalogger-example-using-sense-hat-influxdb-grafana/ but using the features of the cluster for near realtime processing.

But first a few caveats, unlike my Hadoopi project as this is an experiment there isn’t chef code to setup and configure the cluster of Raspberry Pis (you’ll need to do this by hand). Originally this project was intended to implement a SMACK (Spark, Mesos, Akka, Cassandra and Kafka) stack. You’ll see the end result is more of a SMKS stack (Spark, Mesos, Kafka and Scala) acting as a transfer mechanism between two Pis for capturing sensor mnetrics and visualsation of the collected data. On the sensor side a Pi zero is using an EnviroPhat pushing data to Kafka via Python. On the visualisation side there is an influxdb instance and grafana server to store and serve a realtime dashboard of the data.

Despite all of those caveats, I learned a tonne about running a Mesos on a cluster (on tin), writing Scala code, building it, Spark streaming, IOT sensors, Influxdb TICK stack and Grafana dashboards. So if you want to play along I expect you’ll learn all those things too, so it’s a case of manual setup, please make sure your command line Fu is cranked up to 11!
What You Will Need
The project uses a cluster of 5 Raspberry Pis, a wireless hub and 60W usb power adapter, full details of the cluster hardware can be found on the Hadoopi project. You’ll also need a development PC, I’m running Debian linux as it supports all the technologies and tools to build and deploy. Finally for the sensor I’m using an EnviroPhat from PiMoroni on a Raspberry Pi Zero W.
These instructions below will help you set up the cluster, this is how we are going to spread the workload across it:
Raspberry Pi Zero W and EnviroPhat - Python application posting sensor data to a Kafka Topic
Master01 - Running influxDB and Grafana
Master02 - Mesos Master, Launch Scripts and NFS share for spark app checkpointing
Worker01/02/03 - mesos slaves for running tasks from mesos
Each of the workers will run the spark application and kafka brokers as part of the mesos cluster.
You’ll be using the development PC for building the scala application and submitting it to Spark, if you have Kafka installed you can also use that to view the messages on the Kafka topic to help with troubleshooting.
As stated above this project really is an experiment because you could post metrics from the sensor Pi directly to influxdb - therefore the mesos, spark, scala and kafka components really are their just to learn.
Compilation and Packaging
Because the Raspberry Pi uses an arm architecture we are going to have to compile Mesos and Kafka, you’ll also find minimal documentation on achieving this, I’m using instructions that Netflix posted after one of their hackdays and blog post so as a result we have quite an old version of Mesos 0.28.3. I’ll be using the tried and trusted jessie lite 23-09-16 distribution of raspbian as I’d proven whilst building the Hadoopi project.
Boot one of you Pis from a fresh install and run the following to prepare the environment for compiling:
sudo -i apt-get update apt-get -y install oracle-java8-jdk tar wget git autoconf libtool build-essential python-dev python-boto libcurl4-nss-dev libsasl2-dev libsasl2-modules maven libapr1-dev libsvn-dev update-alternatives --config java select /usr/lib/jvm/jdk-8-oracle-arm32-vfp-hflt/jre/bin/java java -version <--- check it's the 1.8 SDK vi /etc/dphys-swapfile set CONF_SWAPSIZE to 1024 /etc/init.d/dphys-swapfile restart free -h <--- check you have 1GB of swap
Next clone and patch Mesos:
git clone https://github.com/apache/mesos.git cd mesos/ git checkout tags/0.28.3 wget https://raw.githubusercontent.com/Netflix-Skunkworks/mesos-on-pi/master/mesos-docker/mesos.patch wget https://raw.githubusercontent.com/Netflix-Skunkworks/mesos-on-pi/master/mesos-docker/add-to-patch.zookeeper git apply < mesos.patch cat add-to-patch.zookeeper > 3rdparty/zookeeper-3.4.5.patch
And now build the binary (warning this may take 3-4 hours):
./bootstrap mkdir build cd build ../configure --disable-python make mkdir /opt/mesos make DESTDIR=/opt/mesos/ install tar -C /opt/mesos/ -zcvf /home/pi/mesos-install.tar.gz .
Now transfer the binary mesos-install.tar.gz down to the dev pc
Next we need to make the kafka binary for mesos, following from the above build on the Pi:
cd apt-get -y install oracle-java8-jdk git java -version <--- check it's the 1.8 SDK git clone https://github.com/mesos/kafka cd kafka vi build.gradle version <--- change this to theabsolute path for Config.scala, so prepend /root/kafka/ ./gradlew jar downloadKafka cd /root tar -C /root/kafka/ -zcvf /home/pi/kafka-install.tgz .
Now transfer the binary kafka-install.tgz down to the dev pc
You can now power off the Pi and wipe the sdcard for reuse.
Setup OS and Networking
On each of the 5 nodes in the cluster - master01/02/worker01/02/03 (so excluding the sensor Pi). The Network is is setup to use the 10.0.0.255 subnet with master01/02 at 10.0.0.11 and 12, the workers being 21, 22, 23.
sudo -i apt-get update vi /etc/wpa_supplicant/wpa_supplicant.conf country=GB ctrl_interface=DIR=/var/run/wpa_supplicant GROUP=netdev update_config=1 network={ ssid="XXXXXXXX" <---- replace twith the SSID and KEY for the wireless network psk="YYYYYYYY" } vi /etc/dhcpcd.conf ...add to bottom... interface wlan0 static ip_address=10.0.0.XX/24 <-- 10.0.0.11,12,21,22,23 as appropriate static routers=10.0.0.1 static domain_name_servers=10.0.0.1 hostnamectl set-hostname ZZZZZZ <- change to master01/02/worker01/02/03 as appropriate vi /etc/hosts ...add to bottom... 10.0.0.11 master01 10.0.0.12 master02 10.0.0.21 worker01 10.0.0.22 worker02 10.0.0.23 worker03 vi /etc/ssh/ssh_config ...add to bottom... StrictHostKeyChecking no <--- this will break sshd on a stretch based distro of raspbian, it's ok on jessie service networking restart ifup wlan0 ifconfig <---- check got correct ip apt-get install nscd
You may for convenience wish to setup passwordless login from your dev pc
ssh-copy-id -i ~/.ssh/id_rsa.pub pi@ZZZZZZZZ <- master01/02/worker01/02/03
At this point you should have all 5 cluster nodes setup with network connectivity, the correct hostnames and access to the other nodes in the cluster.
Setting up the Worker Nodes
Now we are going to setup each of the worker nodes installing mesos, zookeeper, spark and startup script.
Firstly copy the mesos binary from you dev pc to each pi
scp mesos-install.tar.gz pi@workerXX:~
Then on each worker pi:
sudo -i cd / tar -zxvf /home/pi/mesos-install.tar.gz apt-get install libcurl4-nss-dev libsvn-dev mkdir /opt/mesos-slave-work_dir sudo -i apt-get install oracle-java8-jdk apt-get install zookeeperd vi /etc/zookeeper/conf/zoo.cfg ...add server list... server.1=worker01:2888:3888 server.2=worker02:2888:3888 server.3=worker03:2888:3888 echo "X" > /etc/zookeeper/conf/myid <---- X is 1, 2 or 3 correcponding to worker01/02/03 service zookeeper start
Next Create the startup script in /root, change the “ip” and “hostname” as applicable for the node
cd vi startup.sh #!/bin/bash mount -t nfs4 10.0.0.12:/ /mnt mesos-slave --log_dir=/var/log/mesos/ --work_dir=/opt/mesos-slave-work_dir --ip=10.0.0.XX --hostname=workerXX --master=zk://worker01:2181,worker02:2181,worker03:2181/mesos --launcher=posix --resources="cpus(*):2; mem(*):768;disk(*):40000;ports:[31000-32000,7000-7001,7199-7199,9042-9042,9160-9160]" <---- replace XX with ip address and hostname chmod a+x startup.sh
Now setup spark
cd /opt/ wget https://archive.apache.org/dist/spark/spark-1.6.2/spark-1.6.2-bin-hadoop2.6.tgz tar -zxvf spark-1.6.2-bin-hadoop2.6.tgz ln -s /opt/spark-1.6.2-bin-hadoop2.6 /opt/spark cp spark-1.6.2-bin-hadoop2.6/conf/spark-defaults.conf.template spark-1.6.2-bin-hadoop2.6/conf/spark-defaults.conf vi spark-1.6.2-bin-hadoop2.6/conf/spark-defaults.conf spark.network.timeout 500s spark.testing.reservedMemory 64000000 spark.testing.memory 128000000 cp spark-1.6.2-bin-hadoop2.6/conf/spark-env.sh.template spark-1.6.2-bin-hadoop2.6/conf/spark-env.sh vi spark-1.6.2-bin-hadoop2.6/conf/spark-env.sh ...add to bottom... SPARK_MASTER_IP=10.0.0.12
That’s the worker nodes ready to go.
Setting up master02
The master02 node is the most fidly to setup, it runs the majority of services, so there are a few steps to install, mesos, spark, nfs share and kafka.
Copy the required files to the Pi - that’s startup scripts, the mesos and kafka bianaries onto the node:
scp scripts/*.sh pi@master02:~ scp mesos-install.tar.gz pi@master02:~ scp kafka-install.tgz pi@master02:~
Then install mesos:
sudo -i cd / tar -zxvf /home/pi/mesos-install.tar.gz apt-get install libcurl4-nss-dev libsvn-dev
Next we need to setup an nfs share for the spark applications to use for checkpointing, details taken from http://www.instructables.com/id/Turn-Raspberry-Pi-into-a-Network-File-System-versi/
apt-get install nfs-common nfs-kernel-server mkdir -p /srv/nfs4/share chmod a+w /srv/nfs4/share/ vi /etc/exports /srv/nfs4/share 10.0.0.21(rw,sync,no_subtree_check) /srv/nfs4/share 10.0.0.22(rw,sync,no_subtree_check) /srv/nfs4/share 10.0.0.23(rw,sync,no_subtree_check) wget https://cdn.instructables.com/ORIG/F10/L3AF/I6HSMRV1/F10L3AFI6HSMRV1.script mv F10L3AFI6HSMRV1.script /etc/init.d/nfs-kernel-server wget https://cdn.instructables.com/ORIG/FS8/4950/I6HSMRZH/FS84950I6HSMRZH.cfg mv FS84950I6HSMRZH.cfg /etc/default/nfs-kernel-server vi /etc/default/nfs-common NEED_STATD="no" NEED_IDMAPD="yes" chmod a+x /etc/init.d/nfs-kernel-server update-rc.d rpcbind enable update-rc.d nfs-kernel-server enable service rpcbind start service nfs-kernel-server start
Next repeat the install of spark on master02 as was done on the worker nodes.
Now install kafka:
cd /opt mkdir kafka cd kafka tar -zxvf /home/pi/kafka-install.tgz vi /opt/kafka/kafka-mesos.properties ...remove all lines and add... storage=zk:/kafka-mesos master=zk://worker01:2181,worker02:2181,worker03:2181/mesos zk=worker01:2181,worker02:2181,worker03:2181/KafkaCluster api=http://master02:7000
Finally move that startup scripts to /root
mv /home/pi/*.sh /root chmod a+x /root/*.sh
That’s master02 ready to go.
Setting up master01
We’ll install 2 TICK stack components - influxdb 1.4 (which unfortunately doesn’t have the free clustering option) and the Chronograf. For dashboards we’ll also install Grafana.
Let’s install influxdb and create an empty database for our data:
sudo -i apt-get install apt-transport-https curl -sL https://repos.influxdata.com/influxdb.key | sudo apt-key add - source /etc/os-release echo "deb https://repos.influxdata.com/debian jessie stable" | sudo tee /etc/apt/sources.list.d/influxdb.list apt-get update apt-get install influxdb vi /etc/influxdb/influxdb.conf [http] # Determines whether HTTP endpoint is enabled. enabled = true # The bind address used by the HTTP service. bind-address = ":8086" # Determines whether user authentication is enabled over HTTP/HTTPS. auth-enabled = false service influxd restart influx -precision rfc3339 ---issue db creation command --- create database sensordata exit
Next install Chronograf:
apt-get install chronograf systemctl start chronograf http://master01:8888
Next lets install Grafana:
apt-get install apt-transport-https curl curl https://bintray.com/user/downloadSubjectPublicKey?username=bintray | sudo apt-key add - echo "deb https://dl.bintray.com/fg2it/deb jessie main" | sudo tee -a /etc/apt/sources.list.d/grafana.list apt-get update apt-get install grafana vi /etc/grafana/grafana.ini [server] # Protocol (http, https, socket) protocol = http # The ip address to bind to, empty will bind to all interfaces ;http_addr = # The http port to use http_port = 3000 service grafana-server restart
Check http://master01:3000 to check grafana is working
Setting up the Sensor
Connect up the EnviroPhat and boot, next configure the networking as for the main cluster, I chose 10.0.0.99 as the ip.
Upload the sensor.py code
scp sensor/sensor.py pi@XXXXX:~ <--- replace XXX with the ip of your sensor pi
Install the supporting libraries and configure:
sudo -i apt-get install pip python-envirophat pip2 install envirophat sudo raspi-config <------ enable i2c bus from the interfaces option pip2 install kafka-python
Everything is ready to go
Starting up the Cluster
This is where the fun starts, Make sure all the Pis are up and running and we can start playing.
Open 3 terminal windows to worker01/02/03
sudo -i ./startup.sh
The workers should have mounted the nfs share from master02 and kick off the mesos slave daemons.
Next open 3 terminal windows to master02
sudo -i ./start-mesos-master.sh
Open http://master02:5050/#/slaves check mesos is running
Take a look at the slaves and check our worker nodes are present and correct.
Now start the spark and kafka frameworks
sudo -i ./start-spark-framework.sh ./start-kafka-framework.sh
Open http://master02:5050/#/frameworks check both frameworks are running:

For first run only you’ll need to create the Kafka brokers, note we are pinning each broker to a specific worker via the constraints option:
sudo -i cd /opt/kafka ./kafka-mesos.sh broker add 0 --constraints hostname=like:worker01 --heap 64 --mem 128 --options log.cleaner.dedupe.buffer.size=67108864 --jvm-options "-Xmx128M -Xms64M" ./kafka-mesos.sh broker add 1 --constraints hostname=like:worker02 --heap 64 --mem 128 --options log.cleaner.dedupe.buffer.size=67108864 --jvm-options "-Xmx128M -Xms64M" ./kafka-mesos.sh broker add 2 --constraints hostname=like:worker03 --heap 64 --mem 128 --options log.cleaner.dedupe.buffer.size=67108864 --jvm-options "-Xmx128M -Xms64M"
Then for this and subsequent runs start the brokers with:
sudo -i ./start-kafka-brokers.sh ./list-kafka-brokers.sh
Open http://master02:5050/#/ check the 3 tasks are running for the Kafka brokers
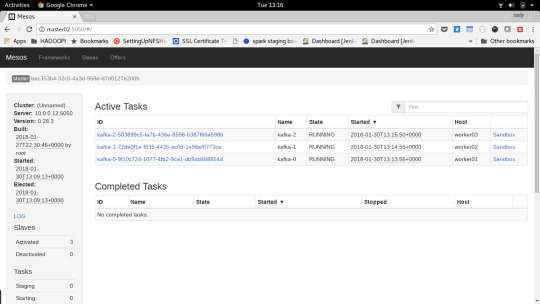
Get the Sensor Sending Metrics to Kafka
Next ssh to the sensor pi and run:
python sensor.py
On the dev pc, locate your local kafka install and read from the kafka topic with the console consumer to check messages are making it to kafka
./bin/kafka-console-consumer.sh --bootstrap-server 10.0.0.21:7000,10.0.0.22:7000,10.0.0.23:7000 --topic test --from-beginning
You’ll see the sensor data from kafka being displayed on the consumer console.
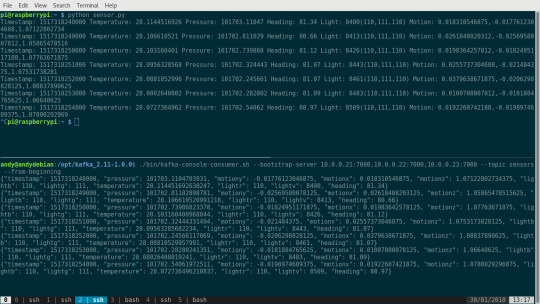
Building the Scala Application and getting ready to deploy
One of the challenges I set myself with this project was to write code in a new language, I chose to use Scala and Spark streaming (an ideal fit for mesos), much of the work is based around the learnings from a couple of books and the excellent Taming Big Data with Spark Streaming and Scala - Hands On! by Frank Kane.
I’ve put together a small spark streaming app that loads small batches of data from Kafka and pushes them to influxdb. One of the main frustrations during development was library dependency issues, I worked originally in ScalaIDE http://scala-ide.org/ submitting the app to my local spark instance using the data sources on the Pi Cluster. This was somewhat “clunky” but worked, packaging up the application to deploy to the cluster using the Scala Build Tool was also problematic, but after much wrangling I got it working. Here’s the files included for the KafkaSensor app:
. ├── build.sbt ├── project │ └── assembly.sbt └── src └── main ├── resources │ └── application.conf └── scala ├── KafkaSensor.scala ├── Settings.scala └── Utility.scala
To build the fat/uber jar (app, config and dependencies), install sbt from https://www.scala-sbt.org/ Set the version in project/assembly.sbt as directed in https://github.com/sbt/sbt-assembly. The dependencies are defined in the build.sbt:
libraryDependencies ++= Seq( "org.apache.spark" %% "spark-core" % "1.6.2" % "provided", "org.apache.spark" %% "spark-streaming" % "1.6.2" % "provided" ) libraryDependencies += "org.apache.spark" %% "spark-streaming-kafka" % "1.6.2" libraryDependencies += "org.apache.kafka" %% "kafka" % "0.8.2.1" libraryDependencies += "org.apache.spark" %% "spark-sql" % "1.6.2" libraryDependencies += "com.typesafe.play" %% "play-json" % "2.6.8" libraryDependencies += "com.pygmalios" %% "reactiveinflux" % "0.10.0.5" libraryDependencies += "com.typesafe" % "config" % "1.2.1"
There include libraries for kafka, json parsing, config management and influxdb. The job of sbt is to go and grab the nested dependencies of jars needed to build the jar and package it up for runtime.
You may want to review the runtime settings included in the project in src/main/resources/application.conf.
To build the jar run:
sbt assembly
If all goes welll you’ll have a jar file target/scala-2.10/KafkaSensor-assembly-1.0.jar
Running the Scala Application on the Cluster
Now we have compiled our application, we need to use the spark libraries on the development pc to submit the application to the cluster.
Open 2 terminal windows on your dev pc. In one window run a web server to allow the cluster to load your jar:
cd target/scala-2.10 python -m SimpleHTTPServer 8000
In the second, submit the spark application (you’ll need the spark binaries installed), replace the 10.0.0.9 with you dev pc ip
/opt/spark/bin/spark-submit --class com.andyburgin.sparkstreaming.KafkaSensor --master mesos://master02:7077 --deploy-mode cluster --conf spark.testing.reservedMemory="64000000" --conf spark.testing.memory="128000000" --executor-memory 256m --driver-memory 256m --num-executors 1 http://10.0.0.9:8000/KafkaSensor-assembly-1.0.jar
You’ll note the teeny memory settings needed to get the app to run on the cluster (see the hadoopi project for more details on cluster memory allocation). Check the application is running on the cluster http://master02:5050/#/ watch the driver and then worker tasks be created

Select one of the tasks and look at the “stdout” output, you should see the heartbeat message

View Metrics in Chronograf + Grafana
Now the application is running, lets look at the data being collected in Chronograf, point the browser at http://master01:8888/

Use the data explorer to quickly find the metrics and knock up a quick graph.
Next we need to set up Grafana, make sure the server is running on master01 and restart it if not
sudo -i service grafana-server restart
Log into Grafana by hitting http://master01:3000/, login as user “admin” password “admin” (change these at your leisure)

Next set up the influxdb data source to http://master01:8086

Then import the “grafana/EnviroPhat.json” dashboard.

And at long last view the dashboard and metrics
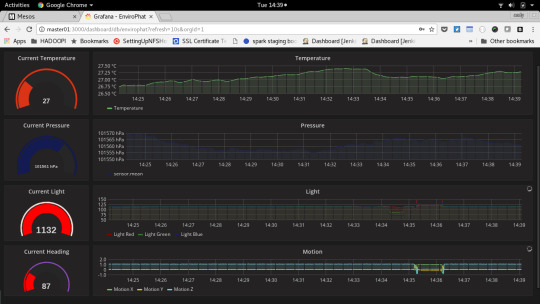
Stopping the App and Cluster
To kill the spark app, much like how it was launched run:
/opt/spark/bin/spark-submit --master mesos://master02:7077 --kill driver-XXXXXXXXXXXXXXXXXXXX
Replace the driver id as applicable, check the tasks in mesos have ended http://master02:5050/#/
To shut the whole cluster down, first cleanly stop the Kafka brokers and Spark framework on master02
sudo -i ./stop-kafka-brokers.sh ./stop-spark-framework.sh
Then terminate the running processes for the kafka framework and mesos master by hitting ^C on each terminal window on master02, also do this on the mesos slave processes on each worker.
Summary
As you’ll have seen this is very much an experiment, the original plan to build a SMACK stack hasn’t come to fruition. The cluster is really a massive overkill to simply recreate https://www.circuits.dk/datalogger-example-using-sense-hat-influxdb-grafana/
But in doing this as I said at the start I’ve learned a whole heap about Mesos, Spark and Scala and that was always the intention (and it turns out my soldering skills aren’t too bad either).
0 notes
Text
Cheap Strategies To Lose Weight Reduction
Talk of weight loss and you may have numerous weight reduction methods at your aid. But, most of these dieting plans cost you a fortune. Whether it is those expensive trend diets or toiling it out at the gymnasium, you are bound to blow up your position. But you need not worry any longer as you can lose weight in a cheap demeanor too. Here are a few pointers that can help you lose weight on a budget.
If you are considering weight reduction in an inexpensive manner, walking is the ideal option for you. This weight loss method practically costs not even a single penny. You would like not join a fitness center session to maintain a walking regime. All you need to do is to go out and go to the nearest park and begin walking. This will give you the same benefit as walking in a gym and that too freely. Mavens are convinced that if you are considering considering weight loss, it might be ideal to stroll for no less than 1 hour every day. To derive maximum benefits it is recommended to maintain your pace at a moderate level.
Another cost effective method in this direction is to utilize weight loss pills. These pills generally come at a price that fits well into your budget. However, Exercise caution while you purchase weight loss pills. The low cost of these tablets doesn’t give you the liberty to buy any of them. It’s vital to opt only for those tablets that are loyal. In this context Caralluma Burn Appetite Suppressant is the ideal pick. These pills usually come with discounts and offers. Avail these offers to make the purchase much more pocket friendly.
Drink loads of water. Now how much would that cost? Perhaps , next to negligible! Drinking plenty of water can help a giant amount in your weight loss process. Water helps the digestion process and ensures that the food is optimally utilized. Also, drinking water ensures that you are feeling full and you do not feel the prerequisite to chew on anything.
If you’re following a weight loss diet, then you can look for less expensive possibilities to lose weight on a budget. For instance, If you are following a diet that recommends you to eat if you could go in for walnuts rather than cashews or almonds. Or if then you are following a fruit diet, then you can go in for the cheaper options like bananas instead of the costly ones like strawberries and pineapple.
Last but not the least, if you are thinking about weight reduction, try buying from bulk bins. This option is of great help particularly if you’re on a diet plan. It’s a superb way of losing away the unwanted weight bags and that too in a way that matches your budget. When you purchase food form bulk bins you tend to buy bigger amounts of foods that help in weight reduction. This bulk buying therefore cuts down on your costs to a major level. These weight loss foods can be simply saved. Stick them in a fridge and employ them as and when the obligation arises.
By following these strategies you can look forward to losing your weight and not only losing your money.
To know more about Caralluma Burn and Caralluma Burn Review visit: http://www.carallumaburnreviews.com
from Lose Weight http://healthfitnessweblog.us/weight-loss/cheap-strategies-to-lose-weight-reduction/
0 notes
Link
December 23, 2019 at 02:22AM
(DIRIYAH, Saudi Arabia) — Supermodels and social media mavens, their makeup artists and hair stylists in tow, posed at a concert in leather pants, chunky sweaters and trendy black combat boots. What was unusual about these Instagram posts was that they were all deliberately tagged in Riyadh, Saudi Arabia.
The bevy of Instagram stars, former Victoria’s Secret models, including Alessandra Ambrosio, and Hollywood actors like Ryan Phillipe, Ed Westwick and Wilmer Valderrama were invited to Saudi Arabia over the weekend to promote the kingdom’s most eye-popping effort yet at showcasing the dramatic changes taking hold in this country, where more than half of its 20 million citizens are under 25 years old.
The efforts are aimed at boosting the economy while polishing Saudi Arabia’s image abroad and appealing to the young. It’s a staggering pivot from just three years ago, when religious police would storm restaurants playing music and harass women in malls for showing their face or wearing red nail polish.
Now, the kingdom has movie theaters and concerts. Women are allowed to drive and travel without male permission, and they can sit with men, unsegregated at restaurants. The kingdom began issuing tourist visas this year. Female visitors are not required to wear the conservative black-flowing robe known as the abaya and headscarves in public.
At Riyadh airport, a booth welcomes tourists with pamphlets on etiquette in Saudi Arabia, labeled “Our Code of Conduct.”
“Both men and women are asked to dress modestly in public, avoiding tight fitting clothing,” it explains. “Women should cover their shoulders and knees in public.”
Apparently, not all the V.I.P. guests flown to Saudi Arabia on private jets got the memo — some opted for stomach-baring bralettes under open coats.
The blast of glossy social media posts helped draw attention to the visit’s purpose — to promote MDL Beast, a three-day musical extravaganza in Riyadh that drew more than 130,000 visitors on its first day alone, according to the General Entertainment Authority. Ticket prices started at just 75 riyals ($20), but organizers were eager to ensure a big turnout so tickets were also handed out for free to some government employees.
More than 70 world-renowned DJs were invited to perform across five stages to the backdrop of surrealist performances — including one with a woman in a skintight sky blue leotard writhing from a hot air balloon over a crowd of young Saudi men.
Men and women cut loose and danced at the unprecedented rave-like event. Thousands waited for hours to get in.
A popular social media account, Diet Prada, named and shamed some of the celebrities present, accusing them of allegedly accepting six-figure sums for attendance and geo-tagged posts to “rehabilitate the image of Saudi Arabia.”
Earlier this year, hip-hop star Nicki Minaj pulled out of performing in the kingdom over concerns about women’s rights, gay rights and freedom of expression.
When asked by The Associated Press, the entertainment authority that licensed MDL Beast said some people had been compensated for promoting the event, but denied such high sums were paid to individuals.
While the social changes ushered in by Crown Prince Mohammed bin Salman have been sweeping, so too is his crackdown on criticism and political expression. The prince has overseen the country’s war in Yemen, which has led to the world’s worst humanitarian crisis, and the arrest of women’s rights activists, clerics and writers.
He’s also drawn international condemnation for the killing of Saudi writer and Washington Post columnist Jamal Khashoggi in Turkey, slaughtered by Saudi agents inside the Saudi Consulate in Istanbul last year.
The incident tarnished Prince Mohammed’s international image though his popularity is undeniable at home.
“The changes are really incredible and, God willing, we are heading toward even more,” said Mona Hassan, a mother out with her grown daughters at a family-friendly carnival in Diriyah, near Riyadh. “We are with Mohammed bin Salman wherever he takes us and whatever happens.”
The fully veiled Hassan said she wasn’t raised on this kind of entertainment, but has no problem with her kids enjoying it.
Saad al-Otaibi, who traveled 300 kilometers (186 miles) from al-Duwaidmi to attend the Diriyah festival, wanted to ensure it was family-friendly and affordable before bringing his wife and kids.
“All the changes are positive, not negative,” he said. “But one comment is that the prices are expensive,” he said, repeating a refrain others have quipped about on Twitter.
The Diriyah festival, which opened a month ago, has included sporting events like the world’s heavyweight boxing championship.
Families skated on an ice-rink, ziplined across the park, ride on a Ferris wheel and played galactic bowling. At the other end of the site, a younger crowd of Saudi elites smoked shisha — the bubbling waterpipe — and dined at pop-up restaurants where prices range from $100 to $1,200 a person for a meal.
Couples sat on park benches under the stars, listening to a Saudi musician playing the oud, a stringed instrument popular in the Middle East.
“No one could have imagined everything that’s happening,” said Abdullah Abulkheir, a 28-year-old Saudi visiting Diriyah. “We never thought we could reach this point in 30 years’ time. It’s been a huge transformation in a short period of time.”
Not all are happy with the crown prince’s style of governance or the changes. Yet Saudi clerics, many of whom had spoken out in the past against these changes, appear unwilling or unable to publicly criticize the moves. Those who dared have been detained and their social media accounts shuttered. In this absolute monarchy, the king holds final say on major decisions.
Only one major incident has so far marred the festivities. Last month, a Yemeni man stabbed two Spanish dancers and a guard at a live show in Riyadh. State media reported this week that he had allegedly acted on the orders of a senior al-Qaida leader in Yemen, according to evidence submitted during his trial.
Still, it’s clear most Saudis are ready for the changes.
“I don’t feel like I need to travel abroad like before because everything is here now,” Sarah Muteiri, 28, said. “We want these things and more.”
0 notes