#<- they did also include scripts for python i just dont know if i have to manually path anything and if i do
Explore tagged Tumblr posts
Visit Tumblr Blog
Explore Tumblr blogs with no restrictions, modern design and the best experience.
Last Seen Tumblr Blogs


Fun Fact
Kazakhstan’s Minister of Communications and Informatics has blocked the Tumblr site because it contained 60 sites of terrorism, extremism, and pornography in 2015.
Text
HEAD IN HANDS WHAT AM I DOING I CANT EVEN TELL IF ITS WORKING
what the fuck am i doing i downloaded python and parsehub for this
#FUCK OKAY WELL THE PARSEHUB WAS EASY BC ITS A PRETTY SIMPLE PROGRAM AND THE OP INCLUDED THE FULL SCRIPT BUT#I MIGHT BE ON MY OWN W PYTHON AND I DONT FUCKING KNOW HOW TO USE IT SO I JUST HAVE TO WAIT UNTIL THIS SCRIPT FINISHES TO SEE IF IM DOING IT#CORRECTLY OR NOT ANKBHJSGVDBJNS#<- they did also include scripts for python i just dont know if i have to manually path anything and if i do#i dont know how to do that.
3 notes
·
View notes
Text
How to back up your Tumblr blog
Not sure if all of you heard the news, but Wordpress laid off 16% of its staff, which happened to include senior tumblr staff like cyle. According to 3liza, the amount of staff running tumblr is about 25.
Welp. Will Tumblr finally die? I don't know. It's pretty likely, since this site costs millions to run and to host all this content, but I'll stay till the end. But I backed up my blog, with the help of a post that can't be reblogged rn.
you can reblog this one though.
Quoth butchlinkle: "In your blog settings you have the ability to initiate a blog export, and this will generate a backup for your blog.
Fair warning though, if you’ve been on the platform for a long time this archive is likely to be quite hefty in file size. This blog I have had for 5 years with 22k posts, and the export from tumblr came to be 48GB. My previous blog I made in 2011 and has 95k posts, so needless to say I did not use tumblr’s built in export to back that one up.
If you want more control over exactly what you back up from your blog, I recommend that you use tumblr-utils instead. It allows you to backup specific tags, post types, and to ignore posts that you did not create (reblogs where you’ve added a comment count unfortunately do not count unless you use the older version of the script made with python 2.7).
To use it:
download and install python
create an application on tumblr to get an api key
create a folder where you would like to save your backups and right click to open it in the terminal/command prompt, or type cmd.exe in the address bar from inside that folder


Backing up just my original posts from this blog with this command came to 632MB rather than 48GB, and also gave me the option to save my posts in JSON format which will be useful for converting my posts to a new format for self hosting.
On that note I’m currently looking into figuring out a simple (and ideally free) way of self hosting a static site blog that utilises activitypub, and also converting my old posts to re-host on said blog.
This post series by maho.dev on implementing activitypub with any static site is my primary source of guidance atm if you also want to try figure that out yourself, as well as having an explanation for why you’d even want to do this if you don’t already know
but if tumblr goes down before I get things sorted and write up a post about it then i’ll be reporting back on it via my bsky, mastodon, and toyhouse accounts
if you dont have an account on any of these I’ll also be sharing an update via my personal site’s RSS feed, link of which includes an explanation of what RSS is and some feed readers you can use, I highly recommend checking it out as getting a feed reader is going to be the best way you can stay connected with people if they scatter across the internet!
tldr: download tumblr-utils to backup your blog more efficiently, introduce yourself to RSS and get a feed reader to stay connected with people, consider saving mine so you can find out how to self host your blog later if tumblr goes down."
here's a guide from the notes: https://docs.google.com/document/u/0/d/1yBWlk-yEgpSoEh3c9oLhz_kbLtUGqbqzOpCtJsvQgjI/mobilebasic?pli=1#h.u9vj7pezwpcy
Back up those blogs. This was way faster than trying to use Webarchive, and webarchive seems to be only good for saving text, audio, and video, because it saved none of the images. And remember: I did not write this guide, and I do not know a thing about coding or fixing bugs.
8 notes
·
View notes
Text
JIS-CTF Walkthrough
Having not posted on here in a very, very long time, I’m back to solve a CTF. Earlier this year I finished my Computer Science degree at the University of Bristol, and I’ve got a new job working in cyber security at a very large and influential multinational technology company.
I’ve been playing around with the Offensive-Security labs, which are basically a set of on-demand virtual machines set up for CTFs. Offensive-Security are also the owners of some industry leading security certifications such as OSCP - which I aim to begin in the near future.
The particular CTF we will be looking at today is JIS-CTF by Mohammad Khreesha. Note that we will be using the version on Offensive-Security, which has less flags than the version on VulnHub. The difficulty is not affected by this since you need to do the same steps to get the flags anyway.
The CTF
After connecting to the VPN and being given the IP address of the machine, the first thing we can do is see what ports are open by using an nmap scan.
nmap -p- 192.168.203.25 insert result output here
Ok so now we can see that ports 23 and 80 are open. Lets explore what’s going on with HTTP on port 80 first by opening it up with our browser of choice.
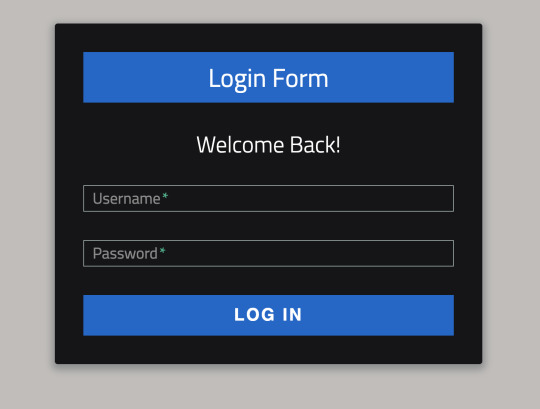
Hmm… a login page, but we don’t have any credentials. I tried looking at the source code for the page, but nothing valuable was to be found. I also tried throwing some funky characters like semicolons, hashes, apostrophes, and pipes into the login form to see if any errors would pop up, indicating the possibility of SQL injection but unfortunately we had no such luck.
The next thing we can try is looking at what other pages and paths are available on the site. One way of doing this would be by using a tool such as DIRB - which enumerates through a dictionary of common URL paths. DIRB is very noisy and takes a while, and should be used a last resort. Instead, we could first take a look at /robots.txt. This file is used by websites to instruct search engines & web crawlers as to which pages to not visit or include on their searches. Unlike using DIRB, checking /robots.txt is unlikely to be noticed or considered malign behaviour since search engines check /robots.txt frequently. The contents of /robots.txt can be seen below.
User-agent: * Disallow: / Disallow: /backup Disallow: /admin Disallow: /admin_area Disallow: /r00t Disallow: /uploads Disallow: /uploaded_files Disallow: /flag
This looks promising! After checking them all out we find that either the pages are innaccessible, or seem to be red herrings. We can dive in a bit deeper and look at the source code for the pages and voila! In the source code for /admin_area we found the credentials:
username : admin password : 3v1l_H@ck3r
Nice! Next I was cheeky and tried to see if we could login to the system via SSH with the newfound credentials but no luck. Fortunately though, they did work for the login form on the home page of the website!
After logging in, we are taken to a new page in which we can upload files to the server. If only there was some way of getting the system to run the files we could get a reverse shell going…
To test something out, I uploaded a random image file (image.jpg) and then navigated to /uploaded_files/image.jpg and it serves me the image! This is bad news for the server but good news for us. Since Apache is configured to execute .php files with the PHP interpreter, we can get the system to execute PHP scripts for us by uploading a file e.g. phpscript.php and then navigating to /uploaded_files/phpscript.php.
Naturally, a reverse shell script is what we want. I used this PHP reverse shell script from Pentest Monkey. You need to go into the script and change the IP address to your own IP address (note that it will be your address on the VPN, not your public internet IP address), and change the port to a free port on your machine (I used 9998).
Next, we need to set our computer to listen on the above port, ready to give commands to the reverse shell. I used Netcat, but you could also set up Python to do something similar. Change 9998 to whatever port you are using.
nc -nlvp 9998
Upload the PHP reverse shell script we fixed earlier, and then navigate to /uploaded_files/php-reverse-shell.php. Success! Your netcat terminal should let you know that you’ve made the desired connection.
Now that we’re in we can have a nosy around. First off, by entering whoami we see that we’re running as www-data - which is the default user for users on web users, and typically has a low level of priviledge. By looking at some of the files and folders in the immediate directory, we can see that we do not have access to many of them (flag, flag.txt). Looking in hint.txt tells that we should look for the credentials to log in to the user ‘technawi’.
After looking around with ls -a (ls lists files and -a includes hidden files) in the current directory as well as some other common places like /, it was clear that we’d need to perform a deeper search. There are two obvious tools for this, Grep and Find.
Grep searches for strings contained within files, whereas Find only searches by file name. I opted to use Grep with the following command:
grep -ir password / 2>/dev/null
(the 2>/dev/null part is not essential - it essentially gets rid those pesky errors you get you try to access files and directories that you don’t have access to)
Looking through the results, we find a file containing the string 'password’ /etc/mysql/conf.d/credentials.txt. Taking a look using cat tells us that the flag is in another file, but gives us the password for that 'technawi’ account we were looking for.
cat /etc/mysql/conf.d/credentials.txt Your flag is in another file... username : technawi password : 3vilH@ksor
Now we currently dont have a proper terminal, but we could try to spawn one… but a much easier way would just be to SSH in using those new credentials! So lets Ctrl+C out of this shell and SSH in.
There’s a file here called local.txt - which if we cat it gives us one of the flags!
The instructions for the CTF said that we were looking for a file called 'proof.txt’. Performing a search using Find:
find / -name proof.txt
But we get no results. Perhaps again it could be a permissions problem, if so then perhaps only the root user has access. If we prefix the above command with sudo it will search as if we are the root user.
sudo find / -name proof.txt /root/proof.txt
And if we cat out the file we just found, we get the last flag!
Fixes
Don’t allow uploading files to uncontrolled areas
Mediate access to uploaded files
Require a key for SSH
0 notes