#(it currently has ubuntu since I installed it with the intent of doing more coding stuff)
Explore tagged Tumblr posts
Visit Tumblr Blog
Explore Tumblr blogs with no restrictions, modern design and the best experience.
Last Seen Tumblr Blogs


Fun Fact
The average Tumblr user visits about 67 pages every month.
Text
how does one become a person with strong opinions on linux distros
#trying to decide whether or not to go through the effort of installing linux mint on my laptop#despite the fact that I basically just use it as a fanfic writing/occasional youtube machine#(it currently has ubuntu since I installed it with the intent of doing more coding stuff)#(which it turns out I do not have motivation or discipline to actually do)#(but I've heard ubuntu is bad or something)#(but also like it runs libreoffice so do I really care?)
1 note
·
View note
Text
John The Ripper Gpu Windows

John the Ripper is a free and open source software. It is a dictionary-based free password cracking tool that attempts to crack plaintext ciphers in the case of knowing the ciphertext, it fully supports the most current encryption algorithms such as DES, MD4, MD5, etc. Simply speaking, it is a brute force password cracking. Based on OpenBenchmarking.org data, the selected test / test configuration (John The Ripper 1.9.0-jumbo-1 - Test: Blowfish) has an average run-time of 2 minutes.By default this test profile is set to run at least 3 times but may increase if the standard deviation exceeds pre-defined defaults or other calculations deem additional runs necessary for greater statistical accuracy of the result. John the Ripper is a fast password cracker, currently available for many flavors of Unix, macOS, Windows, DOS, BeOS, and OpenVMS (the latter requires a contributed patch). Its primary purpose is to detect weak Unix passwords. John the Ripper 1.7.9-jumbo-6 supported GPUs for the following hashes and non-hashes: Latest release include more formats and latest git trees include even more. CUDA significantly benefits from compile-time tuning of parameters for a given GPU, see doc/README-CUDA. WPA-PSK CUDA uses a little bit of CPU code as well, and benefits from OpenMP (so you'll get slightly faster speed if you enable OpenMP in the JtR build, although you'll load multiple CPU cores then).
John the Ripper (JtR) is one of the hacking tools the Varonis IR Team used in the first Live Cyber Attack demo, and one of the most popular password cracking programs out there. In this blog post, we are going to dive into John the Ripper, show you how it works, and explain why it’s important.
Prison school ova dubbed. Notes about hacking: Hacking is a pursuit of knowledge about systems, design, and humans. In this case, we are talking about software and operating systems.
Get the Free Pen Testing Active Directory Environments EBook
“This really opened my eyes to AD security in a way defensive work never did.”
Hacking is not necessarily criminal, although it can be a tool used for bad intentions. We advocate for ethical hacking. Stay in the light side of the Force.
How Does John the Ripper Work?
JtR supports several common encryption technologies out-of-the-box for UNIX and Windows-based systems. (ed. Mac is UNIX based). JtR autodetects the encryption on the hashed data and compares it against a large plain-text file that contains popular passwords, hashing each password, and then stopping it when it finds a match. Simple.

In our amazing Live Cyber Attack demo, the Varonis IR team demonstrates how to steal a hashed password, use JtR to find the true password, and use it to log into an administrative account. That is a very common use case for JtR!
JtR also includes its own wordlists of common passwords for 20+ languages. These wordlists provide JtR with thousands of possible passwords from which it can generate the corresponding hash values to make a high-value guess of the target password. Since most people choose easy-to-remember passwords, JtR is often very effective even with its out-of-the-box wordlists of passwords.
JtR is included in the pentesting versions of Kali Linux.
What is John the Ripper Used for?
JtR is primarily a password cracker used during pentesting exercises that can help IT staff spot weak passwords and poor password policies.
Here is the list of encryption technologies found in JtR:
UNIX crypt(3)
Traditional DES-based
“bigcrypt”
BSDI extended DES-based
FreeBSD MD5-based (linux and Cisco IOS)
OpenBSD Blowfish-based
Kerberos/AFS
Windows LM (DES-based)
DES-based tripcodes
SHA-crypt hashes (newer versions of Fedora and Ubuntu)
SHA-crypt and SUNMD5 hashes (Solaris)
That’s the “official” list. JtR is open-source, so if your encryption of choice isn’t on the list do some digging. Someone might have already written an extension for it.
How to Download John the Ripper
JtR is an open-source project, so you can either download and compile the source on your own, download the executable binaries, or find it as part of a penetration testing package.
The official website for John the Ripper is on Openwall. You can grab the source code and binaries there, and you can join the GitHub to contribute to the project.
JtR is available on Kali Linux as part of their password cracking metapackages.
Tutorials for Using John the Ripper
We are going to go over several of the basic commands that you need to know to start using John the Ripper. To get started all you need is a file that contains a hash value to decrypt.
If you ever need to see a list of commands in JtR, run this command:
Cracking Passwords
John the Ripper’s primary modes to crack passwords are single crack mode, wordlist mode, and incremental. The single crack mode is the fastest and best mode if you have a full password file to crack. Wordlist mode compares the hash to a known list of potential password matches. Incremental mode is the most powerful and possibly won’t complete. This is your classic brute force mode that tries every possible character combination until you have a possible result. Iobit folder lock crack.
The easiest way to try cracking a password is to let JtR go through a series of common cracking modes. This command below tells JtR to try “simple” mode, then the default wordlists containing likely passwords, and then “incremental” mode.
You can also download different wordlists from the Internet, and you can create your own new wordlists for JtR to use with the –wordlist parameter.
If you want to specify a cracking mode use the exact parameter for the mode.
Word Mangling Rules
Mangling is a preprocessor in JtR that optimizes the wordlist to make the cracking process faster. Use the –rules parameter to set the mangling rules.
Viewing Your Output
When you want to see the list of passwords that you have cracked, use the –show parameter.
If your cracked password list is long, you can filter the list with additional parameters. You can also redirect the output using basic redirection in your shell. For example, if you want to see if you cracked any root users (UID=0) use the –users parameter.
John The Ripper Gpu Support Windows
Or if you want to show users from privileged groups use –groups.
Below is the JtR command from our Live Cyber Attack Webinar. In this scenario, our hacker used kerberoast to steal a Kerberos ticket granting ticket(TGT) containing the hash to be cracked, which was saved in a file called ticket.txt. In our case, the wordlist used is the classic rockyou password file from Kali Linux, and the command was set to report progress every 3 seconds.
If you want to see some cool pentesting and defense tactics using Varonis, check out the Live Cyber Attack Webinars! Pick any time that works for you!
Password cracking a Word document or an Excel file hasbecome much easier. Previously you hadto rely on a flaw in the document, some sketchy software or an even sketchierwebsite. Since October 2014 OclHashcat now supports cracking the documentspassword. The process is simple but notas straight forward as a novice might want. You need a couple of things agraphics card capable of cracking using GPU’s, such as an NVidia card with cudasupport, OclHashcat version 1.31 or greater, python, and a password protecteddocument.
I’m writing this for Windows because, let’s face it if youlost a password for Word, Excel or Powerpoint you probably have Windows. First go to hashcat.netgrab the correct OclHashcat version for your GPU either AMD or NVidia. Download it and unzip it, you may need 7zipif you can’t unzip the file. Next, you need python, get that here python.org.(I’m not going to say use Python 2.7 or Python3 just grab whatever, I just use2.7.) Grab the installer, and install it. You also need a python script calledoffice2john and you can get that here office2john.Long story short john the ripper another password cracking suite is alsocapable of doing this, but I prefer OclHashcat.
Now, we have everything we need to recover that passwordright? Nope, we need one more thing some dictionaries to use with OclHashcat.Get those from SkullSecurity. You can move on torule attacks or brute force if the dictionaries fail. One of my first go tolists is the rockyou list start there.
Let’s get cracking, open up a command prompt and navigate tothe directory with the office2john.py file and the password protectedfile. Enter: python office2john.py FILENAME, filenamebeing the protected document. After a second you will see the output likebelow:
Book1.xlsx:$office$*2010*100000*128*16*657ca4864bf8f86a617d21cb71b0c572*0d689a95b0e6ddca4c6f0b3b2c30cc46*1b4c305643f3a7da83f0671df10e80e6ed4d6c576129406f79dd6526ca34f153
This is the hash of the password that protects the document,the important part here is highlighted as we need to tell OclHashcat what typeof hash this is. This one is an Office 2010 document. From the command prompt navigate to where youhave OclHashcat actually CudaHashcat for me. Entering --help after thecudahashcat32.exe or cudahashcat64.exe will show you the hash type numbers andyou pick the one that matches your office version you see in the extracted hashabove.
Since the document is Office 2010 I need hash type 9500.Here is my command
John The Ripper For Windows
“cudaHashcat32.exe -a 0 -m 9500 --username Book1.xlsx:$office$*2010*100000*128*16*657ca4864bf8f86a617d21cb71b0c572*0d689a95b0e6ddca4c6f0b3b2c30cc46*1b4c305643f3a7da83f0671df10e80e6ed4d6c576129406f79dd6526ca34f153'D:password_listsskullsecurity-listsskullsecurity-listsrockyou.txt'
-a 0, specifies dictionary attack mode
-m, is the hash type
--username, tells hashcat to ignore the usernamein this case the username is “Book1.xlsx”
The next part is the hash followed by the dictionary.Running this will result in the output similar to below.
In the image the hash was cracked in 4 seconds with thepassword being “Password”. If thatdoesn’t work try another dictionary use rules or try to brute force. Keep inmind that a brute force can take a LONG TIME.
Install John The Ripper For Gpu Windows
Even brute forcing a 6 character password with uppercase,lowercase and numbers can take more than a year. Obviously, the better or moreGPU’s you have the faster it will be. Long story short:
John The Ripper Password Cracker
Run office2john.py to get the hash of the protected document
Run OclHashcat on the hash
Open document
Gpu Download For Windows 10
See, I told you. easy.
0 notes
Text
Cassandra Demo
In this second blog post, I am going to show everyone how to create your very own 3 node Cassandra cluster. You will have to have some items set up beforehand. The first item that will need to be created are three different virtual machines, each with a working operation system. In this exercise, I have created three different VM using the VMware Work Station; each with a working Linux Ubuntu OS. (Why Linux Ubuntu? No real reason, I just like that OS. Beware that for different OS, there will be different commands that I might not cover).
The second item that will need to be set up is a two-parter. Both the Java Development Kit and the Python Software Development Kit need to be functional in each VM, for Cassandra to be able to execute properly. In this exercise, I have installed the most current stable version the JDK available. The only thing I will mention, in case anyone is following along with the blog, do remember to include the following line of code in your .bashrc user profile file:
#$ export PATH=$PATH:~/Documents/jdk1.8.0_202/bin
It is the only way Cassandra will recognize that the JDK is running on your OS.
As for the Python SDK, that is a whole another animal all together. The following commands (2 commands) need to be entered on command line, within the Python directory:
#$ ./configure --prefix=/usr/local
#$ make
Once this is done, the source code for Python itself has been compiled. You will also need to download PIP, which lets you manage libraries, directories and drivers for Python. Now with the way Python works, you can have several versions of Python present on the same OS. You need to make sure the version you are working with is Python 2.7 (Documentation does say that it supports 3.6, 3.7 and 3.8). The last item you will download for the SDK is the Cassandra-driver, which lets the python interpreter talk to the ./cqlsh program (more on that later).
#$ pip install cassandra-driver.
Why both Java and Python? Cause nothing in programming in ever truly easy. Java is what your Cassandra node uses to execute its programming, because Cassandra itself was written in Java. Now, the CQL Shell or cqlsh for short is the command line shell use to interact with your Cassandra nodes. Python is the native protocol driver for this shell. There is indication when I read the cqlsh documentation, that other languages can be used for talking to the cqlsh; but for the purposes of this blog I will be using Python. I did not go into further research about that particular topic.
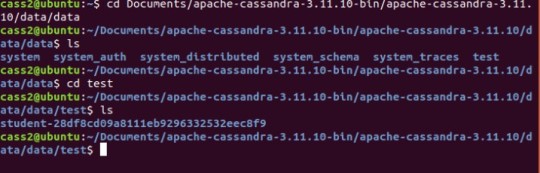
The last item you need to research before we can further and start the set up of our Cassandra nodes, is probably the most complicated one of them all. You need to find out the IP address for each of the VM. A simple ip addr, will do the trick. The three ip address for my VM are the following:
Cassandra Node 1 – 192.168.8.135
Cassandra Node 2 – 192.168.8.136
Cassandra Node 3 – 192.168.8.137
Once, the VMs are setup (each with a working OS, JDK, SDK and the IP address are recorded) Cassandra can finally be downloaded. I am working with the latest stable version of Cassandra 3.11.10. Once unzip, the configuration file cassandra.yaml is the only thing that needs to be modified and/or touched.
Just a quick intro before we move on. YAML (or YAML Ain’t Markup Language) is a human-readable data-serialization language, commonly used for configuration files where data is being sorted or transmitted. I just wanted to make sure everyone knows that bit of information; there is a lot more to YAML.
With that out of the way, we are going to start setting up our first Cassandra Node, or cass1. There are several things that can to be configured, but there are only two decision that have to be made in this YAML file (When looking from the perspective of this test cluster, in industry a lot more settings would be considered). The first decision is naming the cluster; for the cluster to work, all of the cluster nodes must have a shared name between them. Its how they first recognize themselves within the cluster ring. In my case, I used the cluster name ‘INTP – 362’.
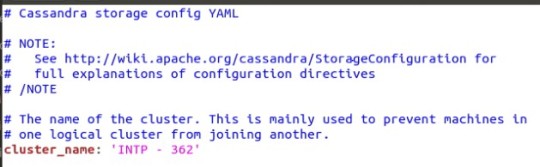
Cluster Name
It is important that you make the name simple and easy to reproduce. My first test cluster had a more complicated name in the intent to be funny, and two of my nodes would not “gossip” to one another (more on gossiping later). And I used copy and paste, which sometimes does not work.
Once the cluster name is decided on. The next decision are the seed nodes and non-seed nodes. A seed node serves two functions:
When a new node joins the cluster, it will learn about the topology of the cluster or ring by contacting a seed node.
They are also what assist other nodes in gossip convergence.
A seed node is still not a single point of failure; if a seed node “dies”, a cluster can survive without. I choose cass1 and cass2 to be my seed nodes. It is industry standard to at least have 3 seed nodes per cluster; the typical small sized cluster is around 5 nodes. Since, I only have 3 nodes, I decide to just do 2 seed nodes to demonstrate what they do. To set up the seed nodes, the IP address for each of the selected nodes are to be place, in between the double quotes; separate by commas but with no spaces in between (see image below).
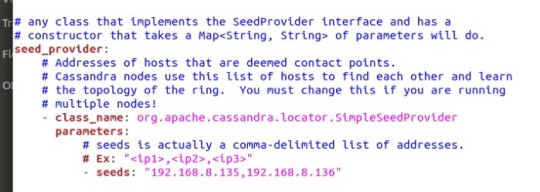
Seed Nodes
With the seeds nodes and the cluster name taken care of, the basic decision-making process to get this cluster running is done. I do want to point out that there are many other settings and configurations that can be made through this YAML file. Everything from how many concurrent read or write can be done at a time, which ports each node will use to communicate thought TCP/UDP (Ports 7000, 9042), what is a cache size for different types of operations; so many different settings I am not getting into because really there is no time. But I will speak about to two particular settings that gave a lot of problems for several days. Those are Listen Address and RPC Address.
Just to expand out knowledge base, RPC is a framework or set of tools that allow programmer to call a piece of code in a remote process. Again, there is a lot more to this framework; but that is the bare minimum just to understand why this address is important.
As a default, Listen Address and RPC Address come with the value ‘Localhost’; which should work since they do use the localhost to work. They even suggest just leaving it blank, since that will activate:
InetAddress.getLocalHost()
A protocol that will find the local IP address of the machine and retrieve for use. Except its not reliable, it even mentioned in the configuration file that it might not work. The documentation for both Cassandra and the YAML configuration file does not, to my knowledge, ever mention how to deal with this. Why do I mention this? Because in this case, the nodes will not actually wake up (at least in my experience). The actual best thing to do, is to actually use the IP Address number itself. My lesson learned here is that sometimes hardcoding an important value is necessary.
What is going on in the background is that the nodes can’t gossip. What is gossip? It’s the protocol that Cassandra uses to communicate between nodes. It’s a peer-to-peer system, that periodically exchanges state information about themselves and about other nodes in the ring. Basically, Cassandra nodes are just gossiping all the time, about how they are doing.
The gossiping protocol is very similar to the TCP three-way handshake; so much so that in the Cassandra server start up process, it is called a handshake. In the image below, you can the different Cassandra nodes handshaking each other.
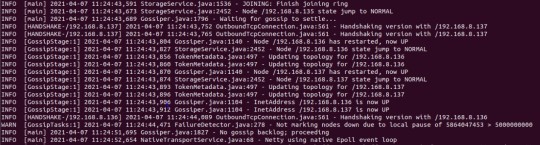
Handshake
I think that is enough for now about the YAML configuration file; there is a lot more to it, entire Wikipedia pages just dedicated to explaining each one of the different settings. We are moving to yet another program that needs to be install for Cassandra to run. Why didn’t I mention this one before? Because its not mentioned anywhere (Note: I am not bitter about this).
iptables is this cool linux utility that lets you block or allow traffic, it’s a neat firewall. Cassandra needs it install and running to be able to gossip to other nodes. In iptables, there are policy chains, which are:
Input - this is for incoming connections.
Forward - incoming connections not being delivered locally, think a router.
Output - this is for outgoing connections.
Now, I only had so much time to actually research iptables and all its useful commands. Due to time constraints I concentrated on understanding the command I needed to run my Cassandra nodes. The command is:
#$ sudo iptables -A INPUT -p tcp -s 192.168.8.135 -m multiport --dports 7000,9042 -m state --state NEW,ESTABLISHED -j ACCEPT
A – Type of policy
p – Type of connection the protocol uses
s – Is the IP address to listen for
m multiport – is when there are multiple ports
dport – The ports to listen for
m state – The state of the connection (The only states I know of are NEW and ESTABLISHED)
j – Is the command for the response policy (Accept, Drop or Reject)
This command must be done on each node, with the other nodes IP address (so the command must be entered twice in each node). Finally, Cassandra will be run. There is an order to these things. Seed nodes must be woken up first before non-seed nodes, it is the only caveat to waking up Cassandra nodes to start gossiping.
To confirm that the nodes are running and gossiping, Cassandra comes with application called nodetool. The application will take different commands, the only one we care about at the moment is the status command.

Nodetool program
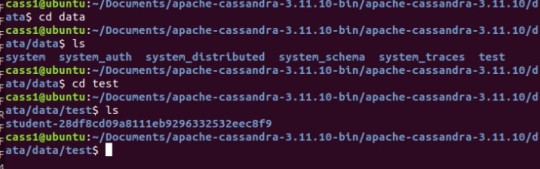
The UN means Up and Normal, which is really the piece of information we care about. This means each node on the rack is running. Since we have confirmed all the Cassandra nodes are up and running. The CQL shell program can be started. In the bin directory, the following commands needs to be typed:
#$ ./cqlsh 192.168.8.135
The IP address at the end of the command must be the IP address of the node you want to access. As you can see from the image below, I am still in Cassandra node 1. But I am able to access another Cassandra node though its IP address.

Accessing different nodes
With the CQL shell running, we can finally explore the CQL language. It is very similar to SQL, super similar. It is basically the same thing (at least syntax-wise it does not behave the same way), with some key exception. All the relational part of SQL is non-existent in CQL. That means no JOINS, no FOREIGN KEYS, none of that stuff. But the following commands, are all permissible (and again Syntax is the same, but the behavior of the command might be different):
Alter
Create
Delete
Insert
Select
Update
Where
There are more commands, I am just showcasing the classic ones. Let’s start with the creation of a KEYSPACE (Database in the SQL world). The command is the following:
#$ CREATE KEYSPACE test WITH replication = {‘class’:’SimpleStrategy’, ‘replication_factor’ : 3};
Finally, replication at work. There are two replication classes. The SimpleStrategy class, which will assign the same replication factor to the entire cluster. This is used for evaluation purposes, single data center test (Like what I am doing in this blog), and development environments. In industry they use the second class, called ‘NetworkTopologyStrategy’. This strategy is for assigning the replication factor to each data center in a comma separated list, giving you more flexibility and control. The Data center names must match the snitches data center name. In a real data center, there are snitch nodes; in basic terms the snitch determines which data centers and racks nodes belong to. The snitch allows network topology to be discovered, thus making routing more efficient.
A note about replication factor for both strategies, the number does not have match the number of nodes present in your cluster. It is not a requirement for the command to run. There can be a KEYSPACE with a replication factor of 2, in a 5 nodes cluster. It is documented that it is recommended that your replication factor does not exceed the number of nodes present in your cluster (But again this will not cause any immediate problems). The following command is not recommended, with my current cluster set up:
#$ CREATE KEYSPACE test WITH replication = {‘class’:’SimpleStrategy’, ‘replication_factor’ : 4};
But it is permissible. Why? The idea of scaling. I could start setting up KEYSPACEs with replication factor of 4 in my cluster right now, and add a new node (cass4) in the future.
Now that we have our KEYSPACE set up. We can now proceed to create a table and inserting some data.
#$ CREATE TABLE student (name text PRIMARY KEY, id int, age int);
#$ INSERT INTO student(name,id,age) VALUES (‘alex’,105,32);
With everything set up correctly, we can see the replication happening. I used cass1 to insert my data. And the KEYSPACE, TABLE and data was replicated into the other nodes.
Cassandra Node 1 – test data
Cassandra Node 2 – test data
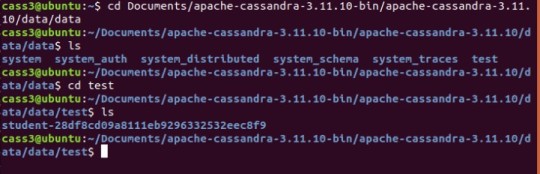
Cassandra Node 3 – test data
As observed in all three different nodes, the student table is present.
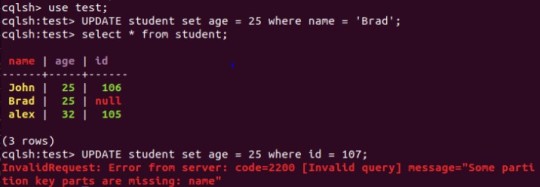
The last cool thing I am going to show you, is how UPDATEs are a bit different in CQL vs SQL. In SQL an UPDATE command is both a read and a write; and this is important to note, because it first reads the tablespace and if the WHERE clause is not present the UPDATE will not happen. In CQL, the UPDATE command is only a write. This means that if the WHERE clause of an UPDATE command is based on a primary key (see example below), the UPDATE will happen as an INSERT if the row does not exist. I will showcase this in action, in the demo video.
UPDATE command in CQL
I hope this blog brought to light some of the lessons I learned while trying to navigate my way through Cassandra. Lessons like the value of documentation, but that ultimately there might be vital information missing; further research into some unexpected places might be need; and even some trial and error might be a possible avenue. I also hope I help shed some light on the world of NOSQL, and the cool application (cool to me at least) that is Cassandra.
Thank you so much for reading my blog
Here is the Demo Video.
youtube
0 notes
Text
GNOME Wiki
I hate hate hate when I search gnome and this comes up! I love your name but I am not looking for you! Anyways here is the wiki article about it thought because it is still part of the gnome family...
GNOME

GNOME (/(ɡ)noʊm/) is a free and open-source desktop environment for Unix-like operating systems. GNOME was originally an acronym for GNU Network Object Model Environment, but the acronym was dropped because it no longer reflected the vision of the GNOME project.
GNOME is part of the GNU Project and developed by The GNOME Project which is composed of both volunteers and paid contributors, the largest corporate contributor being Red Hat. It is an international project that aims to develop software frameworks for the development of software, to program end-user applications based on these frameworks, and to coordinate efforts for internationalization and localization and accessibility of that software.
GNOME 3 is the default desktop environment on many major Linux distributions including Fedora, Debian, Ubuntu, SUSE Linux Enterprise (exclusively), Red Hat Enterprise Linux, CentOS, Pop! OS, Oracle Linux, SteamOS, Tails and Endless OS, as well as Solaris, a major Unix operating system; and provided as an official edition by Manjaro; also the continued fork of the last GNOME 2 release that goes under the name MATE is default on many Linux distros that targets low usage of system resources.
History
GNOME 1

GNOME was started on 15 August 1997 by Miguel de Icaza and Federico Mena as a free software project to develop a desktop environment and applications for it. It was founded in part because K Desktop Environment, which was growing in popularity, relied on the Qt widget toolkit which used a proprietary software license until version 2.0 (June 1999). In place of Qt, GTK (GIMP Toolkit) was chosen as the base of GNOME. GTK uses the GNU Lesser General Public License (LGPL), a free software license that allows software linking to it to use a much wider set of licenses, including proprietary software licenses. GNOME itself is licensed under the LGPL for its libraries, and the GNU General Public License (GPL) for its applications.
The name "GNOME" was initially an acronym of GNU Network Object Model Environment, referring to the original intention of creating a distributed object framework similar to Microsoft's OLE, but the acronym was eventually dropped because it no longer reflected the vision of the GNOME project.
The California startup Eazel developed the Nautilus file manager from 1999 to 2001. De Icaza and Nat Friedman founded Helix Code (later Ximian) in 1999 in Massachusetts; this company developed GNOME's infrastructure and applications, and in 2003 was purchased by Novell.
During the transition to GNOME 2 around the year 2001 and shortly thereafter there were brief talks about creating a GNOME Office suite. On 15 September 2003 GNOME-Office 1.0, consisting of AbiWord 2.0, GNOME-DB 1.0 and Gnumeric 1.2.0 was released. Although some release planning for GNOME Office 1.2 was happening on gnome-office mailing list, and Gnumeric 1.4 was announced as a part of it, the 1.2 release of the suite itself never materialized. As of 4 May 2014 GNOME wiki only mentions "GNOME/Gtk applications that are useful in an office environment".
GNOME 2
GNOME 2 was very similar to a conventional desktop interface, featuring a simple desktop in which users could interact with virtual objects, such as windows, icons, and files. GNOME 2 started out with Sawfish, but later switched to Metacity as its default window manager. The handling of windows, applications, and files in GNOME 2 is similar to that of contemporary desktop operating systems. In the default configuration of GNOME 2, the desktop has a launcher menu for quick access to installed programs and file locations; open windows may be accessed by a taskbar along the bottom of the screen, and the top-right corner features a notification area for programs to display notices while running in the background. However, these features can be moved to almost any position or orientation the user desires, replaced with other functions or removed altogether.
As of 2009, GNOME 2 was the default desktop for OpenSolaris. The MATE desktop environment is a fork of the GNOME 2 codebase (see Criticism, below.)
GNOME 3
GNOME 1 and 2 followed the traditional desktop metaphor, but GNOME 3, released in 2011, changed this with GNOME Shell, a more abstract metaphor where switching between different tasks and virtual desktops takes place in a separate area called "Overview". Also, since Mutter replaced Metacity as the default window manager, the minimize and maximize buttons no longer appear by default, and the title bar, menu bar and tool bar combined in one horizontal bar called "header bar" via Client-Side Decoration mechanism. Adwaita replaced Clearlooks as the default theme. Many GNOME Core Applications also went through redesigns to provide a more consistent user experience.
Criticism

The release of GNOME 3, notable for its move away from the traditional menu bar and taskbar, has caused considerable controversy in the GNU and Linux community. Many users and developers have expressed concerns about usability. A few projects have been initiated to continue development of GNOME 2.x or to modify GNOME 3.x to be more like the 2.x releases.
GNOME 3 aims to provide a single interface for desktop computers and tablet computers. This means using only input techniques that work on all those devices, requiring abandonment of certain concepts to which desktop users were accustomed, such as right-clicking, or saving files on the desktop.
These major changes initially evoked widespread criticism. The MATE desktop environment was forked from the GNOME 2 code-base with the intent of retaining the traditional GNOME 2 interface, whilst keeping compatibility with modern Linux technology, such as GTK 3. The Linux Mint team addressed the issue in another way by developing the "Mint GNOME Shell Extensions" that ran on top of GNOME Shell and allowed it to be used via the traditional desktop metaphor. This eventually led to the creation of the Cinnamon user interface, which was forked from the GNOME 3 codebase.
Among those critical of the early releases of GNOME 3 is Linus Torvalds, the creator of the Linux kernel. Torvalds abandoned GNOME for a while after the release of GNOME 3.0, saying "The developers have apparently decided that it's 'too complicated' to actually do real work on your desktop, and have decided to make it really annoying to do". Torvalds stated that his objections were universally held by the varied Linux developers he knew. In 2013, Torvalds resumed using GNOME, saying "things had gotten much better in the past year" but noting that "they have extensions now that are still much too hard to find; but with extensions you can make your desktop look almost as good as it used to look two years ago". Torvalds has suggested that the "GNOME Tweak Tool" should be merged into GNOME 3.
As of 2015, critical reception has been much more positive. For example, Debian, a Linux distribution that had historically used GNOME 2, switched to Xfce when GNOME 3 was released but readopted GNOME 3 in time for the release of Debian 8 "Jessie".
Releases
Release cycle
Each of the component software products in the GNOME project has its own version number and release schedule. However, individual module maintainers coordinate their efforts to create a full GNOME stable release on an approximately six-month schedule, alongside its underlying libraries such as GTK and GLib. Some experimental projects are excluded from these releases.
GNOME version numbers follow the scheme v.xx.yy. Here, v is a major version, which can include large changes such as ABI breakage; these have no regular schedule and occur in response to requirements for large-scale changes. xx is a minor version, released on the above schedule of approximately every 6 months, in which the 1- or 2-digit number's parity indicates the type of release: if xx is even (e.g. 3.20) the release is considered stable, whereas if xx is odd it represents a current development snapshot (e.g. 3.21) that will eventually evolve into the next stable release. yy indicates a point release, e.g. 3.20.6; these are made on a frequency of weeks in order to fix issues, add non-breaking enhancements, etc.
GNOME releases are made to the main FTP server in the form of source code with configure scripts, which are compiled by operating system vendors and integrated with the rest of their systems before distribution. Most vendors only use stable and tested versions of GNOME, and provide it in the form of easily installed, pre-compiled packages. The source code of every stable and development version of GNOME is stored in the GNOME git source code repository. Interested users can always obtain a snapshot of the _master_ development branch or any other branch/tag and build a cutting-edge version for their own use.
A number of build-scripts (such as JHBuild or formerly GARNOME) are available to help automate the process of compiling the source code.
Release history
Features
User interface design
See also:
Worse is better, KISS principle, Principles of user interface design, Minimalism (computing), Usability
The Official GNOME Human Interface Guidelines
Since GNOME 2, productivity has been a key focus for GNOME. To meet this end, the GNOME Human Interface Guidelines (HIG) were created. All GNOME programs share a coherent style of graphical user interface (GUI) but are not limited to the employment of the same GUI widgets. Rather, the design of the GNOME GUI is guided by concepts described in the GNOME HIG, itself relying on insights from cognitive ergonomics.[74] Following the HIG, developers can create high-quality, consistent, and usable GUI programs, as it addresses everything from GUI design to recommended pixel-based layout of widgets.
During the GNOME 2 rewrite, many settings deemed of little value to the majority of users were removed. Havoc Pennington summarized the usability work in his 2002 essay "Free Software UI", emphasizing the idea that all preferences have a cost, and it is better to make software behave correctly by default than to add a UI preference to get the desired behavior:
A traditional free software application is configurable so that it has the union of all features anyone's ever seen in any equivalent application on any other historical platform. Or even configurable to be the union of all applications that anyone's ever seen on any historical platform (Emacs *cough*). Does this hurt anything? Yes it does. It turns out that preferences have a cost. Of course, some preferences also have important benefits – and can be crucial interface features. But each one has a price, and you have to carefully consider its value. Many users and developers don't understand this, and end up with a lot of cost and little value for their preferences dollar.
Accessibility
GNOME aims to make and keep the desktop environment physically and cognitively ergonomic for people with disabilities. The GNOME HIG tries to take this into account as far as possible but specific issues are solved by special software.
GNOME addresses computer accessibility issues by using the Accessibility Toolkit (ATK) application programming interface, which allows enhancing user experience by using special input methods and speech synthesis and speech recognition software. Particular utilities are registered with ATK using Assistive Technology Service Provider Interface (AT-SPI), and become globally used throughout the desktop. Several assistive technology providers, including Orca screen reader and Dasher input method, were developed specifically for use with GNOME.
Internationalization and localization
Main article:
Internationalization and localization
The internationalization and localization of GNOME software relies on locale.
Desktop
GNOME provides three different login sessions for desktop:
GNOME Flashback

GNOME Flashback is an official session for GNOME 3. It is based on GNOME Panel and Metacity (window manager), it is lightweight, has lower hardware requirements and uses less system resources (memory and CPU) than GNOME Shell. It provides a traditional and highly customizable taskbar (panel) with many plug-ins bundled in one package (gnome-applets) including a customizable start menu. It provides a similar user experience to the GNOME 2.x series and has customization capacities as built-in.
GNOME Flashback consists of the following components:
Metacity (window manager)
GNOME Panel – a highly configurable taskbar
gnome-applets – a collection of useful applets for the GNOME Panel
GNOME Shell

This session is based on GNOME Shell and Mutter (window manager). It is default and offers a mobile-like paradigm for launching applications and accessing open windows and virtual desktops, but through the use of extensions it is possible for the appearance to be that of a traditional taskbar and provide a basic start menu. This session uses more RAM and CPU due to use of JavaScript for GNOME Shell and all of its extensions, and requiring 3D acceleration.
GNOME Shell is the default graphical shell of GNOME. It features a top bar holding (from left to right) an Activities button, an application menu, a clock and an integrated system status menu.[80][81] The application menu displays the name of the application in focus and provides access to functions such as accessing the application's preferences, closing the application, or creating a new application window. The status menu holds various system status indicators, shortcuts to system settings, and session actions including logging out, switching users, locking the screen, and suspending the computer.
Clicking on the Activities button, moving the mouse to the top-left hot corner or pressing the Super key brings up the Overview.[82] The Overview gives users an overview of current activities and provides a way to switch between windows and workspaces and to launch applications. The Dash on the left houses shortcuts to favorite applications and open windows and an application picker button to show a list of all installed applications.[80] A search bar appears at the top and a workspace list for switching between workspaces is on the right. Notifications appear from the bottom of the screen.[83]
GNOME Classic
Beginning with GNOME 3.8, GNOME provides a suite of officially supported GNOME Shell extensions that provide Applications menu (a basic start menu) and "Places menu" on the top bar, and a panel with windows list at the bottom of the screen that lets quickly minimize and restore open windows, a "Show Desktop" button in the bottom left and virtual desktops in the bottom right corner.
Mobile
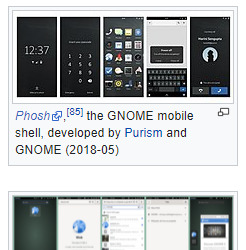
By using GNOME Shell, client-side decoration, and the libhandy library, GNOME and its applications provide a responsive user interface that works on all the three desktop, tablet, and mobile form factors without the need to be designed and compiled separately for each one.
Development
GNOME is developed by The GNOME Project, and, like most free software projects, GNOME development is loosely managed. Discussion chiefly occurs on a number of public mailing lists.GNOME developers and users gather at an annual GUADEC meeting to discuss the current state and the future direction of GNOME.[ GNOME incorporates standards and programs from freedesktop.org to better support interoperability with other desktops.
GNOME is mainly written in C, XML, C++, C#, HTML, Vala, Python, JavaScript, CSS, and more. A number of language bindings are available
Development platform
The GLib data structures and utilities library, GObject object and type system and GTK widget toolkit comprise the central part of GNOME development platform. This foundation is further extended with D-Bus IPC framework, Cairo 2D vector-based drawing library, Clutter accelerated graphics library, Pango international text rendering library, PulseAudio low-level audio API, GStreamer multimedia framework, and several specialized libraries including NetworkManager, PackageKit, Telepathy (instant messaging) and WebKit.[90]
GNOME Display Manager (GDM), which manages user sessions, X and Wayland alike.
Tracker automatically searches the specified directories for files and keeps an index of them to provide fast search; heavily integrated into GNOME Shell and GNOME Files
GVfs, an abstraction layer framework for file systems augmenting GIO; well integrated into GNOME Files and GNOME Disks
dconf a backend for GSettings
Mutter, the Wayland compositor and X Window Manager
Linux color management, udev, etc.
Evolution Data Server, responsible for managing mail, calendar, address book, tasks and memo information
Meson is replacing GNU Build System (autotools) as build automation tools of choice
BuildStream a distribution agnostic build and integration tool
Dependencies
The GNOME desktop environment does not consist solely of the graphical control element library GTK and the core applications that make use of it. There are quite a few additional software packages that make up the GNOME desktop environment, such as the above.
Wayland or X Window SystemMain article:
Wayland (display server protocol)
GNOME runs on Wayland and the X Window System. Wayland support was introduced in GNOME 3.10 and deemed "for the majority of users […] a usable day to day experience" by 3.20, at which point Wayland became the default user session. GNOME 3.24 will extend Wayland compatibility to Nvidia drivers. With GNOME 3.30, it is possible to run GNOME without X.Org Server, using only Wayland.
systemd
In May 2011 Lennart Poettering proposed systemd as a GNOME dependency. As systemd is available only on Linux, the proposal led to a discussion of possibly dropping support for other platforms in future GNOME releases. Since GNOME 3.2 multiseat support has only been available on systems using systemd. In November 2012 the GNOME release team concluded there will be no compile time dependency on systemd for basic functionality, like session tracking. For non-basic functionality, like power management, compile time dependency is possible. For example, there is no concept of systemd inhibitors in alternatives like consolekit. A package manager may want to ensure that the system is not turned off while the upgrade is taking place.
Application
Core Applications
GNOME Core Applications
There are a large number of GTK and Clutter-based programs written by various authors. Since the release of GNOME 3.0, The GNOME Project concentrates on developing a set of programs that accounts for the GNOME Core Applications. The commonalities of the GNOME Core Applications are the adherence to the current GNOME Human Interface Guidelines (HIG) as well as the tight integration with underlying GNOME layers like e.g. GVfs and also with one another e.g. GOA (gnome-online-accounts)settings and GNOME Files with Google Drive and GNOME Photos with Google Photos. Some programs are simply existing programs with a new name and revamped user interface, while others have been written from scratch.
Games
GNOME Games have the look and feel of the GNOME Core Applications and are released simultaneously with GNOME. All have been rewritten to conform to the current GNOME Human Interface Guidelines.
Development tools
Programmers have written software to provide development tools consistent with the GNOME desktop and to facilitate the development of GNOME software.
GNOME Builder is the new integrated development environment, Anjuta is the older one. Glade Interface Designer software constructs graphical interfaces using the graphical control elements in GTK. Devhelp is an API browser, Accerciser an accessibility explorer.
There are several debugging tools, including Nemiver, GtkInspector and Alleyoop, have also been provided to facilitate development of GNOME software.
Integration options for third-party development tools (e.g. NoFlo) also exist.
The libsoup library enables access to HTTP servers from GNOME applications.
BuildStream is a flexible and extensible framework for the modelling of build and CI pipelines in a declarative YAML format, written in Python. Its mascot is a Beaver, because beavers build things in a stream.

https://en.wikipedia.org/wiki/GNOME
That concludes that! It is everywhere though! Once again Thank you Wiki!
0 notes
Text
Learn Enough Docker to be Useful
Docker Images
Recall that a Docker container is a Docker image brought to life. It’s a self-contained, minimal operating system with application code.
The Docker image is created at build time and the Docker container is created at run time.
The Dockerfile is at the heart of Docker. The Dockerfile tells Docker how to build the image that will be used to make containers.
Each Docker image contains a file named Dockerfile with no extension. The Dockerfile is assumed to be in the current working directory when docker build is called to create an image. A different location can be specified with the file flag (-f).
Recall that a container is built from a series of layers. Each layer is read only, except the final container layer that sits on top of the others. The Dockerfile tells Docker which layers to add and in which order to add them.
Each layer is really just a file with the changes since the previous layer. In Unix, pretty much everything is a file.
The base image provides the initial layer(s). A base image is also called a parent image.
When an image is pulled from a remote repository to a local machine only layers that are not already on the local machine are downloaded. Docker is all about saving space and time by reusing existing layers.
A Dockerfile instruction is a capitalized word at the start of a line followed by its arguments. Each line in a Dockerfile can contain an instruction. Instructions are processed from top to bottom when an image is built. Instructions look like this:
FROM ubuntu:18.04 COPY . /app
Only the instructions FROM, RUN, COPY, and ADD create layers in the final image. Other instructions configure things, add metadata, or tell Docker to do something at run time, such as expose a port or run a command.
In this article, I’m assuming you are using a Unix-based Docker image. You can also used Windows-based images, but that’s a slower, less-pleasant, less-common process. So use Unix if you can.
Let’s do a quick once-over of the dozen Dockerfile instructions we’ll explore.
A Dozen Dockerfile Instructions
FROM — specifies the base (parent) image. LABEL —provides metadata. Good place to include maintainer info. ENV — sets a persistent environment variable. RUN —runs a command and creates an image layer. Used to install packages into containers. COPY — copies files and directories to the container. ADD — copies files and directories to the container. Can upack local .tar files. CMD — provides a command and arguments for an executing container. Parameters can be overridden. There can be only one CMD. WORKDIR — sets the working directory for the instructions that follow. ARG — defines a variable to pass to Docker at build-time. ENTRYPOINT — provides command and arguments for an executing container. Arguments persist. EXPOSE — exposes a port. VOLUME — creates a directory mount point to access and store persistent data.
Let’s get to it!
Instructions and Examples
A Dockerfile can be as simple as this single line:
FROM ubuntu:18.04
FROM
A Dockerfile must start with a FROM instruction or an ARG instruction followed by a FROM instruction.
The FROM keyword tells Docker to use a base image that matches the provided repository and tag. A base image is also called a parent image.
In this example, ubuntu is the image repository. Ubuntu is the name of an official Docker repository that provides a basic version of the popular Ubuntu version of the Linux operating system.
Notice that this Dockerfile includes a tag for the base image: 18.04 . This tag tells Docker which version of the image in the ubuntu repository to pull. If no tag is included, then Docker assumes the latest tag, by default. To make your intent clear, it’s good practice to specify a base image tag.
When the Dockerfile above is used to build an image locally for the first time, Docker downloads the layers specified in the ubuntu image. The layers can be thought of as stacked upon each other. Each layer is a file with the set of differences from the layer before it.
When you create a container, you add a writable layer on top of the read-only layers.
Docker uses a copy-on-write strategy for efficiency. If a layer exists at a previous level within an image, and another layer needs read access to it, Docker uses the existing file. Nothing needs to be downloaded.
When an image is running, if a layer needs modified by a container, then that file is copied into the top, writeable layer. Check out the Docker docs here to learn more about copy-on-write.
A More Substantive Dockerfile
Although our one-line image is concise, it’s also slow, provides little information, and does nothing at container run time. Let’s look at a longer Dockerfile that builds a much smaller size image and executes a script at container run time.
FROM python:3.7.2-alpine3.8 LABEL maintainer=" [email protected]" ENV ADMIN="jeff" RUN apk update && apk upgrade && apk add bashCOPY . ./appADD https://raw.githubusercontent.com/discdiver/pachy-vid/master/sample_vids/vid1.mp4 \ /my_app_directory RUN ["mkdir", "/a_directory"]CMD ["python", "./my_script.py"]
Whoa, what’s going on here? Let’s step through it and demystify.
The base image is an official Python image with the tag 3.7.2-alpine3.8. As you can see from its source code, the image includes Linux, Python and not much else. Alpine images are popular because they are small, fast, and secure. However, Alpine images don’t come with many operating system niceties. You must install such packages yourself, should you need them.
LABEL
The next instruction is LABEL. LABEL adds metadata to the image. In this case, it provides the image maintainer’s contact info. Labels don’t slow down builds or take up space and they do provide useful information about the Docker image, so definitely use them. More about LABEL metadata can be found here.
ENV
ENV sets a persistent environment variable that is available at container run time. In the example above, you could use the ADMIN variable when when your Docker container is created.
ENV is nice for setting constants. If you use a constant several places in your Dockerfile and want to change its value at a later time, you can do so in one location.
With Dockerfiles there are often multiple ways to accomplish the same thing. The best method for your case is a matter of balancing Docker conventions, transparency, and speed. For example, RUN, CMD, and ENTRYPOINT serve different purposes, and can all be used to execute commands.
RUN
RUN creates a layer at build-time. Docker commits the state of the image after each RUN.
RUN is often used to install packages into an image. In the example above, RUN apk update && apk upgrade tells Docker to update the packages from the base image. && apk add bash tells Docker to install bash into the image.
apk stands for Alpine Linux package manager. If you’re using a Linux base image in a flavor other than Alpine, then you’d install packages with RUN apt-get instead of apk. apt stand for advanced package tool. I’ll discuss other ways to install packages in a later example.
RUN — and its cousins, CMD and ENTRYPOINT — can be used in exec form or shell form. Exec form uses JSON array syntax like so: RUN ["my_executable", "my_first_param1", "my_second_param2"].
In the example above, we used shell form in the format RUN apk update && apk upgrade && apk add bash.
Later in our Dockerfile we used the preferred exec form with RUN ["mkdir", "/a_directory"] to create a directory. Don’t forget to use double quotes for strings with JSON syntax for exec form!
COPY
The COPY . ./app instruction tells Docker to take the files and folders in your local build context and add them to the Docker image’s current working directory. Copy will create the target directory if it doesn’t exist.
ADD
ADD does the same thing as COPY, but has two more use cases. ADD can be used to move files from a remote URL to a container and ADD can extract local TAR files.
I used ADD in the example above to copy a file from a remote url into the container’s my_app_directory. The Docker docs don’t recommend using remote urls in this manner because you can’t delete the files. Extra files increase the final image size.
The Docker docs also suggest using COPY instead of ADD whenever possible for improved clarity. It’s too bad that Docker doesn’t combine ADD and COPY into a single command to reduce the number of Dockerfile instructions to keep straight 😃.
Note that the ADD instruction contains the \ line continuation character. Use it to improve readability by breaking up a long instruction over several lines.
CMD
CMD provides Docker a command to run when a container is started. It does not commit the result of the command to the image at build time. In the example above, CMD will have the Docker container run the my_script.py file at run time.
A few other things to know about CMD:
Only one CMD instruction per Dockerfile. Otherwise all but the final one are ignored.
CMD can include an executable. If CMD is present without an executable, then an ENTRYPOINT instruction must exist. In that case, both CMD and ENTRYPOINT instructions should be in JSON format.
Command line arguments to docker run override arguments provided to CMD in the Dockerfile.
Ready for more?
Let’s introduce a few more instructions in another example Dockerfile.
FROM python:3.7.2-alpine3.8 LABEL maintainer=" [email protected]"# Install dependencies RUN apk add --update git # Set current working directory WORKDIR /usr/src/my_app_directory # Copy code from your local context to the image working directory COPY . . # Set default value for a variable ARG my_var=my_default_value # Set code to run at container run time ENTRYPOINT ["python", "./app/my_script.py", "my_var"] # Expose our port to the world EXPOSE 8000 # Create a volume for data storage VOLUME /my_volume
Note that you can use comments in Dockerfiles. Comments start with #.
Package installation is a primary job of Dockerfiles. As touched on earlier, there are several ways to install packages with RUN.
You can install a package in an Alpine Docker image with apk. apk is like apt-get in regular Linux builds. For example, packages in a Dockerfile with a base Ubuntu image can be updated and installed like this: RUN apt-get update && apt-get install my_package.
In addition to apk and apt-get, Python packages can be installed through pip, wheel, and conda. Other languages can use various installers.
The underlying layers need to provide the install layer with the the relevant package manger. If you’re having an issue with package installation, make sure the package managers are installed before you try to use them. 😃
You can use RUN with pip and list the packages you want installed directly in your Dockerfile. If you do this concatenate your package installs into a single instruction and break it up with line continuation characters (\). This method provides clarity and fewer layers than multiple RUN instructions.
Alternatively, you can list your package requirements in a file and RUN a package manager on that file. Folks usually name the file requirements.txt. I’ll share a recommended pattern to take advantage of build time caching with requirements.txt in the next article.
WORKDIR
WORKDIR changes the working directory in the container for the COPY, ADD, RUN, CMD, and ENTRYPOINT instructions that follow it. A few notes:
It’s preferable to set an absolute path with WORKDIR rather than navigate through the file system with cd commands in the Dockerfile.
WORKDIR creates the directory automatically if it doesn’t exist.
You can use multiple WORKDIR instructions. If relative paths are provided, then each WORKDIR instruction changes the current working directory.
ARG
ARG defines a variable to pass from the command line to the image at build-time. A default value can be supplied for ARG in the Dockerfile, as it is in the example: ARG my_var=my_default_value.
Unlike ENV variables, ARG variables are not available to running containers. However, you can use ARG values to set a default value for an ENV variable from the command line when you build the image. Then, the ENV variable persists through container run time. Learn more about this technique here.
ENTRYPOINT
The ENTRYPOINT instruction also allows you provide a default command and arguments when a container starts. It looks similar to CMD, but ENTRYPOINT parameters are not overwritten if a container is run with command line parameters.
Instead, command line arguments passed to docker run my_image_name are appended to the ENTRYPOINT instruction’s arguments. For example, docker run my_image bash adds the argument bash to the end of the ENTRYPOINT instruction’s existing arguments.
A Dockerfile should have at least one CMD or ENTRYPOINT instruction.
The Docker docs have a few suggestions for choosing between CMD and ENTRYPOINT for your initial container command:
Favor ENTRYPOINT when you need to run the same command every time.
Favor ENTRYPOINT when a container will be used as an executable program.
Favor CMD when you need to provide extra default arguments that could be overwritten from the command line.
In the example above, ENTRYPOINT ["python", "my_script.py", "my_var"]has the container run the the python script my_script.py with the argument my_var when the container starts running. my_var could then be used by my_script via argparse. Note that my_var has a default value supplied by ARG earlier in the Dockerfile. So if an argument isn’t passed from the command line, then the default argument will be used.
Docker recommends you generally use the exec form of ENTRYPOINT: ENTRYPOINT ["executable", "param1", "param2"]. This form is the one with JSON array syntax.
EXPOSE
The EXPOSE instruction shows which port is intended to be published to provide access to the running container. EXPOSE does not actually publish the port. Rather, it acts as a documentation between the person who builds the image and the person who runs the container.
Use docker run with the -p flag to publish and map one or more ports at run time. The uppercase -P flag will publish all exposed ports.
VOLUME
VOLUME specifies where your container will store and/or access persistent data. Volumes are the topic of a forthcoming article in this series, so we’ll investigate them then.
Let’s review the dozen Dockerfile instructions we’ve explored.
Important Dockerfile Instructions
FROM — specifies the base (parent) image. LABEL —provides metadata. Good place to include maintainer info. ENV — sets a persistent environment variable. RUN —runs a command and creates an image layer. Used to install packages into containers. COPY — copies files and directories to the container. ADD — copies files and directories to the container. Can upack local .tar files. CMD — provides a command and arguments for an executing container. Parameters can be overridden. There can be only one CMD. WORKDIR — sets the working directory for the instructions that follow. ARG — defines a variable to pass to Docker at build-time. ENTRYPOINT — provides command and arguments for an executing container. Arguments persist. EXPOSE — exposes a port. VOLUME — creates a directory mount point to access and store persistent data.
Now you know a dozen Dockerfile instructions to make yourself useful! Here’s a bonus bagel: a cheat sheet with all the Dockerfile instructions. The five commands we didn’t cover are USER, ONBUILD, STOPSIGNAL, SHELL, and HEALTHCHECK. Now you’ve seen their names if you come across them. 😃
Wrap
Dockerfiles are perhaps the key component of Docker to master. I hope this article helped you gain confidence with them. We’ll revisit them in the next article in this series on slimming down images. Follow me to make sure you don’t miss it!
If you found this article helpful, please help others find it by sharing on your favorite social media.
Credit : https://towardsdatascience.com/learn-enough-docker-to-be-useful-b0b44222eef5
0 notes
Photo

An Introduction to Gulp.js
Developers spend precious little time coding. Even if we ignore irritating meetings, much of the job involves basic tasks which can sap your working day:
generating HTML from templates and content files
compressing new and modified images
compiling Sass to CSS code
removing console and debugger statements from scripts
transpiling ES6 to cross-browser–compatible ES5 code
code linting and validation
concatenating and minifying CSS and JavaScript files
deploying files to development, staging and production servers.
Tasks must be repeated every time you make a change. You may start with good intentions, but the most infallible developer will forget to compress an image or two. Over time, pre-production tasks become increasingly arduous and time-consuming; you'll dread the inevitable content and template changes. It's mind-numbing, repetitive work. Wouldn’t it be better to spend your time on more profitable jobs?
If so, you need a task runner or build process.
That Sounds Scarily Complicated!
Creating a build process will take time. It's more complex than performing each task manually, but over the long term, you’ll save hours of effort, reduce human error and save your sanity. Adopt a pragmatic approach:
Automate the most frustrating tasks first.
Try not to over-complicate your build process. An hour or two is more than enough for the initial setup.
Choose task runner software and stick with it for a while. Don't switch to another option on a whim.
Some of the tools and concepts may be new to you, but take a deep breath and concentrate on one thing at a time.
Task Runners: the Options
Build tools such as GNU Make have been available for decades, but web-specific task runners are a relatively new phenomenon. The first to achieve critical mass was Grunt — a Node.js task runner which used plugins controlled (originally) by a JSON configuration file. Grunt was hugely successful, but there were a number of issues:
Grunt required plugins for basic functionality such as file watching.
Grunt plugins often performed multiple tasks, which made customisation more awkward.
JSON configuration could become unwieldy for all but the most basic tasks.
Tasks could run slowly because Grunt saved files between every processing step.
Many issues were addressed in later editions, but Gulp had already arrived and offered a number of improvements:
Features such as file watching were built in.
Gulp plugins were (mostly) designed to do a single job.
Gulp used JavaScript configuration code that was less verbose, easier to read, simpler to modify, and provided better flexibility.
Gulp was faster because it uses Node.js streams to pass data through a series of piped plugins. Files were only written at the end of the task.
Of course, Gulp itself isn't perfect, and new task runners such as Broccoli.js, Brunch and webpack have also been competing for developer attention. More recently, npm itself has been touted as a simpler option. All have their pros and cons, but Gulp remains the favorite and is currently used by more than 40% of web developers.
Gulp requires Node.js, but while some JavaScript knowledge is beneficial, developers from all web programming faiths will find it useful.
What About Gulp 4?
This tutorial describes how to use Gulp 3 — the most recent release version at the time of writing. Gulp 4 has been in development for some time but remains a beta product. It's possible to use or switch to Gulp 4, but I recommend sticking with version 3 until the final release.
Step 1: Install Node.js
Node.js can be downloaded for Windows, macOS and Linux from nodejs.org/download/. There are various options for installing from binaries, package managers and docker images, and full instructions are available.
Note for Windows users: Node.js and Gulp run on Windows, but some plugins may not install or run if they depend on native Linux binaries such as image compression libraries. One option for Windows 10 users is the new bash command-line, which solves many issues.
Once installed, open a command prompt and enter:
node -v
This reveals the version number. You're about to make heavy use of npm — the Node.js package manager which is used to install modules. Examine its version number:
npm -v
Note for Linux users: Node.js modules can be installed globally so they’re available throughout your system. However, most users will not have permission to write to the global directories unless npm commands are prefixed with sudo. There are a number of options to fix npm permissions and tools such as nvm can help, but I often change the default directory. For example, on Ubuntu/Debian-based platforms:
cd ~ mkdir .node_modules_global npm config set prefix=$HOME/.node_modules_global npm install npm -g
Then add the following line to the end of ~/.bashrc:
export PATH="$HOME/.node_modules_global/bin:$PATH"
Finally, update with this:
source ~/.bashrc
Step 2: Install Gulp Globally
Install Gulp command-line interface globally so the gulp command can be run from any project folder:
npm install gulp-cli -g
Verify Gulp has installed with this:
gulp -v
Step 3: Configure Your Project
Note for Node.js projects: you can skip this step if you already have a package.json configuration file.
Presume you have a new or pre-existing project in the folder project1. Navigate to this folder and initialize it with npm:
cd project1 npm init
You’ll be asked a series of questions. Enter a value or hit Return to accept defaults. A package.json file will be created on completion which stores your npm configuration settings.
Note for Git users: Node.js installs modules to a node_modules folder. You should add this to your .gitignore file to ensure they’re not committed to your repository. When deploying the project to another PC, you can run npm install to restore them.
For the remainder of this article, we'll presume your project folder contains the following sub-folders:
src folder: preprocessed source files
This contains further sub-folders:
html - HTML source files and templates
images — the original uncompressed images
js — multiple preprocessed script files
scss — multiple preprocessed Sass .scss files
build folder: compiled/processed files
Gulp will create files and create sub-folders as necessary:
html — compiled static HTML files
images — compressed images
js — a single concatenated and minified JavaScript file
css — a single compiled and minified CSS file
Your project will almost certainly be different but this structure is used for the examples below.
Tip: If you're on a Unix-based system and you just want to follow along with the tutorial, you can recreate the folder structure with the following command:
mkdir -p src/{html,images,js,scss} build/{html,images,js,css}
Step 4: Install Gulp Locally
You can now install Gulp in your project folder using the command:
npm install gulp --save-dev
This installs Gulp as a development dependency and the "devDependencies" section of package.json is updated accordingly. We’ll presume Gulp and all plugins are development dependencies for the remainder of this tutorial.
Alternative Deployment Options
Development dependencies are not installed when the NODE_ENV environment variable is set to production on your operating system. You would normally do this on your live server with the Mac/Linux command:
export NODE_ENV=production
Or on Windows:
set NODE_ENV=production
This tutorial presumes your assets will be compiled to the build folder and committed to your Git repository or uploaded directly to the server. However, it may be preferable to build assets on the live server if you want to change the way they are created. For example, HTML, CSS and JavaScript files are minified on production but not development environments. In that case, use the --save option for Gulp and all plugins, i.e.
npm install gulp --save
This sets Gulp as an application dependency in the "dependencies" section of package.json. It will be installed when you enter npm install and can be run wherever the project is deployed. You can remove the build folder from your repository since the files can be created on any platform when required.
Step 4: Create a Gulp Configuration File
Create a new gulpfile.js configuration file in the root of your project folder. Add some basic code to get started:
// Gulp.js configuration var // modules gulp = require('gulp'), // development mode? devBuild = (process.env.NODE_ENV !== 'production'), // folders folder = { src: 'src/', build: 'build/' } ;
This references the Gulp module, sets a devBuild variable to true when running in development (or non-production mode) and defines the source and build folder locations.
ES6 note: ES5-compatible JavaScript code is provided in this tutorial. This will work for all versions of Gulp and Node.js with or without the --harmony flag. Most ES6 features are supported in Node 6 and above so feel free to use arrow functions, let, const, etc. if you're using a recent version.
gulpfile.js won't do anything yet because you need to …
Step 5: Create Gulp Tasks
On its own, Gulp does nothing. You must:
install Gulp plugins, and
write tasks which utilize those plugins to do something useful.
It's possible to write your own plugins but, since almost 3,000 are available, it's unlikely you'll ever need to. You can search using Gulp's own directory at gulpjs.com/plugins/, on npmjs.com, or search "gulp something" to harness the mighty power of Google.
Gulp provides three primary task methods:
gulp.task — defines a new task with a name, optional array of dependencies and a function.
gulp.src — sets the folder where source files are located.
gulp.dest — sets the destination folder where build files will be placed.
Any number of plugin calls are set with pipe between the .src and .dest.
The post An Introduction to Gulp.js appeared first on SitePoint.
by Craig Buckler via SitePoint http://bit.ly/2PBh4vG
0 notes
Text
How to set up an iPad for web development
A few months ago, I detailed my process for setting up a Pixelbook to code on. It wasn’t easy or simple or straightforward, but it worked in the end: I had all the power and flexibility of Linux, access to my favorite code editor (VS Code), and, of course, the slick web browsing experience that Chromebooks are known for.
Around that same time, I attempted to set up an iPad for coding. I failed miserably. I love using the iPad for writing and other creative work. It’s super portable, has great battery life, an excellent screen, and the limited multitasking keeps me focused. Unfortunately, it’s very bad for complex tasks and intentionally crippled for software development.
But I’m older and wiser now, and after an entire Saturday spent bashing my head against a wall, I’m happy to report that I can use a $799 tablet computer to write software. Will I ever actually use it for this purpose? Maybe! But we’ll get to that.
Feel free to follow in my footsteps if you, too, wish to code on the iPad. I can’t promise you it’s a worthwhile destination, but I learned a lot on my way there.
Chapter 1: The journey begins by lowering my expectations
As everyone knows, Apple is scared to death that anyone might ever run arbitrary code on one of its pristine iOS devices. It makes a little bit of sense: the strictures of iOS and the App Store are why a years-old iPad is vastly more responsive and cruft-free than a similarly aged MacBook Pro.
But it makes developing software nearly impossible. It’s ironic because the iPad is excellent for creators in so many ways like drawing, design, and music. Under the hood is the same Unix kernel that makes macOS excellent for programmers.
Anyway, you know all this.
Unlike on the Pixelbook, where I wanted a full-on Rust development environment basically comparable to my Mac setup, I decided to just do some JavaScript-based web development on my iPad.
I knew just the place to go: CodeSandbox. It’s a website, and everything runs in the browser. Therefore, the iPad won’t be able to stop me from my dreams of creating my “Calculator 2: The Sequel to Calculators” web app in JavaScript.
CodeSandbox allows you to use arbitrary NPM packages, and it has a code editor based on VS Code’s own editor. So as long as you stick to the world of JavaScript, it’s almost as powerful as a traditional desktop-based web development setup. CodeSandbox also sands off some of the rough edges of configuration files and has a lot of premade projects built with various technologies (React, Vue, Redux, and even exotic frameworks like Hyperapp), which makes it easy to get started with the uber-complicated build chain that modern web development seems to require.
And I was extra excited to see that CodeSandbox has a Vim mode. Vim keybindings are my preferred way to navigate around text, and it’s especially important on the iPad where you don’t have a mouse for assistance. Moving the cursor, highlighting text, deleting words or lines, moving lines, and jumping large distances in a file all require just a couple keystrokes in Vim. Contrast that to the iPad alternative: seconds spent poking at the screen with your clumsy finger, hoping iOS will discern your intent.
Basically, everything was going great. CodeSandbox was all I needed, and my iPad was suddenly an ultra useful webdev box — at least for building the sort of small experiments I gravitate toward.
Except there was one problem: the iPad doesn’t have an Escape key.
Chapter 2: What despair feels like
See, in Vim, there are different “modes.” There’s the default mode where you use the keyboard to navigate around your document. There’s the selection mode, where you use those same navigations keys to select text. And, importantly, there’s an insert mode, where you use your keyboard to type. Since you need to get out of insert mode to move your cursor again, you need some sort of command to exit insert mode. By default, that command is wired to the Escape key.
Many Vim users (like myself, for instance) map a fancy key combo like “jj” to make exiting insert mode easier, but CodeSandbox isn’t actually Vim. It just emulates some of Vim’s default keybindings. So I need an Escape key. And the iPad doesn’t even know what that means.
I’m serious! At first, I thought this was just a problem with Apple’s own Smart Keyboard Cover, which has no function row and no Escape key. So I pulled out a regular Bluetooth keyboard and hooked it up to the iPad. I jammed on the Escape key and... nothing. In the world of iOS, there is no escape.
I browsed around StackExchange and various GitHub issues in a state of despair. Yes, there are ways to emulate an Escape keypress with “Ctrl + [,” but that gets me nothing in this case. I’m stuck in insert mode for the rest of my life.
CodeSandbox, you brought me so close!
In fact, based on CodeSandbox’s rapid iteration, I wouldn’t be surprised if they solved this issue in the near future.
But in the meantime: what’s a boy to do?
Chapter 3: Okay, let’s try the cloud again
The first time I tried to set up an iPad for coding, I naturally went straight to the cloud. But the cloud isn’t a magical place where all your dreams come true. Setting up a devbox on Digital Ocean or Google Cloud requires some knowledge of Linux and SSH, and there’s no GUI Linux interface to fall back on when your command line skills fail you.
Why was this so hard before?
Weirdly, the debris of scattered knowledge from my last attempt at a cloud devbox setup was all I needed to quickly get everything working. I paid for the basic $5 box on Digital Ocean, put a clean install of Ubuntu on it, and provided it an SSH key I generated in Panic’s Prompt app, an SSH terminal emulator for iOS. Why was this so hard before?
After SSHing into my Digital Ocean box, I started adding the tools I need. I installed Neovim (a modern Vim alternative) and found someone’s .config file for Neovim on GitHub and copied it. Then I installed nodejs, yarn, npm, parcel, rust, gcc... all the good stuff I crave. Because the “language server” aspect of VS Code is open source, I can get many of the hints and errors I rely on so heavily when coding into Neovim, even though it lacks all the GUI bells and whistles of VS Code.
It’s hard for me to describe how I did all these things, other than a liberal application of sudo apt-get install, copying and pasting shell scripts, and careful reading of error messages. Mostly, it’s just years of trial and error in the command line. I guess DM me if you get stuck on something, and I’ll do my best to help. Have you tried modifying your $PATH?
So, anyway, now I can write a web app in JavaScript, serve it from my Digital Ocean box, and preview my work in Safari (with live reload, thanks to some magic performed by Parcel). I can even split-screen the terminal and Safari and reallyget to work.
But soon, I got frustrated: a very small fraction of my work “coding” is actually typing code. I spend most of my time reading documentation and other people’s code to try and figure out how the hell anything ever works. After a couple of minutes browsing StackOverflow, I get a notification from Prompt, warning me that my SSH session is about to disconnect because of inactivity.
The whole reason iOS is so nice and responsive is because it has almost zero multitasking unless you’re working with multiple audio apps at once. Prompt does its best to stay alive, but iOS always kills it in the end.
Chapter 4: UDP saves the day
So, I Googled for a solution and discovered Mosh. Basically, Mosh is a UDP protocol for using a terminal from an intermittent connection. You connect over SSH like usual, but then that connection is handed off to Mosh to keep it “alive” during downtime. Prompt doesn’t support Mosh, so I paid another $20 for another terminal emulator app, called Blink, and set up Mosh. It took some trial and error to get the Mosh server running on my Ubuntu box and correctly enter my login details into Blink, but once I got it working, it works great.
I can leave the terminal for days, and as soon as I open Blink I have all the sessions open from the last time. For command line warriors, this is no huge feat. They know all about “reattaching” to sessions or whatever they do. But for me, it’s a huge achievement.
In fact, in some ways, I prefer my iPad / Blink / Digital Ocean setup to coding on my Mac. I can’t do everything my Mac does — anything involving windowing or graphics, for instance, outside of a web browser, isn’t really possible — but I have the joy of knowing I’m not mucking up my Mac with all the various weird command line software I install from the internet. If my setup ever breaks beyond repair, it’s just a couple clicks to wipe my Ubuntu box and start fresh.
Also, while my Digital Ocean box is a lot slower than my MacBook Pro, it has a blazing-fast internet connection. Anything I want to git clone or npm install feels way snappier on this cloud box, thanks to its minimal latency and huge internet pipe.
Only one problem: I’m terrible at JavaScript
Oh, and in case you were wondering: Blink supports the “Ctrl + [“ command to emulate escape. You can also map your Caps Lock key to escape if you want to be really crazy (I traditionally map Caps Lock to Ctrl, which is also supported by Blink). But, thankfully, my Neovim config maps “jj” to escape when in insert mode, so I’m golden on that front.
There’s really only one problem with my current setup: I’m terrible at JavaScript, and therefore nothing I write works the first time, and I can’t see any console error messages in Mobile Safari because it’s a crippled browser for babies.
CodeSandbox.io includes its own console interface.
I guess my first job on this new coding setup will be to write a pull request for CodeSandbox to support the “jj” escape method.
If only I was better at JavaScript!
It’s a real pickle I’ve found myself in.
via Blogger https://ift.tt/2upzJDH
0 notes
Photo

An Introduction to Gulp.js
Developers spend precious little time coding. Even if we ignore irritating meetings, much of the job involves basic tasks which can sap your working day:
generating HTML from templates and content files
compressing new and modified images
compiling Sass to CSS code
removing console and debugger statements from scripts
transpiling ES6 to cross-browser–compatible ES5 code
code linting and validation
concatenating and minifying CSS and JavaScript files
deploying files to development, staging and production servers.
Tasks must be repeated every time you make a change. You may start with good intentions, but the most infallible developer will forget to compress an image or two. Over time, pre-production tasks become increasingly arduous and time-consuming; you'll dread the inevitable content and template changes. It's mind-numbing, repetitive work. Wouldn’t it be better to spend your time on more profitable jobs?
If so, you need a task runner or build process.
That Sounds Scarily Complicated!
Creating a build process will take time. It's more complex than performing each task manually, but over the long term, you’ll save hours of effort, reduce human error and save your sanity. Adopt a pragmatic approach:
Automate the most frustrating tasks first.
Try not to over-complicate your build process. An hour or two is more than enough for the initial setup.
Choose task runner software and stick with it for a while. Don't switch to another option on a whim.
Some of the tools and concepts may be new to you, but take a deep breath and concentrate on one thing at a time.
Task Runners: the Options
Build tools such as GNU Make have been available for decades, but web-specific task runners are a relatively new phenomenon. The first to achieve critical mass was Grunt — a Node.js task runner which used plugins controlled (originally) by a JSON configuration file. Grunt was hugely successful, but there were a number of issues:
Grunt required plugins for basic functionality such as file watching.
Grunt plugins often performed multiple tasks, which made customisation more awkward.
JSON configuration could become unwieldy for all but the most basic tasks.
Tasks could run slowly because Grunt saved files between every processing step.
Many issues were addressed in later editions, but Gulp had already arrived and offered a number of improvements:
Features such as file watching were built in.
Gulp plugins were (mostly) designed to do a single job.
Gulp used JavaScript configuration code that was less verbose, easier to read, simpler to modify, and provided better flexibility.
Gulp was faster because it uses Node.js streams to pass data through a series of piped plugins. Files were only written at the end of the task.
Of course, Gulp itself isn't perfect, and new task runners such as Broccoli.js, Brunch and webpack have also been competing for developer attention. More recently, npm itself has been touted as a simpler option. All have their pros and cons, but Gulp remains the favorite and is currently used by more than 40% of web developers.
Gulp requires Node.js, but while some JavaScript knowledge is beneficial, developers from all web programming faiths will find it useful.
What About Gulp 4?
This tutorial describes how to use Gulp 3 — the most recent release version at the time of writing. Gulp 4 has been in development for some time but remains a beta product. It's possible to use or switch to Gulp 4, but I recommend sticking with version 3 until the final release.
Step 1: Install Node.js
Node.js can be downloaded for Windows, macOS and Linux from nodejs.org/download/. There are various options for installing from binaries, package managers and docker images, and full instructions are available.
Note for Windows users: Node.js and Gulp run on Windows, but some plugins may not install or run if they depend on native Linux binaries such as image compression libraries. One option for Windows 10 users is the new bash command-line, which solves many issues.
Once installed, open a command prompt and enter:
node -v
This reveals the version number. You're about to make heavy use of npm — the Node.js package manager which is used to install modules. Examine its version number:
npm -v
Note for Linux users: Node.js modules can be installed globally so they’re available throughout your system. However, most users will not have permission to write to the global directories unless npm commands are prefixed with sudo. There are a number of options to fix npm permissions and tools such as nvm can help, but I often change the default directory. For example, on Ubuntu/Debian-based platforms:
cd ~ mkdir .node_modules_global npm config set prefix=$HOME/.node_modules_global npm install npm -g
Then add the following line to the end of ~/.bashrc:
export PATH="$HOME/.node_modules_global/bin:$PATH"
Finally, update with this:
source ~/.bashrc
Step 2: Install Gulp Globally
Install Gulp command-line interface globally so the gulp command can be run from any project folder:
npm install gulp-cli -g
Verify Gulp has installed with this:
gulp -v
Step 3: Configure Your Project
Note for Node.js projects: you can skip this step if you already have a package.json configuration file.
Presume you have a new or pre-existing project in the folder project1. Navigate to this folder and initialize it with npm:
cd project1 npm init
You’ll be asked a series of questions. Enter a value or hit Return to accept defaults. A package.json file will be created on completion which stores your npm configuration settings.
Note for Git users: Node.js installs modules to a node_modules folder. You should add this to your .gitignore file to ensure they’re not committed to your repository. When deploying the project to another PC, you can run npm install to restore them.
For the remainder of this article, we'll presume your project folder contains the following sub-folders:
src folder: preprocessed source files
This contains further sub-folders:
html - HTML source files and templates
images — the original uncompressed images
js — multiple preprocessed script files
scss — multiple preprocessed Sass .scss files
build folder: compiled/processed files
Gulp will create files and create sub-folders as necessary:
html — compiled static HTML files
images — compressed images
js — a single concatenated and minified JavaScript file
css — a single compiled and minified CSS file
Your project will almost certainly be different but this structure is used for the examples below.
Tip: If you're on a Unix-based system and you just want to follow along with the tutorial, you can recreate the folder structure with the following command:
mkdir -p src/{html,images,js,scss} build/{html,images,js,css}
Step 4: Install Gulp Locally
You can now install Gulp in your project folder using the command:
npm install gulp --save-dev
This installs Gulp as a development dependency and the "devDependencies" section of package.json is updated accordingly. We’ll presume Gulp and all plugins are development dependencies for the remainder of this tutorial.
Alternative Deployment Options
Development dependencies are not installed when the NODE_ENV environment variable is set to production on your operating system. You would normally do this on your live server with the Mac/Linux command:
export NODE_ENV=production
Or on Windows:
set NODE_ENV=production
This tutorial presumes your assets will be compiled to the build folder and committed to your Git repository or uploaded directly to the server. However, it may be preferable to build assets on the live server if you want to change the way they are created. For example, HTML, CSS and JavaScript files are minified on production but not development environments. In that case, use the --save option for Gulp and all plugins, i.e.
npm install gulp --save
This sets Gulp as an application dependency in the "dependencies" section of package.json. It will be installed when you enter npm install and can be run wherever the project is deployed. You can remove the build folder from your repository since the files can be created on any platform when required.
Step 4: Create a Gulp Configuration File
Create a new gulpfile.js configuration file in the root of your project folder. Add some basic code to get started:
// Gulp.js configuration var // modules gulp = require('gulp'), // development mode? devBuild = (process.env.NODE_ENV !== 'production'), // folders folder = { src: 'src/', build: 'build/' } ;
This references the Gulp module, sets a devBuild variable to true when running in development (or non-production mode) and defines the source and build folder locations.
ES6 note: ES5-compatible JavaScript code is provided in this tutorial. This will work for all versions of Gulp and Node.js with or without the --harmony flag. Most ES6 features are supported in Node 6 and above so feel free to use arrow functions, let, const, etc. if you're using a recent version.
gulpfile.js won't do anything yet because you need to …
Step 5: Create Gulp Tasks
On its own, Gulp does nothing. You must:
install Gulp plugins, and
write tasks which utilize those plugins to do something useful.
It's possible to write your own plugins but, since almost 3,000 are available, it's unlikely you'll ever need to. You can search using Gulp's own directory at gulpjs.com/plugins/, on npmjs.com, or search "gulp something" to harness the mighty power of Google.
Gulp provides three primary task methods:
gulp.task — defines a new task with a name, optional array of dependencies and a function.
gulp.src — sets the folder where source files are located.
gulp.dest — sets the destination folder where build files will be placed.
Any number of plugin calls are set with pipe between the .src and .dest.
Continue reading %An Introduction to Gulp.js%
by Craig Buckler via SitePoint http://ift.tt/2DO6sCV
0 notes