#(technically twice but we deleted that panel))
Note
I love the way you draw Etho he's so squishy

thank you! Whwh honestly I don’t think I ever have or could draw him threatening I never saw him that way
Even in the Apocalypse au he isn’t
#ask stufff#stufffsart#last life apocalypse au#Etho#ethoslab#bdubs#(Is there once#(technically twice but we deleted that panel))#he’s ‘chill’ at least early on I guess#forgive inconsistent hairstyles decided he doesn’t have the highlights when my hc of how he got those doesn’t exist here#found the lore doc and we back to building on it :]#left out a important detail in what his whole thing is in this au— another day#last life smp#last life#trafficblr#mcytblr
980 notes
·
View notes
Text
How Do I Make Gifs? - A Photoshop CC Giffing Tutorial
(for @elektrawwf, and anyone else interested in how I make gifs I guess, lol)
So, I feel like I should preface this by saying that I'm certainly no expert on this, nor am I a Professional Giffer™, but I’ve been making gifs for a few years now, and have developed a pretty standard system for doing so. Hopefully it works for you like it’s worked for me! :)
Basic Tutorial Steps:
Step 1 - Recording the scene you want to gif
Step 2 - Importing, deleting, and cropping your gif frames
Step 3 - Adding adjustment layers
Step 4 - Resizing your gif and setting the frame delay
Step 5 - Converting and sharpening your gif
Step 6 - Trimming and saving your gif
BONUS STEP - Adding text (OPTIONAL)
-
Programs Used/Needed:
- QuickTime Player
- Photoshop CC 2018
-
The finished gif that I’ll be making:

This tutorial is VERY screenshot-heavy, so the rest of it will be below the cut. Happy giffing!
STEP 1 - Recording the scene you want to gif.
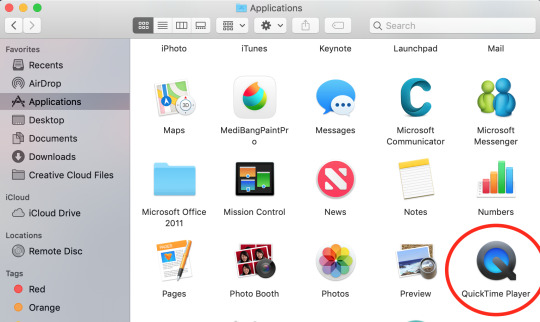
All gifs start as videos. I use the Screen Recording feature on QuickTime Player to create videos of whatever scenes I want to gif. If you have a Mac, you can find QuickTime in the Applications folder:
Right click, then select New Screen Recording.

You can then play the scene you want to gif on your computer, and your screen with the video on it will be recorded. Hit the stop button when you want to end the recording, and then save the video.
It’s best to not record more than a minute or two at a time - basically, just record the exact scene that you’re looking for - because the longer the video is, the harder it’ll be to select the portion of it that you need for giffing.
You can technically screen-record any type of video, but I (and most giffers) vastly prefer videos that are 1080p, which is the best kind of HD. That’s why I usually don’t gif things unless I can find them either on Netflix, Youtube (in HD) or the CW site (or NBC, CBS, whatever). There are definitely other (less legal) ways to get your hands on HD videos, but I’m just not super comfortable using those lol.
That being said, 720p videos are usually okay for smaller (268px-wide) gifs - they’re just less ideal (I wouldn’t really recommend using them to make 540px-wide gifs, but you can still technically do it).
STEP 2 - Importing, deleting, and cropping your gif frames.
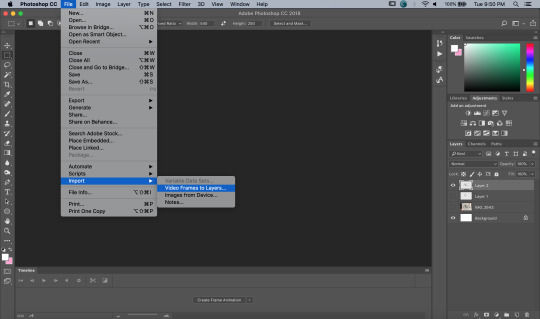
Now that you have your video, you have to import it into Photoshop. Once you open Photoshop, you need to go to File > Import, then select Video Frames to Layers.
A window will pop up, where you can set the amount of frames that you want Photoshop to import, and select the exact section of the video that you want to import. Here are my settings:
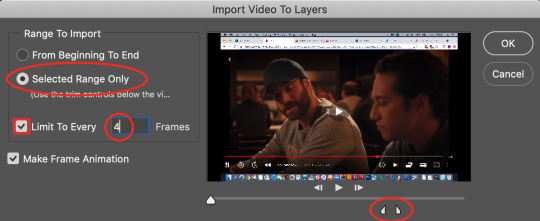
The two little toggles below the video are meant to be dragged around, and you use them to section out the specific Range of the video that you want to turn into a gif. Once you have all of this set up to your liking, hit OK.
-
NOTE: The selection of Limit To Every 4 Frames is more my personal preference than anything else. If you want Really Smooth Gifs, then you can uncheck that box and simply import every single frame in your Selected Range. This is what High Quality Giffers always say to do. Unfortunately, while those gifs do end up really smooth, they also end up being really short, which I don’t particularly like.
So basically, I’m personally willing to sacrifice some smoothness in favor of an increased gif length, but you do NOT have to do that if you don’t want to. Choose whichever option you like best - these Steps work no matter which one you do. (We’ll come back to this later though, once we get to setting the frame delay in Step 4).
-
Okay, back to the tutorial.
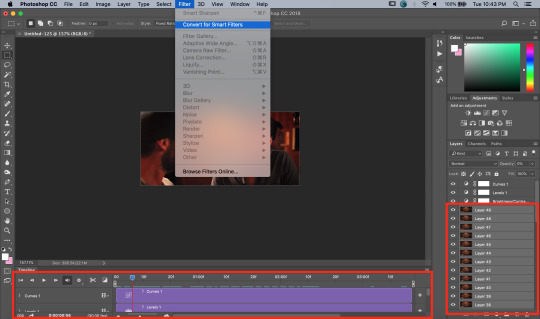
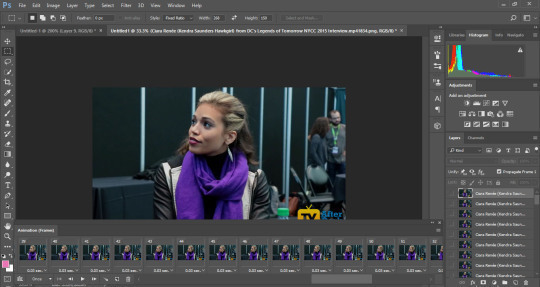
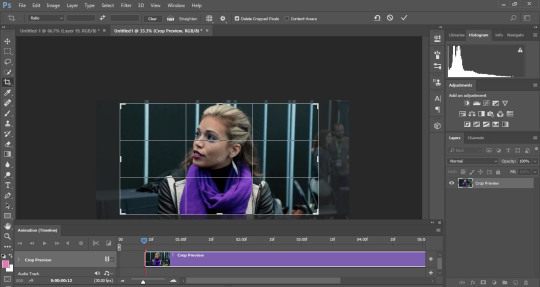
Once the scene is imported, you can delete any extraneous frames at the beginning and end of the frame animation Timeline, which can be found at the bottom of the screen.
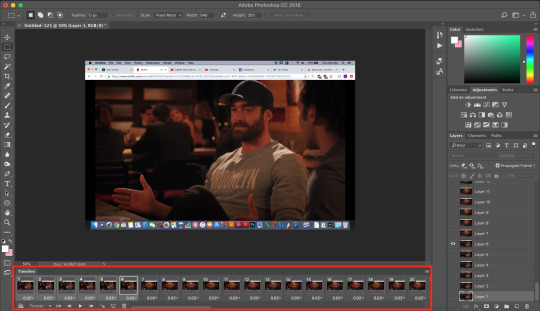
As you can see, I have the first 6 frames selected. Those are the ones I ended up deleting (among some others at the end of the Timeline).
You can also go to the Layers panel on the right, and delete the corresponding layers from there, once you’ve deleted the frames. This isn’t technically necessary, but it might help free up some computing space if you’re deleting a lot of frames.

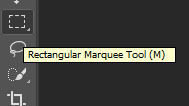
Next, you need to click the Selection Tool in the top left corner of the screen. Then, set your selection preferences (circled below) as follows:

Style: Fixed Ratio
Width: 540
Height: 250
This is specifically the ratio to set for a 540 x 250px sized gif, which are the dimensions of the example gif I’m making. If you want to place two gifs beside each other in a gifset, each gif needs to be 268px wide. (The heights can be whatever you want them to be.)
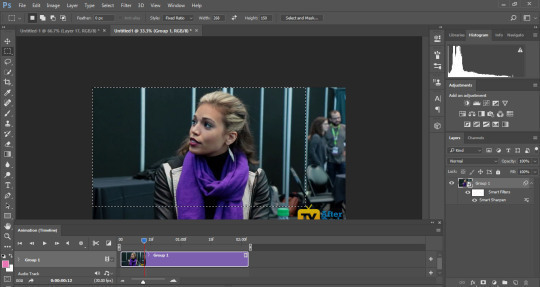
Use the Selection Tool to select the area that you want to be your gif, and then go to Image > Crop.

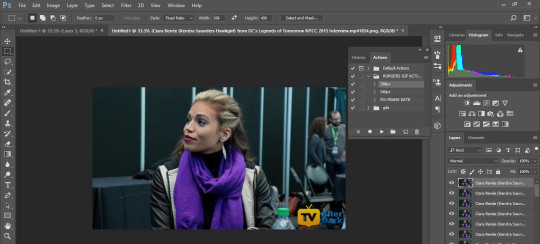
STEP 3 - Adding adjustment layers.
Now it’s time to make your gif look pretty™. For this part, you’ll be using the Adjustments panel above the Layers panel.
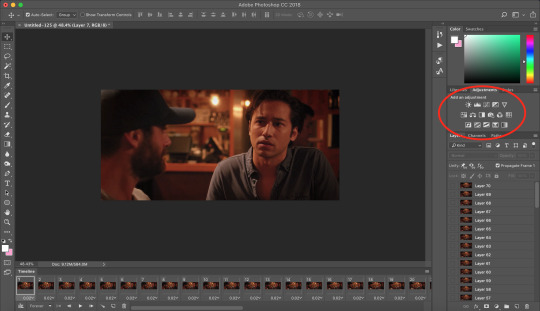
Adjustments will affect all the layers below it, so you want to make sure that your adjustment layers are placed above all of your gif layers.

These are the adjustment layers that I used for this specific gif, but they’re also just generally the same three adjustments that I use for every gif I make. (I also usually add a Hue/Saturation adjustment to my gifs, which I set to +15 Saturation, but since this scene was already so heavily saturated, it didn’t need it.)
Here are the specifications for the Brightness/Contrast and Levels adjustment layers:

Regarding the Curves adjustment layer (pictured below), if you click on the RGB dropdown menu, you can single out specific colors in order to color-correct the gif, which I did here (by removing a lot of extra reds and yellows).
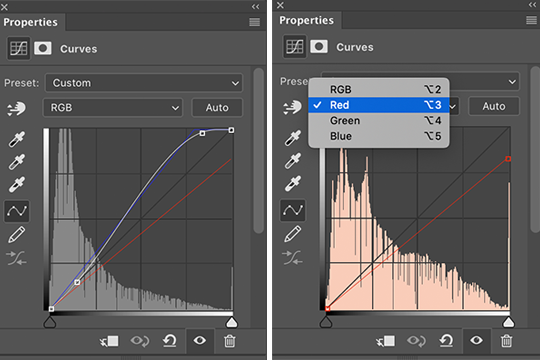
While these are good general adjustment examples, just take note that the values pictured here won’t be exactly the same for every gif, and you need to toggle and play around with them to make every new gif look its best.
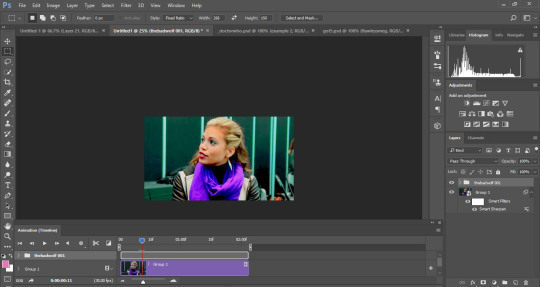
Here’s the example scene before any adjustments:

And here’s the scene after my adjustments:

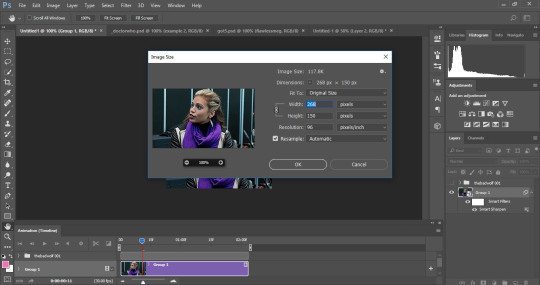
STEP 4 - Resizing your gif and setting the frame delay.
To resize your gif, go to Image > Image Size, and then change the gif’s width (in this example, I change the gif’s width to 540px).
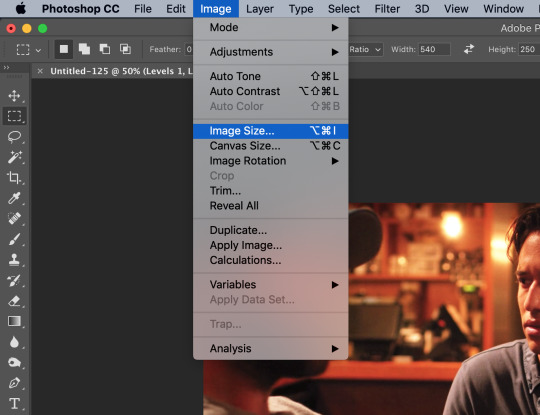

As long as Resample is checked the you’re working with Pixels, the gif should resize properly. Hit OK.
Next, to change the Frame Delay of the gif (basically how fast it goes), look for this button in the right corner of your Timeline, then click it and Select All Frames.

Once all the frames are selected, you can hit one of the little downward arrows next to the 0.02 values, and select Other.
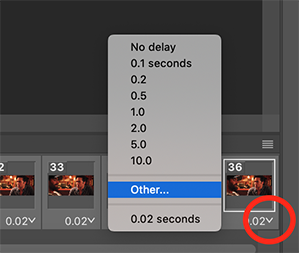
Now you can set your new frame delay. I always set my delay to 0.09 seconds, which produces gifs that are a bit slower than the Professional Gif Standard™. This is due to a combination of personal preference (I just like slower gifs) and an effort to maintain as much smoothness as possible, given how I choose to import my frames.
-
NOTE: Remember the NOTE from Step 2? Now, if you chose to import every frame, rather than “Every 4 Frames” like I do, then you should set your frame delay to 0.04.
Doing so will produce a final gif that looks like this:

Notice how this gif is smoother and faster, but also shorter than my example gif? Yeah. Like I said, whichever style of gif you choose to make is up to your own preference.
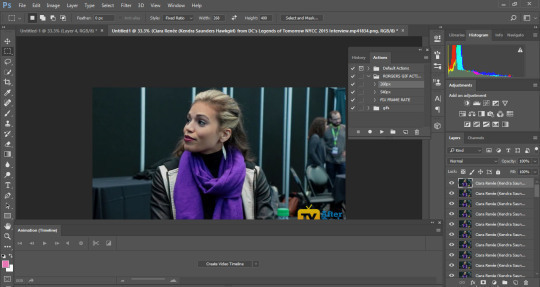
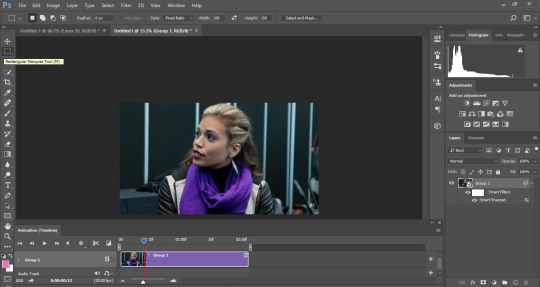
STEP 5 - Converting and sharpening your gif.
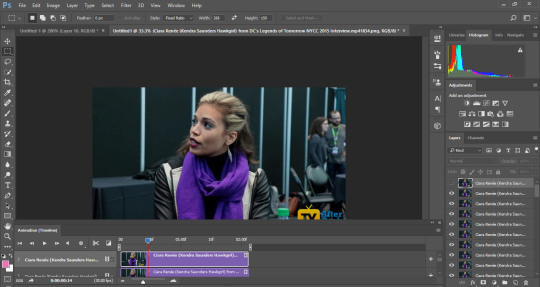
You never quite realize how blurry a gif really is until you Sharpen it. To do this, you first need to convert your Timeline from a Frame Animation to a solid Timeline. You can do this by making sure all your frames are still selected, and then clicking the Convert to Timeline button in the bottom left corner of the Timeline.

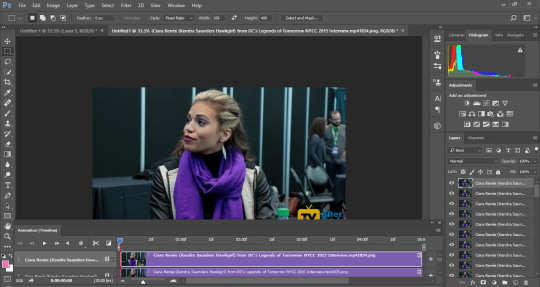
Now your Timeline should look purple, like it does in the picture below.
Next, you need to select all of your layers (MINUS the adjustment layers) on the right side of the screen. Once all of your layers are selected, go to Filter > Convert for Smart Filters.
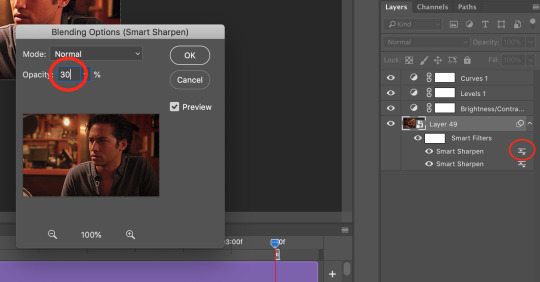
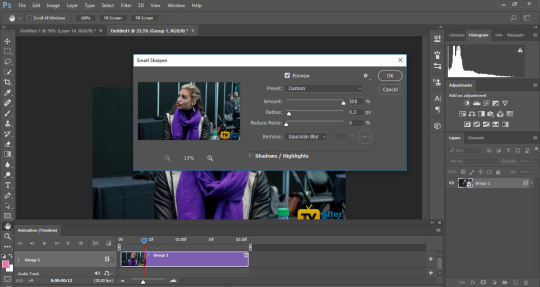
Once your gif layers have been compressed into a Smart Object (see circle below), you can select Filter > Sharpen > Smart Sharpen.

The first time you select Smart Sharpen, you need to set all the parameters for it. But once you do that the first time, you shouldn’t have to set them again. Basically, make sure your window looks exactly like this one:

Then hit OK.
You’re going to do this TWICE (so you’re going to end up with TWO Smart Sharpen layers below your Smart Object layer). Then, you need to click the button to the right of the top Smart Sharpen layer, and change the opacity of that layer to 30%. (Otherwise, your gif will be way over-sharpened.)
STEP 6 - Trimming and saving your gif.
You’re almost done! It’s time to save your gif.
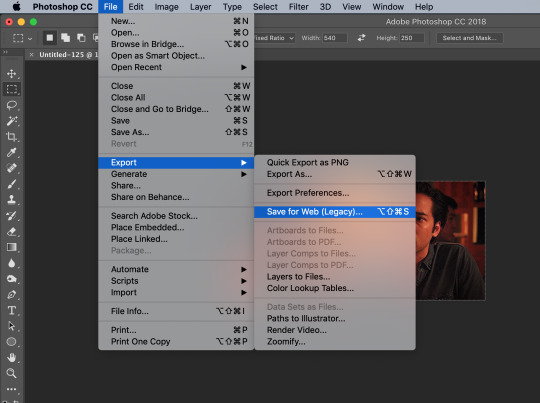
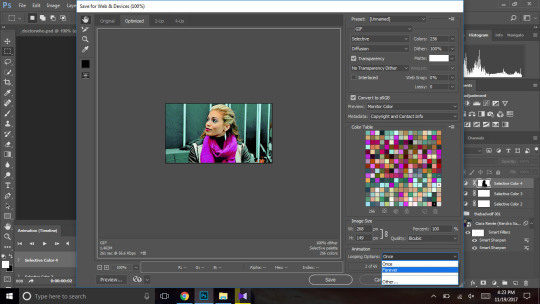
To save a gif, you must go to File > Export > Save For Web (Legacy).
However, this gif has a problem.


This number in the bottom left corner of the Save For Web window tells you the current size of your gif. As you can see, this gif’s size is currently 3.541 MB. That size wouldn’t be a problem if you were intending to upload this gif to Twitter, because Twitter has a gif size limit of 5 MB.
Tumblr, however, only has a size limit of 3 MB. So, to get your gif to work on tumblr, you need to Trim it.
Trimming is the process of changing the length of a gif without actually deleting any part of it permanently. This gives you the freedom to edit your gif and pick the portion of it that you like best.
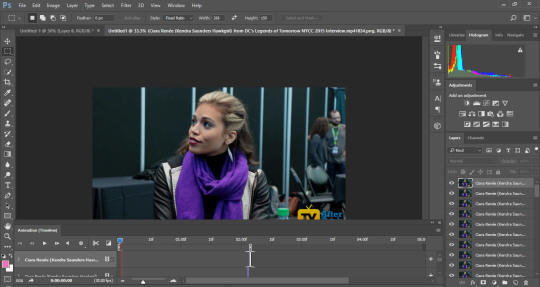
You can easily trim your gif in the Timeline, by clicking the dragging the Gray Sliders at each end of it (see the arrows below). Wherever you leave the stoppers will become the new beginning and end of the gif. You can make this process more precise by using the Blue Slider (circled below) to choose where you want your stopper to go before you drag it there.

The Timeline pictured here has already been trimmed.
Trimming your gif will often require some trial and error. Whenever you want to check the length of your gif, simply go to Save For Web again and check the amount of MBs in your gif. (Click Cancel if your gif is still too big.)
Once your gif falls below 3 MB, you can finally save it!

The last thing you need to do before saving is change your Looping Options from Once to Forever in the bottom right corner of the window. Then, click Save.
You now officially have a finished gif!
Mine looks like this:

-
BONUS STEP - Adding text (OPTIONAL)
Now, I’ve just shown you how to make and save a gif. But what if you want to add text to that gif? I’ll show yow how to do that too.
First off, you should only add text after the rest of your gif is completely done and ready to be saved (basically, once you’ve already completed Steps 1-5). Then, before you save it, you can click on the Text button on the left side of the screen.
Click on the gif to create a new Text layer, and then type whatever you want. Generally, dialogue captions are placed in the middle of a gif towards the bottom, while other, more artistic types of Text can go wherever you want.
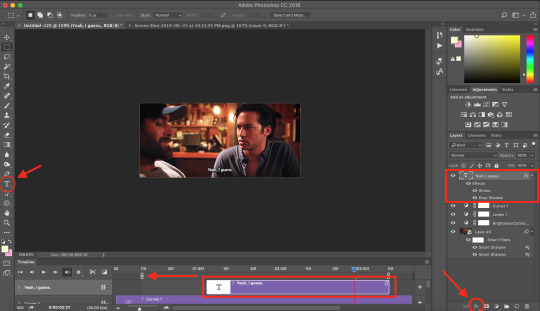
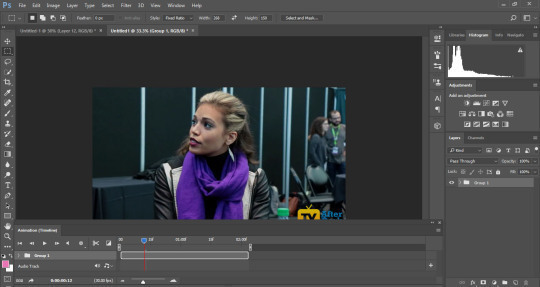
Now that you have a Text layer, you want to make sure of a few things. First, make sure that your Text layer is your TOP layer on the right side of the screen, above all of the Adjustment layers.
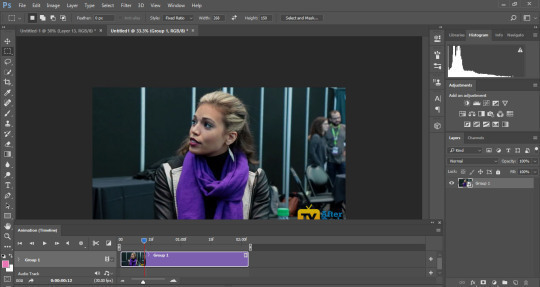
Next, you want to make sure that your Text layer spans your entire gif Timeline. Notice how my Text layer (depicted as a purple rectangle in the Timeline) doesn’t reach the Gray Slider on the left? To fix this, simply click and drag the Text layer until it extends past both Gray Sliders.
And finally, I always add Effects to my Text. You can do this by hitting the fx button in the bottom right of your screen. Specifically, I use the Stroke and Drop Shadow effects to make my gif stand out from whatever background it happens to be on.
My Stroke is always set to 1px thick, and my Drop Shadow settings are as follows:

As a final note, if you want your text to look exactly like mine, then you need to use the font Myriad Pro in size 14, which I then italicize and bold. You can also open Window > Characters, and make sure that your preferences look like this:

ALRIGHT. Now that you’ve added your extra text, you can FINALLY go to Step 6 and save your gif.
Now, your finished gif should look like this:

I hope this tutorial was helpful! I tried to be as thorough as possible to avoid any confusion, but if you have any additional questions, you should always feel free to ask me!
Have fun giffing!! :)
#my tutorials#my gifs#idk what else to tag this lol#gif tutorial#personal shit#long post#I'm so sorry to anyone on mobile with no read more
55 notes
·
View notes
Text
gif tutorial
an anon asked me how i make my gifs, and tbh i just do it in the traditional way. buuut since i have some free time, i’m up for explaining things! this tutorial is long and detailed as well as image heavy. i’ll also provide links as to where to start with everything, so let’s get started!

so you want to make a gif? the first step would be to download photoshop. i use ps cc 2017 which can be downloaded here for windows and here for mac. you’ll need winrar or 7-zip to unzip the file for windows after downloading, and then just follow the steps to open and use it! the second step is download kmplayer, which works best for getting screencaps from your video. you can download videos from hdpopcorns, get the url of a youtube video and download it using 4kvideo, or use a torrenter to use a torrenting site to find movies. be sure to only use either 720p or 1080p movies / videos, never any less. the gif will be harder to work with if you use anything lower, and it will likely come out extremely grainy, which is generally regarded as “ugly”.
so, now that we have ps, kmplayer, and a video, we can go ahead and open up our video in kmplayer. once your video is open, find the scene you want to gif and right before the scene starts, pause the video and press ctrl + g to bring up the frame extraction panel, which will look like this.
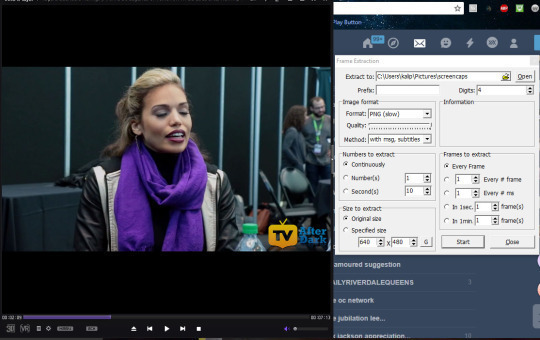
you can change the “extract to” to an area where you want your screencaps to go. since i’m me, i tend to keep things organized, so i made a folder specifically for screencaps. for image format, i use png, however others may use jpeg. png is the highest quality, though, so that’s what i prefer. for method, you can select “only video image” if you’d like, but since this video doesn’t have subtitles, it doesn’t make much of a difference for me. the numbers to extract should be marked with continuously, as well as selecting every frame. some may say it’s okay to select every other frame, but the gif looks smoother selecting every frame, but it’s all up to you.
so, now we just press “start” and press play on our video, and the screencaps will be captured. once the scene ends, press “STOP” on the frame extraction panel and you can open up the folder where your screen caps are and see if there are any images you need to delete (which would typically be from starting too early or ending too late). delete the unnecessary scenes.

i have all of my screencaps, so i’m just going to go ahead and now open up photoshop.
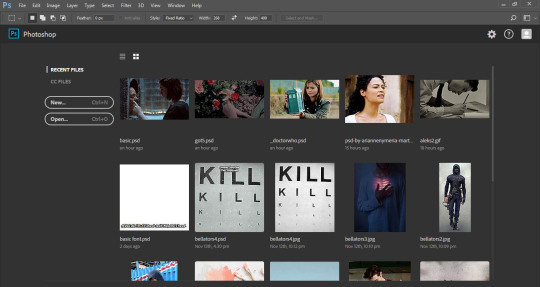
this is generally how it’ll look upon being opened (minus the recent files part bc…we’re all different people and these are just my recent files).
the first thing we’re going to do is press FILES, scroll down to SCRIPTS, and click LOAD FILES INTO STACK. then we’ll get a little pop up like this:

click Browse and select your screencaps folder. select all of your screencaps from the folder.
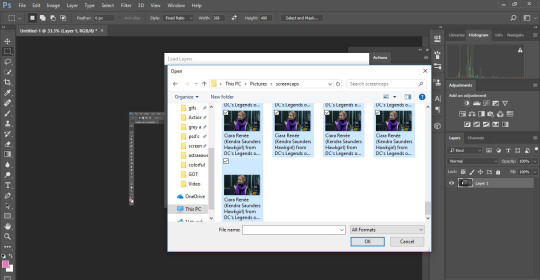
and select ok.
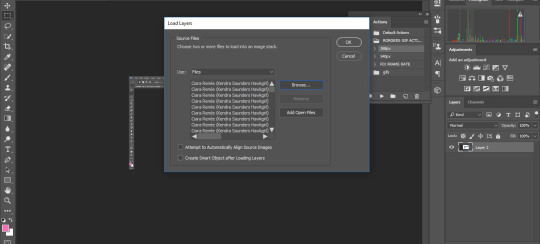
the pop up will show up again. select ok and wait for all of your screencaps to show up in a new tab.
now it will look something like this. the first thing youre going to do is click on “windows” at the top bar, and press animation so that you can bring up the timeline.
now it looks like this. press “create video timeline”.
it now looks like this. the first thing you’re going to do is select the little stack button in the right corner of the animation tab, which looks like this.

from there, you’ll press the button that says CONVERT FRAMES, and then select MAKE FRAMES FROM LAYERS.
now it’ll look like this.
now. you’re going to press the three squares in the bottom left corner that looks like this:

and then your workspace should look like this:
click the little three stack in the top right of the animations tab and select “reverse frames” (because ps puts them in backwards).
and now this is essentially your “gif”. you can play it to see how it looks (also be sure to change the “once” to “forever”!) you can change the delay as well; depending on the video and the gif, my time varies. be sure not to make it too fast or too slow.
so technically, this is our gif and we can be done, but to make a nice gif, we need to do two more steps: sharpening and coloring.
to sharpen, we click the little boxes by the bottom left area of the animations tab, which looks like this:

this will take us back to the original looking panel.
what we’re going to do from here is press the select tab at the top and press select all layers. (this can also be done by pressing ctrl + alt + a). and then press ctrl + g to make all the layers into one group, so we don’t have to sharpen each layer separately.
the workspace should now look like this.
so, now that all our layers are together, we’re going to press filter and then convert for smart filters. it should now look like this:
select filter again and click on smart sharpen. enter these settings:
and press ok. our gif is now sharpened!
now we’re going to resize our gif and crop out unwanted parts. you can do this step in the beginning, before making our gif, when we just have our screencaps, or you can do it after, before coloring. either works.
so, first we’re going to select the rectangular marquee tool.
and input the measurements for our gif. i’m using 268x150, which is what i usually do for gifs that are side by side.

and then i drag the rectangular marquee over where i want it to be.
then, i get the cropping tool, which is three below the rectangular marquee tool, and the dotted line becomes like so:
i then go ahead and press enter once, and then twice (to which it looks like this):
and then press enter again. my gif is now cropped and looks like so:
next, select image from the top and click on image size. type in the width you selected from the rectangular marquee and it will adjust.
press ok and then your gif is now resized! you can zoom in to get your gif to a comfortable size for viewing.
now, we can get to the fun part: coloring!
if you have a psd, feel free to apply it by opening up your psd and dragging the group onto your gif. this can be trial and error depending on what you’re giffing, as well as what scene it is and how bright the scene is. different psd’s work on different things, and brightness / selective color may need to be added to get a desired effect.
this is my gif with my desired coloring; i dropped on a psd and added adjustments to get it to look like this.
now that our psd is colored and sharpened and down to the size we want, we can save! select FILE, and scroll down to export. then click save for web.
be sure to change the looping option to forever, and use the above settings. click save and you’re good to go!
here’s my final product (vibrant coloring):

and a b&w version:

compared to this, with no coloring, just sharpening:

if you found this useful, please like / reblog! and if you need any more help, feel free to message me.
43 notes
·
View notes
Text
hi guys. today i was very sick again. i got up on time and showered. i made myself a bagel for breakfast and before i could even eat a single bite i almost threw up and passed out.
suzanne and harrison covered my teaching sections today. i don’t know how to make it up to them. both of them said not to worry about it. i wish they would humor me at least though.
so i stayed home and... basically did nothing but draw and play with snoopy? i finished an entire scene. the first page took almost twice as long as normal (~7 hours on and off) because i had to design and draw about 10 new characters and fit them into the scene. some of them i had to draw more than once. only one of them (besides nastasia) will ever show up again. and that one will just be in a flashback.
it’s similar to the market scene i drew with timpani a while back, but this time i was trying really hard to give everyone personality and the outfits were all relatively complicated. and i had to do actual research into the game i had decided to make a nod at, and i also had to learn how to draw bats within the last three panels.
oh yeah and i had to refresh myself on two-point perspective and try to also freehand some stuff in that perspective because my knowledge on doing angled things is limited.
so like, visually, the page is not technically impressive. i didn’t do anything special with the backgrounds (although the design on the carpet might look familiar if you look close enough). but the amount of work that went into the scene is approximately A LOT.
it’s also a third draft, the two-part altogether. i went through two rounds of storyboards alone.
i’m still not sure how i feel about it. i hope i established nastasia as a kind of quiet observer type of person. by putting her in a group and letting everyone around her talk while she just looks on.
for you guys it’s only been a scene since we last saw blue but for me it’s been hours and hours and hours and days haha. just from the amount of new information i had to cram into my head and then somehow translate into hand motions.
nastasia has so many questions/demands for blue that i’m having trouble figuring out what she asks about first and how to weave in what’s going on with blue in his own head and make sure we also know exactly how nastasia’s doing so we can get to know her really well before things get bad / complicated. i guess it’ll come out a little more naturally once i have it down on a page and i can do nonverbal cues along with the dialogue and stage directions i got in my notes. but GOD!!!!!
i also found a song i really liked when i was clicking around on youtube today looking for new music. https://www.youtube.com/watch?v=m_ZRWZv14SA i put it in the comic playlist. and had a digression where i looked up an interview with the singer of the band. i liked what he had to say about feeling conflicted and how he put that into the band’s whole album!
i think what i’m gonna do for the upcoming conversation / traveling scenes is tell it mostly from nastasia’s point of view because blue is on turbo autopilot and doesn’t have a lot of internal monologue going until he cracks periodically.
anyway oh! i forgot, because i wasn’t sure how to process the conversation. but i invited taylor to read my comic after talking to him about manga he liked. i mentioned it was based on a mario game and it was about a guy looking for his wife. taylor made a joke about the princess being in another castle and i wasn’t sure how to react. then he said he wanted to read the whole thing when it was done. i said that might be a few years. i said harrison reads it and thought he would like it, and if he’s ever interested i could show him. he said ok.
i guess i was hoping for a yes / no, and not quibbling around the commitment, and the most obvious jokes. to be fair he’s got no context for what the comic is about other than the premise. i think he figured it was the “stupid pun” kind of story i tell rather than the “horribly depressing” kind. twist ending: it’s actually both.
that’s what was on my mind today. it’s a bit of a relief to have told someone else i draw a comic and be rejected. i had a panic attack when i tried to send the message and deleted it and retyped it several times for about 10 minutes before i finally hit send. i guess it was frustrating to know that he wasn’t gonna read it but he still refused to say “no thanks.” just pick one, dude!!!!!
it was. good. to take a break from physics for a day. i feel like i was doing an arm-day workout for fifty years straight and i finally took a break to do a leg-day. my nose also finally cleared up a little bit in the last hour or so. i had to skip therapy too though, since i stayed home. i made sure to keep the window open since it was just, really nice outside, and i missed going for a long bike ride in that nice weather again. gotta stop being sick!
anyway that’s where i’m at. something good today is that i felt like i was kinda in an art block sort of mood but i just worked meticulously through it and i think i like how the pages came out anyway. they’ll post tomorrow. and i found a new song. so it was... a good productive day non-physics-wise. tomorrow i’d like to get a head start on my grading if i can, in between classes. if i’m well enough to go to class.
2 notes
·
View notes
Text
TLC DVD commentary: Finishing up
Oh boy, the Dave dysfunction junction. I reread this so many times while doing revisions that trying to read it now gives me a headache, but there’s plenty of general comments to make here.
This is another one Skiba helped me with, bc I was new at this and struggling. These days I'm much more confident - I'll probably touch it up when I do the DC, since I was never entirely happy with it, or maybe that was my soul protesting devoting 16 pages to Strider drama. I’d have to go through carefully to remember which bits are mine and which are his, but the ‘pasted together with mansweat’ is definitely his. I don’t think I’ve ever used ‘mansweat’ in my life. Good word tho.
This conversation was inevitable - in Homestuck if there are two versions of someone they'll get into a fight, because why wouldn't they? We all have things we dislike about ourselves. We don't want those rubbed in our face. Dave's denial of time travel is a perfect catalyst, because Davesprite has internalized his "role" so hard he can't imagine someone denying it. Neither can full conceive of a use of time powers beyond the 'generating doomed doubles' thing because they were raised by a Prince of Heart and learned self-destruction.
This is also a big culmination of the depersonalization Dave learned as a self-defense mechanism. He tries to act like his dead doomed selves mean nothing to him, because if he didn't, that would psychologically destroy you very quickly. And that works for a while, but once you *become* one of those selves, then that's turned on you. He's also developed some survivor's guilt that he diverts into paranoia (if he feels guilty that they died and he didn't, then they must hate him for it, therefore they are an Enemy) which fuels this argument even more.
The real villain here, naturally, is the alpha timeline. Dave sees it as a trap. Davesprite sees it as validation. What it really is is a system set up by Lord English to profit himself and no one else. In canon, Dave complains that LE isn't a good villain because it's ambiguous how he ever hurt them. The story never does a great job of emphasizing how he has really hurt them at every turn, forcing them into situations and punishing harmless choices that simply didn't serve his agenda. That’s why he’s the bad guy, even more than a few explosions out in space.
I like to think I write Dave and Davesprite differently enough that it's clear who's talking even without the appellation. I can certainly tell the difference (I have on occasion deleted a section of dialog I wrote for one of them because 'it sounds like the other one') but then I’m the writer. Mostly those differences stem from different attitudes, but this conversation is a good example of a more surface-level difference I implemented. If I come up with a good piece of figurative language I'm going to use it no matter what, but in general, I key the similes and metaphors they use after the people they've been spending time with. Dave is more likely to use literary allusions (Rose) or crude bodily comments (Karkat), while Davesprite is more likely to use science (Jade) or tv/film references (John). (As a side note, I observed that in canon Dave is more likely to use film references when talking to John, so both are more likely to use them when talking to or about him in TLC.) Dave also occasionally uses a bit of legalese (Terezi), and Davesprite does it once or twice after BAA, although he gets real pissed when he notices.
God these early pages are just littered with errors from that old gif-making method. Plenty to fix in the DC. That being said, Dave getting punched so hard his shirt freaks out is p funny and may need to be preserved just because. I actually had them both scuffling a little, but the beta reader switched it up to just be Ds decking Dave, which I think worked out. They're both so surprised that he actually did it that things settle down pretty quickly rather than escalating.
Page 94 is a reference to the 'Karkat is too upset to be rendered in a less shitty manner’ panel.
I actually think it's interesting to explore Davesprite as the aftermath of the heroic sacrifice trope. Because you're supposed to die, but you died doing something useful, so you get lauded for it afterward. But when you make that sacrifice and you *don't* die... there's no room for you in the story anymore. You can only ride on those laurels for so long, and then you start wondering what the point of you is. I tend to think the heroic sacrifice trope is kinda fucked, especially with children, which I’ve talked about before so this lets me explore how toxic that mentality can be.
I sort of touched on this in a recent post - a tuesjade I think - but you can look at that with a lot of the kids. John is the archetypal pure hearted hero... who only manages to maintain that genre-typical innocence and optimism because he’s repressed everything else. Dave is the reluctant hero who ends up finding far more happiness in being part of a team rather than being the solo figure saving the day. Jade starts out as the ‘wise sage’ figure but is repeatedly cut down to size and has her dreams ruthlessly crushed by the canon narrative anyway, and Skaia was only showing her what it wanted to in order to guide her choices. She didn’t have a “special connection” as much as she was a pawn. And Rose is the one who looks at the fairy kingdom and the animals who want to crown her queen and instead joins up with the white witch, without even being offered candy as a bribe. And you know what? I think she was right.
p 96 Gill was in a print making class doing engravings that semester lmao
I was going to just cover this bit for this post, but there are only a few more pages before I get to the bucket death, so we might as well keep going.
JOHN: kissing a dead person was weird, but it wasn't that bad.
JOHN: i think kissing an alive person might be weirder.
ROSE: Really, now?
JOHN: wait, was that a weird thing to say?
JOHN: i meant because then they'd be awake and expecting stuff and...
JOHN: forget it, let's go back to talking about jack.
Technically aro/ace John would be indirectly violating our neither promote nor prevent shipping policy. I at least attempt to maintain this policy, as this is management 101. If you follow policy, you can point to it as justification when some angry person shows up in your inbox. Of course I am only half the team and can only sigh meaningfully when Gill over there is like ‘so Dirk and Jake are gonna hold hands for an entire scene’. I sigh meaningfully so often that she probably thinks we have a gas leak. Anyway because of policy it's not explicit but it does impact how I interpret and write him, so it's kinda there. Nothing binding though.
It wasn't intentional, but it's fitting that John (Breath player, aspect of freedom) ends up freeing both mind-controlled girls, even if it was done unintentionally. Breath doesn't like to be constrained.
And we're done with the requested segment!
9 notes
·
View notes
Text
How to Fix Disabled File Sync for Adobe Creative Cloud?
There are several aspects that decline the Adobe Creative Cloud, and the major one was that it prevents you from syncing the files by a CC account. Here we have discussed a few possible steps that can be used to overcome the issue of Adobe CC syncing. Here are the steps to fix disabled file sync for Adobe Creative Cloud.
Disable the Synchronize Setting
In case you intend to disable the synchronize setting, then go through the below-mentioned steps.
You should open a Creative Cloud application within the Start menu when it’s not running already.
Navigate to Creative Cloud button at the system tray.
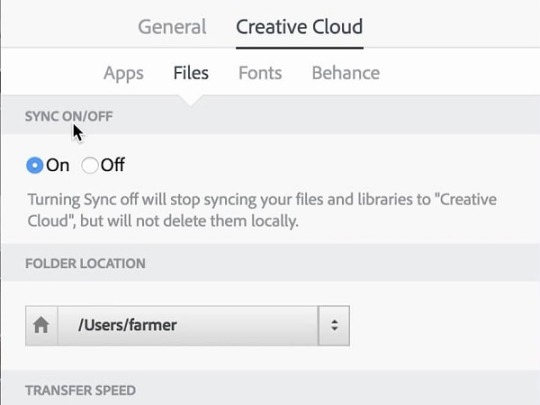
You have to select a gear icon on the upper right-hand side of the application screen and choose Preferences.
Go to the Creative Cloud button.
Later, you should choose the Files option to launch the options displayed straight below.
Finally, switch the toggle of ‘Sync’ to disable it.
Remove Creative Cloud Files Folder
If you would like to remove Creative Cloud files folder, then abide by the given steps.
You should delete the shortcut for Creative Cloud File folder on the left-hand side navigation pane of the File Explorer in the PinCCF, which includes a file of official registry from Adobe.
You have to download the PinCCF.zip file to a folder.
Navigate to the File Explorer’s screen by holding the Win + E keys at once on your keyboard.
Thereafter, launch the folder which contains the PinCCF.zip.
Go to PinCCF .zip to launch it.
You should select Extract all option to launch the screen displayed straight below.
Select the Extract option.
You have to twice click on the file of unPinCCF.reg within the extracted folder.
Now, you will see a Registry Editor dialog section.
Select the Yes option on the screen to proceed.
You should select the OK option.
Reboot the Windows once you update the registry using unPinCCF.reg.
Finally, Creative Cloud Files folder will not be on the navigation panel of the File Explorer.
The users should be able to restore the Creative Cloud Files folder by twice-clicking the file of rePinCCF.reg.
You should turn off the CC’s file remove and sync the folder of Creative Cloud Files at the left-hand side of the File Explorer. Remember that the Creative Cloud File folder may show again if the CC application gets updated.
Ava Williams is an avid technical blogger, a magazine contributor, a publisher of guides at mcafee.com/activate, and a professional cyber security analyst. Through her writing, she aims to educate people about the dangers and threats lurking in the digital world.
Source : Adobe Creative Cloud
0 notes
Text
Version 395
youtube
windows
zip
exe
macOS
app
linux
tar.gz
source
tar.gz
I had a good work week. I fixed a variety of bugs, improved the feel of the suggested tags columns, and made zooming in the media viewer nicer.
suggested tags quality of life
I recently did some work on the different 'suggested tags' panels the manage tags dialog can support. This week I worked on some of the feedback from that pass, hopefully making it a bit easier to get what you want done. As a reminder, you can set these columns up under options->tag suggestions.
The columns are now 'synced' with the current media. They all refresh/repopulate reliably when you move to another media in the media viewer. Also, all columns now hide tags that all the selected media already have, and they update this ~as you edit~, so if both 'favourites' and 'related' suggest 'character:samus aran', and you add that through any means, both lists will remove that tag! Furthermore, if you remove a tag that one of those lists would show, they now re-show that tag instantly, without having to do any new lookup.
Furthermore, the tag lists now try to retain the selection location when you add a tag through the keyboard enter key, so even though a tag you hit enter on will disappear, the focus should stay on the tag above or below. I hope this makes it easier to work with these columns with just the keyboard. As a second remind to keyboard users, you can currently set up some slightly mickey-mouse shortcuts to move focus around here under the 'main_gui' shortcuts, the actions starting 'show_and_focus_manage_tags_...'.
zoom center
When you zoom a file in or out, there is a 'centerpoint' about which the zoom happens. This position 'stays still', while everything else grows or shrinks around it. Until now, this has been hardcoded on the media center, which was sometimes unhelpful when the media had been panned. This centerpoint is now customisable under options->media. It now defaults to the media window centerpoint, which means the image will always grow and shrink around the center of what you are looking at. This makes it much nicer to pan and zoom in the duplicate filter. You can change it back to the media centerpoint, the media top-left corner, or even the current mouse cursor position, for RTS-vidya-like zooming.
fixes
'character:aran' matches 'character:samus aran' again in the Windows build (or anything else running python 3.7). It was a regex library version issue.
The hover windows in the media viewer are now aware of the new shortcuts system in Qt and should pass uncaught regular keyboard shortcuts up to the media viewer. So, if you click the top-right hover to set a rating or the center-right duplicates hover to do a skip, you should now be able to hit custom keyboard shortcuts to add tags or set ratings and so on without having to click back on the media viewer. Where this will not happen are simple things like the taglist on the left eating up/down arrow keys to do list navigation and a handful of Qt-hardcoded shortcuts like tab and space, which can intercept and do panel navigation and currently-focused-button pressing.
If your mouse has back and forward buttons, these should now be caught by the shortcuts system, for those shortcut sets that can currently do mouse events. I assume there is no such thing as a double back-click, but let's see what happens!
The client now tries to avoid large analyze and vacuum database maintenance jobs in the normal maintenance cycle. Too many users in unusual situations have been hit by unreasonably big jobs here, and the benefit is not worth it.
Dialog messages that intercept ok and cancel events, the 'hey, are you sure you want to cancel, there is some uncommitted stuff, yes/no' sort of thing, now have improved logic. They fire off in better order and shouldn't ever bother you twice in one action.
deleted tags overwrite
This is an important bug fix, but it is technical and not a priority for non-advanced users for now.
Some users recently reported some unusual deleted mappings counts on the PTR, not matching that of other users. I also had a job to check that deleted tags were being filtered correctly out of local tag domains, so I went into it this week. To my mild horror, I realised that deleted tags were not being filtered out of tag parsing at all, so any time files were being re-parsed, any previously deleted tags were being overwritten. In the case of tag repositories, deleted tags were still being discarded at the server level (and hence not overwritten for other users), but the overwrite was happening to the local client that did the 'late' reparsing.
I regret this oversight, and I am sorry for the transactions of inconvenience and difficulty this has likely caused, even without us ever realising directly what was going on. The issue is unusual, with numerous technical caveats that make it apply to different users in different ways, but I believe it has not hit most users too much. It is also retroactively fixable for tag repositories.
The parsing is now fixed. Tag import options will now filter out the currently deleted tags from their importee file's parsed tags. If you wish, you can force an overwrite using the tag import options cog menus. Hard drive imports and tag migrations continue to overwrite deleted tags, as these are still considered 'human, manual' actions that can take responsibility for overwriting a deleted tag.
For tag repositories, particularly the PTR, a 'reprocess content' run will fix the historical record, re-deleting things that should be deleted. Advanced users can do this now from the review services panel if they wish. This is an expensive job, so I have not queued it up automatically in today's update. I think I will write a separate targeted maintenance routine for it in the coming weeks.
full list
some more suggested tags fixes/qol:
favourite tags now correctly refreshes on new media
the tag suggestion lists in manage tags now discard current and pending tags that _all_ the current media already have, and all tag suggestion lists update this filter any time the media gets a tag content update! they _should_ update live now
all tag and predicate taglists now try to move the selection to a 'nice' neigbour when a keyboard enter activation results in the current selection being removed (e.g. as in these tag suggestion lists). the nice selection should be the tag after, before, or at the top of the list, and should make it nicer to keep navigating the list and add tags with your keyboard
all tag and predicate taglists now try to preserve selection on simple clear-and-set data refreshes
.
deleted tags overwrite update:
due to an unfortunate oversight, until now tag parsing has not filtered out previously deleted tags from the tags it parses and sends to the local database
as the majority of downloaded files are parsed once per site per user and in a similar time window before manual editing ever occurs, and most non-tag-sibling-eligible bad tags are site specific or not parsed to begin with, and as these undesired tags were not broadcast up to the tag repository, this problem has not been very obvious and I believe has not affected most users too much. this is however a reason why some users who have more recently downloaded many older files are seeing smaller 'deleted mappings' counts on their ptr review panel (and some low quality tags in their db), as they have been re-adding previously deleted tags to their local store
this has been fixed. tag import options now load the pending importee file's metadata before tags are filtered and discard currently deleted tags from those to be added or pended. this applies to parsed tags, additional tags, and those tags added through special other means, such as from a parent gallery page.
if you do wish to allow parsed or additional tags to overwrite currently deleted tags for a particular job, the cog icons on the edit tag import options panel now allow you to permit overwrite for either
tags added via hard drive imports or the migrate tags tool still overwrite deleted tags as before
as this is a local-only problem, there is thankfully a retroactive fix for this issue for tag repository domains, involving a content reprocess run to re-apply deleted tags. I am not activating this automatically this week as this is a heavy job for the ptr and I need to study the true fallout of the problem more, but I may in future, likely as a smaller and more targeted maintenance job. advanced users can do it now under the ptr's review services panel
I regret missing this, and I am sorry for any inconvenience. I only discovered it through the serendipity of some users recently reporting unusual deleted counts and a personal item in my todo to check the reliability of deleted mapping filtering for local tag domains--turns out it never got added, and we never specifically noticed, fugg
there are now unit tests for the improved tag filtering pipeline and both of these new overwrite options
.
the rest:
hydrus can now use several different zoom 'centerpoints' about which to expand and shrink a zooming file. this was previously hardcoded to the center of the media. under options->media, you can now set it to be the media window center (the new default, which feels much nicer after a pan), the mouse cursor, the old media center, or the media top-left corner
cleaned up the related zoom positioning code, and removed the jarring old re-centering off-screen rescue hack when zooming out to canvas zoom
added a warning about big zooms to the media options page
fixed tag autocomplete filtering in python 3.7 so 'character:aran' matches 'character:samus aran' again
when the hover windows on a media viewer have focus, they _should_ now pass up all options->shortcuts shortcuts to the media viewer
mouse back/forward buttons _should_ now be supported in the shortcuts system, as much as your OS allows them to work like regular clicks
fixed a rare crash with the 'clear trash' button
the client will now not re-analyze tables that have been previously scanned with at least 100k rows in the normal 'soft' maintenance cycle, as this is an expensive operation with limited benefit
the client will now not vacuum database files greater than 1GB in the normal 'soft' maintenance cycle, as this is an expensive operation with limited benefit
the new 'cannot vacuum because xxxx' log entry is now only ever printed once per boot. however due to the above change, it likely won't appear in the normal maintenance cycle anyway now
cleaned up some vacuum code
reworked the panel system to better test data validity vs 'woah, you sure you want to do this?' tests and generally cleaned and simplified the canok/cancancel/isvalid testing logic for all panels. panels like manage siblings will now not produce two message boxes if you try to ok them on an uncommited pair and then back out of the ok
refactored the top level window code and improved scrollable panel code typing
more standalone gui function code refactoring
fixed a click-selection-test bug when clicking on certain whitespace in certain predicate lists
the text of the cloudflare-specific error when encountering a captcha page is improved
cleaned up some tag list menu copy and select code, both the menu labels and the copy action, for unusual tags. the 'copyable tags' fetching code is now flexible and unified for menu and action
cleaned up the taglist sibling copy code, eliminating the chance of dupes
fixed a _little_ of the wording on the discard/exclude tag list menu labels for negated predicates, it still feels a bit awkward and I will keep working here
cleaned up some old media metadata fetching code
misc import code typing
misc list/iterable typing improvements
added some misc media-tag tool code
unified the tag import options tag filtering pipeline somewhat to deal with the deleted overwrite situation
improved a debug ui test to no longer need window focus
misc help cleanup
next week
Next week is a 'medium-sized' jobs week. I would like to finally get to an expansion of the prototype 'file notes' system. I would ideally like multiple named notes, note parsing support (so you can pull an artist comment from a web page), note preview on the media viewer background, and note import/export. This is a ton of work, so I don't expect to get it all done in one week.
0 notes
Text
6 Steps to Spyware Removal - Speed Up Your Computer Today
In my my city Port Saint Lucie and all over the great state of Florida, say the words Spyware, Adware, or malware and Business owners, along with any technically average Windows PC user will shudder in horror. That's because these programs not only are incredibly stubborn when you're trying to remove them, but they often change administrator or security settings on your computer, Workstation, or Server, such as what sites you allow trust or the settings in your HOST files. Spyware or adware, a malicious program that can add, change or remove values in the Windows registry allowing the program to fully install on the opening of Internet Explorer or Firefox, or on the next reboot of your computer repair, even after deleted if not removed completely.
Today's spyware is more common than a virus for the average Windows user surfing the internet. Spyware has hundreds of successful ways to disable or infect your computer via all the common exploits or software bugs, like errors within the Windows operating system allowing spyware the use of your CPU cycles, to spam others, and to solicit your desktop to show you pop ups for everything from pornography to other spyware programs that will claim to be able to remove the currently installed spyware or clean a virus from your computer, when in fact it can make it worse by installing more spyware. Spyware can copy secure data from your desktop computer or PC and send it off to another country, or even some where else in our own country where a malicious hacker waits to sell or use your stolen data for anything from ID theft, to pirating your Audio and or Video collection and posting it online. It is very important to remove spy ware as soon as its detected as you can see by all the harm it can cause besides just slowing down your computer and making its use a miserable experience.
The best path to take is to try stopping the spyware before it is able to fully take hold or control of your computer, server or workstation if you already have some installed. If you have a clean spyware computer follow the tips below to keep it that way. It is just as important to verify complete removal once you feel the spyware has been uninstalled to make sure, it cannot reinstall on the next reboot and that your data is once again secure from theft of prying eyes. Simply put Spyware is part of a big online business of data theft and forced marketing along with the fake software to remove the spyware for another $50 dollars then they can go for your credit card info next. If you are seeing a major slowdown in the functions of your windows desktop computer you need to have the computer cleaned and probably a little spyware removal depending on your internet surfing habits and what you like to Google for. Worst case you have to reinstall your Windows operating system and all programs then copy your data over from a back up if you have one.
If you are not backing up please allow me to introduce you to a great little program called Carbonite. Carbonite provides a great solution to the problem of backing up your home or office compueter. Carbonite includes unlimited size online or off site storage for for your files at a very reasonable price of $59.99 or so per year. Not only do I recommend the program I use it my self for years I was a beta tester and have it installed on three of my home servers protecting my data with off site storage day and night. I have personally witnessed this program save 4 companies from complete data loss due to the person in charge at that office not testing there backup tapes, a raid went bad in another and they never complained about the error on reboot of the server until it was to late, and one company who claimed they backed up to a USB hard drive and said don't worry about us, well they forgot for a year and had no back at all when there server got hit by lightening. Each of the companies listed were saved by the great little program for off site backups called Carbonite. After the problem was repaired in all cases the software they lost was immediately downloaded to the new location and re shared to the office allowing them to get back to work.
Follow my free tips below to attempt to remove installed spyware from your PC server or workstation.
(Please remember this is done at your own risk I take no responsibility for the outcome of your work.)
Step 1.) To remove spyware, first you should download the programs listed below then disconnect your computer from the Internet. After you complete the downloads unplug your computer from the modem or router to ensure that you are offline. You'll need the right programs to remove spyware from your computer. If you are unable to surf the internet with your browser correctly you will need to download the free software for removal from another computer that is connected to the internet, like a friend or family member PC. Once you have downloaded the files from Google, Yahoo or Bing You'll need to burn the spyware removal programs to a cd or copy them to a USB memory stick and then install them on your PC and use them from there. There are hundreds of programs to remove or repair a PC or computer infected with spyware.
The programs I would like you to download are:
a.) Cleanup.exe to remove temp files
b.) Spybot Search And Destroy to search through its definitions after you update it like anti virus software and remove the spyware from both the folders and registry and also cleanup the Host files
c.) Sysinternals process explorer to view the running process or services to see what is hogging your resources
d.)Unhackme for rootkit removal
You can use all programs listed or one or two if your problem is easily removed. For the do it yourselfer these will work unless you have a very deep infestation and would then need to call in a pro like myself. The easy way to get each of these files except unhackme is to open your favorite search engine like Google, Yahoo or Bing then type download programname MG. The program name will be the name of the software listed above. The download will bring up this type of page or link for downloading, the MG stands for and will take you to "Major Geeks" a great place to download free or paid applications to help with anything you can think of on the PC or MAC. To download the unhack me software you need to type in download unhackme the first result gratis inc will be the one you want to download from.
Now that you have the correct software to cleanup your PC it's time to get dirty.
Step 2.) Once you're offline, click start button the look for the control panel icon. Once in the control panel go to your add/remove programs screen by clicking the add/remove programs icon. Many times spyware will have uninstallers that will allow you to completely remove them without too much effort. Remove as many as you can this way some will give you errors or take you online for feedback and force you to answer to close. just put unhappy and click remove. If you are unsure of an item in the add remove programs section do not just delete it.
All your real programs along with your Windows updates are also within this list. To learn what something is click or highlight the item and it will have more information under it like programmed by and company name. Now armed with a little more info than a program name open your favorite search Engine once again Google, Yahoo, Bing and type in the program name and find out what it is. If it shows up as marketing or pop ups or ads or there are how to remove this or that yep of spyware you are on the right path to get rid of that spyware. If you see many warning and info on spyware when you look it up 9 times out of 10 it would be safe to remove unless you have a program with the same name running in your office or home that you really need. Please ask your boss or double check, then delete.
Step 3.) Now we install and run the cleanup.exe program selecting the first button top right cleanup. The program will ask you if you want to run in demo mode which does not do anything you will select no and really run for the first time. Your pc stores many temp files in multiple locations to save settings for faster loading and use in those apps. By deleting these backups or cached settings you computer will run better allowing faster removal and will also remove the spyware saved in the temp folders. Once you have ran first the cleanup program to remove trash your pc will run slightly faster. This does not delete you files only the temp and saved settings in the browser which you need to run to clean up spyware. No book marks or favorites are deleted.
Step 4.) Now we need to install then allow the full update process during install of the Spybot program. Once installed the first thing you need to do is click the immunize button in the upper left and it will run once and will need to be run twice for all items to turn green. the good in green should now be the large number and the bad or unprotected in red should go down to zero. Once your computer has been immunized, now it's time to run a full search of the computer files and registry for spyware. This is completed by clicking the Search and destroy button on the upper left, then click search for problems button with the magnifying lens image to start the search for spyware.
Once the program searches the whole computer you will be shown a list on the right side of the screen and they will have open check boxes or squares to the left of each. You will notice the search for problems button has now changed to fix problems in the upper left. To remove all spyware you need to click this button again and the spybot program will attempt to remove and delete and files it has found associated with spyware. For ones it is unable to remove it will ask if you can run one more time when completed after a full restart of your computer. You need to say yes to this and let the program work its magic once again. If at this point the computer shows clean, all green checks to the left of each removed spyware file or registry entry. You are most likely clean and can continue happy surfing. If not please follow the additional steps below to remove a more aggressive type of problem called a root kit or hijacked browser.
Step 5.) If you are unable to remove all spyware with Spybot or have many pop ups on the start up of your computer without even going on line, you will need to next download the program unhackme then install it to stop the rouge service from starting when your computer boots up. This is risky because you need to be careful what you stop to keep your windows programs, and your good software from becoming damaged. Next step open your internet browser and then pay another visit to your favorite search engine Google, yahoo, Bing and type your search request download unhackme, the first result or the one from gratis inc is the place you need to be. Open the link and click the download free trail in the center of the page. Next we run the installer when downloaded then remove what it can with the spy ware removal tool button.
Once that is done you will be given a few more choices the only one you want to hit is remove rootkit. The software will run then tell you to restart so it can run and stop processes from starting as they try to start. This is the be careful moment while it runs you will be asked after each find to remove or if it is a false positive. There will be a help button under each which will tell you most times if the file is good or bad and the answer given is usually safe to follow. Once you have clicked through all removal screens the software will not start on the next log in and you will need to run spybot one more time to clean what ever programs where running before that could not be removed. Now that windows did not load them to memory they will be easily deleted. If your problems are now removed you are good to go if not you can try step siix.
Step 6.) If you are still here unfortunately you have a bad infestation of spyware or possibly a virus. Lets try to remove the virus first, unless you feel comfortable diving in the repair posts available on Google, yahoo, Bing and trying registry fixes this would be a good time to call in a professional computer repair person or an online computer repair expert to help with your problem. You can download a free year worth of anti virus protection offered by Grisoft inc by going to your favorite search engine once again and typing in download avgfree mg. Download then install the AVG anti virus software, during the install it will have you run a full update for the virus definitions. Your computer will need to be online for this to take place so please plug back to modem or network. Once the update is completed open the software by clicking the avg icon and select run full computer scan. After your scan has completed you will be given a list of files found select to delete all or clean if one is a document you need or want.
You may need more programs to fully remove the spyware infection on your computer depending on the severity of the infection. Programs are easy to find and use depending on your computer experience, be careful not all that is free is good it may be more spyware. Look up any software before you try it. Google, Yahoo, and Bing are your friend. It's a good idea to scan your computer in safe mode just to ensure that you can complete any PC repair that needs to be done within Windows you are locked out of certain changes for security reasons and safe mode will allow you to complete the same task.
When the PC starts up after you press power tap the F8 key until you get the menu to enter safe mode then you can select the first choice safe mode and try your new cleanup software. The programs must be installed outside of safe mode in a regular boot for the most part. The best way to remove spyware is to not get it in the first place. Keep your system and anti-virus updated, be very selective about what programs you download. There are many websites that offer computer help and or repair you should be able to find anything that you need online. Nothing is truly free remember that the next time you see a pop up and you will be one step closer to staying spyware free.
Looking for a computer repair expert to remove spyware or repair your computer/network in Port saint Lucie, West Palm Beach, Stuart, Boca Raton, or the greater south Florida area? Give Eric Jaffe from Jejtek.com a call (754) 245-1477. Not only will you end up with a repaired computer for a reasonable price. I will teach you how to keep the computer clean and spyware free while I complete your repair. The next time you run into computer trouble You can follow the notes you took during our session and do basic removal your self saving your budgeted cash for more important things.
0 notes
Text
How To Fix Windows Error Code 0x80070057 ?
today I will discuss how might you settle Error Code 0x80070057 from your framework. However, before proceeding we need to discuss some essential things which ought to be constantly remembered before confronting these sorts of Errors on your System.
Different Instances To Get Error Code 0x80070057
There are Several Reasons why you can get this specific error code on your screen. Some of them have been specified underneath:
1. When you are attempting to Backup your documents, You may get Error 0x80070057
2. You can confront Error 0x80070057 on your framework while introducing Windows 7 OS.
3. Harmed System Reserve Partition.
4. Error Code 0x80070057 while Creating New Profile on MS Outlook.
5. While Updating or Installing Pending Updates Specially on Windows 10.
Previously mentioned are only couple of Common Instances when Windows clients confront this blunder. As now we know them, we will push forward and perceive how to Fix 0x80070057 mistake for all occurrences Separately.
1. Fix Error 0x80070057 While Taking Backup
Larger part of Windows clients are confronting error code 0x80070057 while taking reinforcement. In this way, we will is it over this post.
While backing up your files utilizing windows default backup programming you may confront this Error. More often than not at times the procedure may begin yet get stop in the center demonstrating this Error message “An inner mistake has happened: The parameter is erroneous: (0x80070057)”
To tackle this issue, Follow these Steps:
Stage 1. click Start > type “Regedit.exe” in the Search projects and records box, and afterward press ENTERcatch.
Stage 2. Find and afterward tap the accompanying registry subkey: HKEY_LOCAL_MACHINE\SOFTWARE\Policies\Microsoft\System.
Stage 3. On the Edit menu, point to New, and afterward you need to tap on DWORD Value.
Stage 4. Type CopyFileBufferedSynchronousIo, and press ENTER.
Stage 5. Right-click CopyFileBufferedSynchronousIo, and now click Modify.
Stage 6. In the Value information box, type 1, and snap OK.
Stage 7. Leave Registry Editor.
This arrangement of Tweaking Registry has worked for few while other have announced that it didn’t worked for them, So go to Solution 2 Below.
ARRANGEMENT #2: CHANGE THE DECIMAL SYMBOL SETTING
Simply take after the beneath straightforward strides to illuminate Error Code 0x80070057:-
Click Start > Control Panel > Date, Time, Language and Regional Options > then snap Region and Language choices.
Tap the Formats tab and afterward click Additional settings.
In the Decimal image field, type . (spot), and after that snap OK twice.
Restart the PC.
2. Error 0x80070057 While Installing Windows 7/8/8.1/10
The primary explanation for this Error is the point at which the System Reserved segment (which is around 100mb default parcel for BitLocker encryption, Recovering Windows, and comparative System Files) gets harmed because of some reason.
In this case,When you attempt to Re-introduce or Fresh put in new Windows OS, You will be demonstrated “Windows Could not Format a Partition on circle 0. The blunder happened while setting up the parcel Selected for establishment. Blunder code 0x80070057.”
The Most Effective Method To Tackle Error Code 0x80070057 While Installation ?
To settle this Error from your Pc you have to erase the current windows parcel where the past form of Windows was introduced including System Reserved Partition. (for the most part it is situated at Local Disk [C:]). At that point design the plate for clear establishment of Windows.
Presently take after the means recorded underneath :-
>Embed the Windows DVD and Start establishment.
>Pick Custom (advanced) type of installation.
>Select Disk 0 partition 1, and click Delete. This progression will erase the System Reserved Space.
>Snap OK when the discourse box shows up.
>Presently select Disk 0 partition 2, and do an indistinguishable strides from finished with Disk 0 partition 1.
>Presently you have some Unallocated Space, so select it and make another partition.
Note: While making “New” circle you ought to be extremely cautious. Compute once while making the new circle estimate, at that point click Apply.
>Again an exchange box shows up on your screen, click OK.
>Presently select the Disk 0 partion 2, Format it “again“.
This is it, Now simply ahead and proceed with your Windows Installation. This time you ought not get blunder 0x80070057 code on your screen and you will have the capacity to experience the establishment easily.
3. Step By Step Instructions To Fix Windows Refresh Error 0x80070057
Windows clients may get this error code while endeavoring to introduce Pending Windows refreshes. The message you get will resemble “There were a few Problems introducing refreshes, But we will attempt again later. (0x80070057)”
To explain this and experience your windows refresh, take after beneath steps;
a) Delete/Rename SoftwareDistribution envelope to fix error code 0x80070057
SoftwareDistribution Folder is where every one of the updates and establishment Files are put away. More often than not, you can securely Delete this organizer to dispose of mistakes that are caused while refreshing windows.
> Go to C:\Windows\SoftwareDistribution and erase all documents from the folder.
>Presently, Delete the folder itself.
On the off chance that you can’t Delete it, simply rename it to something like SoftwareDistributionold. Presently to go to Windows refresh and check whether this tackles Windows refresh error 0x80070057.
b) Disable Anti-Virus/Firewall
Once in a while your inbuilt windows firewall or Antivirus can square microsoft servers. Your Updates are Downloaded and introduced from these servers and on the off chance that they are hindered by your Firewall, You may get mistake 0x80070057 on your screen.
So Temporarily Disable your Antivurus program which you have introduced on your framework. Additionally on the off chance that you don’t have any Such Antivirus, Simply Disable Windows Firewall. To Disable Firewall, Search Firewall in Search and tap on the outcome.
Another window will open up. Kill Firewall from that point. You might be provoked with a notice message yet simply disregard it and do it for now.
Hope this article will help you to fix error code 0x80070057 easily. For more such error related solution
Call On Our Technical Support Phone Number for fix Windows Error Code 0x80070057 by Errorcode Expert USA +1 (800) 848-5295 Right Now to Get Instant Help
0 notes
Text
Spyware Removal - Speed Up Your Computer
New Post has been published on https://myupdatesystems.com/2017/04/09/spyware-removal-speed-up-your-computer/
Spyware Removal - Speed Up Your Computer
Spyware Removal to Speed up
In my city, Port Saint Lucie and all over the great state of Florida, say the words Spyware, Adware, or malware and Business owners, along with any technically average Windows PC user will shudder in horror. That’s because these programs not only are incredibly stubborn when you’re trying to remove them, but they often change administrator or security settings on your computer, Workstation, or Servers, such as what sites you allow trust or the settings in your HOST files. Spyware or adware, a malicious program that can add, change or remove values in the Windows registry allowing the program to fully install on the opening of Internet Explorer or Firefox, or on the next reboot of your computer repair, even after deleted if not removed completely.
Today’s spyware is more common than a virus for the average Windows user surfing the internet. Spyware has hundreds of successful ways to disable or infect your computer via all the common exploits or software bugs, like errors within the Windows operating system allowing spyware the use of your CPU cycles, to spam others, and to solicit your desktop to show you pop ups for everything from pornography to other spyware programs that will claim to be able to remove the currently installed spyware or clean a virus from your computer, when in fact it can make it worse by installing more spyware. Spyware can copy secure data from your desktop computer or PC and send it off to another country, or even some where else in our own country where a malicious hacker waits to sell or use your stolen data for anything from ID theft, to pirating your Audio and or Video collection and posting it online. It is very important to remove spy ware as soon as its detected as you can see by all the harm it can cause besides just slowing down your computer and making its use a miserable experience.
The best path to take is to try stopping the spyware before it is able to fully take hold or control of your computer, server or workstation if you already have some installed. If you have a clean spyware computer follow the tips below to keep it that way. It is just as important to verify complete removal once you feel the spyware has been uninstalled to make sure, it cannot reinstall on the next reboot and that your data is once again secure from theft of prying eyes. Simply put Spyware is part of a big online business of data theft and forced marketing along with the fake software to remove the spyware for another $50 dollars then they can go for your credit card info next. If you are seeing a major slowdown in the functions of your windows desktop computer you need to have the computer cleaned and probably a little spyware removal depending on your internet surfing habits and what you like to Google for. Worst case you have to reinstall your Windows operating system and all programs then copy your data over from a back up if you have one.
If you are not backing up please allow me to introduce you to a great little program called Carbonite. Carbonite provides a great solution to the problem of backing up your home or office compueter. Carbonite includes unlimited size online or off site storage for for your files at a very reasonable price of $59.99 or so per year. Not only do I recommend the program I use it my self for years I was a beta tester and have it installed on three of my home servers protecting my data with off site storage day and night. I have personally witnessed this program save 4 companies from complete data loss due to the person in charge at that office not testing there backup tapes, a raid went bad in another and they never complained about the error on reboot of the server until it was to late, and one company who claimed they backed up to a USB hard drive and said don’t worry about us, well they forgot for a year and had no back at all when there server got hit by lightening. Each of the companies listed were saved by the great little program for off site backups called Carbonite. After the problem was repaired in all cases the software they lost was immediately downloaded to the new location and re shared to the office allowing them to get back to work.
Follow my free tips below to attempt to remove installed spyware from your PC server or workstation.
(Please remember this is done at your own risk I take no responsibility for the outcome of your work.)
Step 1.) To remove spyware, first you should download the programs listed below then disconnect your computer from the Internet. After you complete the downloads unplug your computer from the modem or router to ensure that you are offline. You’ll need the right programs to remove spyware from your computer. If you are unable to surf the internet with your browser correctly you will need to download the free software for removal from another computer that is connected to the internet, like a friend or family member PC. Once you have downloaded the files from Google, Yahoo or Bing You’ll need to burn the spyware removal programs to a cd or copy them to a USB memory stick and then install them on your PC and use them from there. There are hundreds of programs to remove or repair a PC or computer infected with spyware.
The programs I would like you to download are:
a.) Cleanup.exe to remove temp files
b.) Spybot Search And Destroy to search through its definitions after you update it like anti virus software and remove the spyware from both the folders and registry and also cleanup the Host files
c.) Sysinternals process explorer to view the running process or services to see what is hogging your resources
d.)Unhackme for rootkit removal
You can use all programs listed or one or two if your problem is easily removed. For the do it yourselfer these will work unless you have a very deep infestation and would then need to call in a pro like myself. The easy way to get each of these files except unhackme is to open your favorite search engine like Google, Yahoo or Bing then type download programname MG. The program name will be the name of the software listed above. The download will bring up this type of page or link for downloading, the MG stands for and will take you to “Major Geeks” a great place to download free or paid applications to help with anything you can think of on the PC or MAC. To download the unhack me software you need to type in download unhackme the first result gratis inc will be the one you want to download from.
Now that you have the correct software to cleanup your PC it’s time to get dirty.
Step 2.) Once you’re offline, click start button the look for the control panel icon. Once in the control panel go to your add/remove programs screen by clicking the add/remove programs icon. Many times spyware will have uninstallers that will allow you to completely remove them without too much effort. Remove as many as you can this way some will give you errors or take you online for feedback and force you to answer to close. just put unhappy and click remove. If you are unsure of an item in the add remove programs section do not just delete it.
All your real programs along with your Windows updates are also within this list. To learn what something is click or highlight the item and it will have more information under it like programmed by and company name. Now armed with a little more info than a program name open your favorite search Engine once again Google, Yahoo, Bing and type in the program name and find out what it is. If it shows up as marketing or pop ups or ads or there are how to remove this or that yep of spyware you are on the right path to get rid of that spyware. If you see many warning and info on spyware when you look it up 9 times out of 10 it would be safe to remove unless you have a program with the same name running in your office or home that you really need. Please ask your boss or double check, then delete.
Step 3.) Now we install and run the cleanup.exe program selecting the first button top right cleanup. The program will ask you if you want to run in demo mode which does not do anything you will select no and really run for the first time. Your pc stores many temp files in multiple locations to save settings for faster loading and use in those apps. By deleting these backups or cached settings you computer will run better allowing faster removal and will also remove the spyware saved in the temp folders. Once you have ran first the cleanup program to remove trash your pc will run slightly faster. This does not delete you files only the temp and saved settings in the browser which you need to run to clean up spyware. No book marks or favorites are deleted.
Step 4.) Now we need to install then allow the full update process during install of the Spybot program. Once installed the first thing you need to do is click the immunize button in the upper left and it will run once and will need to be run twice for all items to turn green. the good in green should now be the large number and the bad or unprotected in red should go down to zero. Once your computer has been immunized, now it’s time to run a full search of the computer files and registry for spyware. This is completed by clicking the Search and destroy button on the upper left, then click search for problems button with the magnifying lens image to start the search for spyware.
Once the program searches the whole computer you will be shown a list on the right side of the screen and they will have open check boxes or squares to the left of each. You will notice the search for problems button has now changed to fix problems in the upper left. To remove all spyware you need to click this button again and the spybot program will attempt to remove and delete and files it has found associated with spyware. For ones it is unable to remove it will ask if you can run one more time when completed after a full restart of your computer. You need to say yes to this and let the program work its magic once again. If at this point the computer shows clean, all green checks to the left of each removed spyware file or registry entry. You are most likely clean and can continue happy surfing. If not please follow the additional steps below to remove a more aggressive type of problem called a root kit or hijacked browser.
Step 5.) If you are unable to remove all spyware with Spybot or have many pop ups on the start up of your computer without even going on line, you will need to next download the program unhackme then install it to stop the rouge service from starting when your computer boots up. This is risky because you need to be careful what you stop to keep your windows programs, and your good software from becoming damaged. Next step open your internet browser and then pay another visit to your favorite search engine Google, yahoo, Bing and type your search request download unhackme, the first result or the one from gratis inc is the place you need to be. Open the link and click the download free trail in the center of the page. Next we run the installer when downloaded then remove what it can with the spy ware removal tool button.
Once that is done you will be given a few more choices the only one you want to hit is remove rootkit. The software will run then tell you to restart so it can run and stop processes from starting as they try to start. This is the be careful moment while it runs you will be asked after each find to remove or if it is a false positive. There will be a help button under each which will tell you most times if the file is good or bad and the answer given is usually safe to follow. Once you have clicked through all removal screens the software will not start on the next log in and you will need to run spybot one more time to clean what ever programs where running before that could not be removed. Now that windows did not load them to memory they will be easily deleted. If your problems are now removed you are good to go if not you can try step siix.
Step 6.) If you are still here unfortunately you have a bad infestation of spyware or possibly a virus. Lets try to remove the virus first, unless you feel comfortable diving in the repair posts available on Google, yahoo, Bing and trying registry fixes this would be a good time to call in a professional computer repair person or an online computer repair expert to help with your problem. You can download a free year worth of anti virus protection offered by Grisoft inc by going to your favorite search engine once again and typing in download avgfree mg. Download then install the AVG anti virus software, during the install it will have you run a full update for the virus definitions. Your computer will need to be online for this to take place so please plug back to modem or network. Once the update is completed open the software by clicking the avg icon and select run full computer scan. After your scan has completed you will be given a list of files found select to delete all or clean if one is a document you need or want.
You may need more programs to fully remove the spyware infection on your computer depending on the severity of the infection. Programs are easy to find and use depending on your computer experience, be careful not all that is free is good it may be more spyware. Look up any software before you try it. Google, Yahoo, and Bing are your friend. It’s a good idea to scan your computer in safe mode just to ensure that you can complete any PC repair that needs to be done within Windows you are locked out of certain changes for security reasons and safe mode will allow you to complete the same task.
When the PC starts up after you press power tap the F8 key until you get the menu to enter safe mode then you can select the first choice safe mode and try your new cleanup software. The programs must be installed outside of safe mode in a regular boot for the most part. The best way to remove spyware is to not get it in the first place. Keep your system and anti-virus updated, be very selective about what programs you download. There are many websites that offer computer help and or repair you should be able to find anything that you need online. Nothing is truly free remember that the next time you see a pop up and you will be one step closer to staying spyware free.
Looking for a computer repair expert to remove spyware or repair your computer/network in Port saint Lucie, West Palm Beach, Stuart, Boca Raton, or the greater south Florida area? Give Eric Jaffe from Jejtek.com a call (754) 245-1477. Not only will you end up with a repaired PC for a reasonable price. I will teach you how to keep the computer clean and spyware free while I complete your repair. The next time you run into computer trouble You can follow the notes you took during our session and do basic removal your self saving your budgeted cash for more important things.
How is your website doing? Looking for more traffic? Tell me about it when you call. I will show you how pslseo.com drives massive new traffic to our customers websites. We not only drive traffic to your website we can coach you to optimize your conversion to sales with tracking from Google analytics at every step. I am your Port Saint Lucie Expert SEO or Search Engine Optimization and SEM or Search Engine Marketing Guru. Better results for your Internet Marketing are a phone call away!
0 notes
Text
6 Steps to Spyware Removal - Speed Up Your Computer Today
New Post has been published on https://beingmad.org/6-steps-to-spyware-removal-speed-up-your-computer-today/
6 Steps to Spyware Removal - Speed Up Your Computer Today
Port Saint Lucie and all over the great state of Florida, say the words Spyware, Adware, or malware and Business owners, along with any technically average Windows PC user will shudder in horror. That’s because these programs not only are incredibly stubborn when you’re trying to remove them, but they often change administrator or security settings on your computer, Workstation, or Servers, such as what sites you allow trust or the settings in your HOST files. Spyware or adware, a malicious program that can add, change or remove values in the Windows registry allowing the program to fully install on the opening of Internet Explorer or Firefox, or on the next reboot of your computer repair, even after deleted if not removed completely.
Today’s spyware is more common than a virus for the average Windows user surfing the internet. Spyware has hundreds of successful ways to disable or infect your computer via all the common exploits or software bugs, like errors within the Windows operating system allowing spyware the use of your CPU cycles, to spam others, and to solicit your desktop to show you pop-ups for everything from pornography to other spyware programs that will claim to be able to remove the currently installed spyware or clean a virus from your computer, when in fact it can make it worse by installing more spyware. Spyware can copy secure data from your desktop computer or PC and send it off to another country, or even somewhere else in our own country where a malicious hacker wants to sell or use your stolen data for anything from ID theft, to pirating your Audio and or Video collection and posting it online. It is very important to remove spyware as soon as it’s detected as you can see by all the harm it can cause besides just slowing down your computer and making its use a miserable experience.
The best path to take is to try stopping the spyware before it is able to fully take hold or control of your computer, server or workstation if you already have some installed. If you have a clean spyware computer follow the tips below to keep it that way. It is just as important to verify complete removal once you feel the spyware has been uninstalled to make sure, it cannot reinstall on the next reboot and that your data is once again secure from a theft of prying eyes. Simply put Spyware is part of a big online business of data theft and forced marketing along with the fake software to remove the spyware for another $50 dollars then they can go for your credit card info next. If you are seeing a major slowdown in the functions of your windows desktop computer you need to have the computer cleaned and probably a little spyware removal depending on your internet surfing habits and what you like to Google for. Worst case you have to reinstall your Windows operating system and all programs then copy your data over from a backup if you have one.
If you are not backing up please allow me to introduce you to a great little program called Carbonite. Carbonite provides a great solution to the problem of backing up your home or office computer. Carbonite includes unlimited size online or off-site storage for your files at a very reasonable price of $59.99 or so per year. Not only do I recommend the program I use it myself for years I was a beta tester and have it installed on three of my home servers protecting my data with off-site storage day and night. I have personally witnessed this program save 4 companies from complete data loss due to the person in charge at that office not testing their backup tapes, a raid went bad in another and they never complained about the error on reboot of the server until it was too late, and one company who claimed they backed up to a USB hard drive and said don’t worry about us, well they forgot for a year and had no back at all when their server got hit by lightening. Each of the companies listed was saved by the great little program for off-site backups called Carbonite. After the problem was repaired in all cases the software they lost was immediately downloaded to the new location and re-shared to the office allowing them to get back to work.
Follow my free tips below to attempt to remove installed spyware from your PC server or workstation.
Step 1.) To remove spyware, first, you should download the programs listed below then disconnect your computer from the Internet. After you complete the downloads unplug your computer from the modem or router to ensure that you are offline. You’ll need the right programs to remove spyware from your computer. If you are unable to surf the internet with your browser correctly you will need to download the free software for removal from another computer that is connected to the internet, like a friend or family member PC. Once you have downloaded the files from Google, Yahoo or Bing You’ll need to burn the spyware removal programs to a cd or copy them to a USB memory stick and then install them on your PC and use them from there. There are hundreds of programs to remove or repair a PC or computer infected with spyware.
The programs I would like you to download are:
a.) Cleanup.exe to remove temp files
b.) Spybot Search And Destroy to search through its definitions after you update it like antivirus software and remove the spyware from both the folders and registry and also clean up the Host files c
.) Sysinternals process explorer to view the running process or services to see what is hogging your resources
d.)Unhackme for rootkit removal
You can use all programs listed or one or two if your problem is easily removed. For the do it yourselfer these will work unless you have a very deep infestation and would then need to call in a pro like myself. The easy way to get each of these files except unhackme is to open your favorite search engine like Google, Yahoo or Bing then type download programname MG. The program name will be the name of the software listed above. The download will bring up this type of page or link for downloading, the MG stands for and will take you to “Major Geeks” a great place to download free or paid applications to help with anything you can think of on the PC or MAC. To download the unhack me software you need to type in download unhackme the first result gratis inc will be the one you want to download from.
Now that you have the correct software to cleanup your PC it’s time to get dirty.
Step 2.) Once you’re offline, click start button the look for the control panel icon. Once in the control panel go to your add/remove programs screen by clicking the add/remove programs icon. Many times spyware will have uninstallers that will allow you to completely remove them without too much effort. Remove as many as you can this way some will give you errors or take you online for feedback and force you to answer to close. just put unhappy and click remove. If you are unsure of an item in the add remove programs section do not just delete it.
All your real programs along with your Windows updates are also within this list. To learn what something is click or highlight the item and it will have more information under it like programmed by and company name. Now armed with a little more info than a program name open your favorite search Engine once again Google, Yahoo, Bing and type in the program name and find out what it is. If it shows up as marketing or pop ups or ads or there are how to remove this or that yep of spyware you are on the right path to get rid of that spyware. If you see many warning and info on spyware when you look it up 9 times out of 10 it would be safe to remove unless you have a program with the same name running in your office or home that you really need. Please ask your boss or double check, then delete.
Step 3.) Now we install and run the cleanup.exe program selecting the first button top right cleanup. The program will ask you if you want to run in demo mode which does not do anything you will select no and really run for the first time. Your pc stores many temp files in multiple locations to save settings for faster loading and use in those apps. By deleting these backups or cached settings you computer will run better allowing faster removal and will also remove the spyware saved in the temp folders. Once you have ran first the cleanup program to remove trash your pc will run slightly faster. This does not delete you files only the temp and saved settings in the browser which you need to run to clean up spyware. No book marks or favorites are deleted.
Step 4.) Now we need to install then allow the full update process during install of the Spybot program. Once installed the first thing you need to do is click the immunize button in the upper left and it will run once and will need to be run twice for all items to turn green. the good in green should now be the large number and the bad or unprotected in red should go down to zero. Once your computer has been immunized, now it’s time to run a full search of the computer files and registry for spyware. This is completed by clicking the Search and destroy button on the upper left, then click search for problems button with the magnifying lens image to start the search for spyware.
Once the program searches the whole computer you will be shown a list on the right side of the screen and they will have open check boxes or squares to the left of each. You will notice the search for problems button has now changed to fix problems in the upper left. To remove all spyware you need to click this button again and the Spybot program will attempt to remove and delete and files it has found associated with spyware. For ones it is unable to remove it will ask if you can run one more time when completed after a full restart of your computer. You need to say yes to this and let the program work its magic once again. If at this point the computer shows clean, all green checks to the left of each removed spyware file or registry entry. You are most likely clean and can continue happy surfing. If not please follow the additional steps below to remove a more aggressive type of problem called a root kit or hijacked browser.
Step 5.) If you are unable to remove all spyware with Spybot or have many pop ups on the start up of your computer without even going on line, you will need to next download the program unhackme then install it to stop the rouge service from starting when your computer boots up. This is risky because you need to be careful what you stop to keep your windows programs, and your good software from becoming damaged. Next step open your internet browser and then pay another visit to your favorite search engine Google, yahoo, Bing and type your search request download unhackme, the first result or the one from gratis inc is the place you need to be. Open the link and click the download free trail in the center of the page. Next we run the installer when downloaded then remove what it can with the spy ware removal tool button.
Once that is done you will be given a few more choices the only one you want to hit is remove rootkit. The software will run then tell you to restart so it can run and stop processes from starting as they try to start. This is the be careful moment while it runs you will be asked after each find to remove or if it is a false positive. There will be a help button under each which will tell you most times if the file is good or bad and the answer given is usually safe to follow. Once you have clicked through all removal screens the software will not start on the next log in and you will need to run spybot one more time to clean what ever programs where running before that could not be removed. Now that windows did not load them to memory they will be easily deleted. If your problems are now removed you are good to go if not you can try step siix.
Step 6.) If you are still here unfortunately you have a bad infestation of spyware or possibly a virus. Lets try to remove the virus first, unless you feel comfortable diving in the repair posts available on Google, yahoo, Bing and trying registry fixes this would be a good time to call in a professional computer repair person or an online computer repair expert to help with your problem. You can download a free year worth of anti virus protection offered by Grisoft inc by going to your favorite search engine once again and typing in download avgfree mg. Download then install the AVG anti virus software, during the install it will have you run a full update for the virus definitions. Your computer will need to be online for this to take place so please plug back to modem or network. Once the update is completed open the software by clicking the avg icon and select run full computer scan. After your scan has completed you will be given a list of files found select to delete all or clean if one is a document you need or want.
You may need more programs to fully remove the spyware infection on your computer depending on the severity of the infection. Programs are easy to find and use depending on your computer experience, be careful not all that is free is good it may be more spyware. Look up any software before you try it. Google, Yahoo, and Bing are your friend. It’s a good idea to scan your computer in safe mode just to ensure that you can complete any PC repair that needs to be done within Windows you are locked out of certain changes for security reasons and safe mode will allow you to complete the same task.
When the PC starts up after you press power tap the F8 key until you get the menu to enter safe mode then you can select the first choice safe mode and try your new cleanup software. The programs must be installed outside of safe mode in a regular boot for the most part. The best way to remove spyware is to not get it in the first place. Keep your system and anti-virus updated, be very selective about what programs you download. There are many websites that offer computer help and or repair you should be able to find anything that you need online. Nothing is truly free remember that the next time you see a pop up and you will be one step closer to staying spyware free.
Looking for a computer repair expert to remove spyware or repair your computer/network in Port saint Lucie, West Palm Beach, Stuart, Boca Raton, or the greater south Florida area? Give Eric Jaffe from Jejtek.com a call (754) 245-1477. Not only will you end up with a repaired PC for a reasonable price. I will teach you how to keep the computer clean and spyware free while I complete your repair. The next time you run into computer trouble You can follow the notes you took during our session and do basic removal your self saving your budgeted cash for more important things.
0 notes
Text
New Post has been published on Vin Zite
New Post has been published on https://vinzite.com/spyware-removal-speed-up-your-computer/
Spyware Removal - Speed Up Your Computer
In a my-my city, Port Saint Lucie and all over the great state of Florida, say the words Spyware, Adware, or malware and Business owners, along with any technically average Windows PC user will shudder in horror. That’s because these programs not only are incredibly stubborn when you’re trying to remove them, but they often change administrator or security settings on your computer, Workstation, or Servers, such as what sites you allow trust or the settings in your HOST files. Spyware or adware, a malicious program that can add, change or remove values in the Windows registry allowing the program to fully install on the opening of Internet Explorer or Firefox, or on the next reboot of your computer repair, even after deleted if not removed completely.
Spyware Removal for Cleaning up your Computer
Today’s spyware is more common than a virus for the average Windows user surfing the internet. Spyware has hundreds of successful ways to disable or infect your computer via all the common exploits or software bugs, like errors within the Windows operating system allowing spyware the use of your CPU cycles, to spam others, and to solicit your desktop to show you pop-ups for everything from pornography to other spyware programs that will claim to be able to remove the currently installed spyware or clean a virus from your computer, when in fact it can make it worse by installing more spyware. Spyware can copy secure data from your desktop computer or PC and send it off to another country, or even somewhere else in our own country where a malicious hacker wants to sell or use your stolen data for anything from ID theft, to pirating your Audio and or Video collection and posting it online. It is very important to remove spyware as soon as it is detected as you can see by all the harm it can cause besides just slowing down your computer and making its use a miserable experience.
The best path to take is to try stopping the spyware before it is able to fully take hold or control of your computer, server or workstation if you already have some installed. If you have a clean spyware computer follow the tips below to keep it that way. It is just as important to verify complete removal once you feel the spyware has been uninstalled to make sure, it cannot reinstall on the next reboot and that your data is once again secure from the theft of prying eyes. Simply put Spyware is part of a big online business of data theft and forced marketing along with the fake software to remove the spyware for another $50 dollars then they can go for your credit card info next. If you are seeing a major slowdown in the functions of your windows desktop computer you need to have the computer cleaned and probably a little spyware removal depending on your internet surfing habits and what you like to Google for. Worst case you have to reinstall your Windows operating system and all programs then copy your data over from a backup if you have one.
If you are not backing up please allow me to introduce you to a great little program called Carbonite. Carbonite provides a great solution to the problem of backing up your home or office computer. Carbonite includes unlimited size online or off-site storage for your files at a very reasonable price of $59.99 or so per year. Not only do I recommend the program I use it myself for years I was a beta tester and have it installed on three of my home servers protecting my data with off-site storage day and night. I have personally witnessed this program save 4 companies from complete data loss due to the person in charge at that office not testing their backup tapes, a raid went bad in another and they never complained about the error on reboot of the server until it was too late, and one company who claimed they backed up to a USB hard drive and said don’t worry about us, well they forgot for a year and had no back at all when their server got hit by lightening. Each of the companies listed was saved by the great little program for off-site backups called Carbonite. After the problem was repaired in all cases the software they lost was immediately downloaded to the new location and re-shared to the office allowing them to get back to work.
Follow my free tips below to attempt to remove installed spyware from your PC server or workstation.
(Please remember this is done at your own risk I take no responsibility for the outcome of your work.)
Step 1.) To remove spyware, first, you should download the programs listed below then disconnect your computer from the Internet. After you complete the downloads unplug your computer from the modem or router to ensure that you are offline. You’ll need the right programs to remove spyware from your computer. If you are unable to surf the internet with your browser correctly you will need to download the free software for removal from another computer that is connected to the internet, like a friend or family member PC. Once you have downloaded the files from Google, Yahoo or Bing You’ll need to burn the spyware removal programs to a cd or copy them to a USB memory stick and then install them on your PC and use them from there. There are hundreds of programs to remove or repair a PC or computer infected with spyware.
The programs I would like you to download are:
a.) Cleanup.exe to remove temp files
b.) Spybot Search And Destroy to search through its definitions after you update it like antivirus software and remove the spyware from both the folders and registry and also clean up the Host files c
.) Sysinternals process explorer to view the running process or services to see what is hogging your resources
d.)Unhackme for rootkit removal
You can use all programs listed or one or two if your problem is easily removed. For the do it yourselfer these will work unless you have a very deep infestation and would then need to call in a pro like myself. The easy way to get each of these files except unhackme is to open your favorite search engine like Google, Yahoo or Bing then type download programname MG. The program name will be the name of the software listed above. The download will bring up this type of page or link for downloading, the MG stands for and will take you to “Major Geeks” a great place to download free or paid applications to help with anything you can think of on the PC or MAC. To download the unhack me software you need to type in download unhackme the first result gratis inc will be the one you want to download from.
Now that you have the correct software to cleanup your PC it’s time to get dirty.
Step 2.) Once you’re offline, click start button the look for the control panel icon. Once in the control panel go to your add/remove programs screen by clicking the add/remove programs icon. Many times spyware will have uninstallers that will allow you to completely remove them without too much effort. Remove as many as you can this way some will give you errors or take you online for feedback and force you to answer to close. just put unhappy and click remove. If you are unsure of an item in the add remove programs section do not just delete it.
All your real programs along with your Windows updates are also within this list. To learn what something is click or highlight the item and it will have more information under it like programmed by and company name. Now armed with a little more info than a program name open your favorite search Engine once again Google, Yahoo, Bing and type in the program name and find out what it is. If it shows up as marketing or pop ups or ads or there are how to remove this or that yep of spyware you are on the right path to get rid of that spyware. If you see many warning and info on spyware when you look it up 9 times out of 10 it would be safe to remove unless you have a program with the same name running in your office or home that you really need. Please ask your boss or double check, then delete.
Step 3.) Now we install and run the cleanup.exe program selecting the first button top right cleanup. The program will ask you if you want to run in demo mode which does not do anything you will select no and really run for the first time. Your pc stores many temp files in multiple locations to save settings for faster loading and use in those apps. By deleting these backups or cached settings you computer will run better allowing faster removal and will also remove the spyware saved in the temp folders. Once you have ran first the cleanup program to remove trash your pc will run slightly faster. This does not delete you files only the temp and saved settings in the browser which you need to run to clean up spyware. No book marks or favorites are deleted.
Step 4.) Now we need to install then allow the full update process during install of the Spybot program. Once installed the first thing you need to do is click the immunize button in the upper left and it will run once and will need to be run twice for all items to turn green. the good in green should now be the large number and the bad or unprotected in red should go down to zero. Once your computer has been immunized, now it’s time to run a full search of the computer files and registry for spyware. This is completed by clicking the Search and destroy button on the upper left, then click search for problems button with the magnifying lens image to start the search for spyware.
Once the program searches the whole computer you will be shown a list on the right side of the screen and they will have open check boxes or squares to the left of each. You will notice the search for problems button has now changed to fix problems in the upper left. To remove all spyware you need to click this button again and the spybot program will attempt to remove and delete and files it has found associated with spyware. For ones it is unable to remove it will ask if you can run one more time when completed after a full restart of your computer. You need to say yes to this and let the program work its magic once again. If at this point the computer shows clean, all green checks to the left of each removed spyware file or registry entry. You are most likely clean and can continue happy surfing. If not please follow the additional steps below to remove a more aggressive type of problem called a root kit or hijacked browser.
Step 5.) If you are unable to remove all spyware with Spybot or have many pop ups on the start up of your computer without even going on line, you will need to next download the program unhackme then install it to stop the rouge service from starting when your computer boots up. This is risky because you need to be careful what you stop to keep your windows programs, and your good software from becoming damaged. Next step open your internet browser and then pay another visit to your favorite search engine Google, yahoo, Bing and type your search request download unhackme, the first result or the one from gratis inc is the place you need to be. Open the link and click the download free trail in the center of the page. Next we run the installer when downloaded then remove what it can with the spy ware removal tool button.
Once that is done you will be given a few more choices the only one you want to hit is remove rootkit. The software will run then tell you to restart so it can run and stop processes from starting as they try to start. This is the be careful moment while it runs you will be asked after each find to remove or if it is a false positive. There will be a help button under each which will tell you most times if the file is good or bad and the answer given is usually safe to follow. Once you have clicked through all removal screens the software will not start on the next log in and you will need to run spybot one more time to clean what ever programs where running before that could not be removed. Now that windows did not load them to memory they will be easily deleted. If your problems are now removed you are good to go if not you can try step siix.
Step 6.) If you are still here unfortunately you have a bad infestation of spyware or possibly a virus. Lets try to remove the virus first, unless you feel comfortable diving in the repair posts available on Google, yahoo, Bing and trying registry fixes this would be a good time to call in a professional computer repair person or an online computer repair expert to help with your problem. You can download a free year worth of anti virus protection offered by Grisoft inc by going to your favorite search engine once again and typing in download avgfree mg. Download then install the AVG anti virus software, during the install it will have you run a full update for the virus definitions. Your computer will need to be online for this to take place so please plug back to modem or network. Once the update is completed open the software by clicking the avg icon and select run full computer scan. After your scan has completed you will be given a list of files found select to delete all or clean if one is a document you need or want.
You may need more programs to fully remove the spyware infection on your computer depending on the severity of the infection. Programs are easy to find and use depending on your computer experience, be careful not all that is free is good it may be more spyware. Look up any software before you try it. Google, Yahoo, and Bing are your friend. It’s a good idea to scan your computer in safe mode just to ensure that you can complete any PC repair that needs to be done within Windows you are locked out of certain changes for security reasons and safe mode will allow you to complete the same task.
When the PC starts up after you press power tap the F8 key until you get the menu to enter safe mode then you can select the first choice safe mode and try your new cleanup software. The programs must be installed outside of safe mode in a regular boot for the most part. The best way to remove spyware is to not get it in the first place. Keep your system and anti-virus updated, be very selective about what programs you download. There are many websites that offer computer help and or repair you should be able to find anything that you need online. Nothing is truly free remember that the next time you see a pop up and you will be one step closer to staying spyware free.
Looking for a computer repair expert to remove spyware or repair your computer/network in Port saint Lucie, West Palm Beach, Stuart, Boca Raton, or the greater south Florida area? Give Eric Jaffe from Jejtek.com a call (754) 245-1477. Not only will you end up with a repaired PC for a reasonable price. I will teach you how to keep the computer clean and spyware free while I complete your repair. The next time you run into computer trouble You can follow the notes you took during our session and do basic removal your self saving your budgeted cash for more important things.
0 notes
Text
Steps to Spyware Removal & Speed Up Your Computer
New Post has been published on https://netmaddy.com/steps-to-spyware-removal-speed-up-your-computer/
Steps to Spyware Removal & Speed Up Your Computer
In my my city Port Saint Lucie and all over the great state of Florida, say the words Spyware, Adware, or malware and Business owners, along with any technically average Windows PC user will shudder in horror. That’s because these programs not only are incredibly stubborn when you’re trying to remove them, but they often change administrator or security settings on your computer, Workstation, or Server, such as what sites you allow trust or the settings in your HOST files. Spyware or adware, a malicious program that can add, change or remove values in the Windows registry allowing the program to fully install on the opening of Internet Explorer or Firefox, or on the next reboot of your computer repair, even after deleted if not removed completely.
Today’s spyware is more common than a virus for the average Windows user surfing the internet. Spyware has hundreds of successful ways to disable or infect your computer via all the common exploits or software bugs, like errors within the Windows operating system allowing spyware the use of your CPU cycles, to spam others, and to solicit your desktop to show you pop ups for everything from pornography to other spyware programs that will claim to be able to remove the currently installed spyware or clean a virus from your computer, when in fact it can make it worse by installing more spyware. Spyware can copy secure data from your desktop computer or PC and send it off to another country, or even some where else in our own country where a malicious hacker waits to sell or use your stolen data for anything from ID theft, to pirating your Audio and or Video collection and posting it online. It is very important to remove spy ware as soon as its detected as you can see by all the harm it can cause besides just slowing down your computer and making its use a miserable experience.
The best path to take is to try stopping the spyware before it is able to fully take hold or control of your computer, server or workstation if you already have some installed. If you have a clean spyware computer follow the tips below to keep it that way. It is just as important to verify complete removal once you feel the spyware has been uninstalled to make sure, it cannot reinstall on the next reboot and that your data is once again secure from theft of prying eyes. Simply put Spyware is part of a big online business of data theft and forced marketing along with the fake software to remove the spyware for another $50 dollars then they can go for your credit card info next. If you are seeing a major slowdown in the functions of your windows desktop computer you need to have the computer cleaned and probably a little spyware removal depending on your internet surfing habits and what you like to Google for. Worst case you have to reinstall your Windows operating system and all programs then copy your data over from a back up if you have one.
If you are not backing up please allow me to introduce you to a great little program called Carbonite. Carbonite provides a great solution to the problem of backing up your home or office compueter. Carbonite includes unlimited size online or off site storage for for your files at a very reasonable price of $59.99 or so per year. Not only do I recommend the program I use it my self for years I was a beta tester and have it installed on three of my home servers protecting my data with off site storage day and night. I have personally witnessed this program save 4 companies from complete data loss due to the person in charge at that office not testing there backup tapes, a raid went bad in another and they never complained about the error on reboot of the server until it was to late, and one company who claimed they backed up to a USB hard drive and said don’t worry about us, well they forgot for a year and had no back at all when there server got hit by lightening. Each of the companies listed were saved by the great little program for off site backups called Carbonite. After the problem was repaired in all cases the software they lost was immediately downloaded to the new location and re shared to the office allowing them to get back to work.
Follow my free tips below to attempt to remove installed spyware from your PC server or workstation.
(Please remember this is done at your own risk I take no responsibility for the outcome of your work.)
Step 1.) To remove spyware, first you should download the programs listed below then disconnect your computer from the Internet. After you complete the downloads unplug your computer from the modem or router to ensure that you are offline. You’ll need the right programs to remove spyware from your computer. If you are unable to surf the internet with your browser correctly you will need to download the free software for removal from another computer that is connected to the internet, like a friend or family member PC. Once you have downloaded the files from Google, Yahoo or Bing You’ll need to burn the spyware removal programs to a cd or copy them to a USB memory stick and then install them on your PC and use them from there. There are hundreds of programs to remove or repair a PC or computer infected with spyware.
The programs I would like you to download are:
a.) Cleanup.exe to remove temp files
b.) Spybot Search And Destroy to search through its definitions after you update it like anti virus software and remove the spyware from both the folders and registry and also cleanup the Host files
c.) Sysinternals process explorer to view the running process or services to see what is hogging your resources
d.)Unhackme for rootkit removal
You can use all programs listed or one or two if your problem is easily removed. For the do it yourselfer these will work unless you have a very deep infestation and would then need to call in a pro like myself. The easy way to get each of these files except unhackme is to open your favorite search engine like Google, Yahoo or Bing then type download programname MG. The program name will be the name of the software listed above. The download will bring up this type of page or link for downloading, the MG stands for and will take you to “Major Geeks” a great place to download free or paid applications to help with anything you can think of on the PC or MAC. To download the unhack me software you need to type in download unhackme the first result gratis inc will be the one you want to download from.
Now that you have the correct software to cleanup your PC it’s time to get dirty.
Step 2.) Once you’re offline, click start button the look for the control panel icon. Once in the control panel go to your add/remove programs screen by clicking the add/remove programs icon. Many times spyware will have uninstallers that will allow you to completely remove them without too much effort. Remove as many as you can this way some will give you errors or take you online for feedback and force you to answer to close. just put unhappy and click remove. If you are unsure of an item in the add remove programs section do not just delete it.
All your real programs along with your Windows updates are also within this list. To learn what something is click or highlight the item and it will have more information under it like programmed by and company name. Now armed with a little more info than a program name open your favorite search Engine once again Google, Yahoo, Bing and type in the program name and find out what it is. If it shows up as marketing or pop ups or ads or there are how to remove this or that yep of spyware you are on the right path to get rid of that spyware. If you see many warning and info on spyware when you look it up 9 times out of 10 it would be safe to remove unless you have a program with the same name running in your office or home that you really need. Please ask your boss or double check, then delete.
Step 3.) Now we install and run the cleanup.exe program selecting the first button top right cleanup. The program will ask you if you want to run in demo mode which does not do anything you will select no and really run for the first time. Your pc stores many temp files in multiple locations to save settings for faster loading and use in those apps. By deleting these backups or cached settings you computer will run better allowing faster removal and will also remove the spyware saved in the temp folders. Once you have ran first the cleanup program to remove trash your pc will run slightly faster. This does not delete you files only the temp and saved settings in the browser which you need to run to clean up spyware. No book marks or favorites are deleted.
Step 4.) Now we need to install then allow the full update process during install of the Spybot program. Once installed the first thing you need to do is click the immunize button in the upper left and it will run once and will need to be run twice for all items to turn green. the good in green should now be the large number and the bad or unprotected in red should go down to zero. Once your computer has been immunized, now it’s time to run a full search of the computer files and registry for spyware. This is completed by clicking the Search and destroy button on the upper left, then click search for problems button with the magnifying lens image to start the search for spyware.
Once the program searches the whole computer you will be shown a list on the right side of the screen and they will have open check boxes or squares to the left of each. You will notice the search for problems button has now changed to fix problems in the upper left. To remove all spyware you need to click this button again and the spybot program will attempt to remove and delete and files it has found associated with spyware. For ones it is unable to remove it will ask if you can run one more time when completed after a full restart of your computer. You need to say yes to this and let the program work its magic once again. If at this point the computer shows clean, all green checks to the left of each removed spyware file or registry entry. You are most likely clean and can continue happy surfing. If not please follow the additional steps below to remove a more aggressive type of problem called a root kit or hijacked browser.
Step 5.) If you are unable to remove all spyware with Spybot or have many pop ups on the start up of your computer without even going on line, you will need to next download the program unhackme then install it to stop the rouge service from starting when your computer boots up. This is risky because you need to be careful what you stop to keep your windows programs, and your good software from becoming damaged. Next step open your internet browser and then pay another visit to your favorite search engine Google, yahoo, Bing and type your search request download unhackme, the first result or the one from gratis inc is the place you need to be. Open the link and click the download free trail in the center of the page. Next we run the installer when downloaded then remove what it can with the spy ware removal tool button.
Once that is done you will be given a few more choices the only one you want to hit is remove rootkit. The software will run then tell you to restart so it can run and stop processes from starting as they try to start. This is the be careful moment while it runs you will be asked after each find to remove or if it is a false positive. There will be a help button under each which will tell you most times if the file is good or bad and the answer given is usually safe to follow. Once you have clicked through all removal screens the software will not start on the next log in and you will need to run spybot one more time to clean what ever programs where running before that could not be removed. Now that windows did not load them to memory they will be easily deleted. If your problems are now removed you are good to go if not you can try step siix.
Step 6.) If you are still here unfortunately you have a bad infestation of spyware or possibly a virus. Lets try to remove the virus first, unless you feel comfortable diving in the repair posts available on Google, yahoo, Bing and trying registry fixes this would be a good time to call in a professional computer repair person or an online computer repair expert to help with your problem. You can download a free year worth of anti virus protection offered by Grisoft inc by going to your favorite search engine once again and typing in download avgfree mg. Download then install the AVG anti virus software, during the install it will have you run a full update for the virus definitions. Your computer will need to be online for this to take place so please plug back to modem or network. Once the update is completed open the software by clicking the avg icon and select run full computer scan. After your scan has completed you will be given a list of files found select to delete all or clean if one is a document you need or want.
You may need more programs to fully remove the spyware infection on your computer depending on the severity of the infection. Programs are easy to find and use depending on your computer experience, be careful not all that is free is good it may be more spyware. Look up any software before you try it. Google, Yahoo, and Bing are your friend. It’s a good idea to scan your computer in safe mode just to ensure that you can complete any PC repair that needs to be done within Windows you are locked out of certain changes for security reasons and safe mode will allow you to complete the same task.
When the PC starts up after you press power tap the F8 key until you get the menu to enter safe mode then you can select the first choice safe mode and try your new cleanup software. The programs must be installed outside of safe mode in a regular boot for the most part. The best way to remove spyware is to not get it in the first place. Keep your system and anti-virus updated, be very selective about what programs you download. There are many websites that offer computer help and or repair you should be able to find anything that you need online. Nothing is truly free remember that the next time you see a pop up and you will be one step closer to staying spyware free.
Looking for a computer repair expert to remove spyware or repair your computer/network in Port saint Lucie, West Palm Beach, Stuart, Boca Raton, or the greater south Florida area? Give Eric Jaffe from Jejtek.com a call (754) 245-1477. Not only will you end up with a repaired PC for a reasonable price. I will teach you how to keep the computer clean and spyware free while I complete your repair. The next time you run into computer trouble You can follow the notes you took during our session and do basic removal your self saving your budgeted cash for more important things.
0 notes
Text
I’m back, again, after a long hiatus. I have wanted to write this post for quite a while but haven’t had the time/energy. Not only to sit down and write, but to clean enough to take nice photos. Today, Sam did the heavy lifting with the cleaning so I finally took some photos (after deleting some because I have zero storage on my phone :/), sat down in the very room I’ll be documenting, goofed around a bit, then opened WordPress. So now that you know what it took for me to get here, let’s get started!
First thing’s first. I struggled with this room at the very beginning. I was convinced the living room would be a beautiful dining room because of the shape and the windows. Who am I kidding, I still think that. But after some convincing I agreed that the flow of the house would be all wrong if that’s what I decided to do. When I say convincing I mean very gentle prodding from my dad and my husband. Ultimately they left the decision to me (bless their hearts) but made it quite clear what they thought. And, I’m grateful for it. This room is the heart of our home. Physically the kitchen is but we spend the most time in the dining room. We have a large six-seater table (given to us by my dad) that I am absolutely in love with. We also house the hutch that once belonged to my great grandmother and the sideboard/banquet that I redid over the course of a year or so (it shouldn’t have taken that long but cut me some slack, I’m busy). It really is a welcoming room and I love it. Have I mentioned once or twice that it’s my favorite room? Well, in case you’re wondering, it is. I have realized that I thoroughly enjoy hosting friends and family. I love coming home and putting all of my crap down on that giant table (sorry, Sam). I love changing out centerpieces and I can’t wait to find another table runner that I like enough to buy. There is so much I can subtly change in this room.
Now, let’s talk about the actual forming of the dining room. I’m pretty sure it wasn’t a dining room when we began the project. It had a giant, gross heater/stove thing in the corner and some huge piece of furniture that somewhat resembled a desk. There was also a wall that cut off this room from the kitchen. Guess what we did with that wall? That’s right, tore that sucker down. Well, to be more realistic, we put a few holes in it and then just kind of pushed it down. It was quite flimsy and wobbley. Pretty sure the left half of it was just a piece of paneling. That piece of paneling was not only serving as the wall in this room but also the back of a crumbling built-in in the kitchen.
The carpet was disgusting (shocker)
Paneling everywhere
The paneling was torn down by my brother and I. So many tiny nails
Under the paneling we found the original door casing. We were surprised how short and wide the original door was!
The flimsy wall…
After demo, including wall tear-down
Now that we have lived here for a few months I forget how truly appalling the house was originally was. That’s all part of the fun though, right?! As for the design of the room, I wanted to keep it simple. I picked a paint color (my new absolutely favorite paint color) that would work for the dining room and the kitchen since it was just one large stretch of the house. It’s called Stone Isle by Sherwin Williams. Seriously, if you want a light/bright paint color, this is the one. I rave about it constantly. Everyone who worked on the house is probably super sick of hearing about how much I love this paint color. It will forevermore be my go-to neutral color. To be fair though, I love paint colors in general. One of my favorite parts of HGTV magazines is the spread of all the paint colors that were used throughout the issue (go ahead, make fun of my like my husband does, I don’t even care). Ok, moving on now.
We took the wall down, tore down the panelling (which is quite difficult when there are 9 foot ceilings and no tall people around, by the way), and took out the carpeting. It was dark, dingy, and disgusting. But there were some awesome features that I was stoked about. First of all, the space looked HUGE. Granted, there was no furniture and no kitchen but still. The windows are tall along with the ceiling. Finally, I started to see this room as a dining room. I pictured the table under a rustic chandelier (that image was hard to make happen but we’ll get there soon), beautiful curtains for the windows, the hutch in one specific corner (where the original door was), and the sideboard/banquet perfectly centered between a window and the back door. I pictured floating shelves and a couple coat hooks. And guess what, it pretty much all happened.
The kitchen table quickly became my workstation. This photo was the first day we got it in there. I immediately loved that I was basically surrounded not only by towering windows but also by the rest of my home. To my left (even currently as I type) is my stunning kitchen designed by my dad and I over several trips to Lowe’s. I can admire the original hardwood floors in that room and the decor I laboriously picked to compliment each wall. Ahead of me is the living room. Lounging there is my husband and dog, enjoying what I’m certain is their favorite room in the house. I can admire that risk I took in the form of bold blue paint in that room and I constantly try to imagine other ways I could rearrange the furniture or add something new (from another part of the house, not actually new). I imagine hosting my family more often (Mom, that’s for you!) and where Sam and I will go from here. This project alighted my imagination and determination. For those of you who do not know, I am working on getting my Real Estate License so I can eventually make a career of finding families homes that make them as happy as this one makes me. Granted, most people wouldn’t be so ecstatic to walk through a literal dump of a house like I was with this one. But God knew it would start here, in a house owned by multiple generations of my family. He knew I needed this push to realize what excited me enough to make into a career. And now, without further ado, I’ll show you the after photos of the dining room as it currently is. No promises things won’t change as early as tomorrow though.
View from standing in the living room
View from standing in the kitchen
It took forever to find a chandelier because I’m incredibly picky (I didn’t realize that about chandeliers until I had to pick one)
Loki makes it quite difficult to take photos of the house.
Those floating shelves I was hoping for
We tried to do corner shelves but no corners in this house are suitable for them
The photo on the wall is my wonderful grandma on her second (I think) birthday
This basket was one of the first things I hung. It fits perfectly in the space
The frames are from Barnstormer (I don’t know which booth, so sorry!), the plaque thing is from a yard sale, and the photo is of my grandma and grandpa in front of their car. One of my favorite photos of them
Banquet/sidboard (I don’t know what it technically is. An amazing friend of dad’s gave it to us and I redid it)
The hutch that was my great grandmother’s, then my grandfather’s
This is my favorite way to spend Saturday mornings with Sam
My latest centerpiece
A cheap find from Real Deals. I put a small strand of LED lights into it
Our constant companion when we have food at the table
Time to Dine I'm back, again, after a long hiatus. I have wanted to write this post for quite a while but haven't had the time/energy.
0 notes
Text
6 Steps to Spyware Removal - Speed Up Your Computer
New Post has been published on https://beingmad.org/6-steps-to-spyware-removal-speed-up-your-computer/
6 Steps to Spyware Removal - Speed Up Your Computer
In my city, Port Saint Lucie and all over the great state of Florida, say the words Spyware, Adware, or malware and Business owners, along with any technically average Windows Computer user will shudder in horror. That’s because these programs not only are incredibly stubborn when you’re trying to removal them, but they often change administrator or security settings on your computer, Workstation, or Servers, such as what sites you allow trust or the settings in your HOST files. Spyware or adware, a malicious program that can add, change or remove values in the Windows registry allowing the program to fully install on the opening of Internet Explorer or Firefox, or on the next reboot of your computer repair, even after deleted if not removed completely.
Today’s spyware is more common than a virus for the average Windows user surfing the internet. Spyware has hundreds of successful ways to disable or infect your computer via all the common exploits or software bugs, like errors within the Windows operating system allowing spyware the use of your CPU cycles, to spam others, and to solicit your desktop to show you pop-ups for everything from pornography to other spyware programs that will claim to be able to remove the currently installed spyware or clean a virus from your computer, when in fact it can make it worse by installing more spyware. Spyware can copy secure data from your desktop computer or PC and send it off to another country, or even somewhere else in our own country where a malicious hacker wants to sell or use your stolen data for anything from ID theft, to pirating your Audio and or Video collection and posting it online. It is very important to remove spyware as soon as it’s detected as you can see by all the harm it can cause besides just slowing down your computer and making its use a miserable experience.
The best path to take is to try stopping the spyware before it is able to fully take hold or control of your computer, server or workstation if you already have some installed. If you have a clean spyware computer follow the tips below to keep it that way. It is just as important to verify complete removal once you feel the spyware has been uninstalled to make sure, it cannot reinstall on the next reboot and that your data is once again secure from a theft of prying eyes. Simply put Spyware is part of a big online business of data theft and forced marketing along with the fake software to remove the spyware for another $50 dollars then they can go for your credit card info next. If you are seeing a major slowdown in the functions of your windows desktop computer you need to have the computer cleaned and probably a little spyware removal depending on your internet surfing habits and what you like to Google for. Worst case you have to reinstall your Windows operating system and all programs then copy your data over from a backup if you have one.
If you are not backing up please allow me to introduce you to a great little program called Carbonite. Carbonite provides a great solution to the problem of backing up your home or office computer. Carbonite includes unlimited size online or off-site storage for your files at a very reasonable price of $59.99 or so per year. Not only do I recommend the program I use it myself for years I was a beta tester and have it installed on three of my home servers protecting my data with off-site storage day and night. I have personally witnessed this program save 4 companies from complete data loss due to the person in charge at that office not testing their backup tapes, a raid went bad in another and they never complained about the error on reboot of the server until it was too late, and one company who claimed they backed up to a USB hard drive and said don’t worry about us, well they forgot for a year and had no back at all when their server got hit by lightening. Each of the companies listed was saved by the great little program for off-site backups called Carbonite. After the problem was repaired in all cases the software they lost was immediately downloaded to the new location and re-shared to the office allowing them to get back to work.
Step 1.) To remove spyware, first, you should download the programs listed below then disconnect your computer from the Internet. After you complete the downloads unplug your computer from the modem or router to ensure that you are offline. You’ll need the right programs to remove spyware from your computer. If you are unable to surf the internet with your browser correctly you will need to download the free software for removal from another computer that is connected to the internet, like a friend or family member PC. Once you have downloaded the files from Google, Yahoo or Bing You’ll need to burn the spyware removal programs to a cd or copy them to a USB memory stick and then install them on your PC and use them from there. There are hundreds of programs to remove or repair a PC or computer infected with spyware.
The programs I would like you to download are:
a.) Cleanup.exe to remove temp files
b.) Spybot Search And Destroy to search through its definitions after you update it like antivirus software and remove the spyware from both the folders and registry and also clean up the Host files c
.) Sysinternals process explorer to view the running process or services to see what is hogging your resources
d.)Unhackme for rootkit removal
You can use all programs listed or one or two if your problem is easily removed. For the do it yourself these will work unless you have a very deep infestation and would then need to call in a pro like myself. The easy way to get each of these files except unpack is to open your favorite search engine like Google, Yahoo or Bing then type download program MG. The program name will be the name of the software listed above. The download will bring up this type of page or link for downloading, the MG stands for and will take you to “Major Geeks” a great place to download free or paid applications to help with anything you can think of on the PC or MAC. To download the hack me software you need to type in download unpack the first result gratis inc will be the one you want to download from.
Now that you have the correct software to clean up your PC it’s time to get dirty.
Step 2.) Once you’re offline, click start button the look for the control panel icon. Once in the control panel go to your add/remove programs screen by clicking the add/remove programs icon. Many times spyware will have uninstallers that will allow you to completely remove them without too much effort. Remove as many as you can this way some will give you errors or take you online for feedback and force you to answer to close. just put unhappy and click remove. If you are unsure of an item in the add remove programs section do not just delete it.
All your real programs along with your Windows updates are also on this list. To learn what something clicks or highlight the item and it will have more information on it like programmed by and company name. Now armed with a little more info than a program name open your favorite search Engine once again Google, Yahoo, Bing and type in the program name and find out what it is. If it shows up as marketing or pop-ups or ads or there are how to remove this or that yep of spyware you are on the right path to get rid of that spyware. If you see many warning and info on spyware when you look it up 9 times out of 10 it would be safe to remove unless you have a program with the same name running in your office or home that you really need. Please ask your boss or double check, then delete.
Step 3.) Now we install and run the cleanup.exe program selecting the first button top right cleanup. The program will ask you if you want to run in demo mode which does not do anything you will select no and really run for the first time. Your PC stores many temp files in multiple locations to save settings for faster loading and use in those apps. By deleting these backups or cached settings your computer will run better allowing faster removal and will also remove the spyware saved in the temp folders. Once you have run first the cleanup program to remove trash your PC will run slightly faster. This does not delete your files only the temp and saved settings in the browser which you need to run to clean up spyware. No bookmarks or favorites are deleted.
Step 4.) Now we need to install then allow the full update process during install of the Spybot program. Once installed the first thing you need to do is click the immunize button in the upper left and it will run once and will need to be run twice for all items to turn green. the good in green should now be the large number and the bad or unprotected in red should go down to zero. Once your computer has been immunized, now it’s time to run a full search of the computer files and registry for spyware. This is completed by clicking the Search and destroy button on the upper left, then click search for problems button with the magnifying lens image to start the search for spyware.
Once the program searches the whole computer you will be shown a list on the right side of the screen and they will have open check boxes or squares to the left of each. You will notice the search for problems button has now changed to fix problems in the upper left. To remove all spyware you need to click this button again and the Spybot program will attempt to remove and delete and files it has found associated with spyware. For ones, it is unable to remove it will ask if you can run one more time when completed after a full restart of your computer. You need to say yes to this and let the program work its magic once again. If at this point the computer shows clean, all green checks to the left of each removed spyware file or registry entry. You are most likely clean and can continue happy surfing. If not please follow the additional steps below to remove a more aggressive type of problem called a rootkit or hijacked browser.
Step 5.) If you are unable to remove all spyware with Spybot or have many pop-ups on the start up of your computer without even going online, you will need to next download the program unshackle then install it to stop the rouge service from starting when your computer boots up. This is risky because you need to be careful what you stop to keep your windows programs and your good software from becoming damaged. Next step open your internet browser and then pay another visit to your favorite search engine Google, yahoo, Bing and type your search request download unpack, the first result or the one from gratis inc is the place you need to be. Open the link and click the download free trail in the center of the page. Next, we run the installer when downloaded then remove what it can with the spyware removal tool button.
Once that is done you will be given a few more choices the only one you want to hit is removed the rootkit. The software will run then tell you to restart so it can run and stop processes from starting as they try to start. This is the be a careful moment while it runs you will be asked after each find to remove or if it is a false positive. There will be a help button under each which will tell you most times if the file is good or bad and the answer given is usually safe to follow. Once you have clicked through all removal screens the software will not start on the next login and you will need to run Spybot one more time to clean whatever programs were running before that could not be removed. Now that windows did not load them to memory they will be easily deleted. If your problems are now removed you are good to go if not you can try step six.
Step 6.) If you are still here, unfortunately, you have a bad infestation of spyware or possibly a virus. Let’s try to remove the virus first, unless you feel comfortable diving in the repair posts available on Google, yahoo, Bing and trying registry fixes this would be a good time to call in a professional computer repair person or an online computer repair expert to help with your problem. You can download a free year worth of anti-virus protection offered by Grisoft inc by going to your favorite search engine once again and typing in download agree on mg. Download then install the AVG antivirus software, during the install it will have you run a full update for the virus definitions. Your computer will need to be online for this to take place so please plug back to modem or network. Once the update is completed open the software by clicking the Avg icon and select run full computer scan. After your scan has completed you will be given a list of files found select to delete all or clean if one is a document you need or want.
You may need more programs to fully remove the spyware infection on your computer depending on the severity of the infection. Programs are easy to find and use depending on your computer experience, be careful not all that is free is good it may be more spyware. Look up any software before you try it. Google, Yahoo, and Bing are your friend. It’s a good idea to scan your computer in safe mode just to ensure that you can complete any PC repair that needs to be done within Windows you are locked out of certain changes for security reasons and safe mode will allow you to complete the same task.
When the PC starts up after you press power to tap the F8 key until you get the menu to enter safe mode then you can select the first choice safe mode and try your new cleanup software. The programs must be installed outside of safe mode in a regular boot for the most part. The best way to remove spyware is to not get it in the first place. Keep your system and anti-virus updated, be very selective about what programs you download. There are many websites that offer computer help and or repair you should be able to find anything that you need online. Nothing is truly free to remember that the next time you see a pop-up and you will be one step closer to staying spyware free.
0 notes
Last Seen Blogs

wzw47
Wlad

77dekiru
#1 Toga Himiko Defender

coleshanzo
Bungacowa!

thedaiilybooks
thedaiilybooks

dannyisababyking2
Danny Phantom Is A Baby King Change My Mind