#*insert ctrl alt del panel here*
Explore tagged Tumblr posts
Visit Tumblr Blog
Explore Tumblr blogs with no restrictions, modern design and the best experience.
Last Seen Tumblr Blogs


Fun Fact
The average Tumblr user visits about 67 pages every month.
Text
i put on a jacket because i was shivering uncontrollably and now i’m just still doing that, but with a jacket on
#*insert ctrl alt del panel here*#i need a text post tag#i can't figure out where the cold air is getting in from besides 'all windows in general' so i'm kind of resigned to being cold#rip
2 notes
·
View notes
Text
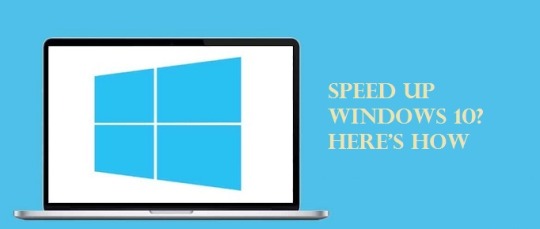
How to Speed up Windows 10? Here’s How
In this article, we have discussed the ways using which you can speed up your Windows 10 PC, thereby improving its efficiency and responsiveness. To speed up your system’s performance, you don’t need expert help; instead, you need a bit of expert advice, which you can follow later to speed up your Windows 10 PC. It may sound complicated to you; however, it’s not.
From defragmenting or clearing out unused programs and files to turning off the special effects and more, let us show you how you can speed up your system’s performance to get maximum out of it in times of slow-downs.
With that said, let’s proceed further to the tried and tested methods to improve the efficiency of your Windows 10 system.
Restart your PC
One of the most basic and effective ways to speed up your Windows 10 PC is rebooting. Your PC might be running for weeks without getting rest for even a while. Though Windows 10, however, puts the display to sleep, any process which was started will continue to be carried on in the background. The data will get accumulated over time and affect the performance of your PC.
However, you can easily fix this issue by rebooting your PC each day when you have finished using it. Tap on the Windows button, and further click on the “Power” button. Before you reboot your system, make sure to close all your tabs. If your Windows 10 system has slowed down to the extent that it has stuck at a place and is not responding, then hold down the power button till the system turns off completely.
Keep Updating Your System
Microsoft releases updates on a regular basis. These updates deal with the common bugs and help remove them, thereby improving the performance of the systems. Some of them are minor ones; however, others do have the tendency to make changes to your system, thereby improving efficiency.
If the performance is lagging somewhere, try these fixes:
· Launch the Windows menu
· In the search bar, type “Update.”
· Further, click on the “Check for Updates” option.
· If you see a major update, then don’t just straightforward go for it. First, ensure you have taken the backup of data before you continue. Your PC needs to be restarted various times to apply the updates. You can manually check for the updates if it’s been a while since you did it.
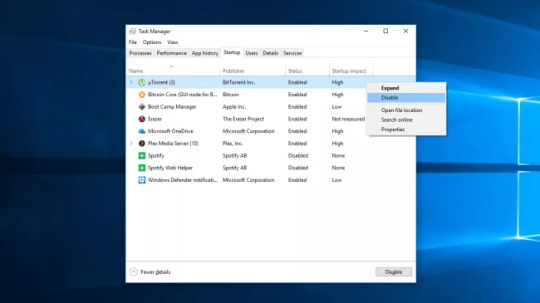
Check Startup Apps
Your system’s performance can be brought down by various running processes. The significant reason behind this is the installers that command Windows to run their programs immediately after a user logs in, thereby slowing down the system speed. To track the startup programs:
· Open the Task Manager. You may use the shortcut Ctrl + Alt + Del.
· Further, click on the “Startup” tab.
· Now, you need to carefully watch the “Startup Impact” values for each program like “High.” This is a good way to track the apps that are slowing down your system.
· Further, you need to tap on the program you need to restrict from getting launched during login. This can be done using right-clicking the app and then selecting “Disable.”
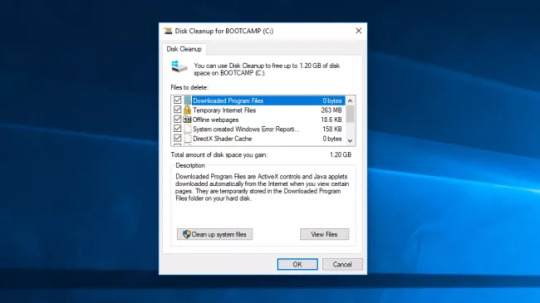
Run Disk Cleanup
One of the most prominent built-in Windows utilities is the Disk Cleanup. It is used to clear out temporary files that might have heavily accumulated the resources of your machine, for instance, the image thumbnails, offline web pages, and downloaded program files. You can run a disk clean up by these steps:
· Go to the Windows menu.
· Under the search bar, type “Disk Cleanup.” Then select the files that need to be removed. Simply check mark each option adjacent to the files in question.
· Then, tap on “Clean up system Files.” The amount of space that will be saved will be shown by the Disk Cleanup after calculating.
· You have a great chance to remove the unnecessary files from your hard drive. You can start with the “Downloads” folder.
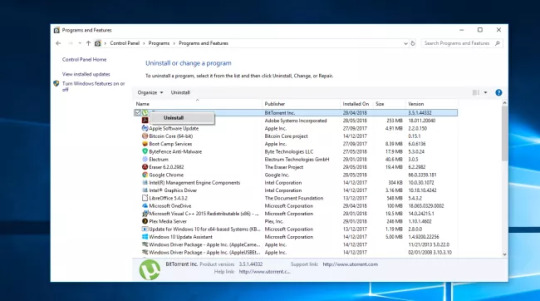
Remove Unused Software
It’s better to remove the unwanted/unused software from your PC than to keep them and bring unnecessary load on your system. Various system vendors ship their systems bundled with a vast number of third-party software, and due to their file sizes, they are referred to as “Bloatware.”
There are also cases when a user installs software for a specific purpose and never uses it again. So, these kinds of programs can take up a significant amount of space on your hard drive and thereby reduce its performance. To remove the unused software from your PC, you need to follow these steps:
· Visit the “Control Panel” settings.
· Go to the “Programs.”
· Now, head over to the “Programs and Features.”
· Click on “Uninstall a Program.”
· Further, right-click on any of the programs you don’t use any longer.
· Now tap on “Uninstall.”
· Tap on “Yes” when Windows 10 asks for permissions to make the changes on your system.
Disable Special Effects
When special effects are concerned, Windows 10 rather performs heavily. Windows and other features are by default programmed to fade in and fade out of the view. A few other resource-intensive apps like animations and translucency might be unnecessary. So, you need to disable them as soon as possible. Going back to the basics:
· Launch the Windows menu.
· Search “System”
· Go to the “Advanced Settings” tab.
· Head over to the “Performance Settings.”
· Now click on the radio button for “Custom” under the “Visual Effects” tab.
· On this screen, uncheck the boxes next to visual effects that need to be disabled.
· Now, tap on “Apply” to save the changes.
Disable Transparency Effects
Alongside displaying features like animation by making heavy usage of your system resources, Windows 10 also offers transparency effects for some features like the task menu. This seemingly simple and light effect is, however, quite complicated to draw. It’s because the system will have to calculate the same plane two times. So, you can disable the transparency effects, and for that:
· Launch the Windows menu.
· Enter the “Make Start, taskbar and Action Center transparent.”
· Now, you need to turn off transparency under the “Color” Settings.
· Meanwhile, if desired, you can also make changes to the default app mode between “Light” and “Dark.” You need not worry about the system speed. It will only make your Desktop easier on your eyesight.
Upgrade your RAM
You can improve your system’s overall speed significantly by increasing its RAM. To have a lag-free experience, you need to have at least 4GB of RAM on your Windows 10, although this isn’t applicable for the resource-hungry high-end games -like apps. So, what needs to be done? Well, you need to consider adding more virtual memory to your PC. Your PC must be having some RAM ‘slots’ into which you can insert additional chips.
Meanwhile, if you want to know the memory type of your system, then:
· Head over to the Task Manager
· You can also use the shortcut (Ctrl + Alt + Del) to reach the Task Manager.
· Further, tap on “Performance.”
· All the memory slots that are in use will be displayed alongside their type. For instance, the “DDR4.”
It’s very easy to install new RAM chips and if you are doing it by yourself, using an anti-static wrist strap is a must to prevent the delicate components from getting affected. You can visit a PC repair store to get your PC’s hardware upgraded.
Use an SSD
SSDs make use of the same kind of Flash memory found in USB sticks, thereby allowing faster writing times and access compared to the traditional mechanical hard drives, which make use of the magnetized disks. Though SSD is comparatively more expensive than regular hard drives, if you are willing to spend that much amount, you’ll observe a significant improvement in the system’s boot time, responsiveness, and file access times.
Run System Maintenance
Windows 10 offers a built-in utility that looks after the tasks related to routine system maintenance. For instance: regular malware checks, scanning for updates, and defragmentation of the hard drive.
Generally, these tasks operate in the background when the system is idle. However, you can run the maintenance checks manually on your system if you notice an issue with its performance. For that, you need to:
· Visit Control Panel,
· Head over to “System and Security,”
· Then go to “Security and Maintenance,”
· Tap on the arrow facing downwards to look for the complete list of maintenance options.
· From the options, you need to select “Start Maintenance,”
· Meanwhile, you need to save and close the open files, if there are any before you proceed further.
So, these were the instructions to speed up your Windows 10 PC.
Source: How to Speed up Windows 10? Here’s How
0 notes
Text
How to Speed up Windows 10? Here’s How
In this article, we have discussed the ways using which you can speed up your Windows 10 PC, thereby improving its efficiency and responsiveness. To speed up your system’s performance, you don’t need expert help; instead, you need a bit of expert advice, which you can follow later to speed up your Windows 10 PC. It may sound complicated to you; however, it’s not.
From defragmenting or clearing out unused programs and files to turning off the special effects and more, let us show you how you can speed up your system’s performance to get maximum out of it in times of slow-downs.
With that said, let’s proceed further to the tried and tested methods to improve the efficiency of your Windows 10 system.
Restart your PC
One of the most basic and effective ways to speed up your Windows 10 PC is rebooting. Your PC might be running for weeks without getting rest for even a while. Though Windows 10, however, puts the display to sleep, any process which was started will continue to be carried on in the background. The data will get accumulated over time and affect the performance of your PC.
However, you can easily fix this issue by rebooting your PC each day when you have finished using it. Tap on the Windows button, and further click on the “Power” button. Before you reboot your system, make sure to close all your tabs. If your Windows 10 system has slowed down to the extent that it has stuck at a place and is not responding, then hold down the power button till the system turns off completely.
Keep Updating Your System
Microsoft releases updates on a regular basis. These updates deal with the common bugs and help remove them, thereby improving the performance of the systems. Some of them are minor ones; however, others do have the tendency to make changes to your system, thereby improving efficiency.
If the performance is lagging somewhere, try these fixes:
· Launch the Windows menu
· In the search bar, type “Update.”
· Further, click on the “Check for Updates” option.
· If you see a major update, then don’t just straightforward go for it. First, ensure you have taken the backup of data before you continue. Your PC needs to be restarted various times to apply the updates. You can manually check for the updates if it’s been a while since you did it.
Check Startup Apps
Your system’s performance can be brought down by various running processes. The significant reason behind this is the installers that command Windows to run their programs immediately after a user logs in, thereby slowing down the system speed. To track the startup programs:
· Open the Task Manager. You may use the shortcut Ctrl + Alt + Del.
· Further, click on the “Startup” tab.
· Now, you need to carefully watch the “Startup Impact” values for each program like “High.” This is a good way to track the apps that are slowing down your system.
· Further, you need to tap on the program you need to restrict from getting launched during login. This can be done using right-clicking the app and then selecting “Disable.”
Run Disk Cleanup
One of the most prominent built-in Windows utilities is the Disk Cleanup. It is used to clear out temporary files that might have heavily accumulated the resources of your machine, for instance, the image thumbnails, offline web pages, and downloaded program files. You can run a disk clean up by these steps:
· Go to the Windows menu.
· Under the search bar, type “Disk Cleanup.” Then select the files that need to be removed. Simply check mark each option adjacent to the files in question.
· Then, tap on “Clean up system Files.” The amount of space that will be saved will be shown by the Disk Cleanup after calculating.
· You have a great chance to remove the unnecessary files from your hard drive. You can start with the “Downloads” folder.
Remove Unused Software
It’s better to remove the unwanted/unused software from your PC than to keep them and bring unnecessary load on your system. Various system vendors ship their systems bundled with a vast number of third-party software, and due to their file sizes, they are referred to as “Bloatware.”
There are also cases when a user installs software for a specific purpose and never uses it again. So, these kinds of programs can take up a significant amount of space on your hard drive and thereby reduce its performance. To remove the unused software from your PC, you need to follow these steps:
· Visit the “Control Panel” settings.
· Go to the “Programs.”
· Now, head over to the “Programs and Features.”
· Click on “Uninstall a Program.”
· Further, right-click on any of the programs you don’t use any longer.
· Now tap on “Uninstall.”
· Tap on “Yes” when Windows 10 asks for permissions to make the changes on your system.
Disable Special Effects
When special effects are concerned, Windows 10 rather performs heavily. Windows and other features are by default programmed to fade in and fade out of the view. A few other resource-intensive apps like animations and translucency might be unnecessary. So, you need to disable them as soon as possible. Going back to the basics:
· Launch the Windows menu.
· Search “System”
· Go to the “Advanced Settings” tab.
· Head over to the “Performance Settings.”
· Now click on the radio button for “Custom” under the “Visual Effects” tab.
· On this screen, uncheck the boxes next to visual effects that need to be disabled.
· Now, tap on “Apply” to save the changes.
Disable Transparency Effects
Alongside displaying features like animation by making heavy usage of your system resources, Windows 10 also offers transparency effects for some features like the task menu. This seemingly simple and light effect is, however, quite complicated to draw. It’s because the system will have to calculate the same plane two times. So, you can disable the transparency effects, and for that:
· Launch the Windows menu.
· Enter the “Make Start, taskbar and Action Center transparent.”
· Now, you need to turn off transparency under the “Color” Settings.
· Meanwhile, if desired, you can also make changes to the default app mode between “Light” and “Dark.” You need not worry about the system speed. It will only make your Desktop easier on your eyesight.
Upgrade your RAM
You can improve your system’s overall speed significantly by increasing its RAM. To have a lag-free experience, you need to have at least 4GB of RAM on your Windows 10, although this isn’t applicable for the resource-hungry high-end games -like apps. So, what needs to be done? Well, you need to consider adding more virtual memory to your PC. Your PC must be having some RAM ‘slots’ into which you can insert additional chips.
Meanwhile, if you want to know the memory type of your system, then:
· Head over to the Task Manager
· You can also use the shortcut (Ctrl + Alt + Del) to reach the Task Manager.
· Further, tap on “Performance.”
· All the memory slots that are in use will be displayed alongside their type. For instance, the “DDR4.”
It’s very easy to install new RAM chips and if you are doing it by yourself, using an anti-static wrist strap is a must to prevent the delicate components from getting affected. You can visit a PC repair store to get your PC’s hardware upgraded.
Use an SSD
SSDs make use of the same kind of Flash memory found in USB sticks, thereby allowing faster writing times and access compared to the traditional mechanical hard drives, which make use of the magnetized disks. Though SSD is comparatively more expensive than regular hard drives, if you are willing to spend that much amount, you’ll observe a significant improvement in the system’s boot time, responsiveness, and file access times.
Run System Maintenance
Windows 10 offers a built-in utility that looks after the tasks related to routine system maintenance. For instance: regular malware checks, scanning for updates, and defragmentation of the hard drive.
Generally, these tasks operate in the background when the system is idle. However, you can run the maintenance checks manually on your system if you notice an issue with its performance. For that, you need to:
· Visit Control Panel,
· Head over to “System and Security,”
· Then go to “Security and Maintenance,”
· Tap on the arrow facing downwards to look for the complete list of maintenance options.
· From the options, you need to select “Start Maintenance,”
· Meanwhile, you need to save and close the open files, if there are any before you proceed further.
So, these were the instructions to speed up your Windows 10 PC.
Ella johnson has extensive expertise in Microsoft Office and has spent a good part of her life working in the technical industry. Ella has written several technical blogs, manuals, and reviews for several renowned websites.
Source: How to Speed up Windows 10? Here’s How
0 notes
Text
HOW TO SPEED UP WINDOWS 10
HOW TO SPEED UP WINDOWS 10 https://sandarutec.blogspot.com/
How to speed up Windows 10
Boost your PC efficiency with these top tips
If you’re trying to figure out how to speed up Windows 10, you’ve come to the right place. While Windows 10 is arguably the most efficient coded operating system from Microsoft, we understand that it also has a vast number of features that require large amounts of system resources. Even if its latest iteration comes built-in with extremely useful features to improve overall efficiency, your computer’s performance could still slow down.
There are a number of usual suspects that are most probably responsible for such slow down. That includes bloatware, temporary files and less powerful hardware. And, you can certainly do something about them so you can speed up Windows 10 and put your computer’s performance back up to tip-top shape.
In this guide, we'll explore ten of the best ways that you can speed up Windows 10 today, from defragging and clearing out unwanted programs to disabling superfluous special effects and even performing hardware upgrades. Let us show you how to speed up Windows 10.
1. Restart your PC

While this may seem an obvious step, many users keep their machines running for weeks at a time. Windows 10 will automatically put the display to sleep, but any processes which have previously been started will continue. These can accumulate over time and slow down your computer.
You can fix this issue by shutting down your PC each day once you have finished using it, by clicking on the Windows button and selecting the 'Power' button.
Make sure to close any running programs and save your work before you do so. If your PC has slowed down to the extent that you can't display the Windows menu, manually hold down the Power button until the computer is fully powered off.
2. Update, Update, Update
Microsoft continually releases updates for Windows 10 which are designed to fix common bugs that reduce system performance. Some of these are fairly minor whereas others make significant changes to your system, maximising efficiency.
If machine performance is lagging, open the Windows menu and type 'Update' in the search bar and click 'Check for Updates' to access your settings.
If a major update is available, then make sure to save and back up your personal data before continuing. Your PC may need to restart several times to apply all available updates. If it's been a while since your last update, make sure to click 'Check for Updates' again after restarting to make sure no more are available.
3. Check startup apps
PCs can become bogged down by the sheer number of running processes. This is often because many installers will instruct Windows to run their programs immediately after you log in, slowing down system speed.
To check your startup programs, open Task Manager (Ctrl + Alt + Del), then click the 'Startup' tab. Pay close attention to the 'Startup Impact' values for each program e.g. 'High' as this is a good way to spot apps that are likely to slow your system down.
To prevent a program from launching on login just right-click and choose 'Disable'.
4. Run Disk Cleanup
Disk Cleanup is an extraordinarily built-in Windows utility. You can use it to clear out temporary files which accumulate on your machine, such as image thumbnails, downloaded program files and offline webpages.
Click the Windows menu and type 'Disk Cleanup' in the search bar to get started. The utility will offer you a choice of files to remove. Simply mark the check box next to each option. Click 'Clean up system Files' to begin. Disk Cleanup will calculate the amount of space you will save.
This is also a good opportunity to delete any files on your hard drive which you no longer need. An easy place to start is your 'Downloads' folder.
5. Remove unused software
Many PC vendors ship their machines with bundled third party software, which due to its large size and unnecessary nature is sometimes referred to as 'Bloatware'. Many computer users also install software for a specific purpose and never use it again e.g. designing a newsletter.
Redundant programs take up space on your hard drive and can reduce performance. To check your installed apps go to 'Control Panel'>'Programs'>'Programs and Features'>'Uninstall a Program'.
Right-click on any programs you no longer need and select 'Uninstall'. Windows 10 will ask for permission to make changes to your system. Click 'Yes' to continue.
6. Disable special effects
Windows 10 is rather heavy on the special effects side. By default Windows and other features are programmed to fade in and fade out of view. Other resource-intensive but unnecessary features include translucency and animations.
To take your PC back to basics, open the Windows menu and search for 'System', then go to 'Advanced Settings' tab and select 'Performance Settings'.
Under the 'Visual Effects' tab, click the radio button for 'Custom'. From here, you can uncheck the tick boxes next to any visual affects you want to disable. Click 'Apply' to confirm your changes.
7. Disable transparency effects
Besides making heavy use of your system resources to display features like animation, Windows 10 also employs transparency effects for certain features such as the task menu. This seemingly light and simple effect is actually quite complicated to draw, as the system needs to calculate the same plane twice.
To disable transparency effects, open the Windows menu and type 'Make Start, taskbar and Action Center transparent'. This will pull up the 'Color' Settings. From here you can choose to switch off transparency.
You can also change the default app mode here between 'Light' and 'Dark'. This won't affect your system speed, but may make your Desktop easier on the eye.
8. Upgrade your RAM
Your PC's overall speed can be hugely improved by increasing the amount of virtual memory (RAM). Windows 10 requires a minimum of 4GB to run smoothly, although this does not take into account resource hungry applications such as video games.
The easiest solution to this is to install more RAM. Your PC has a certain number of RAM 'slots' into which you can insert chips. To determine the type of memory your machine uses, open Task Manager (Ctrl + Alt + Del), then click 'Performance'. The system will display any memory slots in use as well as the type use e.g. DDR4.
Installing new RAM chips is quite simple. If you do it yourself use an anti-static wrist strap to prevent damage to delicate components. Alternatively many PC repair stores will be happy to do the hardware upgrade for you, for a small fee.
9. Use an SSD

SSDs (Solid State Drives) use Flash memory, the same kind found in USB sticks. They allow for much faster access and writing times then traditional mechanical hard drives which use magnetized disks.
SSDs do cost much more per GB than regular hard drives, but if you're are willing to pay the cost, you'll notice a huge improvement in boot time, files access times and overall system responsiveness.
If you want to buy an SSD to install yourself make sure you have the correct size for your machine (2.5" for portable devices, 3,5" for desktop machines). You can use free software such a Clonezilla to copy content form your current hard disk to your new SSD. See our guide on how to clone your hared drive with Clonezilla.
10. Run System Maintenance
Windows 10 has a built-in utility which performs routine system maintenance tasks such as defragmenting the hard drive, scanning for updates, and checking for malware.
These tasks usually run in the background while your PC is idle but if you have noticed an issue with system performance you can run maintenance manually if you wish.
To get started, open Control Panel, select 'System and Security' then choose 'Security and Maintenance'. Click the arrow to expand the maintenance options.from here you can select 'Start Maintenance'. Close and save any open files before going ahead..
0 notes
Text
New Post has been published on Vin Zite
New Post has been published on https://vinzite.com/essential-computer-tips-you-should-learn-right-now-2/
Essential Computer Tips You Should Learn Right Now
Some essential computer tips that we should know to handle our PC
How to Lock Personal Computer with Just Single Click?
Instead of pressing “CTRL+ALT+DEL” or “Windows + L” keys to Lock Down your computer you can create an icon on your Computer desktop, with the help of this icon you can lock down your computer in single click. To create the icon:
1- Right click on free space of desktop then hover your cursor on NEW and then select SHORTCUT
2- A window/Dialogue Box named: Create Shortcut will appear on your computer screen
3- Now type given phrase in the blank space of dialogue box
Rundll 32 user32 dll, Lock Work Station And Press Next.
4- As soon as you will press Next Button, a new window will appear and here you will see “Type a name for this shortcut”. Here you can have a name for this short-cut of your choice, I.e. Lock Computer or Log off etc.
5- Now press Finish and you will have a Short-cut icon on your desktop.
How to see your most important file on top of the other files in Windows Explorer?
If you want to see your most important file in any folder or Windows Explorer on top of the other files, so that it will be convenient and time saving for you. For that you just need to follow a simple trick:
1 – Go to the folder where you want your file should be top of the other files
2 – Right click any free space in folder and arrange these files “Sort by Type”
3 – Now click on any file of your choice then press F2 to rename the file and at the start of the name of file insert an Underscore ” _” I.e. New Document.docx to _New Document.docx.
How to Shut Down Computer Friskily?
When you shut down your computer or laptop, many programs remain in Running Process and they are not completely closed. That’s why Computers and Laptop take too much time to shut down. To resolve this problem I am going to share a very useful tip with you.
1- Open Notepad
2- Write these three words “Shutdown inn text” in notepad and save it as Shutdown.reg
3- Now go to the location where you have saved this file and double click on this file.
4- Import the file
(Your computer will shut down faster than before)
How to Create a File or Folder without any Name?
1- First of all select the file or folder which you want to remove its name.
2- Press F2, then Press and Hold ALT Key and then press 0160. Press Enter
3- Your file or folder will now be un-named…
How to clean program files with Run menu?
When you write any command in Run menu, few of past commands remain save in Run Menu drop down list. Furthermore the lists of programs which are currently running also remain in Run Menu. If you want to remove these lists from Run Menu then use this small yet powerful tip.
Open Run and type “REGEDIT”
In Registry Editor select this Registry Key “HKEY_CURRENT_USER” from left side panel.
Now go to “Software > Microsoft > Windows > CurrentVersion > Explorer > RUN MRU”
In RUN MRU Folder every last used information are saved. After clicking on RUN MRU folder there will be shown some values on right hand side window. Except “Default” file delete every file from this folder.
In this step restart your computer, now when you will see your RUN Menu drop down list, it will be emptied.
How to hide shared folders from Network?
To hide shared folders from your network location, simply add a “$” sign in the end of every folder name. By doing this your shared folders will be hidden from all users. Except those who know the correct location of that folder.
How to change the ownership of Windows?
If in case while installing fresh windows on your system, you have unconsciously entered some wrong information regarding ownership, you do not need to worry about it. Because you can alter these information anytime, you just need to have a bit knowledge about Windows Registry.
Go to Registry Editor “Run > Regedit” and search the Registry Key.
HKEY_LOCAL_MACHINE > Software > Microsoft >WindowsNT > Current > Version
From right side panel find a file named “Owner” double click this file and change the values as per your need.
Close the registry editor and restart your computer. Done
How to find properties of any file or folder quickly?
If you want to know the properties of any file or folder quickly then select the file and press “ALT + Enter”, the properties will rapidly be shown. It’s a better and quick to get property information then the mouse.
0 notes