#...I should probably find a vector art program instead of using ProCreate
Explore tagged Tumblr posts
Visit Tumblr Blog
Explore Tumblr blogs with no restrictions, modern design and the best experience.
Last Seen Tumblr Blogs


Fun Fact
Tumblr has been providing a Korean-language service since 2013.
Text
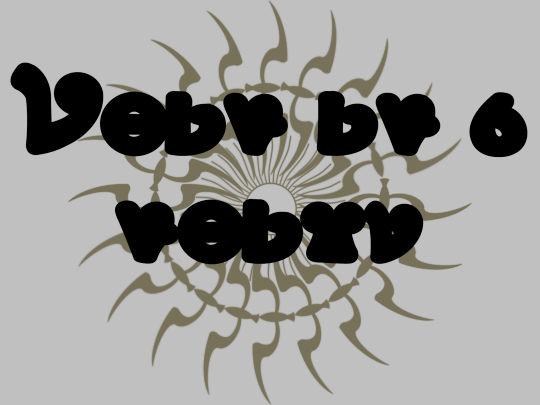
Month 3, day 18
Working on cleanup for the shirt design! Blocked out the letters with their background shapes and color so all the lines are nice and crisp and go where I want them to 🥰
#the great artscapade of 2024#art#my art#my design#graphic design#Forspoken#forspoken spoilers#Forspoken fan art#athia#athian#athian font#athian script#in tanta we trust#itwt#Forspoken Susurrus#Thalia Solarius#the hard part is gonna be the birb sunburst in the background#so naturally I save that for last#like a dingbat lol#...I should probably find a vector art program instead of using ProCreate#don't get me wrong ProCreate is FANTASTIC#but it's not really designed for subtle rotations applied to a shape several times in a row#it's how the blurring on the Sus birds happened#you can actually see each progressive stage of rotation in how blury they get as you go along#... anyway yeah woo hoo art!
2 notes
·
View notes
Text
Meet The Artists – Beugism

Alexander Beuge or ‘Beugism’, is one of the most recent artists to join The Artworks! Based in East London, Beugism is a digital Illustrator with a love for character, colour and humour. He has worked with clients such as The Guardian, The Times, The Independent, BBC, Visa, Facebook, Red Bull and Nobrow Press.
We had a chance to chat to Beugism and find out more about his life as an Artworks artist…
Where do you live?
I currently live in St John’s Wood, that’s close to Baker Street.
Where is your studio located?
My studio is located on the top floor of a cinema near Hackney Central station.
Can you describe your creative process?
I used to draw everything by hand, using french curves and Rotring architectural pens which had the smallest nib ever. The disadvantage of that was that I had to scan portions of my artwork and piece it together again afterward in Photoshop. Today I do all my sketching on an iPad Pro using Procreate as my go-to drawing app. Most of the time I’ll do an initial sketch, lower its opacity and draw a final draft on a separate layer. In order to vectorize my designs, I’ll place the image into Adobe Illustrator and draw the Bezier curves on top of it. If the timeline of the project allows for it, I’ll add some texture to my illustrations in Photoshop.
What does a typical working day look like?
I usually think about what I am going to work on that day during my morning walk which leads me past Regent’s Canal and through Regent’s Park. It’s a win-win situation, I walk my 10,000 steps that are recommended by the NHS and at the same time I get some headspace as an added bonus. With a bit of luck, you can occasionally even spot Stephen Fry doing the same walk in the early hours. A lot of the time commuters will pass me by either jogging or cycling to work. That’s when I feel lucky to be able to work remotely and do something creative for a living. After returning from my walk I shower and have breakfast, not at the same time though. I’ll pack my laptop and iPad into my backpack alongside provisions for the day. I commute to my studio in Hackney from St John’s Wood. There are about four different routes I can take to the studio, I like to keep things interesting for myself. Once I am at the studio, typically around noon I’ll answer emails and do admin stuff like researching art directors and updating spreadsheets. At 2pm I’ll start sketching or vectorizing. I have never been a morning person and I can’t do any creative work in the mornings. I recently read Daniel H. Pink’s book ‘When’. According to his findings, my chronotype is a dolphin, which means that my productivity peaks in the late afternoon. I work in green tea infused sessions of 25 minutes so I don’t tire myself out too soon. I’ll typically stay in the studio until 8pm to 9pm.
Do you listen to music or the radio whilst you work? If so, what’s on your playlist?
Most of the time I am listening to my ‘Gym playlist’ on Spotify. It has a lot of Vocal House, which helps me ease into the workflow as it’s quite upbeat. It’s a bit cliché because there is this stereotype of how German people only listen to electronic music. When I am bored of that I’ll switch to an interesting podcast or listen to an audiobook.
How long have you been with the Artworks for?
I have been with The Artworks for one year.
What drew you to Artworks?
The Artworks have been on my radar for a while. What I like about them is that compared to other bigger agencies their roster is quite small ensuring each artist gets the attention they deserve. I met Steph, one of The Artworks’ agents at a portfolio review back in 2018. To me, she seemed very confident and I remember thinking ‘ If anybody can negotiate a good deal on my behalf, it’s definitely her!’. What books or programs did you love as a child? Have they influenced your work in any way?
When I was a child I loved watching a TV program called ‘Der Sandmann’ (The Sandman). The program was aired at 6pm every day and showed good night stories for kids using stop motion animation. At the time this program was the coolest thing I could think of and I would always try to work out how they made the characters move.
If you weren’t an artist, what would you be instead?
When I was little I always wanted to be a horse. So if the illustration thing hadn’t worked out I would maybe work on an interesting movie set somewhere as a stunt horse.
What was the most important lesson you learned at Art School, if you went!
I have studied at several universities in Berlin, Bilbao, Warsaw, and London. Each university would have its own methods and claim to possess the holy grail of how one should draw. After graduating from Central Saint Martins I realised that you don’t actually need to study to become an illustrator. All it takes is drive and perseverance.
What inspires you the most to create?
In one word, people. I am a keen observer of my surroundings and love watching how people interact with each other, the things they do and the way they dress. My illustration practice is all about characters and what would be a better place to be than London which is home to so many interesting characters.
Name three artists that you admire.
Olaf Hajek (German illustrator), Neo Rauch (German painter), John Singer Sargent (American painter) What kind of commissions do you enjoy the most?
My favourite commissions are the ones where the art director is open to ideas and lets me bring in my sense of humour into the project.
What would your dream commission be?
It would be amazing to be commissioned to paint a mural in my style for every stop of the London Central line. It would probably take me a lifetime to finish the project but millions of people would get to see my illustrations.
Do you have any pets? If so, what and what are they called?
When I was younger I had a little blue budgie called ‘Bubi’. He loved sitting on my head when I was drawing. He also loved chewing away at my books and leaving his droppings on top of them. One day I stupidly left the window open and Bubi was never to be seen again. I’d like to think that he joined the parakeets in Hyde Park. What 5 things could you not live without?
My girlfriend, my family, green tea, my iPad and emojis. What is your very favourite meal?
It is really hard to choose just one dish because there is so much delicious food out there but if I had to choose one meal to eat for the rest of my life, it would be ‘Ghormeh Sabzi’. It is an Iranian herb stew that doesn’t look very appealing but tastes amazing. What do you like to do in your spare time?
I am very fond of martial arts, sketching people, cycling, eating out and traveling, I also love learning new languages (which is a really good way of doing something useful during your commute). What is your current dream travel destination?
My current dream destination would definitely be Japan. In many ways, it’s exactly like Germany and in so many ways it’s the total opposite. I used to practice ninjutsu when I was a teenager and it would be amazing to visit one of the ancient martial arts schools in Japan.
See more of Beugism’s work here.


#illustration#art#illustrator#design#alex beuge#beugism#political illustration#meettheartist#meet the artist#meet the maker#the artworks#illustration agency
0 notes