#0.96 oled arduino
Explore tagged Tumblr posts
Visit Tumblr Blog
Explore Tumblr blogs with no restrictions, modern design and the best experience.
Last Seen Tumblr Blogs


Fun Fact
1,644 Tumblr posts in 1 second.
Text
How to Use AHT10 High Precision Digital Temperature & Humidity Sensor with Arduino
Looking to measure temperature and humidity with high accuracy using Arduino? The AHT10 sensor is a compact, I2C-based module that provides reliable data, making it perfect for IoT projects, weather stations, and smart home automation.
What You’ll Learn: ✔️ How the AHT10 sensor works ✔️ Wiring it to an Arduino board ✔️ Writing & uploading the code to get readings ✔️ Tips for stable and accurate measurements
What You Need:
AHT10 Temperature and Humidity Sensor Module
Arduino Nano
0.96 inch SSD1306 OLED Display (128x64, I2C)
Breadboard
Connecting/Jumper Wires
Arduino Nano Cable
Download the Code & Library Arduino AHT10 Temperature and Humidity Sensor Module
Watch the full tutorial on YouTube:
youtube
Follow for more DIY electronics tutorials & Arduino projects!
3 notes
·
View notes
Text
Arduino Hands-on — 0.96-inch OLED Display
Experiment: 0.96 inch I2C IIC Communication 128*64 Display OLED LCD Screen Module
OLED, short for Organic Light-Emitting Diode, is also known as Organic Electroluminescence Display. It belongs to a kind of current-driven organic light-emitting device, in which light emission is achieved through the injection and recombination of charge carriers, with the intensity of light emission directly proportional to the injected current. Under the influence of an electric field, holes generated at the anode and electrons produced at the cathode move towards the hole transport layer and electron transport layer respectively, to finally reach the light-emitting layer. Upon meeting in the light-emitting layer, they form excitons that excite light-emitting molecules to emit visible light. Generally speaking, OLED can be divided into two categories based on the emissive materials: small molecule OLED and polymer OLED (also known as PLED). OLED is a device that utilizes multi-layer organic thin films to achieve electroluminescence, making it easy to fabricate with low driving voltages. These characteristics make OLED particularly outstanding for flat panel display applications. OLED displays are thinner and lighter compared to LCDs, with higher brightness, lower power consumption, faster response time, superior clarity, good flexibility, high luminous efficiency, meeting consumers' new demands for display technology. With more and more display manufacturers worldwide investing in research and development, the industrialization process of OLED has been significantly accelerated.
Characteristics of OLED
(1) Low power consumption - Compared to LCDs, OLEDs do not require a backlight source, which is a relatively energy-consuming part in LCDs, making OLEDs more energy-efficient. For example, a 24-inch AMOLED module consumes only 440mW, while a 24-inch polysilicon LCD module reaches 605mW.
(2) Fast response time - OLED technology has a fast response time compared to other technologies, with response times reaching the microsecond level. The higher response speed better achieves motion images. According to relevant data analysis, its response speed is approximately 1000 times faster than that of liquid crystal displays.
(3) Wide viewing angles - Compared to other displays, OLED screens do not exhibit distortion over a large viewing angle range due to their active light emission. The vertical and horizontal viewing angles exceed 170 degrees.
(4) High-resolution display capability - Most high-resolution OLED displays use active matrix organic light-emitting diode (AMOLED) technology, which can absorb up to 260,000 true colors of high resolution. With the advancement of science and technology, OLED resolutions are expected to increase further in the future.
(5) Wide temperature characteristics - Unlike LCDs, OLEDs can operate over a wide temperature range. According to technical analysis, OLEDs can function normally within a temperature range of -40 degrees Celsius to 80 degrees Celsius. This reduces geographical limitations, allowing for normal use even in extremely cold regions.
(6) OLED enables flexible screens - OLED technology can be produced on various flexible substrate materials such as plastic and resin. By depositing or coating organic layers on flexible substrates, OLEDs can achieve flexible screens.
(7) Lighter weight of OLED finished products - Compared to other products, OLEDs have a smaller footprint and thickness than LCDs. They have a higher resistance coefficient, able to withstand greater accelerations, vibrations, and harsh environments.
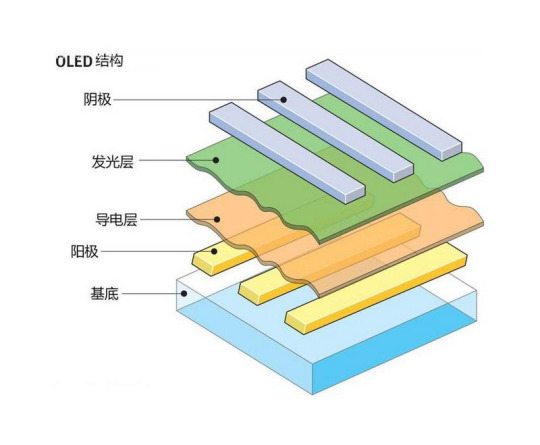
OLED Structure
The structure of an OLED consists of various components including the substrate, cathode, anode, hole injection layer (HIL), electron injection layer (EIL), hole transport layer (HTL), electron transport layer (ETL), electron blocking layer (EBL), hole blocking layer (HBL), and emissive layer (EML). The substrate serves as the foundation of the entire device, with all functional layers needing to be deposited onto it; typically, glass is used as the substrate material for the device, but if flexible OLED devices are required, other materials such as plastic may be used. The anode is connected to the positive terminal of the external driving voltage applied to the device, where the holes within the anode move towards the emissive layer within the device under the influence of the driving voltage. The anode needs to have a certain degree of transparency when the device is in operation, allowing light emitted from within the device to be observed externally; the most commonly used material for the anode is ITO. The hole injection layer modifies the anode of the device and facilitates the smooth injection of holes from the anode into the hole transport layer; the hole transport layer is responsible for transporting holes to the emissive layer. The electron blocking layer prevents electrons from the cathode from entering the emissive layer interface of the device, increasing the concentration of electrons at the emissive layer interface. The emissive layer is where the recombination of electrons and holes occurs to form excitons which then emit light. The hole blocking layer blocks the holes from the anode at the interface of the emissive layer in order to enhance the probability of electron-hole recombination at the emissive layer interface, thereby increasing the device's luminous efficiency. The electron transport layer is responsible for transporting electrons from the cathode to the emissive layer of the device; the electron injection layer functions to modify the cathode and transfer electrons to the electron transport layer. Electrons within the cathode move towards the device's emissive layer under the driving force of the external driving voltage, where they recombine with holes from the anode at the emissive layer.
Principle of Luminescence
The luminescent process of OLED devices can be divided into: injection of electrons and holes, transmission of electrons and holes, recombination of electrons and holes, and exciton excitation light emission. Specifically:
(1) Injection of electrons and holes. Electrons in the cathode and holes in the anode will move towards the light-emitting layer of the device under the driving voltage. In the process of moving towards the light-emitting layer, if the device contains an electron injection layer and a hole injection layer, electrons and holes first need to overcome the energy barrier between the cathode and the electron injection layer, as well as between the anode and the hole injection layer, and then move through the electron injection layer and hole injection layer to the electron transport layer and hole transport layer of the device; the electron injection layer and hole injection layer can increase the efficiency and lifespan of the device. The mechanism of electron injection in OLED devices is still under continuous research, and currently, the most commonly used mechanisms are tunneling effect and interface dipole mechanism.
(2) Transmission of electrons and holes. Under the driving voltage, electrons from the cathode and holes from the anode will respectively move to the electron transport layer and hole transport layer of the device. The electron transport layer and hole transport layer will then move electrons and holes to the interface of the light-emitting layer of the device; at the same time, the electron transport layer and hole transport layer will block the holes from the anode and electrons from the cathode at the interface of the light-emitting layer, allowing electrons and holes to accumulate at the interface of the light-emitting layer.
(3) Recombination of electrons and holes. When a certain number of electrons and holes at the interface of the light-emitting layer of the device are reached, electrons and holes will recombine to form excitons in the light-emitting layer.
(4) Light emission due to exciton de-excitation. Excitons generated in the light-emitting layer will activate the organic molecules in the light-emitting layer of the device, causing the outermost electrons of the organic molecules to transition from the ground state to the excited state. Since the electrons in the excited state are highly unstable, they will transition back to the ground state, releasing energy in the form of light during the transition, thereby achieving device illumination.
Comparison between OLED and LED/LCD
Compared to the crystal layer of LED or LCD, the organic plastic layer of OLED is thinner, lighter, and more flexible.
The light-emitting layer of OLED is relatively light, allowing for the use of flexible materials in its base layer, rather than rigid materials. While OLED's base layer is made of plastic, LED and LCD use glass substrates.
OLED is brighter than LED. The organic layer of OLED is much thinner than the corresponding inorganic crystal layer in LED, allowing OLED's conductive and emitting layers to be multi-layered. Additionally, LED and LCD require glass as support, which absorbs some light. OLED, on the other hand, does not need to use glass.
OLED does not require a backlight system like LCD. LCD selectively blocks certain backlight areas to display images, while OLED emits light by itself. Due to not needing a backlight system, OLED consumes less power compared to LCD (where most of the power consumption is for the backlight system). This is particularly important for battery-powered devices such as mobile phones.
OLED is easier to manufacture and can be made in larger sizes. Being made of plastic material, OLED can be manufactured into large thin sheets. In contrast, it would be much more challenging to use so many crystals and lay them flat.
OLED has a wide viewing angle, reaching around 170 degrees. LCD needs to block light when operating, leading to natural viewing obstacles at certain angles. As OLED emits light by itself, the viewing range is also much wider.
0.96 inch I2C IIC Communication 12864 Display OLED LCD Screen Module
Voltage: 3V~5V DC
Operating Temperature: -30℃~70℃
Duty Duty: 1/64 duty
High Resolution: 128 64
Panel Size: 26.70 19.26 1.85 mm / 1.03 0.76 0.07 inches (approx.)
Effective Area: 21.74 11.2 mm / 0.86 0.44 inches (approx.)
Driver IC: SSD1306
128 * 64 LED display module, supporting various control chips.
Fully compatible with 51 series, MSP430 series, STM32/2, CSR IC, etc.
Ultra-low power consumption: 0.08W when the full screen is lit.
Super high brightness and adjustable contrast
With embedded driver/controller
Interface Type: IIC


1 note
·
View note
Video
instagram
Here is a thread coil winding machine, using arduino and 3D printed parts. The GUI Is a 0.96 OLED display and the user is a rotary encoder knob. A Photoelectric Speed Sensor is used the measure the length of thread. The machine has two modes of operation. The 1st is manual mode in which thread starts to wind on coil until stop is not pressed. The 2nd mode, Auto mode, the machine will wind the thread as per the user predefined length. This Machine was built using custom PCBs from @jlcpcb Check out my story for a link to the full video as well as the code and circuit diagram! - - - - - #pcbs #jlcpcb #arduino #diyelectronics #diyprojects #threads #diyelectronics #stem #stemeducation #stemforkids #3dprinting #sensor #oled #electronics #3dprint #coding #programming #arduinoproject #tech #electronicslovers #diyvideo #maker #makerspace #makersmovement #microcontroller (at Busan, South Korea) https://www.instagram.com/p/B3eqGFnDkg3/?igshid=56bs4q5rp7ob
#pcbs#jlcpcb#arduino#diyelectronics#diyprojects#threads#stem#stemeducation#stemforkids#3dprinting#sensor#oled#electronics#3dprint#coding#programming#arduinoproject#tech#electronicslovers#diyvideo#maker#makerspace#makersmovement#microcontroller
3 notes
·
View notes
Text
Desktop Weather Monitor Leaves Nothing to Chance
[Mirko Pavleski] has put together a little weather station for himself that combines Internet-sourced forecasts with physical sensor data to give him a complete view of his local conditions. There’s no shortage of weather applications for our smartphones and computers that will show us the current local conditions and the forecast for the next couple of days. It’s so easy to pull weather data from the various APIs out there that you even see the functionality “baked in” to different gadgets these days. Of course, you can dig through every weather API in the world and not find the temperature and humidity inside your office; for that, you need your own sensors.
[Mirko] took a somewhat unconventional approach by essentially building two totally separate weather devices and packing them into one enclosure, which gives the final device a rather unique look thanks to the contrasting display technologies used.
Local conditions are detected by an Arduino Nano connected to a BMP180 sensor and displayed on a Nokia 5110 LCD. The screen shows not only real-time temperature and barometric pressure, but the change in pressure over the last several hours. The three-day forecast, on the other hand, is provided by a NodeMCU ESP8266 development board connected to the increasingly ubiquitous 0.96 inch OLED.
If you’re not into the whole duality thing and would rather do it all on the same device, you might be interested in one of the ESP8266 weather monitors we’ve seen in the past.
Desktop Weather Monitor Leaves Nothing to Chance was originally published on PlanetArduino
1 note
·
View note
Link
Adeept 4pcs 0.96 inch OLED Module Display Board Compatible with Arduino Raspberry Pi Application: These I2C serial
0 notes
Text
Invest in IoT Devices and Enjoy Their Amazing Quality
Buying the highest quality Arduino Data Logger Temperature is only a step away from you. Simply visit Norvi as it is a leading platform offering a wide range of products available at quite reasonable prices. Invest in Arduino Data Logger Temperature with confidence and be sure it is a great electronic device that can store a number of measurements.
Using a data logger allows people enjoy more accurate measurements.
They can be taken automatically and data logging will not be subject to human error.
Data loggers are needed for various reasons, especially for making sure compliance with industry specific regulations, as well as quality and environmental control procedures. Opt for this data logger and it will certainly help to save costs through energy efficiency/environmental management.
Other than real-time acquisition and pushing to an IoT platform, data loggers are one method of keeping track of values and analyzing. The industrial world is full of various types of data loggers and they are as follows. USB loggers which are used for Short-term trend logging with manual offload, Bluetooth (BLE) Loggers with Wireless data access via mobile devices, Web-based Systems with Long-range wireless internet access, as well as Wireless Sensors with Short-range centralized data collection.
Norvi is a top choice and this team is proud of working with the most outstanding enclosure manufacturers around the world, to provide you the best solutions for enclosing the product for protection. This company works based on the requirements of installation, and environments so that you will get the best product range such as:
NORVI Cema
Norvi IIOT
NORVI ENET
NORVI Arita
Agent 1
Agent 2
Expansion Modules
M11 E Series
M11 B Series
M12 B Series
M12 C Series
NORVI IIOT stands out due to many features:
ESP32-WROOM32 Module
Built-in 0.96 OLED Display
Built-in Button on front panel
Digital Inputs
Industrial Standard Analog Inputs
Relay Outputs
DIN-Rail mount
Supports Expansion port
NORVI ENET is another popular product offered by Norvi. Like NORVI IIOT, it also has its specific features:
ESP32-WROOM32 Module
W5500 Ethernet Connectivity
Built-in 0.96 OLED Display
Digital Inputs
Industrial Standard Analog Inputs
Relay Outputs
DIN-Rail mount
You can also get the needed technical support and have a successful project. Fast turn-around time is also guaranteed. The experts have ready to use products, which you can start your concept development on, while a device is being tailor made for you.
Norvi is a great destination where you can come across the highest quality data loggers and enjoy the best quality. All you need to visit the website and a wide range of products will be at your disposal. Look no further and choose Norvi because this is the most trustworthy source for buying affordable and the highest quality devices.
0 notes
Video
#Оригинальный #oled-#модуль #TZT 0,96 #дюйма, #последовательный #белый #...
#Электронные #компоненты #и #комплектующие #Electronic #components #and #components #Оригинальный #oled-#модуль #TZT 0,96 #дюйма, #��оследовательный #белый #OLED-#дисплей #IIC 128X64 #I2#C #SSD1306 12864 #стандарта #для #Arduino.#ИНТЕРНЕТ #МАГАЗИН #ONLINE #STORE https://www.youtube.com/channel/UCVnJieMS52vKlq7NADGt98A .Цена 98,50 руб.147,75 - 180,33 руб.Цвет:Желтый, синий,Белый,Синий,Желтый.Бесплатная доставка .#ССЫЛКА #НА #ВИДЕО #ТОВАР https://youtu.be/Ylu5i5JupL0 .#Ссылка #на #покупку #товара #и #на #пожизненный #кэшбек http://alii.pub/60huil ХАРАКТЕРИСТИКИ Название бренда : TZT,Происхождение : Китай,Режим отображения : 0,96 дюйма oled Black Board,Номер модели : 0.96 oled,Индивидуальное изготовление : Да,Тип : ГРАФИЧЕСКИЙ,Разрешение : 128 * 64,Функции : Электронный модуль,Диапазон применения : переключатель и датчик для Arduino STM,Минимальная единица измерения : 100000015,Продано В : sell_by_piece,Каждая упаковка : 1,Вес логистики : 0.001,Размер логистики - длина (см) : 1,Размер логистики - высота (см) : 1,Размер логистики - ширина (см) : 1 #Electronic #components #and #components #Electronic #components #and #components #Original #oled- #module #TZT 0.96 #inch, #serial #white #OLED- #display #IIC 128X64 #I2 #C #SSD1306 12864 #standard #for #Arduino. #INTERNET #STORE #ONLINE #STORE https ://www.youtube.com/channel/UCVnJieMS52vKlq7NADGt98A .Price $ 1.60 $ 1.75 - $ 2.80 Color: Yellow, Blue, White, Blue, Yellow Free Shipping. #LINK #TO #VIDEO #GOODS https://youtu.be/Ylu5i5JupL0 . #Link #to #purchase #of #goods #and #to #lifetime #cashback http://alii.pub/60huil SPECIFICATIONS Brand Name: TZT, Origin: China, Display Mode: 0.96 Inch oled Black Board, Model Number: 0.96 oled, Custom Made: Yes, Type: GRAPHIC, Resolution: 128 * 64, Functions: Electronic Module, Application Range: Switch and sensor for Arduino STM, Min Unit: 100000015, Sold To: sell_by_piece, Each Pack: 1, Logistics Weight: 0.001, Logistics Size - Length (cm): 1, Logistics Size - Height (cm): 1, Logistics Size - width (cm): 1
0 notes
Text
0.96 Inch IIC I2C Serial GND 128X64 OLED LCD LED Display Module SSD1306 for Arduino Kit
0.96 Inch IIC I2C Serial GND 128X64 OLED LCD LED Display Module SSD1306 for Arduino Kit

lastest_volume
0
Just For Today
Click Here To Visit The Shop
N€W 0.96 Inch IIC I2C Serial GND 128X64 OLED LCD LED Display Module SSD1306 for Arduino Kit
1 note
·
View note
Text
0.96 Inch IIC I2C Serial GND 128X64 OLED LCD LED Display Module SSD1306 for Arduino Kit
0.96 Inch IIC I2C Serial GND 128X64 OLED LCD LED Display Module SSD1306 for Arduino Kit

0.96 Inch IIC I2C Serial GND 128X64 OLED LCD LED Display Module SSD1306 for Arduino Kit
Price
4.23 Catch me HERE
0 notes
Text
0.96 Inch IIC I2C Serial GND 128X64 OLED LCD LED Display Module SSD1306 for Arduino Kit
0.96 Inch IIC I2C Serial GND 128X64 OLED LCD LED Display Module SSD1306 for Arduino Kit

lastest_volume
0
Just For Today
Click Here To Visit The Shop
N€W 0.96 Inch IIC I2C Serial GND 128X64 OLED LCD LED Display Module SSD1306 for Arduino Kit
0 notes
Link
Feature: OLED Driver IC: SSD1306Resolution: 128 x 64Visual Angle: >160°Input Voltage: 3.3V ~ 6VCompatible I/O Level: 3.3V, 5VMini Size: 2.7 x 2.8cmOnly Need 2 I/O Port to ControlFull ...
0 notes
Text
Send text messages over ham radio with the HamMessenger
Ham radio, or amateur radio, is a hobby enjoyed by millions of enthusiasts around the world. The FCC in the US and similar organizations in other countries provide amateur radio licenses that allow hobbyists to communicate on designated radio bands. Most ham radio operators communicate by voice, but ham radios can transmit other kinds of data. Dale Thomas built HamMessenger, which is a device that lets users send text messages through their ham radios.
If you remember the early days of the internet, you have heard for yourself that audio can carry digital data. Dial-up internet uses a modem to transmit that audio through standard phone lines. HamMessenger uses a similar methodology to encode a text message as audio. If someone listening on that frequency also has a HamMessenger device, they can decode the text message. Messages are not encrypted, so you shouldn’t use HamMessenger for sensitive information. But it’s a fun way to chat with your ham radio buddies.
HamMessenger contains two Arduino development boards. An Arduino Mega handles most of the functionality and a separate Pro Mini acts as a MicroAPRS modem. A Neo-6M GPS radio module lets you send position information along with your text messages. The HamMessenger’s custom PCB has a small 0.96″ OLED screen to display the messages. You input text via an M5Stack CardKB keyboard. Power comes from a pair of 18650 lithium-ion battery cells. The output from the HamMessenger device is an audio signal, which feeds into any ham radio — even a handheld model. Thomas plans to design an enclosure soon, but you can follow his instructions to put the rest of the hardware together right now.
The post Send text messages over ham radio with the HamMessenger appeared first on Arduino Blog.
Send text messages over ham radio with the HamMessenger was originally published on PlanetArduino
0 notes
Text
[N€W FULL] 0.96 inch oled IIC Serial White OLED Display Module 128X64 I2C SSD1306 12864 LCD Screen Board GND VDD SCK SDA for Arduino
[N€W FULL] 0.96 inch oled IIC Serial White OLED Display Module 128X64 I2C SSD1306 12864 LCD Screen Board GND VDD SCK SDA for Arduino
Just For Today get free read 60 days »
Only At My Best Shop Place : https://s.click.aliexpress.com/e/_A4tNaX
0.96 inch oled IIC Serial White OLED Display Module 128X64 I2C SSD1306 12864 LCD Screen Board GND VDD SCK SDA for Arduino

Description: 0.96 inch oled IIC Serial White OLED Display Module 128X64 I2C SSD1306 12864 LCD Screen Board GND VDD SCK SDA for Arduino
0 notes
Text
Robotik kodlama ve Arduino ile kullanılabilen LCD ve TFT ekranlar nelerdir?
Robotik kodlama ve Arduino ile kullanılabilen LCD ve TFT ekranlar nelerdir?
Robotik kodlama ve Arduino ile kullanılabilen LCD ve TFT ekranlar nelerdir? Robotik kodlamada hiç kuşkusuz ekranlardan da çıktı alırız. Termometre, dijital saat, mesafe bilgisi gibi verileri ekrana yazdırmak isteriz. Bunun için projemize uygun ekranlar seçebiliriz. 0.96 inch Oled Arduino TFT LCD Ekran Modülü Arduino SPI TFT Ekranı, 0.96 inç ekran boyutundadır. Ekran modu siyah IPS’dir. 8 pinli…

View On WordPress
0 notes
Text
BMP180 Pressure/Temperature/Altitude Sensor with 2.4" TFT LCD and Arduino
youtube
BMP180 Pressure/Temperature/Altitude Sensor with 2.4" TFT LCD and Arduino. ****************************************************************** If You Want To Purchase the Full Project or Software Code Mail Us: [email protected] Title Name Along With You-Tube Video Link Project Changes also Made according to Student Requirements http://svsembedded.com/ è https://www.svskits.in/ M1: +91 9491535690 è M2: +91 7842358459 ****************************************************************** 1. BMP 180 pressure sensor with 2.4 TFT LCD and Arduino UNO R3, 2. Arduino BMP180 Temperature and Pressure Sensor, 3. Interfacing Pressure Sensor BMP180 with Arduino Uno, 4. BMP 180 Barometric Pressure Sensor - PotentialLabs, 5. BMP180 Barometric Pressure Sensor Module Board for Digital , 6. BMP180 Barometric Sensor Arduino | Random Nerd Tutorials, 7. Using BMP180 Digital temperature and pressure Sensor with Arduino, 8. BMP 180 pressure sensor with 2.4 TFT LCD and Arduino MEGA2560 R3, 9. BMP180 Arduino Tutorial | Measure Pressure & Temperature, 10. BMP180 I2C Temp./Pressure sensor Interfacing in details | Arduino, 11. BMP180 Barometric Pressure/Temperature/Altitude Sensor Module – Arduino + LCD, 12. HOW TO SET UP THE BMP180 BAROMETRIC PRESSURE SENSOR ON AN ARDUINO, 13. Interface BMP180 Sensor with Arduino to measure Pressure & Temperature, 14. Weather Station: DHT11 Temperature and Humidity Sensor Arduino 2.4” TFT LCD Touch Shield - SPFD5408, 15. BMP180 Arduino Tutorial | Measure Altitude, Pressure & Temperature, 16. Display temperature from BMP180 as bargraph on LCD for Arduino, 17. BMP280 temperature and pressure sensor on an Arduino, 18. Pressure Sensor BMP180 Interfacing with Arduino Uno, 19. How to Build: Arduino Bmp180 Pressure Temperature Altitude Meter with OLED Display, 20. BMP180 pressure sensor Simulation Proteus, 21. BMP180 Arduino Tutorial | Measure Pressure & Temperature, 22. 15 Pressure Sensor (BMP180) with arduino on Proteous, 23. How to Build a Barometer with the BMP180 and an Arduino UNO, 24. Arduino Weather Station Project with BMP180 and DHT11 Sensors, 25. Arduino humidity sensors: testing and calibration, 26. Lesson 5 BMP180 Digital Barometric Pressure Sensor, 27. TFT Touch Shield Plotting ADC Graph, 28. 7Pin 0.96 inch SPI Serial white OLED Module, 29. OpenCR Arduino TFT Graph Test, 30. Easyelectronyx weather station with TFT shield and WIFI to thingspeak and plotting, 31. 2.4 TFT LCD weather station ILI9341, 32. Arduino mega2560 with 3.2" TFT 320X480, Menu and Symbols, 33. How to Interface BMP180 module with Esp8266 and send the data to IOTGuru.cloud, 34. Arduino 2.4? Touch Screen LCD Shield Tutorial - Arduino, 35. A-Z Guide to Arduino 2.4" Touch Screen LCD Shield Tutorial, 36. BME180 Temperature, Humidity and Pressure on Nextion, 37. 2.4'' tft lcd touch shield for arduino uno code, 38. 2.4'' tft lcd shield mcufriend, 39. 2.4'' tft lcd touch shield for arduino uno, 40. Arduino tft touch screen projects, 41. 2.4'' tft lcd shield arduino mega 2560, 42. 2.4'' tft lcd shield library, 43. how to connect tft lcd to arduino uno, 44. arduino touch screen button code, 45. arduino tft display
0 notes
Text
0.96 Inch IIC I2C Serial GND 128X64 OLED LCD LED Display Module SSD1306 for Arduino Kit
0.96 Inch IIC I2C Serial GND 128X64 OLED LCD LED Display Module SSD1306 for Arduino Kit

lastest_volume
0
Just For Today
Click Here To Visit The Shop
N€W 0.96 Inch IIC I2C Serial GND 128X64 OLED LCD LED Display Module SSD1306 for Arduino Kit
0 notes