#Adhesive Tape Printing Machine
Explore tagged Tumblr posts
Visit Tumblr Blog
Explore Tumblr blogs with no restrictions, modern design and the best experience.
Last Seen Tumblr Blogs


Fun Fact
Tumblr is available in 18 languages.
Text
here's some punk diy tips and ideas
[other than crusty pants and battle jacket, although we still love those greatly.]
why should you diy, when you can just find decorated items everywhere, you can ask. what if you are clumsy at painting or anything?
firstly, good questions. we diy so we don't give credit to the big companies who rule the world. we diy to get more independent from the system we dislike. we diy so to save money. to express uniqueness, recognize eachother and be recognized. and especially to have fun and feel cool. diy is not only about clothing, but anything you can set your mind on. of course, one cannot make EVERYTHING for themselves, there isn't enough time and energy. but making at least small steps are already a statement and more than nothing. also, helping small artists by buying their products is also pretty punk.
that being said, i provide you with some tips of mine, all gained from experience:
anything you drew/painted on, you will WANT TO protect. acrylic paint/markers + acrylic paint varnish/transparent nail polish/textile medium are your best friends. read after anything that's new to you.
i highly recommend working with old clothing or thrift shop finds when it comes to textiles, as it is environmentally friendly and you will stay in budget. Anyways, always make sure that the material you use isn't gonna be problematic. for example, if you want to do some patchwork, the material shouldn't decay easily (if it does, it will come off so quickly.). if you want to paint on it, it shouldn't be rugged.
you can not only draw/paint on your canvas shoes, but can also sew, embroidery (just make sure to use a thimble, plus floss instead of thread could make your work more durable), and add beads and trinkets to your shoelaces. in the case of shoes, never use glue (neither hot nor instant glue) – it will come off quickly. for some inspiration, i'll show you my shoes!
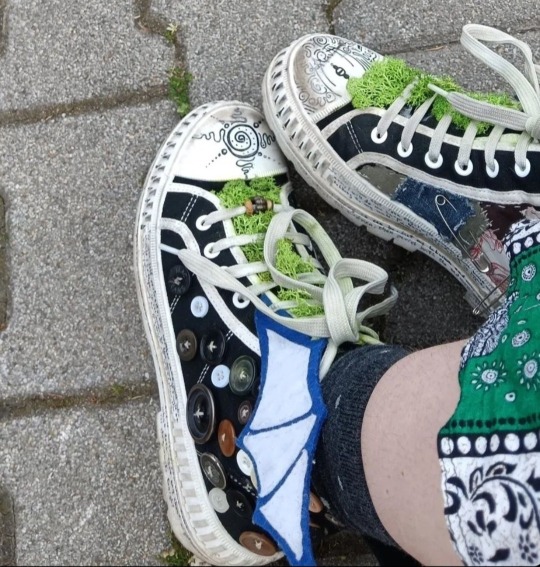
(the fake moss is literally unstoppable from falling off or getting dirty. risky idea.)
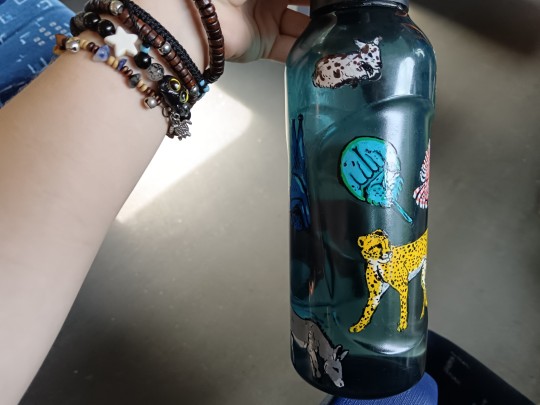
it's good to carry around water and food!! you don't even have to pay for decorative water bottles and food boxes, as you can draw on glass and plastic just fine with acrylic markers. just don't forget to paint transparent nail polish all over your drawing. in at least two layers. don't be lazy or laid-back. even posca comes off while washing the dishes. and you WANT TO save your reference pictures/final designs, as the case of emergency is likely. but after all, my water bottle is exactly fine after six months, with no accuring problem.
if your current best option to get stickers from is aliexpress or overpriced decor stores, search for local artists and shops on instagram and tiktok, as it may be their most efficent way of getting you to know them. if it seems like you have no chance, you may can still find a print shop with the option of printing on self-adhesive sheets (at least in hungary, those are pretty cheap). and if you want drawings to print out as stickers, you may use your own or –ONLY IF YOU GET PERMISSION– other artist's work. not only good for decorations for like, headphones, but for vandalism too. WAIT WAIT who said that. who said it. not me. no never
(in case that's also impossible, you can create stickers by printing out/drawing a picture, cover it up in transparent adhesive tape, and then put some two-sided adhesive tape on the white side of the pic. it won't be that durable, but it functions.)
if you want to bleach-paint clothing, get some plastic brushes!! any other brush dissolves. draw your design first with chalk!! never forget to put cardboard inside the clothing, and to wash the finished work in a washing machine before you'd put it on. prepare to be patient with the process. and it's not dangerous to touch 5%-9% household bleach, just wash your hands soon after.
if you want your crusty pants to last veryyy long, wax them. look up on youtube jeans waxing.
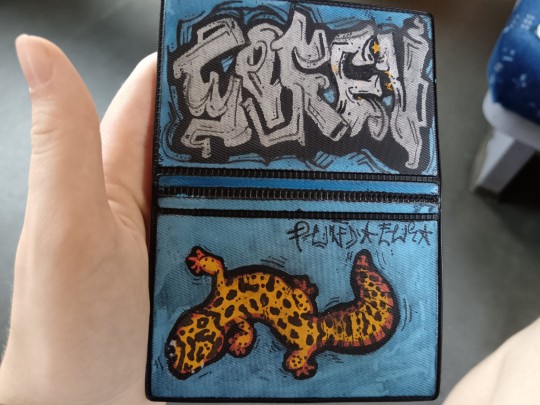
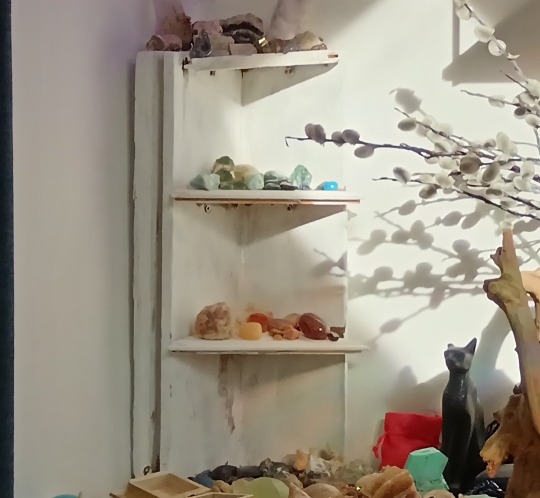
some more things i made for myself so to give you some inspiration: totebag with pockets, a small crystal holder cabinet, badges, and i decorated some t-shirts, button-ups, an id card case, phonecase, laptop.
theoretically speaking, there is nothing that an individual would be unable to learn how to make, when it comes to diy. you can't imagine how easy it is to bake bread at home. consuming-focused media makes people believe that it's hard to make anything. of course, everyone has to decide about their own priorities, i don't want to convince or change anyone in here. and if you have any questions, send an ask!! i hope i had been helpful.
#punk diy#tips#tutorial#clothes painting#do it yourself#bleaching#alternative clothing#soren's hoard of words#i hope you'll have fun with this#stay safe and drink water
219 notes
·
View notes
Note
Not a suggestion, more a question - how do you make your stickers? Your art inspired me to make stickers but I don’t know where to start!!
Ooh Tutorial Time! I have a small rundown of my process here. (I’ve got a video here, but I’ve had an update in my materials. Also this got a little away from me, I hope this helps and lemme know if there’s anything I need to elaborate on!)
--- Materials: Printer - Epson Ecotank 8500 Cutters - Silhouette Cameo 4s (I’ve got 2 at the moment) Paper - Zicoto Glossy Vinyl Laminates - Glossy and Holo Star Laminate (Both Self Adhesive) Misc Off Brand Sticker Cutter mats Ruler Squeegee with extra microfiber wrap Sports glove tack spray or sewing basting spray
Printer - Aim for a photographic printer at the minimum. General print quality, color variety, and paper handling will make sure your prints are the highest possible quality. They’re a little more expensive, but my last printer lasted 4 years with frequent weekly printing. The ecotank is nice, it’s more visual that the ink is actually disappearing than the pre-filled cartridges lol. Cutter - I’ve only used Silhouette, but I’ve heard to stay clear of Cricut due to general cut unreliability and lack of customer service assistance. I’ve also heard great things about the Siser Juliet cutter from mutuals. In order to use 2 machines at the same time, I had to purchase the Business license ( p sure it was a one time $50 purchase, but I can work twice as fast). If you want to cut by hand, check out what kind of ergonomic scissors you can find. Classic scissors over time can really screw up your hands, especially when you’re making fine cuts.
Printing and Sizing - The Silhouette Studio resizes your stickers without many issues with quality changes. This does kinda depend on the base size of your files. I always make my stickers on a canvas 3000x2000 pixels and 300 dpi. I wouldn’t go any lower than 100 dpi for print, and no larger than 500 dpi, but you can always test this out.
Paper - I enjoy the luster of the paper I linked above, there’s almost a pearlescent quality to it. If you’d like a different quality, I recommend still sticking with glossy vinyl for your paper. Laminates on matte sticker paper have had a lot of trapped air underneath for me and it tended to be more likely to bleed in contact with water despite being laminated.
Laminate - If you’re just doing paper finish stickers, you can skip this step :)
Laminate them to make them more water and scratch resistant. The laminates I’ve listed are all self adhesive. There are also heat adhesive laminates, which require a heat laminator. I haven’t experimented much with heated laminates. Mine are best rated for hand wash, though they can go through the dishwasher a few times. When laminating your sticker sheet, be sure to not cover your registration marks. When your cutter tries to read over them and the surface is really reflective, it can cause the machine to read improperly (and it’s worse with the holographics lol). Either precut your laminates like I do in the video I linked above, or you can use matte tape over your laminate to dull the sheen. If you accidentally cover your registration marks, the matte tape is a lifesaver. Self laminating takes some muscle memory to not get bubbles trapped under the laminate, but a wide squeegee and firm pressure helps make sure you get as few bubbles as possible. Mats - Your cutter will come with a few, but I find that my off-brand ones are just as good and less expensive. I prefer low-tack, but there comes a time when the tack is absolutely gone, and I have 10+ mats just sitting around. That’s where the Sports Glove spray or Sewing basting spray comes in! After washing them (soap and water, then dry for a few hours), I hit them with a few coats of spray. Right now I’m using Pow’r Tac Grip Spray. It’s just ok, but this leaves less residue on the back of my stickers than the Basting Spray I used to use. I retack every month or so, but that’s more bc I’d prefer the mats to be less sticky than risk ripping my backing sheets.
----
If there’s anything you’d still like to know, please let me know!!
#my art#tutorial#stickers#sticker making#art tutorial#my process#i'll never gatekeep lol#paleo party
15 notes
·
View notes
Text
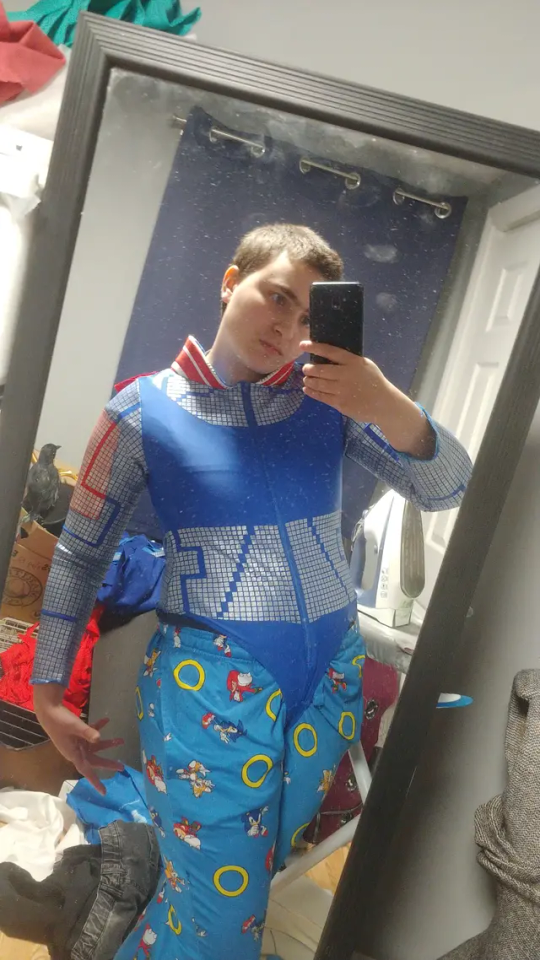
Have not been on here nearly as much as I used to-outside of my job I've been working very hard on my next cosplay build: Electra from starlight express
This is the most complex costume I've ever made, but I'm very pleased with what I have so far!
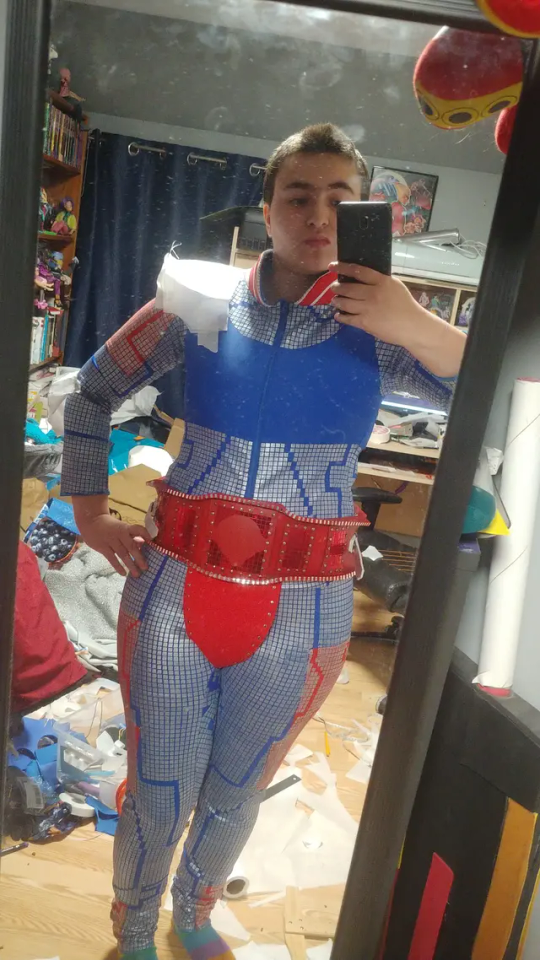
Still have a lot of ways left to go! But it's been extremely rewarding seeing things piece together so nicely
Write-up and WIP photos under cut
The very first thing I started with this costume was the bodysuit, it is the foundation that everything will sit upon so it should be out of the way first, and it would be easier to pattern my armour once I know how it will sit in relation to the rest of the costume
I also knew I would be wearing this to a convention and would want to have easy access for the washroom, so I actually turned a full bodysuit pattern into separate leggings and a leotard with a snap crotch closure
Did the leggings first-at first I wanted to be as accurate as possible with a silver chrome foil HTV that I cut on my Cricut machine with the circuit pattern cut out- but I found out after ironing that despite there being all these spaces between the squares that the fabric did not stretch enough to be able to fit(I had made mock-ups for my clothing pieces and those did fit correctly)
Red sections of clothing is turned edge applique done with water soluble stabilizer so it could stretch after throwing it in the wash

So after that didn't pan out I switched to a stretch HTV, just using the same design files, and widened the legs a bit, it helped a bit but the HTV not only did not stretch enough, but does not like the lycra I was using and in areas with the most stretch the squares were peeling and in some places even falling off
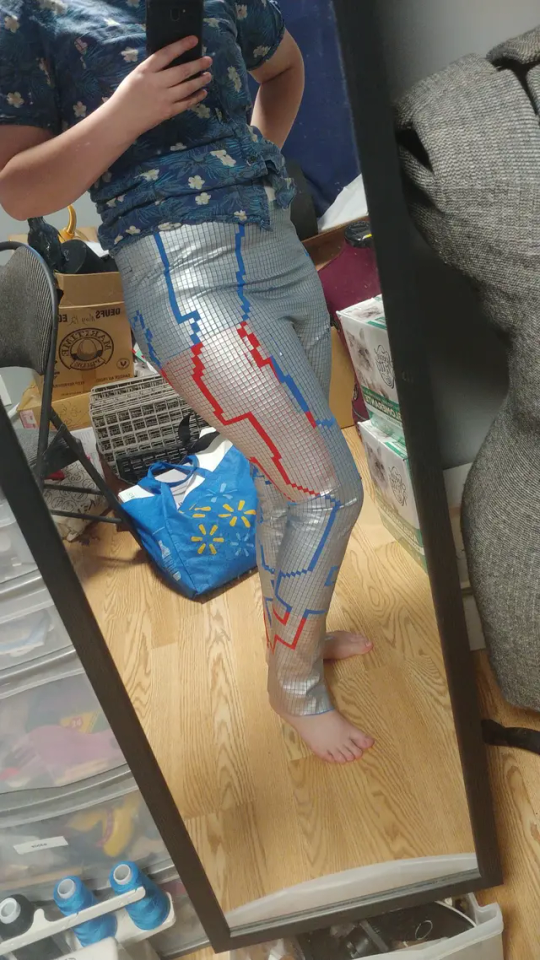
At this point I had spent almost an entire month on just my leggings-clearly I had to try something else because the HTV was just not going to work
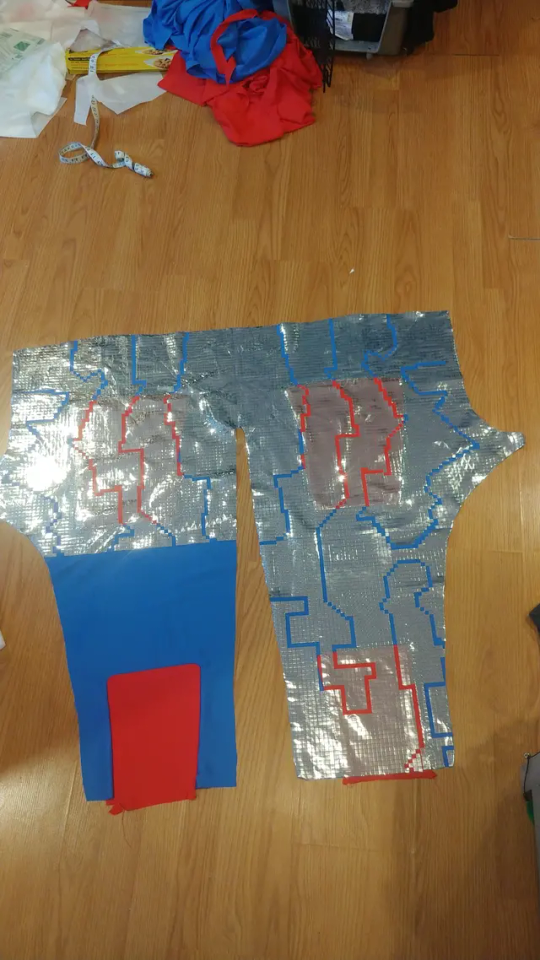
I got jacquard lumiere fabric paint in silver-it's okay if I could go back I'd probably just have gotten angelus leather paint I find it has much nicer stretch and softer feel
I also widened the spaces between my squares to give them a little more stretch, and cut just a full grid of adhesive vinyl to use as a stencil and kept the wider pants pattern from my second pair
I did have to mask off the circuit pattern this way but it came out very nicely and finally had a method that gave me a wearable garment
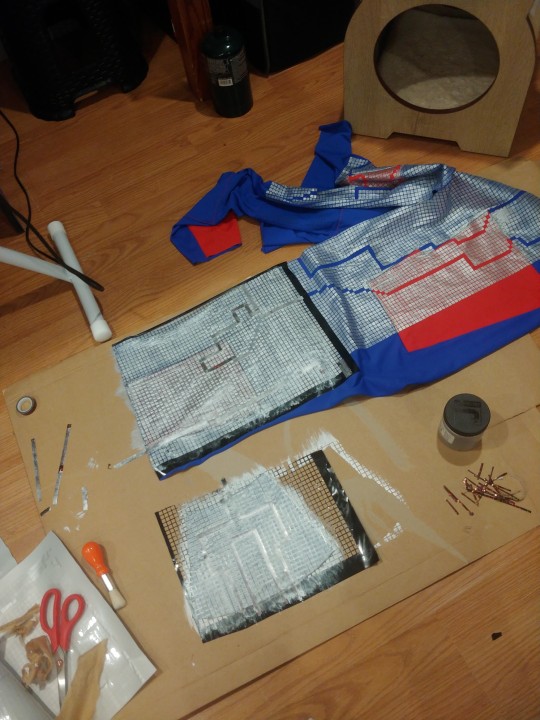
So I moved onto my leotard next with significantly less headaches- though my arms did not stretch enough after being painted but that was easily remedied with a gusset on the underarm
Collar is interfaced with flexfoam

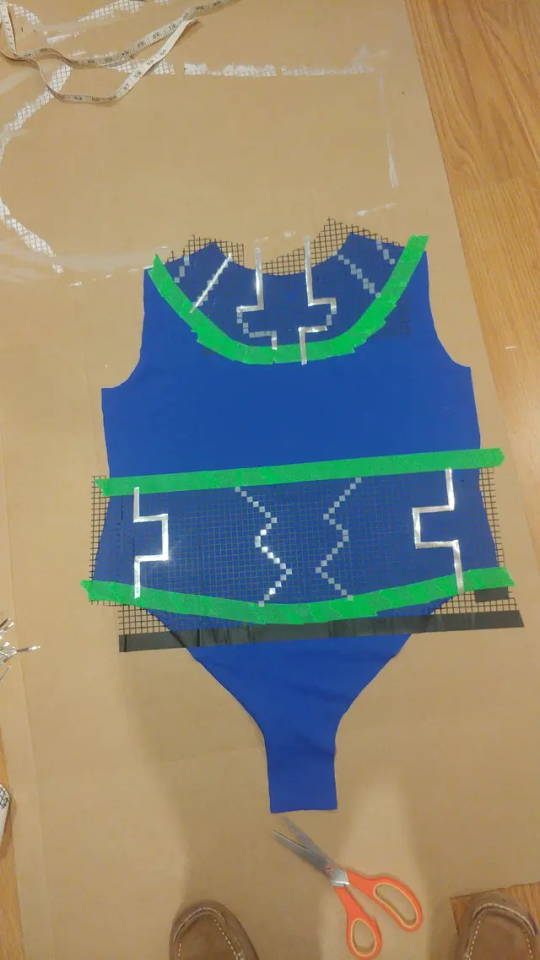
Since my thigh armour will attach to the belt that was next, honestly pretty easy, mostly rectangles, used real studs and then permanent vinyl for the red and silver bits
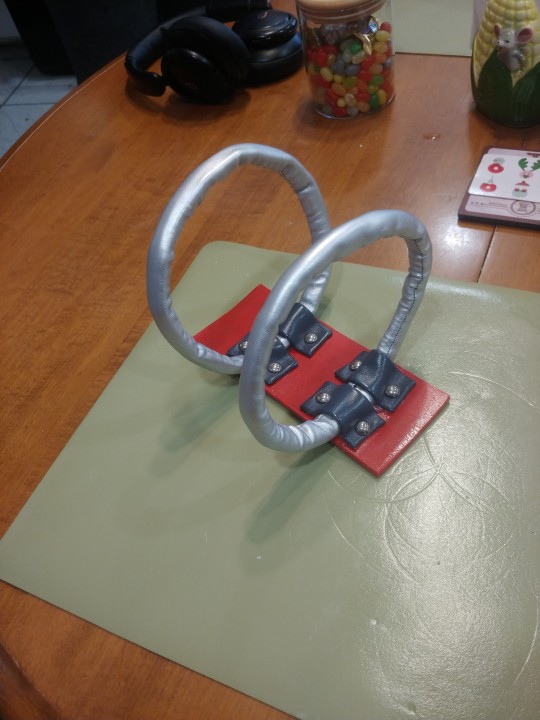
Couplers are flexfoam inside a tube of silver pleather, physical belting straps is a thick interfacing covered with the same silver, had to use grommets for the belt holes because it was very frayed when I punched them open
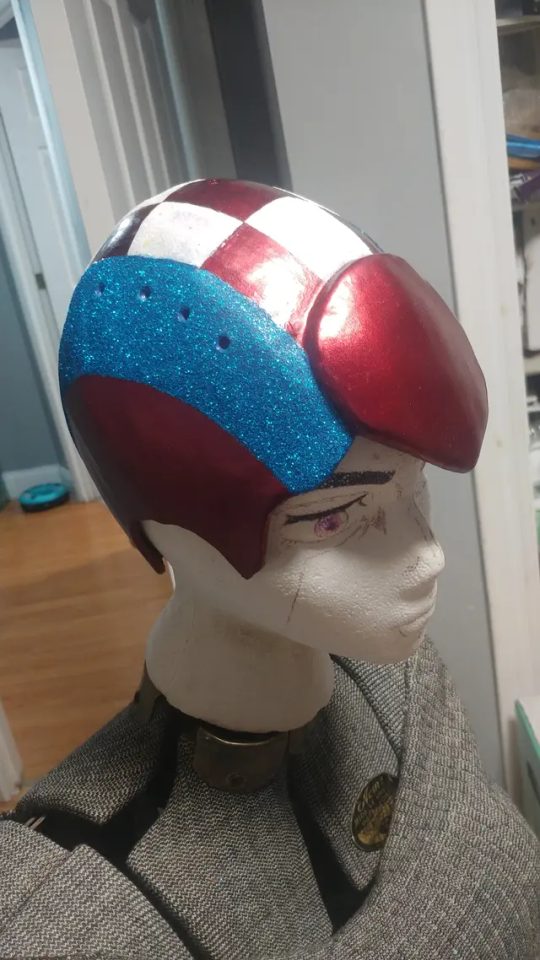
Tumblr mobile won't let me add more than 10 photos on mobile but for my helmet I duct tape patterned my head and then used 2mm foam covered in worbla, used wood filler and sanded that as much as I could, then covered in a few layers of flexbond and then wet sanded that
Painted with automotive paint to get those little silver flecks, and then painted the colour blocks and covered them with glitter
Still have to add the stripes and chinstrap, and going to be using magnet snaps to attach the Mohawk to the helmet
That's essentially what I have so far!
I 3D modeled the little arrow thing that goes on the front of the belt and elbows, my brother's going to 3D print them for me 🤭
Started foam patterning this week, my original goal was to have this done by November 7th(leaving for the con I'm taking them to) but again-i did have almost an entire month of setbacks so I'm going to try to not take it too hard if I don't
11 notes
·
View notes
Text
Specialist practice
Saddle Stitch Binding
Our first binding method is saddle stitch, which happens to be the easiest of all. Saddle stitching proves affordable and ideal for documents consisting of fewer pages. By stapling wire through the spine and folding printed sheets in half, a finished product takes shape. Alternatively, utilizing looped staples permits insertion into ring binders without requiring punched holes.
Side Staple Binding
The side staple technique is primarily employed to bind perforated pages, such as those found in quote books and delivery notes. The procedure involves stacking individual pages together before stapling them with wire through the front cover from front to back before trimming.
Singer Sewn & Side Sewn Binding
Singer-sewn binding is a sturdy technique employed for creating resilient materials such as passports. It employs an industrial sewing machine to stitch the pages together along the spine lengthwise. Additionally, side singer-sewn or side-sewn binding provides another option where pages are jointly fastened through both front and back covers, making it perfect for thicker books and notepads.
Padded/Pad Binding
The technique of pad binding, also known as "padding," is utilized primarily for notepads and enables the easy detachment of individual pages. A lower-strength adhesive coating is applied on the edge of a stack of pages to create these pads. To ensure stability and usability when held, a thicker board is generally affixed at the back end.
Wiro /Plastic Coil Binding
The two primary types of punched binding are wire and plastic coil binding, enabling books to open fully flat with the pages rotating 360 degrees towards the back. Firstly, printed pages are trimmed and then hole-punched before being fastened using a spiral coil or wire that is crimped shut.
Japanese / Stab Binding
Dating back centuries, Japanese or stab binding is a decorative technique where sheets are folded once at the center, hole-punched and sewn by hand along the spine using different needle and thread patterns.
Perfect binding
The process of perfect binding involves using machinery to bind softcover books, magazines and brochures. The technique entails stacking individual pages together before affixing them to an outer cover that sports a square spine. This is achieved by the application of potent polyurethane (PUR) glue which gives the method its name- Perfect Binding.
Burst Binding
Burst binding is essentially perfect binding with a unique twist whereby pages are grouped into sections, folded and then notched down the spine by machinery to achieve stronger adherence of glue. This results in an exceptionally robust finish that makes it particularly ideal for books containing a greater number of pages compared to standard bindings.
Quarter Binding
In the past, quarter-bound, half-bound or taped bindings were commonly used to produce books at a lower cost by employing inexpensive materials. These binding methods involve two distinct materials - one for covering the spine and another for protecting the cover. However, to enhance durability, pages are often bonded together and fastened on one side which results in reduced ease of opening compared with
Case Binding
The conventional hardcover book involves printing pages that are folded and stitched into multiple sections, safeguarded by a firm rigid cover. The covers may be coated with various materials like linen, buckram or leather; alternatively, a printed design can be affixed on top of the tough casing. Such casebound books have long-lasting durability and might even sustain restoration years down the road.
Pamphlet Stitch
A refined binding technique known as the pamphlet stitch is ideal for documents with a modest number of pages. After folding and hole-punching the printed sheets, one manually threads them together using needle and thread before tying them off at the book's center to finish it elegantly.
Exposed Spine Binding
Exposed spine binding, also known as exposed Smyth sewn or thread-bound, is an aesthetically appealing method of bookbinding. The pages are folded into sections and then hand-sewn together at the spine with a continuous thread. To reinforce durability, pad glue is applied to the spine after sewing it. Books bound in this manner open almost completely flatly for easy reading.
Chicago Screw Binding
The Chicago Screw technique involves utilizing metal screw posts for fastening pages, allowing flexibility in terms of adding or removing sheets. This makes it a desirable option for materials like menus and folios that undergo frequent revisions. Furthermore, an expandable hardcover can be customized with exterior, interior or concealed screws to fit any desired dimensions. Given its versatile nature, this binding process is particularly popular among property sales pitches as well as showcasing photographic portfolios.
Custom Boxes, Slipcases and Ring Binding
sophisticated storage solution that allows for showcasing your valuable materials and samples, custom boxes and slipcases are just the perfect fit. This type of binding is artistically crafted according to your precise specifications. Manual assembly entails utilizing top-quality board material before wrapping it with an array of premium fabrics including buckram, linen cloths as well as leather or printed laminated paper.
47 notes
·
View notes
Text
One thing I find hilarious about 3D printing
A pretty common problem in 3D printing is your print coming off the print bed duo to lack of bed adhesion, which ends up looking like this:

The hilarious part: Going over the print bed with regular old glue stick, is one of the best ways to prevent this. And you don't even need some special brand, the cheapest sticks you can find will probably work, and the glue is water-soluble.
It's just so funny that a problem with these highly sensitive machines, where half a millimeter can be the difference between a success or failure, can be solved... with glue sticks.
Like successfully fixing a nuclear reactor with duct-tape.
3 notes
·
View notes
Note
your custom cassettes are really really cool! ive been thinking about making custom cassettes for a bit, would you be willing to share what kind of paper you used for the label stickers and j-cards? also where do you get blank cassettes from? ive been looking at cassettecomeback but i was wondering if there was a better option.
Thanks a lot! They're really fun to make hehe
So full disclosure: I run a merch shop for my webcomic and I make most of my stuff myself in my studio. I've been doing this for the better part of ten years and over that time I've accumulated quite a bit of specialized, expensive equipment like the photo printer and cutting machine I use to make my cassette ephemera. THAT SAID mixtapes don't necessarily need all that!! Unless you're running a bootleg business on etsy or somethin I don't think you and your friends gotta run out and spend a ton of money to make these (beyond tracking down a deck and a player, obviously).
Unfortunately most of these items are found on Amazon because I'm a professional artist trying to Live, but if that's something you'd rather avoid buying through I'm listing the brick and mortar places I can find them when I need to for whatever reason!
My j-cards are just the 8x10 glossy photo paper from Pen & Gear, it's usually less than ten bucks a pack at walmart lmao. I use it with an inkjet photo printer! There are plenty of laser printer options out there though, which is probably the type non-artists have access to. Honestly I think the look of black ink on colored copy paper is super cool for handmade tapes, especially between friends.
My sticker paper was a bitch to find and I'm not sure if it would be useful without my specific equipment, but it's this glossy adhesive photo paper from some rando company called LDProducts. Literally just called "Sticker Photo Paper" pf. It's more expensive but I get it in stacks of a hundred because I print tons of stickers for my shop. Again, glossy adhesive paper might not be useful without a big boy printer but MATTE sticker paper is everywhere, that's also pretty common to find at walmart or at the very least at an office supply store; you can print on it or even get out some markers (not sure i'd suggest anything besides ink tho, I'd be worried it could come off and damage the player). I design the labels in clip studio and then load them into cricut so it's super easy to get the right shape every time, but if you're Determined you could get out a measuring tape and an xacto knife and get similar results.
I've only found my tapes on amazon unfortunately, and it's been a while since I bought any because I sort of inherited a bunch of sealed ones when my dad died and i'm still going through them lol. Almost all my custom ones are 90 minute Sony High Fidelity, last I checked you could order them in packs of five or ten but I'm not sure what the prices are like rn. If you REALLY want to get fancy with colored shells/custom lengths i did find this cool site you can order from, Duplication.ca, but the shipping is kinda rough. One of these days I wanna make some cassettes for my webcomic and I'll drop some money on some pretty ones then, but for now the Sonys are treating me fine so I haven't dug too deep.
I hope something in here is useful! I'm always happy to share what I know but again, I'm very fortunate to have access to quite a bit of stuff most people don't and I try to be up front about it alskdjf. Cassettes are best when they're sorta janky and handmade tho, it's kind of the whole point, and if they're just for you or someone you care about then marking them with a sharpie and masking tape is just as cool in my opinion. probably cooler. everybody should put music on physical media and trade it i think.
8 notes
·
View notes
Text
I encourage exploring different stitches. Saddle stitch limits you to the one and there's only so many pages you can stick in there (I usually only do about 4 or 5 pages per signature), and while attaching several signatures together with adhesives is fine, it requires additional materials and most adhesives disintegrate with time, especially on a binding that does a lot of opening and closing. Modifying the saddle stitch or learning new stitches is easy and makes your book your very own, on top of using found or second hand materials.
My college bookbinding club usually led with long stitch (at its core a modified multiple signature saddle stitch), followed by coptic stitch, Japanese Stab stitch, and secret Belgian binding because they're easy and you get a cool unique look with each of them. Other regulars included French link, kettle stitch (the one often used for books with glued on hard covers), butterfly stitch, and buttonhole stitch. With any of these you can try dos a dos or French doors books, or add an endband. You can find many free tutorials online, we usually used videos by Sea Lemon.
Some of my books and further tips below the cut:


Here you see long stitch (one with stitching covered by a glued on calendar page), Japanese Stab stitch, buttonhole stitch binding, Coptic stitch, and butterfly stitch. The last photo has a saddle stitch, secret Belgian binding, and Coptic stitch again.
I can't find all my books right now and I don't claim to be an expert. You can really go crazy with the possibilities. Folks might prefer a softer or harder cover depending on the stitch but I like to stick to a soft cardboard like those used in food and other packaging. As you can see it also means I can use any funky designs I find, and has a built in spine I can use for stitches that need them like buttonhole or secret Belgian.
I've used magazines, calendars, paper bags, fabric scraps, decorative tape, candy wrappers, and whatever else I found to decorate covers. I've used thread (though you might need to double up or use embroidery thread so it doesn't slice the paper), linen cord, ribbons, nylon chord, and yarn for the stitching. Beware frizzy or poor quality cords/threads may have a tendency to tangle or catch and be a pain while stitching (or if your thread is a little too thick for your poked holes), you can run it through a hunk of beeswax to assist it with keeping its shit together.
Book binding machines are cool! But before you invest in one, try making them by hand, and also check if your local library or university might have one you can use. Try making one page zines, try making art books, print out something you wrote or your favorite public domain book and bind it, make a junk made out of junk, rebind an old book that's fallen apart. Use up all those crafting scraps you have lying around and make your growing collection of unused sketchbooks look cooler. Follow your book binding dreams with an awl, a needle and hubris.
(If you would like assistance finding resources or following bookbinding directions I would be glad to do my best to assist)
DIY notebook/junk journal tutorial for people on a budget

I found myself watching a lot of bookbinding videos recently & had the realization: I could probably do that at home, for free. And I was right. So before an influencer convinces you to drop 50 dollars on a book press and a fancy bonefolder, here's how:
STEP 0: MATERIALS

Cardstock - This can be any slightly thicker paper. I've been using postcards and blank greeting cards, because they're already around the size I want, but you can even use the cardboard from a cereal box if you want something sturdier.
Scissors/Xacto knife - You need at least the scissors, but the Xacto knife makes things a lot easier. If you have an actual paper cutter, use that instead.
Glue - your choice, I've been using modpodge but you can use a glue stick, etc instead.
Sturdy tape - duct tape, electrical tape, masking tape, etc. It needs to hold up to wear and tear; washi/scotch tape will not work.
Binder or Paper clips - binder clips are my preference but large paper clips work in a pinch
Ruler(s) - If you have them, I recommend using two rulers: one metal (if you're cutting paper with an xacto knife), one plastic or wood (this will be your bonefolder).
Pen or pencil
Paper scraps - These will be the pages of your notebook. You want them to be the same size or bigger than your covers. You can use literally anything; I've been using the last blank pages of old planners and notebooks, end pages of old books, and various scraps that would otherwise be thrown away.
Safety pin - Awl substitute
Needle and thread
ADDITIONALLY you should have a) a surface to glue on and b) a surface to cut on. A piece of scrap cardboard works well for both.
--
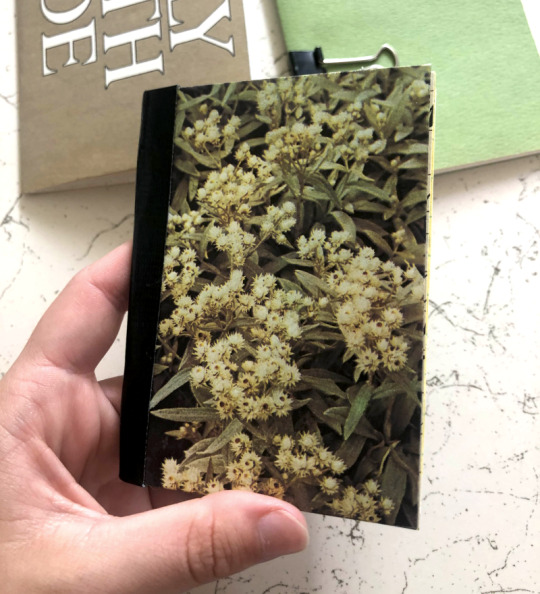
STEP 1: DECORATING THE COVER
Take the cardstock you want to use for your cover, cut it to size if you need to, and fold it in half, using the side of your wooden/plastic ruler to flatten the crease. If you want to decorate it, take a magazine clipping or paper scrap of your choice and glue it on one side ( shown below). Avoid gluing anything onto the crease.

Flip it over and trim the sides down. Cut off the corners, then glue and fold the sides over. Use the ruler on anything you need to crease.

Flip back over and repeat for the other side! Make sure to leave a gap at the 'spine'.
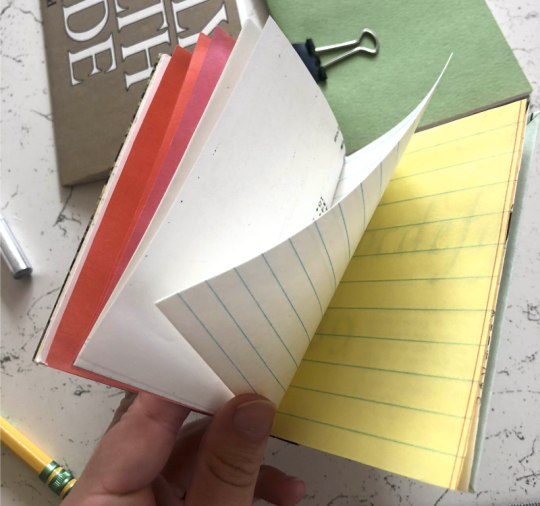
STEP 2: CREATING A SIGNATURE
A "signature" is a stack of folded papers, aka, your notebook's pages. Take the papers you wish to use, fold each of them in half, and nest them together. I've been using 10 sheets of paper for mine, which will become 40 pages total. It might be harder to fit more than this into a small-sized notebook. Also, I try to arrange the sheets so that the CLEAN EDGES line up at the BOTTOM of the stack, with the rough edges at the top. This way you'll only have to trim 2 sides instead of 3.

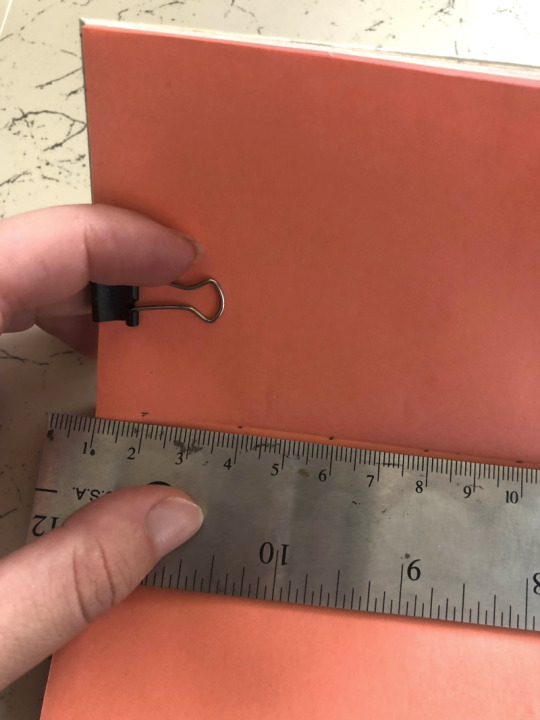
Line your cover up with the signature's bottom edge, making sure everything inside is aligned neatly. Then slap on a binder clip and trim off some of the excess material with scissors, if needed.

Use a ruler to mark where the edge of the cover is, then remove the cover to avoid damaging it (but keep the binder clip). Hold the ruler firmly in place slightly to the left of the line you just made. Carefully make repeated, even strokes with your xacto knife along the side of the ruler to cut straight through the layers of paper. Repeat with the top of the signature. A metal ruler is recommended for this step because a sharp xacto knife WILL CUT THROUGH PLASTIC AND WOODEN RULERS. I learned this the hard way, but if you're careful it should be fine. If you have access to an actual paper cutter, skip this step and use that instead!! it's way faster and safer!!


The finished signatures should be the same size as your cover now.
STEP 3: PUTTING IT TOGETHER
Stick your signature into the cover, align everything, then open to the center page. Clip the pages to the cover at the top or bottom, one on each side, in this 'open' position. Make a few marks along the center crease with even spacing.
Awl time. Using your marks as a guide, CAREFULLY push your safety pin through your signature and out through notebook's spine. You might want to use a thumbtack to make things easier on your fingers.

The next step is to sew the sheets together through the holes you made. Unfortunately this is not a sewing tutorial, so if you don't know how to thread a needle you might want to pause here and look that up. I'm using a simple saddle stitch, keeping the knots on the outside. There are many ways to do the actual book binding, including just stapling it, but this is how I do it.

You can remove the binder clips at this point. The only thing left to do is reinforce the spine. Trim the thread and fold your Sturdy Tape of choice over the spine, leaving some excess at both ends. The goal here is mainly to cover up the loose thread. Split the excess along the dotted lines shown below...

...Then stick it down on the insides of the front and back cover.

And you're done!!!!!
Enjoy your cool new handmade notebook!
#i was in bookbinding club for all four years of college and on the board of it for two of those#while im not the best bookbinder in the world i can help you figure out how a stitch works 👍#bookbinding#my art#craft
3K notes
·
View notes
Text
Custom Hook and Loop Tape Solutions for Unique Diaper Designs
In today’s competitive hygiene market, diaper brands are pushing for more innovation, comfort, and personalization. One key component helping achieve that is custom hook and loop tape��a smart closure solution that combines functionality with flexibility.

🔄 Why Custom Hook and Loop Tape?
Hook and loop tape (often called magic tape) provides: ✔️ Strong & adjustable grip ✔️ Repeated fastening without loss of adhesion ✔️ Soft texture for baby’s delicate skin ✔️ Design freedom for unique diaper shapes and styles
🎨 Customization Options for Your Brand
At Favourite Fab, we offer hook and loop tape with options like:
Custom colors and branding prints
Variable hook strength for different age groups
Different tape widths and patterns
Compatibility with all major diaper machines
Whether you need tape for baby diapers, training pants, or adult incontinence products, we deliver tailor-made solutions for your product vision.
🏭 Trusted Quality & Bulk Supply
Backed by advanced manufacturing, our custom hook and loop tapes meet hygiene standards, are skin-safe, and offer consistent performance at scale.
0 notes
Text
Packing Tape Market Emerging Trends Driving Global Demand and Innovation
The global packing tape market is undergoing a transformation, driven by technological advancements, sustainability demands, and expanding e-commerce activities. Packing tapes, essential for sealing and securing packages, have evolved from being a simple utility product to a strategic element in supply chain management. The market is expected to experience robust growth as businesses and consumers increasingly prioritize safe, efficient, and eco-friendly packaging solutions.

Sustainable and Biodegradable Tape Solutions on the Rise
A key emerging trend in the packing tape market is the growing preference for sustainable and biodegradable materials. With global awareness around plastic pollution rising, manufacturers are investing in eco-friendly tapes made from natural rubber, paper, and water-based adhesives. These alternatives are gaining popularity, especially among companies looking to align their packaging processes with environmental regulations and sustainability goals.
Biodegradable tapes not only reduce carbon footprints but also help brands improve their eco-conscious image, particularly in industries such as food and retail where green packaging is a selling point. In response, several packaging firms are adopting recyclable tapes that decompose easily without compromising strength or adhesion.
Booming E-Commerce Sector Fueling Demand
The exponential growth of the e-commerce sector continues to be a major driver for the packing tape market. Online retailers require high-performance tapes to secure packages that travel long distances and face varied handling conditions. As more consumers turn to online shopping for convenience, the volume of packages shipped daily is skyrocketing, thus increasing the demand for durable and tamper-evident packing tapes.
E-commerce giants are also pushing for custom-printed tapes, not just for branding purposes but also to enhance security. Printed tapes that carry a company's logo or messaging act as a deterrent to tampering and theft while providing brand visibility during shipment.
Technological Advancements in Tape Manufacturing
Technological innovations are reshaping the production and functionality of packing tapes. New hot-melt adhesives, solvent-based adhesives, and hybrid tape materials are being developed to enhance adhesion, even on irregular surfaces. These tapes offer superior performance in extreme weather conditions and provide longer shelf lives.
Automation in the packaging industry has also influenced the demand for machine-compatible tapes. As industries adopt high-speed packaging machines, the need for consistent and reliable tape application has led to the development of pressure-sensitive tapes designed for automation.
Smart and Tamper-Evident Tape Solutions
Security concerns in shipping and logistics have led to the development of tamper-evident and smart packing tapes. These tapes change color or display warning messages when tampered with, providing a clear indication of any unauthorized access. This feature is especially critical for pharmaceutical, electronics, and high-value goods.
Smart tapes with embedded RFID tags or QR codes are also entering the market, offering enhanced tracking and traceability. These innovations not only prevent theft but also help supply chain managers monitor product movement in real time, thereby reducing losses and ensuring timely delivery.
Shift Towards Customization and Branding
Customization is becoming a significant trend in the packing tape market. Businesses are increasingly using custom-printed tapes for branding, promotional campaigns, and messaging. These tapes allow brands to create a memorable unboxing experience and establish a visual identity without additional packaging costs.
Moreover, personalized tapes are being used to convey instructions, warnings, or handling guidelines. This not only improves customer experience but also ensures safer handling by logistics providers, reducing damage-related losses.
Regional Growth and Market Expansion
The Asia-Pacific region, especially countries like China, India, and Vietnam, is witnessing significant growth due to increased manufacturing activity and booming e-commerce. North America and Europe are focusing on sustainable and premium tape solutions due to stringent environmental regulations and mature retail sectors.
Emerging markets in Latin America and Africa are also showing potential for growth, driven by the rise of local manufacturing, infrastructure development, and regional trade activities.
Conclusion
The packing tape market is rapidly evolving, with innovation and sustainability leading the way. From biodegradable materials and smart security features to custom branding and automation-ready designs, the industry is responding to the changing demands of global trade and consumer behavior. As companies across sectors prioritize efficiency, safety, and environmental responsibility in packaging, the demand for advanced packing tape solutions is expected to grow substantially in the coming years.
By embracing these emerging trends, manufacturers and distributors can tap into new opportunities and drive growth in a competitive global market.
0 notes
Text
What Material is Used for a Heat Press?

From heat plates to pressing surfaces and garment types, every part contributes to the process of heat transfer. In this article, we’ll cover what the key materials are in a heat press, provide real-world examples, and share tips for improved results — whether you’re into custom t shirt printing in Chennai or not.
Heat Press Machine Materials: What are they made of? Let’s begin with the machine itself. A heat press is comprised of several parts of differing materials, chosen for particular purposes.
1. Platen (Heating Element) Material: Typically aluminum or steel
Why: Aluminum provides rapid, even heating, so it’s the choice of the industry. Steel is robust but slower to warm up.
Coating: Frequently Teflon-coated so as not to scorch fabrics and transfer ink
2. Lower Platen (Base Surface) Material: Silicone rubber pad topped with Teflon or fabric
Why: The silicone takes pressure and provides equal pressing without harming the fabric
Pro Tip: For bulk custom t shirt printing in Chennai, choose machines with thick silicone padding and uniform temperature control for consistent results.
What Garment Materials Work Best with a Heat Press? The type of fabric you’re printing on matters just as much as the press itself. Not all textiles react the same way to heat, and the wrong choice could ruin your designs.
Best Fabric Types for Heat Press: Cotton: Holds up well to heat, making it ideal for beginners
Polyester: Lightweight, fast-drying, and common in sportswear — but requires lower temps
Poly/Cotton Blends: Offer a balance of comfort and durability
Spandex and Nylon: More difficult to press; need special heat transfer vinyl and settings
Stat: A 2024 Printwear Magazine report states that 67% of users of heat presses prefer 100% cotton due to its simplicity and sharp print quality.
Irrespective of whether you are designing a cotton T-shirt or a polyester jersey, recognizing your fabric prevents most custom t shirt printing in Chennai.
Materials Used in Heat Transfers: Inks, Vinyl, and Papers Besides the press and garment, you’ll also need the right transfer material. These act as the bridge between your design and the fabric.
Popular Transfer Materials: Heat Transfer Vinyl (HTV): Great for bold designs and lettering; available in various finishes (glitter, matte, flock)
Sublimation Paper: Works best with polyester; not compatible with cotton
Inkjet Transfer Paper: Suitable for cotton fabrics and offers photo-quality prints
Plastisol Transfers: Pre-made designs to heat press; best for bulk orders
Experienced Tips: As seasoned heat press professional John Peters explains, “The secret to longevity in prints isn’t just pressure or temperature — it’s the compatibility between your fabric and transfer material.”
This tip is essential to ensure quality and consistency in Chennai custom t shirt printing.
Some Other Materials and Accessories to Achieve Great Heat Press Results In order to get pro-grade outcomes, use the following accessories:
Teflon Sheets: Avoid burns and ink bleed
Heat Tape: Maintains transfer paper in position while pressing
Heat Press Pillows: Seams, zippers, or heavy fabrics are a good use
Lint Rollers: Clean quickly prior to pressing to significantly enhance transfer adhesion
Illustration: One Chennai apparel startup saw its quality of output go up by 40% after it changed to better-quality Teflon sheets and silicone pads — while scaling up their custom t shirt printing in Chennai venture.
Conclusion: Success = Using the Right Materials Choosing the right materials for your heat press — everything from platen surfaces to garments and transfer media — lays the groundwork for printing success. Whether you operate a full-scale business or begin out of your garage, knowing these factors will ensure that you create cleaner, longer-lasting designs.
Ready to take your print to the next level? Whether you’re designing for events, companies, or fashion labels, the right setup is crucial. And if you’re searching for premium custom t shirt printing in Chennai, there are plenty of professional options standing by to bring your ideas to wearable life.
0 notes
Text
artline 400xf
Zayzi Inc: South Africa’s One-Stop eCommerce Powerhouse for Office, Tech & School Essentials
In an increasingly crowded eCommerce landscape, standing out means offering more than just a product—it means providing a seamless, comprehensive, and customer-first experience. That’s exactly what Zayzi Inc does, and it’s the reason they’ve become a go-to destination for thousands across South Africa looking for stationery, tech, school supplies, and office essentials—all under one digital roof. What sets Zayzi Inc apart from competitors is its all-in-one product ecosystem combined with curated affordability and unbeatable variety, tailored to everyday professionals, students, and home users alike.
A Unique Blend of Everyday Necessities and High-Value Technology
Unlike most eCommerce platforms that either specialize in electronics or focus solely on office supplies, Zayzi Inc merges both worlds, giving customers access to a highly diverse product range. Need a glue stick 43g, print paper A4, and a 64GB flash drive at a competitive price? Zayzi has you covered—all in one transaction. This seamless accessibility eliminates the need to shop from multiple stores, saving both time and shipping costs.
Even within their categories, Zayzi Inc excels in offering brand-specific, high-demand items like:
Amos glue stick for classrooms and crafts
Stabilo highlighters for vibrant studying
Artline permanent marker 70 and Artline 400XF for precision labeling
Claro pens and HB pencils 12 pack for everyday writing
And for tech-savvy users, Zayzi carries top-tier gadgets like:
Lenovo IdeaPad 3 i3 laptops
Mecer Android Tablets
Pantum multifunction printers
TP-Link 300Mbps Wi-Fi Range Extenders
Exceptional Value for Schools, Offices, and Families
Zayzi Inc shines brightest in environments that demand bulk purchasing with quality assurance—like schools and office environments. From copy paper to labelling machines, Bantex filing boxes, and post-it flags, Zayzi acts as a silent but crucial productivity partner.
Parents will also love Zayzi’s affordability and practicality, whether it's for maths sets, 50-pocket flip files, or permanent white markers. Even niche needs like adhesive for tape or Decifix covers are handled effortlessly.
What Makes Zayzi Inc Truly Stand Out?
Product Range Depth & Breadth Whether it's an office, classroom, or home study setup, Zayzi Inc has the variety to meet any requirement—something few eCommerce competitors can replicate at this scale.
Affordable Technology at Your Fingertips With constant updates on devices like Lenovo i3 laptops and fast-moving gadgets, Zayzi remains tech-relevant without overpricing.
Streamlined Shopping Experience The site’s layout is intuitive, category-rich, and search-friendly, making it easy to find what you need—whether it's a frixion pen or a magic tape.
Local Stock with Nationwide Reach Products ship efficiently from within South Africa, ensuring faster delivery times and localized support—a major advantage over international resellers or dropshipping sites.
Customer-Centric Service Zayzi’s responsiveness and dedication to fulfilling orders with speed and accuracy have earned them a reputation for reliability among repeat buyers.
Conclusion
Zayzi Inc isn’t just an online store—it’s a smart supply partner for South African households, businesses, and educational institutions. With everything from a glue stick 43g to a 64GB flash drive at a great price, this platform offers the tools, tech, and trust you need—all in one place.
Visit Zayzi Inc today and experience a smarter, simpler way to shop for your everyday essentials.
0 notes
Text
How to Use Cricut Transfer Tape? Tips & Tricks
Are you a crafter looking for a material that allows you to apply your design to the desired surface? If yes, then this blog is for you! Transfer tape is a great material for transferring any design and vinyl pattern to your project’s surface. It is helpful for applying designs to curved surfaces. But ‘how to use Cricut Transfer Tape‘ to transfer your designs?
When you buy a Cricut machine and start using the Cricut Design Space app, you might not realize how important transfer tape is. Basically, transfer tape is a material that helps you transfer your design and can be removed once you’ve applied it to your chosen surface. This surface can be anything from a mug to a wall or frame. Also, it helps prevent your decal from getting damaged or sticking to the wrong areas.
This write-up outlines tips and basic steps for using transfer tape in your DIY projects. Let’s start by reading this blog to understand it better.
Types of Cricut Transfer Tape
If you don’t know, Cricut has two types of transfer tape. You should know about them before starting your project, and if you choose the wrong material, you can ruin your project. Here, we will explain the two different transfer tapes:
Cricut Transfer Tape
It is mostly known and commonly used for crafting projects. This material is also used for everyday vinyl projects, such as premium and permanent vinyl, foil vinyl, etc.
Cricut Strong Grip Transfer Tape
It is a strong transfer tape mainly used for glitter vinyl. Because glitter is a thick material, you will need a sturdy, strong grip transfer tape is essential for transferring it to your project.
How to Use Cricut Transfer Tape: Simple Steps
Transfer tape is necessary to transfer your vinyl projects. When you cut a vinyl design with your machine, the design is printed on the back paper. Here are the instructions which you need to follow to use transfer tape:
Step 1: Create a Design
The very first step is to create a design in the Cricut Design Space. You can make a design in the app or add your image and upload your SVG file. When you’ve finished generating your design, submit it to the machine for precise cutting.
Step 2: Cutting Your Design
When your design is ready after cutting, take off the extra parts using the weeding tool. After that, it is time to place your design with transfer tape.
Step 3: Use the Transfer Tape
Now, it is time to use the transfer tape. Simply cut a piece of transfer paper larger than your design. After cutting the tape, you need to peel off the back layer and put it on a sticky side on top of your vinyl design. But if your project is too large, you should start peeling off from the corner of the transfer tape and then place the design. Continue peeling until the vinyl is completely coated in transfer tape.
Step 4: Applying Your Design
Once you have a design on your transfer tape, and place it wherever you want it on your project. Before you apply the design with your transfer tape, make sure to clean the surface area. When applying your design, use the scraper tool to smooth out and prevent bubble formation, and then peel back your transfer paper. After placing your design, press down and smooth it with the scraper tool. Finally, you are done placing your design on your desired surface.
Basic Tips for Using Transfer Tape
Now you know there are two types of transfer paper and how to use them for your project. By following these tips, you can make sure that you are using it in the right way:
Before placing your design on the surface, clean the area to remove dust; otherwise, the design will not adhere smoothly.
Frequently Asked Questions (FAQs)
Why Is Cricut Transfer Tape Necessary?
This material is important for transferring vinyl designs smoothly to various surfaces which protects complex details during the procedure. Its adhesive strength allows for easy lifting without residue that ensures precise alignment and simplifies the application, making it perfect for newbies and pro crafters.
Why does your vinyl peel off slowly?
If your transfer tape is new, it may be very sticky, which can make it hard for the vinyl to release. If this happens, try pressing the tape onto a clean, flat surface to reduce its stickiness before applying your design. You can also use a hair dryer to help release the vinyl with gentle heat.
Can you reuse Cricut Transfer Tape?
You can reuse your Cricut transfer tape as long as it is sticky. Roll and store it; this will save you a lot of money. There is no need to throw it away after you use it each time. If you transfer paper that has to be back on it, you can reapply the tape to the paperback, and by doing this, you can minimize dust and lint particles sticking to your tape.
Visit: cricut.com/setup www.cricut.com/setup login
Source: https://cricutsetjoy.com/how-to-use-cricut-transfer-tape-tips-tricks/
#CricutTransferTape#cricutcomsetup#cricutdesignspace#wwwcricutcomsetuplogin#cricutexploreair2setup#designcricutcomsetup#installcricutexploreair2#cricutsetup#cricutsetupforpc#cricutdesignspacesetup#designcricutcomdownload#cricutdesignspacedownload#cricutdesignspaceonline#cricutdesignspaceapp#cricutdesignspacedesktop#cricutaccountsubscription#cricutaccess#Cricutexploreair2setuppdf#cricutexploreair2download#howtousecricutexploreair2withphone#howtosetupcricutexploreair2oniphone#cricutexploreair2bluetooth#cricutcomsetupmac#cricutcomsetupforwindow#supportcricutcom#cricutnewmachinesetup#cricutaccountlogin#cricutdesignspacelogin#cricutsoftwareapp#cricutdesignspacefree
0 notes
Text
amos glue stick
Get equipped with everything you need for your office, classroom, or home workspace with Zayzi Inc. — your trusted online destination for quality stationery, technology products, and essential supplies at unbeatable prices in South Africa. Whether you're a student, professional, teacher, or business owner, Zayzi Inc. offers convenience, affordability, and variety — all at your fingertips.
Looking for a reliable glue stick 43g for school projects or office tasks? Or maybe you're trying to find the best 64gb flash drive price without compromising on quality? At Zayzi Inc., we've got you covered with premium brands and competitively priced items.
Affordable Paper & Writing Essentials
Running low on paper? Stock up on our best-selling print paper a4 or go for high-quality a4 white paper that's perfect for printing, photocopying, and general use. Whether you need bulk or just a ream, our pricing will meet your budget.
Writing tools matter — and with our premium frixion pen range, you'll never want to write with anything else. Looking for classic pencils? Try our hb pencils 12 pack, ideal for students and sketchers alike.
Organization Tools & Accessories
Never lose track of important documents with vibrant and practical post it flag solutions. Organize paperwork efficiently with a 50 page flip file or get more storage with the versatile 50 pocket flip file.
Our bantex filing box is perfect for professionals who need portable and durable storage solutions.
Markers, Highlighters, and Adhesives
Need a bold and lasting mark? Try the artline permanent marker 70 or our reliable white marker permanent for writing on all surfaces.
Highlight notes effectively with the vibrant stabilo highlighters pack – ideal for studying or working in color-coded environments.
And if you're looking for strong adhesives, browse our range of adhesive for tape that can handle everything from crafts to industrial packaging.
Tech and Office Upgrades
Upgrade your digital workspace with the affordable mecer tablet — a feature-packed Android tablet perfect for students or remote workers.
Need a labeling solution? Our collection of labelling machines makes it easy to stay organized at home or in the office.
And when it's time to refill your paper supply, check out the printing paper a4 with competitive copy paper cost — perfect for bulk purchases.
Back-to-School and Everyday Stationery
If you're prepping for school season, don't miss out on must-have items like the classic amos glue stick or the versatile bk440 ballpoint pen set.
Why Choose Zayzi Inc.?
✔️ Easy Online Ordering
✔️ Fast Nationwide Delivery
✔️ Competitive Prices
✔️ Premium Brands
✔️ Friendly Customer Support
Zayzi Inc. is your one-stop shop for reliable, affordable, and top-quality supplies across South Africa. Whether you're shopping for personal use, reselling, or stocking up your office, our range of products and seamless service make every order easy.
Don’t wait — visit Zayzi Inc. today and experience the convenience of online shopping with premium products at the best prices!
0 notes
Text
How To Choose The Best PET high temperature tape
Industrial machinery demands the service of durable and specialized tapes to maintain smooth operations, component protection, and insulation in high-performance environments. Out of many types of Tapes Used for industrial machinery, PET high temperature tape finds its niche with good heat resistance, durability, and adhesion properties.
Types of Tapes Used in Industrial Machinery
Based on the specific needs for insulation, sealing, protection, and bonding, various types of Tapes Used for industrial machinery find their application in industrial settings.

PET High Temperature Tape
1. PET High-Temperature Tape
PET high temperature tape, or polyethylene terephthalate high-temperature tape, is a very high-temperature tape designed for electronic and industrial applications. This tape has been particularly noted for thermal stability, tensile strength, and adhesion, thereby making it ideal for protecting sensitive components that may be subjected to a heat source.
2. Electrical Insulation Tape
Electrical tapes are essential in machines when electrical parts require insulation. These tapes prevent short circuits and protect wires against moisture, heat, or mechanical stresses.
3. Double-Sided Adhesive Tapes
For applications involving mounting and bonding, double-sided adhesive Tapes Used for industrial machinery afford strong adhesion to most surfaces without using mechanical fasteners. They reduce vibration and improve the efficiency of assembly.
4. Masking Tape
Industrial masking tapes serve for painting, coating, and surface protection. They are easily removable, leaving no residues for short-term protection.
5. Anti-Slip Tape
Anti-slip tape is applied to surfaces of machinery and walkways to prevent accidents by providing extra traction against slipping, to ensure safety in industrial environments.
Why is PET High-Temperature Tape Important?
In industrial machinery, PET high temperature tape has become the preferred option due to its numerous advantages. Here’s why it is so widely applied:
1. Heat Resistance
PET high-temperature tapes withstand high temperatures while maintaining adhesive strength and structural integrity. They find full application in electronics, automotive, and industrial heating systems.
2. Superior Adhesion
The tape adheres very well to a variety of surfaces, such as metals, plastics, and glass, providing satisfactory results even in strenuous situations.
3. Electrical Insulation
PET tape is largely utilized for electrical insulation on circuit boards, transformers, and wiring harnesses. It prevents electrical leakage, promoting safety.
4. Chemical and abrasion resistance.
The pity is that in many industrial environments, there is exposure to chemicals and abrasives. PET high-temperature tape has resistance from corrosion chemicals and resistance from wear and carries long-last protection.
5. Versatility
PET tape is meant for several applications, such as in coating powder, masking, and the protection of components. It can withstand immense stress; thus it is a significant asset in an industrial setting.
Uses of PET High-Temperature Tape in Industrial Machinery
Electronics: Protection of printed circuit boards (PCBs) and semiconductor components.
Automotive: Wire harness and thermal insulation in engine compartments.
Aerospace: Heat and thermal insulation for aircraft components.
Manufacturing Sector: Applications in powder coating, metal finishing, and sealings.
Medical Equipment: Component safety and insulation in high-temperature conditions.
Conclusion
Industrial machinery very much relies on tapes for protection, insulation, and efficiency enhancement, and in this, one of the top special tapes is PET high temperature tape because of its great heat reliability, durability, and versatility. Tapes such as these PET tapes used in electronics or automotive manufacturing prove their worth in industry-undermining conditions. High-quality industrial tapes guarantee longer life at the same time improved safety for machines and much better operational efficiency.
0 notes
Text
Protect Your Shipments with High-Quality Eco Friendly Products in Australia for Packaging
High-quality packaging providers must provide the greatest products since the retail and e-commerce industries depend on high-quality eco friendly products in Australia. This type of packaging is becoming more and more popular as customers consciously choose more eco-friendly items after learning about the harm that other packaging causes to the environment.
The greatest products are required by businesses that require dependable packaging solutions, and industries such as pallet wrap, stretch films, and adhesive tapes and dispensers offer a wide variety of items.
Eco-friendly tape is one of the most often utilised kinds of tape nowadays since, in addition to preserving shipments, it provides a distinctive branding opportunity. Companies must ensure that their goods are transported in a secure and stylish manner, which calls for product packaging. For this reason, efficient packaging is essential. Packing tape, labels with unique printing, boxes, and signage are examples of bespoke packaging products.

A Variety of Products from Top Packaging Suppliers
Pallet Wrap and Stretch Films: Use the proper stretch films and dispensers to safeguard the goods. Pallets may be simply and swiftly stabilised during travel by employing stretch film dispensers and manually wrapping them with stretch film. The ideal option for firms with large volume operations is to have a pallet wrapping machine and a stretch film machine.
Protective Packaging: Well-known businesses provide superior cushioning to stop harm, such as polyfoam and bubble wrap. To ensure their safety during handling and transit, items must be wrapped with protection. Other goods, including rolls of corrugated cardboard, offer a more flexible cover for bigger items, while protective film keeps surfaces from becoming scratched.
Adhesive tapes and dispensers are essential for fastening packages to prevent items from falling out of sealed cartons, packs, or packaging. Forza packaging tape works well for a variety of package sealing applications. Machine packaging tape is another well-liked choice since it provides reliable application and allows for process automation. Cloth tape's high stickiness and durability make it ideal for challenging tasks. For securing and bundling heavy items, reinforced fibreglass is a stronger material than filament tape.
Consult with the top suppliers of the goods needed to package different items and make bulk or specification-based orders.
Source
0 notes
Text
High-Performance Printing & Converting Machines | Advanced Solutions
In the modern world, the printing and packaging industry has started to completely rely on precision, effectiveness, and novelty. Advanced technology such as slitting rewinding machines, label die cutting machines, paper core cutting machines, hot foil stamping machines, and UV curing systems is among the most significant tools rendering final mba product quality.
Machine manufacturers and converters rely heavily on high-level technological tools to speed up the process of production, increase accuracy, and aid versatility of their machines. The description of the machines' importance in various industrial applications has been outlined in a set of present practice method, showing machines' necessity in printing and packaging industries today.
Slitting Rewinding Machine
A slitting rewinding machine is a vital component in industries dealing with flexible packaging, paper, films, and foil materials. It enables the precise slitting and rewinding of large master rolls into smaller rolls with accurate tension control.
Key Features of a Slitting Rewinding Machine:
High-Speed Performance: Ensures rapid slitting and rewinding without compromising quality.
Precision Cutting: Adjustable slitting blades provide clean and accurate cuts.
Tension Control Mechanism: Maintains optimal tension for smooth rewinding.
User-Friendly Interface: Automated controls for easy operation and reduced downtime.
Versatile Applications: Suitable for plastic films, aluminum foils, paper rolls, and adhesive tapes.
Applications of Slitting Rewinding Machines:
Flexible Packaging Industry: For slitting plastic films and foils.
Label Production: Converts large rolls into label-sized formats.
Printing Industry: For handling coated and laminated materials.
Label Die Cutting Machine
A label die cutting machine is essential for the precise cutting of labels, stickers, and adhesive sheets. It ensures clean edges, intricate shapes, and high-speed production for industries requiring mass labeling.
Key Features of a Label Die Cutting Machine:
Rotary & Flatbed Cutting: Supports various die-cutting methods for different label types.
Automatic Waste Removal: Ensures a cleaner output with no excess material.
High Cutting Accuracy: Ideal for custom shapes and intricate label designs.
Multi-Layer Processing: Allows multiple layers for enhanced durability.
User-Friendly Control Panel: Simplifies operation and reduces labor requirements.
Applications of Label Die Cutting Machines:
Food & Beverage Labeling: Used for bottle and container labeling.
Pharmaceutical Industry: For precision-cut medical labels.
Cosmetic & Personal Care Products: Ensures premium quality label cutting.

Paper Core Cutting Machine
A paper core cutting machine is used to cut paper tubes and cores to the desired length, ensuring smooth edges and accurate dimensions for various industrial applications.
Key Features of a Paper Core Cutting Machine:
High Cutting Precision: Produces accurate and smooth cuts for uniform core sizes.
Adjustable Cutting Lengths: Allows customization for different applications.
Heavy-Duty Construction: Ensures durability and longevity.
Automatic & Manual Operation: Supports both automatic and manual cutting modes.
Dust-Free Operation: Minimizes waste and enhances cleanliness.
Applications of Paper Core Cutting Machines:
Packaging Industry: For manufacturing paper cores for packaging rolls.
Printing Sector: Used for paper roll cores and film winding.
Textile Industry: For fabric and yarn core cutting.
Hot Foil Stamping Machine
A hot foil stamping machine enhances the visual appeal of printed products by adding metallic and holographic foil designs. It is widely used in luxury packaging, book covers, greeting cards, and promotional materials.
Key Features of a Hot Foil Stamping Machine:
Advanced Foil Transfer Technology: Ensures sharp and clean imprints.
Temperature & Pressure Control: Allows precise adjustments for different materials.
Multi-Purpose Applications: Works on paper, plastic, leather, and fabric.
Automatic Foil Feeding System: Ensures smooth and continuous foil application.
Energy-Efficient Design: Reduces operational costs and improves efficiency.
Applications of Hot Foil Stamping Machines:
Luxury Packaging: Enhances premium product packaging.
Branding & Promotions: Used for high-end business cards and brochures.
Security Printing: Adds holographic elements for anti-counterfeiting.
UV Curing Systems
A UV curing system is an advanced technology used for instant drying and curing of inks, coatings, and adhesives using ultraviolet light. This method ensures high-quality finishes, durability, and eco-friendly operations.
Key Features of a UV Curing System:
Instant Drying & Curing: Reduces production time significantly.
Energy Efficiency: Consumes less power compared to traditional drying methods.
Eco-Friendly Operation: Eliminates the need for solvents and harmful chemicals.
High Durability: Ensures scratch-resistant and long-lasting prints.
Wide Compatibility: Suitable for offset, flexographic, and screen printing.
Applications of UV Curing Systems:
Printing Industry: For UV-cured inks and coatings.
Electronics & PCB Manufacturing: Ensures durable protective coatings.
Medical Devices: Used for adhesive bonding in healthcare applications.
Why Invest in High-Performance Printing & Converting Machines?
Enhanced Production Efficiency – Reduces downtime and increases output.
Precision & Quality – Ensures accurate cutting, stamping, and curing.
Cost-Effective Solutions – Optimizes material usage and reduces waste.
Versatile Applications – Suitable for various industries, from packaging to textiles.
Advanced Automation – Minimizes manual labor and improves operational accuracy.
By integrating the latest slitting rewinding machine, label die cutting machines, paper core cutting machines, hot foil stamping machines, and UV curing systems, manufacturers can achieve superior productivity and quality.
Project Name: UV Graphic Technologies Pvt. Ltd
Address: Plot 15, Sector 140A, Noida UP 201305
Contact No: 919810114365
Email ID: [email protected]
Our Website: https://gtigti.com/
Linkedin ID: https://www.linkedin.com/company/uv-graphic-technologies-pvt-ltd/
You tube: https://www.youtube.com/watch?v=EleXfuBanIk&ab_channel=AbhayDatta
0 notes