#Airtight Ziplock bag + freezer for a couple of days!
Text
An Instructional Song
What do we do with an antique woolen?
What do we do with an antique woolen?
What do we do with an antique woolen, newly bought this morning?
Put it in the freezer; kill those moth eggs!
Put it in the freezer; kill those moth eggs!
Put it in the freezer; kill those moth eggs- they’ve seen their last morning!
#antiques#antique clothes#vintage clothes#actually it's a doll's dressing-gown. but same principle.#Airtight Ziplock bag + freezer for a couple of days!#nobody's got time for an infestation
123 notes
·
View notes
Photo

FRUIT CAKE
(From StH)
https://www.rockrecipes.com/fruitcake-loaf-cake/
Ingredients:
1 cup glacé cherries, quartered.
3/4 cup raisins, any kind.
3/4 cup mixed glacé fruit (or glacé mixed peel)
1 2/3 cups flour
1 tsp baking powder
1/2 tsp salt
1 cup sugar
1 cup cream cheese (One 8 oz or 250 g) block)
1/3 cup butter
2 eggs (large or extra large)
1 tsp pure vanilla extract
1/4 tsp pure almond extract (optional)
Directions:
Cut the cherries into quarters and mix together with the raisins and mixed fruit (or glacé citrus peel). Measure the cherries AFTER they are quartered. In the cake pictured, I have used a mixture of half red and half green glacé cherries for the most colourful appearance.
Preheat oven to 325 degrees F.
Lightly grease a 9x5 inch standard loaf pan and line with parchment paper.
Measure the flour, then remove 2 tbsp to dust the fruit with later.
Sift the remaining flour with the baking powder and salt. Set aside.
Cream together butter, sugar and cream cheese, until smooth and fluffy,
Add the eggs, one at a time, beating well after each addition.
Next, beat in the vanilla extract (and almond extract if you are using it.)
Fold in the dry ingredients until almost fully incorporated. A few streaks of flour in the batter should remain at this point.
Toss the fruit mixture with the reserved 2 tbsp flour.
Add the flour coated fruit to the batter and fold in well.
Spread batter evenly into the prepared loaf pan.
Bake for 1 hour and 20 minutes or until a toothpick inserted in the centre comes out clean. My oven actually took closer to 1 1/2 hours.
Cool on a wire rack. Store in an airtight container. If freezing, wrap tightly in several layers of plastic wrap before placing it in a large ziplock freezer bag, removing as much air from the bag as you can before sealing it.
Notes:
This is not the sort of fruitcake that needs to age for a long time. It is best made closer to the Holidays or when you plan on serving it. Even making it just a couple of days in advance is perfectly fine.
If you like you can soak this cake in a little brandy but don't overdo it. Poke holes in the top and bottom of the cake with a wooden skewer and brush on 1/4 cup of brandy or orange liqueur before sealing it in the plastic wrap. If you choose to do this step, I would recommend making it about a week in advance.
Serving size is half slices for the purposes of this recipe.
#food#recipe#recipes#harvest moon#story of seasons#hm#sos#fruit cake#cake#fruit#dessert#cherry#raisin#cream cheese#butter#egg#vanilla
3 notes
·
View notes
Text
Perfect Air Fryer Chocolate Chip Cookies Recipe [2022] (Homemade)

Air Fryer Chocolate Chip Cookies are a simple dessert that doesn't require you to heat up your kitchen.
On your countertop, bake the perfect cookie for quick treats that your family will enjoy. If you don't have an air fryer, there are also oven-baking instructions.
Nothing beats a homemade cookie unless it's one you can whip up quickly without heating up your entire kitchen.

Perfect Air Fryer Chocolate Chip Cookie
CAN YOU BAKE IN AN AIR FRYER?
Yes! It can be difficult to find the right combination of temperature and time, but you can absolutely bake in your air fryer.
It's ideal when your oven is in use or when you don't want to heat up the entire kitchen for a single batch of cookies.
When baking these, I highly recommend using parchment paper.
They make special parchment paper for air fryers (like this), or you can use your favorite brand with some holes poked in it.
This will keep the edges from curling up as a result of the air fryer fan's power/heat.
CAN YOU USE ALUMINUM FOIL IN THE AIR FRYER?
This is dependent on the make and model of your air fryer, so consult the user manual.
I tried using foil in my air fryer, but I didn't make any holes in it to allow air to circulate, so it didn't work very well.
If you're going to use foil, make sure to poke holes in it to allow air to circulate and keep everything in place.

Chocolate Chip Cookie Air Fryer
CAN YOU COOK FROZEN COOKIES IN THE AIR FRYER?
It's always better to let your cookies thaw before baking them in the air fryer, because otherwise you'll end up with very thick cookies.
It won't have enough time to spread and cook evenly, but if that's what you want, go ahead and try it. But that's not what we were going for with this dish.
If you want to give it a shot, bake your frozen cookie dough balls in a 300F preheated air fryer basket for 10-12 minutes and see how they turn out.
HOW TO AIR FRY COOKIES?
- Combine the butter, sugar, and brown sugar in a large mixing bowl. Combine all of the ingredients in a mixing bowl and whisk until smooth and creamy.
- Then stir in the eggs, vanilla extract, salt, baking soda, and half of the flour. Combine the dry ingredients and the butter mixture in a mixing bowl.
- Mix in the rest of the flour on medium speed until the cookie dough is thick and creamy. Once the dough has been combined, stir in the chocolate chips and optional nuts until they are evenly distributed throughout.
- Shape the dough into balls with a small cookie scoop or spoon. Place the dough balls on top of the parchment paper in the air fryer basket. Allow about an inch of space between each cookie.
- Air fry for 7-8 minutes at 300°F. When the cookies are golden brown, leave them in the air fryer basket for 1 to 2 minutes to set.
- Remove the cookies from the air fryer and place them on a wire rack to cool.
- Because no two air fryers are the same, cooking time will vary depending on the model. Cooking time may need to be increased by a couple of minutes for larger cookies.

Air Fryer Chocolate Chip Cookie
HOW TO FREEZE COOKIE BATTER?
Keep any leftover cookie dough in the fridge or freezer for easy air fryer cookies at any time!
Scoop the dough into small balls and place them in ziplock bags. Keep refrigerated for up to 7 days or frozen for up to 3 months.
- Pro Tip: Keep any leftover cookie dough in the fridge or freezer for easy air fryer cookies at any time! Scoop the dough into small balls and place them in ziplock bags. Keep refrigerated for up to 7 days or frozen for up to 3 months.
- To bake, place straight into the air fryer and bake for an additional 1-2 minutes.
HOW TO STORE AIR FRYER CHOCOLATE CHIP COOKIES?
So, keep your air-fried cookies in an airtight container at room temperature for up to 4 days.
You can also freeze your air fryer chocolate chip cookies for up to a month in an airtight container.
VARIATIONS FOR THE BEST AIR FRYER COOKIES

Air Fryer Cookie Recipe
The simplest way to customize your cookies is to change up the ingredients.
- Chips: Instead of chocolate chips, try butterscotch, peanut butter, or white chocolate chips.
- Mix in chopped nuts, craisins, raisins, flaked coconut, or oatmeal to taste. You only need about 12 cups of whatever you add.
- Flavoring: Along with the vanilla, add a dash of almond or coconut flavoring to give it a unique flavor.
CAN YOU BAKE THESE COOKIES IN A REGULAR OVEN?
You certainly can! Preheat the oven to 350 degrees Fahrenheit and bake the cookies for 8-10 minutes.
The oven will produce incredible soft and chewy cookies, just like grandma used to make!
TIPS FOR THE BEST CHOCOLATE CHIP COOKIES
So, while the dough for chocolate chip cookies is nearly identical, the method of cooking is slightly different.
With a few hints, you'll always have perfect ooey gooey cookies.
Liners: Unlike other air-fried foods, cookies require a liner in order to bake. You can use parchment paper liners or aluminum foil.
I've discovered that using a smaller liner than the basket and keeping the cookies away from the edges works best. It keeps the cookies from flying around too much, as well as the liner.

Best Air Fryer Chocolate Chip Cookie
AIR FRYER COOKIE TIPS
Here are a few pointers to make your life easier when baking cookies in the air fryer:
- Don't skip the preheating step– Preheating your air fryer works the same way as preheating your oven, so if you want the best chocolate chip cookies, preheat your air fryer basket first.
- Use air fryer parchment paper or poke holes in your parchment paper to keep it from flying away—I tried regular parchment paper and it was a total disaster. Remove the air fryer tray and bake your cookies directly on the bake of the air fryer basket, or simply use the appropriate type of parchment!
- Make sure to leave enough space between each cookie to ensure even baking.
- Begin with less baking time- I understand that the temperature of your air fryer can vary depending on the make and model, so what worked for me may not work for you. But there is still hope! Begin with one cookie and see how it turns out, or bake your first batch for 1-2 minutes less and see how they turn out before proceeding.
- Microwave your cookie before eating it– This is a trick I use all the time after the cookies have sat for more than 24 hours (in an airtight container). For that ooey gooey chocolate chip cookie experience, microwave your cookie for 10-15 seconds.
Frequently Asked Questions
Can you cook cookies in the air fryer?A basic chocolate chip cookie bakes for five minutes at 350°F and comes out perfectly. Most cookies, however, can be made in an air fryer. Reduce the heat on the machine by about 25°F when air frying (for example, if a cookie recipe calls for 350°F in a conventional oven, set it to about 325°). It's extremely simple to modify.What happens when you air fry a cookie?It entails frying them in your air fryer. The air fryer functions similarly to a countertop convection oven. Because of the high fan speed and concentrated heat, the outside of the cookie becomes crispy while the inside remains gooey.How long should you put cookies in an air fryer?Allow about an inch of space between each cookie. Air fry for 7-8 minutes at 300°F. When the cookies are golden brown, leave them in the air fryer basket for 1 to 2 minutes to set. Remove the cookies from the air fryer and place them on a wire rack to cool.Should you use parchment paper in an air fryer?A high-quality parchment paper is recommended for your air fryer, especially if you plan to make your own perforated parchment paper. Because most air fryers have a maximum temperature of 400 F, parchment paper or baking paper that is heat safe up to 425°F/ 218°C is an excellent choice.
More alternative recipes to try:
#1 Air Fryer Chocolate Chip Cookie Bites
#2 Soft And Chewy Air Fryer Chocolate Chip Cookies
#3 Air Fryer Chocolate Chip Cookies (Small Batch)
Read the full article
#airfryerchocolatechip#Airfryerchocolatechiprecipe#Airfryerdessert#Airfryerrecipe#Chocolatechiprecipe#Easychocolatechipcookieairfryer
0 notes
Text
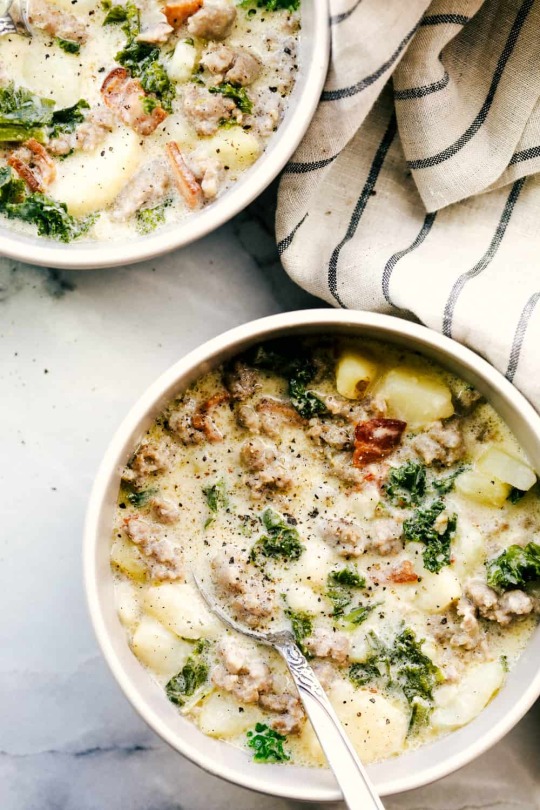
Agilenano - News: Creamy Zuppa Toscana is thick, rich and creamy sauce mixed with chunks of potatoes and spicy sausage all blended together with bacon chunks and kale to make a savory Italian soup
This is a MUST make soup this fall!
Delicious and creamy zuppa toscana that tastes just like it is from the Olive Garden! If you love copycat recipes from your favorite restaurants try these Creamy Chicken Gnocchi Soup (Olive Garden Copycat), Copycat Panera Broccoli Cheese Soup, The Best Avocado Egg Rolls (Cheesecake Factory Copycat) or Fuji Apple Chicken Salad (Panera Bread Copycat).
Creamy Zuppa Toscana
I have been a little under the weather lately, so all that sounds good to me is soup and breadsticks.
We have been going to Olive Garden a lot lately. Their soup, salad, and breadsticks never disappoint.
Zuppa Toscana is creamy and amazing, while hearty and filling. I love the potatoes in the soup.
The sausage and bacon added to it give it a great flavor.
It is warm, creamy and smooth and it definitely hits the spot every time!
This is as close to the real deal at Olive Garden as it gets and it is absolutely fantastic!
What you need to make Zuppa Toscana
I love the Olive Garden. It is my restaurant of choice.
Mainly for the soup, salad and breadsticks.
Zuppa Toscana is one of my favorite soups to get there!
I think it is awesome when you can make the same delicious soup at home that tastes straight from the restaurant.
Chicken broth: helps add in a rich broth flavor. Heavy cream: makes a heavy, thick base that soaks up the potatoes and adds bold flavoring. Italian Sausage: cook this up and have those thick pieces of savory sausage in every bite. Bacon: who doesn’t love some bacon in their soup! Russet potatoes: tender chunks of potatoes in every bite. Onion: diced up and added for a little crunch on your texture. Garlic cloves: minced with a subtle hint of garlic in the broth. Spinach or Kale: adds color, texture and a great flavoring to the soup. Salt and pepper: just a dash for taste!
How to make zuppa tuscana
There are a few steps to take to prepare this Zuppa tuscana soup but don’t let that discourage you!
This soup is a tried and true soup that will not let you down.
It is worth every step not only in the aroma you will be smelling in your home but in every warm bite you take.
My favorite part about this soup is all the flavor that goes together.
Even cooking your potatoes in chicken broth brings out the rich flavors in the potatoes.
Enjoy your soup in less than an hour and you will appreciate the few extra steps to get there!
Cook your meats: Cook and crumble the bacon. Set aside on a plate lined with a paper towel. Cook the sausage and set aside. Prepare your potatoes: Skin each potato and slice in half and make about 1/4 inch slices. You can slice these into fourths making the potatoes more bite sized. Boil your potatoes: Bring a large pot with the chicken broth to a boil. Boil the potatoes for about 10 minutes or until tender. Sauté: While the potatoes are boiling, sauté the onion and garlic until tender and set aside. Combine ingredients together: Once potatoes are tender, add sausage, onion, garlic, and chopped spinach to the pot. Boil for a couple of minutes until the spinach starts to wilt. Reduce heat and add heavy cream. Cook: finish by cooking until heated through and add salt and pepper to taste.
Make Zuppa Toscana in a slow cooker
This soup is so simple to make and comes out tasting like gold!
It doesn’t take long to cook on the stove but for those busy days it is nice to have another option.
Cooking in a slow cooker is just as great as having it on the stove top.
You still prepare your ingredients and then add to the slow cooker to finish while you have a days work.
The great thing about a slow cooker for soups is it allows the flavors to blend so well together and add an extra creamy flavoring while soaking in the warm bowl.
Brown your bacon and sausage: Cook and crumble the bacon. Set aside on a plate lined with a paper towel. Cook the sausage and set aside. Prepare your potatoes: Skin each potato and slice in half and make about 1/4 inch slices. You can slice these into fourths making the potatoes more bite sized. Boil your potatoes: Bring a large pot with the chicken broth to a boil. Boil the potatoes for about 10 minutes or until tender. Sauté: While the potatoes are boiling, sauté the onion and garlic until tender and set aside. Combine ingredients together: Once potatoes are tender, add sausage, onion and garlic to the slow cooker. Leave out the kale or spinach until the last 30 minutes. Slow cooker: cook on high about 3 to 4 hours or low for about 5 to 6 hours. Last 30 minutes: add in the kale or spinach to your slow cooker.
Tips for making Zuppa Toscana
I love Zuppa tosacna just the way it is!
You can’t go wrong with this soup and all the flavoring it has.
This is a tried and true favorite recipe of mine and I have loved it since I went to Olive Garden for the first time.
If you need a few changes here are a few that we have tried in the past. We still keep going back to my original recipe though!
Instead of using heavy cream you can use half and half or 1 cup of milk with 3 tablespoons of cornstarch whisked in. The heavy cream gives it the most flavoring though! If you like more vegetables added in try carrots or corn. I have the option of spinach or kale in the ingredients in case you prefer one over the other. Crisp the bacon and then set aside until ready to serve, so that it doesn’t get soggy. To add more spice the Italian sausage can be heated or changed also. Adding in a dash of pepper flakes or other seasonings to change the soup a bit too. What to serve with Zuppa tuscano
We love Zuppa tuscano by itself most days it is always nice to have a few more options if you are having a dinner party with family and friends.
Switching the soup into a bread bowl or have a side of homemade breadsticks like these 20 Minute Italian Bread Twists or Perfectly Soft and Buttery Rolls are always nice to add with this soup.
A side salad like Strawberry, Apple and Pear Spinach Salad with an Apple Cider Poppyseed Dressing, Bacon Pear Gorgonzola Salad or Autumn Chopped Salad with Creamy Poppyseed Dressing are always a hit!
Storing creamy zuppa tuscano
I don’t think I could ever store Zuppa tuscano soup! haha
I would be sneaking it every day that I knew it is in my refrigerator or freezer.
It is seriously one of my favorite soups that I could eat All. Day. Long!
It is best to make this either the day of or ahead a couple of days.
Freezing is not the best for this soup but can be done with a little extra care.
Enjoy your soup for as many as you can!
Making ahead: this soup is great for making ahead. You can make ahead and cook it in the slow cooker or make it ahead and place it in an airtight container to leave in the refrigerator until you are ready to cook. Leave out the spinach or kale for making ahead so it does whither or ruin your spinach. Refrigerator: prepare and make this soup as instructed. When ready to refrigerate, simply let it cool and place in an airtight container or ziplock bag. I always like to remove the spinach or kale and replace with new ingredients when I reheat. This will last in your refrigerator for 2 to 3 days. Freezer: zuppa toscano doesn’t do well in the freezer and will separate when reheating. Just remember to reheat slowly. Again, you will want to remove the kale before freezing. It will have a different taste and sometimes the potatoes become too mushy in the freezer. If you are making ahead and can freeze it that way, just cook up the ingredients and leave out the potatoes and spinach or kale. This will last about 1 month in the freezer. Reheating: it is best to have the soup cooked and refrigerator for the best results; however, if you are freezing the soup, you will want to reheat slowly stirring occasionally so you do not smash your potatoes.
More Soup Recipes Chicken Tortilla Soup Slow Cooker Creamy Chicken Tortellini Soup Cheesy Vegetable Soup Beef Barley Soup Creamy Chicken Broccoli Soup
Creamy Zuppa Toscana
Delicious and creamy zuppa toscana that tastes just like it is from the Olive Garden!
3 cans (14 ounces) Chicken broth 2 cups heavy cream 1 lb Italian Sausage 1/2 pound bacon 4 russet potatoes 1 medium onion (diced) 2 garlic cloves (minced) 2 1/2 cups chopped spinach (or kale) salt and pepper (to taste) Cook and crumble the bacon. Set aside on a plate lined with a paper towel. Cook the sausage and set aside. Skin each potato and slice in half and make about 1/4 inch slices. You can slice these into fourths making the potatoes more bite sized. Bring a large pot with the chicken broth to a boil. Boil the potatoes for about 10 minutes or until tender. While the potatoes are boiling, saute the onion and garlic until tender and set aside. Once potatoes are tender, add sausage, onion, garlic, and chopped spinach to the pot. Boil for a couple of minutes until the spinach starts to wilt. Reduce heat and add heavy cream. Cook until heated through and add salt and pepper to taste.
Original post November 19, 2013
Updated post September 29, 2019
#Vegetables #MainDishes #Soups #SideDishes #Family
Agilenano - News
from Agilenano from shopsnetwork (4 sites) https://agilenano.com/blogs/news/creamy-zuppa-toscana-is-thick-rich-and-creamy-sauce-mixed-with-chunks-of-potatoes-and-spicy-sausage-all-blended-together-with-bacon-chunks-and-kale-to-make-a-savory-italian-soup
0 notes
Text
Honey Butter Baked Chicken
Honey Butter Baked Chicken is a rich and flavorful dinner that has tender baked chicken made with only four ingredients! The blend of honey and butter is the perfect combination for a flavorful chicken dinner.
Chicken is always a favorite protein for dinner in our home. Some of our favorite chicken recipes recently is this Chicken Margherita, Skillet French Onion Chicken and using my Absolutely Perfect Chicken Marinade to make the BEST chicken every time.
Honey Butter Baked Chicken
This is one of those recipes that is good to bring out of the archive every once in a while to change it up. It is super easy to put together and has a really good honey flavor to it. Honey butter chicken is the perfect combination of sweet and savory chicken that bakes it perfectly. Every bite is tender and juicy packed with so much flavor.
Baked chicken is always a favorite of mine during the busy week. It is simple to whisk together all the ingredients, pour over top of the chicken and bake while I am able to help with other things around the house. My girls love how easy this chicken recipe is and knows just how to help me in the kitchen to make it. Add a couple side dishes and make this baked chicken dinner a complete meal.
Honey Butter Chicken Ingredients:
Seriously, only four ingredients to make this simple baked chicken recipe! It comes together so quickly and easily, even you will be amazing at the flavors and tenderness this chicken dinner has to offer.
Chicken Breasts: Fresh, thawed chicken ready to be baked.
Honey: Thickens the sauce and adds a hint of sweetness!
Margarine or Butter: Melted and stirred in for a buttery flavor blend.
Mustard: Adds a tangy mustard taste to the chicken while cooking.
Salt: Just a pinch!
How to Bake Chicken:
Simply add all the ingredients together and pour over the chicken. Bake it for one hour and dinner is made! It is perfect for a busy weeknight or a simple dinner your family can help with in the kitchen.
Prepare oven: Preheat oven to 350 degrees Fahrenheit.
Whisk Together: Combine honey, butter, mustard and salt in a mixing bowl.
Chicken: Arrange chicken breasts in a shallow baking pan laying flat. Pour whisked ingredients over chicken evenly.
Bake: Bake for 1 hour, basting the chicken every 15 minutes.
What to Serve with Honey Butter Chicken:
Adding side dishes with this baked chicken is a great idea to make this a complete meal. Bread, salad and a vegetable or fruit is always a great balance for dinner time. I love to serve this chicken recipe with a various of side dishes that are quick and easy to make while the chicken is baking for one hour.
Bread: Garlic Parmesan Pull-Apart Bread or Perfect Soft and Buttery Rolls with some honey is delicious!
Salad: Strawberry Avocado Spinach Salad or Very Berry Cheesecake Salad are fun and fresh salads.
Fruit: Mouthwatering Watermelon Salad is delicious and simple to cut up and mix together.
Vegetables: This classic Fried Green Tomatoes or a simple Roasted Lemon honey Garlic Asparagus are easy to make and add the perfect touch!
Dessert! Don’t forget dessert with this favorite Pineapple Upside Down Cake or these delicious White Chocolate Oreo Cookies. Dessert can be baking while you are enjoying dinner!
Storing Baked Chicken:
Baked chicken is easy to make with the perfect blend of honey, butter and mustard. It is simple to bake and clean up is even easier. Let the chicken completely cool before adding it to the bag or airtight containers. This dinner will reheat easily and quickly when ready!
Refrigerator: Add the left over chicken to a ziplock bag or airtight container and place in the refrigerator for 2 to 3 days long.
Freezer: Place the chicken in a ziplock bag releasing all the air. Laying the chicken flat, place the chicken on in the freezer for about a month long. When ready to reheat, move the chicken into the refrigerator over night and let it thaw completely before warming up.
Warming Up: Bake it in the oven at 350 degrees Fahrenheit or place in the microwave flipping it every minute until it is warmed through. Add a side salad or some potatoes and you have a delicious meal all over again!
More Amazing Baked Chicken Dinners:
Best Baked Chicken Thighs
Baked Parmesan Garlic Chicken Breast
Easy Baked Cheesy Mushroom Chicken
Baked Buttery Herb Chicken and Potatoes
Creamy Baked Asiago Chicken
Print
Honey Baked Chicken
Honey Butter Baked Chicken is a rich and flavorful dinner that has tender baked chicken made with only four ingredients! The blend of honey and butter is the perfect combination for a flavorful chicken dinner.
Course Dinner, Main Course
Cuisine American
Keyword baked chicken, chicken recipes
Prep Time 10 minutes
Cook Time 1 hour
Total Time 1 hour 10 minutes
Servings 4 Servings
Calories 227kcal
Author Alyssa Rivers
Ingredients
4 Chicken Breast
1/3 cup Honey
1/3 cup Margarine or Butter
2 Tablespoons Mustard
1/4 Teaspoon Salt
Instructions
Preheat oven to 350 degrees Fahrenheit
Combine honey, butter, mustard and salt in a mixing bowl.
Arrange chicken breasts in a shallow baking pan laying flat. Pour whisked ingredients over chicken evenly.
Bake for 1 hour, basting the chicken every 15 minutes.
Notes
Updated on August 15, 2020
Originally Posted on June 4, 2012
Nutrition
Calories: 227kcal | Carbohydrates: 24g | Protein: 1g | Fat: 16g | Saturated Fat: 3g | Sodium: 410mg | Potassium: 25mg | Fiber: 1g | Sugar: 23g | Vitamin A: 677IU | Calcium: 10mg | Iron: 1mg
from The Recipe Critic https://ift.tt/30WkzEm
https://ift.tt/3atVO5j
Honey Butter Baked Chicken is a rich and flavorful dinner that has tender baked chicken made with only four ingredients! The blend of honey and butter is the perfect combination for a flavorful chicken dinner.
Chicken is always a favorite protein for dinner in our home. Some of our favorite chicken recipes recently is this Chicken Margherita, Skillet French Onion Chicken and using my Absolutely Perfect Chicken Marinade to make the BEST chicken every time.
Honey Butter Baked Chicken
This is one of those recipes that is good to bring out of the archive every once in a while to change it up. It is super easy to put together and has a really good honey flavor to it. Honey butter chicken is the perfect combination of sweet and savory chicken that bakes it perfectly. Every bite is tender and juicy packed with so much flavor.
Baked chicken is always a favorite of mine during the busy week. It is simple to whisk together all the ingredients, pour over top of the chicken and bake while I am able to help with other things around the house. My girls love how easy this chicken recipe is and knows just how to help me in the kitchen to make it. Add a couple side dishes and make this baked chicken dinner a complete meal.
Honey Butter Chicken Ingredients:
Seriously, only four ingredients to make this simple baked chicken recipe! It comes together so quickly and easily, even you will be amazing at the flavors and tenderness this chicken dinner has to offer.
Chicken Breasts: Fresh, thawed chicken ready to be baked.
Honey: Thickens the sauce and adds a hint of sweetness!
Margarine or Butter: Melted and stirred in for a buttery flavor blend.
Mustard: Adds a tangy mustard taste to the chicken while cooking.
Salt: Just a pinch!
How to Bake Chicken:
Simply add all the ingredients together and pour over the chicken. Bake it for one hour and dinner is made! It is perfect for a busy weeknight or a simple dinner your family can help with in the kitchen.
Prepare oven: Preheat oven to 350 degrees Fahrenheit.
Whisk Together: Combine honey, butter, mustard and salt in a mixing bowl.
Chicken: Arrange chicken breasts in a shallow baking pan laying flat. Pour whisked ingredients over chicken evenly.
Bake: Bake for 1 hour, basting the chicken every 15 minutes.
What to Serve with Honey Butter Chicken:
Adding side dishes with this baked chicken is a great idea to make this a complete meal. Bread, salad and a vegetable or fruit is always a great balance for dinner time. I love to serve this chicken recipe with a various of side dishes that are quick and easy to make while the chicken is baking for one hour.
Bread: Garlic Parmesan Pull-Apart Bread or Perfect Soft and Buttery Rolls with some honey is delicious!
Salad: Strawberry Avocado Spinach Salad or Very Berry Cheesecake Salad are fun and fresh salads.
Fruit: Mouthwatering Watermelon Salad is delicious and simple to cut up and mix together.
Vegetables: This classic Fried Green Tomatoes or a simple Roasted Lemon honey Garlic Asparagus are easy to make and add the perfect touch!
Dessert! Don’t forget dessert with this favorite Pineapple Upside Down Cake or these delicious White Chocolate Oreo Cookies. Dessert can be baking while you are enjoying dinner!
Storing Baked Chicken:
Baked chicken is easy to make with the perfect blend of honey, butter and mustard. It is simple to bake and clean up is even easier. Let the chicken completely cool before adding it to the bag or airtight containers. This dinner will reheat easily and quickly when ready!
Refrigerator: Add the left over chicken to a ziplock bag or airtight container and place in the refrigerator for 2 to 3 days long.
Freezer: Place the chicken in a ziplock bag releasing all the air. Laying the chicken flat, place the chicken on in the freezer for about a month long. When ready to reheat, move the chicken into the refrigerator over night and let it thaw completely before warming up.
Warming Up: Bake it in the oven at 350 degrees Fahrenheit or place in the microwave flipping it every minute until it is warmed through. Add a side salad or some potatoes and you have a delicious meal all over again!
More Amazing Baked Chicken Dinners:
Best Baked Chicken Thighs
Baked Parmesan Garlic Chicken Breast
Easy Baked Cheesy Mushroom Chicken
Baked Buttery Herb Chicken and Potatoes
Creamy Baked Asiago Chicken
Print
Honey Baked Chicken
Honey Butter Baked Chicken is a rich and flavorful dinner that has tender baked chicken made with only four ingredients! The blend of honey and butter is the perfect combination for a flavorful chicken dinner.
Course Dinner, Main Course
Cuisine American
Keyword baked chicken, chicken recipes
Prep Time 10 minutes
Cook Time 1 hour
Total Time 1 hour 10 minutes
Servings 4 Servings
Calories 227kcal
Author Alyssa Rivers
Ingredients
4 Chicken Breast
1/3 cup Honey
1/3 cup Margarine or Butter
2 Tablespoons Mustard
1/4 Teaspoon Salt
Instructions
Preheat oven to 350 degrees Fahrenheit
Combine honey, butter, mustard and salt in a mixing bowl.
Arrange chicken breasts in a shallow baking pan laying flat. Pour whisked ingredients over chicken evenly.
Bake for 1 hour, basting the chicken every 15 minutes.
Notes
Updated on August 15, 2020
Originally Posted on June 4, 2012
Nutrition
Calories: 227kcal | Carbohydrates: 24g | Protein: 1g | Fat: 16g | Saturated Fat: 3g | Sodium: 410mg | Potassium: 25mg | Fiber: 1g | Sugar: 23g | Vitamin A: 677IU | Calcium: 10mg | Iron: 1mg
from The Recipe Critic https://ift.tt/30WkzEm
via Blogger https://ift.tt/2DWfpiL
0 notes
Quote
Honey Butter Baked Chicken is a rich and flavorful dinner that has tender baked chicken made with only four ingredients! The blend of honey and butter is the perfect combination for a flavorful chicken dinner.
Chicken is always a favorite protein for dinner in our home. Some of our favorite chicken recipes recently is this Chicken Margherita, Skillet French Onion Chicken and using my Absolutely Perfect Chicken Marinade to make the BEST chicken every time.
Honey Butter Baked Chicken
This is one of those recipes that is good to bring out of the archive every once in a while to change it up. It is super easy to put together and has a really good honey flavor to it. Honey butter chicken is the perfect combination of sweet and savory chicken that bakes it perfectly. Every bite is tender and juicy packed with so much flavor.
Baked chicken is always a favorite of mine during the busy week. It is simple to whisk together all the ingredients, pour over top of the chicken and bake while I am able to help with other things around the house. My girls love how easy this chicken recipe is and knows just how to help me in the kitchen to make it. Add a couple side dishes and make this baked chicken dinner a complete meal.
Honey Butter Chicken Ingredients:
Seriously, only four ingredients to make this simple baked chicken recipe! It comes together so quickly and easily, even you will be amazing at the flavors and tenderness this chicken dinner has to offer.
Chicken Breasts: Fresh, thawed chicken ready to be baked.
Honey: Thickens the sauce and adds a hint of sweetness!
Margarine or Butter: Melted and stirred in for a buttery flavor blend.
Mustard: Adds a tangy mustard taste to the chicken while cooking.
Salt: Just a pinch!
How to Bake Chicken:
Simply add all the ingredients together and pour over the chicken. Bake it for one hour and dinner is made! It is perfect for a busy weeknight or a simple dinner your family can help with in the kitchen.
Prepare oven: Preheat oven to 350 degrees Fahrenheit.
Whisk Together: Combine honey, butter, mustard and salt in a mixing bowl.
Chicken: Arrange chicken breasts in a shallow baking pan laying flat. Pour whisked ingredients over chicken evenly.
Bake: Bake for 1 hour, basting the chicken every 15 minutes.
What to Serve with Honey Butter Chicken:
Adding side dishes with this baked chicken is a great idea to make this a complete meal. Bread, salad and a vegetable or fruit is always a great balance for dinner time. I love to serve this chicken recipe with a various of side dishes that are quick and easy to make while the chicken is baking for one hour.
Bread: Garlic Parmesan Pull-Apart Bread or Perfect Soft and Buttery Rolls with some honey is delicious!
Salad: Strawberry Avocado Spinach Salad or Very Berry Cheesecake Salad are fun and fresh salads.
Fruit: Mouthwatering Watermelon Salad is delicious and simple to cut up and mix together.
Vegetables: This classic Fried Green Tomatoes or a simple Roasted Lemon honey Garlic Asparagus are easy to make and add the perfect touch!
Dessert! Don’t forget dessert with this favorite Pineapple Upside Down Cake or these delicious White Chocolate Oreo Cookies. Dessert can be baking while you are enjoying dinner!
Storing Baked Chicken:
Baked chicken is easy to make with the perfect blend of honey, butter and mustard. It is simple to bake and clean up is even easier. Let the chicken completely cool before adding it to the bag or airtight containers. This dinner will reheat easily and quickly when ready!
Refrigerator: Add the left over chicken to a ziplock bag or airtight container and place in the refrigerator for 2 to 3 days long.
Freezer: Place the chicken in a ziplock bag releasing all the air. Laying the chicken flat, place the chicken on in the freezer for about a month long. When ready to reheat, move the chicken into the refrigerator over night and let it thaw completely before warming up.
Warming Up: Bake it in the oven at 350 degrees Fahrenheit or place in the microwave flipping it every minute until it is warmed through. Add a side salad or some potatoes and you have a delicious meal all over again!
More Amazing Baked Chicken Dinners:
Best Baked Chicken Thighs
Baked Parmesan Garlic Chicken Breast
Easy Baked Cheesy Mushroom Chicken
Baked Buttery Herb Chicken and Potatoes
Creamy Baked Asiago Chicken
Print
Honey Baked Chicken
Honey Butter Baked Chicken is a rich and flavorful dinner that has tender baked chicken made with only four ingredients! The blend of honey and butter is the perfect combination for a flavorful chicken dinner.
Course Dinner, Main Course
Cuisine American
Keyword baked chicken, chicken recipes
Prep Time 10 minutes
Cook Time 1 hour
Total Time 1 hour 10 minutes
Servings 4 Servings
Calories 227kcal
Author Alyssa Rivers
Ingredients
4 Chicken Breast
1/3 cup Honey
1/3 cup Margarine or Butter
2 Tablespoons Mustard
1/4 Teaspoon Salt
Instructions
Preheat oven to 350 degrees Fahrenheit
Combine honey, butter, mustard and salt in a mixing bowl.
Arrange chicken breasts in a shallow baking pan laying flat. Pour whisked ingredients over chicken evenly.
Bake for 1 hour, basting the chicken every 15 minutes.
Notes
Updated on August 15, 2020
Originally Posted on June 4, 2012
Nutrition
Calories: 227kcal | Carbohydrates: 24g | Protein: 1g | Fat: 16g | Saturated Fat: 3g | Sodium: 410mg | Potassium: 25mg | Fiber: 1g | Sugar: 23g | Vitamin A: 677IU | Calcium: 10mg | Iron: 1mg
from The Recipe Critic https://ift.tt/30WkzEm
http://easyfoodnetwork.blogspot.com/2020/08/honey-butter-baked-chicken.html
0 notes
Last Seen Blogs

wintarsfell
I have always been a storm.

f0rever-hallow33n
benny's adventure team

toyohara
SOBA

hianonsuper
Untitled

imnotapacifist
Im_a_Pacifist