#Autel Im608 Ii
Text
Autel IM608 Program Key for BMW CAS4 CAS4+ via OBD
Autel MaxiIM IM608 II can program BMW CAS4 and CAS4+ keys using OBD, without needing to open the ECU box. Remember, a network connection is essential during the whole process.
For instance, let’s consider BMW F30 key programming:
Important Notes:
For CAS4, the procedure for adding a key in case of all keys lost remains the same; ISN retrieval is unnecessary.
For CAS4+ all key lost scenarios, attempt to read the Engine ISN code under ISN code management. If this is not supported, explore alternative methods to acquire the ISN code.
The subsequent steps are identical to adding a key. To determine the CAS system type, access “ECU information.”
Programming Procedure:
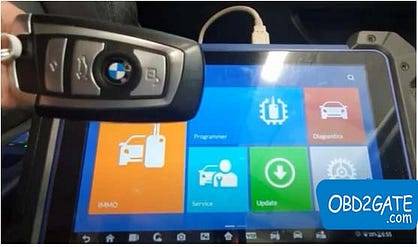
Connect IM608 II to the OBD2 port of your BMW.
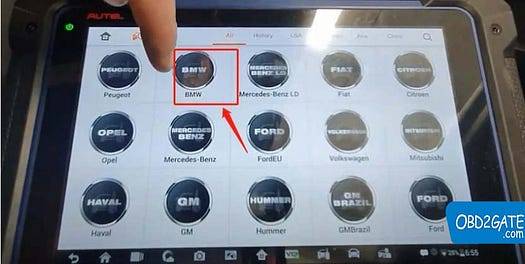
Navigate to “BMW” in the device.
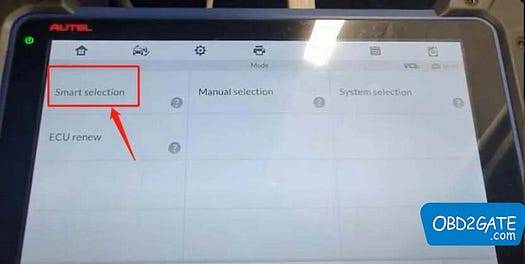
Opt for “Smart Selection.”
Choose “Mini (Europe) > Smart Mode.”
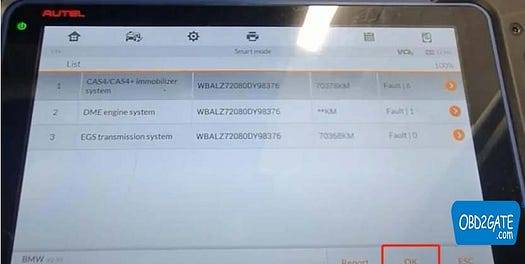
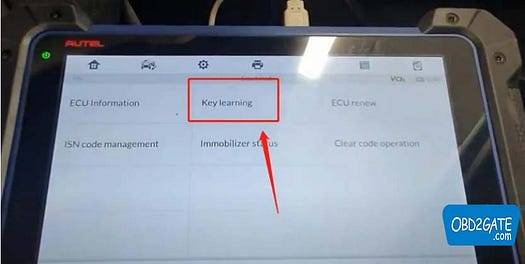
Select “Key Learning” followed by confirming vehicle information with “OK.”
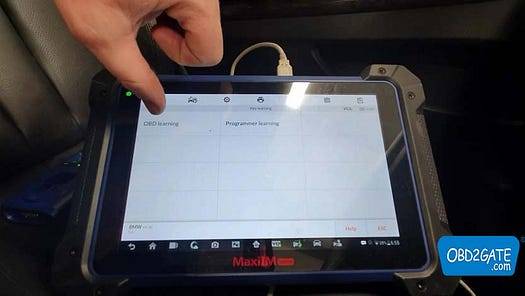
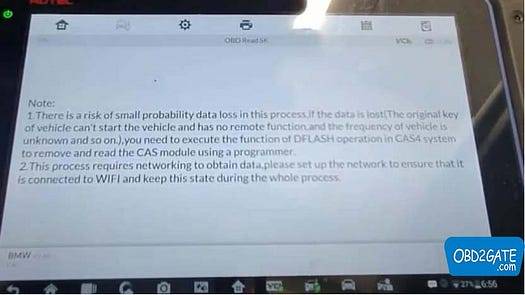
Proceed to “OBD Learning” >read the provided instructions, click ‘OK’
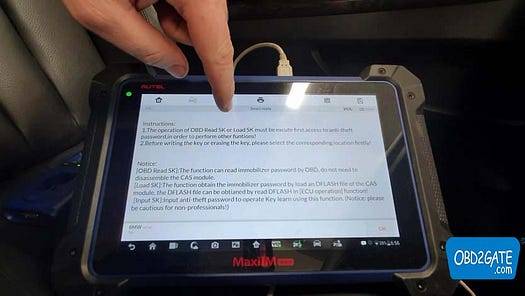
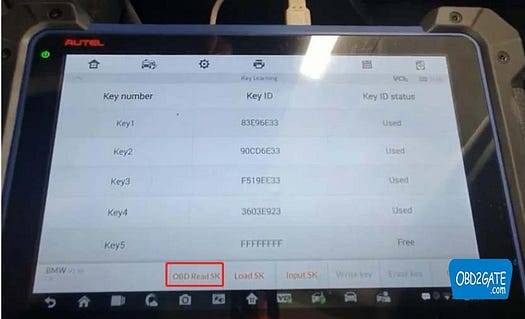
Click “OBD Read SK” on MaxiIM IM608> read notes.
Respond to the question about having a working key with “Yes” or “No.”

Position a working key as close to the start coil as possible.
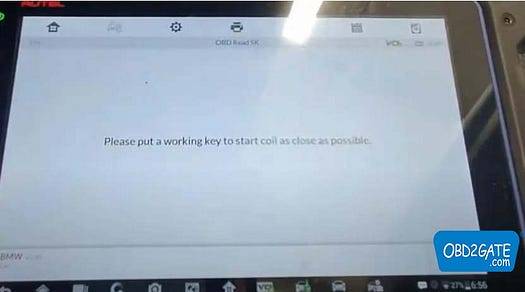
Successful reading of the password.
Pick an empty key position for key writing.
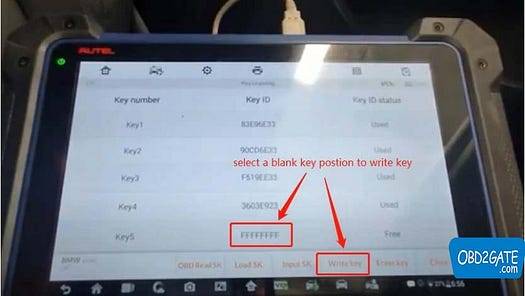
Place the new key near the starting coil. Key frequency: 868MHZ.
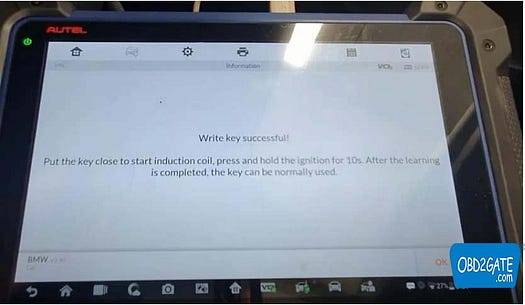
The key learning process consists of two steps.

Key writing is completed successfully.
By adhering to the instructions on Autel MaxiIM IM608 II, the entire process will be effortlessly accomplished!
Check Autel im608 pro II price on OBD2GATE.com:
2 notes
·
View notes
Text
Autel IM608 II and Godiag Test Platform Add BMW CAS2 Key Guide
Question:
Is it possible to add BMW CAS2 Semi Smart Key with Autel IM608/IM608 II and Godiag CAS2 CAS3 Test Platform?
Here is the clue.
Autel MaxiIM IM608 II cannot read data by connecting CAS1/CAS2/CAS3/CAS3+/ CAS3++ via OBD directly.
The device will be unable to communicate with the CAS module when you use the IMMO function. No matter automatic selection or system selection.

But you can connect XP400/XP400 Pro key programmer and CAS module via APA106/APA109 cable to make key, and then use Godiag BMW CAS1 CAS2 Test Platform (for CAS1/CAS2 mechanical keys) or Godiag BMW CAS2 CAS3 Test Platform (for CAS2/CAS3 series semi smart keys) to test the key and CAS module synchronization.
NOTE:
APA106 is for XP400/XP401, and APA109 is for Autel XP400 Pro/XP401 Pro. Do not mix!
Operation guide:
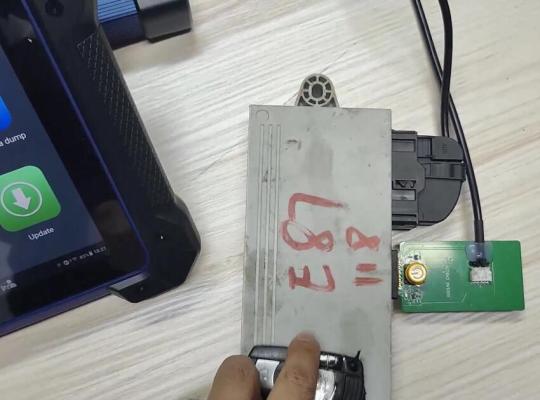
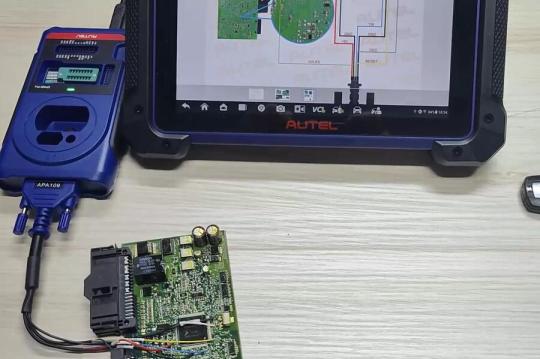
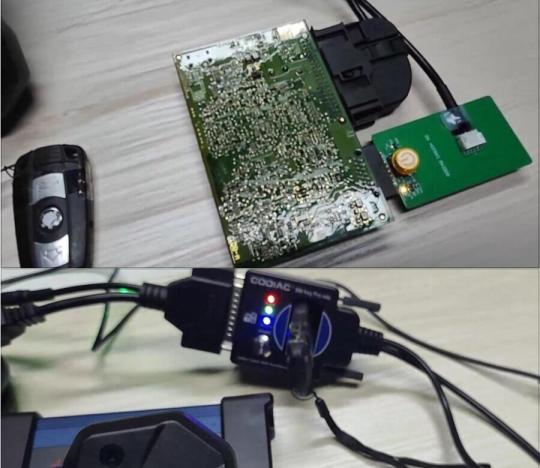
1.Connect IM608II, MaxiFlash JVCI, XP400/XP400 Pro, Godiag CAS2/CAS3 Test Platform correctly
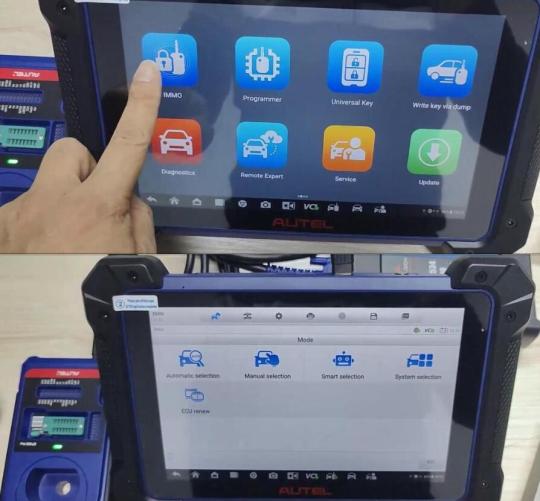
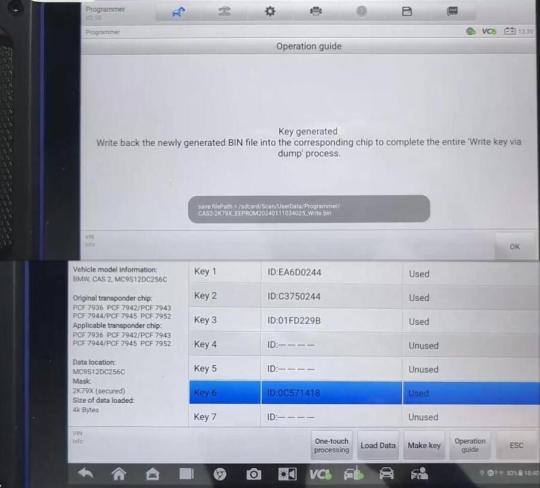
2.Enter “Write key via dump” option
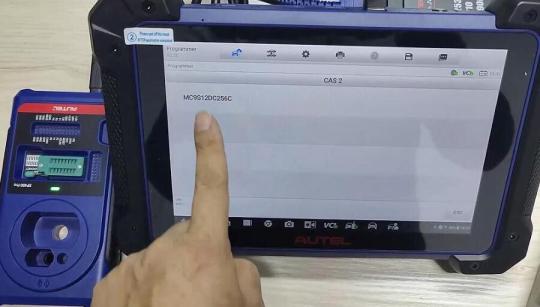
Select Area>> Europe>> BMW>> CAS2>> MC9S12DC256C

Follow the operation guide to connect device

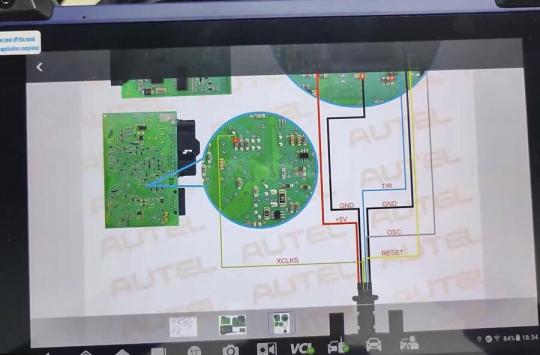
Remove the component from the vehicle, check the circuit board of the current component and identify the corresponding circuit board, and connect XP400/XP400 Pro and CAS module according to the wiring diagram
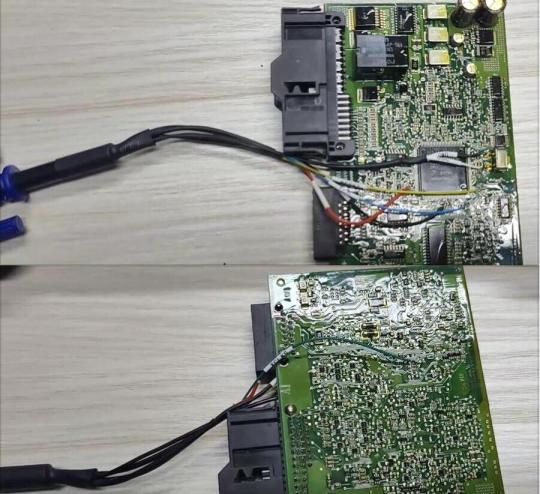
3.After connection, go to “Programmer” option
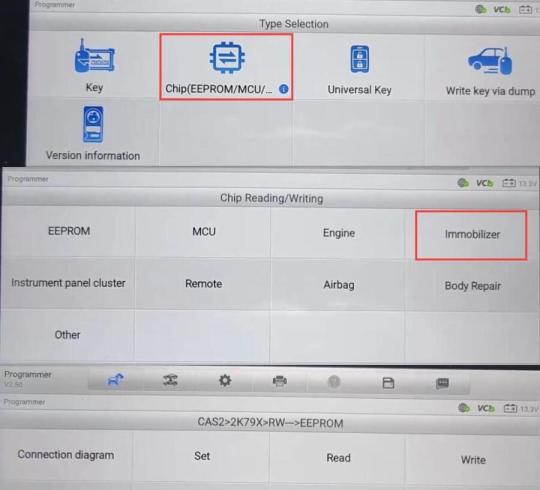
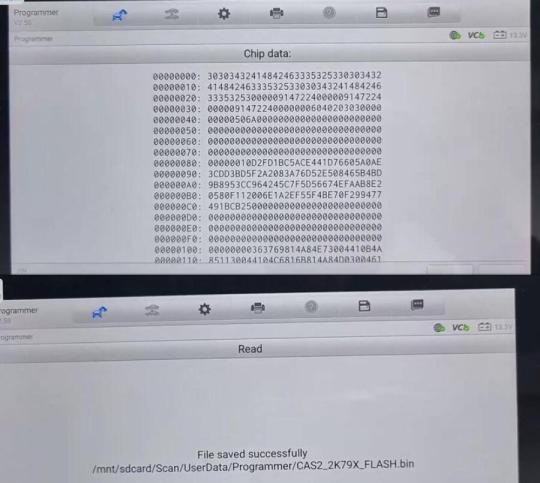
Select Chip (EEPROM/MCU/…)>> Chip Reading/Writing>> Immobilizer>> BMW>> CAS2>2K79X>RW>> EEPOM
The connection diagram also can be found here.
Select “Read” to read EEPROM data, and then save the file after reading
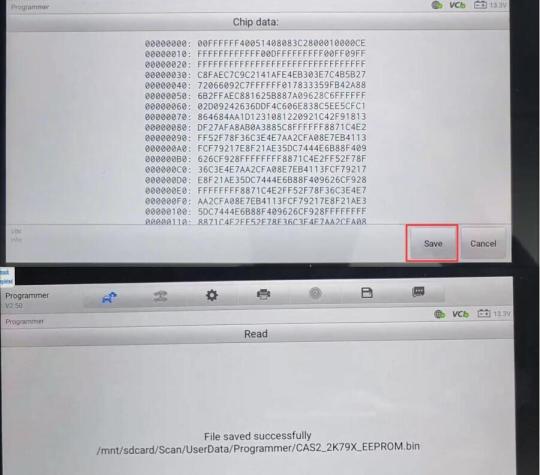
Then select FLASH to read flash data and save the file
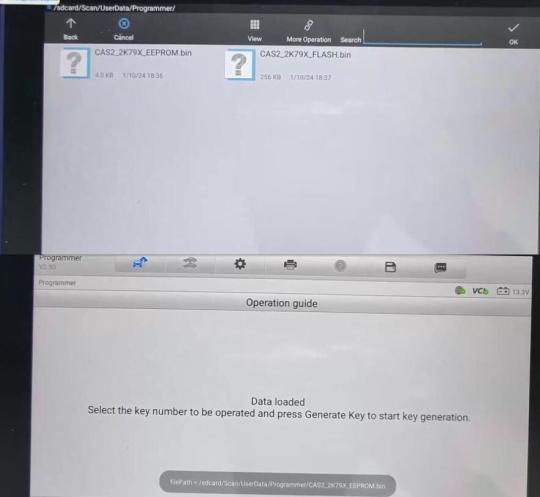
4.Go to “Write key via dump” option and select the corresponding CAS2 module type the same as step 2
Tap “Load data” to select the EEPROM data just saved
Disconnect APA106 or APA109 cable
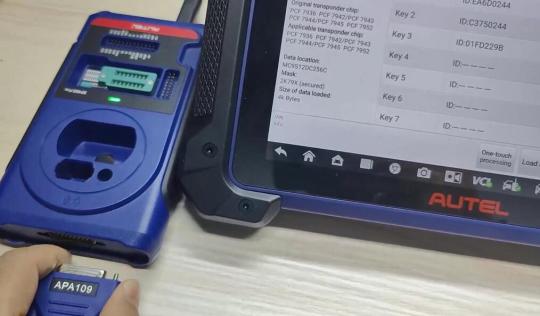
Put a blank key into the coil of XP400/XP400 Pro programmer
Select an unused key position (i.e key 6) to and tap “Make key”
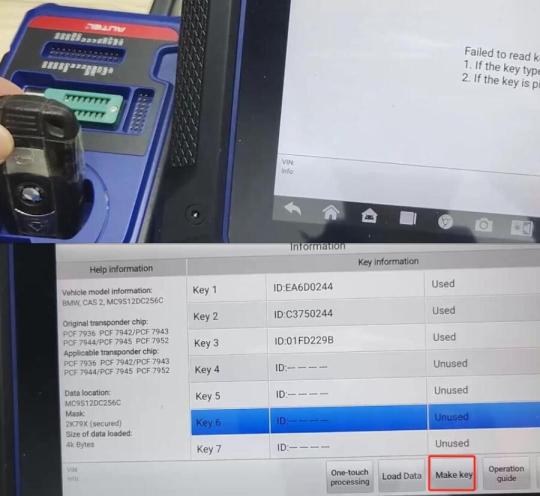
Reading key info
Confirm add a key to key 6
Creating data…writing back key
Save the newly generated file
Generate key successfully
The key 6 is used now.
Disconnect all cables on the CAS2 module
Connect Godiag CAS2 CAS3 Semi Smart Key Test Platform and CAS2 module
Put the key generated into the coil of Godiag Test Platform
Press the START button
The IMMO and INDUC indicators light up, that means the key has been written into CAS system successfully.
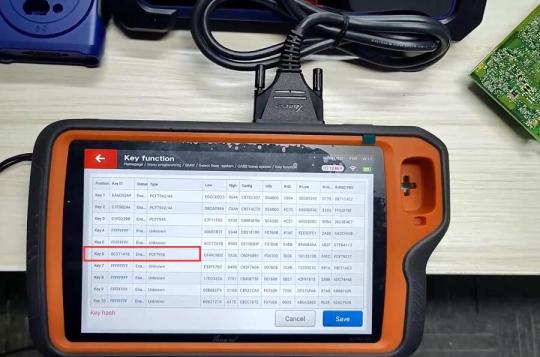
Use VVDI Key Tool Plus to read the new key info, displays the same result.
If the key is unsynchronized with the CAS module, write back the newly generated BIN file into the corresponding chip to complete the entire “Write key via dump” process.
0 notes
Text
Toyota Corolla Add New Smart Key by Autel IM608 II and APB112
Autel MaxiIM IM608 II key programmer and APB112 Smart Key Simulator can work together to add a smart key for Toyota Corolla in less than 2 minutes. Here is the instruction.

A Step-by-Step Procedure:
Step 1: Establish Vehicle Connection
Plug in the VCl into the vehicle’s OBDII port.
Activate the vehicle’s ignition.
Step 2: Navigate to IMMO and choose vehicle model
Press “IMMO” on the main menu of MaxiIM IM608 II
Agree to the disclaimer
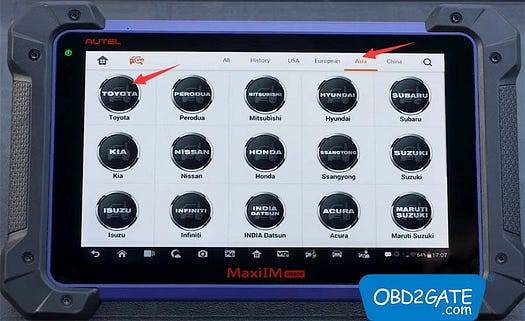
Select the region “Asia,” followed by “Toyota.”
Choose “Manual selection,” then “USA,” and further select “COROLLA.”
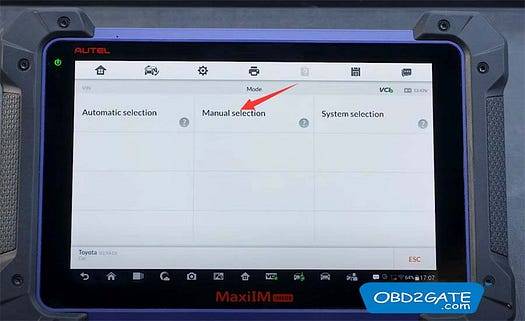
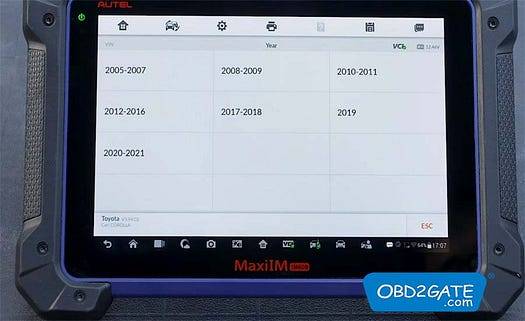
Choose the appropriate car year range (e.g., 2017–2018).
Opt for “Smart key.”
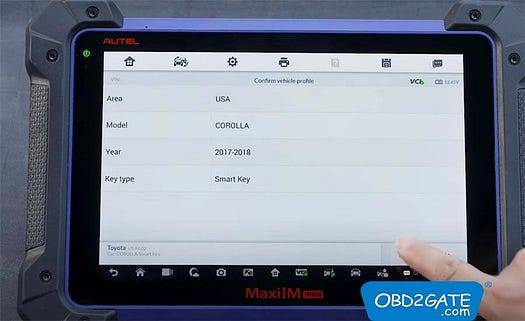
Confirm vehicle profile
Step 3: Add a Smart Key
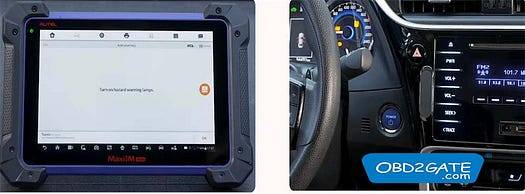
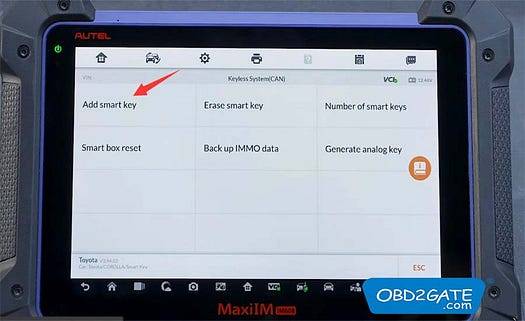
Select “Control Unit,” followed by “Keyless System (CAN),” and choose “Add Smart Key.”
Verify the usage of Autel APB112 smart key simulatorActivate the hazard warning lamps.
Every step must be performed within the designated time frame.
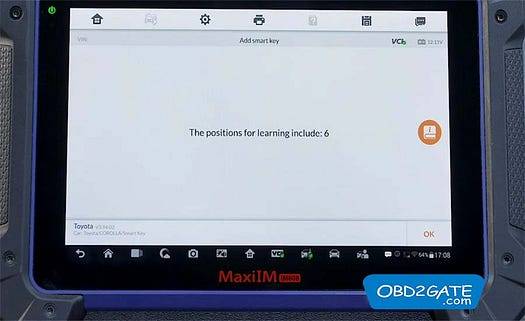
A total of 6 learning positions are involved.

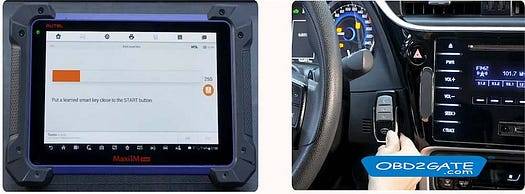
Position a previously learned smart key near the START button.
Successful learning confirmation.

Process Completed!
By following these straightforward steps, Autel MaxiIM IM608 II successfully adds a new smart key for Toyota Corolla model.
0 notes
Text


1 note
·
View note
Text
Can Autel IM608 II Program Locked Radio from GM Vehicle?
Quick Question:
I have Autel IM608 Pro 2. Has anyone encountered a locked radio on 2013 Buick or any other GM vehicle? Just says lock with no passcode
Use SPS2 Techline connect (new home of tis2web), 40-50$, and a J2534 passthru or GM MDI.
More details:
We need to go to ACDELCO website.

And create an account and buy subscription, 1 vehicle for 40USD.

Then install and open techline.
We could just use Autel J2534 here as the passthru for sps2. (of course we could use other J2534 including VNCI MDI2, VXDIAG, TOPDON RLink...)

Select our VCI.

Enter Body Control Module.

Select the option with auto door lock option.

The new software improvement.

Then just next and wait until it finishes programming.

Radio functions again.

Done! With SPS2 less than 10 minutes to unlock GM radio.
0 notes
Text
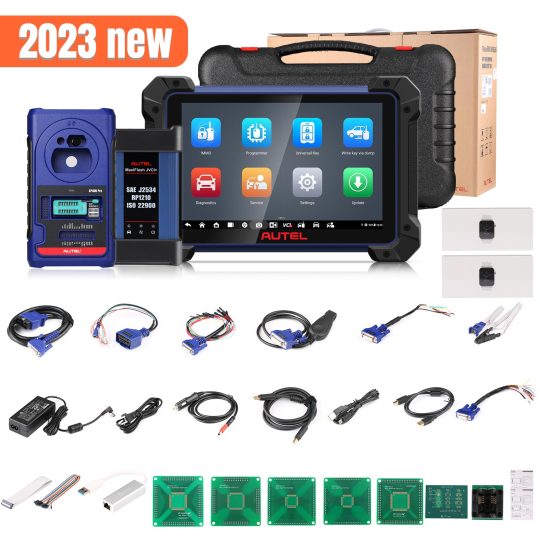
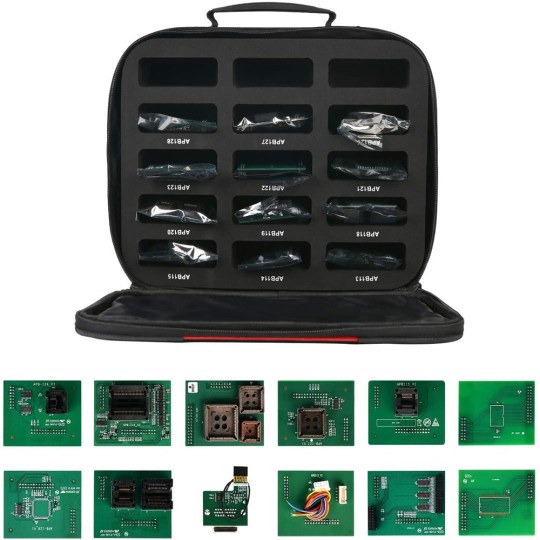
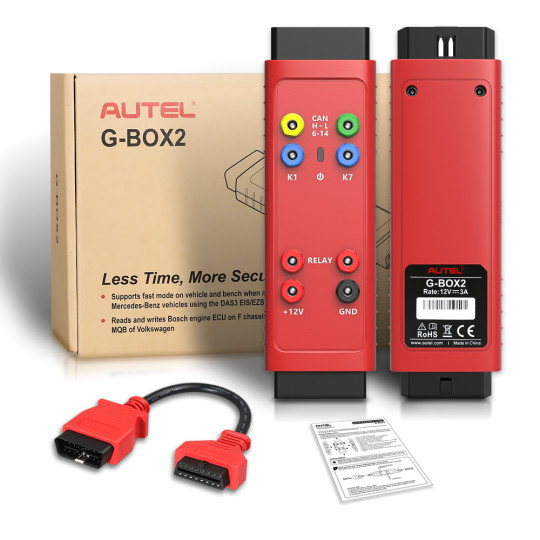
Autel MaxiIM IM608 PRO II Plus IMKPA Accessories with G-Box2 and APB112 Replace Autel IM608 PRO
#autel #autelim608pro2 #im608pro2 #gbox2 #apb112 #im608 #im608proii


wasap.my/+8615886576826
0 notes
Text
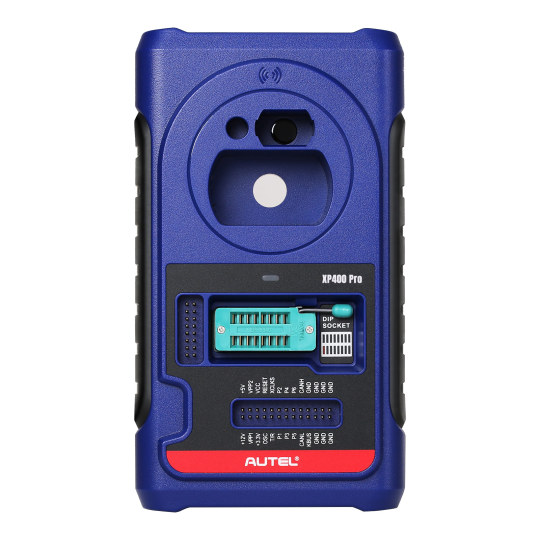
Autel XP400 PRO - works with IM508/ IM508S/ IM608 II
🚗 Benz - One-tap Key Programming, All Key Lost
🔑 BMW - Smart IMMO Programming, Add/All Key Lost
🚘 VW/Audi - Online Programming, Add/All Key Lost
🔐 GM, Ford, Mazda, FCA, Renault - Key Programming, All Key Lost
🚙 LandRover, Jaguar, Volvo - Key Learning, Add/All Key Lost
1 note
·
View note
Text
How to Use Autel IM608 Generic OBD II Function?
Autel MaxiIM 608,A fast-access option for OBD II/EOBD vehicle diagnosis is available on the Vehicle Menu screen. This option presents a quick way to check for DTCs,isolate the cause of an illuminated malfunction indicator lamp (MIL), check monitor status prior to emissions certification testing, verify repairs, and perform a number of other services that are emissions-related. The OBD direct access option is also used for testing OBD II/EOBD compliant vehicles that are not included in the Diagnostics database.
Functions of the diagnostics toolbar buttons at the top of the screen are the same as those available for specific vehicle diagnostics.
Autel IM608 General Procedure
To access the OBD II/EOBD diagnostics functions
1. Tap the Diagnostics application button from the MaxiIM Job Menu.
The Vehicle Menu displays.
2. Tap the EOBD button. There are two options to establish communication with the vehicle.
Auto Scan – when this option is selected the diagnostic tool attempts to establish communication using each protocol in order to determine which one the vehicle is broadcasting on.Protocol – when this option is selected the screen opens a submenu of various protocols. A communication protocol is a standardized way of data communication between an ECM and a diagnostic tool. Global OBD may use several different communication protocols.
3. Select a specific protocol under the Protocol option. Wait for the OBD II Diagnostic Menu to appear.
NOTE
Tapping the button displayed beside the function name opens a bubble with additional function information.
4. Select a function option to continue.
DTC & FFD
I/M Readiness
Live Data
On-Board Monitor
Component Test
Vehicle Information
Vehicle Status
http://www.uobdii.com/wholesale/autel-maxiim-im608.html
0 notes
Text
How to Use Autel IM608 II to Diagnose Toyota FJ?
In this guide, I will show you how to diagnose a Toyota FJ vehicle using Autel MaxiIM IM608 II key programmer. The following are the procedures to achieve this.
Equipment involved:
IM608 II
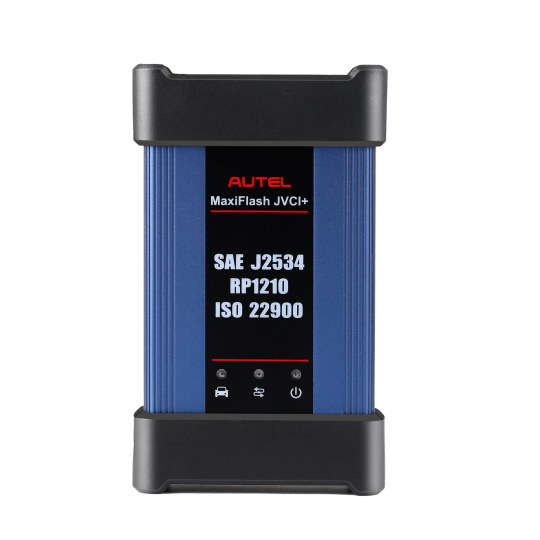
Autel J2534
Toyota FJ

Procedure:
1. Begin by connecting the OBD port to the car’s connector.
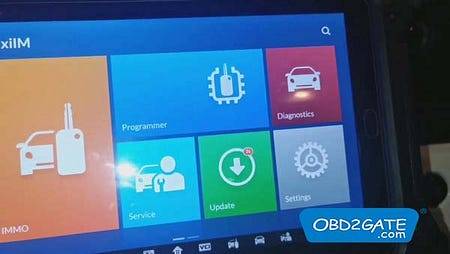
2. Power on MaxiIM IM608>> input the password >> start the car’s ignition.
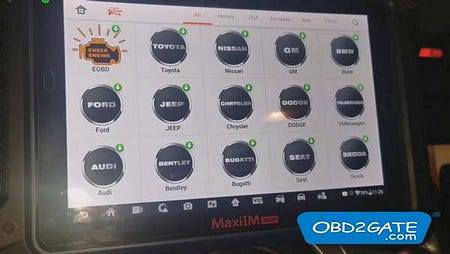
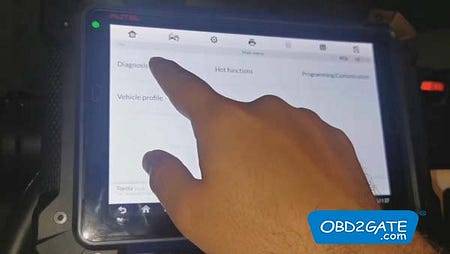
3. Access the “Diagnostics” section >> click on”Toyota” button>>Agree to the disclaimer.
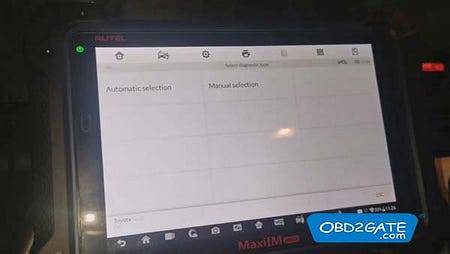
4. Opt for “Automatic selection” and click”Read” to have the system automatically identify the vehicle’s VIN number.
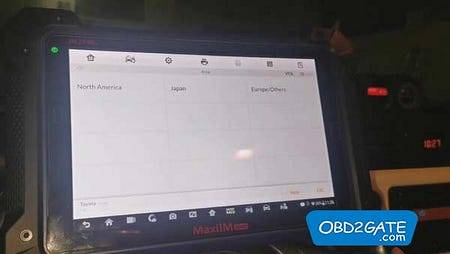
5. Select”Japan” , then click “08/2012 later” , and click “Yes.”
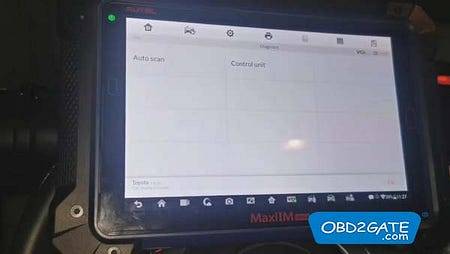
6. Press”Diagnosis” >>”Auto scan”
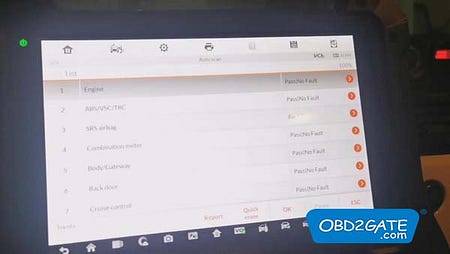
Autel Maxi IM608 II will perform a comprehensive scan automatically.
7. The task has been completed, and now we should proceed to clear faults. Click on “Quick Erase” and then everything will be set.
With these simple steps, you can effectively diagnose a Toyota FJ using Autel MaxiIM IM608 II.
0 notes
Text
Autel IM608 II Program Key for BMW CAS4 CAS4+ via OBD
Autel MaxiIM IM608 II can program BMW CAS4 and CAS4+ keys using OBD, without needing to open the ECU box. Remember, a network connection is essential during the whole process.
For instance, let’s consider BMW F30 key programming:
Important Notes:
For CAS4, the procedure for adding a key in case of all keys lost remains the same; ISN retrieval is unnecessary.
For CAS4+ all key lost scenarios, attempt to read the Engine ISN code under ISN code management. If this is not supported, explore alternative methods to acquire the ISN code.
The subsequent steps are identical to adding a key. To determine the CAS system type, access “ECU information.”

Programming Procedure:
Connect IM608 II to the OBD2 port of your BMW.
Navigate to “BMW” in the device.

Opt for “Smart Selection.”

Choose “Mini (Europe) > Smart Mode.”

Select “Key Learning” followed by confirming vehicle information with “OK.”
Proceed to “OBD Learning” >read the provided instructions, click ‘OK’


Click “OBD Read SK” on MaxiIM IM608> read notes.

Respond to the question about having a working key with “Yes” or “No.”

Position a working key as close to the start coil as possible.

Successful reading of the password.
Pick an empty key position for key writing.

Place the new key near the starting coil. Key frequency: 868MHZ.
The key learning process consists of two steps.

Key writing is completed successfully.

By adhering to the instructions on Autel MaxiIM IM608 II, the entire process will be effortlessly accomplished!
Check Autel im608 pro II price on OBD2GATE.com:
0 notes
Text
Toyota Corolla Add New Smart Key by Autel IM608 and APB112
Autel MaxiIM IM608 II key programmer and APB112 Smart Key Simulator can work together to add a smart key for Toyota Corolla in less than 2 minutes. Here is the instruction.
A Step-by-Step Procedure:
Step 1: Establish Vehicle Connection
Plug in the VCl into the vehicle’s OBDII port.
Activate the vehicle’s ignition.
Step 2: Navigate to IMMO and choose vehicle model
Press “IMMO” on the main menu of MaxiIM IM608 II
Agree to the disclaimer
Select the region “Asia,” followed by “Toyota.”
Choose “Manual selection,” then “USA,” and further select “COROLLA.”


Choose the appropriate car year range (e.g., 2017–2018).
Opt for “Smart key.”
Confirm vehicle profile

Step 3: Add a Smart Key
Select “Control Unit,” followed by “Keyless System (CAN),” and choose “Add Smart Key.”
Verify the usage of Autel APB112 smart key simulator
Activate the hazard warning lamps.

Every step must be performed within the designated time frame.
A total of 6 learning positions are involved.
Position a previously learned smart key near the START button.
Successful learning confirmation.

Process Completed!
By following these straightforward steps, Autel MaxiIM IM608 II successfully adds a new smart key for Toyota Corolla model.
0 notes
Text
How to Use Autel IM608 to Diagnose Toyota FJ?
In this guide, I will show you how to diagnose a Toyota FJ vehicle using Autel MaxiIM IM608 II key programmer. The following are the procedures to achieve this.
Equipment involved:
IM608 II
Autel J2534
Toyota FJ


Procedure:
1. Begin by connecting the OBD port to the car’s connector.

2. Power on MaxiIM IM608>> input the password >> start the car’s ignition.
3. Access the “Diagnostics” section >> click on”Toyota” button>>Agree to the disclaimer.


4. Opt for “Automatic selection” and click”Read” to have the system automatically identify the vehicle’s VIN number.

5. Select”Japan” , then click “08/2012 later” , and click “Yes.”

6. Press”Diagnosis” >>”Auto scan”
Autel Maxi IM608 II will perform a comprehensive scan automatically.


7. The task has been completed, and now we should proceed to clear faults. Click on “Quick Erase” and then everything will be set.

With these simple steps, you can effectively diagnose a Toyota FJ using Autel MaxiIM IM608 II.
0 notes
Text
How to Program Key for Renault Clio V 2021 with IM608 II
Autel Maxi IM608 II / IM508 key programmer was able to make a flip key for Renault Clio V 2021. There are two methods available to make the key.
Method 1: Online OBD Programming
Effortless programming can be carried out directly online using the On-Board Diagnostics (OBD) interface. This procedure requires no removal or installation within the vehicle. A nominal transaction fee of $8.8.
It’s important to note that when using OBD transactions, you can work with the same car three times within a 24-hour period without any cost. But if this time limit is exceeded, you will need to make another payment.


How to purchase Renault Security Gateway Function?
To procure the Renault Security Gateway function, you have several options:
Automatically detect or manually select the Renault vehicle from the Diagnostic or Service section. If no usage times are available, a prompt will appear to purchase the Renault Security Gateway function.
When the Renault vehicle is detected or manually chosen in the IM608 II/IM508 Diagnostic or Service area, and the vehicle is eligible for the function, an OEM Authorization icon will appear on the diagnostics toolbar. This icon facilitates the direct purchase of the function.
If the Renault Security Gateway function has been purchased previously, customers can renew their subscription by accessing the OEM Authorization within the MaxiSys Job Menu.


Method 2: Free Cable-Based Programming
An alternative, cost-free method involves connecting the 16+32 Nissan/Renault cable to the car’s Gateway module. This operation requires disassembly up to the glove box’s rear. This approach allows for programming without any associated charges.


In certain models, the pin code is generated automatically. In contrast, other models necessitate the utilization of a 28-digit code from AUTEL. Because of the time zone difference between different places and China, the transaction might be postponed until the following day.
Therefore, locksmiths can choose from the 2 methods to program flip key for your Renault Clio V 2021 model with im608 Autel II.
0 notes
Text
3 Ways to Read EEPROM Data with Autel IM608 II and XP400 Pro
In this article, we will show you how to use Autel Maxi IM608 II and XP400 key programmer to read EEPROM data in three different ways. These methods offer you flexibility and convenience for accessing EEPROM data. The three methods are:
Method 1: Reading with Autel XP400 Pro and APA103 (EEPROM Clamp)
Required Devices:
Maxi IM608 II
XP400 Key Programmer
Autel APA 103 EEPROM Clamp
Programmer USB cable

Steps:
Prior to starting, it is advised to wear electrically insulated gloves.
Align the redline of the EEPROM Clamp with EEPROM pin #1.

Connect the other end of the APA103 EEPROM Clamp to XP400 Pro device.
Use the programmer USB cable to connect XP400 Pro and Autel IM608 II.

Method 2: Using APA002 EEPROM Socket
Required Devices:
Maxi IM608 II
XP400 Pro Key Programmer
Autel APA002 EEPROM Socket
Programmer USB cable
EEPROM chip
Clip

Steps:
Identify the correct position corresponding to EEPROM pin #1.

Grab the clip with the clip and put it in the right spot of EEPROM Socket

Insert the APA002 EEPROM Socket into XP400 Pro.
Utilize the programmer USB cable to connect the XP400 Pro and Autel IM608 II.

Method 3: Employing APB129 EEPROM Adapter Shell
Required Devices:
Maxi IM608 Tablet
XP400 Pro Key Programmer
Autel APB129 EEPROM Adapter
Programmer USB cable
EEPROM chip
Clip
Welding tool

Notes: APB129 supports both 6-Pin and 8-Pin chips.
Steps:
Determine the correct position aligned with EEPROM pin #1.
Use a clip and a welding tool to attach the EEPROM chip securely onto the APB129 EEPROM Adapter.


Connect the APB129 EEPROM Adapter to the XP400 Pro device.
Establish a connection between the XP400 Pro and Autel IM608 II using the programmer USB cable.

Reading EEPROM Data on IM608 Autel II Tablet:
Navigate through the following menu path on IM608 tablet:
Programmer > Accept the disclaimer > Chip (EEPROM, MCU, ECU) > Chip read & write > EEPROM.
Choose the appropriate EEPROM type for your operation.


By following these three methods, users can easily read EEPROM data using IM608 II and XP400 key programmer. Whether utilizing the APA103 Clamp, APA002 Socket, or APB129 Adapter, retrieving EEPROM data becomes a streamlined process with various options to choose from.
0 notes
Text
How to Program Key for Renault Clio V 2021 with IM608 II
Autel Maxi IM608 II / IM508 key programmer was able to make a flip key for Renault Clio V 2021. There are two methods available to make the key.
Method 1: Online OBD Programming
Effortless programming can be carried out directly online using the On-Board Diagnostics (OBD) interface. This procedure requires no removal or installation within the vehicle. A nominal transaction fee of $8.8.
It’s important to note that when using OBD transactions, you can work with the same car three times within a 24-hour period without any cost. But if this time limit is exceeded, you will need to make another payment.


How to purchase Renault Security Gateway Function?
To procure the Renault Security Gateway function, you have several options:
Automatically detect or manually select the Renault vehicle from the Diagnostic or Service section. If no usage times are available, a prompt will appear to purchase the Renault Security Gateway function.
When the Renault vehicle is detected or manually chosen in the IM608 II/IM508 Diagnostic or Service area, and the vehicle is eligible for the function, an OEM Authorization icon will appear on the diagnostics toolbar. This icon facilitates the direct purchase of the function.
If the Renault Security Gateway function has been purchased previously, customers can renew their subscription by accessing the OEM Authorization within the MaxiSys Job Menu.


Method 2: Free Cable-Based Programming
An alternative, cost-free method involves connecting the 16+32 Nissan/Renault cable to the car’s Gateway module. This operation requires disassembly up to the glove box’s rear. This approach allows for programming without any associated charges.


In certain models, the pin code is generated automatically. In contrast, other models necessitate the utilization of a 28-digit code from AUTEL. Because of the time zone difference between different places and China, the transaction might be postponed until the following day.
Therefore, locksmiths can choose from the 2 methods to program flip key for your Renault Clio V 2021 model with im608 Autel II.
0 notes
Text
3 Ways to Read EEPROM Data with Autel IM608 II and XP400 Pro
In this article, we will show you how to use Autel Maxi IM608 II and XP400 key programmer to read EEPROM data in three different ways. These methods offer you flexibility and convenience for accessing EEPROM data. The three methods are:
Method 1: Reading with Autel XP400 Pro and APA103 (EEPROM Clamp)
Required Devices:
Maxi IM608 II
XP400 Key Programmer
Autel APA 103 EEPROM Clamp
Programmer USB cable

Steps:
Prior to starting, it is advised to wear electrically insulated gloves.
Align the redline of the EEPROM Clamp with EEPROM pin #1.

Connect the other end of the APA103 EEPROM Clamp to XP400 Pro device.
Use the programmer USB cable to connect XP400 Pro and Autel IM608 II.

Method 2: Using APA002 EEPROM Socket
Required Devices:
Maxi IM608 II
XP400 Pro Key Programmer
Autel APA002 EEPROM Socket
Programmer USB cable
EEPROM chip
Clip

Steps:
Identify the correct position corresponding to EEPROM pin #1.

Grab the clip with the clip and put it in the right spot of EEPROM Socket

Insert the APA002 EEPROM Socket into XP400 Pro.
Utilize the programmer USB cable to connect the XP400 Pro and Autel IM608 II.

Method 3: Employing APB129 EEPROM Adapter Shell
Required Devices:
Maxi IM608 Tablet
XP400 Pro Key Programmer
Autel APB129 EEPROM Adapter
Programmer USB cable
EEPROM chip
Clip
Welding tool

Notes: APB129 supports both 6-Pin and 8-Pin chips.
Steps:
Determine the correct position aligned with EEPROM pin #1.
Use a clip and a welding tool to attach the EEPROM chip securely onto the APB129 EEPROM Adapter.


Connect the APB129 EEPROM Adapter to the XP400 Pro device.
Establish a connection between the XP400 Pro and Autel IM608 II using the programmer USB cable.

Reading EEPROM Data on IM608 Autel II Tablet:
Navigate through the following menu path on IM608 tablet:
Programmer > Accept the disclaimer > Chip (EEPROM, MCU, ECU) > Chip read & write > EEPROM.
Choose the appropriate EEPROM type for your operation.


By following these three methods, users can easily read EEPROM data using IM608 II and XP400 key programmer. Whether utilizing the APA103 Clamp, APA002 Socket, or APB129 Adapter, retrieving EEPROM data becomes a streamlined process with various options to choose from.
0 notes
Last Seen Blogs