#AutoCAD Tutorial AutoCAD Software AutoCAD Basic
Explore tagged Tumblr posts
Visit Tumblr Blog
Explore Tumblr blogs with no restrictions, modern design and the best experience.
Last Seen Tumblr Blogs


Fun Fact
12.7% of mobile users access Tumblr.
Text
Why Technostruct Academy is the Best BIM Institute in India
The Demand for BIM Expertise
In an era where infrastructure is becoming increasingly complex and digitized, professionals in the construction sector must stay updated with the latest technological advancements. One of the most impactful innovations in recent times is Building Information Modeling (BIM). With BIM, engineers, architects, and construction managers can plan, design, and manage building projects more efficiently than ever before.
Setting the Benchmark in BIM Education
This is where Technostruct Academy comes into the picture. As the best BIM institute in India, Technostruct Academy is committed to delivering top-notch education in BIM technologies. The academy is trusted by students and industry professionals alike for its comprehensive and industry-relevant training modules.
Master Isometric Drawings and More
What sets Technostruct apart from other institutes is its deep integration of practical learning with theoretical foundations. A vital part of this is the emphasis on isometric drawings, which are an essential component in BIM processes. By learning how to create and analyze these 3D illustrations, students gain a better grasp of piping layouts, ductwork systems, and other mechanical designs crucial in building planning.
Beyond the Basics: Full-Cycle BIM Training
Technostruct’s BIM courses go beyond software tutorials. They offer full-cycle training from basic modeling to advanced project management. Students learn about 3D visualization, 4D construction sequencing, 5D cost estimation, and even facility management – all based on real-world project scenarios.
Expert Faculty and Updated Curriculum
Faculty at Technostruct Academy include experienced BIM managers, engineers, and architects who have worked on large-scale global projects. Their insights and guidance provide learners with valuable industry perspectives that are rarely found in traditional academic settings.
Moreover, the academy’s curriculum is updated regularly to reflect the latest developments in BIM software and standards. Tools such as Revit, Navisworks, AutoCAD, and Dynamo are all part of the training process. Every student is encouraged to work on live projects that simulate the challenges and workflows of actual construction sites.
Job-Ready Skills and Opportunities
Technostruct Academy also offers a unique advantage through its partnerships and affiliations. Their close ties with industry leaders and construction firms allow them to offer job placement services and internship opportunities to students. This makes Technostruct not just an institute, but a career-launching platform.
Accessible Learning for All
Another highlight is their flexible learning options. With a mix of online and in-person sessions, students from all over India can benefit from their expert training without relocating. Whether you are a fresh graduate or an experienced professional, there is a course tailored for your learning level.
Final Thoughts: The Smart Choice for a BIM Career
All these features make Technostruct Academy a standout choice for anyone looking to pursue a career in BIM. If you're searching for the best BIM institute in India, look no further. Whether you want to gain expertise in isometric drawings, improve your design coordination skills, or get certified in advanced BIM courses, Technostruct Academy has it all.
Take a step towards a smarter future in construction. Join Technostruct Academy today and transform your career with in-demand BIM skills.
0 notes
Text
Exactly How to Get Going with Computer-Aided Design Software Application: A Beginner's Guide

Computer-aided design software has become an essential device for designers, engineers, and architects seeking to create precise electronic designs. Whether you are a total novice or transitioning from typical composing approaches, discovering just how to utilize CAD software program effectively can substantially enhance your design process. With various devices readily available, finding the appropriate software program and comprehending its features is important for getting started.
Selecting the Right CAD Software Program
Before diving right into CAD, choosing the suitable software application is crucial. There are numerous alternatives, from beginner-friendly programs to innovative professional devices. If you're looking for a budget friendly choice, take into consideration AutoCAD for sale that still gives durable features for creating and modeling. In addition, several experts look for AutoCAD up for sale to access to industry-standard tools at a lower cost. The right software depends on your particular requirements, whether for mechanical design, style, or product development.
Understanding the Fundamentals of CAD User Interface
When you have chosen your computer-aided-design software, familiarizing on your own with its user interface is the next step. The majority of CAD programs have a similar format, consisting of an office, toolbars, and a command line. Beginners should begin by learning vital features such as attracting lines, developing shapes, and changing items. If you're utilizing low-cost CAD software application for computer, ensure it consists of an user-friendly user interface to alleviate the learning curve.
Grasping Basic Illustration and Modeling Methods

After obtaining comfortable with the interface, the following step is exercising standard drawing and modeling strategies. Understanding exactly how to create precise 2D sketches is basic prior to transitioning to 3D modeling. Several tutorials are readily available online to direct novices via these initial steps. If you're wanting to purchase AutoCAD cheap, make the most of its substantial training materials and integrated tutorials to accelerate the understanding process. Additionally, for those thinking about 3D modeling, take into consideration checking out alternatives to buy solidworks cheap, which additionally provides important sources for understanding these skills.
Exploring Advanced Characteristics and Tools
As you get self-confidence with the fundamentals, discovering advanced functions can boost your styles. Tools such as parametric modeling, providing, and simulations allow for even more complex and reasonable tasks. Many AutoCAD for sale choices consist of these capabilities, making it less complicated for beginners to progress without investing in costly programs. Explore different tools will help refine your abilities and prepare you for professional-level tasks.
Finding Resources and Support for Constant Knowing
Discovering CAD software program like SolidWorks or AutoCAD is a recurring procedure, and having accessibility to resources and assistance is crucial. If you're wanting to AutoCAD buy cheap or AutoCAD buy affordable, make sure that the software supplier provides totally free tutorials or user neighborhoods. On the internet programs, online forums, and neighborhood teams can provide important insights and fixing assistance. Continuous technique and engagement with other customers will assist increase your discovering journey.
Beginning with CAD software application may seem overwhelming, yet with the right devices and technique, beginners can rapidly develop vital skills. Whether selecting AutoCAD available for sale for professional-grade attributes or opting for low-cost CAD software for pc for cost, the secret is consistent practice and exploration. By following this overview, you'll be on your method to mastering CAD and bringing your design ideas to life.
0 notes
Text
Just How to Start with Computer-Aided Design Software: A Novice's Overview

Computer-aided design software has ended up being a necessary tool for designers, engineers, and designers aiming to produce precise electronic designs. Whether you are a total newbie or transitioning from standard drafting methods, learning just how to utilize CAD software application properly can substantially improve your design process. With various tools available, locating the ideal software program and understanding its attributes is vital for beginning.
Choosing the Right CAD Software Application
Before diving right into CAD, choosing the proper software is vital. There are numerous choices, from beginner-friendly programs to innovative expert devices. If you're seeking a cost effective option, consider cheap CAD software for pc that still provides robust features for developing and modeling. Furthermore, numerous specialists seek AutoCAD for sale to gain access to industry-standard devices at a lower expense. The ideal software program depends on your certain needs, whether for mechanical design, style, or item growth.
Recognizing the Essentials of Computer-Aided Design Interface
When you have picked your CAD software, familiarizing on your own with its interface is the following action. A lot of CAD programs have a comparable design, consisting of a work area, toolbars, and a command line. Newbies ought to begin by discovering important features such as drawing lines, developing forms, and customizing items. If you're utilizing inexpensive CAD software program for pc, ensure it includes an instinctive interface to ease the understanding curve.
Understanding Basic Drawing and Modeling Methods

After getting comfy with the user interface, the following action is exercising basic drawing and modeling techniques. Understanding how to develop exact 2D sketches is fundamental before transitioning to 3D modeling. Numerous tutorials are readily available online to guide novices via these initial steps. If you're aiming to purchase AutoCAD affordable, benefit from its comprehensive training products and built-in tutorials to speed up the discovering procedure. Furthermore, for those thinking about 3D modeling, consider checking out alternatives to AutoCAD buy cheap, which additionally supplies useful resources for mastering these abilities. Look at this to get a cheap CAD programs.
Exploring Advanced Characteristics and Devices
As you gain confidence with the basics, exploring advanced functions can improve your designs. Tools such as parametric modeling, providing, and simulations permit more complicated and practical tasks. Lots of AutoCAD for sale choices consist of these abilities, making it simpler for newbies to progress without buying expensive programs. Try out various tools will help improve your skills and prepare you for professional-level projects.
Searching For Resources and Assistance for Constant Knowing
Understanding CAD software program like SolidWorks or AutoCAD is a continuous procedure, and having access to sources and assistance is important. If you're wanting to AutoCAD buy cheap or AutoCAD purchase economical, guarantee that the software program provider uses cost-free tutorials or individual neighborhoods. On-line courses, discussion forums, and area teams can offer valuable understandings and repairing assistance. Continuous method and engagement with other users will certainly assist accelerate your understanding trip.
Starting with CAD software may appear overwhelming, however with the right tools and strategy, novices can swiftly establish essential skills. Whether choosing AutoCAD available for professional-grade features or opting for economical CAD software for pc for affordability, the trick is consistent technique and exploration. By following this overview, you'll be on your method to mastering CAD and bringing your design ideas to life.
0 notes
Text
Revit Tutorials has been set up to help both new and experienced users learn the fundamentals and best practices for using Revit software. All Free Revit Ebooks you can download here:-
Getting Started with Revit Architecture: Getting Started Welcome to Revit Architecture 2009! We hope you enjoy learning and using this revolutionary parametric building modeller.
Revit Structure and Revit Architecture: Revit Structure Coordination between Revit Structure and Revit Architecture Structural engineers who use Revit® Structure software can better coordinate their work...
Revit Architecture 2014 Basics: Revit Architecture 2014 Basics From the Ground Up Elise Moss www.SDCpublications.com SDC Better Textbooks.
Revit Architecture 2013: Autodesk Revit Architecture 2013 Fundamentals 2-4 2.1 Building Information Modeling Building Information Modeling (BIM) is an approach to the entire.
What s New with Autodesk Revit 2013 Stairs and Railings: What s New with Autodesk Revit 2013 Stairs and Railings What's New with Autodesk Revit 2013 Stairs and Railings? Paul F. Aubin Paul F. Aubin Consulting Services.
Effective Design of Structural Steel Using Autodesk: Effective Design of Structural Steel Using Autodesk Revit Structure 2012 5 Part 2: Hands-on Tutorial for Structural Extensions Preparing Revit Model for...
BIM Building Information Modeling and Pedagogical Challenges: BIM (Building Information Modeling) and Pedagogical Challenges Jeong Han Woo Western Illinois University Macomb, IL BIM is a new building design and documentation...
Autodesk Revit 2013: Suite Workflow from Autodesk Revit 2013 to Autodesk. Showcase AutoCAD Architecture 2013 Universal Manual transfer of assembly sheets...
Read more
0 notes
Text
Mastering AutoCAD and Revit: Essential Skills for Civil Engineering Draftspersons
Civil Engineering Draftsperson Melbourne seeking to enhance their skills and career prospects should consider delving into AutoCAD and Revit. These powerful software tools have become indispensable for creating precise, detailed, and visually appealing civil engineering designs. By mastering AutoCAD and Revit, draftspersons can streamline their workflows, improve efficiency, and contribute significantly to successful project outcomes.

Understanding AutoCAD and Revit
AutoCAD is a versatile computer-aided drafting (CAD) software widely used in various industries, including civil engineering. It provides a comprehensive set of tools for creating 2D and 3D drawings, plans, and sections. Revit, on the other hand, is a Building Information Modeling (BIM) software that goes beyond traditional CAD capabilities. It allows for the creation of intelligent, parametric models that integrate various aspects of a building's design, including architectural, structural, and MEP (mechanical, electrical, and plumbing) systems.
Key Benefits of Mastering AutoCAD and Revit
Enhanced Efficiency: AutoCAD and Revit automate repetitive tasks, reducing the time required for drafting and design. Draftspersons can create accurate drawings and models more quickly and efficiently.
Improved Accuracy: The parametric nature of Revit ensures that changes made to one part of a design are automatically reflected in other related components, minimizing errors and inconsistencies.
Enhanced Collaboration: BIM software like Revit facilitates seamless collaboration among different project stakeholders, including architects, engineers, and contractors. It enables real-time updates and facilitates better communication.
Enhanced Visualization: AutoCAD and Revit provide powerful visualization tools that allow draftspersons to create realistic 3D renderings of their designs, helping clients better understand and appreciate the proposed project.
Increased Job Opportunities: Proficiency in AutoCAD and Revit is highly sought after by employers in the civil engineering industry. Mastering these tools can open doors to a wider range of job opportunities and career advancement.
Essential Skills for Civil Engineering Draftspersons
To effectively use AutoCAD and Revit, Civil Engineering Draftsperson Melbourne should possess the following skills:
Strong understanding of civil engineering principles and standards: A solid foundation in civil engineering concepts is essential for creating accurate and compliant designs.
Proficiency in 2D and 3D drawing techniques: A good grasp of drafting fundamentals, including dimensioning, hatching, and sectioning, is crucial for creating clear and professional drawings.
Ability to work with parametric models: Understanding how to create and manipulate parametric models in Revit is essential for leveraging its advanced capabilities.
Knowledge of BIM workflows: Familiarity with BIM methodologies and best practices is necessary for effective collaboration and project management.
Tips for Mastering AutoCAD and Revit
Start with the basics: Begin by learning the fundamental tools and commands in AutoCAD and Revit. Gradually build your skills as you become more comfortable with the software.
Practice regularly: The best way to master AutoCAD and Revit is through consistent practice. Work on various projects to apply your knowledge and develop your skills.
Utilize online resources: There are numerous online tutorials, courses, and forums available to help you learn AutoCAD and Revit. Take advantage of these resources to supplement your learning.
Join a community: Connect with other draftspersons and professionals in the field to share knowledge, ask questions, and stay updated on industry trends.
By mastering AutoCAD and Revit, Civil Engineering Draftsperson Melbourne can significantly enhance their skills, improve their career prospects, and contribute to the success of civil engineering projects. These powerful tools provide the foundation for creating innovative and efficient designs that meet the demands of the modern construction industry.
1 note
·
View note
Text
How to Get the Most Out of V-Ray Assignment Help: Tips and Resources

In the realm of 3D rendering and visualization, V-Ray stands out as one of the most powerful and versatile tools available. Whether you're a student tackling complex assignments or a professional enhancing your skills, mastering V-Ray can significantly boost your ability to create photorealistic renderings. However, understanding and utilizing V-Ray effectively can be challenging. This is where V-Ray assignment help comes into play. Here’s how to maximize the benefits of such assistance, along with tips and resources to help you excel in your 3D projects.
Understand Your Assignment Requirements
Before seeking V-Ray assignment help, it’s crucial to have a clear understanding of your assignment’s requirements. Take time to thoroughly read the assignment brief and identify key objectives. Are you required to create a specific type of scene, apply certain textures, or render images with particular lighting conditions? Knowing exactly what is expected will help you communicate your needs more effectively to your assignment help provider.
Leverage Professional Expertise
One of the significant advantages of V-Ray assignment help is access to professional expertise. Experienced professionals can provide valuable insights into best practices, advanced techniques, and troubleshooting strategies. When working with a service like BookMyEssay, you gain access to experts who can guide you through complex processes, ensuring that your work meets high standards of quality.
Explore Online Resources and Tutorials
In addition to personalized help, there are numerous online resources and tutorials available to enhance your V-Ray skills. Websites like YouTube, Udemy, and Coursera offer comprehensive tutorials ranging from beginner to advanced levels. Utilizing these resources alongside professional help can deepen your understanding of V-Ray’s features and functionalities.
Utilize Forums and Community Support
Engaging with online forums and communities can also be beneficial. Platforms like Reddit, CGTalk, and various V-Ray-specific forums provide a space to ask questions, share experiences, and receive feedback from peers and experts. These interactions can provide practical solutions to common problems and expose you to new techniques and workflows.
Implement Feedback and Revisions
When working with V-Ray assignment help, be open to feedback and revisions. Constructive criticism from experts can significantly improve the quality of your work. Take note of their suggestions, implement the recommended changes, and ask for further clarification if needed. This iterative process helps refine your skills and ensures that your final submission is of the highest standard.
Practice Regularly
Mastering V-Ray requires practice. Regularly working on projects and experimenting with different features will help you become more proficient. Set aside time to practice outside of your assignments. The more you work with V-Ray, the more comfortable you’ll become with its tools and capabilities, which will enhance your overall proficiency.
Integrate with Other Tools
V-Ray is often used in conjunction with other software such as AutoCAD, SketchUp, and 3ds Max. Understanding how V-Ray integrates with these tools can improve your workflow and efficiency. Seek help with these integrations if necessary, and explore resources that cover the compatibility and best practices for using V-Ray with other software.
Apply What You Learn to Other Areas
The skills and techniques learned through V-Ray assignment help can be applied to other areas of your academic and professional life. For instance, if you’re also working on Visual Basic assignment help, the problem-solving and technical skills gained from V-Ray can be beneficial. Similarly, if you’re handling Marketing assignments or other subjects, the ability to present complex information visually can enhance your work.
Invest in Quality Assignment Help Services
Choosing the right assignment help service is crucial. Services like BookMyEssay offer specialized assistance not only for V-Ray assignments but also for a range of academic and professional needs. Whether you need help with Visual Basic assignments, Marketing assignment help, or even buying essay papers, investing in a reputable service can ensure that you receive high-quality support tailored to your specific requirements.
Stay Updated with Industry Trends
The field of 3D rendering and visualization is constantly evolving. Staying updated with the latest trends and advancements in V-Ray and related technologies will keep your skills relevant and competitive. Follow industry blogs, attend webinars, and participate in workshops to remain informed about new features and best practices.
Conclusion
Getting the most out of V-Ray assignment help involves a combination of understanding your requirements, leveraging professional expertise, utilizing online resources, engaging with communities, and applying feedback. By integrating these strategies and investing in quality help from services like BookMyEssay, you can enhance your V-Ray skills and produce exceptional 3D renderings. Remember, the knowledge and techniques you gain through V-Ray assignments can benefit various other areas of your academic and professional journey. Embrace the learning process, practice regularly, and stay connected with industry advancements to continue growing as a proficient 3D artist.
#V Ray Assignment Help#Visual Basic Assignment Help#Marketing assignment help#Buy Essay Paper Writing help
0 notes
Text
Difference Between AutoCAD and CATIA: Which is Better CAD Tool?
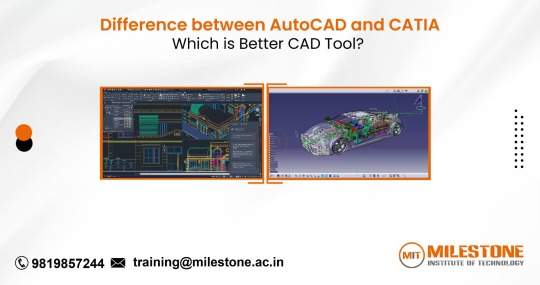
When it comes to Computer-Aided Design (CAD) tools, AutoCAD and CATIA stand out as two of the most prominent software options in the industry. Both tools are renowned for their robust capabilities, but they serve distinct purposes and excel in different areas. If you're trying to determine which CAD tool is best suited for your needs, understanding Catia vs AutoCAD key differences can guide your decision. In this blog, we'll explore the features, strengths, and typical applications of AutoCAD and CATIA to help you make an informed choice.
AutoCAD: The Versatile Workhorse
AutoCAD, developed by Autodesk, has been a staple in the CAD industry since its inception in 1982. It is renowned for its versatility and broad applicability across various industries, including architecture, engineering, and construction (AEC). Here are some of its standout features:
1. 2D Drafting and 3D Modeling: AutoCAD excels in 2D drafting, offering a range of tools for creating detailed floor plans, technical drawings, and schematics. While its 3D modeling capabilities are not as advanced as CATIA’s, AutoCAD still provides essential tools for creating and manipulating 3D models. This makes it suitable for projects that require a combination of 2D and basic 3D designs.
2. User-Friendly Interface: One of AutoCAD's significant advantages is its user-friendly interface. Its tools and features are relatively easy to learn and use, making it accessible for both beginners and experienced designers. Autodesk also offers extensive online resources, tutorials, and a large community that can assist with troubleshooting and tips.
3. Compatibility and Integration: AutoCAD supports various file formats and integrates well with other Autodesk products, such as Revit and Civil 3D. This compatibility is particularly beneficial for collaborative projects involving different software tools. Additionally, AutoCAD's widespread adoption means that file sharing and communication with other professionals are generally smooth.
4. Customization and Automation: AutoCAD allows for a high degree of customization through AutoLISP, VBA, and .NET programming. Users can create custom scripts and automation to streamline repetitive tasks, which can significantly enhance productivity.
CATIA: The Advanced Design Powerhouse
CATIA, developed by Dassault Systèmes, is renowned for its advanced capabilities in 3D design and is widely used in industries such as aerospace, automotive, and industrial design. It offers a suite of powerful tools tailored to complex design and manufacturing processes. Here’s what sets CATIA apart:
1. Advanced 3D Modeling and Simulation: CATIA excels in advanced 3D modeling and simulation. Its robust surface modeling, parametric design, and generative shape design tools make it ideal for creating intricate and highly detailed models. CATIA is particularly strong in handling complex geometries and assemblies, which is crucial for industries with demanding design requirements.
2. Integrated Product Lifecycle Management (PLM): CATIA is integrated with Dassault Systèmes' PLM solutions, offering comprehensive management of the entire product lifecycle. This integration provides tools for product design, simulation, and manufacturing, all within a unified platform. It’s particularly useful for managing complex projects and coordinating between different teams.
3. Industry-Specific Solutions: CATIA offers specialized tools and modules tailored to specific industries. For example, the automotive and aerospace industries benefit from CATIA’s advanced capabilities in creating and managing complex parts and assemblies. This industry-specific focus allows for optimized workflows and better alignment with sector-specific standards.
4. High-Precision Design: CATIA’s tools are designed for high precision and accuracy, making it ideal for projects that require detailed and exact design specifications. This precision is essential for industries where design errors can lead to significant costs or safety issues.
Choosing the Right Tool
Deciding between AutoCAD and CATIA depends largely on your specific needs and the nature of your projects:
For General Drafting and Basic 3D Modeling: If your work primarily involves 2D drafting with occasional 3D modeling, AutoCAD’s versatility and ease of use make it an excellent choice. It’s also a good fit if you need a tool that integrates well with other Autodesk products and provides robust support and community resources.
For Complex 3D Design and Industry-Specific Applications: If your work involves intricate 3D modeling, simulation, or product lifecycle management, CATIA is likely the better option. Its advanced features and industry-specific tools cater to complex design needs, especially in sectors like aerospace and automotive.
Ultimately, both AutoCAD and CATIA are powerful CAD tools with their own strengths and specializations. By evaluating the specific requirements of your projects and considering the features offered by each software, you can choose the CAD tool that aligns best with your needs and enhances your design capabilities.
0 notes
Text
Unveiling the Language of Design: A Comprehensive Guide to Architecture Drawing
Meta Description: Master the art of translating ideas into reality with this in-depth exploration of architecture drawing techniques, tools, and best practices. Crafted entirely by human experts, this guide empowers you to communicate your vision effectively.
Introduction:
Hook: Open with a captivating anecdote about a famous architectural drawing or its impact on a historical structure.
What is Architecture Drawing? Define the concept clearly, emphasizing its role in visualizing and communicating architectural ideas.
Importance of Architecture Drawing: Explain its significance throughout the design process, from initial concepts to construction documents.
Types of Architecture Drawings: Outline the different drawing types used in architecture, including:
Floor Plans: Explain their purpose and common symbols.
Sections: Define their use in revealing interior details.
Elevations: Discuss their function in showcasing exterior facades.
3D Renderings: Explore their role in creating realistic visualizations.
Construction Drawings: Explain their importance for builders and contractors.
Benefits of Learning Architecture Drawing:
Enhanced Design Communication: Clearly convey your ideas to clients, collaborators, and construction teams.
Improved Spatial Reasoning: Develop a strong understanding of scale, proportion, and spatial relationships.
Boosted Creativity: Explore design ideas visually, fostering innovation and problem-solving.
Professional Development: Gain a valuable skill for architecture careers or design-related fields.
Personal Projects: Bring your own design ideas to life for renovations, additions, or personal projects.
Tools and Techniques
Traditional Drawing Tools: Discuss the use of pencils, pens, rulers, drafting boards, and templates.
Computer-Aided Design (CAD) Software: Explore popular CAD programs like AutoCAD, Revit, and SketchUp, highlighting their advantages.
Hand-Drawing vs. CAD: Discuss the pros and cons of each approach, emphasizing the importance of both skills.
Developing Drawing Skills: Provide practical tips on linework, shading, dimensioning, and annotation.
Learning Resources: Recommend online tutorials, books, and courses for further learning.
The Architecture Drawing Process :
Project Brief and Design Intent: Explain the importance of understanding project requirements and design goals.
Schematic Design: Discuss creating initial sketches and brainstorming ideas.
Design Development: Explore refining the design through detailed drawings.
Construction Documents: Explain the process of creating detailed drawings for construction.
Collaboration and Communication: Emphasize effective communication with clients, engineers, and other stakeholders.
Beyond the Basics: Advanced Techniques:
Presentation Drawings: Explore techniques for creating visually compelling drawings for presentations.
Parametric Design: Introduce the concept of using software to create design variations based on parameters.
Building Information Modeling (BIM): Discuss how BIM software integrates various aspects of a building's design.
Sustainable Design Considerations: Address incorporating sustainability principles into architecture drawings.
The Future of Architecture Drawing: Explore emerging technologies like virtual reality (VR) and augmented reality (AR) in architectural visualization.
FAQs :
What are the best tools for learning architecture drawing? (Discuss both traditional and digital options)
How long does it take to learn architecture drawing? (Emphasize individual learning styles and practice importance)
Do I need to be good at math to learn architecture drawing? (Explain the importance of basic math concepts)
Can I learn architecture drawing without going to college? (Highlight online resources, self-learning options, and professional certifications)
What are the career opportunities in architecture drawing? (Discuss various roles and career paths)
Conclusion:
Recap the benefits of learning architecture drawing.
Encourage the reader to embark on this rewarding journey.
Provide a call to action for further exploration through resources or contacting an architect.
1 note
·
View note
Text
Discover Free CAD Software Solutions for Designers
Discover free CAD software solutions tailored for designers seeking powerful tools without financial investment. These options provide robust features for both 2D drafting and 3D modeling, catering to various design needs. From intuitive interfaces like TinkerCAD for beginners to advanced capabilities of FreeCAD and LibreCAD, designers can create detailed plans and prototypes efficiently. Explore these alternatives to AutoCAD to enhance creativity and productivity without compromising on quality or functionality, making high-quality design accessible to all aspiring designers and professionals alike.
Overview of Free CAD Software Solutions
Explore a comprehensive overview of free CAD software solutions tailored for designers. Discover versatile tools that cater to various design needs, from 2D drafting to complex 3D modeling, without the financial investment of premium software.
Advantages of Using Free CAD Software
Learn about the advantages of opting for free CAD software, including cost-effectiveness, accessibility, and the ability to experiment with different design tools and techniques without upfront expenses.
Top Free CAD Software Tools for Designers
Explore top free CAD software tools like FreeCAD, LibreCAD, and SketchUp, each offering unique features such as parametric modeling, precise 2D drafting, and intuitive 3D modeling interfaces suitable for diverse design projects.
Features to Look for in Free CAD Software
Discover essential features to consider when selecting free CAD software, including usability, compatibility with industry standards, advanced modeling capabilities, and support for plugins or extensions to enhance functionality.
Choosing the Right Free CAD Software for Specific Design Needs
Understand how to choose the right free CAD software based on specific design needs, whether it's architectural drafting, mechanical engineering, product design, or industrial prototyping, ensuring optimal tool selection for project success.
Community Support and Resources for Free CAD Software Users
Explore the importance of community support and available resources for free CAD software users, including forums, tutorials, and user communities that provide valuable insights, troubleshooting assistance, and shared knowledge.
Tips for Getting Started with Free CAD Software
Gain practical tips for getting started with free CAD software, including installation guides, basic tutorials, workflow optimization techniques, and recommended learning resources to accelerate proficiency and maximize design potential.
Conclusion
Exploring free CAD software solutions offers designers valuable tools without financial barriers. Options like FreeCAD, LibreCAD, and others provide robust capabilities for 2D drafting, 3D modeling, and simulation, catering to diverse design needs. These platforms empower designers to innovate, prototype, and refine their creations with intuitive interfaces and community support. Whether for hobbyists, students, or professionals, leveraging its fosters creativity and skill development while ensuring projects are executed efficiently. Embracing these tools not only expands design possibilities but also encourages collaboration and knowledge-sharing within the global design community, driving continuous innovation in the field.
0 notes
Text
Step-by-Step Tutorial: Creating Your First Plant 3D Model
Plant 3D modeling is an essential skill for engineers and designers, offering the ability to create detailed and accurate representations of industrial plants. If you're new to this field, creating your first Plant 3D model might seem daunting. However, with a step-by-step approach, you can master the basics and set the foundation for more complex projects. This tutorial will guide you through the process of creating your first Plant 3D model, ensuring a smooth and rewarding experience.
1. Getting Started with Plant 3D Software
The first step in creating a Plant 3D model is to choose and install the right software. Popular options include AutoCAD Plant 3D, AVEVA E3D, and Intergraph Smart 3D. These tools offer comprehensive features for plant design, including libraries of standard components, parametric design capabilities, and real-time collaboration tools.
Installing Your Chosen Software:
Visit the official website of the chosen software.
Download the installer and follow the on-screen instructions.
Complete the installation process and open the software to begin your project.
2. Setting Up Your Project
Once the software is installed, the next step is to set up your project. This involves defining the project parameters, such as the project name, location, and units of measurement. Proper setup ensures that your project remains organized and that all team members are working with the same settings.
Creating a New Project:
Open the software and navigate to the project management section.
Select “Create New Project” and enter the required information.
Save the project and ensure that all settings are correct.
3. Importing or Creating a Plant Layout
The plant layout serves as the foundation for your model. You can either import an existing layout or create a new one from scratch. The layout should include the basic structure of the plant, such as buildings, equipment locations, and major pipelines.
Importing an Existing Layout:
Navigate to the import section of the software.
Select the file format (e.g., DWG, DXF) and locate the existing layout file.
Import the file into your project.
Creating a New Layout:
Use the drawing tools to outline the plant’s structure.
Add basic elements like walls, floors, and major equipment locations.
Save the layout for future use.
4. Adding Equipment and Components
With the layout in place, you can begin adding equipment and components to your model. Most Plant 3D software includes libraries of standard components, such as tanks, pumps, and valves. You can also create custom components if needed.
Adding Standard Components:
Open the component library and browse for the required equipment.
Select the component and place it in the appropriate location on the layout.
Adjust the size and orientation as needed.
5. Connecting Components with Piping
Connecting components with piping is a crucial step in creating a functional Plant 3D model. The piping should follow the layout and connect all relevant equipment, ensuring proper flow and operation.
Creating Piping Connections:
Select the piping tool from the toolbar.
2. Click on the starting point (e.g., a pump outlet) and drag the pipe to the destination (e.g., a tank inlet).
3. Adjust the pipe’s size, material, and routing as needed.
6. Applying Material and Finishing Details
After the main components and piping are in place, apply material properties and finishing details to your model. This step involves adding textures, colors, and other visual elements to make the model realistic and easy to understand.
Applying Materials:
Open the material library and select the appropriate materials for each component.
Apply the materials to the components and adjust their properties (e.g., texture, reflectivity).
Add finishing details like labels, annotations, and safety markings.
7. Performing Quality Checks
Quality checks are essential to ensure that your model is accurate and meets all project requirements. This step involves reviewing the model for errors, verifying dimensions, and ensuring that all components are correctly connected.
Conducting Quality Checks:
Use the software’s built-in tools to check for errors and inconsistencies.
Verify the dimensions and alignment of all components.
Ensure that all piping and equipment connections are correct and functional.
8. Generating Reports and Documentation
Once your model is complete and verified, generate the necessary reports and documentation. These documents are crucial for project approval, construction, and future maintenance.
Generating Reports:
Navigate to the reporting section of the software.
Select the required reports (e.g., Bill of Materials, Isometric Drawings).
Generate and save the reports for project documentation.
9. Collaborating with Team Members
Collaboration is key to the success of any Plant 3D project. Use the software’s collaboration tools to share your model with team members, gather feedback, and make necessary adjustments.
Sharing Your Model:
Save the model to a shared location (e.g., cloud storage).
Invite team members to view and edit the model.
Gather feedback and make any required changes.
10. Continuous Learning and Improvement
Plant 3D modeling is a dynamic field with continuous advancements in technology and techniques. Stay updated with the latest features, attend training sessions, and participate in forums and communities to enhance your skills.
Continuous Learning:
Follow industry blogs and websites for updates and tutorials.
Participate in online courses and webinars.
Join professional communities and forums to share knowledge and gain insights.
Conclusion
Creating your first Plant 3D model can be a rewarding experience with the right approach and tools. By following this step-by-step tutorial, you can lay a solid foundation for your Plant 3D modeling skills. Remember to start with the basics, use templates and standards, leverage advanced features like parametric design and automation, and continuously improve your knowledge and skills. With practice and dedication, you’ll be able to create detailed and accurate Plant 3D models that enhance your engineering projects.
If You Want To Explore More About 3D Modeling Services then Visit the Site: Jasmino
0 notes
Text
Mastering the Basics: A Step-by-Step Guide to CAD Drafting
In the world of design and engineering, Computer-Aided Design (CAD) has become an indispensable tool. Whether you're an architect designing buildings, an engineer conceptualizing machinery, or a product designer crafting consumer goods, CAD drafting lays the foundation for bringing ideas to life with precision and efficiency. However, mastering CAD drafting requires more than just familiarity with software; it demands a thorough understanding of its fundamental principles and techniques. In this guide, we'll delve into the step-by-step process of mastering CAD drafting, empowering you to create intricate designs with confidence. A Step-by-Step Guide to CAD Drafting Understanding CAD Fundamentals Before diving into CAD software, it's crucial to grasp the underlying concepts that govern the drafting process. CAD operates on the principles of geometry, precision, and scalability. Familiarize yourself with basic geometric shapes, dimensions, and measurement units. Understanding concepts like layers, drawing scales, and coordinate systems will lay a solid foundation for your CAD journey. Choosing the Right Software CAD software comes in various forms, each tailored to different industries and design requirements. Research and select the software that best suits your needs and budget. Popular options include AutoCAD, SolidWorks, and Fusion 360. Take advantage of free trials and tutorials to explore different software interfaces and functionalities before committing to one. Getting Started with Basic Tools Once you've chosen your CAD software, acquaint yourself with its basic tools and interface. Learn how to navigate the workspace, access drawing tools, and manipulate objects. Mastering functions like drawing lines, circles, arcs, and rectangles forms the backbone of CAD drafting. Practice creating and modifying simple shapes until you're comfortable with the software's basic operations. Understanding Drawing Constraints CAD drafting relies heavily on precise measurements and constraints to ensure accuracy and consistency in designs. Familiarize yourself with drawing constraints such as dimensions, angles, and relationships between objects. Learn how to apply constraints to geometry to maintain design integrity and facilitate modifications. Exploring Advanced Techniques As you gain proficiency in basic CAD operations, explore advanced techniques to enhance your drafting skills. Learn how to create 3D models, apply textures and materials, and generate realistic renderings. Experiment with parametric design, which allows you to create dynamic models that can be easily modified and adapted to different scenarios. Practicing and Refining Your Skills Like any craft, mastering CAD drafting requires practice and perseverance. Dedicate time to regular practice sessions, tackling increasingly complex design challenges. Take advantage of online tutorials, forums, and communities to seek guidance, exchange ideas, and learn from experienced professionals. Don't be afraid to experiment and push the boundaries of your creativity. Collaborating and Receiving Feedback CAD drafting often involves collaboration with colleagues, clients, and stakeholders. Learn how to effectively communicate your design intent through annotated drawings, sketches, and presentations. Solicit feedback from peers and mentors to identify areas for improvement and refine your drafting skills further. Staying Updated with Industry Trends The field of CAD is constantly evolving, with new software updates, tools, and techniques emerging regularly. Stay abreast of industry trends and technological advancements by attending workshops, conferences, and webinars. Continuously expand your knowledge and skill set to remain competitive in the ever-changing landscape of CAD drafting. Conclusion Mastering CAD drafting is a journey that requires dedication, patience, and a thirst for knowledge. By understanding the fundamentals, exploring advanced techniques, and practicing regularly, you can elevate your drafting skills to new heights. Embrace challenges, seek inspiration from fellow designers, and never stop learning. With perseverance and passion, you'll soon find yourself creating intricate designs with confidence and precision. What is CAD in drafting?CAD stands for Computer-Aided Design. It's a technology that uses computer software to create, modify, analyze, or optimize designs for various purposes, including architectural and engineering drafting. CAD software replaces traditional drafting methods by providing tools for precise drawing, dimensioning, and annotation, along with features for 3D modeling and visualization. CAD has revolutionized the design process by improving accuracy, efficiency, and flexibility in creating technical drawings and models.Is CAD drafting a good career?CAD drafting can be a rewarding career for individuals who enjoy design, technical work, and working with computer software. Here are some factors to consider when evaluating whether CAD drafting is a good career choice for you:Job Stability: CAD drafting skills are in demand across various industries, including architecture, engineering, manufacturing, construction, and product design. As long as these industries continue to exist, there will be a need for CAD drafters.Technological Advancement: The CAD software landscape is constantly evolving with new tools and features. As a CAD drafter, you'll have the opportunity to stay up-to-date with the latest technology and expand your skillset.Variety of Industries: CAD drafters can work in a wide range of industries, allowing for versatility and the opportunity to specialize in areas such as architecture, mechanical engineering, civil engineering, interior design, etc.Creativity and Problem-Solving: While CAD drafting involves technical skills, it also requires creativity and problem-solving abilities to produce accurate and visually appealing designs.Career Progression: With experience and additional training, CAD drafters can advance to roles such as CAD manager, design engineer, or project manager.Remote Work Opportunities: With the advancement of technology, many CAD drafting jobs can be done remotely, offering flexibility in work location. Read the full article
0 notes
Text
Interior Designing Course in Delhi.
Interior Designing Course Outline
Module 1: Introduction to Interior Design
Overview of Interior Design
History and evolution of interior design
Role of an interior designer
Different fields of interior design (residential, commercial, hospitality, etc.)
Basic Design Principles
Elements of design (line, shape, color, texture, space, form)
Principles of design (balance, contrast, emphasis, rhythm, scale, harmony)
Understanding the Design Process
Project phases (concept, design development, documentation, implementation)
Client interaction and briefing
Module 2: Design Fundamentals
Color Theory and Application
Color wheel and relationships
Psychological effects of color
Creating color schemes
Space Planning
Principles of space planning
Functional and flow planning
Zoning and layout techniques
Furniture Design and Layout
Types of furniture
Ergonomics and human factors
Furniture arrangement principles
Module 3: Materials and Finishes
Introduction to Materials
Types of materials (wood, metal, glass, textiles, etc.)
Properties and applications
Surface Finishes
Paints, wall coverings, and coatings
Flooring options (hardwood, tiles, carpets, etc.)
Ceiling and lighting finishes
Sustainable and Eco-Friendly Materials
Importance of sustainability in design
Green building materials
Certifications and standards (LEED, WELL)
Module 4: Lighting Design
Basics of Lighting
Types of lighting (ambient, task, accent)
Light sources (natural and artificial)
Lighting Techniques
Layering lighting
Creating mood and atmosphere with lighting
Energy-efficient lighting solutions
Lighting Plans and Fixtures
Developing a lighting plan
Types of light fixtures
Selection and placement of fixtures
Module 5: Technical Drawing and Software Skills
Technical Drawing Basics
Orthographic projections (plans, elevations, sections)
Perspective drawing
Detailing and dimensioning
Computer-Aided Design (CAD)
Introduction to CAD software (AutoCAD, SketchUp, Revit)
Basic commands and tools
Creating 2D and 3D drawings
Visualization and Rendering
Introduction to rendering software (V-Ray, Lumion, Enscape)
Creating realistic renderings
Presentation techniques
Module 6: Interior Design Styles and Trends
Historical Styles
Classical, Gothic, Renaissance, Baroque, etc.
Influence of historical styles on contemporary design
Contemporary Styles
Modern, minimalist, industrial, Scandinavian, etc.
Characteristics and applications
Current Trends
Latest trends in interior design
Influences of technology and culture
Forecasting future trends
Module 7: Project Management and Professional Practice
Project Management Fundamentals
Planning and scheduling
Budgeting and cost estimation
Procurement and sourcing
Client Relations and Communication
Effective communication skills
Presenting design proposals
Managing client expectations
Legal and Ethical Considerations
Contracts and agreements
Building codes and regulations
Professional ethics and responsibilities
Module 8: Portfolio Development and Career Preparation
Creating a Professional Portfolio
Selecting and organizing work samples
Layout and presentation techniques
Digital and physical portfolios
Job Search and Networking
Resume and cover letter writing
Preparing for interviews
Networking and building professional relationships
Freelancing and Entrepreneurship
Starting your own design business
Marketing and branding strategies
Managing finances and accounting
Additional Resources
Recommended Reading
"Interior Design Illustrated" by Francis D.K. Ching
"The Interior Design Reference & Specification Book" by Chris Grimley and Mimi Love
Online Tutorials and Courses
LinkedIn Learning
Coursera
Udemy
Course Delivery
Lectures and Demonstrations
Hands-On Projects
Peer Reviews and Critiques
Guest Lectures from Industry Professionals
Assessment and Evaluation
Quizzes and Tests
Project Submissions
Final Portfolio Review

This course structure aims to provide students with a thorough understanding of interior design principles, practical skills, and professional practices, ensuring they are well-prepared for a successful career in interior design.
0 notes
Text

���� Attention all creatives! 🎨
Are you interested in learning Adobe Illustrator? Do you want to master the art of vector graphics and bring your ideas to life? Look no further! 🌟
I’ve curated a FREE playlist of comprehensive video tutorials that will guide you through the ins and outs of Adobe Illustrator. From basic tools to advanced techniques, these videos have got you covered! 🎥
What’s more? You can download Adobe Illustrator for FREE and start practicing right away! 💻
youtube
📣 Attention all creatives! 🎨
Are you interested in learning Adobe Illustrator? Do you want to master the art of vector graphics and bring your ideas to life? Look no further! 🌟
Class 1 = Installation of illustrator How to Install Adobe illustrator Step by Step OnlineTrainingsWorld
I’ve curated a FREE playlist of comprehensive video tutorials that will guide you through the ins and outs of Adobe Illustrator. From basic tools to advanced techniques, these videos have got you covered! 🎥
Watch and Learn Adobe Illustrator Link Blow
What’s more? You can download Adobe Illustrator for FREE and start practicing right away! 💻
#onlinetrainingsworld, #Adobeillustrator, #learnadobeillustrator, #illustratormagic, In this detailed tutorial, learn the step-by-step process of installing Adobe Illustrator. Whether you're a beginner or looking to enhance your skills, this video will walk you through the essential tools and techniques needed to create stunning designs using Adobe Illustrator.
Welcome to Basic Setting Your Workspace in Adobe Illustrator 2024 Class 2 by #OnlineTrainingsWorld. This comprehensive playlist is perfect for beginner students eager to learn photo editing from basic to advanced levels. Dive into the full course for mastering Adobe Photoshop, a powerful software that offers endless creative possibilities.
#illustratoradobeillustrator, #illustratorbyadobe, #adobeillustratoradobe, #adobeillustratorillustrator, #adobeillustratoradobeillustrator, #adobeandillustrator, #adobesoftwareillustrator, #adobeadobeillustrator, #adobesystemsadobeillustrator, #adobeillustratorsoftware, #adobeillustrator, #adobeillustratorfreeware, #adobeillustratorfree, #adobeillustratorsoftwareprice, #adobeillustratorcost, #adobeillustratorprice, #adobeillustratorforfree, #illustratoradobefree, #adobeillustratorprices, #costadobeillustrator
#bloggersonlinetrainings, #grapexels, #onlinetrainingsworld,
For more details, visit the provided links for software downloads and additional resources. This tutorial covers everything from basic tools in Illustrator to advanced use of effect tools and blend tool. Explore logo design tutorials for beginners, learn how to add color, create vector blend flowers, and more. Enhance your skills with step-by-step guidance on drawing shapes, utilizing the pen tool, and mastering the selection tool in Adobe Illustrator.
Join the community of Youtube and Telegram
t@OnlineTrainingsWorld
#adobeillustrator #adobeillustrator #adobeillustration #adobeillustrators #AdobeIllustratorCC #adobeillustratorcc #adobeillustratortips #adobeillustratorcourse #adobeillustratordraw #adobeillustratortutorial #adobeillustratorindonesia
#Best4YouByOnlineTrainingsWorld, and other creative minds. Discover essential tips and tricks for graphic design, digital design, and creative workspace organization. Whether you're new to Adobe Illustrator or seeking advanced training, this tutorial series has something for everyone.
Connect with us on social media platforms like Facebook, Twitter, Tiktok, and more for updates on upcoming tutorials and design tips. Subscribe to our channel for more tutorials and helpful resources. Thank you for your support, and happy designing!
--------------------------------------------------------------------------------------------
Social account Details
Heylink.me
Facebook
Twitter
Tiktok
Linkedin
https://www.linkedin.com/in/onlinetrainingsworld
OK.Ru
Tumblr
Vk.com
So why wait? Dive into the world of digital design today! Click on the link to access my video playlist and let’s embark on this creative journey together! 🚀
Remember, every expert was once a beginner. Start your journey today and unleash your creativity with Adobe Illustrator! 💪
#AdobeIllustrator #LearnForFree #DesignYourWorld
#illustration#adobe illustrator#illustrators on tumblr#art on tumblr#illustrative art#illustrator#drawing#Youtube
0 notes
Text

Top 5 Websites for AutoCAD Assignment Help
Are you a student struggling with your AutoCAD assignments? Do you find yourself in need of expert guidance to navigate through the complexities of architectural design software? If so, you're not alone. AutoCAD assignments can be challenging, requiring a deep understanding of both the software itself and the principles of architecture. Wondering, "How to complete my AutoCad assignment"?- Visit Architecture Assignment Help.
Fortunately, there are numerous online resources available to help you tackle your AutoCAD assignments effectively. To make your search easier, we've compiled a list of the top 5 websites for AutoCAD assignment help. Let's dive in:
ArchitectureAssignmentHelp.com
As an architecture expert, you're likely familiar with the value of specialized assistance. ArchitectureAssignmentHelp.com is a platform dedicated to providing comprehensive support specifically tailored to the needs of architecture students. With a team of experienced professionals well-versed in AutoCAD, this website offers personalized assistance, ensuring that you receive guidance that aligns with your academic requirements.
Assignmentpedia.com
Assignmentpedia.com is a versatile platform offering assistance across various subjects, including AutoCAD. With a vast pool of experts proficient in AutoCAD, this website provides timely solutions to your assignment queries. Whether you're struggling with basic concepts or grappling with advanced techniques, Assignmentpedia.com offers reliable support to help you excel in your AutoCAD assignments.
TheAssignmentHelper.com
For students seeking personalized attention and tailored solutions, TheAssignmentHelper.com is an ideal choice. This website boasts a team of skilled professionals with extensive experience in AutoCAD and related fields. Whether you need help with drafting, modeling, or rendering, TheAssignmentHelper.com offers individualized assistance to address your specific needs and enhance your understanding of AutoCAD concepts.
LiveExamHelper.com
LiveExamHelper.com stands out for its interactive approach to learning. Through live sessions, students can engage directly with experienced tutors to receive real-time guidance on their AutoCAD assignments. This platform emphasizes practical application, allowing students to gain hands-on experience and sharpen their skills in AutoCAD. With flexible scheduling options and personalized support, LiveExamHelper.com offers a dynamic learning environment conducive to academic success.
ArchDaily
While not specifically an assignment help website, ArchDaily is a valuable resource for architecture students seeking inspiration and guidance. Featuring articles, tutorials, and case studies related to architectural design and software tools like AutoCAD, ArchDaily provides valuable insights that can complement your academic studies. By exploring the latest trends and innovations in architecture, students can broaden their understanding and apply fresh perspectives to their AutoCAD assignments.
In conclusion, these top 5 websites offer valuable resources and support to help architecture students excel in their AutoCAD assignments. Whether you're seeking personalized assistance, interactive learning experiences, or inspiration from industry trends, these platforms cater to diverse learning needs. By leveraging these resources effectively, you can enhance your proficiency in AutoCAD and achieve academic success in your architecture studies.
#architectureassignmenthelp#autocadassignmenthelp#completemyautocadassignment#college#student#university#onlinehelp#assignmenthelp#architecture#academicsupport#autocad#autocadassignment
1 note
·
View note
Text
Navigating the World of CAD: A Guide to Free Tutorials
Navigating the World of CAD: A Guide to Free Tutorials
Computer-Aided Design (CAD) has revolutionized the field of design and engineering, offering a platform for creating precise and complex designs with ease. For those looking to master this powerful tool, a variety of free tutorials are available online. Here are some of the top picks:To get more news about free cad tutorial, you can visit shine news official website.
myCADsite: myCADsite offers free online AutoCAD tutorials for both new and experienced users with no registration needed4. Cadalyst: Cadalyst provides a wide array of AutoCAD and other CAD software tutorials, tips, and training resources4.
CADTutor: CADTutor offers free tutorials and articles for AutoCAD, ds Max and associated applications4.
Tutorial 45: Tutorial 45 offers a range of tutorials covering different aspects of AutoCAD.
Ellen Finkelstein: Ellen Finkelstein’s website offers numerous tips, techniques, and tutorials for various versions of AutoCAD.
AutoCAD tutorial by Computer Aided Design Guide: This tutorial covers the basics of AutoCAD in easy-to-understand language.
The CAD Setter Out: The CAD Setter Out offers practical tips, advice, and tutorials to help users get the most out of their CAD software.
Draftperson.net: Draftperson.net provides a set of free AutoCAD tutorials, tips and tricks, and articles.
In addition to these resources, there are also comprehensive video tutorials available on YouTube. For instance, FreeCAD Academy offers a multi-part FreeCAD 0.9 Basic Course for beginners. This course covers everything from downloading and setting up FreeCAD to creating your first part with sketches. Another resource is the “AutoCAD for Beginners” course offered by freeCodeCamp.org on YouTube. This university-level course teaches basic architectural D drafting techniques using Autodesk AutoCAD.
These free resources provide an excellent starting point for anyone looking to learn or improve their CAD skills. Whether you’re a beginner just starting out or an experienced user looking to brush up on your skills, these tutorials offer valuable insights into the world of CAD.
1 note
·
View note
Text
How to Start Isometric Drawing in AutoCAD
Isometric drawing is a valuable skill for anyone working in fields like engineering, architecture, or design. It allows you to create three-dimensional representations of objects with ease and precision. AutoCAD, a popular computer-aided design software, offers powerful tools for creating isometric drawings. In this article, we'll guide you through the process of getting started with isometric drawing in AutoCAD.
Understanding Isometric Drawing
Before diving into the practical aspects, it's essential to grasp the concept of isometric drawing. In simple terms, isometric drawing is a method of representing a three-dimensional object on a two-dimensional surface. Unlike traditional 2D drawings, isometric drawings provide a realistic perspective, making it easier to visualize complex structures.
Benefits of Isometric Drawing
Enhanced Visualization: Isometric drawings give a more realistic view of your designs, making it easier to identify potential issues and improvements.
Accurate Measurements: It allow for precise measurements and calculations, critical in engineering and construction.
Improved Communication: Isometric drawings are universally understood, making them an effective way to convey your ideas to others.

Setting up AutoCAD for Isometric Drawing
Before you start creating isometric drawings in AutoCAD, you need to configure the software for this specific purpose.
Step 1: Open AutoCAD
Launch AutoCAD on your computer, and ensure you have a new drawing or an existing one ready to work on.
Step 2: Set Units
Go to the "Units" command and ensure your units are set correctly. Isometric drawings often use metric or imperial units, depending on your project's requirements.
Step 3: Enable Isometric Snap
Type "SNAPSTYL" in the command line and set it to "Isometric."
Step 4: Set Isoplane
Use the "ISOPLANE" command to set your drawing plane to isometric. AutoCAD offers three isoplanes: top, right, and left. Choose the one that suits your needs.
Creating Isometric Drawings
With AutoCAD properly configured, you can now start creating isometric drawings.
Step 1: Draw Basic Shapes
Begin by drawing the basic shapes of your object. Use commands like "LINE," "CIRCLE," and "RECTANGLE" to create the framework.
Step 2: Use Isometric Snap
Ensure that your cursor snaps to the isometric gridlines. This helps maintain the correct angles and alignment.
Step 3: Extrude Shapes
To give your drawings depth, use the "EXTRUDE" command to turn 2D shapes into 3D objects. Specify the height or extrusion value as needed.
Step 4: Modify and Refine
AutoCAD offers various editing tools to modify your isometric drawings. Use commands like "MOVE," "ROTATE," and "SCALE" to make adjustments.

Tips for Isometric Drawing
Practice Regularly: Isometric drawing can be challenging at first, but consistent practice will improve your skills.
Use Layers: Organize your drawings using layers to make it easier to manage and edit individual elements.
Keyboard Shortcuts: Learn and use AutoCAD keyboard shortcuts to streamline your workflow.
FAQs (Frequently Asked Questions)
What is the main advantage of isometric drawing in AutoCAD?
Isometric drawings provide a more realistic view of objects, making it easier to understand complex designs.
Do I need prior experience in AutoCAD to start isometric drawing?
While some familiarity with AutoCAD is helpful, this article provides a beginner-friendly guide to get you started.
Can I create isometric drawings for both metric and imperial units in AutoCAD?
Yes, AutoCAD allows you to work with both metric and imperial units, depending on your project's requirements.
Are there any AutoCAD plugins or add-ons that can enhance isometric drawing capabilities? Yes, there are several plugins and add-ons available for AutoCAD that can simplify the process of creating isometric drawings.
Where can I find additional resources to improve my isometric drawing skills in AutoCAD? You can explore online tutorials, forums, and AutoCAD documentation to further enhance your isometric drawing skills.
Incorporating isometric drawing into your AutoCAD repertoire will undoubtedly enhance your ability to create precise and visually appealing designs. So, start practicing and exploring the creative possibilities that isometric drawing offers!
Absolutely, let's continue with more information on advanced techniques and additional resources for mastering isometric drawing in AutoCAD.

Advanced Techniques in Isometric Drawing
Once you've got the basics down, you can delve into more advanced techniques to take your isometric drawing skills to the next level.
1. Isometric Circles and Arcs
Drawing perfect circles and arcs in isometric projection can be tricky. AutoCAD offers commands like "ELLIPSE" and "ARC" to create these shapes accurately. Practice using these commands to add curved elements to your drawings.
2. 3D Models and Renderings
AutoCAD allows you to create detailed 3D models and renderings of your isometric drawings. You can apply materials, textures, and lighting effects to make your designs appear even more realistic.
3. Isometric Text and Dimensions
Incorporate text and dimensions into your drawings to provide important information. AutoCAD provides tools like "MTEXT" and "DIMENSION" for this purpose. Ensure that your text and dimensions align with the isometric grid.
4. Hatching and Fills
Use hatching and fills to distinguish different materials or areas within your isometric drawings. This helps in conveying information effectively.
Additional Resources
To further enhance your isometric drawing skills in AutoCAD, you can explore the following resources:
1. AutoCAD Tutorials
AutoCAD offers a wide range of tutorials on their official website. These tutorials cover various aspects of the software, including isometric drawing techniques.
2. Online Courses
Numerous online platforms offer courses specifically tailored to AutoCAD and isometric drawing. Websites like Coursera, Udemy, and LinkedIn Learning have courses for all skill levels.
3. Community Forums
Joining AutoCAD user forums and communities can be invaluable. You can ask questions, share your work, and learn from experienced users. Websites like Autodesk's own community forum are excellent places to start.
4. YouTube Tutorials
YouTube is a treasure trove of AutoCAD tutorials. Many skilled AutoCAD users create video tutorials that walk you through various aspects of the software, including isometric drawing techniques.
5. AutoCAD Documentation
Don't forget to explore AutoCAD's official documentation. It provides in-depth information on features, commands, and best practices.
Conclusion
Isometric drawing in AutoCAD is a valuable skill that can open up numerous opportunities in various industries. Whether you're an architect, engineer, or designer, mastering isometric drawing can significantly enhance your ability to communicate and visualize complex ideas.
Start your journey into the world of isometric drawing in AutoCAD today. With dedication, practice, and the right resources, you can become proficient in creating stunning, three-dimensional representations of your designs. Happy drawing!
Isometric drawing in AutoCAD opens up a world of possibilities for designers and engineers. It allows you to create detailed and realistic representations of objects and structures. By following the steps outlined in this article and practicing regularly, you'll master the art of isometric drawing in AutoCAD in no time.
You Read More blogs on AutoCAD India's Blog
0 notes