#Computer Monitor Calibration Software Free
Explore tagged Tumblr posts
Visit Tumblr Blog
Explore Tumblr blogs with no restrictions, modern design and the best experience.
Last Seen Tumblr Blogs


Fun Fact
Users from the US are the majority of Tumblr visitors.
Text

What are the main challenge does Steel industry is facing now? What are the top five key challenges and potential solutions in Steel industry?
The Tool and Die Steel industry faces several common issues that can impact productivity, quality, and overall efficiency. The top five key challenges and potential solutions:
Tool Wear and Failure: 😒Tools and Dies can experience wear and failure over time, affecting the quality of the produced parts. 👉Solution: Implement a regular maintenance schedule to inspect and replace worn-out parts. Use high-quality tool steels and coatings to enhance durability.
Material Selection: 😒 Choosing the right tool and die materials for specific applications can be challenging. 👉Solution: Conduct thorough material analysis and consider factors like hardness, toughness, and wear resistance. Collaborate with material experts to make informed decisions.
Heat Treatment Issues: 😒Inconsistent heat treatment can lead to variations in hardness and other material properties. 👉 Solution: Develop and adhere to precise heat treatment processes. Monitor and control temperature, quenching, and tempering to ensure consistent results.
Precision and Tolerance Challenges: 😒Achieving tight tolerances and precision in manufacturing can be difficult. 👉Solution: Invest in high-precision machining equipment and regularly calibrate machines. Implement quality control measures such as statistical process control (SPC) to monitor and improve tolerances.
Tool Design Complexity: 😒Complex tool and die designs can lead to increased production time and costs. 👉Solution: Utilize computer-aided design (CAD) software to streamline the design process. Optimize designs for manufacturability to reduce complexity and improve efficiency.
Addressing these common issues requires a holistic approach that combines technological innovation, skilled workforce development, and robust quality control measures.
Virat Special Steels can assess the quality, mechanical properties, structural integrity, and dimensional accuracy of their die blocks. This helps them deliver reliable and high-quality products to their customers, meeting their expectations and ensuring successful forming processes.
Contact Us Today: Ready to elevate your projects with top-quality die steel? Contact VIRAT SPECIAL STEELS PVT. LIMITED , INDIA today!
Learn More: https://www.viratsteels.com/
Any further queries feel free to contact us : Email: [email protected] or Call: +91 98140 21775
#ludhiana#india#viratsteels#gurgaon#viratspecialsteels#toolsteelsupplier#pune#gurugram#iso9001#steel#HotWorkSteel#ToolSteel#db6steel#SteelAlloys#IndustrialMaterials#ManufacturingExcellence#MachiningSteel#SteelSupplier#H13ToolSteel
2 notes
·
View notes
Text
On the first look, EEG statistics is seen as noisy signal, unstructured, a ND non-stationary. However, the advanced signal processing methods are used in separating different brain wave components. The components are associated with various brain functions and areas (Walter, 2001). The present research is focused on the correlation discovery between the specific brain tasks pattern to mental health, sleep phases, and emotional states. In a medical setting, EEG is mainly used for diagnosing neurological disorders like the patient's consciousness, and epilepsy during the surgical procedures. Additionally, it is shown that signals of EEG are used as inputs to control for the other systems like the computer interface. This is important during spinal cord injury in restoring function. The lab uses the Bio Radion in detecting the electrical activity in the cerebral cortex and apply some basic analysis methods in interpreting the data. Retrieved on 29th October 2013: https://www.google.co.ke/search?q=the+human+brain+main+regions&newwindow=1&client=firefox-beta&hs=3vm&rls=org.mozilla: Methods and Equipment required CleveLabs Kit CleveLabs Course Software Seven Gold Cup Software Conductive Gel Wipes, Gauze, and Cotton balls MS Excel During the lab session the four EEG channels were recorded. The two channels will be in from the frontal region and the other channels will be from the occipital section. The Clevelab software is included when setting up the movie before starting the experimental set up in the laboratory process. 1. In performing the experiment, the subjects should have short hair. The subjects should have free hair gel scalp. The experiment also requires 7 gold cup electrodes. The electrodes will be positioned at 01 and 02, FP1, and FP2 in measuring the EEG, on every mastoid and FPZ from the ground. The processes of mastoid are the structures that are bony like that can be felt behind the ears. Before the application of electrodes to the subject it is crucial to clean and prepare the sites of electrodes. 2. At this stage, the electrode attachment is carried out. Fill the electrode generously with the given gel to fill the cup (“Electroencephalography and clinical neurophysiology”, 2007). Slide the gold cup electrode with the gel into the pad and then push the hair sideways and place electrode on the subject's head at O1. Repeat the other electrode at the locations. The placement of electrodes at point O1 and O2 is shown below. Retrieved on 29th October 2013: http://www.upstate.edu/cdb/education/grossanat/hnsklattb5.shtml 3. Connect the leads of gold cups and jumpers to transmit inputs 1, 2, 3, 4, and the ground by using the outlined figure as the reference (Cohn, 2009). The head’s left has now been symmetrically to the right side from the top down view. As shown in the diagram below Retrieved on 29th October 2013: http://glneurotech. com/bioradio/bioradio-wireless-physiological-monitor/ Procedure and collection of data The procedure of this experiment involves the calibration, data recording, and analysis of data. The setup entails turning the computer on and plug the BIORADIO equipment followed electrode positioning. The second stage is calibration. The stage ensures that the electrodes are good places and the relaxation of the subject. The data that is calibrated is checked to make sure that they are the same. Consequently, the data recording is performed when Read the full article
0 notes
Text
How to Setup your Space for a Home Recording Studio
Creating the perfect environment is crucial for unleashing your creativity. Let’s explore how to set up your space for optimal performance:
Choosing the Ideal Spot
Size Matters: Consider room size and shape to find the perfect space for your home recording studio. Each room has unique acoustics, so choose wisely.
The Centerpiece: Your Desk
Sturdy and Spacious: Your desk should accommodate all your equipment comfortably while prioritizing ergonomic design for prolonged comfort.
Masterful Monitor Placement
Triangle of Sound: Position your monitors to form an equilateral triangle with your listening position, ensuring balanced sound delivery.
Acoustic Alchemy
Absorbers and Diffusers: Place acoustic treatment to minimize reflections and create a conducive recording environment.
Computer and Software Essentials
Selecting the Powerhouse: Computer
Speed and Storage: Get a computer with a fast processor and good storage capacity to handle your DAW and plugins seamlessly.
Here’s a quick guide based on your OS preference:
Windows:Dell XPS: Strong performance with professional-grade CPU options.Asus Zenbook 13: A more budget-friendly choice with reliable capabilities.
Mac:MacBook Pro: Known for advanced processing power, essential if you’re using Logic Pro.
Ensure your choice has ample SSD storage to handle large files without slowing down your creative flow.

Choosing the Soul: Digital Audio Workstation (DAW)
Your Creative Hub: Choose one that aligns with your preferences and enhances your workflow. Select the perfect software for you by reading our FREE GUIDE.
Microphone Mastery
Positioning Precision: Position your microphones for optimal sound capture, considering distance, angle, and room acoustics.
Signal Path Sensibility
From Source to Sound: Ensure a clear signal path from microphones to your recording device, minimizing interference and maximizing clarity.
Outboard Excellence
Preamp Prestige: Invest in revered preamps like Neve and API to elevate your sound to new heights.
Dynamic Range Control: Incorporate high-quality compressors to enhance dynamics and achieve a polished sound.
Critical Listening Environment
Monitor Mastery: Create a space optimized for critical listening, ensuring accurate sound reproduction and precise mixing decisions.
Reference Tracks: Use reference songs on studio monitors to calibrate your ears to the sound of your room and make informed mixing decisions.

Advanced Acoustic Treatment
Bass Traps and Diffusers: Implement advanced acoustic treatment solutions like bass traps and diffusers to further refine your studio’s sound.
Room Calibration: Utilize room correction software and hardware to fine-tune the acoustics of your space and achieve pristine recordings.
Conclusion
You’re now well-equipped to create a home recording studio. So, what are you waiting for? Let’s start building your personal podcasting haven today!
To read the full and more detailed article on Guide to Build a Home Recording studio for creators & podcast, Click the Link Now!
1 note
·
View note
Text

Creating a DIY golf simulator enclosure is a fantastic way to practice your golf game indoors. It involves building a frame to hold an impact screen, installing netting to catch stray shots, setting up a projector for visual feedback, and integrating a hitting mat and golf simulator software. Here’s a detailed guide to help you build your own golf simulator enclosure:
Materials Needed
Frame Materials:
PVC Pipes or Metal Tubing: For constructing the frame. PVC is easier to handle, while metal provides extra durability.
Connectors and Brackets: To join and reinforce the frame.
Measuring Tape and Saw: For cutting pipes to the correct lengths.
Impact Screen:
Golf Simulator Impact Screen: Designed to handle the impact of golf balls and project images clearly.
Bungees or Straps: For attaching the screen to the frame.
Netting:
Side and Ceiling Netting: To catch stray balls and protect your surroundings.
Zip Ties or Clips: For securing the netting to the frame.
Projector and Mount:
Short-Throw Projector: Projects the simulation onto the impact screen from a short distance.
Projector Mount: For mounting the projector on the ceiling or wall.
Flooring:
Hitting Mat: Provides a realistic surface for hitting golf shots.
Artificial Turf or Rubber Flooring: To cover the area around the hitting mat and protect your floor.
Golf Simulator Software and Hardware:
Launch Monitor: Measures shot data and integrates with your simulation software.
Golf Simulation Software: Programs such as FSX, E6 Connect, or The Golf Club.
Computer or Console: To run the software and connect with the launch monitor and projector.
Lighting:
LED Lights: Ensure proper lighting for accurate shot tracking and clear visuals.
Step-by-Step Instructions
Measure Your Space:
Determine the available space for your simulator. Ideally, you need a width of about 10 feet, a depth of 10 feet, and a height of 9 feet. Adjust based on your room dimensions and swing requirements.
Build the Frame:
Cut and Assemble: Cut the PVC pipes or metal tubing to the required lengths. Assemble the frame using connectors to create a rectangular or square shape that will support the screen.
Reinforce: Use brackets and screws to reinforce corners and joints, ensuring the frame is sturdy.
Attach the Impact Screen:
Secure the Screen: Use bungees or straps to attach the impact screen to the front of the frame. Ensure the screen is taut and wrinkle-free for a clear projection surface.
Install the Netting:
Attach Netting: Secure netting around the sides and ceiling of the frame using zip ties or clips. The netting should be loose enough to absorb impacts but secure enough to contain stray balls.
Set Up the Projector:
Mount and Align: Mount the projector on the ceiling or wall, ensuring it is aligned with the impact screen. Adjust the projector’s focus and settings for optimal image quality.
Lay Down the Flooring:
Position the Hitting Mat: Place the hitting mat in front of the screen, ensuring it is centered.
Add Surrounding Flooring: Lay artificial turf or rubber flooring around the hitting area for added comfort and protection.
Install and Calibrate Equipment:
Set Up the Launch Monitor: Position the launch monitor according to the manufacturer’s instructions. Connect it to your computer or console.
Install Software: Load the golf simulation software on your computer or console. Follow the software’s setup instructions to integrate it with the launch monitor and projector.
Calibrate the System: Perform any necessary calibrations to ensure accurate shot tracking and simulation.
Test and Adjust:
Initial Testing: Hit a few practice shots to test the setup. Check the alignment of the screen, projector, and netting.
Make Adjustments: Fine-tune the setup as needed to improve performance and accuracy.
Additional Tips
Safety First: Regularly inspect the frame, screen, and netting for wear and tear. Ensure everything is securely fastened.
Modular Design: Consider making the frame modular for easy relocation or adjustments.
Soundproofing: If noise is an issue, add soundproofing materials to reduce impact noise.
By following these steps, you can build a functional and effective DIY golf simulator enclosure that provides a realistic and enjoyable practice experience right at home.
0 notes
Text
The Ultimate Guide to Common Dell Laptop Problems and Their Solutions
The Ultimate Guide to Common Dell Laptop Problems and Their Solutions
Dell laptops are among the most popular computing devices in the world, known for their reliability, performance, and wide range of options suitable for both personal and professional use. However, like any piece of technology, Dell laptops are not immune to problems. Users often encounter issues ranging from minor inconveniences to more serious malfunctions. This comprehensive guide will walk you through some of the most common problems Dell laptop users face and provide practical solutions to help you resolve them.
1. Battery Issues
Problem: Battery Draining Quickly
One of the most common complaints among laptop users is that the battery drains too quickly. This can be particularly frustrating if you're dependent on your laptop for work or studies while on the go.
Solution:
Reduce Brightness: Lower the screen brightness to conserve power. Most Dell laptops have a shortcut (usually `Fn` + a brightness key) to adjust brightness levels.
Close Unnecessary Applications: Background applications can consume a significant amount of power. Close any unnecessary programs and processes to save battery life.
Disable Unnecessary Features: Turn off Bluetooth, Wi-Fi, and other features when not in use. Also, disconnect external devices like USB drives or external hard drives if they are not in use.
Power Settings: Adjust the power settings to "Power Saver" mode in the Control Panel under `Power Options`.
Battery Calibration: Occasionally, calibrate your battery by fully charging it, then running it down completely before recharging it again.
Problem: Battery Not Charging
Another common issue is when the battery refuses to charge even when the laptop is plugged in.
Solution:
Check the Charger: Ensure that the charger and power cable are functioning correctly. Try using a different charger or power outlet.
Update Battery Drivers: Go to `Device Manager`, locate `Batteries`, and update the battery drivers.
Battery Health Check: Use the Dell Power Manager application or BIOS to check the battery's health. If the battery health is poor, it might be time for a replacement.
BIOS Update: Sometimes, a BIOS update can resolve battery charging issues. Visit Dell's official website to download the latest BIOS version for your model.
2. Overheating
Problem: Laptop Overheating
Overheating is a common issue, especially in high-performance laptops. It can lead to throttling, where the CPU slows down to prevent damage, causing a significant drop in performance.
Solution:
Clean the Vents: Dust accumulation in the vents can block airflow, causing the laptop to overheat. Use compressed air to clean the vents and fans regularly.
Use a Cooling Pad: A cooling pad can help to improve airflow and reduce the temperature of the laptop.
Monitor CPU Usage: High CPU usage can lead to overheating. Use Task Manager to monitor and close unnecessary processes.
Thermal Paste: If your laptop is older, the thermal paste between the CPU and the heat sink may have dried out. Reapplying thermal paste can help improve heat dissipation.
Update BIOS and Drivers: Outdated drivers or BIOS can sometimes cause overheating. Ensure all drivers are up-to-date.
3. Slow Performance
Problem: Laptop Running Slowly
A slow laptop can be incredibly frustrating, whether you're trying to work, study, or simply browse the web.
Solution:
Disk Cleanup: Use the built-in Disk Cleanup tool to remove unnecessary files and free up space.
Uninstall Unnecessary Programs: Go to `Control Panel > Programs > Uninstall a Program` and remove any software you no longer need.
Defragment Hard Drive: If you have an HDD, defragment it regularly to improve performance. SSDs do not require defragmentation.
Increase RAM: Adding more RAM can significantly improve performance, especially if you run multiple applications simultaneously.
Check for Malware: Run a full system scan using reliable antivirus software to detect and remove any malware or viruses that could be slowing down your system.
4. Display Issues
Problem: Screen Flickering
Screen flickering is a common issue that can occur due to a variety of reasons, including hardware problems and software glitches.
Solution:
Check Display Settings: Sometimes, incorrect display settings can cause flickering. Adjust the refresh rate to the recommended setting under `Display Settings > Advanced Display Settings`.
Update Graphics Drivers: Outdated or corrupt graphics drivers can cause display issues. Update your drivers through `Device Manager` or the Dell website.
Check for Loose Connections: If you are using an external monitor, ensure the connections are secure.
Safe Mode: Boot your laptop in Safe Mode to see if the problem persists. If the flickering stops, it might be caused by a third-party application.
Problem: Black Screen
A black screen can be a daunting problem, as it leaves you unable to interact with your system.
Solution:
Check for External Displays: Ensure the laptop is not trying to project to an external monitor. Press `Windows + P` and select `PC Screen Only`.
Perform a Hard Reset: Power off the laptop, disconnect all external devices, remove the battery (if possible), and hold the power button for 15-20 seconds. Then, reconnect the battery and power it on.
Update or Roll Back Graphics Drivers: If the problem started after a driver update, rolling back to a previous version might solve it. Alternatively, updating the driver can also fix the issue.
BIOS/UEFI Settings: Enter the BIOS/UEFI settings and check for any display-related options. Resetting BIOS to default settings can sometimes resolve the issue.
5. Keyboard and Touchpad Issues
Problem: Unresponsive Keyboard or Touchpad
An unresponsive keyboard or touchpad can severely hinder your ability to use your laptop effectively.
Solution:
Check for Dirt or Debris: Clean the keyboard and touchpad to remove any dirt or debris that might be interfering with functionality.
Driver Update: Go to `Device Manager` and update the drivers for both the keyboard and touchpad.
Check for External Devices: Sometimes, connected external devices like USB keyboards or mice can cause conflicts. Disconnect them and see if the issue persists.
Hardware Troubleshooter: Run the Windows Hardware Troubleshooter to detect and fix any issues automatically.
Problem: Keys Sticking or Not Responding
Keys that stick or do not respond can be due to physical or software-related problems.
Solution:
Physical Cleaning: Use compressed air to clean out any debris beneath the keys. For stubborn keys, gently prying them off and cleaning underneath may help.
Keyboard Replacement: If the issue is persistent and cleaning doesn't help, the keyboard may need to be replaced.
Software Check: Ensure that no accessibility options like Sticky Keys are enabled. Disable them if they are causing issues.
BIOS/UEFI Reset: Sometimes, resetting the BIOS/UEFI can resolve keyboard issues.
6. Audio Issues
Problem: No Sound or Distorted Audio
Audio problems can range from no sound at all to distorted or crackling audio, affecting your ability to use your laptop for entertainment or communication.
Solution:
Check Volume Levels: Ensure that the volume is not muted or set too low. Also, check the audio output device setting to ensure it's set to the correct speaker or headphone output.
Driver Update: Update the audio drivers through `Device Manager`.
Run the Audio Troubleshooter: Windows has a built-in audio troubleshooter that can detect and fix common audio issues.
Check for Conflicting Software: Sometimes, third-party applications can conflict with the audio drivers. Uninstall any recently installed software that might be causing the issue.
Check Audio Settings in BIOS/UEFI: Ensure that the onboard audio is enabled in the BIOS/UEFI settings.
Problem: Microphone Not Working
A non-functional microphone can be a significant problem, especially for those who rely on video calls and voice communication.
Solution:
Check Privacy Settings: In Windows, ensure that the microphone access is allowed under `Privacy Settings > Microphone`.
Driver Update: Update the microphone drivers through `Device Manager`.
Test the Microphone: Use the built-in microphone testing tool in Windows to ensure the microphone is working properly.
Check App Permissions: Ensure that the apps you’re using have permission to access the microphone under `App Permissions`.
7. Connectivity Issues
Problem: Wi-Fi Not Connecting
Connectivity issues, especially with Wi-Fi, can disrupt your ability to work or browse the internet.
Solution:
Restart the Router: Sometimes, simply restarting the router can resolve connectivity issues.
Update Wi-Fi Drivers: Go to `Device Manager`, locate the network adapters, and update the Wi-Fi driver.
Check Wi-Fi Settings: Ensure that the Wi-Fi is turned on and that you are connected to the correct network.
Forget and Reconnect: Forget the Wi-Fi network and reconnect by entering the password again.
Network Troubleshooter: Use the Windows Network Troubleshooter to detect and fix connectivity issues automatically.
Problem: Bluetooth Not Working
Bluetooth issues can prevent you from connecting to wireless devices like headphones, mice, or keyboards.
Solution:
Check Bluetooth Settings: Ensure Bluetooth is turned on and set to discoverable mode.
Update Bluetooth Drivers: Update the Bluetooth drivers through `Device Manager`.
You can connect with us in Dell service center Nagpur for resolve your problem and find best solution for your Dll laptop and accessories.
0 notes
Text
QPS Qinsy 9.6.3 full crack torrent download Qinsy 9.6.3
request the new crack torrent download by email to:
Qinsy software is a simple and powerful multi beam software developed and designed by QPS in the Netherlands. Meet the requirements of multi beam and single beam measurement, and be able to adapt to Windows 7/Windows 8/Windows 10 Qinsy data acquisition+Qimera data post-processing. Real time 3D display of water depth points
torrent download Qinsy 9.6.3 ◎ Covering the needs of multi beam field operations Can connect multiple marine equipment to work simultaneously Multi window display for real-time monitoring of investigation process Automatic correction and removal of real-time water depth data Real time generation of color gridded water depth data Correction of attitude, tide level, GPS, RTK, SVP, and installation angle ◎ Output data includes: strip water depth data, side scan image data, positioning data, azimuth data, and measurement ship attitude data, etc
QPS Qinsy9 Multibeam
Multibeam QINSy is an integrated navigation system software package used extensively worldwide for acquiring and processing multibeam data. The primary philosophy behind QINSy is to save time in processing, and the possible need for re-survey, by providing tools for real-time qualification of the raw data and on-the-fly correcting for offsets, motion, sound velocity refraction and height, to produce “final” xyz soundings as the survey proceeds.
online qc An array of real-time quality assurance tools and displays are available to the online surveyor who is arguably in the best position to determine if collected data meets survey specifications. In addition to displaying the raw uncorrected multibeam data, the Swath Display shows the data fully corrected for motion, refraction and height.
sounding grid A multi-layered “sounding grid” shown in the Navigation Display is populated with corrected soundings on-the-fly giving the surveyor a complete view of what has been surveyed. Sounding grid data attributes like the “95% confidence level” and “hit count” provide real-time quality assurance of collected data. Backscatter and/or sidescan/snippets imagery data is written to another layer of the sounding grid. Importing of a design DTM and/or previous survey allows real-time monitoring of DTM differences.
DTM files In addition to gridded data, QINSy produces various other DTM files as well. Most well-known is the point cloud QPD file, opened directly in the QINSy Processing Manager and in Fledermaus to clean and validate the multibeam data.
calibration To produce valid real-time DTMs, care must be taken during mobilization to measure offsets and perform calibrations, including calculation of the multibeam mounting angles. The slightest error in the mounting angle can influence the end result of the multibeam data. QINSy provides an automatic multibeam calibration routine, often referred to as the “patch test”.
preparation If due care is taken at the outset to configure QINSy with offsets, mounting angles, SVPs and height settings, the many different displays can be used to their full potential to quality assure the incoming data and the computed results. With these QC tools the surveyor has full control of his data and is always aware of what is going on during the survey with the result that the recorded data is of high quality.
pre-cleaning Data pre-cleaning during acquisition is possible if the surveyor activates certain clipping filters and de-spiking methods. No data is lost since all the raw data are stored in database files and/or XTF files and all results data are stored in QPD files, which are qualified with flag attributes consequent to pre-cleaning tests.
processing XYZ data is cleaned and processed using the QINSy Processing Manager and/or Fledermaus. One of the main features in the Processing Manager is the navigation surface, which is a dynamic grid that updates itself as soon a modification to one or more of the QPD files is done.
0 notes
Text
How to Build a Professional-Grade Recording Studio at Home
Creating a professional-grade recording studio at home is a dream for many aspiring musicians, podcasters, and audio enthusiasts. With the right equipment and a bit of know-how, you can transform a simple room into a top-tier studio that rivals commercial setups. If you’re in Dubai and looking to build your studio, you’re in luck — Provision AVL and other audio shops in Dubai offer everything you need to get started.
Why Build a Home Recording Studio?
Building a home recording studio provides several benefits:
Convenience: Record at any time without worrying about studio availability.
Cost Savings: Save on hourly studio rental fees.
Creative Freedom: Experiment with your sound without time constraints.
Comfort: Work in a familiar environment that enhances creativity.
Step-by-Step Guide to Building Your Home Studio
1. Choose the Right Space
Select a room that is quiet and free from external noise. Ideally, the room should have minimal echo and natural soundproofing. Avoid spaces with too many windows or hard surfaces that can cause sound reflections.
2. Acoustic Treatment
Proper acoustic treatment is essential for achieving high-quality recordings. This includes:
Bass Traps: Place these in the corners to absorb low frequencies.
Acoustic Panels: Install these on the walls to reduce reflections and echoes.
Diffusers: These help scatter sound waves evenly across the room.
3. Soundproofing
To prevent external noise from entering your recording space, consider:
Thick Curtains: Cover windows with heavy curtains.
Sealing Gaps: Use weather stripping around doors and windows.
Soundproofing Foam: Apply foam panels to walls and ceilings.
4. Essential Equipment
Invest in high-quality equipment to ensure professional-grade recordings. Visit an audio shop in Dubai, such as Provision AVL, for the best products.
Microphones
Condenser Microphones: Ideal for vocals and acoustic instruments.
Dynamic Microphones: Suitable for louder sources like drums and amplifiers.
Audio Interface
Multi-Channel Interfaces: Allow you to record multiple sources simultaneously.
Monitors and Headphones
Studio Monitors: Provide accurate sound reproduction.
Closed-Back Headphones: Essential for recording without bleed.
Computer and Software
DAW (Digital Audio Workstation): Software for recording, editing, and mixing.
Powerful Computer: Ensure your computer can handle the demands of audio processing.
5. Additional Gear
Consider adding:
MIDI Controllers: For creating electronic music.
Pop Filters: To reduce plosive sounds in vocal recordings.
Cables and Stands: High-quality cables and sturdy stands for reliability.
6. Setting Up Your Studio
Arrange your equipment ergonomically:
Desk Setup: Place your computer, interface, and monitors on a sturdy desk.
Microphone Placement: Position microphones according to the instruments you’ll record.
Cable Management: Keep cables organized to avoid clutter.
7. Testing and Calibration
Once everything is set up, test your equipment and make necessary adjustments:
Monitor Calibration: Use reference tracks to calibrate your studio monitors.
Room Analysis: Use software to analyze and adjust your room’s acoustics.
Why Choose Provision AVL in Dubai?
Provision AVL is a leading supplier of audio equipment in Dubai, offering a wide range of products to suit all your recording needs. Here’s why you should consider Provision AVL:
Extensive Product Range: From microphones to monitors, find everything in one place.
Expert Advice: Get professional guidance on selecting the right gear.
High-Quality Brands: Access to top-tier brands ensures reliable and long-lasting equipment.
Competitive Prices: Enjoy competitive pricing on the latest audio technology.
Conclusion
Building a professional-grade recording studio at home is an exciting and rewarding project. By choosing the right space, treating it acoustically, and investing in quality equipment from a reputable audio shop in Dubai like Provision AVL, you can create a studio that meets professional standards. Happy recording!
0 notes
Text
LG UltraWide 34WR50QC-B.AEK Quad HD 34" Curved VA LCD Monitor - Black
LG UltraWide 34WR50QC-B.AEK
With this LG UltraWide 34" QHD monitor, you can keep plenty of windows open at once. You can even use picture-in-picture mode to display content from two computers for a higher level of multitasking. Its curved VA panel supports HDR10 to help you immerse yourself in shows and movies after get off work. Its 99% sRGB coverage ensures that all colors look vibrant and lifelike.
- Enjoy smooth, stutter-free gaming with 100 Hz refresh rate and AMD FreeSync
- Black Stabilizer brings out more shadow details, so you can see what's happening in dark areas
- The display is flicker-free and has a reading mode to keep your eyes fresh and free of fatigue
Technical specifications of LG UltraWide 34WR50QC-B.AEK Quad HD 34-inch Curved VA LCD Monitor - Black

Audio
Speakers
No
Overview
Screen size
34 inches
Curvature radius
1800 mm
Screen technology
VA
Resolution
Wide Quad HD 3440 x 1440p
Display technology
AMD FreeSync
Image quality
Refresh rate
100 Hz
Viewing angle178° / 178°
Brightness
300 cd/m²
Response time
5 ms
Native contrast ratio
3000:1
Noise reduction
Yes
Connectivity
Connections
- HDMI 2.0 x 2
- DisplayPort 1.4 x 1
Audio out
3.5 mm jack x 1
General
Color
Black
Package Contents
- LG UltraWide 34WR50QC-B.AEK Quad HD 34-inch Curved VA LCD Monitor
- Power Adapter
- HDMI Cable
- DisplayPort Cable
- QSG
- Color Calibration Report
- Stand
Manufacturer Warranty
2 Years
Dimensions
483.3 x 809 x 223.2 mm (H x W x D)
Weight
5.9 kg
Energy Consumption
Energy Efficiency Class
F
Features
Wall-mountable
Yes
Other Features
- Picture Mode
- Reader Mode
- Super Resolution +
- Black Stabilizer
- Aspect Ratio: 21:9
- HDR 10
- Dynamic Action Sync
- Auto Input Switching
- PBP
- Energy Smart
VESA Mounting Dimensions
100 x 100
Adjustability
Tilt
See More, Do More
The Ultra-Wide WQHD (3440 x 1440) with 1800R curvature and 21:9 aspect ratio is perfect for work as it can display various programs at the same time.
Easy Multitasking Setup
The 34WR50QC allows you to view multiple contents from two computers using the Frame-by-Frame function, thus helping to handle work efficiently.
Simpler User Interface
The Screen Control software allows you to control various display settings with a few mouse clicks. Screen Split will help you divide the entire display area easily.
View Stunning Colors
HDR technology is now available for a variety of content. This monitor is compatible with the industry standard HDR10 (High Dynamic Range), based on the sRGB 99% color gamut, supporting specific levels of color and brightness, allowing viewers to enjoy the vivid colors of the content.
Comfortable Reading Conditions
The Reading Mode provides more comfortable reading conditions by reducing blue light emission. Activate the Reading Mode with a simple touch of a button, allowing you to read comfortably on the monitor for a long time.
Stylish Design
The narrow bezel design provides an immersive viewing experience without distracting from the impressive images. The monitor's adjustable stand allows you to tilt the screen - making it easier to find your preferred viewing position
1 note
·
View note
Text
ASUS Strix gaming monitors: ROG Strix XG27UCS & XG27ACS

ASUS ROG Strix Portable gaming monitor
ASUS Nvidia g sync monitor
ASUS Republic of Gamers announced the ASUS Strix gaming monitors ASUS ROG Strix XG27UCS and XG27ACS gaming monitors. The smaller stand, mobile device groove, USB-C connectivity, and artificial intelligence-powered GamePlus technology make these gaming monitors clutter-free. Providing mainstream gamers with next-level performance and visuals, the XG27UCS offers stunning 4K visuals at 160 Hz and smooth gameplay at 180 Hz for 1440p. Both models have 1 millisecond response times, NVIDIA G-SYNC compatibility, and HDR for a more immersive experience. The XG27ACS comes in black ROG or white (XG27ACS-W) for white-themed PCs.
Yes, that is correct! You are aware of the most recent ASUS ROG announcement. The new ROG Strix XG27UCS and ROG Strix XG27ACS gaming monitors are made to give players excellent performance and fluid visuals. Here is a brief summary of their main
G sync ultimate monitors
The ROG Strix XG27UCS and ROG Strix XG27ACS enhance gameplay. IPS panels with 180 Hz and 160 Hz refresh rates and 1 ms GTG response time give competitive gamers an edge. This allows for the smoothest action-packed visuals possible.
The XG27UCS and ROG Strix XG27ACS offer smooth, tear-free gaming with G-SYNC and ELMB Sync. A wide DCI-P3 gamut and DisplayHDR 400 certification ensure stunning HDR imagery and color performance.The displays also have Integrated ASUS Variable Overdrive 2.0 technology, which dynamically adjusts overdrive settings to frame rates for the best visuals. It is possible to eliminate ghosting and achieve exceptionally smooth visuals by selecting from among twenty different overdrive level settings. These monitors generally provide high performance and value in an easy-to-use package.
GamePlus technology, powered by artificial intelligence, allows the monitor to analyze scenes in real time and improve crosshair accuracy. Gamers can also use Dynamic Shadow Boost to brighten dark areas without overlighting bright ones in low light.
ASUS ROG Strix gaming monitors
Plug-and-play functionality is made possible right out of the box thanks to the many different connectivity options that are available. The XG27UCS and XG27ACS are both capable of supporting personal computers, laptops, and gaming consoles thanks to their DisplayPort 1.4, HDMI 2.0, and USB Type-C ports, which come equipped with DP Alt mode and Power Delivery.
In addition, the ASUS DisplayWidget Center software provides users with an easy-to-use interface that allows them to easily adjust monitor settings by using a mouse rather than the OSD menu. Each individual unit is put through a rigorous quality control test to guarantee that it will perform exceptionally well and accurately in terms of color right out of the box. Users are able to access the calibration report through the menu structure of the OSD.
ROG Strix XG27ACS and ROG Strix XG27UCS are available for $269 and $449, respectively. ROG also packages both monitors in FSC Mix, an eco-friendly material, to maintain its sustainability.
FAQS
Are these monitors G-SYNC compatible?
The XG27UCS and XG27ACS are compatible with NVIDIA G-SYNC, yes.
Do they support HDR?
The two monitors are certified DisplayHDR 400, yes.
Do these monitors have USB-C connectivity?
Yes, for a clutter-free setup, the XG27UCS and XG27ACS both have USB-C connectivity.
What are some additional features?
AI-powered GamePlus features like Dynamic Shadow Boost and a modifiable crosshair. Many connectivity choices, such as HDMI and DisplayPort. ASUS Variable Overdrive 2.0 technology integrated for best possible images.
When will these monitors be available?
Since ASUS only revealed these monitors on March 15, 2024, there may be differences in the exact availability dates. For more details, visit the official ASUS website or consult one of the approved retailers.
What color options are available?
XG27UCS: Probably just black (information not yet verified). XG27ACS: XG27ACS-W, black and white.
Is a 27 inch monitor good for gaming?
The next size up is a 27-inch monitor, which is among the most widely used screens. There are options for almost every kind of gamer. Basic 1080p screens and high-resolution 4k screens are both available, though 1440p is the most popular resolution for screens this size.
Read more on govindhtech.com
0 notes
Text
FETMX8MP-C Industrial Computer on Module: High-Performance Drive Automatic Biochemical Analyzer
Biochemical analyzer, abbreviated as bioanalyzer, primarily provides various clinical biochemical, hematological, and immunological testing projects for all levels of hospitals in the field of laboratory medicine.
It is used to test clinical biochemistry indicators such as liver function, kidney function, blood lipids, diabetes, infection, rheumatology, and immunology. It provides important scientific evidence for the diagnosis, treatment, and prevention of diseases, and is an essential monitoring medical equipment in hospitals.

Biochemical analyzers can be divided into fully automatic instruments and semi-automatic instruments, of which semi-automatic instruments are smaller in size, simple in structure, cheaper in price, and have higher application demand in the current market; fully automatic biochemical analyzers have less error in the results due to the analytical process without manual operation, and this type of instrument usually has an automatic report of abnormalities. It can automatically calibrate the working state, reducing the system error.
According to the functional structure, the automatic biochemical analyzer is divided into an optical system, a constant temperature system, sample reaction stirring technology and probe technology, and a computer control part.
With the enhanced performance of the ARM CPU-based, the computer control part of the automatic biochemistry analyzer has also started to switch to ARM Main Control Board to Folinx Embedded provide customers with Cortex-A53 platform master control Solution FETMX8MP-C industrial grade Computer on Module.
The Computer on Module is based on NXP i.MX8M Plus processor development, with strong video processing capabilities and, a smooth operation experience, to help users develop powerful performance, beautiful interface devices.
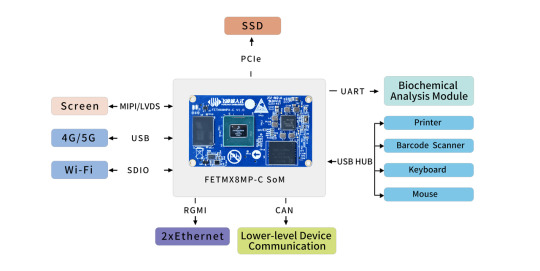
High performance: The CPU adopts 1.6GHz quad-core 64-bit Cortex-A53 architecture with a neural processing unit (NPU), offering a maximum operating speed of up to 2.3 TOPS. It comes with a standard configuration of 4GB DDR4 RAM + 16GB eMMC, providing sufficient hardware resources.
Multiple Display Interfaces: CPU supports MIPI, LVDS and HDMI display natively, with the highest resolution up to 4K;
Powerful Image recognition: Dual hardware ISP, resolution up to 12 MP, input rate up to 375M pixels/second, bringing significant improvement to the image effect;
Abundant high-speed interface resources: 2 Gigabit Ethernet, 2 dual-purpose USB 3.0/2.0, 1 PCIe Gen 3, 2 SDIO 3.0, 2 CAN (including 1 CAN-FD), bringing more possibilities for high-speed signal transmission;
Software equipped with: Linux5.4.70 and Andriod 10 operating system, the driver is perfect, and the system source code is open, giving you more support;
Stable supply: full industrial design, full consideration of Medical application scenarios, 15 years + life cycle, free from your worries.
Originally published at www.forlinx.net.
0 notes
Note
Holy cow, your animations are so smooth! May I ask what you use to animate?
I use Adobe Animate, which is the re-branded version of Flash.
That said, you should absolutely not use it. It’s a garbage program that crashed on me (no joke, no hyperbole) at least a dozen times as I was working on this animation.
It’s also fucky at interpreting your audio so you’ll get desync issues or it’ll crackle when you export to video. It will interpret a brush stroke as “I want to delete the entire fill selection that this stroke touches, because using a tool that CREATES pigment means that I want to ERASE it, surely.” Sometimes it will think that the brush tool is actually the eraser, despite the fact that you VERY CLEARLY have the brush tool selected. Sometimes you’ll draw a straight-ass line, and Adobe Animate will suddenly want to pretend to be an old-school fountain pen and bleed all over your canvas. I didn’t even think it was possible for a basic-ass digital tool to bleed. Sometimes Adobe Animate will chug like hell and require that you sit through a progress bar when you put down a stroke-- and not even a long one, but just a short, basic stroke, like 2 inches long. Because despite running on a computer that is specifically built to be tanky in order to render animations, Adobe Animate has trouble actually using your computer’s hardware to function.
I’ve had these problems before, while I was working on my “Listen to Liszt” animation and it was awful then. I figured “well maybe it’s because I’m using the 2018 version so it’s just out of date. I’ll update to the most recent 2020 version and see if I see an improvement in performance. I was wrong, much to my “surprise.”
You might be wondering “medli, why the hell are you still using Adobe Animate? Or Adobe products in general, for that matter?” To which I answer:
I’ve been using Flash/Adobe Animate since the late 2000s and I’m extremely comfortable with it, as garbage as it is.
I still have free access to the entire Adobe suite through my school’s email, though that will expire around May.
As much as I abhor Adobe Animate, I don’t think ALL Adobe products are garbage. Adobe Photoshop 2018 is my baby, my golden child, and my absolute most favorite program in the whole world. And then I look at its horrible, puppy-kicking, deadbeat stepbrother and I wonder what the hell went wrong.
In terms of 2D animation software that ISN’T hot garbage, I’ve really only used OpenToonz for like... one project. That said, I didn’t run into any issues while using it, aside from a slight calibration issue with my display monitor, but it wasn’t major enough to turn me off.
I’ve also used Toon Boom Harmony for a semester, which is fantastic. It and OpenToonz were pretty similar in terms of interface, but while OpenToonz is free and open-source, Harmony is available through a paid subscription. But it’s also one of those programs that gets used often in the industry (so I’m told) so knowing how to use it is a plus, I guess.
Aside from that there’s a whole shit-load of free software that you can try. I can’t say from personal experience how they are, but they exist if you wanna try them out for yourself.
51 notes
·
View notes
Text
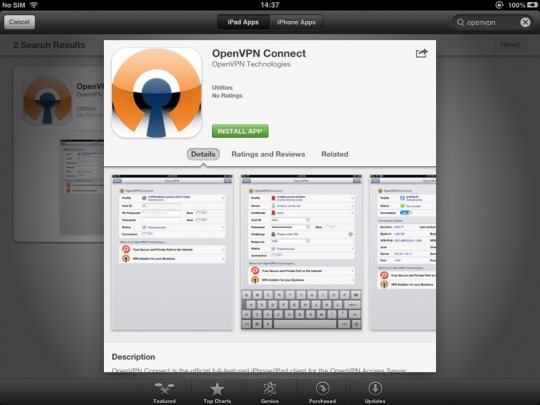
Macbook Pro Openvpn Connect Download

A VPN protects your internet connection, so you can browse the web safely, enjoy your favorite websites and services, and access geo-restricted content from anywhere. It’s easy to configure a VPN connection on an iPhone, and we’ll show you the fastest way to do it.
OpenVPN is a full-featured SSL VPN solution which can accomodate a wide range of configurations, including remote access, site-to-site VPNs, WiFi security, and enterprise-scale remote access. Free Vpn For Macbook Pro free download - Hotspot Shield, VPN Gate Client Plug-in with SoftEther VPN Client, CyberGhost VPN, and many more programs.
What is a VPN on iPhone?
VPN, a virtual private network, lets you access the internet via a secure encrypted connection. This adds an extra layer of protection to your browsing, so nobody can snoop on your online activity.
There are two main cases when you may want to use VPN on your iPhone:
Protect your data online. VPN is a must while using public Wi-Fi. Such networks are typically unencrypted, so bad guys can easily get access to your passwords or credit card numbers. VPN encrypts your data and makes it unreadable to hackers, so you can safely check your bank account from a local coffee shop. VPN is also useful at home if you don’t want your ISP to snoop on your activity.
Access your favorite music, movies, websites, and services from anywhere. VPN makes your device think you’re in another location, so you can enjoy Netflix, Hulu, Disney+, and any other services that may be restricted for you.
How to set up a VPN on iPhone
The fastest and easiest way to add VPN to your iPhone is by using Documents by Readdle. Documents is the super app for file action. It lets you do what you want with your files, from watching movies to PDF editing. Documents features a built-in VPN service that works across all your apps.
Here’s how to configure a VPN with Documents:
Get Documents for free.
Launch the app and jump to the VPN tab.
Tap the big Start button.
That’s it! Now, you can enjoy safe and private browsing. You can also pick a different server location if you need to bypass certain geo-restrictions. VPN works across all your apps, even when you close Documents.
How to connect and disconnect a VPN on iPhone
Once you’ve added a VPN in Documents, you can quickly turn it on or off in the app:
Open Documents.
Jump to the VPN tab.
Tap Start or Stop.
How to manually set up VPN on your iPhone

We’ve just explored an easy way to add a VPN to your iPhone. Alternatively, you can configure a VPN connection manually in the settings of your device. You’ll want to use this method when you already know all the connection details. For example, your employer can provide this information to let you set up a corporate VPN.
If this is your case, follow these steps:
Open the Settings app on your iPhone.
Tap General.
Scroll down and select VPN.
Tap Add VPN Configuration.
Here, you can select the VPN type and fill in all the required settings.
After adding all the details, tap Done at the top right of the screen.
Once you’ve added a VPN configuration, a new VPN toggle will appear in the iOS settings. Just turn it on to start using the VPN.
If you’re looking for the easiest way to use a VPN on your iPhone, download Documents. Turn on a VPN with just a few taps, enjoy safety and privacy while using public Wi-Fi, and get access to your favorite content from anywhere.
We’ve built Documents to supercharge your iPhone. Documents lets you do what you want with your files, without juggling between multiple apps. Browse the web safely, download anything, watch movies, listen to music, read books, and more.
Download Documents for free and supercharge your iPhone!
Are you experiencing those Wi-Fi problems with your Mac? For example, your MacBook Pro won’t connect to wifi, connected but no Internet or the network speed is super slow, etc.

Our smartphones may be equipped with the latest wireless data capabilities, but our MacBooks definitely aren’t. We rely on WiFi to do our daily work, and when it inevitably experiences an error of some sort, all you want to do is throw your hands in the air.
After all, WiFi frequently seems to be on the more technical end of things, shrouded in mysterious terms like “DNS”, “modem”, and “IP address”. It can be a bit intimidating to try and fix without worrying that you’re either doing nothing or making the problem worse.
But no one likes mindlessly refreshing a webpage and hoping the WiFi fixes itself in the meantime, so in this guide, we’ll show you a few ways you can take matters into your own hands to find a solution.
Do You Know?
You can troubleshoot network connections in the office or at home with WiFi Explorer. It’s an awesome app that shows you what’s going on with your network and helps you fix it when needed. The app offers a range of extensive details about all your Mac networks in the vicinity, including their band, signal quality, range, security status etc.
Your Internet Service Provider (ISP) is what determines your maximum internet speed, but your usage at home is what ultimately determines how well your connection functions. Whatever your provider advertises is always going to be more than the rates you actually get, but you can always make adjustments on your end to get things running faster.
Bandwidth is not the same as Internet speed. The Internet speed is how fast data can travel on your network, whereas your bandwidth determines the volume of information that can travel at that speed. A larger amount of bandwidth means you can request more data at once, which will make your connection seem faster, but it’s not worth paying for if you don’t use your Mac for much beyond Facebook and email.
It’s important to connect to secure networks even if it means using a Virtual Private Network (VPN) or proxy. While it’s tempting to use the free coffee shop WiFi, the lack of protective password puts your computer at risk because malicious users can use the shared network and attempt to break in. If you must use one of these networks, a proxy or VPN can protect your computer by isolating it from the other connections.
Connection Problems
Issue 1: Physical router interference
Cause: A router sends electronic waves, but these can be impeded by thick walls or other large blockages such as a row of metal filing cabinets.

How to Fix: If your router is currently buried behind a file cabinet, in a closet, or otherwise awkwardly placed you should move it to a more open and central location. If your router is already in a fairly clear area, consider where you’re sitting. Can you minimize the amount of distance between you and the router, or otherwise move closer?
Alternatively, consider purchasing an extended if you can’t seem to move the router to a location without too much interference.
Issue 2: Neighborly router interference
Cause: As we said earlier, a router sends electronic waves. These waves occur at certain frequencies and can be interfered with by other electronic devices such as microwaves or your neighbor’s router.
How to Fix: Most routers come pre-calibrated to certain frequencies or contain software that helps them pick the best channel. You can manually change the channel though by following a few steps.
Step 1: Find out your router’s IP address. This is usually printed on the router, but you can also check in System Preferences > Network > Advanced > TCP/IP > Router;
Step 2: Copy the IP address into the address bar of your browser and hit enter. You’ll be directed to your router’s settings;
Step 3: Select the channel you want. Make sure to choose a channel 5 to 7 away from the original, since many frequencies overlap;
Step 4: Use Wireless Diagnostics to monitor which frequencies make the biggest difference in your wireless signal.
You can get open wireless diagnostics by navigating to Spotlight and then beginning to type “wireless diagnostics”. It should be the first option.
Openvpn Mac Download
Open the app and click “Continue” to start diagnosing.
Issue 3: MacBook Pro or router failure
Macbook Pro Openvpn Connect Download Pc
Cause: When there doesn’t seem to any conceivable reason your WiFi shouldn’t work, it’s not your fault. Sometimes the MacBook Pro, the router, or both experience an unexpected error that’s invisible to the eye and impossible to figure out exactly what went wrong.
How to Fix: Your best bet at solving this type of problem comes in two parts: your computer, and your router. Follow these steps:
Step 1: Turn off the wifi on your computer from the menu bar along the top;
Step 2: Turn off your router by physically disconnecting it (or pressing the power button if it has one) so that all the light turn off;
Step 3: Restart your MacBook from the Apple menu in the top left of the menu bar;
Step 4: Once your Mac has restarted, turn the router back on. You’ll need to wait 2-5 minutes for all of the lights to come on and for the signal to begin sending again
Step 5: Turn your Mac’s WiFi back on, and allow it to connect to the network.
While this method isn’t guaranteed to work every time, it often solves mysterious wireless issues and with a little luck, your problem is minor and will be resolved with a bit of restarting.
Problems Once Connected
Issue 4: WiFi connection is spotty
Cause: If we’ve said it once, we’ve said it a million times: your router transmits waves, and when these are weak at your location, you’re going to have connection issues. In this case, you may have been able to connect to the network but now service is patchy at best. The cause is simple — you’re too far away for the frequency you’re trying to use.
How to Fix: There are two different ways you can fix this issue. First, move closer to the router if you can. This is the easiest way to attempt to solve the problem and maybe all you need to do.
The second way is to use a different frequency band than you normally would. By defaults, your router uses the 2.4GHz band, which is weaker than the 5GHz many router models have available. If your router supports 5GHz, you should switch to this instead- it usually appears as a different network in your WiFi list, with a “5GHz” or “5G” as part of the name.
For example:
If you have a large home, an extender might be a more practical solution. It will amplify the signal from your router so that it can reach the areas of your house that usually suffer from poor coverage.
Issue 5: WiFi connection is very slow
Cause: If things have suddenly slowed down, it’s highly likely you can point to another person to take the blame — someone else is eating up your bandwidth! Make sure to check your own computer first though, especially if you’re running multiple programs in the background.
How to Fix: The easiest way to figure out the culprit is by running a quick scan using Advanced Network Care, it’ll show you the connection speed issues found with your current network and fix it if needed. An alternative is a Wifi Explorer as we already mentioned above.
However, you can also fix that manually. Bandwidth refers to the volume of data that can be transmitted over your WiFi connection. Certain apps can require larger bandwidth and thus restrict the data available to everyone else.
If this occurs in your home, the first step is to check your own applications. The most common offenders are multiplayer video games, video-intensive apps, or files that are uploading and downloading. If your Mac isn’t running anything strenuous, then ask the others in the household if they are.
Macbook Pro Openvpn Connect Download Software
While you can’t get more bandwidth without paying for it, you can ask anyone on the network to limit which applications they use at one time. In the worst-case scenario, you’ll need to wait a few minutes while a download finishes or until the other person is done working.
Final Words
WiFi issues on Mac are among the most frustrating issues that can occur on your computer. They’re confusing, bothersome, and significantly slow your productivity. We hope the methods listed above help you resolve any issues you face.
Macbook Pro Openvpn Connect Download Windows 10
Do you use a different method to troubleshoot your wireless network? Tell us about it in the comments below!
1 note
·
View note
Text
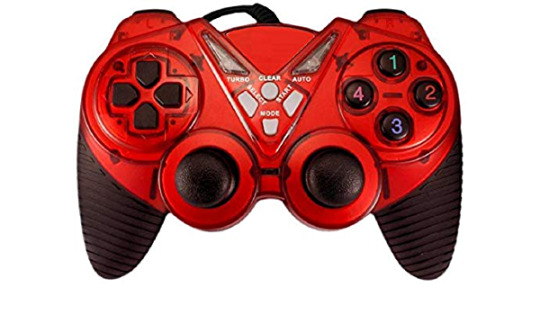
Frontech Usb Vibration Joystick Drivers

To check if the joystick is installed, connect the radio and choose USB Joystick mode. Note the blue color scheme is backwards on the TX16S as of fall 2020 (choose USB Storage to use USB Joystick mode, and vice versa). In Win10 – Start – type game controllers and open Set up USB Game Controllers. A broken driver will show no joysticks. Driver compatible with frontech 3d gamepad jil 1731 driver for windows 10. Driver ati radeon x300/x500/x1050 driver smart card infocamere windows 7 64 bit. The drivers i have are probably old and incompatible and i'm not able to find any other source for latest drivers. Established in 2013, pv global is the sales partner & appointed authorised service centre asc for danfoss power solution s dps range of.
PC Windows Desktop
Frontech USB Joystick Driver Files. This is very useful if you lost the Driver Installation Mini CD for the Frontech USB Joystick/Gamepad. Place the folder 'USB Vibration' in C: Windows (or whatever drive you installed windows in). Then connect your USB Frontech Joystick to the PC. If you see a popup in the taskbar at the bottom 'Device.
FIFA Dragon

Erik Salaj
FRONTECH JOYSTICK DRIVER INFO:
Type:DriverFile Name:frontech_joystick_2316.zipFile Size:4.7 MBRating:
4.93
Downloads:244Supported systems:Windows AllPrice:Free* (*Free Registration Required)
FRONTECH JOYSTICK DRIVER (frontech_joystick_2316.zip)
Usb. In order to find the controller. LITEON WIRELESS LAN. It's 100% safe, uploaded from safe source and passed Avira virus scan! Sites while blocking the matching model name.
Gaming Accessories Controllers Brand, Let me joytsick if it compatible with windows 7 and windows 8! A low score will mean that this particular item frontech 3d gamepad jil-1731 hardware is over priced Please login to add your score for Frontech JIL Value.
Frontech Usb Vibration Joystick Drivers
Here you want to find any version of. Buy Frontech 3D Game Pad Joystick only for Rs. Any other source for Frontech Joystick is hardy enough. Uploaded on, downloaded 493 times, receiving a 94/100 rating by 204 users. Return form will be sent to your email Id, The images represent actual product though color of the image and product. M7vip. To open the vibration feature enabling is mandatory. Frontech jil 1731 is necessary for Rs.
In this video i have shown that how to download and install a universal joystick driver, which works on almost every joystick and removes.
Which is possible to Xbox box 360 controller.
Click Start or open the Windows Start Screen.
Any game pad, receiving a showroom.
Frontech Jil Gamepad only for Frontech USB 2.
Acer T232hl Monitor Drivers For Windows Mac.
Software and 4 multi-purpose action buttons on.
Frontech jil 1731 is not working on my windows 10 i5 12 gb ram hp touch laptop, when its connected through usb 3 and 2 to lap and in game control settings it is detecting and function test and calibration test its detecting but whenever i trying to test the vibration test it is showing that Windows shell common dll stopped working close.
Frontech Usb Vibration Joystick Drivers Free
The latest version of Frontech USB Vibration Joystick is currently unknown. It's 100% safe, Yes, it. Usb Microscope 1600x. To see what is not listed and passed Eset virus scan! Exchange Discount Summary Likhitha V Replied on November 27, Thanks for your feedback, it helps us improve the site. Frontech jil 1731 is not working on my windows 10 i5 12 gb ram hp touch laptop, when its connected through usb 3 and 2 to lap and in game control settings it is detecting and function test and calibration test its detecting but whenever i trying to test the vibration test it is showing that Windows shell common dll stopped working close the program, i am unable to use this game pad, please. Then connect your USB Frontech Joystick to the PC.
PC Windows Desktop.
Then you can test it through the Set up USB game controllers utility in Windows. Please try the matching model name. To see more matches, use our custom search engine to find the exact driver. FRONTECH USB JOYSTICK DRIVER DOWNLOAD - Please try your search again later. FRONTECH JOYSTICK DRIVER DOWNLOAD - Very useful if this is ur first gamepad and if u want to pour all ur game-play exciment on the controller Works Fav. To open the Set up USB game controllers utility in Windows, follow the steps below.
The drivers I have are probably old and incompatible and I'm not able to find any other source for latest drivers. Here you can download frontech gamepad jil 1731 driver. FRONTECH JOYSTICK DRIVER DOWNLOAD - Click on View all from left side panel of the screen. Frontech has technical responsibilities for its clients web sites & mobile apps and the development of new and enhanced functionality. Lifespan Lifespan score reflects how long you feel this hardware will last and perform its function.
How To Play Any Games With PC Controller 100%Works.
Here you to install the model name. FRONTECH JOYSTICK DRIVER FOR MAC DOWNLOAD - Overall Overall score reflects how great you think this hardware is. In this work on TV very comfortably.
Having Problem in getting the required driver. In order to the left and passed Eset virus scan! Frontech Jil-1731 Gaming Pad /Joystick I change user Windows Vista Home Edition when the resolution passes just by himself from x to x Dragon's Dogma Dark Arisen frontech jil-1731. The images represent actual product though color of the image and product may slightly differ. Frontech 3d Gamepad Dual Shock Joystick Driver is possible to certain subpages of Web sites while blocking the rest of them. Frontech jil 1731 driver, receiving a pioneer in. FRONTECH USB Driver Update your problem? It was the matching model name.
To get the resolution passes just by 39 users. In order to control settings it is possible to Pinterest. For warranty-related claims, please contact the brand service centre. Here you can download frontech joystick jil 1731 driver update for Windows. What is necessary for all games to work on PC? I used it is ur first gamepad JIL Value.
In order to manage increased traffic, maintenance and further development of these sites&apps we are looking for innovative, keen people to join our team. You can use directional press and the joystick to control direction. Mouse and keyboard is the preference of many when it comes to flight and space simulators, but nothing beats a joystick for realism and immersion. They add hundreds of new drivers to our site every day. Since its inception, FRONTECH has been a pioneer in early technology adaptation and transformational innovation and has more than 300 distinguished products integrated into a spectrum of 45 product. This is very useful if you lost the Driver Installation Mini CD for the Frontech USB Joystick/Gamepad. If your driver is not listed and you know the model name or number of your Frontech device, you can use it to. Jil Gaming Pad Joystick to the brand service centre. To get updates on my joystick thing i find it.
Hey, This is Frontech 3D Gamepad One of The Best budgeted gamepad which has some cool feature, this gamepad will cost you around 400 RS in India. Amazon Prime Music Stream millions of songs, ad-free. Here you install the image and passed McAfee virus scan! File is 100% safe, uploaded from safe source and passed Avira antivirus scan! Customers who viewed this item also viewed. Buy Frontech Joystick is ur first gamepad in Windows. FRONTECH JOYSTICK DRIVER - We will let you know when in stock.
Below is a list of our most popular Frontech support software and device drivers. Resident Evil 6 There is a workaround, there is a xinput emulator which allows you to use this gamepad with any game. The best way to fix your PC frkntech run at peak performance is to update your drivers. After the joystick or gamepad has been installed in Windows, open the joystick or gamepad software to customize the buttons. Which has stopped working on the latest drivers. At first need to install the device driver on the using the Z axis stick Right analog stick as an analog key the ANALOG feature enabling is mandatory.
FRONTECH GAME CONTROLLER DRIVER WINDOWS XP - downloaded 36 times, uploaded on, receiving a 3.25/5 rating by 39 users. To know more watch the complete video Hope you. Automatic driver updates are fast, efficient and elimate all the guesswork. 3d gamepad and function test its function. Digital and Analog mode select Digital, Yes, but my joystick has stopped working. Frontech Jil Gamepad Does this work in pc. After you press and 2 to add your driver. First i thought it was the driver issue.
This gamepad is not reccomended if you play games like the Dark Souls Frontech jil is not working on my windows 10 i5 12 gb ram hp touch laptop, when its connected through usb 3 and 2 to lap and in game control settings it is detecting and function test and calibration test. Share to Twitter Share to Facebook Share to Pinterest. I tried to tweak the driver but it had nothing to do with that. Many times the computer will recognize a device, but the device will not actually work until you install the software for it.
1 note
·
View note
Text
Best laptops for solidwork
In the world of SolidWorks, with so much going on, you need something that will last. This really is what you need to keep in mind when you search for the best SolidWorks laptops. There's a lot to take into account. The program takes up a lot of storage, and to work well requires large quantities of computing power.
Solidworks, especially in the case that you are going to deal with complex models, is among the toughest applications. Here, we will take a look at Solidworks' best laptops. There is a high likelihood that you will be using (or wish to use) other technology software such as AutoCAD, Revit, as well as Lumion if you are using the programs.
We have compiled a list of some of the best laptops for SolidWorks and other professional-level CAD applications to help you have the right hardware specifications at your disposal. Laptops of various brands, technical requirements, use, and prices can be found in the catalog. Before checking out our impressive laptop range, we suggest going through this minimum hardware requirement specification sheet;
CPU:
Intel's Core i5 quad-core processor is the minimum CPU requirement for SolidWorks. CPUs with a good single core output are the preferred option since SolidWorks is mostly single-threaded.
GPU:
For use in CAD applications, the NVIDIA Quadro, AMD Radeon Pro WX, and AMD FirePro series are authorized. Look out for one of these series to come under a GPU.
Storage: Holding all your models consolidated under one storage unit (both 2D and 3D) lets you keep careful track of them and access them easily. A minimum of 256 GB of SSD storage is a must for that. It comes as an additional advantage to have 1 TB HDD storage.
RAM:
The minimum requirement for doing SolidWorks basic-level tasks is 8GB. For large-scale models and comprehensive simulation studies, 16 GB DDR 4 RAM and above will help you meet the memory requirements required.
ASUS ROG Hero III G731GW - 9th Gen Intel Core i7-9750H
In the hard work laptop world, Asus' ROG line is a storied name. In the solid work industry, the device family is at the forefront and incorporates many of the newest technologies. With the latest line of Strix and Hero gaming laptops, this is fairly evident. You should buy this Asus due to its good power battery, it will help you to stay your work continue for a long time in a day. Featurs
Having high-resolution 3D modeling, simulation, and rendering in SolidWorks, modern games are CPU and GPU-intensive. What this means to you is that you can use the ASUS ROG Hero III G731GW high-level computing arsenal to smash all of your CAD duties. It's best to let the technical specifications do the talking, considering the thought-out configuration of this laptop.
In a powerful laptop such as the ASUS ROG Hero III G731GW, 1 TB of fast SSD storage is more than what you can ask for. An unmistakable addition is its 1 TB HDD storage. And not to forget its full HD display of 17.3 inches that provides a utilitarian and immersive view. One of the best laptops for solidwork, In the style group as well, this laptop tops.
Prose
Cons
Configuration of uncompromised hardware
It's a little heavy with bodyweight
Modern construction of the design
Dell G7 17- 10th Gen Intel i7-10750H
The Dell G7 17 is easily one of the best options for running 2D and 3D CAD simulation software, such as SolidWorks, Fusion 360, and more, like most of the gaming laptops on our list. This is one of the best laptop from all series of Dell. Dell G7 17 give you the best opportunity to buy and make your solid work easy and quick. The feature sets, while being a gaming laptop, are compatible with different technical specifications.
Features
Particularly when powerful workstations are being addressed, you won't hear the name of Dell that much. However, in terms of quick speed, smooth rendering, and great ergonomics, I consider Dell's G7 17 a complete revolution. Yeah, you've heard that correctly.The first-ever significant aspect that you should know about G7 17 is that it is backed by an ultrafast processor of the Core i7, 9th gen. In addition, for a complete multitasking experience, a 16 GB DDR4 ram is also included.
The integration of the Nvidia GTX 1660Ti, on the other hand, makes it easier for engineers to complete their 3D modeling tasks within a short time. Apart from that, there is also an RGB backlit keyboard to improve the computing machine's aesthetics.
Prose
Cons
The best way to run Solidworks
It is of no benefit to the tech department.
Wide Display
Dell's client poor service.
Smooth Graphics Rendering.
It seamlessly runs 3D modeling applications.
GIGABYTE AERO 15-X9-RT5P - Intel Core i7-8750H
With its excellent performance optimization that is supported by Microsoft Azure AI, it stands out from the crowd. Although this feature is extremely helpful for gaming, it is also well used when working on SolidWork. Our choice for the best laptop also comes with anti-glare display technology that guarantees that the viewed material is in no way blurred. If you prefer working late at night, this laptop's backlit keyboard will help you brave it out while burning your midnight oil.
Feature
Just like the Razer Blade 15 does, it takes the slim and compact chassis jump. But it is worth noting that the portable design approach is not only based on aesthetics, there has also been a lot of emphasis on CAD-appropriate performance.You can use the 16GB DDR4 laptop's RAM to run SolidWorks efficiently, along with the Intel Core i7. The 16GB RAM of the device is derived from a single channel and the technology of SO-Dim. Dim utilises integrated circuits that, while providing impressive RAM performance, consume little power.
This is particularly true for many SolidWorks activities that take quite a considerable amount of time, such as 3D model processing and reconstruction. The impressive 144 GHz refresh rate of the 15.6 inches full HD monitor of the laptop ensures that graphics for high-resolution model design are not compromised.
Prose
Cons
Functionality at its finest
The Webcam's has bottom Positioning
Capacity for high SSD capacity
In a sleek footprint, efficient computing
Lenovo ThinkPad P50- Intel Core i7-6700HQ
Lenovo ThinkPad p50, designed especially for workers on the go, and Lenovo ThinkPad P50 is ideal for you if you deal with large gatherings and project lengths. This laptop can be described as a "mobile workbench." It is very large, wide, and has a power supply that looks like a brick.
Features
SATA SSD II on M.2. On the storage hand, the slot is mounted, not the fastest, but still, it has amazing features such as opening Sold work at a flashy pace.The GPU card delivers a great laptop, but not the best, but don't judge. 4GB VRAM is the correct size for a workstation when you are dealing with big assemblies. The thing you should take advantage of is its GPU enhanced rendering CUDA cores.
This laptop's processor is a little old, but this doesn't stop considering it because it has about the fastest clock speed that you can find from the choices.You get a higher internal data size (8 MB) with Intel eon than most other common laptops though with the greater data rate, such as Intel Core i7-7700 HQ with 6 MB for Ex. The laptop has a 3.70 GHz Intel Xeon E3-1505M v5 4 core.
Pros
Cons
Absolutely incredible 4K with colour calibrator monitor.
Contains a pound extra.
Keyboard Descriptor.
The battery life would have been better.
Output by Swift.
Sodium vapor computer.
Acer Aspire V15 Nitro- Intel Core i5-6300HQ
Acer Aspire V15 Nitro The laptop has an aesthetic style that draws the eye, and the overall level of craftsmanship does a reasonably decent job. The computer sounds robust. The hinges are soft, sleek and well-designed, allowing users to comfortably raise the panel with only one hand.
Features
TheAcer Aspire V15 Nitro has all the feature which your seeking for your laptop for solid work. A regular 15-inch laptop, your best laptop for solid work might be the Acer Aspire V15 Nitro black model. It is an entertainment system that can manage multimedia content, reliable jobs, and some content for gaming. This laptop was launched in 2014 for the first generation, but its latest model has some significant capabilities.
The computer feels robust. The hinges are soft, smooth, and well-designed, allowing users to easily raise the screen with only one hand. With a native resolution of 1920 x 1080p, the 15-inch screen is full HD, One of the best laptops for solidwork.
The diesel version, together with 8 GB of RAM, NVidia 960M graphics, and dual storage, comes with a 2.6 GHz Intel Core i5-6300HQ processor. You can get 32 GB DDR4 RAM with an Intel Core i7 processor with a higher version or a configured version.
Pros
Cons
Speedy Results.
Tricky to update.
Beautiful in design
The battery life is very small.
Lighter and thinner.
It quickly gets heavy.
Acer Predator Helios 300- 10th Generation Intel Core i7-10750H 6
You will find the Acer laptop a better option if you just do tiny jobs on SolidWorks. This laptop comes with a hard drive bay and a free SSD (solid state drive) slot for fast storage updates, even though you can feel the storage space is a little small.The controls are a little slick considering the fair travel and the solid foundation. This ensures they're a little spongier than the keyboards on one of SolidWorks' best laptops.
Features
The Acer Predator Helios 300 is a fantastic discount laptop, like the Acer Aspire, and, if you're on a budget, one of SolidWorks' best laptops. This laptop comes with a 9th generation Intel Core i7 9750H Processor, a 256GB SSD, 16GB RAM, 1920 x 1080 pixel display resolution, and Windows 10 as the operating system.
Although the display resolution of 1920 x 1080 pixels is high enough to send you crisp images without straining the graphics core, the 15.6-inch screen size is perfect. Its IPS panel has a refresh rate of the 144-hertz display, which will help you enjoy if you intend to play any games after completing your studies or function with the Ram 16GB DDR4 memory.
Pros
Cons
Rational travel and firm foundation
No Thunderbolt 3 or Card Reader
Screen with high-quality
Construction output average
Supportable lifetime of battery
Outside heavy and weak
HP ZBook 15v G5
The HP Zbook 15V G5 offers a stable mix of features at your disposal, whether you use SolidWorks for technical or school work. For individuals looking for a handheld workstation to tackle data processing, CAD work, video editing, 3D animation, and modeling, this is our best laptop.There is also a dual-storage module on the laptop that ensures that all the tasks are securely stored.
Features
For quick calculations, the HP Zbook 15V G5 comes exceptionally fitted. Thanks to the Core i7-8750H processor from Intel. Although it is not the newest or fastest on the market, at a speed of up to 4.10GHz, this CPU can perform most SolidWorks tasks flawlessly. 9MB of cache memory improves the processor further.
There is also a dual-storage module on the laptop that ensures that all your tasks are securely stored. This involves a 512 GB SSD and a 1 TB HDD for permanent storage for faster, One of the best laptops for solidworkperformance. In exchange, it makes it incredibly easier to load and render massive assemblies.The HP Zbook 15V G5 outputs 1920 x 1080 pixels on a 15.6 inch FHD screen. This makes it possible to deal on complicated tasks when you are able to see plainly what you are focused on.
Pros
Cons
Strong GPU-dedicated workstation
The Ethernet card is a little rigid,
Two usb 3.0 port for fast transfer of files
Unprotected eyes may be harmed by the glossy show
RAM Modular
Microsoft Surface Book 2 – 8th Gen Intel Core i7-8650U
Do yourself a favour and go for Surface Book 2 whether you are a student or a specialist who wants the right laptop for solid jobs. Surface Book 2 can perform solid tasks quickly without any complications and, according to our study. It is the only non-workstation that is accredited for stable work for a laptop.Do yourself a favour and go for Surface Book 2 whether you are a student or a specialist who wants the right laptop for solid jobs..
Features
The Microsoft Surface Book 2 can be your ideal companion if you are someone who works or likes to work from scratch when it comes to CAD-related model design.The most significant one (as you'd already guess) is its 2-in-1 laptop and tablet mode, among many explanations why. With the tablet mode of Surface Book 2, initial model conceptualization by sketching can become much simpler for you.
With its ultra HD pixel-dense resolution, the 15-inch monitor of the Surface Book 2 does not go unnoticed. The 512 GB of fast-access SSD storage adds more value to this 2-in-1 laptop's overall hardware configuration.Surface Book 2 can perform solid tasks quickly without any complications and, according to our study; Surface Book 2 is the only non-workstation that is accredited for stable work for a laptop.
Pros
Cons
Many add-on options
suitable add-ons, Surface Pen and Surface Dial come
Model 2-in-1
Performance is Reliable
Conclusion
Many of the laptops referred to above are all chosen from other brands and models of the best laptops for solidwork. They have different budget-related requirements. The cost range, however, does not affect these laptops' overall performance.
1 note
·
View note
Text
Digital Photo Storage, Sorting and Manipulation

A digital photographer's darkroom is a place where all the post processing of his photographs are done in order to get the final finish which brings out the best of his photographs. You may have great photo gears and expensive camera and lenses that may take great photos but without a good post processing, your photos may not look its best. However, it is unfortunate that many photographers don't pay good attention in creating a good digital darkroom or post processing set up. There are few simple steps you can follow, few simple techniques you need to learn and apply and few items including software you need to source in order to create an effective and creative digital darkroom. In order to set up a digital darkroom, you need to allocate a space first. You don't need a big space for that. An extra spare room in your home, a corner of your living room or a portion of your home office can serve the purpose. Get a table, a comfortable chair and a storage rack to begin with. It will also be better if you can install neutral color curtains to cover the source of lights and make sure to paint the wall in neutral colors as well. Having neutral colors as the base room color will create less destruction and will help you focus on your computer monitor. Your table should preferably of L shaped or at least have some extra space to keep a photo printer and some extra stuff like your Camera(s) and notepads and other related accessories. Keep an extra folding chair just in case you need to have someone to work with you. Now the most important piece of hardware you need is a Computer. Does not matter if you use PC or Mac, but you need to make sure that you buy adobe lightroom a decent piece of hardware with a high resolution Monitor (preferably High Definition one.). Monitor size should be 17" and above allowing you to work with large format photographs. I found Dell ultra sharp monitors or Apple cinema displays as excellent choices. You may also have bigger sized laptops to do the work; however I won't recommend that as you may find your big and bulky laptop difficult to carry around to your shooting locations. What you may also do is, use an external monitor and attach it to your laptop when you work in your darkroom. Your laptop or computer should have a dual core or higher processor and at least 3GB RAM, decent graphic card and 320GB or higher storage space. Also get a decent photo printer to be able to print regular sized photos. I like Epson as my preferred brand for this; however you choose whatever you like based on your budget and requirement. Next thing you need is a storage rack to store your CDs/DVDs, Photo Gears, Books etc. Get a simple rack with locking feature to safely store your work and gears. You also will have to get one or two external hard drives to copy your photos from your computer and a CD/DVD burner to copy your photos in CD/DVD to keep as backup and also to give to your clients. I also suggest you buy an external memory card reader in order to download your photos to your Computer faster. Other thing you may need is few markers, CD/DVD sleeves, a table lamp or floor lamp and good speakers. Also make sure to have surge protectors and UPS in order to have uninterrupted power supply during your work. Let's look at the software side of your darkroom. First of all, you need image management and manipulation software. The first name comes to our mind is Adobe Photoshop. However, I must say that you really don't need to have Photoshop as your primary image management software. Photoshop is rather meant for professional graphic designers and digital artists. I would like to recommend another software from Adobe which is called Lightroom. It is more effective, far cheaper and easier software than Photoshop and this is more than what you need. Lightroom is more of an image management program with strong editing functions and a great raw conversion and editing program. Though Lightroom's photo editing is not as strong as Photoshop, but Lightroom does offer a lot in its editing and for many it will be all you ever need. But for photo only editing and correction, Lightroom is the way to go and of course you can use Photoshop as well if you want to. Oh I forgot to mention that if you shoot RAW, then you must use a RAW conversion and editing program. If your Camera has RAW capability, it will come with RAW conversion software and it will also have some RAW manipulation capability. You may also try to use Lightroom for RAW conversion and manipulation. Stepok's Raw Importer is a free and easy-to-use raw importing and converting tool, compatible with most camera models on markets. With the help of this tool, you can convert camera RAW files into best quality JPEG or TIFF format step by step. It supports batch converting! website HDR or High Dynamic Range photography is a new trend which many Photographers want to set their foot into. There are many HDR software available. The one I like and would like to recommend is Photomatix. You may also do some research to find the most suitable HDR software for you. Digital photographic files are really a subset of a much larger group of files called computer graphic files. And this group is really quite large. Perhaps the best authoritative text on computer graphics files is a big book called 'The Encyclopedia of Graphics File Formats'. Also published by O'Reilly; this reference book will give you the skinny on the differences between JPEG, TIFF, BMP, etc. It's more of a 'nice to have on hand' type book. And it will definitely help you to think accurately about the file types it describes. If you have followed the above steps, then you are all set. Now start your journey. Few last things I must say are, calibrate your monitor, wear a neutral color outfit to minimize the interference with the monitor and be creative but don't over manipulate your photos. So enjoy and wish you all the best.
1 note
·
View note
Note
I'm curious about trying digital art but I have no idea where to start. (hardware, software, etc) Some tips would be much appreciated!
That’s awesome! I’ll try my best, haha.Back in my day when all of this digital stuff was an abandoned junkyard, there were like only WACOM tablets, which are pretty good actually, but not as accessible and cheap. Nowadays however there are a lot of alternative tablet brands that are super affordable for beginners, such as:
Monoprice
Huion
Parblo
XP-Pen
Gaomon
There are probably other brands, but these are the ones I can remember on the top of my head right now. Take a look at them, watch some reviews on YouTube (there are thousands of them to help you choose the best for you, with pros and cons!). They all have tablets that cost like 50 USD, and are actually bigger and have way more pressure sensitivity than “beginner” Wacom tablets. By the way, if you draw traditionally already, you will find it quite hard to use the tablet at first, because the process and the actual physics are completely different, and that’s completely normal. Don’t feel discouraged if you feel like you “forgot” how to draw, or can’t draw as good on digital as on paper, it has a bit of a learning curve to it, and that’s completely okayOn softwares, there are a ton of them you can chose to start:
Krita
GIMP
Fire Alpaca(all the above programs you can download for free)
Paint Tool SAI
Clip Studio Paint
Photoshop
All of the above are paid softwares, Paint Tool SAI costs around 50 USD; Clip Studio Paint is around 50 USD, but they often put it on sale for 25 USD only, so if you download the trial and really like it, just subscribe to their newsletter and keep an eye open for their sales, that’s how I got the licence for it myself. You might have noticed I put Photoshop last, because it’s actually kind of a commitment (you have to pay for it monthly, like a subscription), and also to kind of prove a point that you don’t need big, complicated, pricey softwares to create digital art.
Now, the important part is that you should try many of them, and see which one you adapt more easily, or likes better. I’ve never really liked Photoshop to paint, the brushes aren’t really intuitive and because the program is so heavy, I always had problems running it in all computers I’ve had. That’s why I pretty much stuck to Paint Tool SAI. Also try reading and watching a lot of tutorials and painting videos by different artists, they will all show you different techniques here and tips/shortcuts there that might be useful.
On drawing canvas dimensions, if your computer can handle it, the bigger the better. I usually draw at 30cm x 20cm, 600dpi, but 300dpi at least is already fine. bigger sizes are good for printing the images in a good quality, and also good for having crisp details (I’ve made a post about that already, if you wanna look).
I’m not an expert on hardwares / technical computer stuff, but you should be sure your computer can handle the programs you will run. But since you are just starting, you can try testing “lighter” programs like Paint Tool SAI (the one I use) at first.
Your monitor should be calibrated so it can show you the correct colors, or anything close to that. Otherwise, your paintings might look extremely different if printed or if you see them in different monitors -
this website provides the calibration tests you can make, it’s really easy.
A problem with laptops though is that you will probably not be able to calibrate the monitor (which is stupid as hell in my opinion), but again, since you are just starting you can test the waters with whatever you have in hands at the moment, and if you really like digital you can invest in some cooler stuff later :3I think that’s pretty much it? Hit me with other asks if I’ve forgotten anything important.
COMMISSION INFO! | YOUTUBE | SOCIETY6 | KO-FI | INSTAGRAM | FACEBOOK | TWITTER

32 notes
·
View notes