#ContentResolver
Explore tagged Tumblr posts
Visit Tumblr Blog
Explore Tumblr blogs with no restrictions, modern design and the best experience.
Last Seen Tumblr Blogs


Fun Fact
Tumblr has a low social media market share in South America.
Text
android 중급 28강 Provider tacademy
original source : https://youtu.be/bc6wW-g6uss


=========================================================
.
.
=========================================================
.
.

=========================================================
.
.
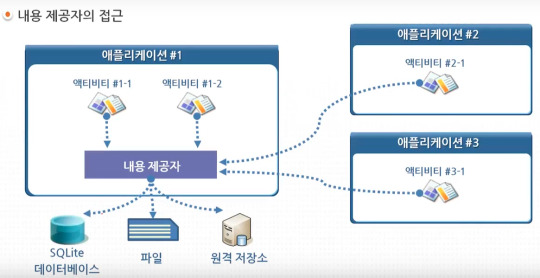
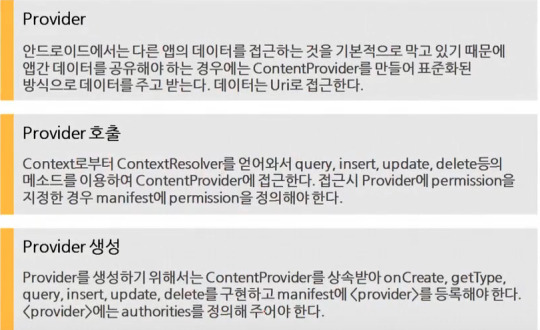
content provider에서 data set이란 database의 table이라고 생각할수 있다.
=========================================================
.
.
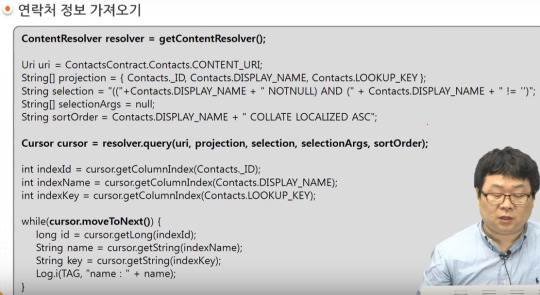
content provider에서 data를 가져올때 cursor에 넣어서 되돌린다. 즉 cursor를 통해 data에 접근하게 된다.


=========================================================
.
.

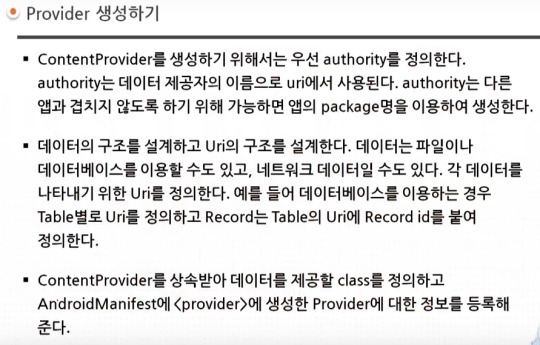
Contract class는 아래와 같이 만들수 있다. authority, data set이름, uri, 칼럼이름, type 이름등을 지정해서 여러곳에 햇갈리지 않고 일관되게 사용할수 있게 한다.


content provider의 data에 접근하기위해 <uses-permission> 를 이용해서 permission을 얻을수 있다. content provider는 다른 app이 어떤 permission을 얻어야 하는지 지정해주어야 한다. 경우에 따라 다른 app에게 임시 permission은 허용하기 위해서는 content provider에 android:grantUriPermissions를 설정하거나 하위에 <grant-uri-permission>설정한다. 임시 permission 이 필요한 app의 경우 호출 intent에 위와 같이 Flag를 지정해 준다.


=========================================================
.
.


=========================================================
.
.


=========================================================
.
.
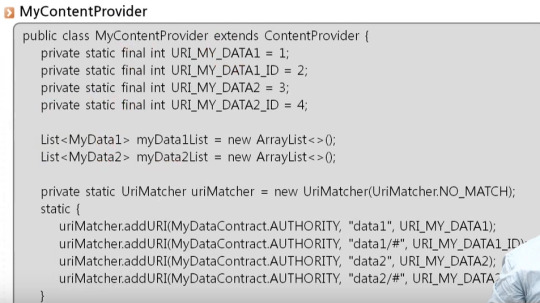
참고자료) UriMatcher 실제 사용 예시 https://youtu.be/6ZbAsvifQq8

=========================================================
.
.


=========================================================
.
.

=========================================================
.
.
authority, data set이름, uri, 칼럼이름, type 이름등을 지정해서 여러곳에 햇갈리지 않고 일관되게 사용할수 있게 한다.

=========================================================
.
.


=========================================================
.
.
#android#중급#28강#provider#tacademy#uri#ContentProvider#ContentResolver#Cursor#permission#loader#database#urimatcher#static#AtomicLong#Atomic
0 notes
Text
簡單取得 Android 手機唯一識別碼 Hardware Id ( Not Advertising ID 非廣告ID )
簡單取得 Android 手機唯一識別碼 Hardware Id ( Not Advertising ID 非廣告ID )
With App Lifecycle 應用程式重裝前都不會改變 With Andoird OS Profile Lifecycle 作業系統Reset to factory前都不會改變 @SuppressLint("HardwareIds") private fun getHardwareId() : String { var output = Settings.Secure.getString(contentResolver, Settings.Secure.ANDROID_ID) if(output == "") { val pref = this.getSharedPreferences("HardwareIds", Context.MODE_PRIVATE) output =…
View On WordPress
0 notes
Text
Basics of Android App Development
Describe Android. The Android mobile operating system was created by a number of companies, primarily Google and the Open Handset Alliance. The operating system is written in a number of languages, including Java (UI), C (Core), and C++. The first commercial Android device was introduced in September 2008 after its announcement in November 2007.
The Linux Kernel has been updated to create Android OS, which is a member of the Unix-like OS family. It is primarily made for touchscreen mobile devices like smartphones and tablets. Since 2011, Android has sold the most smartphones worldwide, and since 2013, Android has sold the most tablets. Over 5 billion people utilise the operating system each month as of right now.
When developers or app development aficionados completely understand the underlying principles of app development, creating Android apps becomes simple. The fundamentals include the elements of app creation, the necessary language skills, the optimum app layout, and the whole lifecycle of an Android application.
To help people navigate the rapidly expanding globe, Wama Technology offers a variety of courses. They also have fair prices for the courses. One of India’s top businesses, Wama Technology provides the top computer programming courses to help you find employment in 2022.
They even offer some free coding training to the less fortunate. Through skill-based education, Wama Technology aims to close the knowledge gap between the learned and the uneducated.
There is a team of knowledgeable trainers at Wama Technology. Due to the close organisational project, all of the instructors give their all to teaching the students in a more straightforward manner and emphasising real-world tasks. There is a software lab with all the necessary tools where students can complete any practicals.
Android Programming Languages: Basics of Essential Android App Development
Java or C++ and XML are the two languages used to programme Android (Extension Markup Language). KOTLIN is also preferred today. As a front-end, the XML file handles design, presentation, layouts, blueprints, etc., whereas the JAVA or KOTLIN file handles button functionality, variables, storage, etc (as a back-end).
Components for Android
The foundation of Android are the App Components. Each component has a certain function and life cycle, or the period from the start of an app to its conclusion. Some of these elements also rely on other elements. Each element serves a distinct function.
The four main parts of the app are:
1. Exercises
2. Providers
3. Receivers for broadcasts:
4. A content creator
The UI and user interactions on the screen are covered. In other words, it is an activity-containing User Interface. Depending on the app, there may be one or more of these. When the application is opened, it begins. There is always at least one action. The following steps are taken to carry out the activity.
Radio and TV receivers
A broadcast replies to messages sent by the system or by other programmes. For instance, when the phone’s battery is low, the Android operating system broadcasts a message to start the Battery Saver function or app. When the programme receives the message, it does the necessary action.
Each object is represented by an intent object in the Broadcast Receiver subclass of the BroadcastReceiver class.
Content Creator
When another application requests it, a content provider is utilised to send data from one application to the others. These are handled by the ContentResolver class. The APIs (application programming interfaces) that this class implements allow other programmes to carry out transactions. The Parent Class of the ContentProvider class must be implemented by all Content Providers.
Services are the tasks the software completes in the background. These may be ongoing processes, such as a user listening to music while browsing the internet. A service may require additional sub-services to carry out particular functions. The main goal of the Services is to keep the app running continuously without interfering with any user interactions.
Layout Structure of Android Studio Android Studio’s default hierarchical Layout depicts the various app structures. It includes the authorization that an application would require to carry out a particular task. The root of the project source set is the XML file known as Android Manifest. The key details regarding the app, the Android development tools, the Android operating system, and Google Play are covered.
The Hardware and Software aspects of a mobile app are also included in the development process because they affect the app’s compliance with the Play Store. It also covers unique activities such as packages, services, broadcast receivers, and content suppliers.
Jar Files
The Java files needed to run the app’s background task can be found in the JAVA subdirectory. It has programming functions, computation, storage, variables, toast (a brief pop-up message), and button functionality. The quantity of these files varies according to the nature of the generated actions.
Material Folder
The many resources that are used in the programme are contained in the res or Resource folder. Subfolders in this include drawable, Layout, mipmap, raw, and values. The drawable is made from of pictures. The XML files that provide the user interface layout make up the Layout.
These are kept in res. Layout and accessed using the class name R.layout. Resources files like audio or music files make up the raw. These can be reached using R.raw.filename. Hardcoded strings (which are thought to be safe to store string values), integers, and colours are all stored in values.
Also read : Mobile App Development Company
0 notes
Text
Bringing modern storage to Viber’s users
This blogpost is a collaboration between Google and Viber. Authored by Kseniia Shumelchyk from Google and Anton Novikov, Sergey Kozlov from Viber.
As a messaging app, Viber needs to store, process and share a significant amount of data. Viber aims to give its users an easy, fast, reliable and secure communication platform by providing an intuitive interface and operating with files in a privacy-preserving way. We believe the modern scoped storage paradigm provides this foundation for app developers and users.
Scoped storage was introduced in Android 10 with further improvements in Android 11 to provide better protection to app and user data on a platform level. Due to Viber’s complexity, the team opted to incrementally implement the changes that were required to comply with scoped storage.
In this article, we’ll share how Viber handled the migration to scoped storage, focusing on what they did to optimize working with media files and other data in the app.
Managing storage across Android versions
Android’s storage model has evolved to adapt to changing privacy considerations, leading to the changes in the storage system APIs. Let’s take a look at key platform changes that affected the legacy Viber implementation.
Media directories
Scoped storage changes the way that apps store and access files on a device’s external storage. Viber needed to evaluate the differences between the existing app’s storage model and updated platform guidelines, followed by gradual application changes to work with files in scoped storage. Therefore Viber invoked the requestLegacyExternalStorage flag to temporarily opt-out of scoped storage on Android 10 until the app was fully compatible.
In order to adjust their app experience to scoped storage, Viber now contributes public media files to well-defined media collections using the MediaStore API. This way, the files are accessible in a device gallery, and can be read by other apps with the storage permission. Private media files are stored in the app-specific directory on external storage and are accessed via the internal ContentProvider.
Storage permissions
The other notable update is related to changes in the storage permissions model: Apps in scoped storage have unrestricted access to their app-specific directories on external storage and can contribute to well-defined media collections without requesting a runtime permission. This change will help Viber provide more granular control to their users:
“This addition supports our efforts to provide our users with the best security and privacy solutions we can provide supported by the Android OS, users will benefit from this added security later without needing to opt-in. We also added a new ‘Save to gallery’ option allowing users to choose to make their photos readable by other apps or not. Because chats may contain private images or videos, it’s important to give users the ability to hide these files from the gallery. This change gives users additional control over the content included in their Viber messages.“ said Anton Novikov and Sergey Kozlov from Viber.
Accessing files outside of app-specific directory
Previously, Viber created and consumed files in a custom top level directory and depended on file path access. With scoped storage, saving app files to a top level directory became an anti-pattern, so Viber has followed best practices to update their implementation to store media files from the chats only in locations that are accessible in scoped storage.
However, to reduce the complexity of migration, Viber decided to keep their own top level directory for Android 10 and below, storing only the media files that are not exposed to the device’s Gallery app, while for Android 11 and above this directory is used in read-only mode to provide backward compatibility.
Another use case that Viber has been refining is sharing files in the chats. The updated storage runtime permission gives read access only to the images, videos and audio files that are available through MediaProvider. Starting from Android 11, the only way for Viber to access non-media files created by other apps is by using the Storage Access Framework document picker, which they had already utilized in a different part of their app.
App-specific files within external storage
In the scoped storage environment, app-specific directories on external storage are becoming private from other apps. This change has helped Viber leverage its use of external storage for storing private user files:
”We find change to app-specific directories to be useful, because it will help to ensure that personal chats are protected and backed with platform security.” said Anton Novikov from Viber. Learn more about how to access app-specific files.
Single interface to access storage
Because Viber targets a large audience running on Android 4.2 and above, they introduced an abstraction layer that aids them in managing storage access efficiently across all supported Android versions and with their use cases in mind.
Previously, Viber heavily used File API to access files, including files in legacy storage locations. Further, they stored absolute file paths for entries in the local database to keep the user’s conversation history.
To standardize access to this conversation history and thus ensure that users don’t lose access to their files, Viber replaced absolute file paths with content URIs. In the new implementation, the app is accessing files only via content providers:
Internal FileProvider for Viber app-specific directories.
External file providers available in the Android framework, such as MediaStore or Storage Access Framework, or those belong to another app that shares files with Viber through Intent.ACTION_SEND.
By using a consistent ContentProvider layer, the ContentResolver gives the app a unified interface to access the file content.
This approach has also helped Viber optimize the network layer and define a universal Loader abstraction to upload/fetch and to read/store different types of media files like voice messages, chat images and stickers.
Summary
Android 11 further enhances scoped storage, which provides better protection of app and user data and makes the transition easier for developers. It’s amazing to see many apps like Viber are migrating to take advantage of scoped storage since Android 10.
We hope Viber’s story is useful and will inspire you to modernize your Android apps as well. Learn more about Android storage use cases and best practices.
Bringing modern storage to Viber’s users published first on https://phonetracking.tumblr.com/ Bringing modern storage to Viber’s users published first on https://leolarsonblog.tumblr.com/
0 notes
Text
Bringing modern storage to Viber’s users
This blogpost is a collaboration between Google and Viber. Authored by Kseniia Shumelchyk from Google and Anton Novikov, Sergey Kozlov from Viber.
As a messaging app, Viber needs to store, process and share a significant amount of data. Viber aims to give its users an easy, fast, reliable and secure communication platform by providing an intuitive interface and operating with files in a privacy-preserving way. We believe the modern scoped storage paradigm provides this foundation for app developers and users.
Scoped storage was introduced in Android 10 with further improvements in Android 11 to provide better protection to app and user data on a platform level. Due to Viber's complexity, the team opted to incrementally implement the changes that were required to comply with scoped storage.
In this article, we’ll share how Viber handled the migration to scoped storage, focusing on what they did to optimize working with media files and other data in the app.
Managing storage across Android versions
Android’s storage model has evolved to adapt to changing privacy considerations, leading to the changes in the storage system APIs. Let’s take a look at key platform changes that affected the legacy Viber implementation.
Media directories
Scoped storage changes the way that apps store and access files on a device's external storage. Viber needed to evaluate the differences between the existing app's storage model and updated platform guidelines, followed by gradual application changes to work with files in scoped storage. Therefore Viber invoked the requestLegacyExternalStorage flag to temporarily opt-out of scoped storage on Android 10 until the app was fully compatible.
In order to adjust their app experience to scoped storage, Viber now contributes public media files to well-defined media collections using the MediaStore API. This way, the files are accessible in a device gallery, and can be read by other apps with the storage permission. Private media files are stored in the app-specific directory on external storage and are accessed via the internal ContentProvider.
Storage permissions
The other notable update is related to changes in the storage permissions model: Apps in scoped storage have unrestricted access to their app-specific directories on external storage and can contribute to well-defined media collections without requesting a runtime permission. This change will help Viber provide more granular control to their users:
“This addition supports our efforts to provide our users with the best security and privacy solutions we can provide supported by the Android OS, users will benefit from this added security later without needing to opt-in. We also added a new ‘Save to gallery’ option allowing users to choose to make their photos readable by other apps or not. Because chats may contain private images or videos, it’s important to give users the ability to hide these files from the gallery. This change gives users additional control over the content included in their Viber messages.“ said Anton Novikov and Sergey Kozlov from Viber.
Accessing files outside of app-specific directory
Previously, Viber created and consumed files in a custom top level directory and depended on file path access. With scoped storage, saving app files to a top level directory became an anti-pattern, so Viber has followed best practices to update their implementation to store media files from the chats only in locations that are accessible in scoped storage.
However, to reduce the complexity of migration, Viber decided to keep their own top level directory for Android 10 and below, storing only the media files that are not exposed to the device’s Gallery app, while for Android 11 and above this directory is used in read-only mode to provide backward compatibility.
Another use case that Viber has been refining is sharing files in the chats. The updated storage runtime permission gives read access only to the images, videos and audio files that are available through MediaProvider. Starting from Android 11, the only way for Viber to access non-media files created by other apps is by using the Storage Access Framework document picker, which they had already utilized in a different part of their app.
App-specific files within external storage
In the scoped storage environment, app-specific directories on external storage are becoming private from other apps. This change has helped Viber leverage its use of external storage for storing private user files:
”We find change to app-specific directories to be useful, because it will help to ensure that personal chats are protected and backed with platform security.” said Anton Novikov from Viber. Learn more about how to access app-specific files.
Single interface to access storage
Because Viber targets a large audience running on Android 4.2 and above, they introduced an abstraction layer that aids them in managing storage access efficiently across all supported Android versions and with their use cases in mind.
Previously, Viber heavily used File API to access files, including files in legacy storage locations. Further, they stored absolute file paths for entries in the local database to keep the user's conversation history.
To standardize access to this conversation history and thus ensure that users don’t lose access to their files, Viber replaced absolute file paths with content URIs. In the new implementation, the app is accessing files only via content providers:
Internal FileProvider for Viber app-specific directories.
External file providers available in the Android framework, such as MediaStore or Storage Access Framework, or those belong to another app that shares files with Viber through Intent.ACTION_SEND.
By using a consistent ContentProvider layer, the ContentResolver gives the app a unified interface to access the file content.
This approach has also helped Viber optimize the network layer and define a universal Loader abstraction to upload/fetch and to read/store different types of media files like voice messages, chat images and stickers.
Summary
Android 11 further enhances scoped storage, which provides better protection of app and user data and makes the transition easier for developers. It’s amazing to see many apps like Viber are migrating to take advantage of scoped storage since Android 10.
We hope Viber’s story is useful and will inspire you to modernize your Android apps as well. Learn more about Android storage use cases and best practices.
Bringing modern storage to Viber’s users published first on https://phonetracking.tumblr.com/
0 notes
Text
Basics About Content Providers
Basic about content providers Content Providers in android is used to manage and share data between applications in secure manner. Content Providers manage access to the structured set of data. The data is encapsulated and shared a standard interface that connects data in one process with code running in another process.The application access the data is known as consumer application and the application providing the data is known as provider application.The consumer application connects to provider application as client using ContentResolver object. The ContentResolver communicates with the provider object, an instance of a class that implements ContentProvider.The Provider object receive data from the client and perform actions on that data and send a result to the Resolver Object of consumer application.If you want to share your data to other applications then only you need to implement a content provider.Android provide various content providers in a package android.provider.The various type of audio, video and contact data is shared with content providers in androidContent Providers : Content Provider is used to publish data from the application.Content Provider represents the data in a form of a table just like a table in relational databases. The row defines a set of data (instance of data provider collects from applications) and column defines the individual piece of the data.For example, one of the built-in providers in the Android platform is the user dictionary, which stores the spellings of non-standard words that the user wants to keep.Example of user dictionary tablewordapp idfrequencylocale_IDmapreduceuser1100en_US1precompileruser14200fr_FR2appletuser2225fr_CA3constuser1255pt_BR4intuser5100en_UK5 For this provider, the _ID column will be treated as a "primary key" column which is automatically manage by the provider.Content Resolver : Content Resolver is used to access data from the application. Content Resolver provides the methods to create, retrieve, update and delete (CRUD).The content provider and content resolver performs a secure inter-process communication to share and access the data among different applications.
0 notes
Text
Android Slices: Getting Started
At Google I/O 2018, Google announced a new way to present UI templates that can display rich, dynamic and interactive content from your app within the Google Search app and, later, in other places such as the Google Assistant.
Those UI templates are called Slices. The templates are great for many reasons:
Slices can help users to get information or take instant action outside of an app screen.
Slices make your users re-engage with your app in a relevant context.
Slices are built into Android Jetpack and can extend all the way back to Android Kitkat API 19.
Slices are in beta release at the time of writing this tutorial, but you can get started developing with them today!
Getting Started
In this tutorial you are going to build a Slice template for a raywenderlich.com Bookstore app. The Slice will display some book covers with titles and prices, as well as a notification icon to enable or disable the app notification. Here’s what the end product will look like:
Prerequisites: For this tutorial, you need basic knowledge of Android programming and familiarity with Kotlin and Android Studio. Knowledge of content providers and URIs is helpful but not required.
If you’re completely new to Android, you might want to first check out Beginning Android Development Part One. If you need to catch up on Kotlin, you can check out Kotlin for Android: An Introduction.
To follow along with this tutorial, you’ll need to use Android Studio 3.1.3 or later and Kotlin 1.2.30 or later.
Start by downloading the materials for this tutorial using the Download Materials button at the top or bottom of this page. Fire up Android Studio and import the starter project. For the most part, you will create your own classes. You will need to find AndroidManifest.xml to add code, so make sure you can locate that.
If you have not downloaded the SDK for Android API Level 28 previously, you’ll have to do that to run the app. If you already have Android API 28 set up, you can skip the following four steps and go right to building and running the app.
Select Tools ▸ SDK Manager, or click the SDK Manager icon in toolbar.
In the SDK Platforms tab, select Android API 28. You may need to select “Show Package Details” to see it.
In the SDK Platforms tab, select Android SDK Platform 28.
In the SDK Tools tab, select Android SDK Build-Tools 28-rc2 or higher. Again, you may need to select “Show Package Details.”
In the SDK Tools tab, select Android SDK Build-Tools 28-rc2
Click OK to begin install.
Once the SDK is installed, build and run the app. It is a bookstore app, and it shows the available books on https://store.raywenderlich.com/.
Slice Viewer
Slices need a viewer or presenter to display their content.
The Google Search app is one of the suitable presenters to show your Slice template. When the user types a word in the search bar, the Slice you’ve created might present related information to the user’s search keyword.
For example, if the user types words such as “ride” or “ride car,” Slices from installed apps like Careem or Uber could show to let the user request a car even without opening the corresponding app; that full experience can be achieved by App Actions and Slices.
Displaying Your Slice With Slice Viewers
Bear in mind that presenters may make a light customization to your Slices to match their design requirements, e.g., font style, font size and/or colors. Icons in your Slice, for example, will be tinted with the accent color of the presenter app.
You will use a Slice Viewer app to display the Slice from your Bookstore app. The Slice Viewer app uses your slice Uri to view it on what’s called its surface, and on a first time request of your Slice, the user will be asked to grant a permission to the viewer.
Installing the Slice Viewer App
Install the SliceViewer.apk, which can be found in the downloaded materials for this tutorial, on a real device or emulator, then open the app. You can install the APK file by dragging and dropping the file onto the emulator if you’re using one or running adb install -r -t SliceViewer.apk from the terminal while in that directory. The Slice Viewer app looks like this:
Creating the BookstoreSliceProvider Class
The starter project already includes the Slices core and builders libraries as dependencies in the app’s build.gradle file, so you can get started right away building your Slice:
implementation "androidx.slice:slice-core:1.0.0-beta01" implementation "androidx.slice:slice-builders:1.0.0-beta01"
Create a new Kotlin class named BookstoreSliceProvider and make it inherit from the androidx.slice.SliceProvider class. Use the androidx option if available for any imports that you need to add for the rest of the tutorial.
import androidx.slice.SliceProvider class BookstoreSliceProvider: SliceProvider() { }
Implementing the SliceProvider Class
The SliceProvider class is your only way to expose your Slice to other apps, and it decides which Slice will be exposed to the viewer.
The SliceProvider class is a subclass of the ContentProvider class. Content providers are one of the primary building blocks of Android applications. They encapsulate data and provide it to applications through the single ContentResolver interface. You can use content providers if you need to share data between multiple apps. For example, Contacts data is used by multiple apps and is stored in a content provider. Learn more about content providers from here.
Add two methods to your BookstoreSliceProvider, along with a companion object. You’ll add the createBookstoreSlice() function shortly:
// 1 override fun onCreateSliceProvider(): Boolean { // 2 return true } // 3 override fun onBindSlice(sliceUri: Uri): Slice? { //4 val path = sliceUri.path when (path) { // 5 "/$BOOKSTORE_PATH" -> return createBookstoreSlice(sliceUri) } // 6 return null } companion object { // 7 const val BOOKSTORE_PATH = "book_store" }
Here, you:
Implement onCreateSliceProvider() to initialize your Slice provider on startup. Do not put long running operations here or your app launch will be delayed, and the first Slice that binds with the viewer will be delayed, too.
Return true if the provider was successfully loaded, false otherwise.
Create your Slice inside the body of onBindSlice(). You should create and return your Slice as quickly as possible. If you want to make network requests or I/O operations, do so in the background to keep your Slice UI responsive. If your background operation is done and you want to update your Slice with the new data, call contentResolver.notifyChange(uri) with the Slice URI, and Android will invoke onBindSlice() for you.
Get the path from the URI.
Check if that path is the path of your Slice and return the bookstore Slice if true.
Return null in case you have no Slice for this path.
Create a String constant as a bookstore path.
Slice providers must be registered in the app Android manifest, so declare BookstoreSliceProvider in the AndroidManifest.xml file as a child of the application element.
<provider android:name=".BookstoreSliceProvider" android:authorities="com.raywenderlich.android.bookstore" android:exported="true" android:grantUriPermissions="true"/>
You’ve marked the Slice provider as exported so that it is made available to Slice viewers.
Creating the Bookstore Slice
Slices are list of rows that are constructed using a ListBuilder, a type of SliceBuilder.
Slice Builders
At the time of writing of this tutorial, Android provides five different Slice builders to build different types of rows with different designs and functionalities: HeaderBuilder, RowBuilder, GridRowBuilder, RangeBuilder, and InputRangeBuilder.
To create your “bookstore Slice” design, you will use:
ListBuilder as the main builder of your Slice.
HeaderBuilder to set a header with title and subtitle.
GridRowBuilder to add a row of cells.
CellBuilder to add a cell; each cell has an image, title and text.
Add the createBookstoreSlice() method to BookstoreSliceProvider:
private fun createBookstoreSlice(sliceUri: Uri): Slice { // 1 return ListBuilder(context, sliceUri, ListBuilder.INFINITY) // 2 .setHeader { it.apply { // 3 title = "Bookstore" // 4 subtitle = "raywenderlich.com" // large mode summary = "raywenderlich.com" //small mode // 5 primaryAction = createOpenBookStoreAction() } } // 6 .build() }
Also, add the createOpenBookStoreAction() method that returns a SliceAction for the action to take when a user interacts with your Slice:
private fun createOpenBookStoreAction(): SliceAction { val pIntent = BookstoreActivity.buildPendingIntent(context) return SliceAction(pIntent, createIcon(R.drawable.logo_raywenderlich), "Open Book Store") }
In the above, you:
Construct a ListBuilder by passing a context object, the Slice Uri and the lifetime of the content in this Slice. For your case, pass ListBuilder.INFINITY for the lifetime to make the content live forever. ListBuilder is the first builder you need to use to start building a new Slice, and it allows you to add different types of rows that are displayed in a list.
Set a HeaderBuilder to display a header as a first row in your Slice template. HeaderBuilder allows you to add title, subtitle, summary subtitle and/or primary action to the header.
Set a title for the header
Set a subtitle and summary for the header.
Set the primaryAction for the header.
Call the build() method to build your Slice.
Letting the Slice Viewer Show Your Slice
You neeed to set up a run configuration to show your Slice on the top of the viewer surface by launching the Slice Viewer app using your Slice URI.
Follow these steps to do this:
In Android Studio, select Run ▸ Edit Configurations.
In the top-left corner, click the Plus button and select Android App.
Enter Bookstore Slice in the Name field.
Select your app module in the Module dropdown.
Under Launch Options, select URL from the Launch dropdown.
Enter your Slice URI in the URL field.
slice-content://com.raywenderlich.android.bookstore/book_store
Click OK. Build and run using this configuration; you will see a screen like this:
Tap on the Slice Viewer item; you will see a screen like this:
Note: The Slice Viewer app can show your Slice if and only if it has permission to access your Slice URI.
Tap on the ALLOW button to grant the permission, then you will see a screen like this:
Using GridRowBuilder to Display Books
Add the following code to your ListBuilder right before .build() to add a row of cells:
//... // 1 .addGridRow { it.apply { // 2 val books = Bookstore.getBooks() for (book in books) { // 3 addCell { it.apply { // 4 addImage(createIcon(book.cover), ListBuilder.SMALL_IMAGE) // 5 addTitleText(book.title) // 6 addText(book.price) // 7 contentIntent = BookstoreActivity.buildPendingIntent(context, book.url) } } } } } //...
Also add the createIcon() method to the class:
private fun createIcon(@DrawableRes resId: Int) = IconCompat.createWithResource(context, resId)
In the above, you:
Add a new GridRowBuilder.
Get the books list from the data store.
For every book in the list, add a new cell to the row.
Add the book cover as an image to the cell.
Add the book title as titleText for the cell.
Add the book price as text for the cell.
Set the PendingIntent to be invoked by the primary action if the user taps on this cell in the row.
Build and run the Bookstore Slice configuration; you will see a screen like this:
Adding a Notification Icon
You can add a notification icon to your Slice to let users enable or disable notifications from your Bookstore app.
Add this addAction() before .build(), and add the getToggleNotificationAction() to the class. You’ll create a the BookstoreSliceBroadcastReceiver in a moment.
... // 1 .addAction(getToggleNotificationAction()) ...
private fun getToggleNotificationAction(): SliceAction { // 2 val pIntent = BookstoreSliceBroadcastReceiver.getToggleNotificationPendingIntent(context) // 3 val iconResId = NotificationSettings.getIcon() // 4 return SliceAction(pIntent, createIcon(iconResId), "Toggle Notification") }
Here, you:
Add a SliceAction to the ListBuilder.
Get a pendingIntent from a broadcast receiver called BookstoreSliceBroadcastReceiver. This broadcast receiver handles broadcasts when the user taps on the notification icon in your remote Slice.
Get the notification icon resource ID based on the notification state (enabled or disabled).
Create and return a new SliceAction with three parameters (pIntent, actionIcon, actionTitle).
Note: To send and receive data from your remote Slice to your app, you need to create a BroadcastReceiver!
Create the BookstoreSliceBroadcastReceiver class:
class BookstoreSliceBroadcastReceiver : BroadcastReceiver() { // 1 override fun onReceive(context: Context, intent: Intent) { // 2 val action = intent.action // 3 if (ACTION_TOGGLE_NOTIFICATION == action) { // 4 NotificationSettings.toggleNotification() // 5 val uri = Utility.getUri(context, BookstoreSliceProvider.BOOKSTORE_PATH) // 6 context.contentResolver.notifyChange(uri, null) } } companion object { // 7 const val ACTION_TOGGLE_NOTIFICATION = "com.raywenderlich.bookstore.ACTION_TOGGLE_NOTIFICATION" // 8 fun getToggleNotificationPendingIntent(context: Context): PendingIntent { // 9 val intent = Intent(context, BookstoreSliceBroadcastReceiver::class.java) // 10 intent.action = ACTION_TOGGLE_NOTIFICATION // 11 return PendingIntent.getBroadcast(context, 0, intent, FLAG_UPDATE_CURRENT) } } }
Here, you:
Implement onReceive() to receive broadcasts.
Get the action of the received broadcast.
Check if the action is equal to your ACTION_TOGGLE_NOTIFICATION.
Toggle the notification state.
Get the URI of the Bookstore Slice.
Notify the URI to update all of the presented Slices.
Create an action string constant to use with the toggle notification broadcast.
Create a method to get a PendingIntent to toggle the notification.
Create new intent for BookstoreSliceBroadcastReceiver.
Set the intent action to ACTION_TOGGLE_NOTIFICATION.
Return a broadcast PendingIntent with the intent you just created.
Next, declare BookstoreSliceBroadcastReceiver in the AndroidManifest.xml file as a child of the application element.
<receiver android:name=".BookstoreSliceBroadcastReceiver"/>
Build and run; you will see a screen like this:
Try to enable the notifications by tapping on the notification icon in your Slice; doing so will broadcast the notification toggle action to the BookstoreSliceBroadcastReceiver.
Open the Bookstore app and notice that the notification icon in the floating button is updated, as seen below:
Setting the Accent Color
You can set an accent color to tint all of the tintable items within the ListBuilder such as:
The icon in the primary action, which will be displayed in the shortcut mode.
Any icons in your slice.
Widgets: Switch, SeekBar and ProgressBar.
Add the following line to your ListBuilder before .build():
.setAccentColor(ContextCompat.getColor(context, R.color.colorAccent))
Build and run again. Notice that the notification icon color is changed from the accent color of the Slice Viewer app to the accent color you have set:
Display Modes
Slice viewers can display Slices in three display modes:
Large: The whole slice will be displayed.
Small: Only the header of the slice will be displayed.
Shortcut: Only the icon of the primary action of the header will be displayed.
You’ve aleady made your Slice compatible with the three modes by adding the following a summary to the Slice header within the apply block. The summary will be shown in the small mode instead of the subtitle.
Note: If you have not set a header to your ListBuilder, the first row added to your ListBuilder is displayed instead.
Build and run in the Slice Viewer app.
Put your Slice in Small mode by tapping on the right-top icon in the Slice Viewer app and select small; you will see a screen like this:
Put your Slice in the Shortcut mode by tapping on the right-top icon in the Slice Viewer app and select shortcut; you will see a screen like this:
And with that, you have finished your Slices tutorial!
Where to Go From Here?
You can download the completed project using the Download Materials button at the top or bottom of this tutorial.
Note: You’ll need to complete the instructions in the Slice viewer and Let the Slice viewer show your Slice sections to be able to run the final project.
During this tutorial you learned how to:
Create a Slice for a bookstore app.
Show the Slice on the surface of the Slice Viewer app.
Make the Slice interactive by adding a notification icon to let the user enable or disable notification without opening the app.
Make the Slice compatible with the different display modes.
Update the Slice with new data.
While you have learned how to incorporate Slices, note that, as of the writing this tutorial, the official Android documentation states: “Slices will start appearing soon for users, but you can start building today.”
You may also find it helpful to learn about RangeBuilder, which you can read about here.
And since Slices are a way to enhance App Actions, you may want to know more about App Actions, which you can learn about here.
Feel free to share your feedback or ask any questions in the comments below or in the forums!
The post Android Slices: Getting Started appeared first on Ray Wenderlich.
Android Slices: Getting Started published first on https://medium.com/@koresol
0 notes
Link
Content Providers ContentResolver with example in Android
0 notes
Text
Andro Tricks
A need is made with an Intent ask for, which portrays a message to start either a specific piece (unequivocal objective) or a specific sort of area (certain objective). For activities and affiliations, a need depicts the improvement to perform (for example, to see or send something) and may show the URI of the data to find up on, slighting exceptional things that the bit being started may need to know. For example, a point may pass on a vitality for a change to exhibit a photo or to open a site page.
Every so often, you can start a change to get a result, in which case the development in like way reestablishes the result in an Intent. For example, you can issue a framework to empower the customer to pick an individual contact and have it returned to you. The fragment target cements a URI exhibiting the picked contact https://andytricks.com/. For show recipients, the objective in a general sense depicts the presentation being passed on. For example, a pass on to demonstrate the contraption battery is low circuits only a known action string that presentations battery is low.
Not in the scarcest degree like activities, affiliations, and pass on gatherers, content providers are not started by targets. Or then again clearly perhaps, they are affected when centered by a request from a ContentResolver. The substance resolver handles each prompt trade with the substance provider so the part that is performing trades with the provider doesn't need to and rather calls approachs on the ContentResolver challenge. This leaves a layer of reflection between the substance provider and the part requesting information (for security).
You can start a change or give it something new to do by passing an Intent to startActivity() or startActivityForResult() (when you require the change to reestablish a result). With Android 5.0 (API level 21) and later, you can use the JobScheduler class to setup works out. For earlier Android changes, you can start an association (or give new rules to an impelling relationship) by passing an Intent to startService(). You would interface have the capacity to with the relationship by passing an Intent to bindService().
You can begin a pass on by passing an Intent to structures, for instance, sendBroadcast(), sendOrderedBroadcast(), or sendStickyBroadcast(). You can play out a request to a substance provider by calling question() on a ContentResolver. For more information about using targets, see the Intents and Intent Filters report. The running with reports give more information about affecting specifc parts: Activities, Services BroadcastReceiver, and Content Providers.
Going before the Android system can start an application zone, the structure must welcome that the bit exists by looking application's show record, AndroidManifest.xml. Your application must report each and every one of its parts in this record, which must be at the establishment of the application wind registry.
The show finishes the way toward differing things paying little personality to broadcasting the application's pieces, for instance, the running with: Sees any customer supports the application requires, for instance, Internet access or read-access to the customer's contacts. Bestows the base API Level required by the application, in light of which APIs the application occupations.
0 notes
Photo

A SQLite primer for Android app developers Sometimes, you need to store more complex data in your app than just simple key/value pairs saved with a text file or Shared Preferences. Databases are ideal for storing complex data structures and are particularly suited to storing records, where each block of data stored uses the same fields, formatted in the same manner. This works like a table or an Excel spreadsheet, and, like Excel, it allows for much more dynamic manipulation and logical organization of data. It’s thanks to databases that many machine-learning and big data applications are possible. Databases also make everyday tools like Facebook possible. As a result it’s a skill in high demand. Programmers will eventually need to learn to use databases This is why programmers will eventually need to learn to use databases. That way, your data will be organized and you’ll have no difficulty retrieving passwords, user data or whatever other information you need. And this also happens to be a great way to store data on an Android device as well. To do all this, we’ll be using SQLite. Introducing SQLite SQL databases are relational databases where data is stored in tables. The Structured Query Language (SQL) is the declarative language used to query those databases so that you can add, remove and edit data. For more on SQL itself, check out this article. SQLite is an implementation of a relational database, specifically aimed for embedded scenarios. It’s ideal for the likes of an Android app. The easiest way to imagine a relational database is to think of it as a series of tables. What’s cool is SQLite doesn’t require a dedicated relational database management system (RDBMS)— it is used directly from your code, rather than via a server or external resource. Your data is saved into a file locally on your device, making it a powerful and surprisingly easy way to store persistent data on Android. SQLite is open-source, easy to use, portable, and highly cross-compatible. There’s no need to install anything additional if you want to start using SQLite in Android Studio. Android provides the classes which you can use to handle your database. Android developers can use the SQLiteOpenHelper to use SQL commands. That’s what we’ll be looking at in this post. In the next few sections, you’ll learn create a table this way and in the process, you’ll hopefully start to feel comfortable with SQLite, SQL, and databases in general. Creating your first database Start a new empty Android Studio project. Now create a new class by right-clicking the package on the left and choosing New > Java Class. I’ve called mine ‘Database’. We want to extend SQLiteOpenHelper class and so enter that as the superclass. To recap: this means we’re inheriting methods from that class, so our new class can act just like it. Right now, your code will be underlined red because you need to implement the inherited methods and add the constructor. The finished article should look like so: package com.androidauthority.sqliteexample; import android.content.Context; import android.database.sqlite.SQLiteDatabase; import android.database.sqlite.SQLiteOpenHelper; public class Database extends SQLiteOpenHelper { public Database(Context context, String name, SQLiteDatabase.CursorFactory factory, int version) { super(context,name,factory, version); } @Override public void onCreate(SQLiteDatabase db) { } @Override public void onUpgrade (SQLiteDatabase db, int oldVersion, int newVersion) { } } The first thing to do is to simplify our constructor. Add these variables: public static final int DATABASE_VERSION = 1; public static final String DATABASE_NAME = "MyDatabase.db"; With that done, update your constructor like so: public Database(Context context) { super(context,DATABASE_NAME,null, DATABASE_VERSION); } Break it down and you can see that we’re calling our database ‘MyDatabase.db’. Now, whenever we make a new Database object from this class, the constructor will build that database for us. Creating tables Now we’re ready to start populating it with some data! This data takes the form of a table and hopefully you’ll see why this is useful. What kind of thing might we use a database for in the real world? Well, how about CRM – customer relationship management? This is what big companies use to keep track of their customers’ details. It’s how they know to call us with special offers in which we may be interested. It’s how your magazine subscription always knows when it’s time for a renewal – that might be a good example to use. In other words, we’re using our powers for evil. To that end, we’re going to need some more variables so that we can build our table and start populating it with data. Logically, that might look something like this: public static final String TABLE_NAME = "SUBSCRIBERS"; public static final String COLUMN_NAME = "NAME"; public static final String COLUMN_MAGAZINE_TITLE = "MAGAZINE_TITLE"; public static final String COLUMN_RENEWAL_DATE= "RENEWAL_DATE"; public static final String COLUMN_PHONE = "PHONE_NUMBER"; Now the publishers who we’re building our app for will be able to query when a certain use is due for a renewal and easily grab their phone number to give them a buzz. Imagine trying to do this without SQL; you’d be forced to create multiple text files with different names for each user, or one text file with an index so you know which line to retrieve information from different text files. Then you’d have to delete and replace each entry manually with no way to check when things got out of sync. Searching for information by name would be a nightmare. You might end up using your own made-up shorthand. It would get very messy, very fast. While it might be possible to avoid using tables with a little creativity— all this can be a little daunting at first— it is an invaluable skill to learn in the long run and will actually make your life a lot easier. It’s also pretty much required if you ever have dreams of becoming a ‘full stack’ developer or creating web apps. SQL is pretty much required if you ever have dreams of becoming a ‘full stack developer' or creating web apps. To build this table, we need to use execSQL. This lets us talk to our database and execute any SQL command that doesn’t return data. So it’s perfect for building our table to begin with. We’re going to use this in the onCreate() method, which will be called right away when our object is created. @Override public void onCreate(SQLiteDatabase db) { db.execSQL("create table " + TABLE_NAME + " ( " + COLUMN_NAME + " VARCHAR, " + COLUMN_MAGAZINE_TITLE + " VARCHAR, " + COLUMN_RENEWAL_DATE + " VARCHAR, " + COLUMN_PHONE + " VARCHAR);"); } What’s happening here is we’re talking to our database and telling it to create a new table with a specific table name, which we’ve defined in our string. If we break the rest of that long ugly string down, it actually contains a number of easy-to-understand SQL commands: create table + TABLE_NAME( COLUMN_NAME + VARCHAR, COLUMN_MAGAZINE_TITLE + VARCHAR, COLUMN_RENEWAL_DATE + VARCHAR, COLUMN_PHONE + VARCHAR) SQLite will also add another column implicitly called rowid, which acts as a kind of index for retrieving records and increases incrementally in value with each new entry. The first record will have the rowid ‘0’, the second will be ‘1’, and so on. We don’t need to add this ourselves but we can refer to it whenever we want. If we wanted to change the name of a column, we would manually create one with the variable INTEGER PRIMARY KEY . That way, we could turn our ‘rowid’ into ‘subscriber_id’ or something similar. The rest of the columns are more straightforward. These are going to contain characters (VARCHAR) and they will each be named by the variables we created earlier. Here is a good resource where you can see the SQL syntax on its own for this command and many others. If we break the string down, it actually contains a number of easy-to-understand SQL commands The other method, onUpgrade, is required for when the database version is changed. This will drop or add tables to upgrade to the new schema version. Just populate it and don’t worry about it: @Override public void onUpgrade (SQLiteDatabase db, int oldVersion, int newVersion) { db.execSQL("DROP TABLE IF EXISTS " + TABLE_NAME); onCreate(db); } DROP TABLE is used to delete the existing data. Here we’re deleting the table if it already exists before rebuilding it. See the previous post for more. If all that’s in place, you’ve built your first database. Well done! In future, if we to refer to a database that was already created, then we would use getReadableDatabase() or getWriteableDatabase() to open the database ready for reading-from or writing-to. Inserting data To insert new data as a row, simply use db.insert(String table, String nullColumnHack, ContentValues). But what are ContentValues? This is a class used by Android that can store values to be resolved by the ContentResolver. If we create a ContentValues object and fill it with our data, we can pass that to our database for assimilation. It looks like this: contentValues.put(COLUMN_NAME, "Adam"); contentValues.put(COLUMN_MAGAZINE_TITLE, "Women's World"); contentValues.put(COLUMN_RENEWAL_DATE, "11/11/2018"); contentValues.put(COLUMN_PHONE, "00011102"); db.insert(TABLE_NAME, null, contentValues); db.close(); Another option would be to use database.execSQL() and input the data manually: db.execSQL("INSERT INTO " + TABLE_NAME + "(" + COLUMN_NAME + "," + COLUMN_MAGAZINE_TITLE + "," + COLUMN_RENEWAL_DATE + "," + COLUMN_PHONE + ") VALUES('Adam','Women's World','11/11/2018','00011102')"); db.close(); This does the exact same thing. Remember to always close the database when you’re finished with it. You weren’t brought up in a barn, were you? Optional Of course, to really use this database properly, we would probably want to populate our columns using objects. We could use the following class to add new subscribers to our list: public class SubscriberModel { private String ID, name, magazine, renewal, phone; public String getID() { return ID; } public String getName() { return name; } public String getRenewal() { return renewal; } public String getMagazine() { return magazine; } public String getPhone() { return phone; } public void setName(String name) { this.name = name; } public void setMagazine(String magazine) { this.magazine = magazine; } public void setRenewal(String renewal) { this.renewal = renewal; } public void setPhone(String phone) { this.phone = phone; } } Then we could easily build as many new subscribers as we liked and take the variables from there. Better yet, we can also retrieve data from our database this way to build new objects. For instance, we might use something like the following to read through a list of clients and then populate an array list using those objects. This uses a ‘cursor’, which you’ll learn about in the next section. public ArrayList getAllRecords() { SQLiteDatabase db = this.getReadableDatabase(); Cursor cursor = db.query(TABLE_NAME, null, null, null, null, null, null); ArrayList subs = new ArrayList(); Subscribers subscribers; if (cursor.getCount() > 0) { for (int i = 0; i
0 notes
Text
Content provider
Content providersare one of the primary building blocks of Android applications, providing content to applications. They encapsulate data and provide it to applications through the single ContentResolver interface. A content provider is only required if you need to share data between multiple applications. For example, the contacts data is used by multiple applications and must be stored in a…
View On WordPress
0 notes
Text
データベース SQLiteを利用���る SQliteOpenHelper(Content context, String name, SQLiteDatabase. CursorFactory factory, int version) void onCreate(SQLiteDatabase db) void onUpgrade(SQLiteDatabase db, int oldVersion, int newVersion) SQLiteを操作する SQLiteDatabase getReadableDatabase() SQLiteDatabase getWriteableDatabase() void execSQL(String sql) throws SQLException void beginTransaction() void setTransactionSuccessful() void endTransaction() long insert(String table, String nullColumnHack, ContentValues valuse) int update(String table, ContentValues values, String whereClause, String[] whereArgs) int delete(String table, String whereClause, Stirng[] whereArgs) Cursor query(String table, String[] columns, String selection, String[] selectionArgs, String groupBy, String having, Stirng orderBy, String limit) テーブルを作成する
テーブルに挿入する db.insert(SQLiteDBHelper.DB_TABLE, null, values); データを更新する db.update(SQLiteDBHelper.DB_TABLE, values, "book = 'Androidポケ利'", null); データをコミットする mDb.beginTransaction(); mDb.execSQL( "insert into " = + SQLiteDBHelper.DB_TABLE+ " (book, type) values ('Web+DB Press', '雑誌');"); mDb.setTransactionSuccessful(); mDb.endTransaction(); データを削除する db.delete(SQLiteDBHelper.DB_TABLE, "book like 'Android%'", null); データを検索する db.query( SQLiteDBHelper.DB_TABLE, SQLiteDBHelper.POKERI_PORODUCTION, null, null, null, null, null); クリップボード クリップボードからテキストを取得する clipMgr.getPrimaryClip(); clipData.getItemAt(0); item.getTExt().toString(); clipMgr.getText().toString(); クリップボードにテキストを設定する void setText(CharSequence text) ClipData.Item(CharSequence text) ClipData(ClipDescription description, ClipData.Item item) ClipDescription(CharSequence label, String[] mimeTypes) void setPrimaryClip(ClipData clip) ClipData.Item(et_target.getText()); ClipDescription.MIMETYPE_TEXT_PLAIN; ClipData(new ClipDescription("text_plain",mimeType), item); clipMgr.setPrimaryClip(clipData); clipMgr.setTExt(et_target.getText()); ローダ ローダを利用してデータを読み込む getSupportLoaderManager().initLoader(0, null, this); getSupportLoaderManager().restartLoader(0, null, this); onCreateLoader(int id, Bundle args) onLoadFinished(Loader<Cursor> loader, Cursor data) onLoaderReset(Loader<Cursor> loader) コンテンツプロバイダ コンテンツプロバイダの概要 コンテンツプロバイダのデータを検索する ContentResolver getContentResolver() Cursor query(Uri uri, String[] projection, String selection, String[] selectionArgs, String sortOrder) boolean moveToFirst() boolean moveToNext() int getString(int columnIndex) int getColumnIndex(String columnName) コンテンツプロバイダのデータを挿入/更新/削除する Uri insert(Uri uri, ContentValues values) Uri update(Uri uri, ContentValues values, String where, String[] selectionArgs) int delete(Uri uri,String where, String[] selectionArgs) void put(String key, String value) ブックマークを取得/登録/更新/削除する BOOKMARK_URI _ID BOOKMARK CREATED DATE FAVICON TITLE UriVISITS com.android.browser.permission.READ_HISTORY_BOOKMARKS com.android.browser.permission.WRITE_HISTORY_BOOKMARKS ブックマークを取得する //クエリで取得する項目 PRIVATE sTRING[] bookmark_production = new String[] ( BookmarkColumn._ID BookmarkColumns.TITLE, BookmarkColumns.Uri }; @Override protected void onCreate(Bundle savedInstanceState) { super.onCreate(savedInstanceState); setContentView(R.layout.activity_main); //ブックマークの名前取得 ContentResolver resolver = getContentResolver(); Cursor cursor = resolver.Query(Browser.BOOKMARKS_URI, BOOKMARK_PRODUCTION, null, null, null); SimpleCursorAdapter adapter = new SimpleCursorAdapter(this, android.R.layout.simple_list_item_2, cursor, new String[] (Bookmarkcolumns,TITLE, BookmarkColumns.URL), new int[] (android.R.id.text1, android.R.id.text2), 0); ListView lv_bookmark = (ListView) findViewById(R.id.lv_bookmark); lv_bookmark.setAdapter(adapter); } ブックマークを登録する //ブックマークの追加 ContentValues values = new ContentValues(); values.put(Browser.BookmarkColumns.BOOKMARK, "1"); values.put(Browser.BookmarkColumns.TITLE, title); values.put(Browser.BookmarkColumns.URI, uri); getContentResolver().insert(Browser.BOOKMARKS_URI, values); ブックマークを更新する //タイトルが一致したものを更新 ContentValues values = new ContentValues(); values.put(Browser.BookmarkColumns.BOOKMARK, "1"); values.put(Browser.BookmarkColumns.TITLE, title); values.put(Browser.BookmarkColumns.URI, uri); getContetnResolver().update( Browser.BOOKMARKS_URI, values, Browser.BookmarkColumns.TITLE + " = '" + title + "'", null); ブックマークを削除する //タイトルが一致いたものを削除 getContentResolver().delete( Browser.BOOKMARKS_URI, Browser.BookmarkColumns.TITLE + " = '" + title + "'", null); 連絡先の情報を取得する _ID CONTENT_URI DISPLAY_NAME NUMBER android.permission.READ_CONTACTS カレンダーを取得/登録/更新/削除する CONTENT_URI CONTENT_URI DISTART DTEND EVENT_TIMEZONE TITLEDESCRIPTION CALENDER_ID android.permission.READ_CALENDAR android.permisiion.WRITE_CALENDAR カレンダーを取得する カレンダーに予定を登録する カレンダーの予定を修正する カレンダーから予定を削除する
0 notes
Link
To share binary data across app boundaries Android’s programming model expects you to use content providers. And while I have covered how to access content providers and how to code one yourself, I haven’t covered how to deal with binary data. I am going to correct that in this post...
#android#contentprovider#binary#database#contentresolver#content#provider#resolver#contentproviders#tutorial
3 notes
·
View notes
Text
How to query the data from Content Provider?
The applications access the data from the other applications content providers using the content resolver object. Content Resolver runs as a client object and allow the CRUD (Create, Retrieve,Update and Delete) operations. Content Provider Provides an abstract layer to query the data as table and hide the internal repository of application data. The Content Providers automatically handles the inter-process communication. Note : To access the applications content provider the client application must need to specify the permissions in manifest file. The ContentResolver object has methods identical to the ContentProvider and when resolver calls a method the identical name method will be invoked in ContentProvider Object. The ContentResolver object ha a query method to pass a request to the ContentProvider Object.
0 notes
Text
Android Intents Tutorial with Kotlin
Update note: This tutorial has been updated to Kotlin, Android 26 (Oreo), and Android Studio 3.0 by Steven Smith. The original tutorial was written by Darryl Bayliss. Previous update by Artem Kholodnyi.
People don’t wander around the world aimlessly; most of everything they do – from watching TV, to shopping, to coding the next killer app – has some sort of purpose, or intent, behind it.
Android works in much the same way. Before an app can perform an action, it needs to know what that actions purpose, or intent, is in-order to carry out that action properly.
It turns out humans and Android aren’t so different after all. :]
In this intents tutorial, you are going to harness the power of Intents to create your very own meme generator. Along the way, you’ll learn the following:
What an Intent is and what its wider role is within Android.
How you can use an Intent to create and retrieve content from other apps for use in your own.
How to receive or respond to an Intent sent by another app.
If you’re new to Android Development, it’s highly recommended that you work through Beginning Android Development and Kotlin for Android to get a grip on the basic tools and concepts. You’ll also need Android Studio 3.0 or later.
Get your best meme face ready. This tutorial is about to increase your Android Developer Level to over 9000!!! :]
Getting Started
Begin by downloading the starter project for this tutorial.
Inside, you will find the XML Layouts and associated Activities containing some boilerplate code for the app, along with a helper class to resize Bitmaps, and some resources such as Drawables and Strings that you’ll use later on in this tutorial.
If you already have Android Studio open, click File\Import Project and select the top-level project folder you just downloaded. If not, start up Android Studio and select Open an existing Android Studio project from the welcome screen, again choosing the top-level project folder for the starter project you just downloaded. Be sure to accept any prompts to update to the latest Gradle plugin or to download the correct build tools.
Take some time to familiarize yourself with the project before you carry on. TakePictureActivity contains an ImageView which you can tap to take a picture using your device’s camera. When you tap LETS MEMEIFY!, you’ll pass the file path of the bitmap in the ImageView to EnterTextActivity, which is where the real fun begins, as you can enter your meme text to turn your photo into the next viral meme!
Creating Your First Intent
Build and run. You should see the following:
It’s a bit sparse at the moment; if you follow the instructions and tap the ImageView, nothing happens!
You’ll make it more interesting by adding some code.
Open TakePictureActivity.kt and add the following to the companion object at the bottom of the Class:
const private val TAKE_PHOTO_REQUEST_CODE = 1
This will identify your intent when it returns — you’ll learn a bit more about this later in the tutorial.
Note: This tutorial assumes you are familiar with handling import warnings, and won’t explicitly state the imports to add. As a quick refresher, if you don’t have on-the-fly imports set up, you can import by pressing option + return on a Mac or Alt + Enter on a PC while your cursor is over a class with an import warning.
Add the following just below onClick(), along with any necessary imports:
private fun takePictureWithCamera() { // 1 val captureIntent = Intent(MediaStore.ACTION_IMAGE_CAPTURE) // 2 val imagePath = File(filesDir, "images") val newFile = File(imagePath, "default_image.jpg") if (newFile.exists()) { newFile.delete() } else { newFile.parentFile.mkdirs() } selectedPhotoPath = getUriForFile(this, BuildConfig.APPLICATION_ID + ".fileprovider", newFile) // 3 captureIntent.putExtra(android.provider.MediaStore.EXTRA_OUTPUT, selectedPhotoPath) if (Build.VERSION.SDK_INT >= Build.VERSION_CODES.LOLLIPOP) { captureIntent.addFlags(Intent.FLAG_GRANT_WRITE_URI_PERMISSION) } else { val clip = ClipData.newUri(contentResolver, "A photo", selectedPhotoPath) captureIntent.clipData = clip captureIntent.addFlags(Intent.FLAG_GRANT_WRITE_URI_PERMISSION) } }
There’s quite a bit going on in this method, so look at it step-by-step.
The first block of code declares an Intent object. That’s all well and good, but what exactly is an intent?
An intent is an abstract concept of work or functionality that can be performed by your app sometime in the future. In short, it’s something your app needs to do. The most basic intents are made up of the following:
Actions: This is what the intent needs to accomplish, such as dialing a telephone number, opening a URL, or editing some data. An action is simply a string constant describing what is being accomplished.
Data: This is the resource the intent operates on. It is expressed as a Uniform Resource Identifier or Uri object in Android — it’s a unique identifier for a particular resource. The type of data required (if any) for the intent changes depending on the action. You wouldn’t want your dial number intent trying to get a phone number from an image! :]
This ability to combine actions and data lets Android know exactly what the intent is intending to do and what it has to work with. It’s as simple as that!
Head back to takePictureWithCamera() and you’ll see the intent you created uses the ACTION_IMAGE_CAPTURE action. You’ve probably already guessed this intent will take a photo for you, which is just the thing a meme generator needs!
The second block of code focuses on getting a temporary File to store the image in. The starter project handles this for you, but take a look at the code in the activity if you want to see how this works.
Note: You may notice the selectedPhotoPath variable being appended with a .fileprovider string. File Providers are a special way of providing files to your App and ensure it is done in a safe and secure way. If you check the Android Manifest you can see Memeify makes use of one. You can read more about them here.
Exploring the Extras
The third block of code in your method adds an Extra to your newly created intent.
What’s an extra, you say?
Extras are a form of key-value pairs that give your intent additional information to complete its action. Just like humans are more likely to perform better at an activity if they are prepared for it, the same can be said for intents in Android. A good intent is always prepared with the extras it needs!
The types of extras an intent can acknowledge and use change depending on the action; this is similar to the type of data you provide to the action.
A good example is creating an intent with an action of ACTION_WEB_SEARCH. This action accepts an extra key-value called QUERY, which is the query string you wish to search for. The key for an extra is usually a string constant because its name shouldn’t change. Starting an intent with the above action and associated extra will show the Google Search page with the results for your query.
Look back at the captureIntent.putExtra() line; EXTRA_OUTPUT specifies where you should save the photo from the camera — in this case, the Uri location of the empty file you created earlier.
Putting Your Intent in Motion
You now have a working intent ready to go, along with a full mental model of what a typical intent looks like:
There’s not much left to do here except let the intent fulfill what it was destined to do with the final line of takePictureWithCamera(). Add the following to the bottom of the method:
startActivityForResult(captureIntent, TAKE_PHOTO_REQUEST_CODE)
This line asks Android to start an activity that can perform the action captureIntent specifies: to capture an image to a file. Once the activity has fulfilled the intent’s action, you also want to retrieve the resulting image. TAKE_PHOTO_REQUEST_CODE, the constant you specified earlier, will be used to identify the intent when it returns.
Next, in the onClick() function, replace the empty closure in the when statement for the R.id.picture_imageview branch condition with a call to the takePictureWithCamera() function. The resulting line of code should look like the following:
R.id.pictureImageview -> takePictureWithCamera()
This calls takePictureWithCamera() when you tap the ImageView.
Time to check the fruits of your labor! Build and run. Tap the ImageView to invoke the camera:
You can take pictures at this point; you just can’t do anything with them! You’ll handle this in the next section.
Note: If you are running the app in the Emulator you may need to edit the camera settings on your AVD. To do this, click Tools\Android\AVD Manager, and then click the green pencil to the right of the virtual device you want to use. Then click Show Advanced Settings in the bottom left of the window. In the Camera section, ensure all enabled camera dropdowns are set to Emulated or Webcam0.
Implicit Intents
If you’re running the app on a physical device with a number of camera-centric apps, you might have noticed something unexpected:
You get prompted to choose which app should handle the intent.
When you create an intent, you can be as explicit or as implicit as you like with what the intent should use to complete its action. ACTION_IMAGE_CAPTURE is a perfect example of an Implicit Intent.
Implicit intents let Android developers give users the power of choice. If they have a particular app they like to use to perform a certain task, would it be so wrong to use some of its features for your own benefit? At the very least, it definitely saves you from reinventing the wheel in your own app.
An implicit Intent informs Android that it needs an app to handle the intent’s action when it starts. The Android system then compares the given intent against all apps installed on the device to see which ones can handle that action, and therefore process that intent. If more than one can handle the intent, the user is prompted to choose one:
If only one app responds, the intent automatically takes the user to that app to perform the action. If there are no apps to perform that action, then Android will return nothing, leaving you with a null value that will cause your app to crash! :[
You can prevent this by checking the result to ensure that at least one app responded to the action before attempting to start it, or in this case you can also state the app can only be installed on devices that have a camera by declaring the necessary hardware requirements by adding the following line to AndroidManifest.xml:
<uses-feature android:name="android.hardware.camera" />
The starter project opts for the device restriction method.
So you have an implicit intent set up to take a photo, but you don’t yet have a way to access that photo in your app. Your meme generator isn’t going to get far without photos!
Add the following new method just below takePictureWithCamera() in TakePictureActivity:
override fun onActivityResult(requestCode: Int, resultCode: Int, data: Intent?) { super.onActivityResult(requestCode, resultCode, data) if (requestCode == TAKE_PHOTO_REQUEST_CODE && resultCode == Activity.RESULT_OK) { //setImageViewWithImage() } }
The above method only executes when an activity started by startActivityForResult() in takePictureWithCamera() has finished and returns to your app.
The if statement above matches the returned requestCode against the constant you passed in (TAKE_PHOTO_REQUEST_CODE) to ensure this is your intent. You also check that the resultCode is RESULT_OK; this is simply an Android constant that indicates successful execution.
If everything does go well, then you can assume your image is ready for use, so you call setImageViewWithImage().
Time to define that method!
First, at the top of TakePictureActivity, add the following boolean variable:
private var pictureTaken: Boolean = false
This tracks whether you have taken a photo, which is useful in the event you take more than one photo. You’ll use this variable shortly.
Next, add the following right after onActivityResult():
private fun setImageViewWithImage() { val photoPath: Uri = selectedPhotoPath ?: return pictureImageview.post { val pictureBitmap = BitmapResizer.shrinkBitmap( this@TakePictureActivity, photoPath, pictureImageview.width, pictureImageview.height ) pictureImageview.setImageBitmap(pictureBitmap) } lookingGoodTextView.visibility = View.VISIBLE pictureTaken = true }
BitmapResizer is a helper class bundled with the starter project to make sure the Bitmap you retrieve from the camera is scaled to the correct size for your device’s screen. Although the device can scale the image for you, resizing it in this way is more memory efficient.
With setImageViewWithImage() now ready, uncomment this line that calls it, within onActivityResult():
// setImageViewWithImage()
Build and run. Select your favorite camera app – if prompted – and take another photo.
This time, the photo should scale to the appropriate size given your display and show up in the ImageView:
You’ll also see a TextView underneath that compliments you on your excellent photography skills. It’s always nice to be polite. :]
Explicit Intents
It’s nearly time to build phase two of your meme generator, but first you need to get your picture over to the next activity since you’re a little strapped for screen real estate here.
In the Constants.kt, add the following constants just below the comment line:
const val IMAGE_URI_KEY = "IMAGE_URI" const val BITMAP_WIDTH = "BITMAP_WIDTH" const val BITMAP_HEIGHT = "BITMAP_HEIGHT"
These will be used as keys for the extras you’ll pass to an intent on the next screen.
Now, add the following method to the bottom of TakePictureActivity, adding any imports as necessary:
private fun moveToNextScreen() { if (pictureTaken) { val nextScreenIntent = Intent(this, EnterTextActivity::class.java).apply { putExtra(IMAGE_URI_KEY, selectedPhotoPath) putExtra(BITMAP_WIDTH, pictureImageview.width) putExtra(BITMAP_HEIGHT, pictureImageview.height) } startActivity(nextScreenIntent) } else { Toaster.show(this, R.string.select_a_picture) } }
Here you check pictureTaken to see if it’s true, which indicates your ImageView has a Bitmap from the camera. If you don’t have a Bitmap, then your activity will briefly show a Toast message telling you to go take a photo – method show from the Toaster class makes showing toasts just a tiny bit easier. If pictureTaken is true then you create an intent for the next activity, and set up the necessary extras, using the constants you just defined as the keys.
Next, in the onClick() function, replace the empty closure in the when statement for the R.id.enter_text_button branch condition with a call to the moveToNextScreen() function. The resulting line of code should look like the following:
R.id.enterTextButton -> moveToNextScreen()
Build and run. Tap LETS MEMEIFY! without first taking a photo and you’ll see the toast appear:
If a photo is taken, then moveToNextScreen() proceeds to create an intent for the text entry activity. It also attaches some Extras to the intent, such as the Uri path for the Bitmap and the height and width of the Bitmap as it’s displayed on the screen. These will come in useful in the next activity.
You’ve just created your first explicit Intent. Compared to implicit intents, explicit intents are a lot more conservative; this is because they describe a specific component that will be created and used when the intent starts. This could be another activity that is a part of your app, or a specific Service in your app, such as one that starts to download a file in the background.
This intent is constructed by providing the Context from which the intent was created (in this case, this) along with the class the intent needs to run (EnterTextActivity::class.java). Since you’ve explicitly stated how the intent gets from A to B, Android simply complies. The user has no control over how the intent is completed:
Build and run. Repeat the process of taking a photo, but this time tap LETS MEMEIFY!. Your explicit intent will kick into action and take you to the next activity:
The starter project has already has this activity created and declared in AndroidManifest.xml, so you don’t have to create it yourself.
Handling Intents
Looks like that intent worked like a charm. But where are those Extras you sent across? Did they take a wrong turn at the last memory buffer? Time to find them and put them to work.
Add the following code at the end of onCreate() in the EnterTextActivity:
pictureUri = intent.getParcelableExtra<Uri>(IMAGE_URI_KEY) val bitmapWidth = intent.getIntExtra(BITMAP_WIDTH, 100) val bitmapHeight = intent.getIntExtra(BITMAP_HEIGHT, 100) pictureUri?.let { val selectedImageBitmap = BitmapResizer.shrinkBitmap(this, it, bitmapWidth, bitmapHeight) selectedPictureImageview.setImageBitmap(selectedImageBitmap) }
When you create the activity, you assign the Uri passed from the previous activity to pictureUri by accessing the Intent via intent. Once you have access to the intent, you can access its Extra values.
Since variables and objects come in various forms, you have multiple methods to access them from the intent. To access the Uri object above, for example, you need to use getParcelableExtra(). Other Extra methods exist for other variables such as strings and primitive data types.
getIntExtra(), similarly to other methods that return primitives, also allows you to define a default value. These are used when a value isn’t supplied, or when the key is missing from the provided Extras.
Once you’ve retrieved the necessary Extras, create a Bitmap from the Uri sized by the BITMAP_WIDTH and BITMAP_HEIGHT values you passed. Finally, you set the ImageView image source to the bitmap to display the photo.
In addition to displaying the ImageView, this screen also contains two EditText views where the user can enter their meme text. The starter project does the heavy lifting for you by taking the text from those views and compositing it onto the photo.
The only thing you need to do is to flesh out onClick(). Update the line to the R.id.write_text_to_image_button branch condition:
R.id.writeTextToImageButton -> createMeme()
Drumroll please. Build and Run. Repeat the usual steps to take a photo, and then enter your incredibly witty meme text on the second screen and tap LETS MEMEIFY!:
You’ve just created your own meme generator! Don’t celebrate too long, though — there are a few bits of polish that you need to add to the app.
Broadcast Intents
It would be nice to save your shiny new meme so you can share it with the world. It’s not going to go viral all on its own! :]
Fortunately the starter project has got it covered for you — you only need to tie things together.
Add the following code to saveImageToGallery(), just below the try block before the second Toaster.show() call:
val mediaScanIntent = Intent(Intent.ACTION_MEDIA_SCANNER_SCAN_FILE) mediaScanIntent.data = Uri.fromFile(imageFile) sendBroadcast(mediaScanIntent)
This intent uses the ACTION_MEDIA_SCANNER_SCAN_FILE action to ask the Android’s media database to add the image’s Uri. That way, any apps that access the media database can use the image via its Uri.
The ACTION_MEDIA_SCANNER_SCAN_FILE action also requires the intent to have some attached data in the form of a Uri, which comes from the File object to which you save the Bitmap.
Finally, you broadcast the intent across Android so that any interested parties — in this case, the media scanner — can act upon it. Since the media scanner doesn’t have a user interface, you can’t start an activity so you simply broadcast the intent instead.
Now, update the R.id.save_image_button branch condition in the onClick() function to the following:
R.id.saveImageButton -> askForPermissions()
When the user hits SAVE IMAGE the above code checks for WRITE_EXTERNAL_STORAGE permission. If it’s not granted on Android Marshmallow and above, the method politely asks the user to grant it. Otherwise, if you are allowed to write to the external storage, it simply passes control to saveImageToGallery().
The code in saveImageToGallery() performs some error handling and, if everything checks out, kicks off the intent.
Build and run. Take a photo, add some stunningly brilliant meme text, tap LETS MEMEIFY!, and then tap SAVE IMAGE once your image is ready.
Now close the app and open the Photos app. If you’re using the emulator then open the Gallery app. You should be able to see your new image in all its meme-ified glory:
Your memes can now escape the confines of your app and are available for you to post to social media or share in any manner of your choosing. Your meme generator is complete!
Intent Filtering
By now you should have a good idea of how to use the right intent for the right job. However, there’s another side to the story of the faithful intent: how your app knows which intent requests to respond to when an implicit intent is sent.
Open AndroidManifest.xml found in app/manifests, and in the first activity element you should see the following:
<activity android:name=".TakePictureActivity" android:label="@string/app_name" android:screenOrientation="portrait"> <intent-filter> <action android:name="android.intent.action.MAIN" /> <category android:name="android.intent.category.LAUNCHER" /> </intent-filter> </activity>
The key here is the intent-filter element. An Intent Filter enables parts of your app to respond to implicit intents.
These behave like a banner when Android tries to satisfy an implicit intent sent by another app. An app can have multiple intent filters, which it waves about wildly, hoping its intent filter satisfies what Android is looking for:
It’s kind of like online dating for intents and apps. :]
To make sure it’s the right app for the intent, the intent filter provides three things:
Intent Action: The action the app can fulfill; this is similar to the way the camera app fulfills the ACTION_IMAGE_CAPTURE action for your app.
Intent Data: The type of data the intent can accept. This ranges from specific file paths, to ports, to MIME types such as images and video. You can set one or more attributes to control how strict or lenient you are with the data from an intent that your app can handle.
Intent Category: The categories of intents that are accepted; this is an additional way to specify which Actions can respond to an implicit Intent.
It would be AWESOME to offer Memeify as an implicit intent to interacting with images from other apps — and it’s surprisingly simple to do.
Add the following code directly underneath the first intent filter in your AndroidManifest.xml file:
<intent-filter> <action android:name="android.intent.action.SEND" /> <category android:name="android.intent.category.DEFAULT" /> <data android:mimeType="@string/image_mime_type" /> </intent-filter>
Your new intent filter specifies that your app will look for SEND action from an implicit intent. You use the default category as you don’t have any special use cases, and you’re looking only for image MIME data types.
Now open TakePictureActivity.kt and add the following to the end of the class:
private fun checkReceivedIntent() { val imageReceivedIntent = intent val intentAction = imageReceivedIntent.action val intentType = imageReceivedIntent.type if (Intent.ACTION_SEND == intentAction && intentType != null) { if (intentType.startsWith(MIME_TYPE_IMAGE)) { selectedPhotoPath = imageReceivedIntent.getParcelableExtra<Uri>(Intent.EXTRA_STREAM) setImageViewWithImage() } } }
Here you get the Intent that started the activity and retrieve its action and type. Then you compare these to what you declared in your intent filter, which is a data source with the MIME type of an image.
If it’s a match, then you get the image’s Uri, query the Uri for the Bitmap using a helper method included with the starter project, and the finally ask the ImageView to display the retrieved Bitmap.
Next add the following line at the end of onCreate():
checkReceivedIntent()
The above code ensures that you will check if there is an intent every time the activity is created.
Build and run. Then back out to the home screen, and go to the Photos app, or the Gallery app if you’re using the emulator. Choose any photo, and tap the share button. You should see Memeify among the presented options:
Memeify is ready and waiting to receive your photo! Tap Memeify and see what happens – Memeify launches with the selected photo already displayed in the ImageView.
Your app is now receiving intents like a boss!
Where to Go From Here?
You can download the completed project here.
Intents are one of the fundamental building blocks of Android. Much of the openness and intercommunication that Android takes pride in just wouldn’t be possible without them. Learn how to use intents well and you will have made a very powerful ally indeed.
If you want to learn more about intents and intent filters then check out Google’s Intents documentation.
If you have any questions or comments on this tutorial, feel free to post your comments below!
The post Android Intents Tutorial with Kotlin appeared first on Ray Wenderlich.
Android Intents Tutorial with Kotlin published first on http://ift.tt/2fA8nUr
0 notes