#Createcourse
Explore tagged Tumblr posts
Visit Tumblr Blog
Explore Tumblr blogs with no restrictions, modern design and the best experience.
Last Seen Tumblr Blogs


Fun Fact
Tumblr has 16.74 million mobile monthly users in the US.
Text
Course Platforms - Zenler
Discover the power of Course Platforms with Zenler! Easy creation, management, and sale of courses. Powerful teaching empowered by effortless access to global audiences. Try Zenler today!

0 notes
Text
#aicomicsbook#aicomicsbookreview#aicomicsbookoto#makemoneyonline#digitalmerketing#affiliatemerketing#chatgpt#createcourse#createebooks#createflipbooks#comicebooks
1 note
·
View note
Link
Whether you’re a guru of knowledge or just want to try out teaching, here are some things you should know about creating and promoting your first online course.
#onlinecourses#elearning#teaching#online courses#onlinecourse#onlinecoursecreator#coursecreator#createcourse
0 notes
Link
Looking for advice on how to pick the best online learning platform for your course? Finding the perfect fit is no simple feat. There is a growing number of platforms available today, and statistics show that the e-learning industry is set to grow to $243 billion by 2022. And with significant projected growth, you’ll be hard-pressed to quickly find the best solution without doing some solid research. The good news is that we’ve done the digging for you. Our Platform makes your course stand out over the network. Subscribe to our plans...
0 notes
Text
Going Jamstack with React, Serverless, and Airtable
The best way to learn is to build. Let’s learn about this hot new buzzword, Jamstack, by building a site with React, Netlify (Serverless) Functions, and Airtable. One of the ingredients of Jamstack is static hosting, but that doesn’t mean everything on the site has to be static. In fact, we’re going to build an app with full-on CRUD capability, just like a tutorial for any web technology with more traditional server-side access might.
youtube
Why these technologies, you ask?
You might already know this, but the “JAM” in Jamstack stands for JavaScript, APIs, and Markup. These technologies individually are not new, so the Jamstack is really just a new and creative way to combine them. You can read more about it over at the Jamstack site.
One of the most important benefits of Jamstack is ease of deployment and hosting, which heavily influence the technologies we are using. By incorporating Netlify Functions (for backend CRUD operations with Airtable), we will be able to deploy our full-stack application to Netlify. The simplicity of this process is the beauty of the Jamstack.
As far as the database, I chose Airtable because I wanted something that was easy to get started with. I also didn’t want to get bogged down in technical database details, so Airtable fits perfectly. Here’s a few of the benefits of Airtable:
You don’t have to deploy or host a database yourself
It comes with an Excel-like GUI for viewing and editing data
There’s a nice JavaScript SDK
What we’re building
For context going forward, we are going to build an app where you can use to track online courses that you want to take. Personally, I take lots of online courses, and sometimes it’s hard to keep up with the ones in my backlog. This app will let track those courses, similar to a Netflix queue.

Source Code
One of the reasons I take lots of online courses is because I make courses. In fact, I have a new one available where you can learn how to build secure and production-ready Jamstack applications using React and Netlify (Serverless) Functions. We’ll cover authentication, data storage in Airtable, Styled Components, Continuous Integration with Netlify, and more! Check it out →
Airtable setup
Let me start by clarifying that Airtable calls their databases “bases.” So, to get started with Airtable, we’ll need to do a couple of things.
Sign up for a free account
Create a new “base”
Define a new table for storing courses
Next, let’s create a new database. We’ll log into Airtable, click on “Add a Base” and choose the “Start From Scratch” option. I named my new base “JAMstack Demos” so that I can use it for different projects in the future.

Next, let’s click on the base to open it.

You’ll notice that this looks very similar to an Excel or Google Sheets document. This is really nice for being able tower with data right inside of the dashboard. There are few columns already created, but we add our own. Here are the columns we need and their types:
name (single line text)
link (single line text)
tags (multiple select)
purchased (checkbox)
We should add a few tags to the tags column while we’re at it. I added “node,” “react,” “jamstack,” and “javascript” as a start. Feel free to add any tags that make sense for the types of classes you might be interested in.
I also added a few rows of data in the name column based on my favorite online courses:
Build 20 React Apps
Advanced React Security Patterns
React and Serverless
The last thing to do is rename the table itself. It’s called “Table 1” by default. I renamed it to “courses” instead.
Locating Airtable credentials
Before we get into writing code, there are a couple of pieces of information we need to get from Airtable. The first is your API Key. The easiest way to get this is to go your account page and look in the “Overview” section.
Next, we need the ID of the base we just created. I would recommend heading to the Airtable API page because you’ll see a list of your bases. Click on the base you just created, and you should see the base ID listed. The documentation for the Airtable API is really handy and has more detailed instructions for find the ID of a base.
Lastly, we need the table’s name. Again, I named mine “courses” but use whatever you named yours if it’s different.
Project setup
To help speed things along, I’ve created a starter project for us in the main repository. You’ll need to do a few things to follow along from here:
Fork the repository by clicking the fork button
Clone the new repository locally
Check out the starter branch with git checkout starter
There are lots of files already there. The majority of the files come from a standard create-react-app application with a few exceptions. There is also a functions directory which will host all of our serverless functions. Lastly, there’s a netlify.toml configuration file that tells Netlify where our serverless functions live. Also in this config is a redirect that simplifies the path we use to call our functions. More on this soon.
The last piece of the setup is to incorporate environment variables that we can use in our serverless functions. To do this install the dotenv package.
npm install dotenv
Then, create a .env file in the root of the repository with the following. Make sure to use your own API key, base ID, and table name that you found earlier.
AIRTABLE_API_KEY=<YOUR_API_KEY> AIRTABLE_BASE_ID=<YOUR_BASE_ID> AIRTABLE_TABLE_NAME=<YOUR_TABLE_NAME>
Now let’s write some code!
Setting up serverless functions
To create serverless functions with Netlify, we need to create a JavaScript file inside of our /functions directory. There are already some files included in this starter directory. Let’s look in the courses.js file first.
const formattedReturn = require('./formattedReturn'); const getCourses = require('./getCourses'); const createCourse = require('./createCourse'); const deleteCourse = require('./deleteCourse'); const updateCourse = require('./updateCourse'); exports.handler = async (event) => { return formattedReturn(200, 'Hello World'); };
The core part of a serverless function is the exports.handler function. This is where we handle the incoming request and respond to it. In this case, we are accepting an event parameter which we will use in just a moment.
We are returning a call inside the handler to the formattedReturn function, which makes it a bit simpler to return a status and body data. Here’s what that function looks like for reference.
module.exports = (statusCode, body) => { return { statusCode, body: JSON.stringify(body), }; };
Notice also that we are importing several helper functions to handle the interaction with Airtable. We can decide which one of these to call based on the HTTP method of the incoming request.
HTTP GET → getCourses
HTTP POST → createCourse
HTTP PUT → updateCourse
HTTP DELETE → deleteCourse
Let’s update this function to call the appropriate helper function based on the HTTP method in the event parameter. If the request doesn’t match one of the methods we are expecting, we can return a 405 status code (method not allowed).
exports.handler = async (event) => { if (event.httpMethod === 'GET') { return await getCourses(event); } else if (event.httpMethod === 'POST') { return await createCourse(event); } else if (event.httpMethod === 'PUT') { return await updateCourse(event); } else if (event.httpMethod === 'DELETE') { return await deleteCourse(event); } else { return formattedReturn(405, {}); } };
Updating the Airtable configuration file
Since we are going to be interacting with Airtable in each of the different helper files, let’s configure it once and reuse it. Open the airtable.js file.
In this file, we want to get a reference to the courses table we created earlier. To do that, we create a reference to our Airtable base using the API key and the base ID. Then, we use the base to get a reference to the table and export it.
require('dotenv').config(); var Airtable = require('airtable'); var base = new Airtable({ apiKey: process.env.AIRTABLE_API_KEY }).base( process.env.AIRTABLE_BASE_ID ); const table = base(process.env.AIRTABLE_TABLE_NAME); module.exports = { table };
Getting courses
With the Airtable config in place, we can now open up the getCourses.js file and retrieve courses from our table by calling table.select().firstPage(). The Airtable API uses pagination so, in this case, we are specifying that we want the first page of records (which is 20 records by default).
const courses = await table.select().firstPage(); return formattedReturn(200, courses);
Just like with any async/await call, we need to handle errors. Let’s surround this snippet with a try/catch.
try { const courses = await table.select().firstPage(); return formattedReturn(200, courses); } catch (err) { console.error(err); return formattedReturn(500, {}); }
Airtable returns back a lot of extra information in its records. I prefer to simplify these records with only the record ID and the values for each of the table columns we created above. These values are found in the fields property. To do this, I used the an Array map to format the data the way I want.
const { table } = require('./airtable'); const formattedReturn = require('./formattedReturn'); module.exports = async (event) => { try { const courses = await table.select().firstPage(); const formattedCourses = courses.map((course) => ({ id: course.id, ...course.fields, })); return formattedReturn(200, formattedCourses); } catch (err) { console.error(err); return formattedReturn(500, {}); } };
How do we test this out? Well, the netlify-cli provides us a netlify dev command to run our serverless functions (and our front-end) locally. First, install the CLI:
npm install -g netlify-cli
Then, run the netlify dev command inside of the directory.
This beautiful command does a few things for us:
Runs the serverless functions
Runs a web server for your site
Creates a proxy for front end and serverless functions to talk to each other on Port 8888.
Let’s open up the following URL to see if this works:
We are able to use /api/* for our API because of the redirect configuration in the netlify.toml file.
If successful, we should see our data displayed in the browser.

Creating courses
Let’s add the functionality to create a course by opening up the createCourse.js file. We need to grab the properties from the incoming POST body and use them to create a new record by calling table.create().
The incoming event.body comes in a regular string which means we need to parse it to get a JavaScript object.
const fields = JSON.parse(event.body);
Then, we use those fields to create a new course. Notice that the create() function accepts an array which allows us to create multiple records at once.
const createdCourse = await table.create([{ fields }]);
Then, we can return the createdCourse:
return formattedReturn(200, createdCourse);
And, of course, we should wrap things with a try/catch:
const { table } = require('./airtable'); const formattedReturn = require('./formattedReturn'); module.exports = async (event) => { const fields = JSON.parse(event.body); try { const createdCourse = await table.create([{ fields }]); return formattedReturn(200, createdCourse); } catch (err) { console.error(err); return formattedReturn(500, {}); } };
Since we can’t perform a POST, PUT, or DELETE directly in the browser web address (like we did for the GET), we need to use a separate tool for testing our endpoints from now on. I prefer Postman, but I’ve heard good things about Insomnia as well.
Inside of Postman, I need the following configuration.
url: localhost:8888/api/courses
method: POST
body: JSON object with name, link, and tags
After running the request, we should see the new course record is returned.

We can also check the Airtable GUI to see the new record.

Tip: Copy and paste the ID from the new record to use in the next two functions.
Updating courses
Now, let’s turn to updating an existing course. From the incoming request body, we need the id of the record as well as the other field values.
We can specifically grab the id value using object destructuring, like so:
const {id} = JSON.parse(event.body);
Then, we can use the spread operator to grab the rest of the values and assign it to a variable called fields:
const {id, ...fields} = JSON.parse(event.body);
From there, we call the update() function which takes an array of objects (each with an id and fields property) to be updated:
const updatedCourse = await table.update([{id, fields}]);
Here’s the full file with all that together:
const { table } = require('./airtable'); const formattedReturn = require('./formattedReturn'); module.exports = async (event) => { const { id, ...fields } = JSON.parse(event.body); try { const updatedCourse = await table.update([{ id, fields }]); return formattedReturn(200, updatedCourse); } catch (err) { console.error(err); return formattedReturn(500, {}); } };
To test this out, we’ll turn back to Postman for the PUT request:
url: localhost:8888/api/courses
method: PUT
body: JSON object with id (the id from the course we just created) and the fields we want to update (name, link, and tags)
I decided to append “Updated!!!” to the name of a course once it’s been updated.

We can also see the change in the Airtable GUI.
Deleting courses
Lastly, we need to add delete functionality. Open the deleteCourse.js file. We will need to get the id from the request body and use it to call the destroy() function.
const { id } = JSON.parse(event.body); const deletedCourse = await table.destroy(id);
The final file looks like this:
const { table } = require('./airtable'); const formattedReturn = require('./formattedReturn'); module.exports = async (event) => { const { id } = JSON.parse(event.body); try { const deletedCourse = await table.destroy(id); return formattedReturn(200, deletedCourse); } catch (err) { console.error(err); return formattedReturn(500, {}); } };
Here’s the configuration for the Delete request in Postman.
url: localhost:8888/api/courses
method: PUT
body: JSON object with an id (the same id from the course we just updated)

And, of course, we can double-check that the record was removed by looking at the Airtable GUI.
Displaying a list of courses in React
Whew, we have built our entire back end! Now, let’s move on to the front end. The majority of the code is already written. We just need to write the parts that interact with our serverless functions. Let’s start by displaying a list of courses.
Open the App.js file and find the loadCourses function. Inside, we need to make a call to our serverless function to retrieve the list of courses. For this app, we are going to make an HTTP request using fetch, which is built right in.
Thanks to the netlify dev command, we can make our request using a relative path to the endpoint. The beautiful thing is that this means we don’t need to make any changes after deploying our application!
const res = await fetch('/api/courses'); const courses = await res.json();
Then, store the list of courses in the courses state variable.
setCourses(courses)
Put it all together and wrap it with a try/catch:
const loadCourses = async () => { try { const res = await fetch('/api/courses'); const courses = await res.json(); setCourses(courses); } catch (error) { console.error(error); } };
Open up localhost:8888 in the browser and we should our list of courses.

Adding courses in React
Now that we have the ability to view our courses, we need the functionality to create new courses. Open up the CourseForm.js file and look for the submitCourse function. Here, we’ll need to make a POST request to the API and send the inputs from the form in the body.
The JavaScript Fetch API makes GET requests by default, so to send a POST, we need to pass a configuration object with the request. This options object will have these two properties.
method → POST
body → a stringified version of the input data
await fetch('/api/courses', { method: 'POST', body: JSON.stringify({ name, link, tags, }), });
Then, surround the call with try/catch and the entire function looks like this:
const submitCourse = async (e) => { e.preventDefault(); try { await fetch('/api/courses', { method: 'POST', body: JSON.stringify({ name, link, tags, }), }); resetForm(); courseAdded(); } catch (err) { console.error(err); } };
Test this out in the browser. Fill in the form and submit it.

After submitting the form, the form should be reset, and the list of courses should update with the newly added course.
Updating purchased courses in React
The list of courses is split into two different sections: one with courses that have been purchased and one with courses that haven’t been purchased. We can add the functionality to mark a course “purchased” so it appears in the right section. To do this, we’ll send a PUT request to the API.
Open the Course.js file and look for the markCoursePurchased function. In here, we’ll make the PUT request and include both the id of the course as well as the properties of the course with the purchased property set to true. We can do this by passing in all of the properties of the course with the spread operator and then overriding the purchased property to be true.
const markCoursePurchased = async () => { try { await fetch('/api/courses', { method: 'PUT', body: JSON.stringify({ ...course, purchased: true }), }); refreshCourses(); } catch (err) { console.error(err); } };
To test this out, click the button to mark one of the courses as purchased and the list of courses should update to display the course in the purchased section.

Deleting courses in React
And, following with our CRUD model, we will add the ability to delete courses. To do this, locate the deleteCourse function in the Course.js file we just edited. We will need to make a DELETE request to the API and pass along the id of the course we want to delete.
const deleteCourse = async () => { try { await fetch('/api/courses', { method: 'DELETE', body: JSON.stringify({ id: course.id }), }); refreshCourses(); } catch (err) { console.error(err); } };
To test this out, click the “Delete” button next to the course and the course should disappear from the list. We can also verify it is gone completely by checking the Airtable dashboard.
Deploying to Netlify
Now, that we have all of the CRUD functionality we need on the front and back end, it’s time to deploy this thing to Netlify. Hopefully, you’re as excited as I am about now easy this is. Just make sure everything is pushed up to GitHub before we move into deployment.
If you don’t have a Netlify, account, you’ll need to create one (like Airtable, it’s free). Then, in the dashboard, click the “New site from Git” option. Select GitHub, authenticate it, then select the project repo.

Next, we need to tell Netlify which branch to deploy from. We have two options here.
Use the starter branch that we’ve been working in
Choose the master branch with the final version of the code
For now, I would choose the starter branch to ensure that the code works. Then, we need to choose a command that builds the app and the publish directory that serves it.
Build command: npm run build
Publish directory: build
Netlify recently shipped an update that treats React warnings as errors during the build proces. which may cause the build to fail. I have updated the build command to CI = npm run build to account for this.

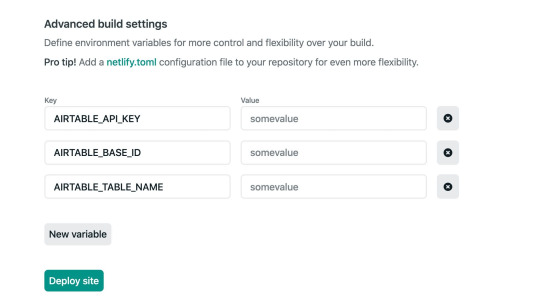
Lastly, click on the “Show Advanced” button, and add the environment variables. These should be exactly as they were in the local .env that we created.
The site should automatically start building.

We can click on the “Deploys” tab in Netlify tab and track the build progress, although it does go pretty fast. When it is complete, our shiny new app is deployed for the world can see!

Welcome to the Jamstack!
The Jamstack is a fun new place to be. I love it because it makes building and hosting fully-functional, full-stack applications like this pretty trivial. I love that Jamstack makes us mighty, all-powerful front-end developers!
I hope you see the same power and ease with the combination of technology we used here. Again, Jamstack doesn’t require that we use Airtable, React or Netlify, but we can, and they’re all freely available and easy to set up. Check out Chris’ serverless site for a whole slew of other services, resources, and ideas for working in the Jamstack. And feel free to drop questions and feedback in the comments here!
The post Going Jamstack with React, Serverless, and Airtable appeared first on CSS-Tricks.
You can support CSS-Tricks by being an MVP Supporter.
Going Jamstack with React, Serverless, and Airtable published first on https://deskbysnafu.tumblr.com/
0 notes
Text
Change Your Way Of Learning, Change The World 💯
Easily #createcourses and #lessons , take #quizzes, award certificates, manage users, download student reports, and so much more! By using #LearnMesh you can access the latest e-learning business trends for building robust learning experiences.
Multi-tier courses, flexible prerequisites, course points, grade books and a lot more features are available to help you alter your online classroom. Trainers can create quizzes as they wish, let it be multiple choice question quizzes or essay questions, LearnMesh will help you manage every process much simply and effortlessly.
.
.
Still here? Do you want to check out all the features?
visit : Learnmesh
.
#management #sociallearning #course #learning #learninganddevelopment #courses #courses #elearning #certificates #trainers #education #edtech #teachers #school #onlinecourse #students #management #digitalmarketing #technology #entrepreneurship #socialmedia #marketing #branding #sales #personaldevelopment #learnmesh
0 notes
Text
#Learnx#Learnxreview#Learnxoto#makemoneyonline#digitalmerketing#affiliatemerketing#chatgpt#createcourse
0 notes
Text
Create Online Courses - Zenler
You can easily Create Online Courses and share them with the global audience through Zenler. Engage your students with interactive lessons, run your teaching business, and begin building your course today with Zenler-share knowledge with the world.

0 notes
Text
A online learning platform is an integrated set of interactive online services that provide trainers, learners, and others involved in education with information, tools and resources to support and enhance education delivery and management. A good online learning platform has features like building courses, create user profiles where you can track progress and growth of individuals, create groups to categorize students and implement different courses for different groups. So, today I am here to introduce you one such platform known as Learnmesh. Visit : learnmesh.com . . . . . #onlinelearning #onlinelearningplatform #sociallearning #courses #elearning #trainers #learners #onlineeducation #management #onlinecourses #learninganddevelopment #onlinecourse #bestonlinelearningplatform #coursecreation #createcourse #educationduringcovid
0 notes
Text
Change Your Way Of Learning, Change The World ✨️
Easily createcourses and lessons , take #quizzes, award certificates, manage users, download student reports, and so much more! By using LearnMesh you can access the latest e-learning business trends for building robust learning experiences.
Multi-tier courses, flexible prerequisites, course points, grade books and a lot more features are available to help you alter your online classroom. Trainers can create quizzes as they wish, let it be multiple choice question quizzes or essay questions, LearnMesh will help you manage every process much simply and effortlessly.
0 notes