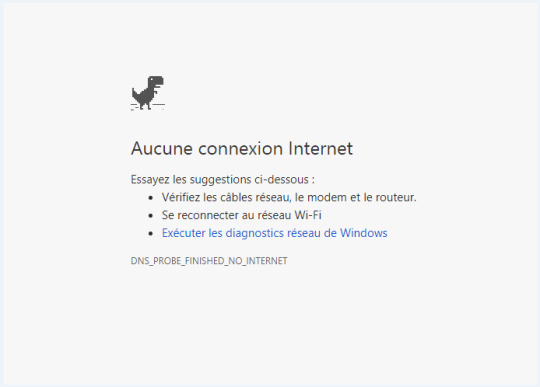
#DNS_PROBE_FINISHED_NO_INTERNET
Explore tagged Tumblr posts
Visit Tumblr Blog
Explore Tumblr blogs with no restrictions, modern design and the best experience.
Last Seen Tumblr Blogs


Fun Fact
In 2020, Tumblr had 29.4 million users in the US.
Link
Follow these steps to fix DNS_PROBE_FINISHED_NO_INTERNET issue on Windows, Mac, Ubuntu, Android, and start using your Google Chrome safely
#DNS_PROBE_FINISHED_NO_INTERNET#GoogleChrome#InternetIssues#Thiswebpageisnotavailable#MalwareJournal#Tips
0 notes
Link
Are you getting en error while opening any website on any browsers like site cannot be reached or not available. Than this is what you need to do to fix
#dns_probe_finished_nxdomain#dns probe finished no internet#dns_probe_finished_bad_config#dns probe finished bad config#dns_probe_finished_no_internet#browser#error#how to
0 notes
Link
If your computer shows DNS_Probe_Finished_No_Internet Error then this article is for you, Fix this Error in Google Chrome with these given solutions.
0 notes
Text
How To Fix Dns_Probe_Finished_No_Internet Chrome [Windows & Android]
Dns_Probe_Finished_No_Internet Chrome
DNS_PROBE_FINISHED_NO_INTERNET: Hey guys are you looking for how to fix dns_probe_finished_no_internet error then you are the right place. Because today in this article we are going to share how to fix dns_probe_finished_no_internet in your windows computer.
[quads id=1]
The dns_probe_finished_no_internet error is a very common error for windowsusers while…
View On WordPress
#dns_probe_finished_no_internet#dns_probe_finished_no_internet android#dns_probe_finished_no_internet chrome#dns_probe_finished_no_internet windows
0 notes
Text
How to Easily Fix Chrome ‘DNS Probe Finished No Internet’ Error
#chrome #googlechrome
DNS Probe Finished No Internet, also known as Dns_Probe_Finished_No_Internet, is a common error in Google Chrome. Many users reported that they got this issue frequently. Usually, this error occurs because of a problem with the default DNS server that your computer or device uses. However, you can easily fix it by changing your default DNS server to other DNS services like Google’s DNS, OpenDNS,…

View On WordPress
0 notes
Text
DNS_Probe_Finished_No_Internet fix for the chrome browser
http://i.securitythinkingcap.com/QnW2XW
1 note
·
View note
Video
Fix Dns_Probe_Finished_No_Internet Issue Using Command Prompt On Windows...
0 notes
Video
Fix Dns_Probe_Finished_No_Internet Issue Using Command Prompt On Windows...
0 notes
Text
Réparer : DNS_PROBE_FINISHED_NO_INTERNET [7 Solutions]
Nous avant remarquer que certains de nos utilisateurs ont rencontré des problèmes concernant l'erreur DNS_PROBE_FINISHED_NO_INTERNET après la mise à jour de leurs système, c'est pour ça nous avons décidé de parler un peu de cette erreur particulière et les méthodes nécessaires pour le résoudre. Elle apparaît généralement. lorsque vous essayez d'accéder à Internet via Google Chrome même si l'Internet fonctionne bien sur d'autres navigateur comme Mozilla ou Internet Explorer pour Windows 8. Cela vous empêchera d'accéder à n'importe quel type de pages Web jusqu'à ce que vous le corrigiez.
Corriger DNS_PROBE_FINISHED_NO_INTERNET sur Windows 10
Méthode 1: Effacer le cache DNS de Google Chrome Effacer le cache DNS de Google Chrome pourrait être la meilleur moyen pour résoudre le problème "DNS_PROBE_FINISHED_NO_INTERNET". Suivez ces étapes à la lettre : Étape 1. Visitez simplement le lien suivant URL chrome://net-internals/#dns . Étape 2. Cliquez sur le bouton Effacer le cache host .
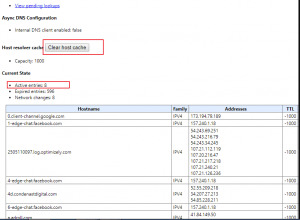
Étape 3. vous remarquerez que les sites Web fonctionnent correctement. C'est l'une des méthodes les plus simples et les plus utiles pour résoudre ce problème. Cela aurait pu marcher pour vous, si ce n'était pas le cas, faites défiler plus loin et essayez la méthode prochaine. Voir aussi: Réparer Facilement l’Erreur WerFault.exe (7 Méthodes) Méthode 2: Modifier les paramètres du serveur DNS Appuyez et maintenez le bouton "Windows" et le bouton "X". Choisissez la fenêtre "Panneau de configuration", vous devez faire un double-cliquer sur le bouton gauche de la souris. cliquez sur l'icône "Réseau et Internet" pour l'ouvrir. Cherchez la fonction "centre réseau et de partage" et cliquez dessus avec le bouton gauche de la souris. Dans la partie droite de la fenêtre "Centre de réseau et de partage", cliquez avec le bouton gauche de la souris sur le lien "Modifier les paramètres de la carte". Ensuite, dans la liste des adaptateurs réseau, vous devez trouver celui que vous utilisez et faire un clic droit dessus. Après avoir cliqué avec le bouton droit de la souris sur l'adaptateur réseau, vous devez cliquer avec le bouton gauche de la souris sur la fonction "Propriétés". Comme vous pouvez le voir sur la capture d'écran ci-dessous, nous utilisons un hotspot mobile, mais vous avez besoin de sélectionnez le réseau auquel vous êtes actuellement connecté.
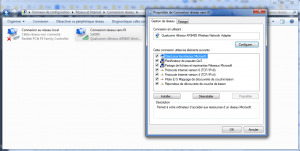
Propriétés adaptateur réseau Dans la nouvelle fenêtre Propriétés que vous avez ouverte, vous devrez recherchez l'option "Internet Protocol Version 4 (TCP/IPv4)". Double-cliquez (clic gauche) sur "Internet Protocol Version 4 (TCP/IPv4)" pour l'ouvrir. Après avoir sélectionné l'option ci-dessus, une autre fenêtre s'ouvrira. Fenêtre "Propriétés". Note : dans cette fenêtre Propriétés, vous aurez accès à la fenêtre pour le protocole Internet. Cliquez avec le bouton gauche de la souris sur "Utiliser l'adresse du serveur DNS suivante :". pour le sélectionner. Dans le champ "Serveur préféré", mettez ce qui suit “208.67.222.222”. Dans le champ "serveur auxiliaire" mettez le suivant "208.67.220.220".
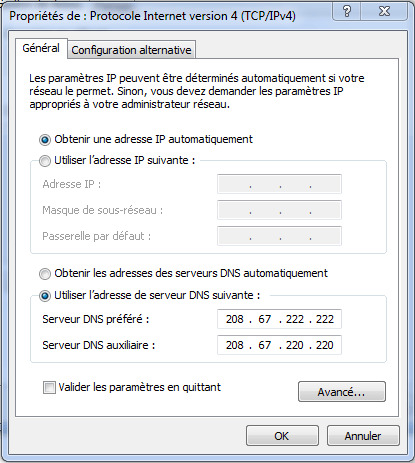
Cochez la case à côté du message "Valider les paramètres en quittant" situé dans la partie inférieure de l'écran. Cliquez avec le bouton gauche de la souris sur "OK" présenté dans la partie inférieure de l'écran. Fermez les fenêtres que vous avez ouvertes. Remarque : Vous pouvez également utiliser le serveur DNS public de Google et définir 8.8.8.8.8 comme serveur préféré et 8.8.4.4.4 comme serveur auxiliaire. Vérifier la connectivité Assurez-vous que votre routeur ou tout autre appareil responsable d'Internet reçoit Internet de votre FAI. S'il s'agit d'un appareil wi-fi, connectez alors votre téléphone ou un autre appareil wifi activé à ce routeur/modem et voir s'il se connecte à l'Internet. Si c'est le cas, alors le routeur va bien s'il ne connecte pas à votre FAI parce que vous n'avez pas accès à Internet. Si vous êtes déjà connecté à ce routeur/modem depuis un autre appareil qui fonctionne correctement, alors votre Internet marche bien. Maintenant, testez-le à l'aide d'un ordinateur et procédez comme suit : Maintenez la touche Windows enfoncée et appuyez sur R Tapez cmd et cliquez sur OK Dans l'invite de commande noire, tapez : ping -t 4.2.2.2 Appuyez sur Entrée. Il devrait montrer les lignes suivantes : Reply from 4.2.2.2: bytes=32 time=193ms TTL=53 Reply from 4.2.2.2: bytes=32 time=193ms TTL=53 Reply from 4.2.2.2: bytes=32 time=192ms TTL=53

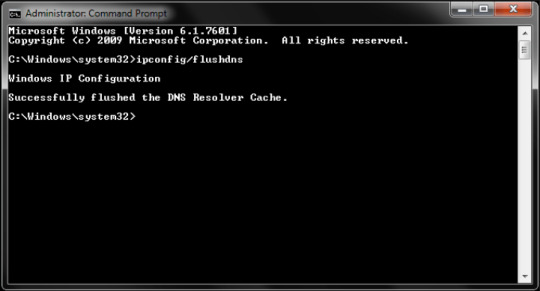
ping -t 4.2.2.2 Cela signifie que l'Internet est connecté, les derniers chiffres peuvent être différents mais c'est ce que devrait se montrer, s'il montre ceci alors l'Internet est connecté, s'il montre "Request Timed Out" ou quoi que ce soit d'autre, l'Internet n'est pas connecté. Assurez-vous que votre connexion sans fil ou câblée est connecté à votre routeur, gardez cette fenêtre ouverte, et continuez à la vérifier après l'installation. en exécutant chaque étape ci-dessous. Lorsqu'il commencera à afficher des réponses, le problème sera corrigé. Méthode 3: Flush DNS L'erreur DNS_PROBE_FINISHED_NO_INTERNET sous Windows 10 peut également apparaître si le cache DNS est obsolète. Alors que vous devez le supprimer manuellement pour résoudre le problème question. Effectuer le processus décrit précédemment : Étape 1 : Tout d'abord, appuyez simultanément sur les touches Win + R. Etape 2 : Tapez "cmd" dans le champ de recherche. Etape-3 : Tapez ipconfig /flushdns et appuyez sur Entrée. Etape 4 : Redémarrez votre ordinateur, puis vérifiez si votre problème est résolu.
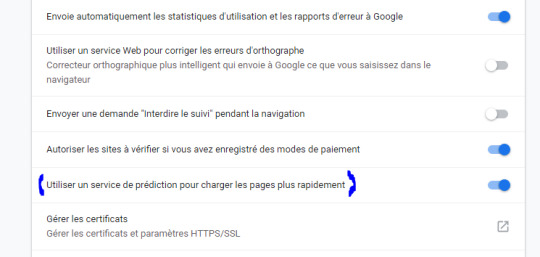
C'est ça. Il se peut que l'erreur soit effacée de votre écran. Si le message "DNS_PROBE_FINISHED_NO_INTERNET" persiste, essayez la méthode suivante. Méthode 4: Désactiver les services de prédiction Désactiver les services de prédiction peut fonctionner comme un charme pour corriger l'erreur DNS_PROBE_FINISHED_NO_INTERNET. Il suffit de suivre ces simples étapes. Etape-1 : Allez dans les paramètres du navigateur Chrome. Étape 2 : Faites défiler vers le bas et cliquez sur Afficher les paramètres avancés. Etape-3 : Vous verrez une option de'Utiliser les services de prédiction pour charger les pages plus rapidement' . Etape 4 : Décochez la case et redémarrez le navigateur.
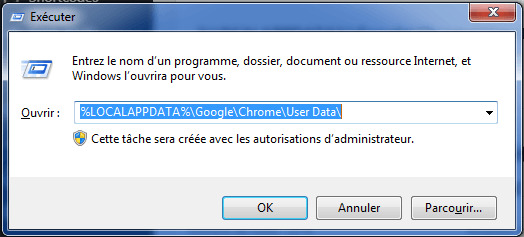
Vous avez terminé la procédure avec succès. Il doit résoudre le problème. Si vous voyez toujours l'erreur "DNS_PROBE_FINISHED_NO_INTERNET", passez à la méthode suivante. Voir aussi: Réparer Code d’erreur 80240020 Facilement Méthode 5: Réinitialiser Google Chrome Cette étape n'est pas techniquement liée à ce que nous avons fait dans les étapes précédentes, mais je recommanderais quand même d'exécuter ces instructions ci-dessous. Maintenez la touche Windows enfoncée et appuyez sur R Dans la boîte de dialogue d'exécution qui s'ouvre, tapez Si vous utilisez Windows XP %USERPROFILE%\Local Settings\Application Data\Google\Chrome\User Data\ Si vous utilisez Windows 7/Vista/8/8.1/10 %LOCALAPPDATA%\Google\Chrome\User Data\
Réinitialiser Google Chrome 7: Autres méthodes pour réparer l'erreur DNS_PROBE_FINISHED_NO_INTERNET Si aucune des méthodes mentionnées ne fonctionne pas, essayez les méthodes expliquées ci-dessous : Étape 1. Désinstaller Antivirus Beaucoup de gens ont suggéré qu'après avoir désinstallé leur programme antivirus (surtout McAfee) le problème avait disparu.
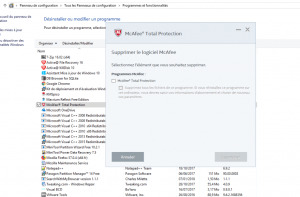
Désinstaller McAfee Étape 2. Désactivez votre pare-feu La désactivation des pare-feu peut également résoudre le problème car certains logiciels peuvent interférer lorsque Chrome tente de se connecter. Cela pourrait être la solution pour vous aussi. Désactivez le pare-feu et vérifiez si l'erreur persiste.
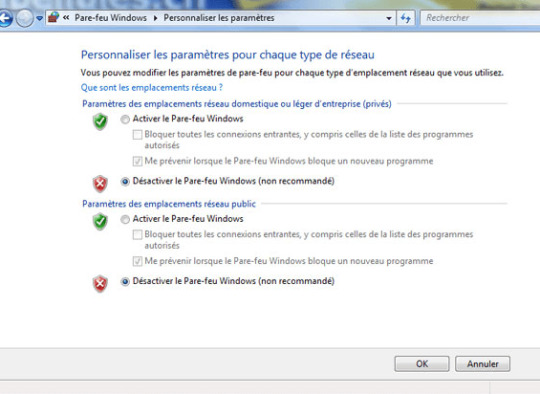
DÉSACTIVER LE PARE-FEU Étape 3. Essayez de vous connecter en mode sans échec Démarrez votre ordinateur en mode sans échec et essayez de charger Chrome. Cela vous aidera à déterminer si un logiciel tiers est à l'origine du problème, car le mode sans échec ne comprendra que des fichiers utiles intégrés. Pour ce faire, redémarrez votre ordinateur, appuyez sur la touche F8 et maintenez-la enfoncée. Sélectionnez Sélectionnez maintenant le mode Sans échec avec la mise charge du réseau dans la liste des options disponibles..
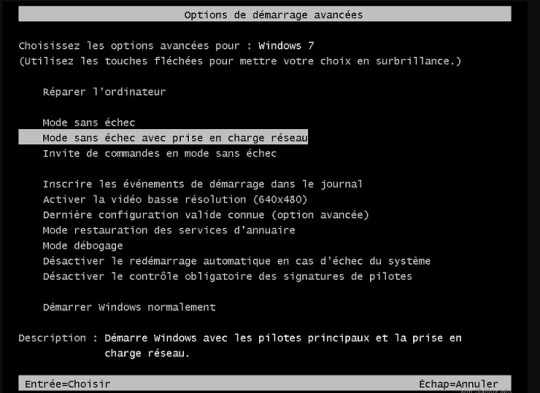
démarrage Mode sans échec avec la prise en charge du réseau Conclusion Félicitations. Vous devez avoir corriger l'erreur "DNS_PROBE_NO_INTERNET" maintenant. C'étaient les plus éprouvées et les plus efficaces méthodes. Vous pouvez appliquer en toute confiance l'une ou l'autre des méthodes mentionnées ci-dessus dans les domaines suivants afin de résoudre le problème. J'espère que vous avez trouvez ce que vous cherchez et que vous êtes débarrassé de ce problème. Commentez dans la section commentaires si un problème persiste. ou si vous avez des questions. Read the full article
0 notes
Link
0 notes
Text
Tech question:
My internet keeps hiccuping. There are periods of sometimes a few minutes at a time where DNS_PROBE_FINISHED_NO_INTERNET shows up again and again on a page. I’ve tried researching into it and most claims say the issue is serverside, or with my internet connection, but this happens when I move to a new network as well. What the heck is going on?
2 notes
·
View notes
Link
DNS is Domain name system service which Resolves IP address to Hostname and Hostname into IP Address. Normally PC only understands numbers (IP address) when we type any hostname the web browser resolves the IP address of the corresponding website using DNS. The DNS related error fails to resolve host to IP or IP to host that causing There is no internet connection – dns_probe_finished_no_internet. Go through the 5 methods below and try solving your issue with these.
5 Methods to fix DNS probe finished no internet error
Method #1 Check Proxy settings to fix DNS probe finished no internet error
You can start by checking your proxy settings to fix DNS probe error.
Click on start menu search type internet options and hit the enter.
Move to the connection tab and click LAN Settings at the bottom.
Now Uncheck the "Use a proxy server for your LAN" box.
Make sure the "Automatically detect settings" box is selected.
Click OK and apply check problem fixed.
Method #2 Check DNS client service is running to fix DNS probe finished no internet error
As discussed before this is DNS related problem, make sure DNS client service is running. To check and restart the DNS client service,
Press Windows + R, type services.msc and ok to open windows services console.
Scroll down and locate DNS Client,
Check If DNS client service is running state then, Right-click and Select Restart to get a fresh start the service.
Double click on the service if it was not started, then change the startup type Automatic and Start the service next to service status. Now the DNS client will Start /restart, open chrome browser and check whether dns_probe_finished_no_internet will be resolved.
Method #3 Flush DNS Cache to fix DNS probe finished no internet error
Flushing the DNS address restarts the connection with the DNS server. In most of the cases, you need to reset the TCP/IP configuration and flush DNS to fix most of the internet related problems including the DNS probe finished no internet. To do this, type cmd on Start menu search, Right-click on command prompt and choose run as administrator. Then Perform the commands below
netsh winsock reset catalog ipconfig /flushdns ipconfig /release ipconfig /renew netsh int ip set DNS
After That type exit to close the command prompt and restart windows to take effect the changes. Now check There is no more internet connection issue on chrome browser.
Method #4 Change Default DNS Address to Open DNS to fix DNS probe finished no internet error
This is another effective solution to fix most of the DNS related problems include (DNS probe finished no internet, DNS probe finished nxdomain, DNS probe finished bad config).
Press Windows + R, type ncpa.cpl and click ok to open network configuration window.
Here right click on the active network connection and select properties.
Then double-click on Internet Protocol Version 4 (TCP/IPv4) to open its properties.
Select the Radio button ‘Use the following DNS server address:’ and set the address below.
Preferred DNS Server: 8.8.8.8 Alternate DNS Server: 8.8.4.4
Or also you can use DNS address below.
Preferred DNS Server: 208.67.222.222 Alternate DNS Server: 208.67.220.220
Now check the box that says, ‘Validate settings upon exit’ and then click on OK. That’s it, Restart windows and check internet connection working properly.
Method #5 Updating the Network Driver to fix DNS probe finished no internet error
Just like apps and software, drivers also need to be updated regularly. It fixes the potential issues and helps keep the connectivity hassle-free. As of now, let’s see how you can update the network adapter to fix the said issue.
Press Windows+R to open Run option, type devmgmt.msc and hit enter.
It will open the device management window as shown below. Look for Network adapters on the list.
Right-click on the Network adapter and select Update Driver Software from the menu.
Click on Browse my computer for driver software.
Now, select Let me pick from a list of device drivers on my computer.
Finally, select the compatible driver and click Next. That’s it.
This will update your network drivers. Once, you see a dialog box saying driver update successful, restart your computer. Now, your system is free from dns_probe_finished_no_internet issue.
Read more:
How to Fix the Windows 10 Update Error that Makes the Desktop Automatically Switch to Tablet Mode
How to Use Custom Background While Video Conferencing on Skype, Microsoft Team, Zoom
How to Join a Google Meet Session from Gmail
via TechLatest
0 notes
Link
http://www.bilgikpss.com/internet/dns_probe_finished_no_internet-sorunun-cozumu/
0 notes
Text
4 Ways to Fix Dns_Probe_Finished_No_Internet in Chrome Browser
4 Ways to Fix Dns_Probe_Finished_No_Internet in Chrome Browser
Internet connectivity issues are like a headache. You have a lot of work to finish but Google Chrome is stopping you from accessing the Internet by showing dns_probe_finished_no_internet. Though there are people who know how to tolerate this error by playing the above dinosaur game, not all people can afford to do that.
Today, I will share some efficient ways to fix a DNS probe finished no…
View On WordPress
0 notes
Text
How To Fix Bungie Error Code Baboon ?
Since Destiny requires constant server connection, there’s a chance you’ve encountered the dreaded Baboon Error Code.
This frustrating error code might be constantly kicking you off the game. According to Bungie:
“This error can be due to packet loss or disconnections between your home network and Bungie (such as ISP saturation or general internet congestion). It can even be caused by certain WiFi setups, or mobile hotspots that may have experienced a blip or loss of connection.”
We’ve collected some potential fixes for this issue below.
5 Baboon Error Code Fixes
Solution #1 (Wired Connection)
If you’re playing wirelessly, try switching to a wired connection. It’s important to test this because you’ll want to rule out WiFi signal strength/stability as a possible server trouble source.
Solution #2 (Force Restart)
Try force quitting Destiny so that the game completely closes before relaunching it.
HOW TO FORCE QUIT DESTINY
PlayStation 3
1. Press down the PS button.
2. Choose “Quit Game”.
3. Choose “Yes”.
Xbox One
1. In the game or app, press the Xbox button.
2. Confirm that the large application tile is highlighted, after which select the Menu button.
3. Select “Quit”.
PlayStation 4
1. Hold down the PS button.
2. Choose “Close Application”.3. Choose “Yes”.
Xbox 360
1. Press the Xbox Guide button.
2. Press the Y button to go back to the dashboardIf you’re having computer trouble, it could be worth trying out Advanced SystemCare (click to learn more). CNET describes it as a “Swiss Army Knife of a PC utility“. Once you download it, you get a suite of optimization tools, including an uninstaller, one-click registry fixes, defragmenters, and more.
Solution #3 (YouTube Fix)
Besides just Baboon, the above video will help you deal with the following Error Codes:
Badger, Chupacabra, Beaver, Beetle, Blackcurrant, Blueberry, Cacao, Cashew, Cherry, Chihuahua, Chinchila, Goat, Goose, Chokeberry, Duck, Elderberry, Flamingo, Flatworm, Fly, Gooseberry, Gopher, Grape, Grapefruit, Jackal, Elephant, Elk, Jackfruit, Grasshopper, Groundhog, Hare, Hawk, Jasmine, Kingfisher, Kiwi, Leech, Tangelo, Tapir, Lemon, Leopard, Lemming, Lemur, Lion, Lionfish, Snail, Tangerine, Tamarind.
Solution #4 (Network Troubleshooting)
Consult the Bungie Network Troubleshooting Guide.
The Network Troubleshooting Guide was made to help gamers walk through the suggested steps for trouble-shooting server and network connectivity problems that might be affecting their ability to play Destiny.
Additionally, it includes information and tips which may be useful for gamers wanting to enhance their network connection and server performance while playing Destiny.
MULTIPLE DISCONNECTS FROM THE BABOON ERROR CODE
If you are getting the same error code, Baboon, for example, several times, it suggests that a gamer is probably experiencing just one underlying problem.
The reason for the disconnects might be something like corrupted data in the Destiny installation or a source of instability in the gamer’s network setup.
Gamers that are getting multiple disconnections from Destiny with the exact same error codes might want to try out these trouble-shooting tips, according to the Network Troubleshooting Guide:
Shutting down and restarting the Destiny program
Restarting as well as clearing the cache
Moving over to a wired connection if the gamer happens to be employing a Wireless internet connection
Researching the Destiny Help Knowledge Base for the associated error page and working through any other trouble-shooting guides
Looking through the Troubleshooting Guide
Searching or posting within the Help forums where Destiny Player Support, Mentors, and community volunteers might be able to supply supplemental support
Solution #5 (The Worst Option)
In our research, it doesn’t seem that there’s a true, specified solution to the problem if the above fixes didn’t work. In fact, many players are speculating that it’s an issue on Bungie’s end.
This has led to a lot of frustration with this Baboon error code. Over in the Bungie Forums, one player with an IT background wrote about his trouble-shooting process.
He says that Destiny/Destiny 2 are the only computer games that are kicking him off. Video games like Assassins Creed, Battlefront, Battlefield 1, Battlefield 4, and others aren’t booting him, just the Destiny Games.
He listed out some facts of his situation:
He has an internet connection speed of 110 megabytes per second download speed and an 8 megabyte per second upload speed.
Speed tests on his Xbox One always report between 75-100 megabyte per second speeds, with an under 100 ms ping, and 0% packet loss.
He has a new Netgear Nighthawk gaming router with DOCSYS 3 modem.
He has experienced getting booted wirelessly and with hard-wired connections on two different Xbox Ones. To him, this indicated that there isn’t something disrupting the WiFi.
ALSO READ: Fix “DNS_PROBE_FINISHED_NO_INTERNET”: Windows 7, 10
He has rebooted his network and has hard booted both of his Xbox gaming consoles.
The way its gone, he’s getting kicked off, generally with the Baboon error code, every 10 minutes on average. He says that the game is basically unplayable because of it.
He says that he’s observed that it seems it occurs generally in a congested place or when the game is loading into a mission or area.
This has led him to believe the error isn’t occurring on the player side but on Bungie’s side. In addition, his ISP doesn’t have any idea what to do to help- they’re reporting that his router and modem look great and get a powerful and clean signal.
Other Error Codes
Destiny has a variety of quaintly named error codes. For the following error codes: Beagle, Buck, Camel, Bull, Butterfly, Buzzard/Vulture, Caribou, Carp, Cat, Canary, Caterpillar, Chicken, Chimpanzee, Catfish, Cattle, Centipede, Marionberry, Pear, Pelican, Penguin, Stingray & Urchin, check out this handy GameSpot guide for help on fixing them.
Call On Our Technical Support Phone Number for fix bungie error code baboon by Errorcode Expert USA +1 (866) 748-5444 Right Now to Get Instant Help
0 notes
Text
Dns_Probe_Finished_No_İnternet Sorunun Çözümü
http://dlvr.it/QwTPcs
0 notes