#Disable lightroom 5 updates
Text
Disable lightroom 5 updates

DISABLE LIGHTROOM 5 UPDATES UPDATE
DISABLE LIGHTROOM 5 UPDATES MAC
DISABLE LIGHTROOM 5 UPDATES WINDOWS
no mention of the virtual memory improvements for Classic) but it goes into a little more details. My initial impressions are kind of ho-hum compared to other options, and I want to do a deep-dive comparison between Super Resolution, normal upsizing, and Topaz Lab's Gigapixel.Įdit - Here's the blog post from Adobe. I'm hoping to put together a video/blog post going into more details, especially around Super Resolution. unless youre editing a stitched panorama over 200 MB when the computer crawls to a stop.
DISABLE LIGHTROOM 5 UPDATES UPDATE
There are the usual camera and lens support updates, and in Classic they've apparently done some virtual memory tweaks to help reduce performance degradation during longer editing sessions. Hi everyone, I just installed the new update and while I appreciate most of it, there is a gigantic issue with presets now: whenever you hover one preset, it not only previews in the 'preview' image in the top left corner but also in the full image, which is fine. Click Apps (on the left) and either use the Auto-update toggle button to disable/enable. Click the Account icon in the upper right, then select Preferences. Win select the icon in the Window’s taskbar.
DISABLE LIGHTROOM 5 UPDATES MAC
Under ‘File Handling,’ set ‘Render Previews’ to ‘Minimal’ as shown below. To disable auto-update for one or more applications, open the Creative Cloud desktop app: Mac select the icon in the macOS menu bar. Go to the Import Dialogue Box by selecting ‘Import’ in the Library module as shown below. To improve the overall speed of Lightroom during the import process, we need to modify a few settings. The other biggie for both versions is native support for Super Resolution that was previously available only in Camera Raw.Īnd in the Cloud app there's finally an option to create a custom crop, along with a whole bunch of new presets. Use Optimal Settings During the Import Process. In the Registry Editor, make a backup copy of the registry by choosing Registry > Export Registry File.
DISABLE LIGHTROOM 5 UPDATES WINDOWS
Type regedit in the Open text field, and then click OK to start the Windows Registry Editor. It only appeared in updates within the last few months. Im using the latest version of Lightroom Classic on a Mac and dont get prompted. Filtering Enable/Disable Filters Ctrl L Cmd L Show Filter Bar Adobe Lightroom 5. Thread starter bergstrom Start date Forums. Updates can be downloaded from of 13. The biggie for many people on here is Classic now supports Apple M1, with Adobe claiming roughly 2x performance improvement over the old Apple chip sets in comparable systems. So to get rid of that annoying update program, one option is to carefully edit the registry. Adobe Lightroom 5 Keyboard Shortcuts Windows Shortcuts Mac Shortcuts Working with Catalogs Open Catalog.
0 notes
Video
youtube
Thank you for your support! Download: https://ift.tt/EMFijpd Password: 123 Good luck and have a nice day If necessary, disable the antivirus, it can work on CRACK. The files do not contain viruses. How to install: 1) Download crack from the link 2) Unzip in new folder 3) Open setup 4) Completed! Rar archive with CRACK will be automatically installed on your desktop If you can't download: Try disabling vpn (if it is enabled); Try downloading the utility from another browser. If you can't install: Disable/Remove Antivirus ( Antivirus may falsely respond to a crack ) Update .Net Framework TAGS(IGNORE) lightroom crack, lightroom cc, adobe lightroom, adobe lightroom crack, photoshop lightroom crack 2022, photoshop lightroom free, adobe photoshop lightroom crack, photoshop adobe crack lightroom, photoshop lightroom crack, lightroom crack 2022, crack lightroom 2022, lightroom cracking 2022, photoshop cc 2022 crack, adobe crack lightroom, lightroom cc 2022, mascaras lightroom 2022, free crack lightroom, lightroom crack cc 2022, lightroom 11, lightroom, lightroom classic, photo editing, picsart photo editing, how to download adobe lightroom classic for free, snapseed photo editing, lightroom install, lightroom classic 2022, lightroom download 2022, lightroom 2022, adobe photoshop lightroom, adobe lightroom cc, classic, picsart editing, lightroom classic cc, lightroom photo editing, how to, lightroom tutorial, lightroom moi nhat, tải lightroom mới nhất, tai lightroom repack, lightroom repack moi nhat, lightroom repack mới nhất, lightroom 2021, tải lightroom 2021, lightroom mới nhất, cài lightroom 2021, best video, tai lightroom repack moi nhat, tai lightroom moi nhat, cài đặt lightroom mới nhất, sky editz, adobe zii, sinhala, tutorials, how to download photoshop crack version, in sinhala, adobe creative cloud, free, cài đặt lightroom, tải và cài đặt lightroom 2021, tải lightroom cc, sadesign, adobelightroomclassic, adobe, lightroom presets, lightroom 5 crack, how to make crack face editing, picsart new photo editing, picsart new concept photo editing, crack photo editing, new crack face editing, bd, gabwire, 3d crack face photo editing, background change photo editing, picsart face crack photo editing, crack face editing, cracked photo editing like vijay mahar, vijay mahar photo editing, picsart editing tutorial, cracked face photo editing, tech, gw gaming, free lightroom hack, lighroom pro free, not time need lightroom, no virus lightroom crack, how to crack lightroom, tải lightroom, cai lightroom 2021, change date and time change by trial hack, hack lightroom by adjsting time, photoshop crack version, how to extend trial period of adobe lightroom 5 crack, loghtroom 5 lifetime hack, lightroom app no trial, no time limit, lightroom app lifetime use, cài đặt lightroom 2021, how to install adobe lightroom 2020 on macbook pro, snapseed best color effect editing, new style photo editing 2020, lightroom mobile editing, photo editing lightroom, picsart amazing dual tone effect editing 2020, crack effect lr, bk editz, lightroom best photo editing, picsart creative photo editing, lightroom para estudantes, adobe lightroom gratis, crack lightroom, lightroom editing, lightroom editing tutorial, loghtroom photo editing tutorial 2020, photo editing kaise kare, adobe creative cloud crackeado 2022, adobe creative cloud free, premiereprocrack, premiere pro free download, premiere pro crack, lightroom mobile photo editing, editing, lorry editing, edit, photoshopcrack, lightroomonwindows11, adobe premiere pro free download, adobe lightroom free download for windows 10 with crack, adobecrack, after effects free download windows 11, lightroomcrack, creative cloud crack, ativador adobe lightroom, tuto materiaux c4d, lightroom 2020 download free mac, how to get adobe lightroom 2020 on macbook, adobe lightroom 2020 for mac crack download, download lightroom mac cracked, lightroom cc 2020 free mac, download lightroom cc 2020, windows 10, aj tech info, aj infotech, adobe photoshop lightroom classic 2022, crack software, photoshop crack software, free download photoshop, photoshop free download, aj tech wala, download photoshop free, adobe lightroom cc 2020 mac download, adobe lightroom 2020 macbook crack, lightroom classic cc for pc for free, download lightroom classic cc for pc for free, download lightroom classic cc for pc, lightroom classic for pc,lightroom, download lightroom classic cc for free, download lightroom classic for free for windows 8.1 by MIG Pro-Gaming
0 notes
Text
Adobe xforce keygen disable activate mac

ADOBE XFORCE KEYGEN DISABLE ACTIVATE MAC FOR MAC OS
ADOBE XFORCE KEYGEN DISABLE ACTIVATE MAC CRACKED
ADOBE XFORCE KEYGEN DISABLE ACTIVATE MAC FULL VERSION
ADOBE XFORCE KEYGEN DISABLE ACTIVATE MAC MAC OS X
This way, for example, we can enable AutoCAD 2022. With this keygen, we can activate any of the Autodesk programs. Xforce 2022 Full Crack For Mac, which allows you to activate each of the Autodesk 2022 products.
ADOBE XFORCE KEYGEN DISABLE ACTIVATE MAC FOR MAC OS
Xforce 5.7 B35255 Crack With Latest Version Key For Mac OS freeload
Xforce 5.7 B35255 Crack With Latest Version Key For Mac OS freeload.
a – Paste it to the Serial field of code from Offline Activation window to Request field of X-FORCEs keygen- ActivatorI use.dll file to active Photoshop CC, it work for me now :). 4 – For Activation use old Activator-X-FORCE. Aha XFORCE also pred the Keygen Only Adobe CC WindowsOS X desktop applications, including Adobe Photoshop CC and Illustrator CC.
ADOBE XFORCE KEYGEN DISABLE ACTIVATE MAC FULL VERSION
FREE Download Photoshop CS6.0 and CS5.1 Extended (Keygen) Full Version UPDATE 2012 XFORCE KEYGEN 32bits version DOWNLOAD 100% Working 01:16. Can not see it your camera is too far away from the screen not quite sure what you did there ?. ( efximorephotoshop_cc_2014_keygen.htm) где. cc xforce invalid request code adobe photoshop cc xforce keygen mac. The third step to take is to download Adobe Photoshop CC crack from. CorelDraw x7 Crack & Keygen | xForceCracks VectorScribe 2.3.1 & 1.8.0 crack for Illustrator CS5,CS6 & CC |.
ADOBE XFORCE KEYGEN DISABLE ACTIVATE MAC CRACKED
Adobe CC Universal cracked by xforce Version of Keygen: v1.6.0 Speaking specifically of Photoshop CC, this software comes with a wide. More Adobe CC Universal Cracked by xforce Photoshop Lightroom 5 Crack. We just finished our Keygen for Vray 3 for 3dsMax 2015. Adobe CC Universal Cracked by xforce We just finished our crack for the new Photoshop CC of 2014.
Now you have Full version of CC 2014 App :) You can turn on Internet !.
Now run the given BLOCKHosts.bat file as administrator / Or block the installed app using a firewall.
Wait till patching finishes (it will print errors,just ignore them).
Now Click Patch button and browse to the installation path of Photoshop CC 2014 (or installed app) - ex : C:Program FilesAdobeAdobe Photoshop CC 2014.
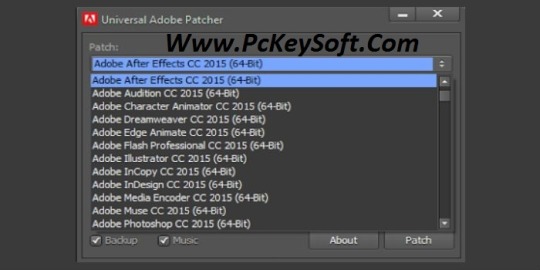
Select Adobe CC Application (32 bit or 64 bit)
Click Patch drop-down list and scroll to the very bottom.
Now download and Run Adobe Universal Patcher CC 2014.
Wait till it loads completely then close it.
Photoshop (or installed app) will launch now.
Now you will get a trial notification.
When setup finishes click Launch Now.In next window click Sign In Later.
It will show an error, Then click Sign In later.
Click Sign In in next window (Or Not Your Adobe ID, if you have already logged in your computer).
TURN OFF YOUR INTERNET CONNECTION (Important).
Download the setup of CC 2014 Application.
Adobe cc creative cloud all keygen v2 full tam indir full. Adobe cc 2014, 2015 all products universal keygen, crack patch for. Mac OSX PC Windows Crack Keygen Download. Download Xforce Osx Keygen For Mac download xforce osx keygen for mac Jun 18, 2015. Install Adobe CC Application with a serial generated from our keymaker (do not close the keygen until the end of the installation).To enter the serial number, it is necessary that the hosts file is not blocked.
ADOBE XFORCE KEYGEN DISABLE ACTIVATE MAC MAC OS X
Adobe Creative Cloud 2014 - Mac OS X KEYGEN X-FORCE dada Disable your Network card or pull the network cable. For X-force keygen, do make sure you had got the real one, not the fake one. Adobe CC 2014, 2015 All Products Universal Keygen, Crack Patch for Win & Mac Below you can get the universal keygens for all products of Adobe Creative Cloud 2014 & 2015 on Windows and Mac OS X, made by X-Force Team. Adobe CC 2014, 2015 All Products Universal Keygen, Crack Patch for Win & Mac SAYS Below you can get the universal keygens for all products of Adobe Creative Cloud 2014 & 2015 on Windows and Mac OS X, made by X-Force Team. This is 'Installing Adobe Edge Animate CC 2014 with X-FORCE 2014' by m4rk on Vimeo, the home for high quality videos and the people who love them.
0 notes
Photo


CHEF’S KISS RESHADE UPDATE
Added additional DOF option. It’s disabled by default and can be activated using the key combination Ctrl + 5
Replaced the Vibrance shader with the QUINT Lightroom shader to make skintones more natural-looking. The shader is included in the download and it’s for ReShade 4.3.x. Make sure to place this with the rest of your shader files.
10 notes
·
View notes
Text
Adobe Premiere Pro Cc 2018 Patcher

Adobe Premiere Pro Cc 2018 Patch
Adobe Premiere Pro Cc 2019 Patcher
Adobe Premiere Pro Cc 2018 Patcher Download
Adobe Premier Pro Cc 2018 Patch
Adobe Premiere Pro Cc 2018 Patcher Serial
Adobe Premiere Pro Cc 2018 Patcher Crack
AMTEmu is a tool that is used to activate Adobe Products. It is the best and the only tool that can give you the lifetime activation of all the Adobe Products. This tool is also famous with the name of Universal Adobe Patcher (UAP) among people.
It will activate any product within just clicks you don’t need to follow any burden steps. This tool is quite simple to use and has many benefits which you will find in the feature section. By using it you can activate all adobe 2021 versions including Dreamweaver & Premiere Pro.
This single tool is sufficient for the activation of all products like Photoshop CC 2019, Premiere Pro, Lightroom, After Effects, etc. Windows and Mac support This tool is supported by Microsoft Windows as well as for Apple Mac OS X under another name, namely Adobe Zii.
GenP (full name: Adobe CC 2019, 2020 – GenP) is a new type of universal patcher developed for cracking the latest versions of Adobe Creative Cloud 2019, 2020 all products in a cleverer and easier way. It’s very easy to use (just select the Adobe product you want to activate, then click ‘Patch’), and can activate almost every latest.
Jul 06, 2018 Crack amtlib.dll 2018 Adobe Photoshop, Premiere Pro, Illustrator, Audition, After Effects. Drive Mega Mediafire-Adobe After Effects CC 2018 Adobe Animate CC 2018 Adobe Audition CC 2018 Adobe Bridge CC 2018 Adobe Character Animator CC 2018 Adobe Dimension CC Adobe Dreamweaver CC 2018 (32 & 64 bit) Adobe Illustrator CC 2018 (32 & 64. Adobe Zii Patcher 5.3.3 Crack 2020 Universal Adobe CC Patcher for Mac is an device to introduce Adobe Products for the Mac OS. It is the option of the most popular activator named AMTEmu 2020 which is invented by the Russian Developer PainteR. Adobe Zii Patcher 6.0.8 has worked excellent without issues with below version: Adobe Acrobat DC v20.012.20048 – 21.001.20135 (new added) Adobe After Effects 2020 v17.5 – 17.7 (new added).
What Is AMTEmu
AMTEmu or AMT Emulator is developed by a famous Russian developer named PainteR. People also know this software and search on google as AMTEmu by PainteR.
We will further discuss this awesome activator below in which I will explain the installation & the activation process as well.
Use AMTEmu
Adobe is the most famous company which developed so many products such as Adobe Photoshop, Adobe Dreamweaver, Adobe After Effects, Adobe Lightroom & many more you can find on their website.
As you know the all the Adobe products come with a 15 days trial period. After the trial ends you won’t use these products again so if you want to continuously use them you need to purchase them. What if you don’t have the money or don’t want to waste it on buying this product?
At this place, AMT Emulator is used and you will know why is this tool so useful and famous. This doesn’t increase the trial limit or add another trial.

But with the help of this tool, you can activate them for the rest of your life. Also, you will get all the latest updates on the products.
By activating any product using this tool then you can even log in to your account as well. Adobe will never disable your account not even know you are using the fake activation method. It is 100% safe to use and is secure from the rest of the activators available on the internet.
Key Feature Of AMTEmu
This is the list of the features which Adobe Universal Patcher also is known as AMTEmu provides. You must check out the features so that you can understand it more easily.
Free of Cost
This is the freemium tool and it will never ask for money. You can use it on as many machines as you want and as much time as you want.
It is free and will always remain free so that you can also enjoy the Adobe products and all the features of those products totally free.
No Advertisement
It doesn’t contain any type of advertisement in it. As you can see in other activators there are so many annoying ads.
These ads keep appearing while you are activating and using it, which makes you feel uncomfortable and pain starts in your head.
But when you use this you will never face such problems as there is no type of pop-up or in App ads available.
Lifetime Activation
Do you have a Trial Reset Tool on your computer so that you can keep getting the trials? Are you using it after every 15 days?
If yes then here is the good news for you. AMTEmu will never reset the trial but it activates your Adobe Product for the rest of your life. Only you need to activate it again right after you uninstall it or install a fresh version of Windows.
Never Sent Data To Adobe
It will never send your activation date to the Adobe company. Nor it stores the log files, after activation, it will automatically delete those files from your machine.
So, in this case, you will never get caught by the Adobe Zii Server while using their product even though you are connected to the internet.
Virus & Trojans Free
AMTEmu is free of all types of malware, trojan & viruses. As compared to other activators it guarantees you from these such attacks. So, you can use it without worrying about your personal files or about getting your machine damaged.
No Ban Issue
This tool activates the Products in such a manner that it will never get caught by the Adobe Servers. This means your account will never get ban from the Adobe Servers and you can use it totally. It activates it in such a way that Adobe thinks it is registered with the original Adobe key.
All In One Activator
Yes, you heard that right this is all in one activator which means you don’t need to have separate activators for different products.
This single tool is enough for the activation of all the products like, Photoshop CC 2019, Premiere Pro, Lightroom, After Effects, etc.
Windows & Mac Supports
This tool is supported by Microsoft Windows as well as for Apple’s Mac OS X. Now you don’t need to be worried about the Mac 😀 as you can enjoy it freely as well.
Download AMTEmu
So, you just read about the features of these awesome adobe activators? Now you are wondering how you can download it? Then there is a little and simple guide to know the way to download AMTEmu from our website.
It is easy to download from our website as we never use any Link ads or link shorteners to earn money. Also, we never use the social lock for links, we only share the fast and direct download link. The reason is that the people feel comfortable and don’t waste their time by solving captchas or skipping the Ads 🙂
Ok, let’s check out our download procedure which you need to follow:
First, you need to click on the download button located below this section. Now from there, you will be redirected to our download page where you see more information about this tool.
Also, there you will find another download button, you again need to click on that button. This time it will open a new tab and you will be redirected to the Mediafire link.
In the Mediafire click on the download Now and you will see the count down timer. After 5 seconds of a count down stops, it will then ask you to choose the location where you want to download the file.
Quick Tip: I recommend you to choose the Desktop and download your file there. Because it will help you to find the file easily at the time of activation.
Now wait for a few seconds and it will be downloaded to your PC on the desktop. That’s it you have now successfully downloaded Universal Adobe Patcher on your computer.
After downloading now let’s just check out the installation & the activation process. You can check out the below guide so that you avoid making mistakes while activating any of the Adobe products.
Installation & Activation Guide
Let me clarify that AMTEmu by PainteR doesn’t require an Installation. It means it is completely portable and you can just extract it and use it on your pc.
The file you download from our website is in .zip format so it requires to be extracted. When you extract the zip file it will ask you for the password which you can find it here.
Before extracting make sure to turn off your Windows Defender & other Antivirus until activation completes.
Now you find the folder where you see the Universal Adobe Patcher. Right-click on the logo and then click on run as administrator.
It will then launch a new window where you see various options. Don’t touch any of these options only select the product which you want to activate from the Path.
In my case, I am trying to activate Photoshop CC 2018 so I will choose Adobe CC 2018 from the menu. After choosing the product just click on the Patch button located right side below.
You will then see an Error message saying, “Cannot Find The File. Search The File?”. Just click on Ok? and you will then see a new window appears.
All you need to do is choose My Computer > Local Disk (C) > Program Files > Adobe. In this folder look for the amtb.dll and select it then click on Open. (For x64 users who use the x32 version, just follow this patch?My Computer > Local Disk (C) > Program Files (32bit) > Adobe).
That’s it you will see the Patched Successfully Message in the AMTEmu screen. Now just close the activator and turn on Antivirus (if you are using any).
Adobe Premiere Pro Cc 2018 Patch
After that restart your computer and when your PC reboots just open Adobe Photoshop (or any product which you patched). Here you will see there is no option for the activation or countdown for the expiration of the trial.
Now you can use it for the rest of your life without getting please activate notification from Adobe. This is the permanent solution to keep enjoying and using the best features of Photoshop or other products. You can activate any product by following the same steps above there could be a change of name but the steps are still the same.
AMTEmu Supported Programs
? Adobe Dreamweaver CC 2018
? Adobe Dreamweaver CC 2017
? Adobe Dreamweaver CC 2016
? Adobe Dreamweaver CC 2015
? Adobe Dreamweaver CC 2014
? Adobe Dreamweaver CC
? Adobe Dreamweaver CS6
? Adobe Dreamweaver CS5.5
? Adobe Dreamweaver CS5
? Adobe Dreamweaver CS4
? Adobe InCopy CC 2015
? Adobe InCopy CC 2014
? Adobe InCopy CC
? Adobe InCopy CS6
? Adobe InCopy CS5.5
? Adobe InCopy CS5
? Adobe Audition CC 2015
? Adobe Audition CC 2014
? Adobe Audition CC
? Adobe Audition CS6
? Adobe Audition CS5.5
Adobe Premiere Pro Cc 2019 Patcher
? Adobe Acrobat DC
? Adobe Acrobat XI
? Adobe Acrobat X
? Adobe Illustrator CC 2018
? Adobe Illustrator CC 2017
? Adobe Illustrator CC 2016
? Adobe Illustrator CC 2015
? Adobe Illustrator CC 2014
? Adobe Illustrator CC
? Adobe Illustrator CS6
? Adobe Illustrator CS5.5
? Adobe Illustrator CS5
? Adobe Illustrator CS4
? Adobe Lightroom CC (with Dehaze feature)
? Adobe Premiere Pro CC 2015
? Adobe Premiere Pro CC 2014
? Adobe Premiere Pro CC
? Adobe Photoshop CC 2018
? Adobe Photoshop CC 2017
? Adobe Photoshop CC 2016
? Adobe Photoshop CC 2015
? Adobe Photoshop CC 2014
? Adobe Photoshop CC
? Adobe Photoshop CS6
? Adobe Photoshop CS6 Pre-release
? Adobe Photoshop CS5.5
? Adobe Photoshop CS5
? Adobe Photoshop CS5 Pre-release
? Adobe Photoshop CS4
? Adobe After Effects CC 2018
? Adobe After Effects CC 2017
? Adobe After Effects CC 2016
? Adobe After Effects CC 2015
? Adobe After Effects CC 2014
? Adobe After Effects CC
? Adobe Audition CC 2018
? Adobe Audition CC 2017
? Adobe Audition CC 2016
? Adobe Audition CC 2015
? Adobe Audition CC 2014
? Adobe Audition CC
? Adobe Audition CS6
? Adobe Audition CS5.5
? Adobe InDesign CC 2018
? Adobe InDesign CC 2017
? Adobe InDesign CC 2016
? Adobe InDesign CC 2015
? Adobe InDesign CC 2014
? Adobe InDesign CC
? Adobe InDesign CS6
? Adobe InDesign CS5.5
? Adobe InDesign CS5
? Adobe Media Encoder CC 2015
? Adobe Media Encoder CC 2014
? Adobe Media Encoder CC
Adobe Muse CC 2015
Adobe Muse CC 2014
Frequently Asked Questions (FAQs)
If you just installed an activated the Adobe Product using the AMTEmu but still have some questions.
Then there is the list of some most frequently asked questions collected from the internet. You can also read them to get your answers, in case you don’t find it here.
Then please let me know in the comment section so, I try my best to answer your question. If your question will be valuable I will also put it into my AMTEmu FAQs list.
Do I need to disable my Antivirus before opening?
Yes, you need to disable your Antivirus or Windows 10 defender. Because it may delete Adobe Universal patcher as all the keygens and activators are blacklisted by Antivirus.
In Adobe Patcher there is an option for the 2017 version? But I am using 2018 what should I do?
Don’t worry about that you can also activate the 2018 version with 2017. All these patches work the same on both of the year versions and are tested by myself.
I just updated a program for the 2019 version? Will this also activate them?
Adobe Premiere Pro Cc 2018 Patcher Download
No, it won’t work on the latest 2019 versions of Adobe Products. I am trying my best to find and bring the patcher which supports these versions so that you can also enjoy the latest features with the latest design.
The file is secured with the password? Where can I find one?
You can find the password on our website by going to this link. Just copy the password and paste in while extracting.
I encountered a problem “amtlib.dll Not Found” what should I do now?
If you just faced amtlib.dll not found an error or “This application has failed to start because amtlib.dll was not found. Re-installing the application may fix this problem.”
Adobe Premier Pro Cc 2018 Patch
Then you need to open this link amtlib.dll Download & download the latest version of amtlib.dll. Now open My Computer > Local Disk (C) > Program Files or Program Files (x32) > Adobe and paste that amtlib.dll there.
Which is the best to Install Amtemu Or CCMaker?
CCMaker uses AMTEmu to patch the software, Instead of CCMaker You should try to use amtemu, it’s the best inactivation, millions of people using ccmaker still it works better for them but recently a lot of people using amtemu for better result and permanent activation.
Adobe Premiere Pro Cc 2018 Patcher Serial
Conclusion
AMTEmu or Adobe Universal Patch is simply one of the best and the most useful activator I have ever used. I personally use it to activate Photoshop CC 2018 latest version and it works like charm. You can even use it and download it from our provided download Link above.
Please make sure to read the features list, it will help you to understand more about the tool. Also, make sure you read the downloading procedure so that you never face a problem when you use our website.
Adobe Premiere Pro Cc 2018 Patcher Crack
I also discuss the installation and the activation process so if you skipped it please go above and check it. It will help you to understand the whole activation process. Also, by reading you avoid making mistakes and can successfully activate it. Otherwise, you may damage the file and the Product never opens again.
0 notes
Text
Universal Patcher Adobe 2018

Universal Patcher Adobe 2018
Adobe 2018 Universal Patcher
Adobe Photoshop Cc 2018 Patch
Universal Adobe Patcher 2018 Free Download
Universal Adobe Patcher By Painter
With this amazing emulator, you can patch any version of the Adobe Software including 2017’s and 2018’s software. Whereas, by Universal Adobe Patcher, you would only be able to Patch Adobe Applications belonging to the year 2016 and before only. What’s New Universal Adobe Patcher. نرم افزار Universal Adobe Patcher ابزاری کم حجم است که تمامی مشکلات شما را در فعال سازی محصولات شرکت Adobe رفع می کند. با استفاده از این نرم افزار Universal Adobe Patcher به راحتی و با انتخاب نرم افزار مورد نظر و چند کلیک می توانید نرم افزار. AMTEmu is a tool that is used to activate Adobe Products. It is the best and the only tool that can give you the lifetime activation of all the Adobe Products. This tool is also famous with the name of Universal Adobe Patcher (UAP) among people. It will activate any product within just clicks you don’t need to follow any burden steps. AMTEmu or Universal Adobe Patcher is a Device which is Familiar to activate Adobe Products. It is a Unique and best tool ever for lifetime activation of all the Adobe Products. It’s another popular name is Universal Adobe Patcher. Instructions to use Universal Adobe Patcher 2018 are: First of all just select the Adobe application you want to install. Now click on the patch button. Now enjoy your application which is now activated to.
Adobe Universal Patcher 2018 Crack for PC & MAC
The tool implements all necessary fucntions required by Abobe’s apps activation and features unlocking. It is based on native API and optimized for the best performance. So the whole protection mechanism will be replaced by a dll with only 100Kb in size.
• It does not require AAM (Adobe Application Manager).
• It does not perform a background license check while the user is saving files/using menus/any other operation in Adobe apps.
• All possible features will become available in all installed Adobe apps.
• It does not require Administrator’s right/elevation to run the app and does not require any kind of registration in the operating system.
• It does not create/modify/update the Abobe application database, so it will not be used by the emulator at all.
• It does not create license labels and license cache.
• It disables all kind of tracking (logging) for all apps.
How To Use :
• Download & Install Adobe product from their website HERE
• Download Adobe Universal Patcher.
• Extract it with Winrar ; Then open it.
• Then select any product which has been installed in the default folder, the files are automatically found. If not, then the patcher will ask you to select directory (with amtlib.dll file).


Patcher will try to find the known sequence and patch them.
sometimes you need to locate amtlib.dll by yourself, It's in your install directories (usually in C:Program FilesAdobeAdobe After Effects CC 2017Support Files)
• Click on Patch.
••••••••••••••••••••• ENJOY••••••••••••••••••••••••
// Supported Products //
Adobe Animate CC 2018 (64-Bit)
Adobe Bridge CC 2018 (64-Bit)
Adobe Dreamweaver CC 2018 (64-Bit)
Adobe InCopy CC 2018 (64-Bit)
Adobe Media Encoder CC 2018 (64-Bit)
Adobe Photoshop CC 2018 (64-Bit)
Adobe Premiere Pro CC 2018 (64-Bit)
Adobe Dreamweaver CC 2018 (32-Bit)
Adobe InCopy CC 2018 (32-bit)
Adobe Photoshop CC 2018 (32-bit)
Adobe After Effects CC 2017 (64-Bit)
Adobe Audition CC 2017 (64-Bit)
Adobe Character Animator CC (Beta) (64-Bit)
Adobe Illustrator CC 2017 (64-Bit)
Adobe InDesign CC 2017 (64-Bit)
Adobe Muse CC 2017 (64-Bit)
Adobe Prelude CC 2017 (64-Bit)
Adobe Bridge CC 2017 (32-Bit)
Adobe Illustrator CC 2017 (32 Bit)
Adobe InDesign CC 2017 (32-bit)
Adobe After Effects CC 2015.3 (64-Bit)
Adobe Audition CC 2015.2 (64-Bit)
Adobe Media Encoder CC 2015.4 (64-Bit)
Adobe Photoshop CC 2015.5 (64-Bit)
Adobe Premiere Pro CC 2015.3 (64-Bit)
Adobe Photoshop CC 2015.5 (32-bit)
Adobe Audition CC 2015 (64-Bit)
Adobe Character Animator CC (Preview) (64-Bit)
Adobe Edge Animate CC 2015 (64-Bit)
Adobe Illustrator CC 2015 (64-Bit)
Adobe InDesign CC 2015 (64-Bit)
Adobe Muse CC 2015 (64-Bit)
Adobe Photoshop Lightroom CC 2015 (64-Bit)
Adobe Premiere Pro CC 2015 (64-Bit)
Adobe Acrobat Pro DC 2015 (32-Bit)
Adobe Dreamweaver CC 2015 (32-Bit)
Adobe InCopy CC 2015 (32-bit)
Adobe Photoshop CC 2015 (32-bit)
Adobe Presenter Video Express 11 (64-bit)
Adobe Presenter Video Express 11 (32-bit)
Adobe Photoshop Elements 15 (64-Bit)
Adobe Elements 14 Organizer (64-Bit)
Adobe Premiere Elements 14 (64-Bit)
Adobe Photoshop Elements 14 (32-Bit)
Adobe After Effects CC 2014 (64-Bit)
Adobe Dreamweaver CC 2014 (64-Bit)
Adobe Illustrator CC 2014 (64-Bit)
Adobe InDesign CC 2014 (64-Bit)
Adobe Muse CC 2014 (64-Bit)
Adobe Prelude CC 2014 (64-Bit)
Adobe SpeedGrade CC 2014 (64-Bit)
Adobe Edge Animate CC 2014 (32-Bit)
Adobe InCopy CC 2014 (32-bit)
Adobe Photoshop CC 2014 (32-bit)
Adobe Photoshop Elements 13 (64-Bit)
Adobe Elements 13 Organizer (32-Bit)
Adobe Premiere Elements 13 (32-Bit)
Adobe Audition CC (64-Bit)
Adobe Flash Builder 4.7 (64-Bit)
Adobe Illustrator CC (64-Bit)
Adobe InDesign CC (64-Bit)
Adobe Photoshop CC Extended (64-Bit)
Adobe Premiere Pro CC (64-Bit)
Adobe Acrobat XI Pro (32-Bit)
Adobe Dreamweaver CC (32-Bit)
Adobe Flash Builder 4.7 (32-Bit)
Adobe InCopy CC (32-Bit)
Adobe Muse CC (32-Bit)
Adobe FrameMaker 12 (32-bit)
Adobe Elements 12 Organizer (32-Bit)

Adobe Premiere Elements 12 (32-Bit)
Adobe Photoshop Lightroom 5.x (64-Bit)
Adobe Photoshop Lightroom 5.x (32-Bit)
Adobe Bridge CS6 (64-Bit)
Adobe Illustrator CS6 (64-Bit)
Adobe Photoshop CS6 Extended (64-Bit)
Adobe SpeedGrade CS6 (64-Bit)
Adobe Audition CS6 (32-Bit)
Adobe Dreamweaver CS6 (32-Bit)
Adobe Flash Builder 4.6 (32-Bit)
Adobe Illustrator CS6 (32-Bit)
Adobe Media Encoder CS6 (32-Bit)
Adobe Prelude CS6 (32-Bit)
Adobe Premiere Elements 11 (64-Bit)
Adobe Photoshop Elements 11 (32-Bit)
Adobe Photoshop Lightroom 4.x (64-Bit)
Adobe After Effects CS5.5 (64-Bit)
Adobe Photoshop CS5.1 Extended (64-Bit)
Adobe Audition CS5.5 (32-Bit)
Adobe Contribute CS5.1 (32-Bit)
Adobe Dreamweaver CS5.5 (32-Bit)
Adobe Fireworks CS5.1 (32-Bit)
Adobe Flash Catalyst CS5.5 (32-Bit)
Adobe Illustrator CS5.1 (32-Bit)
Adobe Media Encoder CS5.5 (32-Bit)
Universal Patcher Adobe 2018
Adobe FrameMaker 10 (32-bit)
Adobe Elements 10 Organizer (32-Bit)
Adobe Premiere Elements 10 (32-Bit)
Adobe Photoshop Lightroom 3.x (32-Bit)
Adobe Media Encoder CS5 (64-Bit)
Adobe 2018 Universal Patcher
Adobe Premiere Pro CS5 (64-Bit)
Adobe Contribute CS5 (32-Bit)
Adobe Dreamweaver CS5 (32-Bit)
Adobe Fireworks CS5 (32-Bit)
Adobe Flash Catalyst CS5 (32-Bit)
Adobe Illustrator CS5 (32-Bit)
Adobe Photoshop Cc 2018 Patch
Adobe Media Encoder CS5 (32-Bit)
Adobe Soundbooth CS5 (32-Bit)
Adobe Elements 9 Organizer (32-Bit)
Adobe Premiere Elements 9 (32-Bit)
Adobe Acrobat 9 (32-Bit)
Universal Adobe Patcher 2018 Free Download
Adobe Contribute CS4 (32-Bit)
Adobe Encore CS4 (32-Bit)
Adobe Flash CS4 (32-Bit)
Adobe InDesign CS4 (32-Bit)
Adobe OnLocation CS4 (32-Bit)
Adobe Premiere Pro CS4 (32-Bit)
::::::::::::::::::::::::::::: Download Link :::::::::::::::::::::::::::::
Photoshop CC 2018 Setup[ DOWNLOAD HERE ]
Adobe Universal Patcher 2018 [ DOWNLOAD HERE ]
tags: adobe acrobat universal patcher adobe cc 2014 universal patcher by painter adobe cc universal patcher download adobe cc universal patcher for mac adobe cc universal patcher mac adobe cc universal patcher painter adobe universal ghost patch adobe universal patch 2014 update adobe universal patch crack latest free download adobe universal patcher adobe universal patcher (latest cc 2014) mac adobe universal patcher 1 adobe universal patcher 1.06 adobe universal patcher 1.06 mac adobe universal patcher 1.1 adobe universal patcher 1.2 adobe universal patcher 1.2 by painter adobe universal patcher 1.4 adobe universal patcher 1.4 painter adobe universal patcher 1.5 adobe universal patcher 1.6 adobe universal patcher 2 adobe universal patcher 2.0 adobe universal patcher 2.0 mac adobe universal patcher 2.0 reddit adobe universal patcher 2014 italiano adobe universal patcher 2014 lightroom 5.6 adobe universal patcher 2014 os x adobe universal patcher 2014 per windows adobe universal patcher 2014 windows adobe universal patcher 2014 windows download adobe universal patcher 2014.exe download adobe universal patcher 2014.rar adobe universal patcher 2014.v1.1.en adobe universal patcher 2015 adobe universal patcher 2015 acrobat dc adobe universal patcher 2015 free download adobe universal patcher 2015 onhax adobe universal patcher 2016 adobe universal patcher 2017 adobe universal patcher 2017 download adobe universal patcher 2017 mac adobe universal patcher 2017 painter adobe universal patcher acrobat dc adobe universal patcher activator adobe universal patcher appnee adobe universal patcher bagas31 adobe universal patcher boerse adobe universal patcher by painter adobe universal patcher by painter 2014 adobe universal patcher cc adobe universal patcher cc 2014 4sh adobe universal patcher cc 2014 download adobe universal patcher cc 2014 free download adobe universal patcher cc 2014 mac os adobe universal patcher cc 2014 mac os x adobe universal patcher cc 2014 os x adobe universal patcher cc 2014 windows adobe universal patcher cc 2014.1 adobe universal patcher cc 2014.rar (516 kb) adobe universal patcher cc 2014.zip adobe universal patcher cc 2015 adobe universal patcher cc 2015 mac adobe universal patcher cc 2017 adobe universal patcher cc mac adobe universal patcher cc.rar adobe universal patcher crack adobe universal patcher cs3 adobe universal patcher cs5 adobe universal patcher cs6 adobe universal patcher dc adobe universal patcher dmg adobe universal patcher download adobe universal patcher download 2017 adobe universal patcher download free adobe universal patcher e adobe universal patcher 2014 adobe universal patcher for cc 2014 adobe universal patcher for cc 2014 download adobe universal patcher for cc 2015 adobe universal patcher for cc 2017 adobe universal patcher for mac adobe universal patcher free download adobe universal patcher guida adobe universal patcher how to use adobe universal patcher instructions adobe universal patcher is here adobe universal patcher kickass adobe universal patcher kuyhaa adobe universal patcher latest adobe universal patcher latest cc 2014 by painter adobe universal patcher latest version adobe universal patcher lightroom 5.6 adobe universal patcher lightroom 5.7 adobe universal patcher lightroom 6 adobe universal patcher mac adobe universal patcher mac 2014 adobe universal patcher mac 2015 adobe universal patcher mac download adobe universal patcher mac os adobe universal patcher mac os x adobe universal patcher mac reddit adobe universal patcher music adobe universal patcher not working adobe universal patcher onhax adobe universal patcher os x adobe universal patcher osx adobe universal patcher painter adobe universal patcher painter 1.2 adobe universal patcher painter 1.4 adobe universal patcher painter 2015 adobe universal patcher painter 2017 adobe universal patcher painter cc 2015 adobe universal patcher pour mac adobe universal patcher reddit adobe universal patcher review adobe universal patcher update adobe universal patcher v1.06.rar adobe universal patcher v1.1 adobe universal patcher v1.2 adobe universal patcher v1.4 adobe universal patcher v1.5 adobe universal patcher v1.5 download adobe universal patcher v2 adobe universal patcher v2.0 adobe universal patcher v2.0.rar adobe universal patcher virus adobe universal patcher windows adobe universal patcher xforce adobe universal patcher youtube adobe universal patcher.rar come usare adobe universal patcher comment utiliser universal adobe patcher como usar o adobe universal patcher is adobe universal patcher safe keygen x-force / universal adobe patcher 1.1 by painter onhax.net adobe universal patcher run adobe universal patcher cc 2014 scaricate adobe universal patcher 2014 universal adobe patcher 1.06 painter universal adobe patcher 1.06 painter.rar universal adobe patcher 1.06-painter.exe universal adobe patcher 1.1 painter 34.1 mb universal adobe patcher 1.1-painter.exe universal adobe patcher 1.2 painter universal adobe patcher 1.3 by painter universal adobe patcher 1.4-painter.exe universal adobe patcher 1.5 by painter universal adobe patcher 1.5 with update management tool universal adobe patcher 1.5 with update management tool-p2p universal adobe patcher 32 bits universal adobe patcher amtlib.dll universal adobe patcher by painter 1.2 universal adobe patcher by painter 2015 universal adobe patcher by painter mac universal adobe patcher cc 2014 64 bit universal adobe patcher come si usa universal adobe patcher como usar universal adobe patcher doesn't work universal adobe patcher dreamweaver universal adobe patcher elements 13 universal adobe patcher fail universal adobe patcher gratis universal adobe patcher indir universal adobe patcher kullanımı universal adobe patcher lightroom 5.5 universal adobe patcher lightroom cc universal adobe patcher nasıl kullanılır universal adobe patcher painter mac universal adobe patcher song universal adobe patcher v1.1.0.0 final universal adobe patcher v1.1.rar universal adobe patcher windows 8 universal adobe patcher+update management tool what is adobe universal patcher
Universal Adobe Patcher By Painter
Share this
Share on FacebookTweet on TwitterPlus on Google+
0 notes
Text
CV new and improved! Also, Critical Evaluation of the experience
CECILIA TAORMINA
Mobile: +447476435196
Email: [email protected]
Website: https://ceciliataorminact.wixsite.com/mywebsite
Profile:
Attitude to listen and understand. Confidence. Positivity. That is what makes me a great employer. I like to be involved in a challenging environment where I can apply my skills and improve my knowledge around photography and art therapy.
Through the use of self-initiative, commitment and work ethic I am able to deliver a great customer service and assuring a prompted problem solving attitude. When working in a team, I have the ability to understand everybody’s needs and to find a middle ground without disrupting or compromising the integrity of the job itself; When working alone instead, I can make choices to speed up the work but still maintaining an exceptional standard for the final result.
I am very patient, energetic and willing to learn more.
Education and Qualification:
2016-2020 BA (Hons) Photography University of Westminster, London
The Photographic Eye, Photography from the invention to Mass Medium, Photography from Cold War to the Present, Vision and Technology, Photography for Wall, Page and Screen, The Constructed Photograph, Photography Beyond the frame, Advanced concept in Photography, Professional Practice, Professional Futures, Advanced Research Methods.
2009- 2014 University of Languages of Genoa, Italy (English, Spanish and Arabic)
2004 -2009 Pedagogical High School (Camillo Finocchiaro Aprile, Palermo, Italy)
Working Experience:
August 2019-Present: Support Worker At Royal Mencap Society
Running Art Phototherapy Activities For People With Learning Disabilities
May 2019- Present: Photographer Assistant For Paul Romans
Assisting During Video And Photo Production
March 2019-August 2019: Photography Assistant For Marcus Boyle
Documenting Workshops, Recording Video Testimonial, Video Editing, Social Media Manager, Content Creator, Targeting And Promoting Events, Contacting Institutions, Booking Manager, Customer Service.
November 2018- Present: Main Event Photographer For Women Of Power Uk
Documenting Events And Fashion Show, Content Creator, Fashion Shoots Organizer, Video Producer.
It Skills:
Microsoft Office Package (Intermediate)
Adobe Photoshop Cc 2017 (Intermediate)
Lightroom (Basic)
Bridge (Basic)
Adobe Premierpro (Basic)
Admin Skills And Others:
Customer Service (Advanced)
Booking Appointment (Intermediate)
Marketing & Promotion (Intermediate)
Excel (Basic)
Spoken Languages:
Italian (mother tongue), English (fluent), Spanish (basic)
Reference contacts:
Raquel Mezquita +447719238848
Marcus Boyle +447506625727
Critical Evaluation
The Critical Evaluation should reflect in depth your own course-based learning and professional work-based practice. You should consider each section carefully and try to summarise and critically evaluate the learning experience. This process of self-realisation should provide you with useful insight that will be transferable to future experiences; your statements should demonstrate this understanding.
(Word count for the whole document should be between 1500 – 2000, excluding CV.)
Work Placement and your job description
Details of the work placement, length of employment and your role and responsibilities and an outline of the tasks undertaken during the experience.
(This section is the basis of your PowerPoint Presentation / Recorded Presentation Submitted on 16th September 2019)
What fascinated me the most when I came to this country it was the huge amount of opportunity I had to exercise my photographic practice. During my University years I became more and more acknowledged of my feelings, myself and my perception of reality. This self-discovery brought lots of emotions to the surface, some of which I worked with to create all the projects of the last three years. Without being conscious of it, I was doing art therapy.
I became familiar with the existence of it – and the terminology –during a meeting with Marcus Boyle, introduced to us by Eileen. He was there to explain us how he started to work in the field. Marcus happened to be a director first and a phototherapy facilitator after, through a long personal intercourse. I approached him immediately after his talk, asking to go to one of his workshops. And this is how the journey started.
He did not interview me or asked me for my CV, because he got a sense of my personality and my working attitude during the workshop where I attended as participants.
On March the 3rd we met for the first time to discuss what my tasks were going to be. He wanted my help to market the workshop in a better way, so we agreed that this it was going to be my point of focus. I then helped him to update his social media contents, creating later on an account both on Instagram and Facebook called Phototherapy Workshops.
My duties involved choosing the right images to post and managing the time when these were uploaded on the web, to reach as many people as possible. My tasks also involved contacting the mailing list informing people of the upcoming workshops and –a week before the event – inform them what props they needed to bring along.
With the time passing by, my role started to include also the research of new venues able to give us a good price deal and offer the right space in the room, facilities included (chairs, kettles, mugs, desks, etc.) to make the workshop happen.
I also helped Marcus with the creation of a video testimonial to use for fundraising purposes, which we also used to promote the workshops on social media to show people the health benefits and creative outcomes participants could gain from the experience.
Another thing I helped Marcus on it was the tracking of the people/institutions we contacted or we had in mind to contact. I did this using Excel and then I shared the file with Marcus on Google Drive, to be able to upload it at any time and have it synchronized.
Finally, it was my duty to take care of the booking for our last workshop together. This included having directed contact with the people who wanted to participate and sending them over the bank details.
Of course all these tasks needed to be done during the preparation of the workshops. During the event itself instead, I covered a more practical role. I was in charge of giving out forms participants needed to fill up –those were meant to measure the effectiveness of the workshops and their results on people. I had to handled them a copy before and after the session to see the personal outcomes. Another important duty of mine was to photo document all the moments of interaction and co-creation between the participants.
The material it was then edited down and published on social media, creating testimonial posts.
The experience lasted for 5 months and we have been seeing each other once a week face to face, but I have been working at home doing researches for him, editing or managing social media pages at least two days per week.
Audit of current knowledge, skills, values and aspirations
Discuss the strengths and weaknesses that have changed through the experience and identify your personal needs arising from the self-analysis exercises.
What I noticed about myself it was that my role evolved through the months. What it was supposed to be an assisting role, it happened to start as what I understand now being a Social Media Manager, due to the fact that I had to learn how to read the statistics given by the app and to understand how to reach as many people as I could, posting at a specific time of the day and of the week. I had to create new accounts on Instagram and Facebook detached from Marcus’ personal profiles, to make the workshops become the focal point of the account themselves. I had to evolve them into a business profile to get access to the daily statistics and I had to learn to choose the right pictures to post, the most effective and/or eye catching ones. Learning how to use the tags to connect with people from different fields it was not easy at first, but then it became almost automatic. The amount of interaction for each post grew, reaching the hype of 500 people on Facebook, which for us it was absolutely great!
Another skills I improved it was time management, which it is something I believe it still can get better but it evolved way more that I could expected. Now I am able to perform better and faster, maintaining a great quality service.
My confidence it is also grown a lot, which helped me to face problems such as the phone booking with venues or price agreement with owners. Last but not least, I learned how to accomplish data entry tasks, without doubting about the quality of the delivered service. I learned to keep a record of the people contacted and to work with Excel.
Something that it still needs lot of improvement and I am not happy about, it is the learning outcome in matters of workshop exercises, vegetotherapy and the concepts behind of the co-creation exercises done during the sessions. As Marcus assistant I hoped to learn more about the thinking that stays behind the creation of the workshop rather than just taking care of business duties. I am sure most of it needed to be done by myself, but I hoped to gain a certain amount of knowledge at the end of the experience, which I am kind of unsure it happened.
Stress under pressure is still something I am working on too, even if I have been able to speed up with my researches to find solutions and so on, fighting with time it was not easy at all and it still is something I feel a bit stressed about.
My personal needs now are still the same, but first of all the economical reward is something that stays on the top list. This work placement was unpaid, so I lost a lot of money in travel that I could not cover due to the fact that for two months I was unemployed. So right now I am focused on finding jobs where I can be paid or at least have the travel expenses covered. Feeling appreciated it is also on top of the list, due to the fact that feel needed and wanted helps me to perform better.
In matters of aspirations, I still want to create a work piece out of this experience, possibly a video or a photographic exhibition with all the material I shot myself.
To be able to run a workshop myself is one of my biggest aspirations at the moment, because I really could see how good I felt seeing people who were able to work with their feelings using them to make art. This is what I really want to do in life. I want to help others, learning more about yoga, mindfulness and mental health.
Contact with Professional Practitioners
Reflect on the strategies you used to contact professional practitioners and how useful the contacts and your current database may be for the future.
At Marcus Workshop I happened to meet another photographer who actually asked me to assist and to collaborate with him for video and photo projects. We agreed that I am going to assist him for as many times as he will need me and everything will be paid. So far, with him I earned £400 doing 2 shootings, and other 100 has yet to come as long as it is a long term project the one he signed me up for. This makes me extremely happy of course, because even though Marcus did not pay me, his workshop kind of helped me to find a paid job in the field.
Another good point of the contact I made during the internship it was that I discovered a lot of charities, institutions and private practitioners who I could rely on later on my career to help me hold my exhibition or to hold my future workshops in their facilities.
Regarding the strategies of approach used to connect with practitioners and institutions, I definitely can say that a face to face introduction is more effective than a simple cold email, unless it is completely necessary to use first.
Personal Development Plan
Discuss and identify the main points of your Personal Development Plan and how you may achieve your aspirations.
The points I have to work on to achieve my aspirations are:
-Understand how to create a specific concept of the workshop
-Identify the right target I would love to work with (such as drug or alcohol addicted people in recovery, people with learning disability, children, young adults and so on)
-Get a master in Art Therapy at the Goldsmiths University
These points set a long term goal, which can be achieved prior education ONLY. I need a certificate to be able to practice art therapy or run my own workshop, which means I still have at least the years of the Master ahead of me. But it is great anyway, because it will allow me to discover and learn more things about psychotherapy and mental health. This journey will help me to find the right place I want to work for, especially thanks to the 2 years internship the Master offers in NHS.
Critical evaluation of the experience
Reflect on your learning in relation to your initial expectations of the experience and evaluate the relevance of this experience in relation to your own professional future.
The experience was very relevant for my professional future.
It helped me to see what actually happens on the backstage of a workshop and how much thinking is involved and needed to be able to run everything smoothly. The final result is beautiful only if well curated.
My initial expectations were very different, as long as I thought I would be involved more in the “content” part instead of the Marketing, but thanks to that I gained lots of social media skills and I improved my time managing skills.
I also learned that mistakes are great and they are the only way to go out from our comfort zone and to achieve things we could never thought we were able to do.
Therefore, overall, I can say that this experience it was not just great for the outcome but very inspiring and it made me become a better person.
I also have to say that thanks to that, I have been able to find a paid assisting role for the Royal Mencap Society where, assisting a professional art therapist, I will work with people with learning disabilities giving them tutorial on how to make art with their camera and express their emotions. I will facilitate their emotional expression through the use of the camera and I will help them to overcome the technical difficulties.
0 notes
Text
There is A LOT that goes into managing and maintaining a blog. I know from the outside looking in, it can sometimes appear to only consist of taking pretty photos and posting them to social media…. but that doesn’t even scratch the surface of what a fulltime blogger does!
I’ve been running Have Clothes, Will Travel for nearly 6 years now, and for the last 3 years, this blog has been my sole source of income. My last blogging tips post covered the various ways I make money from blogging and the tools I use for that (click here if you missed that one). For this post, I’m going to be covering the various tools I use to grow and run my blog.
This list ranges from plugins that I love using for speeding up my blog, to the tools I use to decide what posts to write and when, the I tools I use to create graphics, spy on my competition, manage my finances and more! I know there are many more fantastic blogging tools out there, so if there is a favorite of yours that I missed – let me know in the comments section at the end of the post!
*Disclosure: some of these links are affiliate links. Meaning, if you click a link and make a purchase, Have Clothes, Will Travel gets a very small commission at no extra cost to you. Thank you for supporting the brands that make this blog possible!
20+ Insanely Useful Blogging Tools I Love for Growing & Managing My Blog
Here is the complete list. I’ll go into detail about each of them below.
Tailwind for Pinterest
Tailwind for Instagram
Keysearch
Quickbooks
Siteground
Restored 316 Themes
GTmetrix and Google PageSpeed Insights
Imagify Plugin (for WordPress)
WP Rocket Plugin (for WordPress)
Yoast SEO Plugin (for WordPress)
Grow by Mediavine Plugin (for WordPress)
Wordfence Security Plugin (for WordPress)
Google Analytics & Google Search Console
Title Capitalization Tool
Grammarly
Lightroom
Pixabay, Pexels, Unsplash
Easil, Canva, Fotor
Dropbox
Fiverr
Clockify
Udemy
1.) Tailwind for Pinterest
I started a free trial of Tailwind for Pinterest nearly 3 years ago and have been hooked ever since! Tailwind allows me to schedule my Pins for my Pinterest account at optimal times of the day for engagement and reach. Typically, I have a few hundred Pins scheduled at a time. (I Pin on average 50 times a day via Tailwind.)
Tailwind is also fantastic for Pinterest because they have “Tailwind Tribes.” A Tailwind Tribe is a group of bloggers or businesses that post to Pinterest about a common topic. You’ll join a Tailwind Tribe that relates to your blog’s topic, then post a Pin to it. Other people will share your Pin to their Pinterest account and then you’ll share their Pin. (Most tribes operate on a 1 for 1 basis. Meaning, if you post a Pin to a Tribe, you have to Pin one other person’s pin and so on.)
One of the Tailwind tribes I belong to.
I’ve found Tailwind Tribes to be a big help in getting traffic and exposure to my Pins – especially Pins that I’ve created from new blog posts. (While I have had success using Tailwind for my blog – I do encourage you to check out this post by Tailwind regarding their typical results.)
Now, if you’re not ready to pay for Tailwind they do have a free trial. The Tailwind free trial allows you to schedule up to 30 pins per month and join 5 tribes. If you want to Pin more Pins and join more tribes, you can update your account whenever you want. (I currently use Tailwind Plus for my account.)
Click here to check out the Tailwind free trial for Pinterest.
2.) Tailwind for Instagram
Not too long ago, Tailwind created an amazing scheduling tool for Instagram! It took me a little while to get on board with it, as I was terrified of using any 3rd party tools for Instagram. This is because I had heard tons of horror stories of Instagram disabling accounts for people using 3rd party apps. However, Tailwind is a certified Instagram Partner, so I had no reason to worry.
To clarify, Tailwind posts your scheduled Instagram post and Instagram is OK with this. You won’t get in trouble with Instagram for using this tool!
What Else Tailwind for Instagram Helps With:
Visually plans my feed with a drag and drop grid planner
Helps me stay consistent with built-in content plans and post inspiration
Optimizes each post with SmartSchedule (to post at optimal times) & Hashtag Finder
This too works best with an Instagram Business account.
Tailwind did a MAJOR update to their Instagram tool recently too that was for the better. They now have “content plans” which provides ready to use post ideas customized to my business type. (See example above.)
They also have drag-and-drop scheduling with a 9-grid preview, so I can see what my feed will look like before I post to my Instagram account.
My favorite features of Tailwind for Instagram, though, are Tailwind’s Hashtag finder and the SmartSchedule. The Hashtag finder allows me to get the perfect mix of relevant hashtags on my posts, and it will post my hashtags to the first comment (instead of in my caption).
Tailwind’s SmartSchedule is awesome too, as it helps me figure out when my audience is most engaged, so I can schedule my posts at that time.
Tailwind also has a free trial you can take for a spin to see if you like using their tool before you purchase it. You can schedule up to 30 Instagram posts for free, without a credit card!
Click here to try Tailwind for Instagram for free. (Tailwind Instagram is a separate subscription from Tailwind Pinterest.)
3.) Keysearch
Keysearch is a keyword research tool, and it has been an absolute game-changer for me! Keysearch is how I determine which blog posts I’m going to write and when I’m going to publish these blog posts.
This blogging tool allows me to see which keywords on Google I can rank for, where there are gaps in information, when certain keywords are trending throughout the year and how I stack up against my competition. I can also spy on my competitors to see which keywords they are ranking for. (This post by SuccessLynx is a great overview of how to use Keysearch.)
Keysearch helps me make informed decisions on the type of content I should be publishing… versus my previous not-very-effective strategy of “posting whatever the heck I want.”
Click here to check out Keysearch.
4.) Quickbooks
Quickbooks is the tool I use to keep track of my blogging expenses and income throughout the year. I can also use Quickbooks to create invoices and accept payments from clients. It has made doing my taxes SO much easier, plus it’s rewarding to see clear graphs of how my work is generating income. (I currently just use their most basic Self-Employed Plan for Freelancers at $7 a month.)
Click here to check out Quickbooks.
5.) Siteground
SiteGround is who I have been using as my blog’s hosting provider for the last year. Previously, I had been using GoDaddy, and GoDaddy is an absolute nightmare. If you are using GoDaddy…cancel AS SOON AS POSSIBLE. GoDaddy is very expensive, they slowed down my website and crashed it on nearly a monthly basis, and their customer service is incredibly rude and demeaning. DO NOT USE GODADDY.
So, last year, I made the switch to SiteGround. SiteGround even took care of the migration for me! It was easy peasy and my website has not been down AT ALL this year, at least not because of my hosting provider. Anytime I have a random question about an issue I run into with my website, I have reached out to SiteGround’s support and they have pointed me in the right direction. They are always kind and helpful no matter what! I can’t recommend SiteGround enough.
I also think it’s worth noting too, that A LOT of bloggers recommend using BlueHost on their blogs. However, I’ve heard a lot of stories about BlueHost that are very similar to my past experiences with GoDaddy. Unfortunately, many bloggers recommend BlueHost because they pay bloggers handsomely for referrals. Just a few weeks ago I had a BlueHost rep reach out to me and offered me $125 per referral, even though I had never personally used BlueHost!
I do get a referral bonus if you signup to SiteGround using my referral link, but it’s $50. SiteGround also required me to actually have an account with them before I could promote their services… (makes sense right?) And I can say in all honesty, that SiteGround is incredible. I can’t recommend their services enough. (I’m also happy to answer any questions you have about them in the comments section at the end of this post.)
Click here to check out SiteGround.
6.) Restored 316 Themes
Earlier this year, I made the switch to the Glam Theme by Restored 316 Themes. My previous theme had been outdated and terribly slow. I had been using it for 5 years! That old theme was holding me back from ranking well on Google and was also making my bounce rate super-duper high, as readers didn’t know how to navigate it.
I ended up choosing Restored 316 because it is a clean, FAST and easy-to-navigate set of themes, that are still cute. Their customer service is also fantastic! Since switching themes, my bounce rate has gone from 80-90% to 60-70% on average! I’m kicking myself for not making that switch sooner…
Click here to check out Restored 316 Themes.
7.) GTmetrix and Google PageSpeed Insights
Now, to determine how fast my website is, I use GTmetrix and Google PageSpeed Insights. Both of these tools are free to use and are how I determine what I need to tweak on my website to make it faster and better for my readers. (Ideally, you want your page to be loaded in less than 4 seconds.)
Click here to try GTmetrix.
Click here to try Google PageSpeed Insights.
8.) Imagify Plugin (for WordPress)
One of the biggest problems bloggers tend to run into with their page speeds is due to having big, beautiful images that take 10,000 minutes to load! You can still have beautiful images, but make sure to compress them before you serve them to your audience.
I, personally have liked using Imagify to compress my images. It was great for me because I had been blogging for a while before I realized I needed to be compressing my images. I was able to pay a one-time upgrade fee to compress all the images on my website and it was quite painless! Now, Imagify automatically compresses my images for me each time I upload them.
Click here to check out Imagify. (You can also search for it via the add new Plugins for WordPress.)
9.) WP Rocket Plugin (for WordPress)
Another issue you will likely see that causes slow load times for your website is because of caching issues. You have to be VERY careful with the caching plugins you use for your blog, though. They can crash your website faster than you can blink. (Make sure to have your website backed up with your hosting provider before you start configuring caching plugins!)
I’ve, personally, had the best luck using WP Rocket to cache my website. Their lazy loading feature is also fantastic and can be configured to work with my Mediavine ads without causing any issues!
Click here to check out WP Rocket. (You can also search for it under the Add New Plugin Option.)
10.) Yoast SEO Plugin (for WordPress)
Yoast is an easy-to-use plugin that allows you to write meta descriptions for your posts and specify SEO titles. It’s a nice way to see if your posts are being optimized properly for SEO Keywords. Think of Yoast as more of a helpful suggestion, though… not an absolute-always-right plugin. This article does a great job of explaining how to properly use Yoast on your website.
Click here to check out Yoast SEO. (You can also search for it under the Add New Plugin Option.)
11.) Grow by Mediavine Plugin (for WordPress)
Grow is formerly known as Social Pug, and it is my go-to for social sharing buttons. It lets me add highly customizable social share buttons that integrate beautifully with my website. Plus, they don’t slow down my website!
Click here to check out Grow. (You can also search for it under the Add New Plugin Option.)
12.) Wordfence Security Plugin (for WordPress)
I waited until it was too late before I installed Wordfence. I had installed a compromised plugin to my website a couple years ago that ended up inserting all kinds of malicious code into my posts and spammy links. I ended up having to buy Wordfence’s Site Cleaning option to remove the code, so it would stop inserting spammy links and code into my posts without my knowledge. It was a mess!
I now use the Wordfence Plugin to make sure I don’t run into a security issue like this again. It also sends me reports anytime someone tries to login into my website and it blocks malicious bot traffic. (I actually just had HUGE bot traffic attack last weekend that would have crashed my website if I hadn’t gotten an alert from Wordfence.)
Click here to check out Wordfence. (You can also search for it under the Add New Plugin Option.)
13.) Google Analytics & Google Search Console
I know these are 2 that are quite common, but I’m including them on this list as I am surprised how many bloggers don’t utilize them as they can be rather intimidating. However, if you’re going to be serious with your blog, you need to have a handle on Google Analytics and Google Search Console.
Google Analytics is how you know how much traffic is coming to your website, where it’s coming from and what it’s doing when it’s on your website.
Google Search Console shows how your website is performing on Google Search results. It will also show any errors your website has that is preventing it from ranking on Google. Remember when I was talking about my old website theme… I had over 400 errors on Google Search Console just because of my website theme! If I had been using Google Search Console sooner, I would have been far more motivated to switch my website theme! (This article does a great job of explaining how to use Google Search Console.)
Click here to check out Google Analytics.
Click here to check out Google Search Console.
14.) Title Capitalization Tool
If you’re ever unsure of which letters of a blog post title you should capitalize, just punch them into the Title Capitalization Tool and bam! You’ll have your answer. It’s free and super simple to use. (I used to work in news before starting my blog, so I personally use AP Rules for title capitalization, but you can use whichever you want.)
Click here for the Title Capitalization Tool.
15.) Grammarly
Grammarly is a nifty little Chrome plugin I use to check the grammar of everything I type while in a Chrome browser. It double-checks my blog posts, emails, social media posts – anything that I write within Google Chrome! Even if you’re not a blogger, I think it’s worth adding this extension to your browser.
Click here to check out Grammarly.
Editing my photos in Lightroom.
16.) Lightroom
Lightroom is the tool I use to edit my blog photos. It’s not too difficult to use, plus I can batch edit my photos in Lightroom with presets that I make. It is such a huge timesaver!
With Lightroom, I’ll adjust how bright photos are, the coloring (for example sometimes indoor photos can be too “yellow” so, I’ll adjust that) and I’ll fix minor blemishes. I’m not using Lightroom to edit out an entire person or alter images drastically. (If that is something you are looking to do, I would suggest Photoshop then.)
Click here to check out Lightroom.
17.) Pixabay, Pexels, Unsplash
Sometimes when I am writing a post, I realize I just don’t have the right image to complement it. This is when I’ll utilize resources such as Pixabay, Pexels and Unsplash. These are all websites that have royalty-free images. I personally try not to use them frequently (and use my own images as much as possible), but sometimes they can be a real lifesaver!
Click here for Pixabay.
Click here for Pexels.
Click here for Unsplash.
18.) Canva, Easil & Fotor
Creating Pinterest graphics is something that I spend a lot of time doing – and it pays off. Easy to read and eye-catching and vertical images on Pinterest can drive some serious traffic to your posts. It’s a good idea to experiment with different types of Pinterest graphics too. It can be surprising sometimes which images I create that go viral!
#gallery-0-5 { margin: auto; } #gallery-0-5 .gallery-item { float: left; margin-top: 10px; text-align: center; width: 33%; } #gallery-0-5 img { border: 2px solid #cfcfcf; } #gallery-0-5 .gallery-caption { margin-left: 0; } /* see gallery_shortcode() in wp-includes/media.php */
Above are three of my most popular Pins at the moment – and by popular I mean the Pins that are getting the most click-throughs to my website. I created all of these images using Easil. However, I also like to use Canva and Fotor to create Pinterest images. (Variety is a good thing when it comes to Pinterest graphics!) I do use the paid version of Easil (but they offer a 30-day free trial). For Canva and Fotor I am only using their free versions right now.
Click here for Easil.
Click here for Canva.
Click here for Fotor.
19.) Dropbox
Dropbox is a file hosting service that offers cloud storage and file synchronization. I use Dropbox as file storage for my company, my personal files and my husband uses it as well for his company. It’s a great way to keep certain documents easily accessible no matter what device you’re using. I will also use it as a way to share high-resolution photos with clients and businesses I work with. I currently only use the free plan, but they do have paid plans where you can purchase more space if needed.
Click here to check out Dropbox.
I’m currently using Fiverr to sell my services & also buy services to create a new logo.
20.) Fiverr
Fiverr is an online marketplace for freelance services. If it’s a freelance service that can be offered digitally, chances are you’ll find it on Fiverr. They have everything from voice-over artists to social media professionals to graphic artists and more. I use Fiverr to both buy services for my website and to sell my services.
As a buyer, Fiverr is great because it offers a level of protection to you. If the service you received is subpar to what you had agreed to – you won’t have to pay for it. Fiverr is very much a “buyer friendly” marketplace, in my opinion.
As a seller, Fiverr gets your “gig” in front of A LOT of eyeballs. However, pricing is highly competitive on Fiverr, and many of its users offer insanely low prices for their services. Fiverr also takes a 25% cut of anything you make as a seller on their site. That is HUGE. I much prefer to deal with clients via my own website for that reason. Fiverr can be a great way to get your feet wet, so to speak, though, when it comes to selling your services online.
Click here to check out Fiverr.
21.) Clockify
Clockify is a free time tracking software. It lets me track my time so I can later see where my time goes and how I can improve productivity. I’ve been using Clockify for a few months now to keep track of how much time I spend on certain areas of my blog. It has been incredibly eye-opening and has helped me make some more informed decisions about how I spend my time.
For example, if you would have asked me before I started using Clockify how much time I spend on Instagram. I would have said, “maybe an hour or so a day.” Making an effort to track how much time I spend on certain tasks, made me realize I was spending over 3 HOURS A DAY posting to Instagram and interacting with accounts.
Now, spending 3 hours on Instagram a day would make sense if I was making the majority of my income from Instagram, but that’s not the case for me. The majority of my income is generated from my blog content (and Instagram hardly drives any traffic to my website in comparison to Google and Pinterest). So, I have since cut my Instagram time down to less than a half-hour per day. (Using Tailwind means I can schedule posts weeks in advance too – and only go on the app to respond to comments.)
I am now using that other 2 1/2 hours, that would have been spent on Instagram, to work on building higher-quality blog posts and improving SEO on older blog posts. Much better uses of my time!
Click here to check out Clockify.
22.) Udemy
Udemy is an online learning and teaching marketplace with over 100,000 courses and 24 million students. You can learn everything from programming to marketing, data science to photography and more. Most courses are incredibly affordable too… and are less than $20.
I’ve personally used Udemy to teach myself how to properly use a camera on manual mode and take better photos. I’ve also used Udemy courses to learn the basics of SEO and WordPress. These courses have really been helpful in learning how to become a more effective blogger!
Click here to check out Udemy.
Oofta! I think that’s it for now for all of the various tools I use to manage and grow my blog. I’m happy to answer any questions you may have in the comments section, and please feel free to let me know which blogging tools you love to use!
Read next: How I Make Money Blogging & Tips for How You Can Too!
Read next: How to Support Small Businesses When You Can’t Leave Home
Read next: What to Wear When You Work From Home
20+ Helpful Blogging Tools I Love Using to Grow & Manage My Blog There is A LOT that goes into managing and maintaining a blog. I know from the outside looking in, it can sometimes appear to only consist of taking pretty photos and posting them to social media....
0 notes
Text
what I use in my work and how I post edited particular image.
Equipment and Software.
From the off, I’ve built up my equipment over 7 years. Starting out you buy what you can afford and some things don’t need to be expensive, but you find yourself in a space where you make the decision to invest in certain things.
Camera
When I first decided to buy a decent camera, I researched and was in mind at the time to but Canon, was that a mistake, I don’t know, but I do know that my choice has paid off for me personally. I bought a Sony A65 and at that stage I didn’t understand the difference between full frame cameras and the smaller more consumer style camera like the A65. But when I started my degree and saw the full-frame cameras that were being used by the university, it wasn’t long before I traded in for the full-frame Sony A99.
I’ve grown to love my Sony A99 and I’ve overcome the problems of it having a unique hot shoe unlike the industry normal hot shoe for all cameras.
Lenses
I like the idea of being able to buy different branded lenses, but glass is so important that again I found out at a later stage, as I had bought cheaper lenses in the beginning before making the investment in quality glass. I at this stage had a choice of buying the most expensive Carl Zeiss lenses, but after research went for the Tamron F2.8 versions at half the price. So my lenses comprise of the following:
Tamron SP 24-70mm f/2.8 Di USD
Tamron SP 70-200mm f/2.8 Di VC USD Telezoom
Sigma 18-35mm f/1.8 DC HSM Art
Sony 35mm f/1.8 Prime lens
Sony 50mm f/1.8 Prime lens
Sony 85mm f/1.8 Prime lens
Studio lighting and equipment
My first two lights I bought were from eBay and are Newman strobe lights. They do the job but you can’t adjust to that fine tune look, like you can with the Bowens Gemini 500s. The Bowens are again what was used at UNI and I invested this time last year in two of them and use them on main stands, but use the cheaper ones on my Phottix C stand and Boom that I recently got in the Black Friday deal for just over £100. Stands I’ve got from what use to be Calumet but recently bought by Wex Photo & Video. Background stand from eBay, and all my reflectors from eBay as well.
Regarding Speed Lights, I have 5 Yongnuo YN568EX II TTL, which again I’ve got from eBay.
Studio
I have what some would call a popup studio that doubles as our kitchen, yes I said kitchen, its an on going joke in our house. I have a disabled built bungalow and we are lucky that the rooms are really big, well big enough to set up a 2.72m x 11m background with ease.
When working in the studio, I have a MacBook Pro with PhaseOne Capture Pro thats tethered to my camera. Some might ask why not use Adobe Lightroom, the answer is that Lightroom for some reason after many complaints from Sony users, doesn’t support Sony. There is a add-on from a software company in the USA, but every time theres a major update, the company wants you to re-buy the add-on, where as Capture One does support Sony. I also have an iPad Pro that PhaseOne has come up with an app called Copilot that allows you to setup a wireless connection between the iPad and MacBook and shows the images captured in realtime. This has turned out a great add to my work, I can see the image A4 size and so can the model or sitter, it makes for a great experience and allow you to make decisions on the go and save wasted images and time.
Editing and equipment
Again, when I started out, I had an old HP Pavilion tower computer that ran Windows. But I invested in a Apple iMac, which is the 4k version with 16GB memory and a Fusion SSD drive. Getting the 5k is just not worth it to me as I only do photography and not video, and the screen is big enough for me. My screen is calibrated with Datacolor SpiderElite5.
Regarding storage, I use a external hard drive with the MacBook thats then connected to the iMac to transfer the RAW files to larger backup drive thats dedicated to my images. I also have a NAZ drive that I was given that allows me to backup everything and then some with a cloud drive. Digital images can’t be replace like using film and having the negatives to revert back to, so backup, backup and backup is so important so not to loose images.
I also invested in a Wacom Intuos tablet. Working with a pen to post edit, is smooth and makes light work of fine detail that you just can’t do with a mouse.
Adobe in my view is the industry best photography software out there, so I use Lightroom and Photoshop, with add-on’s like Google NIK Collection, Topaz and Portraiture. My workflow is that I import the RAW images into Lightroom and then use that to choose the images that I feel worthy of being edited and putting them into there own catalog. I make adjustments for camera calibration, highlight, shadows, sharpening. From there I can move them into Photoshop to post edit and then when done they come back into the catalog, so I know where to find them at any time.
It might seem a long winded way of doing things, but its how I work and its about finding what works for you.
Post Editing this image.

When I bring the image into Photoshop, I do the following:
1.Make a copy and then go to filter and add smart filter
2. New layer with 50% grey
3. Dodge and burn parts of the image that I feel is right to do.
4. New layer and use the healing and clone tool to clean spots, blemishes and anything like hair.
5. Make a copy of the image and add quick mask to highlight the eyes, then use selective colour adjustment and go to the neutral and brighten or darken the colour of the eyes.
6. New layer and use the sharpening to bring out the eyes, I roll over them no more than 5 times.
7. Group the layers and call the Clean.
8. New copy of image. Now I look to smooth the skin. I change the image to vivid, then go to image, adjust and invert. The filter High Pass set to 20, then blur, Gaussian blur set to 3.5. Then go to blend mode and the upper levels hold option and break the slide into two and drag to the opposite side (do the same with both left and right). Bring the opacity down to 70% then add mask and a soft brush go round the edges that look blurred. Brush set to black.
9. New copy of image.
10. Choose colour lookup table 3 times and choose green, amber and set to 15% opacity, film stock set to 10%. Then chose gradient and B&W and set to 10%. Group all of theses and then select mask. I then choose the brush, press / key so I can see where the brush is making the changes and go over just the skin of the model. Then change density to 50%. Group these layers and call the LUC
11. New copy of image, then filter noise set to 10%
12 new copy of image, the high pass, set to 3.5, then change mode to hard light.
Choice
New image and then go into camera raw, and use circle and make oval on image and change exposure to add a darken silhouette around edges.
Or use gradient at sides and top and change exposure.
So thats me. I can’t stress enough that it takes time, patients, practice, conviction. I’m still learning and breaking new ground, new ideas, meeting new people and sharing ideas. To a point you have to invest if you want to make a go as a photographer. Its taken me a long time to get where I am, and thats with doing a degree in professional photography that set me on this road and helped me to learn and except certain things like critique to what I do, but it helps me get better at what I do.
I’ve found my unique way of producing my work in the way I do, others have their own ways of working, but your producing for you firstly then others, and they will either like it or hate it, but thats life!
0 notes
Last Seen Blogs

elgaleonmx
El Galeón

im-satans-bitch-666
hell hole called my life

prosiyat
просиять v. To Shine, Beam

elquiu
el quiu

cph-dreaming
cph dreaming