#ESP32-CAM
Explore tagged Tumblr posts
Visit Tumblr Blog
Explore Tumblr blogs with no restrictions, modern design and the best experience.
Last Seen Tumblr Blogs


Fun Fact
In February 2021, Tumblr had 518.6 million blog accounts.
Video
youtube
Rakshak - An IoT Based Wearable Device for Women Safety with Raspberry Pi PICO | GSM | GPS | ESP32-CAM | Smart wearable device for women safety using IoT- GSM GPS ESP32CAM Email Photo | Child
#youtube#Rakshak - An IoT Based Wearable Device for Women Safety with Raspberry Pi PICO | GSM | GPS | ESP32-CAM | Smart wearable device for women saf
0 notes
Text
Thinking about low power nature cams that communicate over LoRa/PierMesh and so I was thinking about the cheapest possible camera I can build, which led me to this:
I think I could use this to write a camera module for the firmware And the sensors are very cheap so I'm going to build a tiny esp32 based camera at some point which for parts would probably be less then $25
11 notes
·
View notes
Text
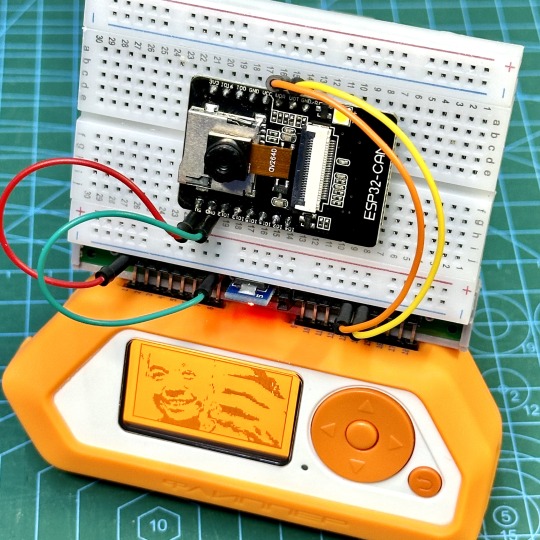
DIY: ESP32-CAM Module for Flipper Zero
Here's a simple add-on module that you can build easily for just a few dollars. Essentially, you just need to connect 4 wires between the ESP32-CAM module and Flipper Zero, then flash the firmware.
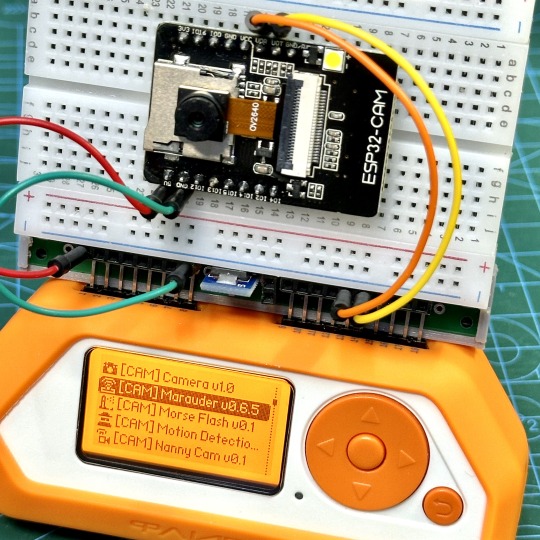
This module allows you to use it with apps like Marauder, Camera, Morse Flasher, etc. The nice thing about using ESP32-CAM is that the module already has micro SD card slot built in, in addition to the camera and LED. This setup is also referred to as Mayhem board.
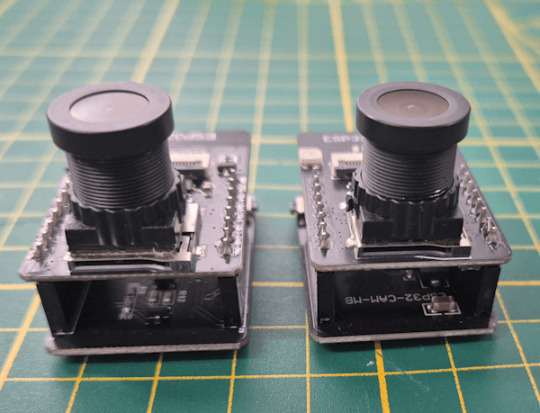
You can find the ESP32-CAM module on various e-commerce sites like Amazon, Aliexpress, etc. for just a few dollars. Note that you only need the ESP32-CAM module itself, the top module in the photo below. You don't need the Micro USB to Serial Port module (bottom module). Many sellers sell both items together as a bundle.

I used a breadboard below for demonstration purposes, but you can make this permanent and smaller by soldering it on a prototype board.
First, here are the connections you need to make. You can even use jumper wires to directly connect the ESP32-CAM module to Flipper Zero.
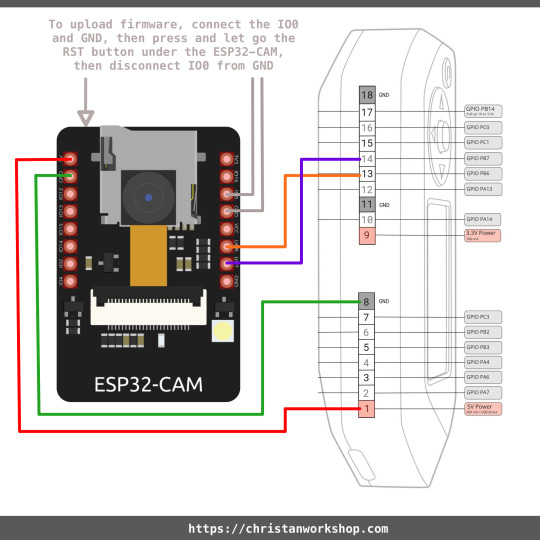
After plugging your module into Flipper Zero, we need to flash the firmware on the ESP32-CAM module. To do that, connect your Flipper Zero to your computer using a data cable (use the cable that came with your Flipper Zero if unsure). Then, on your Flipper Zero, open GPIO > USB-UART Bridge. It should show Pin 13 for TX, Pin 14 for RX. If it doesn't, press the Left arrow button to go into Config and change UART Pins to 13,14. Next, you need to connect pin IO0 and GND (put something metal like the tip of a screwdriver to connect these 2 pins) on the ESP32-CAM, then press and let go the RST button under the ESP32-CAM module, then disconnect pin IO0 from GND. If you do this correctly, the next step will work. If it doesn't, try again.

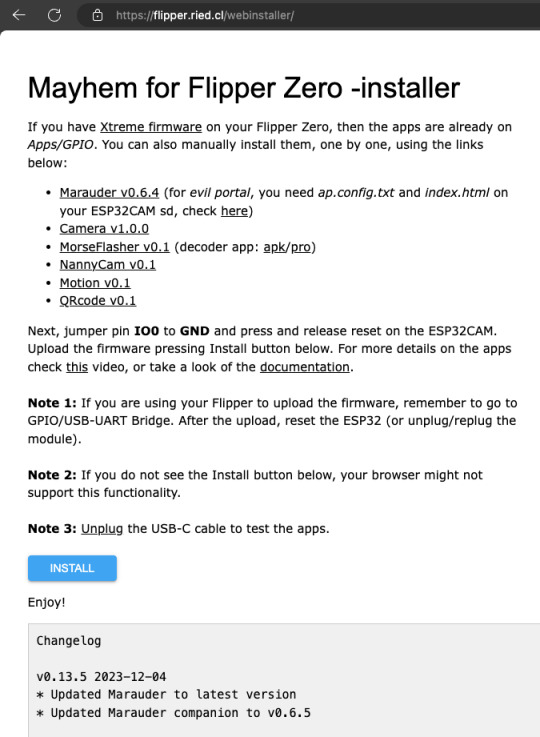
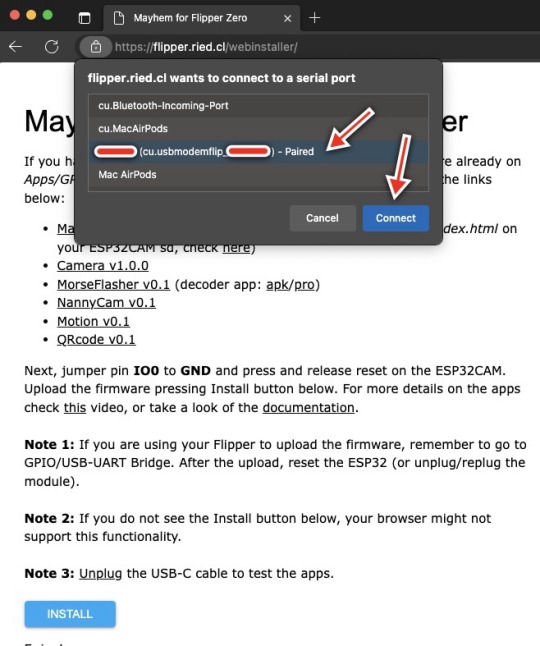
Now, point your Chrome/Microsoft Edge browser to this site and click INSTALL. In the popup, select your Flipper Zero and click Connect.
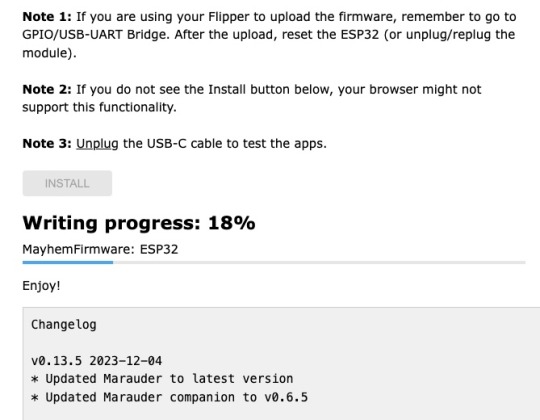
Now, you should see the firmware being flashed. When done, you can disconnect your Flipper Zero from your computer and exit USB-UART Bridge on your Flipper Zero.

If you have already installed third party firmware like Xtreme or RogueMaster, the apps you need to use this module is already installed under GPIO and you can use it right away. Otherwise, you will need to install the apps yourself using the links provided in the above firmware install website. Do connect your Flipper Zero to your computer to install those apps.
That's it! Just a few bucks and a bit of effort.
Here are some videos from other makers for reference:
youtube
youtube
4 notes
·
View notes
Text
Warum der Arduino trotz ESP32 & Co. nicht ausgedient hat

„Arduino? Das nutzt doch heute keiner mehr…“ Wer sich in den letzten Jahren mit Mikrocontrollern beschäftigt hat, stolpert überall über den ESP32. Dual-Core, WLAN, Bluetooth, 240 MHz, massig Speicher – und das alles für ein paar Euro. Kein Wunder also, dass der gute alte Arduino UNO im Schatten der neuen Mikrocontroller-Generation zu stehen scheint. Die Kommentare in Foren und Social Media klingen dann auch oft so: „Warum noch einen Arduino benutzen, wenn es doch den ESP32 gibt?“ Aber ist das wirklich so? Hat der Arduino tatsächlich ausgedient? Oder gibt es gute Gründe, auch heute noch auf den betagten Klassiker zu setzen? Und vor allem: Wenn ich gerade erst einsteige – sollte ich dann überhaupt noch mit einem Arduino anfangen, oder direkt auf einen ESP32 setzen? Genau um diese Fragen geht es in diesem Beitrag. Und so viel sei schon mal verraten: Leistung ist nicht immer alles.
ESP32 – das moderne Powerpaket (aber nicht für alles nötig)
Wenn man sich heute in der Maker-Szene oder auf YouTube umschaut, könnte man fast glauben, es gäbe nur noch den ESP32. Und das ist auch gar nicht so abwegig: Der ESP32 bringt schon ab Werk eine ganze Menge beeindruckender Features mit, die früher nur mit viel zusätzlicher Hardware möglich waren. 🔥 Ein kurzer Blick auf die Highlights: - Dual-Core mit bis zu 240 MHz - WLAN und Bluetooth direkt integriert - Bis zu 520 kB RAM und mehrere Megabyte Flash - Viele GPIOs, PWM, ADC, DAC, I2C, SPI, CAN, Touch-Sensoren, … - Bereits ab ca. 3 € (je nach Ausführung und Händler)
ESP32-S3-Matrix
ESP32-C3 mit LiPo Batterie
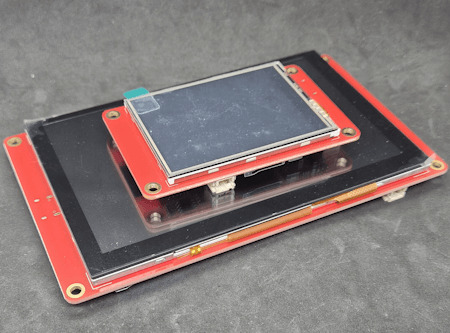
zwei Elecrow CrowPanels 2,4" & 5.0"
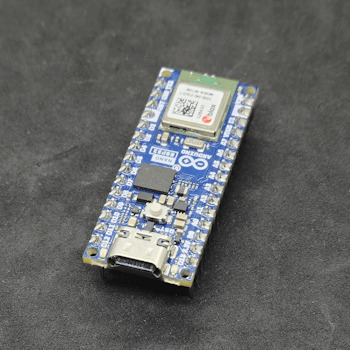
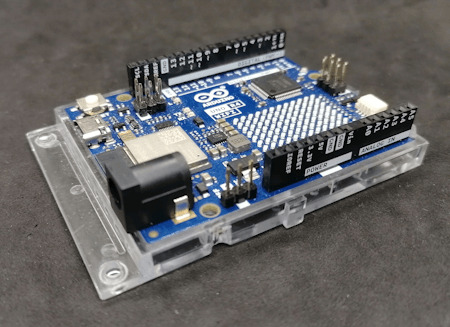
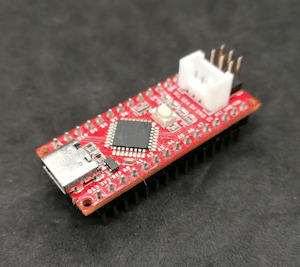
Arduino Nano ESP32
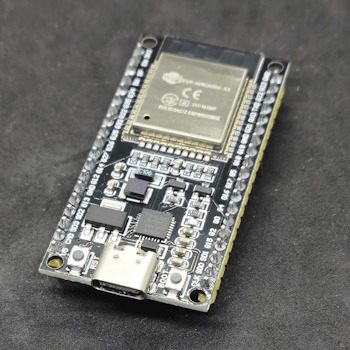
Generic-ESP32 Mikrocontroller

ESP32-C3 Super Mini

ESP32-S3-Zero Und dann wäre da noch ein echter Publikumsliebling: die ESP32-CAM.

Vergleich ESP32-CAM und ESP32-S3 CAM

ESP32-CAM mit externer Antenne und Board

ESP32-CAM

ESP32-CAM Modelle Für rund 5 € bekommt man hier nicht nur die Rechenpower des ESP32, sondern auch gleich eine kleine Kamera mit bis zu 5 Megapixeln dazu. Damit sind Projekte wie: - Überwachungskamera, - QR-Code-Scanner, - Fotos per E-Mail oder Telegram senden ganz einfach umsetzbar – ohne zusätzliche Hardware. Der Raspberry Pi Pico (RP2040) mischt kräftig mit – und bekommt Verstärkung Doch der ESP32 ist nicht allein auf dem Platz. Der Raspberry Pi Pico mit seinem RP2040 Dual-Core Cortex-M0+ Prozessor (133 MHz) hat sich schnell als leistungsfähige und günstige Alternative etabliert – und das in mehreren Varianten: BoardWLANBluetoothBesonderheitenRaspberry Pi Pico❌❌Basisversion, ohne FunkRaspberry Pi Pico W✅✅ (per Firmware)WLAN onboard, BT aktivierbarRP2350-Boards❌❌Mehr Power, keine Funkmodule (derzeit)


RP2040:bit
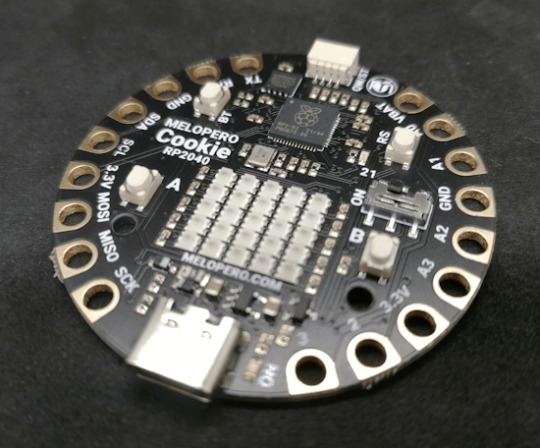
Melopero Cookie RP2040
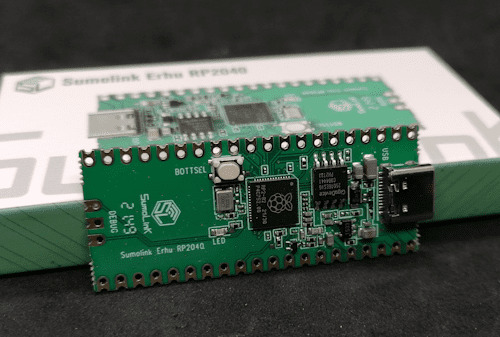
Sumolink Erhu RP240

Mikrocontroller - XIAO RP2040 & Raspberry PI Pico

Raspberry Pi Pico 2 - RP2350A

XIAO RP2350 Mit dem neuen RP2350-Chip steht mittlerweile ein leistungsstärkerer Nachfolger in den Startlöchern. Er wird derzeit auf einigen neuen Boards verbaut (z. B. auf Prototypen oder Dev-Boards asiatischer Hersteller) und bringt: - Höhere Taktraten (bis 200 MHz möglich), - Verbesserte Peripherie, - Und bleibt trotzdem kompatibel zur RP2040-Familie. Was aktuell noch fehlt: WLAN und Bluetooth sind (noch) nicht integriert – was den Chip für reine IoT-Projekte (noch) weniger attraktiv macht, aber für USB-HID oder Highspeed-Sensoranwendungen interessant sein kann.
Arduino – Der Klassiker mit Kultstatus (und vielen Gesichtern)
Wenn man „Arduino“ sagt, denken viele sofort an das gute alte Original: Arduino UNO R3, Made in Italy, stabil, bewährt – aber auch nicht ganz billig. Und genau da beginnt der kleine Konflikt, den vermutlich viele kennen: ➡️ Das originale Board unterstützt die Plattform, die Entwicklung und das Open-Source-Projekt. ➡️ Aber: Der Preis liegt oft bei 20 € und mehr – während Clones für 2–3 € zu haben sind. Doch: Genau das ist eben auch der Spirit von Open Source. Die Arduino-Plattform wurde so entwickelt, dass jeder (mit Einhaltung gewisser Auflagen) eigene Boards bauen und verkaufen darf. Und das tun viele Hersteller – vor allem in Asien. Dabei gibt es längst nicht nur einfache UNO- oder Nano-Kopien. Die Vielfalt an Arduino-kompatiblen Boards ist inzwischen riesig: Board / CloneBesonderheitPreisbereichNano Clone (CH340G)Klassiker für einfache Projekte2–4 €Pro MiniOhne USB, super klein und sparsam2–4 €Nano mit integriertem OLEDAnzeige direkt am Mikrocontroller4–8 €Nano mit 2,4 GHz Funk (nRF24L01) oder 433 MHz ModulIdeal für Funkprojekte ohne WLAN5–10 €Nano mit ESP8266-Modul onboardWLAN-fähig, bleibt aber Arduino-kompatibel5–10 €Nano mit Bluetooth HC-05 oder HM-10Kabellose Kommunikation über BT Classic oder BLE5–10 €

Arduino Nano mit nRF24L01 Erweiterungsboard

Microcontroller BLE-Nano von Keywish

Arduino UNO R3
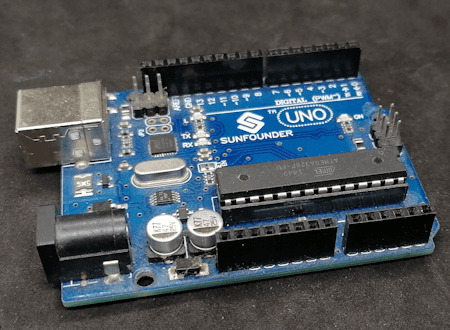
Arduino UNO R3 Clone von der Firma Sunfounder


Arduino Nano V3 , ATmega328P

Arduino Mega 2560 Pro mini

Arduino Nano V3
Seeeduino Nano Gerade diese Vielfalt an spezialisierten Clones und Abwandlungen ist ein echter Vorteil: Man wählt sich für sein Projekt genau die Features, die man braucht – und spart sich den Ballast von Funktionen, die gar nicht benötigt werden. ➡️ Keine WLAN-Probleme, wenn das Projekt gar kein WLAN braucht. ➡️ Keine Bluetooth-Komplexität, wenn ein simples Relais geschaltet werden soll. ➡️ Aber: Wenn ein Display gewünscht ist, einfach ein Clone mit integriertem OLED nehmen. Teures Original oder günstiger Clone? Das Original aus Italien unterstützt natürlich die Entwickler, die die Plattform erst möglich gemacht haben. Gerade wenn es um professionelle Projekte, Support oder Weiterentwicklung geht, ist das ein guter Grund, auch mal bewusst zum Original zu greifen. Wer dagegen einfach ein kleines Hobby-Projekt umsetzt oder ein günstiges Board für Lernzwecke sucht, wird vermutlich bei einem Clone aus Fernost landen – und das ist auch okay so. Beides hat seine Berechtigung. Im nächsten Abschnitt schauen wir uns an, warum diese Einfachheit und Flexibilität dem Arduino einen Platz auf dem Basteltisch gesichert haben – auch wenn ESP32, RP2040 & Co. daneben liegen. Clone statt Frust: Warum gerade Anfänger mit günstigen China-Boards besser fahren Seien wir ehrlich: Wer mit Mikrocontrollern anfängt, wird früher oder später mal einen Fehler machen. Ein Kabel verpolt, einen Pin aus Versehen kurzgeschlossen, eine Lötstelle zu heiß… ➡️ Passiert. Gehört zum Lernen einfach dazu. Wenn dann das teure Original-Board abraucht, ist der Frust groß – und das Projekt vielleicht erst mal gestorben. Anders sieht es aus, wenn das eingesetzte Board nur 2–3 € gekostet hat. Dann bestellt man sich einfach ein neues und weiter geht’s. Genau deshalb finde ich: ➡️ Gerade Anfänger sind mit einem günstigen Clone gut beraten. Das senkt die Hemmschwelle, etwas auszuprobieren, und macht es viel leichter, aus Fehlern zu lernen. Ob Arduino Nano Clone, Pro Mini oder einer der vielen China-Nachbauten mit Zusatzfeatures wie OLED oder Funk – hier kann man für kleines Geld experimentieren, lernen und Spaß haben. Und wenn das Projekt später stabil läuft und vielleicht sogar „ernsthaft“ eingesetzt werden soll, kann man immer noch überlegen, ob man auf ein höherwertiges Original umsteigt.
Wann ESP32, wann Arduino? – Entscheidungshilfe für Projekte
Natürlich ist es immer verlockend, einfach zum leistungsstärksten Mikrocontroller zu greifen. Aber genau das ist oft gar nicht nötig – und manchmal sogar umständlicher. Denn: Der beste Mikrocontroller ist der, der genau das kann, was dein Projekt braucht – nicht mehr und nicht weniger. Um dir die Wahl etwas leichter zu machen, hier eine kleine Entscheidungshilfe: ProjektideeEmpfehlungWarum?Blinkende LEDs, Relais steuern, Taster abfragenArduino UNO, Nano, Pro MiniEinfach, stabil, günstig, kein OverkillLCD/OLED-Anzeige mit Temperatur-/FeuchtesensorArduino oder PicoWLAN meist nicht nötig, einfache UmsetzungDaten per WLAN ins Netz (z. B. ThingSpeak, MQTT)ESP32, Pico WWLAN/BT bereits integriert, viele Beispiele vorhandenMobile Projekte mit Akku und langer LaufzeitPro Mini (mit LowPower-Mod) oder ESP32 mit Deep SleepStromsparend, je nach FunkbedarfKamera-Projekte (Foto/Video-Streaming)ESP32-CAMKamera onboard, einfache EinbindungUSB-Tastatur-Emulation, MacroPads, HID-GeräteArduino Leonardo / Micro oder Raspberry Pi Pico (RP2040)Beide unterstützen native USB-HIDFunkprojekte ohne WLAN (z. B. 433 MHz, nRF24L01)Arduino Nano Clone mit FunkmodulKein unnötiges WLAN, einfache FunkanbindungEchtzeitkritische Anwendungen mit viel GPIO und TimingRP2040 oder RP2350Schnelles Realtime-Processing dank PIO, viele GPIOs 💡 Zusatz-Tipp: Für USB-Tastatur-Emulation (z. B. MacroPads oder automatisierte Eingaben) ist der Arduino Leonardo eine super Wahl, weil er den ATmega32u4 verwendet, der USB nativ unterstützt. Alternativ funktioniert das auch mit dem Arduino Micro oder dem Raspberry Pi Pico (RP2040), dort oft über die TinyUSB-Bibliothek.

Keyestudio Leonardo

Arduino Leonardo Clone

Mini RP2040 Developmentboard
Fazit: Alt, aber alles andere als nutzlos!
Ja, der ESP32 ist ein echtes Powerpaket. Ja, der Raspberry Pi Pico (RP2040) mischt kräftig mit und hat auch seinen Platz auf dem Basteltisch. Und ja – es gibt mittlerweile zig Alternativen mit WLAN, Bluetooth, Kamera, HID und noch viel mehr. Aber: Gerade das macht den guten alten Arduino so sympathisch: Er will gar nicht alles können – sondern einfach das, was man für viele kleine bis mittlere Projekte wirklich braucht. Ein Relais schalten? Ein paar LEDs blinken lassen? Einen Sensor auslesen und auf dem Display anzeigen? ➡️ Warum dafür einen Dual-Core mit WLAN bemühen, wenn es ein Nano für 3 € auch tut? Und genau das ist der Punkt: 🔹 Der Arduino ist einfach. 🔹 Er ist stabil. 🔹 Er hat eine riesige Community und viele erprobte Bibliotheken. 🔹 Er eignet sich perfekt zum Lernen – und bleibt auch danach oft die pragmatische Wahl. Gerade Anfänger profitieren enorm davon, sich nicht direkt mit komplexen Themen wie WiFi-Stack, Sleep-Modes oder USB-Treiberherausforderungen herumschlagen zu müssen. Und: Auch fortgeschrittene Bastler greifen gerne zum „alten Bekannten“, wenn es mal schnell, unkompliziert und robust sein soll. Mein Fazit: Der Arduino hat seinen festen Platz – auch im Jahr 2025. Nicht überall, aber da, wo „Keep it simple“ gefragt ist, ist er oft genau die richtige Wahl. ➡️ ESP32, RP2040 & Co. sind keine Gegner – sie sind Mitspieler im Team der Mikrocontroller. Die Kunst ist es, je nach Projekt den passenden Baustein auszuwählen. Jetzt bist du dran! Arbeitest du noch mit dem Arduino? Oder hast du komplett auf ESP32, RP2040 & Co. umgestellt? Welche Projekte hast du schon umgesetzt – und welcher Mikrocontroller war dafür die beste Wahl? 👉 Schreib es mir gerne in die Kommentare – ich freue mich auf den Austausch! Read the full article
0 notes
Text
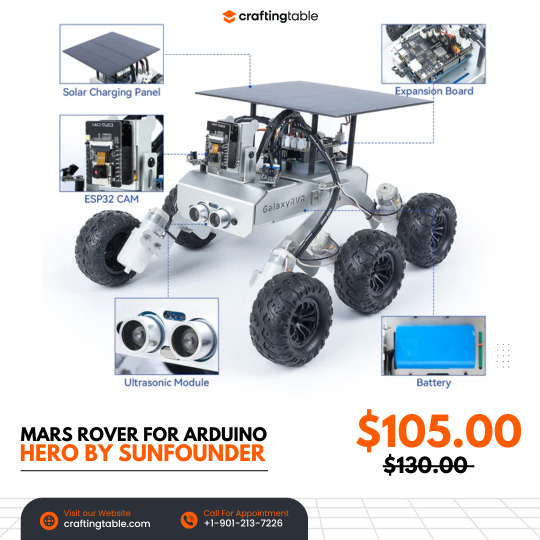
GalaxyRVR is an easy-to-use robot that works with Arduino Uno R3 and lets you experience what it’s like to explore Mars. It’s built strong with metal parts and has a smart wheel system to move smoothly over sand, rocks, grass, and even mud. It uses solar power to charge and has a camera (ESP32-CAM) that shows you what it sees in real time through an app. You can drive it from anywhere! It also has sensors to avoid obstacles and bright lights so it can explore in the dark too. The kit comes with helpful videos and guides, and there's an online community ready to help, making it perfect for beginners who want to build and explore. Buy Now
0 notes
Text
How I buy my webcams and how it ended...
Webcams, how not to buy them, but I'm stupid and learning
Because I have holiday now due to chrismas and I posted nothing in the last month, I decided to make a comment about how I chose my webcams - and it's not a guide or an advice. It's rather more a funny story. I wanted to see the birds on my feeder. So I decided to buy some webcams. Cheap, with network access.
Step 1: ESP32 webcam
I bought some webcams based on ESP32, which is able to connect to my WLAN. Sounds good, bought three of them. Installed an USB hub and 5m USB cables to support them with power. But there was a problem very soon. The connection from the webcams to my WLAN wasn't good, so I replaced it with three WLAN mesh routers (Huawei WIFI AX3). The network quality did not increase so much. Next step was to use external antennas with the ESP32 webcams. To do this, a little bridge is to solder on the PCB board. In 603 circuit format. I'm too old for this sh*t, so I messed up one of the ESP32 cams, it was broken. I configured one of my servers to record the stream via ffmpeg32. Works... okayish. But not really usable outdoors.
Step 2: more ESP32 webcam
There were some offers with ESP32 webcams and external antennas. But when I read the comments about these, they said "yes, antenna included, but not with the soldered bridge to use it, have to make it by myself". So no gain. Finally I found a guy on ebay who offers ESP32 with external antennas and soldered bridge. Doubled the price, but worth great. I bought four of them. Fairly good WLAN connection.
Step 3: The rats are coming... nightsight and better images
Now, there is the bird feeder, the webcams and recording the stream. But then, some new guests are showing up. Rats. From where are they coming? How often? I needed answers to take action against them, because I don't want to contribute to a rat problem in our neighborhood. The ESP32 webcams can only make shots at daytime (and not very good). I needed something to monitor the night. Next step was to buy some webcams with nightsight. I chose 2 x Denver WCT6000 WLAN (but it seems not to be an actual webcam anymore, now it's maybe the WCT8026W). Yeah, installed... but... they are running on batteries (change 8 x AA batteries every 3-4 days), the SD-card (32 GB) was enough to record about 2 days and - most important - the WLAN wasn't really a WLAN. You can connect an app to the webcam via instant-WLAN, but you can't connect the webcams WITH the WLAN. On the plus side: The wildlife camera has (aside nightsight) a pretty good image resolution, the stream has a higher framerate (>20 frames per second, the ESP32 had 6 frames per second) and I could it use outdoors. But nevertheless, I placed the cams at serveral locations and could track the rats and what they are doing when. So I could perform some optimizations with the placement of the birdfeeder, but there was no real solution. Even the city (or the neighbor where the rats are coming from) wouldn't do anything. After all, the wildlife camera was nice, but not a real solution.
Step 4: Reolink 510D webcam
On the road to perfection, the next step was to combine all my knowledge. I need nightsight, outdoor, high resolution, high fps rate and additionally I don't want this WLAN connection anymore. Too much disconnects, not stable. Wires are the way to go! I shifted to webcams from Reolink and I decided to take six of Reolink 510D. Great decision. I removed the USB-Hub with the USB-cables and replaced it with a POE switch, connected to my LAN. Now, I could remove the mesh WLAN routers. Finally, I build a camera pole on my terrace for the webcams and printed three connectors for the Reolink to attached the flat end to the round pole. I installed datarhei streamer on my webserver, so I could see the result via internet (and VLC connected directly).
Step 5: webcam Reolink RLC810wa
Just a few month later, I switched the webcams to 4 x Reolink RLC810wa. I would say, there is a real reason about it. It has increased nightsight (up to 15m instead of 2m), it has a higher resolution (which I don't need, I have to reduce the resolution because of the bandwith). Yeah. They are black. That was the reason. I'm some kind of happy at the moment.
webcam conclusion
The sequence of buying one thing after another may be some kind of logic. But the real step is, that you learn with every new iteration new problem, you have to solve, but you didn't thought about them. So I upgraded from cheap to a fairly high level of money, which left a lot of hardware behind me. I paid too much at the end - regarding the now outdated hardware. Most important, that nobody in my peer group could talk about this to me in detail. They had no knowledge about this, even if they have webcams for their bird feeder or other use cases. But one of my kinks is "privacy". There are too many webcams out in the world, which NEEDS a connection to the manufacturers server, look at "Ring" e.g. I had a Ring doorbell and I was yelling about the question "share your ring webcam with your neighbors". To this point, I was willing to set it up for my use, but thinking about THIS quesiton alone, I was healed from all f*cking company app bindings and so on. So I needed webcams. which can exists in my personally controlled realm and networks and have no dependencies on the outer world, escpecially companies. Nah... merry chrismas and a happy new year 2025. Read the full article
0 notes
Text
Streaming ESP32-CAM Images to Multiple Browsers via MQTT
http://securitytc.com/SyJFzB
0 notes
Video
youtube
QR code based car parking system using ESP32 CAM with IR sensorshttps://www.youtube.com/watch?v=99KntJhETQw
#youtube#QR code based car parking system using ESP32 CAM with IR sensors | QR Code Car Parking System | implementation of Intelligent Automated Gate
0 notes
Photo

Video Streaming and Facial Recognition with ESP32-CAM https://shores.dev/video-streaming-and-facial-recognition-with-esp32-cam/?utm_source=tumblr&utm_medium=social&utm_campaign=ReviveOldPost
0 notes


Text
ESP32 Cam External Antenna Mod

I am now working on building my own Mayhem board for Flipper Zero, so the first thing was to do some testing with ESP32 Cam module. The range of the internal antenna wasn’t great, so it’s time to hookup an external antenna. Thankfully, the process is well documented by Random Nerd Tutorials.
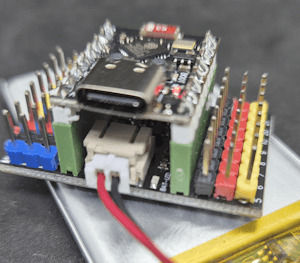
We will need to desolder a zero ohm resistor and move it to a different position, and resolder it in place, as shown in the image below (taken from the above tutorial).

Here’s a close up of how it looks like on my ESP32 Cam module.


I just used my soldering iron to melt the solder joints and pushed that resistor aside. That resistor is crazy tiny and I had to use a magnifying glass to do this. After removing it, I just applied some flux on the joints for the external antenna and just soldered across them to connect them. You don’t need to use the resistor and trying to solder that back in place was a major pain. I know, I tried … lol
Anyway, my testing shows that using the external antenna, Marauder was able to find 4x more access points than using the internal antenna. Success!
If you wish to learn more about ESP32 Cam, check out this article.
2 notes
·
View notes
Text
ESP32-S3 CAM: Der leistungsstarke Nachfolger der ESP32-CAM

Die ESP32-CAM hat sich in vielen Projekten bewährt – vom Überwachungssystem bis zur smarten Bilderkennung. Mit der ESP32-S3 CAM steht nun ein noch leistungsfähigeres Board zur Verfügung, das auf dem ESP32-S3 Chip basiert. In diesem Beitrag zeige ich dir, was die neue Version auszeichnet und wie du sie in Betrieb nimmst. https://youtu.be/tqNIc5_bHsw
Technische Highlights der ESP32-S3 CAM
Die ESP32-S3 CAM bringt einige wichtige Neuerungen mit, die sie besonders für KI- und Bildverarbeitungsanwendungen interessant machen: - Xtensa® LX7 Dual-Core mit 240 MHz - 8 MB PSRAM für anspruchsvolle Bildverarbeitung - Unterstützung für Wi-Fi (802.11 b/g/n) und Bluetooth 5.0 LE + Mesh - 45 programmierbare GPIOs - Unterstützt neuronale Netzwerke durch spezielle Vektor-Erweiterungen - Spannungsbereich: 3,0 – 3,6 V, Temperaturbereich: -40 bis +65 °C
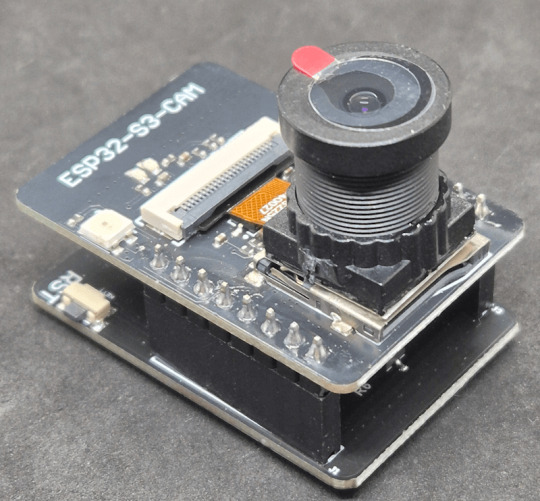
ESP32-S3-CAM mit OV3660
Lieferumfang und erster Eindruck
Die Kamera wird in einer antistatischen Tüte geliefert. Du bekommst die CAM in unterschiedlichen Ausführungen, zum einen entweder mit OV2640 Kameramodul oder mit OV3660 Kameramodul und auch mit/ohne Board um das Modul zu programmieren.


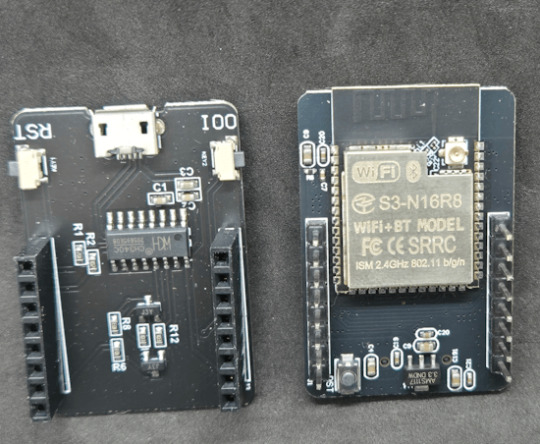
Was mich etwas stört ist das dieses Board immernoch mit einer veralteten Micro-USB Buchse für den Anschluss an den Computer daher kommt. Hier hätte ich erwartet das eine zeitgemäße USB-C Schnittstelle verbaut würde.
Inbetriebnahme: Erste Schritte mit der ESP32-S3 CAM
Wie bereits erwähnt, liegt manchen Sets ein separates Adapterboard bei, das den direkten Anschluss der ESP32-S3 CAM an den Computer über USB ermöglicht. Falls dein Set dieses Board nicht enthält, benötigst du stattdessen einen FTDI-Adapter (USB-zu-Seriell-Konverter) sowie ein paar Breadboardkabel. Damit du das Board trotzdem problemlos programmieren kannst, findest du hier den passenden Anschlussplan für den FTDI-Adapter. Das Pinlayout der Kamera entspricht dem des Vorgängers, daher kannst du den bekannten Schaltplan weiterhin verwenden.

Schematischer Aufbau der Schaltung "ESP32-CAM mit FTDI Modul" In meinem Fall habe ich dieses Board und kann direkt ein Micro-USB Kabel anschließen und den Mikrocontroller in der Arduino IDE programmieren. Davor müssen wir jedoch den Boardtreiber installieren. Das gute an dem Boardtreiber ist, das wir zusätzlich noch einpaar Beispiele erhalten und dort wiederum eines für die ESP CAM um im Browser das Livebild zu streamen, aber dazu später mehr. Installieren des Boardtreibers in der Arduino IDE Die nachfolgende URL muss zu den "zusätzlichen Boardverwalter URLs" hinzugefügt werden: https://espressif.github.io/arduino-esp32/package_esp32_index.json Wenn dieses erfolgt ist, können wir im Boardverwalter nach esp32 suchen und dort das Paket "esp32 von Espressif Systems" installieren.
Erstes Projekt: Kamera-Bild im Browser anzeigen
Der installierte Boardtreiber bringt ein praktisches Beispiel mit, das ein Livebild der Kamera im Browser anzeigt. Über eine einfache Weboberfläche lassen sich dabei verschiedene Einstellungen vornehmen – z. B. Auflösung, Helligkeit oder Kontrast –, um das Kamerabild bzw. den Stream ganz nach Wunsch anzupassen. Damit die Beispiele überhaupt sichtbar sind, musst du zuvor das passende Board in der Arduino IDE auswählen: Werkzeuge > Board > ESP32 > ESP32S3 Dev Module (siehe Grafik unten)
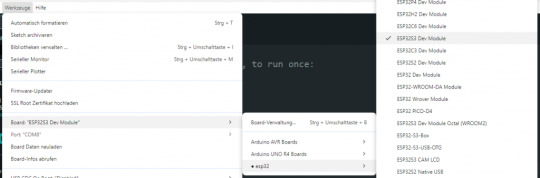
Auswahl des ESP32S3 Dev Module in der Arduino IDE Nach erfolgreicher Einrichtung der Entwicklungsumgebung findest du unter Datei > Beispiele zahlreiche Beispielsketche, die verschiedene Funktionen des ESP32 demonstrieren. Besonders interessant für Kamera-Projekte ist das Beispiel „CameraWebServer“, mit dem du direkt ein Live-Bild im Browser anzeigen lassen kannst.

Beispiel für den betrieb der ESP32-S3 CAM im Webbrowser Im Beispielsketch CameraWebServer sind zahlreiche verschiedene Kamera-Module für den ESP32 aufgeführt. Damit das Beispiel mit der ESP32-S3 CAM funktioniert, musst du die entsprechende Zeile aktivieren. Kommentiere dazu die Zeile für dein Modell ein und lösche oder kommentiere alle anderen aus, damit es nicht zu Konflikten kommt. Für die ESP32-S3 CAM sieht die passende Zeile z. B. so aus: #define CAMERA_MODEL_ESP32S3_EYE Achte darauf, dass du nur eine Kamera-Definition aktiv lässt. Angepasstes Beispiel für die ESP32-S3 CAM Herunterladen

Live-Stream und Einzelbilder im Browser abrufen
Mit dem Beispielprogramm CameraWebServer kannst du das Kamerabild nicht nur live im Browser anzeigen, sondern auch einen Stream wiedergeben oder Einzelbilder aufnehmen – ganz ohne zusätzliche Software. Hier die wichtigsten Adressen, sobald die ESP32-S3 CAM im Netzwerk eingebunden ist: - 📹 Live-Stream: http://:81/stream - 📸 Einzelbild (Snapshot): http:///capture - ⚙️ Einstellungen (Konfigurations-Frontend): http:/// Die jeweils zuletzt gespeicherten Einstellungen aus dem Konfigurationsmenü werden automatisch übernommen – egal, ob es um Auflösung, Helligkeit oder Kontrast geht. ⚠️ Wichtiger Hinweis zur Nutzung der ESP32-CAM & ESP32-S3 CAM: Ein bekanntes Limit dieser Kamera-Module – sowohl beim Vorgänger als auch bei der hier vorgestellten ESP32-S3 CAM – ist, dass immer nur ein Client gleichzeitig auf das Kameramodul zugreifen kann. Das bedeutet: - Wenn du den Live-Stream, das Einzelbild oder das Konfigurations-Frontend nutzen möchtest, darf jeweils nur ein Browser-Tab oder eine App wie VLC aktiv sein. - Möchtest du zwischen den Funktionen wechseln (z. B. vom Stream zum Einstellungsmenü), musst du den zuvor geöffneten Reiter oder die App zuerst schließen, bevor du die nächste Ansicht aufrufst. Andernfalls bleibt die Kamera „blockiert“ und neue Verbindungen schlagen fehl.
Vergleich: ESP32-CAM vs. ESP32-S3 CAM
Die klassische ESP32-CAM war lange Zeit die erste Wahl, wenn es darum ging, günstige Kamera-Projekte mit WLAN-Anbindung umzusetzen. Mit der neuen CAM bringt Espressif nun einen Nachfolger auf den Markt, der in vielen Bereichen deutlich leistungsfähiger ist. Doch worin unterscheiden sich die beiden Boards genau? In der folgenden Tabelle habe ich die wichtigsten Merkmale gegenübergestellt, damit du schnell erkennen kannst, ob sich der Umstieg auf die S3-Variante für dein Projekt lohnt.

Vergleich ESP32-CAM und ESP32-S3 CAM
Vergleich ESP32-CAM und ESP32-S3 CAM MerkmalESP32-CAMESP32-S3 CAMProzessorXtensa LX6Xtensa LX7 Dual-CoreRAM520 KB + 4MB PSRAM512 KB + 8MB PSRAMKamera-UnterstützungOV2640OV2640 / OV5640USB-AnschlussNeinNeinBluetoothNeinBluetooth 5.0 LE
Fazit: Die ESP32-S3 CAM überzeugt auf ganzer Linie
Mit der ESP32-S3 CAM hat Espressif ein würdiges Upgrade zur beliebten ESP32-CAM veröffentlicht. Der neue Chip bietet nicht nur mehr Leistung und Speicher, sondern punktet auch mit praktischen Features wie Bluetooth LE, USB-Anschluss (je nach Modell) und Unterstützung für KI-Anwendungen. Gerade für Projekte mit Livebild, Objekterkennung oder smarter Bildverarbeitung ist die S3-Variante eine spannende Alternative – und das bei einem Preis, der nur minimal über dem Vorgängermodell liegt. Wer bereits mit der ESP32-CAM gearbeitet hat, wird sich schnell zurechtfinden. Neueinsteiger profitieren von der perfekten Integration in die Arduino IDE und der stabileren Performance bei höheren Auflösungen und Bildraten. 👉 Du willst mehr Projekte mit ESP32 sehen? Dann schau regelmäßig auf meinem Blog vorbei oder abonniere meinen YouTube-Kanal! Read the full article
0 notes
Text
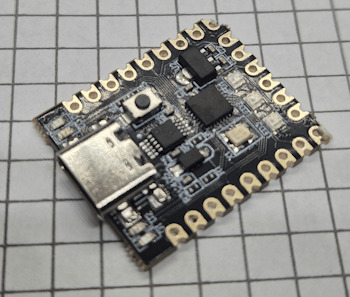
Liked on YouTube: Powerful Alternative to ESP32 CAM | Realtek AMB82-Mini IoT AI Camera Board - Getting Started
Powerful Alternative to ESP32 CAM | Realtek AMB82-Mini IoT AI Camera Board - Getting Started 𝗔𝗺𝗲𝗯𝗮 𝗔𝗿𝗱𝘂𝗶𝗻𝗼 𝗦𝗗𝗞 𝗽𝗮𝗴𝗲: https://ift.tt/blXFw0c 𝗣𝘂𝗿𝗰𝗵𝗮𝘀𝗲 𝗟𝗶𝗻𝗸: https://ift.tt/O3HePEl 𝗣𝗿𝗼𝗷𝗲𝗰𝘁 𝗗𝗲𝘀𝗰𝗿𝗶𝗽𝘁𝗶𝗼𝗻: In today's exciting video, we're exploring a power-packed product from Realtek, the AMB82-Mini. This little beast is essentially an IoT AI Camera Arduino Development Board and an impressive replacement for the ESP32 Camera Module. Designed with Artificial Intelligence, Machine Learning, and Neural Networks in mind, the AMB82-Mini boasts ultra-low power consumption. This makes it incredibly efficient and ensures you won't have to worry about draining your power supply. What makes this board special? It features an HDR Camera with a crisp 1080p resolution, superior to the ESP32 CAM. The CPU speed is a whopping 500MHz, more than double the ESP32's 240MHz. The AMB82-Mini supports both 2.4 GHz and 5GHz Wi-Fi bands, and also includes a BLE chip that enables Bluetooth Low Energy 5.1. Storage? We've got 768KB ROM, 512KB RAM, 16MB Flash, and support for MCM embedded DDR2/DDR3L memory up to 128MB. Power-packed, isn't it? In this tutorial, we'll be diving deep into the board design, pin descriptions, features, and capabilities of this remarkable board. We'll also walk you through setting up the Arduino IDE and how to program the AMB82-Mini using this platform. What's more, we'll get hands-on with some practical exercises like making an LED blink, video streaming over a Web server, Object Detection and Identification, and 1080p Video recording. So, if you're ready to explore the possibilities of IoT, AI, and Machine Learning with this powerful board, hit that play button, and let's get started! Don't forget to like, share, and subscribe for more tech tutorials and updates. Your support keeps us going! #AMB82Mini #Realtek #IoT #Arduino #AI #machinelearning 𝗪𝗿𝗶𝘁𝘁𝗲𝗻 𝗧𝘂𝘁𝗼𝗿𝗶𝗮𝗹 𝙇𝙞𝙣𝙠𝙨: 𝟭. 𝗚𝗲𝘁𝘁𝗶𝗻𝗴 𝗦𝘁𝗮𝗿𝘁𝗲𝗱: https://ift.tt/WVai2or 𝟮. 𝗢𝗯𝗷𝗲𝗰𝘁 𝗗𝗲𝘁𝗲𝗰𝘁𝗶𝗼𝗻 & 𝗜𝗱𝗲𝗻𝘁𝗶𝗳𝗶𝗰𝗮𝘁𝗶𝗼𝗻: https://ift.tt/lG3HtQ2 𝟯. 𝟭𝟬𝟴𝟬𝗽 𝗠𝗣𝟰 𝗩𝗶𝗱𝗲𝗼 𝗥𝗲𝗰𝗼𝗿𝗱𝗲𝗿: https://ift.tt/ni4OlpS .................................................................................................................................................................................................................................... Drop a like if you liked this video. Don't forget to subscribe to our channel for more Electronics projects and tutorials. Website: https://ift.tt/L7raVJs Facebook: https://ift.tt/EFchGia Instagram: https://ift.tt/tQKdAHY Twitter: https://twitter.com/how2electronics via YouTube https://www.youtube.com/watch?v=vI6GZMLfGQk
0 notes
Text

1 note
·
View note