#esp32
Explore tagged Tumblr posts
Visit Tumblr Blog
Explore Tumblr blogs with no restrictions, modern design and the best experience.
Last Seen Tumblr Blogs


Fun Fact
Tumblr posted its first advertisements in May 2012 and subsequently earned $13M in revenue.
Text
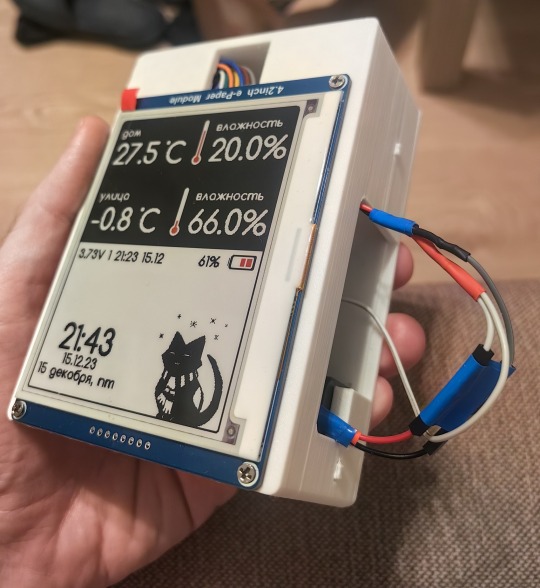
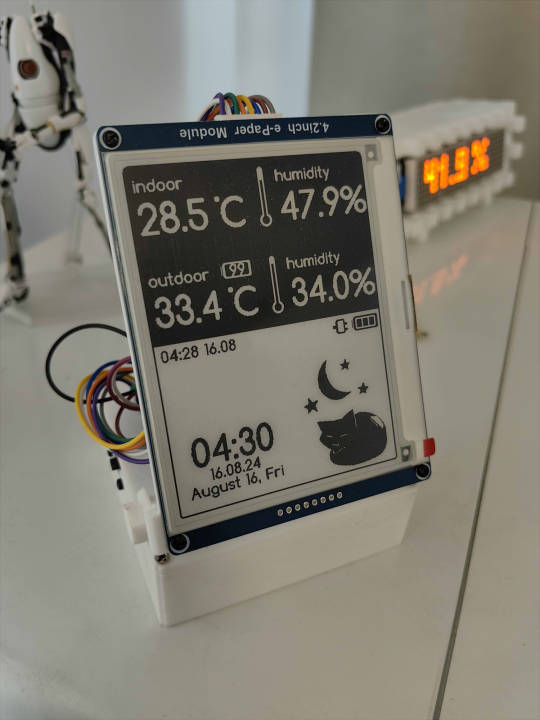

Released my open source weather station firmware, works with E-INK 4.2' \ 1.5' displays; compatible with ESP8266 \ ESP32 Default kitty icon is depends on time \ temperature; Upload custom interfaces is also available via web panel; Optional °F \ °C, English Source code : https://github.com/NC22/Volna42BW Documentation : https://volna42.com
616 notes
·
View notes
Text
Rooooound display prototype testing 🌀✨
Okay, we've got our 1.3" round TFT prototype ready for testing - and here's a cute GIF of a dial turning back and forth. It's a great way to test the display, backlight, and SD card interface. We're using a QT Py ESP32 since we need quite a bit of oomph to decode GIFs and display them in real-time. With EYESPI, no wiring is required! This is good to go - it's time to book the PCB panel!
#rounddisplay#tftprototype#gadgettesting#techinnovation#electronicsengineering#qtpy#esp32#realtimegraphics#gifdisplay#techgeek#displaytesting#sdcardinterface#eyesspi#pcbdesign#hardwaredev#techdiy#makersgonnamake#hardwarehack#electronicsprototyping#techprojects#displaytechnology#hardwaredesign#pcbprototype#techtrends#diytech#engineeringlife#electronicscommunity#gadgetlove#displaytech
82 notes
·
View notes
Text
Corndog girl fps test
#bocchi the rock!#corndog girl#esp32#the framerate is uncapped#hence why she move so FAST#bocchi the rock
342 notes
·
View notes
Text
Some transparency on the esp32 bluetooth "backdoor" that's been reported on over the past couple of days
16 notes
·
View notes
Text
First time messing with e-paper, of course it's gonna be some Hola Mundo thingy lol
10 notes
·
View notes
Text
My worker firmware works! It flashed itself over, now just to add some roll back, security, and validation features. But effectively this means I never have to plug in another ESP32 to send them firmware. I can just tell them to post to MQTT from the worker firmware for logging and post the firmware binary to my local file server. This makes my life so much easier while building out this mesh of meshes multi-protocol com lib. Hell yeahhh
#trans#queer#transgender#tech#esp32#maker#computer#programming#c++#arduino#embedded software#firmware
7 notes
·
View notes
Text
need a bit of advice on something rather new to me... i have been DYING to get into some semblance of diy electronics/robotics, specifically regarding the idea of building a flipper zero knockoff with a raspberry pi/esp32/arduino. or a hack rf one ripoff, etc. u get it? i wanna make a lil handheld pwnagotchi pet style device for rolljam rf shit, something that can copy and paste and send and receive rf signals, but homemade by my self....
please if anyone has experience, resources, ideas, anything at all= hit me up right now immediately asap today please.... i am so passionate and ready to do this please help me make device go beepboop
#flipper zero#hack rf one#raspberry pi#esp32#arduino#diy electronics#diy#diy hacking#car hacking#hacking hardware#hacking#help#hacking help#hacking question#need advice#diy projects#diy craft#diy punk#upcycle#homebrew
13 notes
·
View notes
Text
You can build your own attendance system! With an ESP32, a fingerprint sensor, and a little creativity, you can create a fully functional Biometric Attendance System.
8 notes
·
View notes
Link
8 notes
·
View notes
Text
(doing something stupid) can you allocate an array at a specific address during compile time in C++. This system is Harva-actually wait the docs say this is almost a built in feature. Hang on.
Hell yes okay I have the thing I want working, you just have to. turn off memory protection and use the IRAM_ATTR thing. That's fine. I think I can make this work I'll just block out a couple kB of nops for my plugins. For a moment there I thought I was going to end up using WASM. I might still, WASM is infinitely safer than this. But this is very funny.
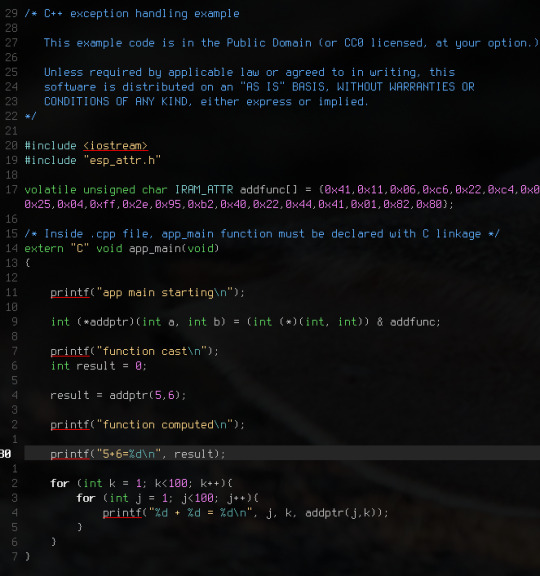
Love function pointer syntax. Makes perfect sense in that awful C way.
That array is just the -O0 implementation of an add in rv32. If you optimize it it's like two instructions but I just wanted to make sure I could execute more than one in a row. I think if you compile right with -fPIC/-fPIE and all that jazz you should just be able to dump that into RAM and execute. Since all your jumps will be relative?
22 notes
·
View notes
Text
playing with my m5 cardputer, wrote a software audio mixing library in micropython and made a crude sequencer with it
19 notes
·
View notes
Text
Protogen Chess
youtube
#furry#fursuit#fursuit friday#protogen#chess#esp32#arduino#furry community#furry fandom#furries#Youtube
12 notes
·
View notes
Text
TLV320DAC3100 first bops 🔊🎶💃🕺
OK, after many hours spent with Claude on writing a driver for the TLV320DAC3100 (https://www.digikey.com/en/products/detail/texas-instruments/TLV320DAC3100IRHBR/2260591), we finally have it configured using our driver, and playing an MP3 stream on this ESP32. This I2S DAC has a particularly complex PLL and audio-routing system, so it's not one where you can just pipe in I2S data and have it magically play. One nice thing we got working on is the MCLK, which is generated from the BCLK, so it'll work great with anything from an Arduino-compatible to a single-board computer like Raspberry Pi. We're hoping to get the headphone detection working next so that we can turn off the amp when the headphone is plugged in. Also, it should be able to control the volume from the headset buttons. Also, we want to get the internal beep generator going so we can make tones separate from the audio stream for UI notifications.
#tlv320dac3100#dac#esp32#i2s#audioengineering#opensource#mp3streaming#embeddedhardware#hardwarehacking#arduino#raspberrypi#microcontrollers#firmware#coding#electronics#headphones#pll#audioprocessing#dsp#mclk#bclk#headphonemod#techinnovation#audiophile#sounddesign#makercommunity#opensourcehardware#iot#embeddeddev#beepgenerator
36 notes
·
View notes
Text
Local idiot orders Arduino clone without the pins attached, solders them himself, kills the only 5V pin on the board. (all 4 0V pins seem to still work)
6 notes
·
View notes
Text

A bit of proof that I got Pyodide to load off the esp32 server. So soon I'll write the adapter to get PierMesh running using the browser as a processing environment
I use the Pyodide example below the cut but point to the local server instead
12 notes
·
View notes
Text
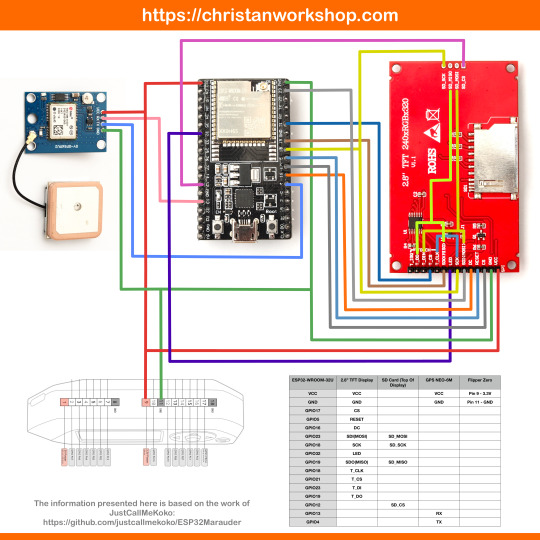
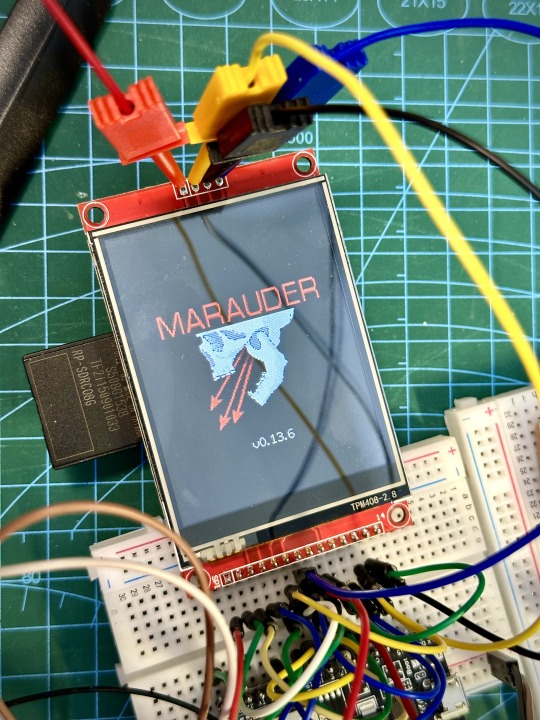
DIY: Marauder with Screen and GPS For Flipper Zero
Many of you would have seen the humongous ESP32 add-on module with touch screen and GPS for Flipper Zero shared in discussion groups, forums, etc. Well, this tutorial will provide you with all the information you need to build one yourself.
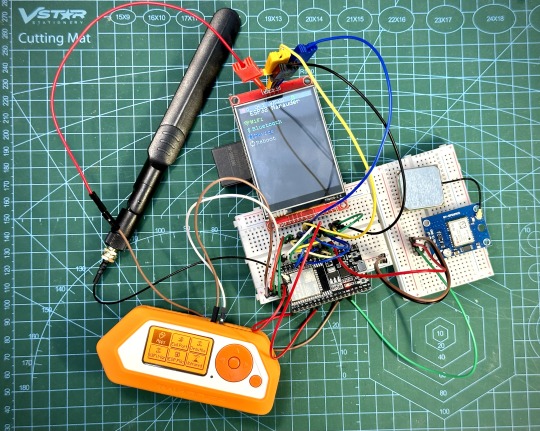
This build consists of mainly 4 parts. The TFT LCD 2.8" 240x320 SPI ILI9341 Touch Display cost me around US$5.50, the ESP32-WROOM-32U module cost around US$3, the NEO-6M GPS module cost around US$2.20 and an 8dbi 2.4GHz Wifi Antenna which cost around US$2. All of these parts can be easily found in online marketplaces like Aliexpress, Amazon, etc. Here is how you need to wire them up together. How you wish to lay this out or mount on a prototyping board is entirely up to you. As long as the connections are correct, you are good to go. The GPS module is optional, and mainly, it's used for the war driving functionality.
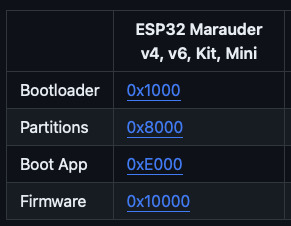
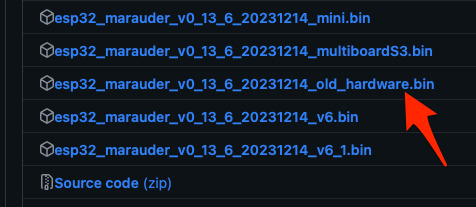
Next, you need to download all the firmware needed from here. Please download the Bootloader, Partitions, Boot App and Firmware files for v4 (Yes, v4 files, not any others) and save it on your computer.
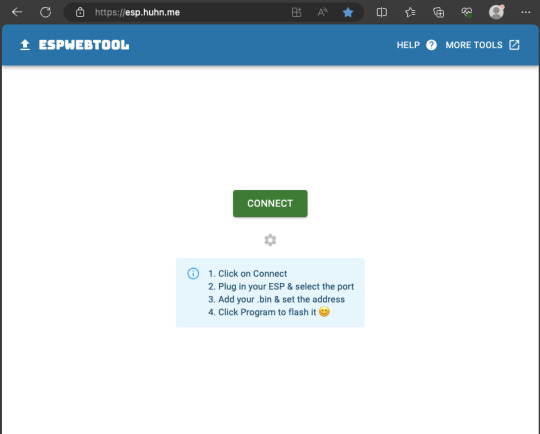
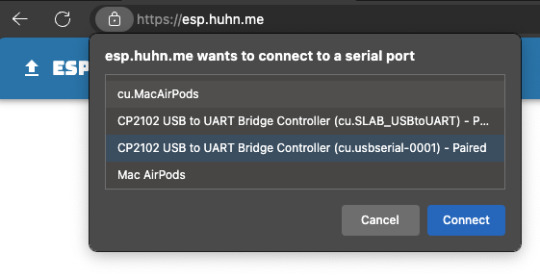
Now, press and hold the BOOT button on your ESP32-WROOM-32U module and connect it to your computer using a data-capable USB cable (some USB cables can only charge), then let go the BOOT button. Open Google Chrome or Microsoft Edge browser and go to ESPWebTool. Click the CONNECT button, then select the ESP32 usb serial connection. It should look something like below but can vary a little between different computers and operating systems.
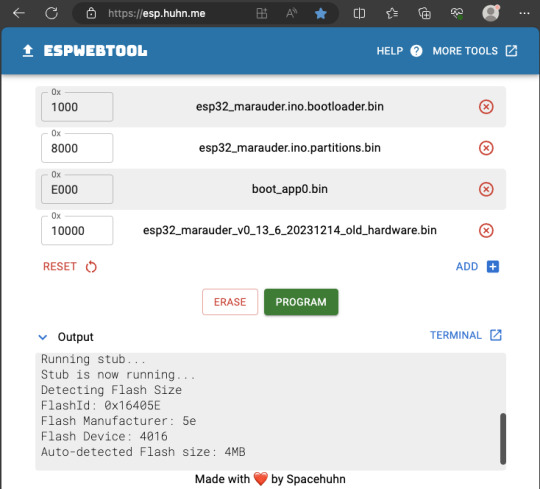
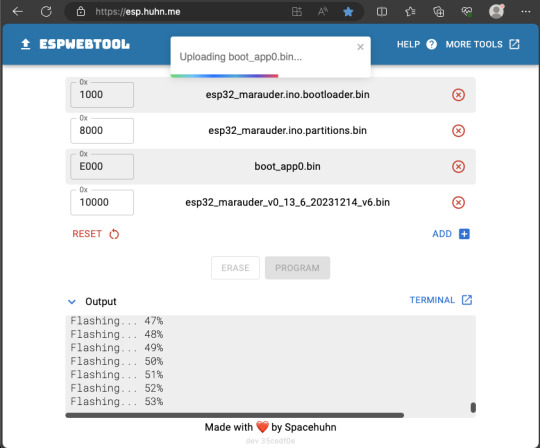
Select the firmware files for each slot exactly like below (take note of the 0x1000, 0x8000, etc. and their corresponding .bin files), then hit the PROGRAM button.
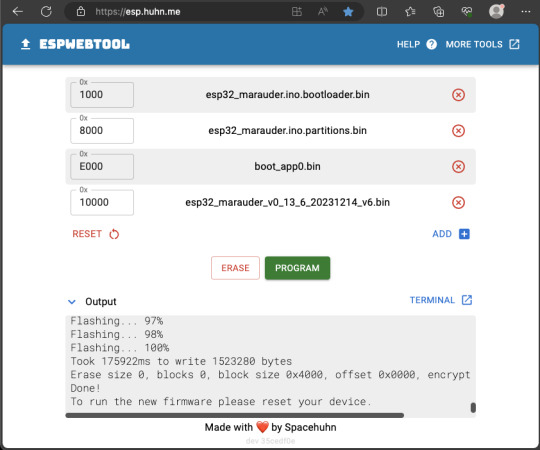
When completed successfully, you can unplug the USB cable from the ESP32 module and now you can connect your Marauder module to your Flipper Zero. Please ensure that your Flipper Zero is turned off before you connect it, and also turn off your Flipper Zero before disconnecting it. The 3.3V pin is also used by your Flipper Zero's SD card reader and connecting/disconnecting external modules that use this pin while the Flipper Zero is on can potentially corrupt the SD card. So, if everything went according to plan, your Marauder module should boot up and everything should look like below.
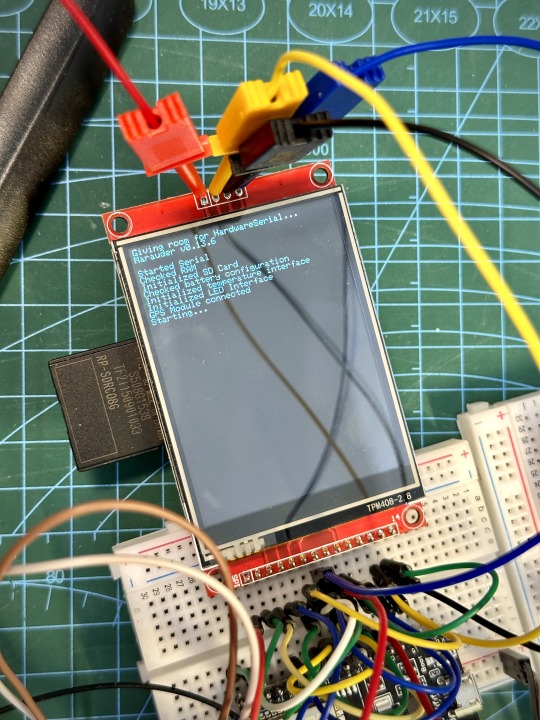
NOTE: If your Marauder boots up, but when you try to touch the screen and get no response, try tapping around the bottom part of your screen and see if the touch panel seems to be in inverted position from the actual display. Should this happen to you, just flash your ESP32 module again following the steps above, but use the v6 firmware. This should resolve the issue.
In this build, I just prototyped this on breadboard, but you can of course make it permanent by soldering it on to a prototype board and 3D print a case for it. This setup is essentially just using the Flipper Zero as a battery pack, instead of using the Flipper Zero to control Marauder. The large screen does make some things easier to do, compared to the small screen of the Flipper Zero, and there may be some functionality (not much) that is not currently in the Flipper Zero Marauder companion app. Here is a video showing the different menus in Marauder.
Personally, I don't think I will actually want to bring something so big around with me, along with my Flipper Zero. I think what makes Flipper Zero special is just how compact it is and all the different functionality cramped into it. This would probably be better off as a standalone unit by just hooking up a battery, but that's just me. Well, that's it for this tutorial. I hope you found this helpful.
Here's a good intro to Marauder if you are unfamiliar.
youtube
16 notes
·
View notes