#Exiftool mac
Explore tagged Tumblr posts
Visit Tumblr Blog
Explore Tumblr blogs with no restrictions, modern design and the best experience.
Last Seen Tumblr Blogs


Fun Fact
Tumblr has been providing a Korean-language service since 2013.
Text
Exiftool mac

Exiftool mac install#
Exiftool mac archive#
Exiftool mac software#
How do we remove exifdata? Let's use the comment tag as an example again. This will add an attribute called "Comment" and the value for it will be This is gHacks. Let's say we want to add something to an image, exiftool -Comment="This is gHacks" image.jpg. Type exiftool followed by the attribute that you wish to change using the following syntax. Editing tagsĮditing exif data is pretty easy. The resulting file will still have the regular properties of a file (size, name, date created, etc). The original file is renamed as image.jpg_original.Īlternatively, use the following command. Instead, it creates a copy of it with the modified metadata, which can be useful for sharing online. The program does not modify the original file. This tells ExifTool to delete all exif (personally identifiable) tags from the image's metadata. They contain a ton of metadata from just one photo I took on vacation last year. Repeat the steps, add a space after "exiftool", and then drop the image onto the window before hitting Enter. This method can also be used for adding an image's path quickly. When you want to use it, open a command window, drag and drop the exiftool.exe to the window to run it from its location. Place it inside a folder that is a system path so that you may run it easier from the command prompt this mode allows you to use all features in the application, so this is what we will be using here. This will open a command window that displays the metadata of the file.Īn alternative way to use it is to rename it from exiftool(-k).exe to exiftool.exe. Instead, drag and drop files or folders on it using Explorer.
Exiftool mac archive#
Download the archive it contains an executable. It is a command-line application (technically a script).
Exiftool mac install#
If you would like to try this workflow out I have attached the Hazel Rules below, remember to also install ExifTools.You can edit or delete metadata with the help of programs like ExifTool by Phil Harvey. Stock images, videos and sounds I collect are placed into a folder named by their category, eg LUTs, Sounds, Backgrounds etcĪs most Stock images generally have a descriptive filename I leave the name alone but Hazel does append the dimensions to images & videos and the duration to sounds, adds the Tags “Stock” and “Category” then moves the file to the final Directory, storing the files in sub folders based on the the category name. On the date being reset the file is moved back into the Workflow. If uncertain of the actual date of the photo I use a default date of 30 June in the year I allocate. The Folder name needs to be in the format YYYYMMDD_HHMMSS. To correct this I have a Hazel rule that will reset the date based on the name of the monitored folder. Often I will obtain images that have an incorrect data associated with the creation of the image, an example being when you scan an old photo. Hazel will detect that the location is now present and will then move the file back into the workflow process.
Exiftool mac software#
For photos in this folder I use the my Geotagging software of choice, Image Exif Editor, to set the location. In my Photo Workflow once the the image has been renamed and the Tags and Keywords set if the GeoTag metadata is detected to be missing rather than being filed to its final location the image will be moved to the Geotag folder. Normally this is set by my principal camera (iPhone X) but if the image has been edited the metadata is often stripped by the software or if it is a scanned image the metadata data will be blank. I want all of my photos to have a Geotag of the location where it was taken. Workflow Results.jpg 2000×1246 549 KB Missing Geotag Rename, Tag, Keyword then FileĪfter importing my new images I will sort them into folders which have been named using the following conventionĬategory,Description (name of Event or Names of People in the photo etc).Įach component of the name needs to be separated by a comma, with a maximum of 7 components being used. My storage location is a sub folder under Documents which means the files are automatically backed up to iCloud and easily accessible remotely via the iOS Files app and Spotlight searches. The curated images are then backed up to Google Photos, my Synology NAS and some are stored in Albums in Apple’s Photos app. I have not yet found the ultimate Digital Asset Management software to achieve my aims so until that happens (fingers crossed for Luminar) I use a hierarchal file system in MacOS with extensive use of Hazel Rules and ExifTool to automate the process as much as possible. I like to keep a curated library of my images and videos using descriptive names, tags and keywords so that I can use a number of different approaches to store and retrieve my assets. Automated Photo Workflow using Hazel Rules and ExifTool I mentioned this over of on the MPU Talk forum but thought I would post it here as well.
0 notes
Text
Exiftool mac

#EXIFTOOL MAC HOW TO#
#EXIFTOOL MAC FULL#
#EXIFTOOL MAC PORTABLE#
#EXIFTOOL MAC SOFTWARE#
#EXIFTOOL MAC WINDOWS#
You can also write your own logic and specify different conditions across entire libraries of images without having to use any kind of shell scripting. You can even define custom tags too!Įxiftool does more than just read tags though.
#EXIFTOOL MAC FULL#
You can find the full list of file and metadata types that exiftool supports here.Įxiftool is a tool with an enormous array of features able to work with over 23,000 tags over 130 different groups. Since then, exiftool has become the go-to tool for working with metadata at the command line due to the vast array of file formats and types of metadata it supports. You’ll see that tags and exiftool go hand in hand! What is exiftool?Įxiftool is a command-line utility, technically a Perl library written by Phil Harvey first released in 2003. You can find a full list of all tag groups in the exiftool documentation. Groups are also categorized into one of seven families depending on what information is defined in each group. These groups can have different lists of tags and set how those tags are defined within the group. Tags are classified into groups, like DICOM and EXIF. The Flash example described above fits in with the EXIF standard. Similarly, the EXIF standard dictates metadata schemas for classifying images and sounds recorded by digital cameras. If tag holding a medical diagnosis embedded in an x-ray image got changed accidentally, that’d be bad. You can add some custom tags not defined by the DICOM or EXIF standard in exiftool and change many tags but not all. The DICOM standard dictates that the image supports tags like the attending physician’s name, procedure date, and exposure length. These standards define tag “schemas” that dictate the tags assigned to specific filesįor example, metadata on an x-ray image taken at a hospital or medical center will follow the DICOM standard. For example, two of these standards are Digital Imaging and Communications in Medicine ( DICOM) and Exchangeable image file format (EXIF). Having this standard set of values for tags allows exiftool users to know what values are available for specific tags. This Flash tag example has a defined set of values it can have 27 to be exact. The Flash tag may then have a date value that indicates when the picture was taken. When you do, your phone may store the picture and embed a metadata tag in the picture named Flash. For example, perhaps you take a picture with your phone. Tags are key-value pairs embedded into files that store information about that file. Tags are extremely important to understand as nearly everything in exiftool comes back to metadata tags in some way. Metadata is stored in these files as metadata tags or just tags. Metadata is information embedded into documents and media that are typically hidden from view.
#EXIFTOOL MAC HOW TO#
Translating Tags into Different Languagesīefore you can understand how to use exiftool, you must understand metadata.
Filtering with If/Then Conditional Logic.
Exporting Tag Lists to CSV, HTML, JSON, and More.
Displaying Only Tags in a Specific Group.
Managing Duplicate Tag Names in Different Groups.
Reading Metadata with ExifTool: A Simple Example.
Adventurous types who like the idea of a super-basic, super-flexible command line tool will find ExifTool easy to learn and educational, too.
#EXIFTOOL MAC WINDOWS#
So who should look at ExifTool's Windows distribution? Windows users with Perl installed on their machines (and some basic skills using the language) will be well-equipped, but the average user will do better with a more familiar tool.
#EXIFTOOL MAC SOFTWARE#
We renamed it, as the instructions recommend, but, as we noted before, we were already well outside the lines of the sort of software we were looking for - or that most users would look for, for that matter. The program's executable file downloads with the (-k) suffix, which tells the Command Prompt to stay open. ExifTool popped back up with all of the image's available metadata displayed (many spaces were blank). Following the instructions, we closed the prompt and dragged an image file into ExifTool's executable. Right away we knew we were in unfamiliar territory. We extracted ExifTool's executable and double-clicked it to open the program's documentation, which includes an extensive list of file types and meta information formats that ExifTools supports. To edit data, you'll need to rename the executable file and open it via a command line, which enables all of the Perl distribution's features.
#EXIFTOOL MAC PORTABLE#
Simply place this portable tool's executable file on your desktop and drag an image file into it to produce a Command Prompt window displaying all of the file's available metadata. If you can handle the Perl programming language or have no problem with the Command Prompt (or typing characters and spaces) then ExifTool offers a super-fast way to view and edit an image file's metadata without having to open a substantial program.
0 notes
Text
Exiftool mac

#EXIFTOOL MAC MP4#
#EXIFTOOL MAC ZIP#
#EXIFTOOL MAC FREE#
#EXIFTOOL MAC WINDOWS#
(I like using that because Photos app sees it as a removable device and it cleanly imports and deletes the files) Then run the following commands below using exiftool to take the or exif date and write it to the file property "FileCreateDate" and "FileModifyDate" - the "Date Created" and "Date Modified" of the file.
#EXIFTOOL MAC MP4#
Problem is, none of the mov or mp4 files - as well as PNG and some jpg and jpeg files - have a "Date Taken" or any other date that Photos reads as a Media Created date or Date Taken date, so the import stuffs them all into the folder with a date from the day I downloaded from iCloud.)Īfter downloading from iCloud, unzip a batch of files to an SD card in an SD card reader in your PC. Then, after unzipping those files, I want them imported into folders named YYYY-MM-DD in my Pictures Library folder.
#EXIFTOOL MAC ZIP#
There you can only download 1000 images at a time so I'm stuck downloading several zip files to clear a whole year. So I had to reverse the process and go to. I couldn't figure out any rhyme or reason why. But when I start an import, it would only go so far, then would just stop midway.
#EXIFTOOL MAC WINDOWS#
I used "Photos" app in Win10 and after much difficulty even "seeing" the iPhone in Windows Explorer, I finally got it visible in Explorer and Photos. I would rather have imported the same batch of files first from my iPhone directly to my PC, but it never worked right. (I would have attacked the problem in reverse if it worked, but it doesn't.
#EXIFTOOL MAC FREE#
To download a large batch of pictures and videos from iCloud so I can import them to my Pictures folder and delete them from iCloud and my iPhone and free up space in both places. Here is what I did - for any future searchers. Ok, so I found this thread on the site that explained what to do exactly. For any pictures I downloaded, the file Attribute "Date Taken" is the actual date it was taken - or created- so that works fine, however "Date Taken" is blank for any video downloaded so photo importing tools get confused and import them into the wrong folders. The file attributes Date Created, Modified, Accessed, etc all refer to a date around the time I downloaded the files, nothing close to (I assume EXIF data) the CreateDate. It would be nice if they separated "Details" from "Exif Data" and gave it it's own tab in Properties. Is that correct?Īnd to further confuse us, I think, Microsoft displays some of that EXIF info in "Details" tab in the file "Properties"? Under the sub-heading "Origin" I see a date that corresponds to EXIF "CreateDate" called "Media Created". So, just to be clear for myself and others who may run across this, when you refer to a "Windows" date, that's what I was calling a "file attribute" or similar, correct? They are the attributes of the file that any non-image file would have, whereas the "EXIF" dates like "CreateDate" are those embedded into a file using EXIF that only apply to images and videos. If you need to refer to a file in a different directory (like the exiftool executable), it's safer to specify its location by path than to cd over to it first.Thanks for the response. Third, cding around in a script can cause confusion in a script, because it changes the meaning of relative paths (shouldn't be a problem here, but it's generally a bad practice). You can use & to join commands, and it'll run the second command only if the first one succeeds. Second, it doesn't do any error checking if something goes wrong with one of the commands, it blithely continues on, maybe in the wrong directory, maybe who knows. To make it run on all of them, put the commands that operate on the files inside the for loop, rather than after it (and remove the echo - it's just there as a placeholder in the sample code). It loops over the files, echoing each path, but then it only runs exiftool on the last one. select several files in the Finder, then drag them all to the app). First, it won't work for multiple files (i.e. There are several problems with the "solution" script. This is the error Message of the Automation Application: I tested it out, and the file path is correctly stored in the $f variable.īut for some reason the shellscript in the Automation can not use the exiftool.Īnd the second error in the error message is not important, because it appears because the exiftool command didnt run. I first tested if exiftools works if i use it in the terminal:īut when I use exiftool in the shellscript inside my Automator App, then it says, that it didn't found the command "exiftools".Īnd the Automation runs this Shellscript: for f in "$f" Im using exiftools to remove the Meta Data. The Atomator App works in such a way, that I drag and drop the File on the App, and the App starts a shellscript, with the filepath as input. I want to create a Atomator App, that removes metadata from files for me.
0 notes
Text
Does exiftool for mac work with catalina

DOES EXIFTOOL FOR MAC WORK WITH CATALINA INSTALL
DOES EXIFTOOL FOR MAC WORK WITH CATALINA DOWNLOAD
DOES EXIFTOOL FOR MAC WORK WITH CATALINA MAC
If I could do what I want to do with x-plat, I’d seriously wiggle out of Apple exclusivity at the moment. Most macOS apps (even written by Objective-C devs) are littered with version checks (something Apple says you should never do) simply to work this broken API in this OS, that broken API in that OS, undocumented changes which effectively break this. You can also write your own logic and specify different conditions across entire libraries of images without having to use any kind of shell. I suspect the issue is broader though, Catalina calls home to check for infected.
DOES EXIFTOOL FOR MAC WORK WITH CATALINA MAC
You can even define custom tags too Exiftool does more than just read tags though. Upgraded our Mac to new Catalina OS and now Office 365 doesn't work at all. I replaced scope.sh with scope.sh.orig and now ranger works OK for me.
DOES EXIFTOOL FOR MAC WORK WITH CATALINA DOWNLOAD
Meaning that java 8 is now supported again, also means that many Windows and MacOS users can now download the version without the extra JRE (java runtime environment) as on most Windows 7/8/10 and MacOS versions 'of the last years. There are so many problems with Apple’s toolbox at the moment, with very little concern over quality or stability, which just amounts to a really worrying experience. Exiftool is a tool with an enormous array of features able to work with over 23,000 tags over 130 different groups. Add exiftool supported languages for displaying metadata tags (also in 'export metadata'). I still use Xojo, but almost everything I do is direct Apple API, which has locked me into a decaying platform. Well, by leaving Xojo and going all in with Swift, you’re removing Xojo from the equation, so you’re one level closer to the OS vendor.īut you’re giving up x-plat, which to be honest is something I’d recommend you reconsider. Im using exiftools to remove the Meta Data.
DOES EXIFTOOL FOR MAC WORK WITH CATALINA INSTALL
The Atomator App works in such a way, that I drag and drop the File on the App, and the App starts a shellscript, with the filepath as input. A good way to troubleshoot this is to check the metadata dates with the following exiftool command: exiftool -a -G1 -s -api QuickTimeUTC1 -time:all -api RequestAll2 movie.mov But for most users that is too difficult because they must download and install exiftool and have some basic Terminal skills. Which is distressing as I’m now wondering it the “safe haven” I’m fleeing Xojo for is more or less as problematic as what I’m already faced with. Im on MacOS Catalina 10.15.3 Im using the zsh I want to create a Atomator App, that removes metadata from files for me.
0 notes
Text
Tag music tag editor

#Tag music tag editor mac os#
#Tag music tag editor mp4#
#Tag music tag editor mp4#
File Explorer has limited tag editing capabilities on MP4 and WMV files.The concise and clear interactive method can help you. XnView – Available for Windows, Linux and OS X Music Tag Editor is a professional all-round tool for editing metadata of audio and video files.IrfanView – Available for Windows, Linux and OS X.DigiKam – Available for Linux, FreeBSD, OS X and Windows.You can also change album-level tags with one. ExifTool – Available for Windows, Linux and OS X bliss has a powerful tag editor which works similarly to traditional tag editors.TagScanner – Supports MP3, Ogg, FLAC, WMA, MP4, Opus, Musepack, APE, AAC, OptimFROG, Speex, WavPack, TrueAudio and WAV, AIFF.Mp3tag – Supports MP3, FLAC, Ogg, MP4, MPC, WMA, APE, OptimFROG, TAK, and WavPack.Supports embedded album art and auto-lyrics. Jaikoz – Commercial package, available for Windows, Linux and OS X that uses the MusicBrainz database for auto-tagging.File Explorer – has limited tag editing capabilities on supported file formats such as MP3 and WMA.puddletag – Supports MP3, FLAC, Ogg, APE, MP4, MPC, WMA, OptimFROG, TAK, and WavPack.
#Tag music tag editor mac os#
Available for FreeBSD, Linux, Mac OS and Windows.
MusicBrainz Picard – Supports MP3, FLAC, Ogg, MP4, MPC, WMA, APE, OptimFROG, and WavPack.
Kid3 – Supports MP3, MP2, FLAC, Ogg, MP4, MPC, WMA, AAC, Opus, Speex, TrueAudio, WavPack, WAV, AIFF, and tracker module (MOD, S3M, IT, XM) formats.
Available for FreeBSD, Linux, Mac OS, and Windows.
Ex Falso – Supports MP3, FLAC, Ogg, MP4, MPC, WMA, APE, MIDI, and WavPack. Tags provide the title, artist, year, genre, album artwork and other great information.
EasyTag – Supports MP3, MP2, FLAC, Ogg, MP4, Musepack (MPC), Monkey's Audio (APE), and WavPack formats.
Media players generally have tag editing capabilities and are not included. Using something like MD5 is useful as a first pass to find exactly-identical files, but another, more advanced algorithm is required to find all items that would nonetheless be interpreted as identical by a human listener. In hash function, for audio identification, such as finding out whether an MP3 file matches one of a list of known items, one could use a conventional hash function such as MD5, but this would be very sensitive to highly likely perturbations such as time-shifting, CD read errors, different compression algorithms or implementations or changes in volume. Practical uses of acoustic fingerprinting include broadcast monitoring, identification of music and ads being played, peer-to-peer network monitoring, sound effect library management, and video identification. Depending upon the particular algorithm, acoustic fingerprints can be used to automatically categorize or identify an audio sample. An acoustic fingerprint is a unique code generated from an audio waveform.
0 notes
Text
Exiftool by phil harvey review

EXIFTOOL BY PHIL HARVEY REVIEW FOR ANDROID
EXIFTOOL BY PHIL HARVEY REVIEW ANDROID
EXIFTOOL BY PHIL HARVEY REVIEW MAC
Exiv2 is an open source tool that decodes Exif, IPTC, and XMP metadata.In addition, different programs may support different types of metadata.Ī few examples of available image metadata tools: Some of these only support one file type (e.g., JPEG-only), while others support many file formats. There are plenty of open source, free, and commercial solutions available. Viewing metadata requires extracting the information from the file. Many converters omit metadata, and WebP does not have facilities for storing all of the various metadata fields found in JPEG images. Similarly, WebP files are nearly always converted from another file format. Converted PNG files may include metadata from the source file format. unless the image was converted from a JPEG or edited with Photoshop. PNG files typically contain very little information. In contrast, a JPEG from a camera usually contains a wide variety of information, including the camera's make and model, focal and aperture information, and timestamps. Some formats, like BMP, PPM, and PBM contain very little information beyond the image dimensions and color space. Metadata provides information about a picture's pedigree, including the type of camera used, color space information, and application notes.ĭifferent picture formats include different types of metadata. They also contain information (metadata) about the picture.
EXIFTOOL BY PHIL HARVEY REVIEW ANDROID
On Android 6.0 and above, you can choose to deny this location permission.Most image files do not just contain a picture. Location permission: This is an optional permission to allow the Map to identify your current location. WiFi Permission: This application requires network connection to load the Map (Google Map). If you're facing any problem, want new feature or have feedback to improve this application, don't hesitate to send it to us via the support email:
Video (mp4): Add/Edit the tag GPSCoordinates in the section QuickTime::ItemList of the group QuickTime.
Image (jpg): Add/Edit the tag GPS Location in the section GPS::Main of the group EXIF.
Supports alternate language tags in XMP, PNG, ID3, Font, QuickTime, ICC Profile, MIE and MXF information.
EXIFTOOL BY PHIL HARVEY REVIEW MAC
Sets the file modification date (and creation date in Mac and Windows) from EXIF information.
Deletes meta information individually, in groups, or altogether.
Reads/writes structured XMP information.
Reads and writes maker notes of many digital cameras.
Writes EXIF, GPS, IPTC, XMP, JFIF, MakerNotes, GeoTIFF, ICC Profile, Photoshop IRB, AFCP and more.
Reads EXIF, GPS (Location), IPTC, XMP, JFIF, MakerNotes, GeoTIFF, ICC Profile, Photoshop IRB, FlashPix, AFCP, ID3 and more.
Supports a large number of different file formats.
The integrated gallery and file browser allow you to surf through your storage.
EXIFTOOL BY PHIL HARVEY REVIEW FOR ANDROID
What can EXIF Pro - ExifTool for Android do? With the clear user interface, EXIF Pro - ExifTool for Android is an easy to use tool that helps you to correct the missing information of your favorite photos, audios, videos and other file types. such as JPG, GIF, PNG, RAW, DNG, PSD, OGG, MP3, FLAC, MP4.). This application allows you to view, modify and delete the Exif, XMP, IPTC and other metadata of your files (include pictures, audio, video. It supports editing multiple files at once. EXIF Pro - ExifTool for Android is a tool which expands the ability of ExifTool by Phil Harvey to Android platform.
0 notes
Text
How to compress video files using ffmpeg

#How to compress video files using ffmpeg how to
#How to compress video files using ffmpeg mp4
#How to compress video files using ffmpeg full
The streams include the actual AV components, such as a movie's audio or video, and are encoded using a particular media encoding, or codec. At a very high-level view, a media file is broken up into a container and its streams. $srcAB = intval($ffmpegObj->getAudioBitRate()/1000) Įxec($ffmpegPath. Before we look at using FFmpeg, first we need to take a quick look at what a media file exactly is. Now, we have a kind of complete command, let’s make our final code! getFrameWidth()) What we do is make flvtool2 run at the same time as FFMPEG so we’ll pipe it into the command which means our general command is ffmpeg -i video.avi -ar 22050 -ab 32 -f flv -s 320x240 video.flv | flvtool2 -U stdin video.flv Steps 4 and 5 in the diagram work simultaneously with this one. Now we have pretty much most of the values ready for our compression, however, we need to call flvtool2 to get our Meta information. $srcAR = $ffmpegObj->getAudioSampleRate() While I suggest the values above for audio as they are the most compressed, but we’ll use the old audio settings for better quality.
#How to compress video files using ffmpeg how to
That’s generally how to convert a video.avi to video.flv with the audio sampling at 22050 & audio bit rate at 32, with the size 320×240. ffmpeg -i video.avi -ar 22050 -ab 32 -f flv -s 320x240 video.flv We’ll see what quality settings we will have to set. I tried to extract with FFmpeg but quality of extracted images is not good.ffmpeg -i X.MTS images/05d.pngThen I. Use FFmpeg to transcode and compress the video Recover the file-level metadata with Exiftool It would be nice to have a tool that bundles up everything weve seen into one simple package, wouldnt it For this reason, I created Shrinkwrap. Let’s see on how our command will consist and what it will be made of. I have an X.MTS video file and I want to extract images from. Here is where the fun starts, executing it and telling FFMPEG where to place it later. $srcHeight = makeMultipleTwo($ffmpegObj->getFrameHeight()) Īlso, the width/height has to be multiples of two so I have created a function that makes it a multiple of two: Ģ. We’ll start out our code with getting our variables: getFrameWidth()) Install FFmpeg if it isn't already installed. I’ll be using the clock.avi located in every windows system. This wikiHow teaches you how to use FFmpeg to convert video and audio from your computer's Command Prompt (Windows) or Terminal (Mac, Linux). What we mainly need is the width, height & FPS (frame per second) so that we can tell FFMPEG about. (You can’t use what you have in “memoryâ€, so you’ll have to look on how to upload a file, once you got that and have the path of the file, we’ll start our script to invoke FFMPEG-PHP and get the file’s resolution. Although the command line is easier to use for experienced users, for new, it’s the iron.
#How to compress video files using ffmpeg full
So, before doing any of this, you should make sure that your file has been uploaded to somewhere and you have the full path to it. FFmpeg is the command line, cross-platform tool to record, convert, compress and stream audio/video files.
#How to compress video files using ffmpeg mp4
Send the script to FFMPEG-PHP and get it’s info How to concatenate mp4 videos with FFmpeg easily with advanced one for intermediate We will show guidance and best alternative to FFmpeg detailed FAQs.
0 notes
Text
Geosetter Alternatives For Mac

Geosetter Alternatives For Mac Osx
How To Use Geosetter
Geosetter Alternatives For Mac Computers
Geosetter Download
GeoSetter (by Friedemann Schmidt) is a Windows program that does a great job helping you set the location for your photos. In this article, I will go in depth on how to use this tool. If you are interested in a Mac program, or a more general overview of geotagging, see my previous post – How to Geotag Old Photos.
With GeoSetter, you can geotag photos manually by using the map. Or you can geotag automatically using a GPS track file such as .kmz or .gpx files. It allows you to save latitude/longitude coordinates (and in some cases altitude) to the EXIF data of your photo files. In the background, it uses the open source exiftool program for saving changes. GeoSetter’s interface includes Google Map display, file browser with thumbnails and previews, and track overlays. Most importantly, it features manual and automatic batch geotagging. The author hasn’t updated the software in a while, but I found it really easy to use for both methods of geotagging. I like seeing the results when the map updates as I browse through my photos. The program has great documentation as well. You may find something else out there, but I’ve tried a few, and this is what I use.
Manually Geotagging Single Photos
It’s easy to geotag a few photos with GeoSetter.
But while the Mac Pro will make some creative professionals happy, the machine's $5,999 sticker price may send others looking for alternatives. Truth is, while the Mac Pro now leads the pack, many. Mac OS X; Other. Cloud; Web and Network. GeoSetter 3.4 map view doesn't load and following message is displayed in the map view: The Map can't be found at.
Open the folder with your photos in the file browser area, and click the photo that you wish to geotag.
Find the right area in the map (you can search to get there quickly).
Click on the map to pin the location.
Click the “Assign position marker to selected images” button in the toolbar above the map (red pin with left arrow). The new coordinates will now show red underneath the photo.
Click the floppy disk icon to “Save all change to image files” or use Ctrl-S. This writes the changes to the file(s).
Of course, you can assign the position on many photos before hitting the Save button to save a bunch in a batch. It may take a minute so that’s a good way to do it.
Once the location is saved in the file, the photo is ready for map displays wherever they are used. This includes uploads to photo sharing sites such as Flickr (see Flickr’s photo map), or uploaded photos of places in Google Maps (How to Upload Great Photos to Google Maps), and many others.
The altitude (or elevation) will not be set using this method. There is no source for that information like there might be in a GPS track.
When Using a GPS Track, Timing is Everything
Geosetter Alternatives For Mac Osx

Geotagging photos automatically using a GPS track is a great way to go. Of course you need to have recorded a GPS track at the time. You do have to be careful about the photo timestamps though. Programs like GeoSetter rely on the time saved in the photo for finding where the photo fits along a GPS track. If the time is incorrect, it won’t match up correctly with the points saved in the track file and the location chosen will probably be way off. Conveniently, you can use an option within GeoSetter to offset the time for purposes of setting photo coordinates.
GPS receivers and apps record the current UTC time into the GPS track in the resulting GPX file. UTC does not have a daylight savings time shift like many places do. So even if you have your camera’s time set correctly, you may still need a correction. When I last geotagged some older photos, I had the time set correctly on my camera, but I had to adjust for 1 hour in the GeoSetter dialog to sync them properly. After that, the result was excellent. I had a few photos where I took one both with my camera and my phone (which already had GPS coordinates), and they matched.
Now you may want to actually save a new time within each photo file to correct it. I do this when I forget to adjust my camera’s time while in a different time zone, and back home I want to keep photos from both my camera and my cellphone in the same folder sorted by time so they show up in order. For this I recommend using ExifToolGUI.


How accurate is geotagging automatically from a GPX track in this way?
GPS tracks do not have continuous data. They record track-points at certain intervals and normally that’s good enough. GeoSetter, and other geotagging applications, allow for estimating the position in between GPS track-points in your track. Presumably it interpolates in this way by the elapsed time between the two points and the time of the photo.
How To Use Geosetter
What does this mean? If the photo is taken about halfway between the time of the two track-points, then the program will place it halfway between the two GPS coordinates of those track-points. So the location it finds can be slightly off depending on the consistency of the speed in which you travel between those two points, the straightness of your trail, and just the time elapsed between the two track-points. If you stop and take several photos in one place, the time difference between them causes them to be put at different locations along your path. Photos taken within a short interval relative to the rest of your travel will be placed quite close together.

You can likely adjust how often track-points are recorded in your GPS receiver or app. Shorter time intervals between track-points will of course result in more accurate estimations (and use more battery). But don’t bother with this unless you notice a need for it.
A Test
Geosetter Alternatives For Mac Computers
For a test in accuracy, I have used my track file recorded by the MotionX GPS mobile app during a backpacking trip in Rocky Mountain National Park, and of course the geotagging program GeoSetter. I took some photos with my camera and some with my phone. The cellphone shots have accurate GPS info saved in their EXIF data due to the phone’s GPS. I stuck one of those in with my regular camera photos, and then ran the synchronization in GeoSetter. That set the location of all my un-geotagged photos. It also overwrote the GPS coordinates on the one photo from my phone to its best estimate based on the photo’s time and the GPS track data.
Geosetter Download
Below is the result. I’d say it’s pretty darn close! Depending on how your GPS track is recorded and the other conditions I mentioned, I’m sure it will be accurate enough for you as well.
0 notes
Text
Pyexiftoolgui

ExifToolGUI For Windows V5.xx - ExifTool By Phil Harvey
Pyexiftool

Skip to end of metadataGo to start of metadata
As of February 5, 2020, pyExifToolGUI is no longer included in the BitCurator Environment (version 2.2.0 and beyond). It can still be installed in the environment - see theproject websitefor more details.

Overview
It’s the gold standard in terms of the image metadata it can access, but by itself, it’s not the most user-friendly tool, so many users might prefer one of the versions that adds a more user-friendly interface on top, such as pyExifToolGUI (Windows, Mac, Linux) or ExifToolGUI (Windows). It’s free and platform-independent, and you can find. PyExifToolGui is a graphical frontend for the excellent open source command line tool ExifToolby Phil Harvey. PyExifToolGui is a python pySide QT4 script program that reads and writes all kind of metadata tags from/to image files.
BitCurator includes Harvey Van Der Wolf’s pyExifToolGUI, a front‐end for ExifTool, to simplify the process of viewing, editing, and manually exporting data from select image files.
Step-by-Step Guide
Step 1: Open PyExifToolGUI by double clicking on the 'Forensics Tools' folder on the BitCurator desktop and then double clicking on the 'PyExifToolGUI' icon (see Figure 1).
Figure 1: Opening PyExifToolGUI.
Step 2: Click on 'File' in the upper-left of the screen, then click on 'Load Images' from the resulting drop-down menu (see Figure 2).
Op gg euw vayne. Figure 2: Loading the image file.
Step 3: Navigate to the image file in which you are interested, then click 'open' in the bottom right-hand corner (see Figure 3). The image file you chose should now appear in the lefthand column of the screen (see Figure 4).
Figure 3: Navigating to the image file.

ExifToolGUI For Windows V5.xx - ExifTool By Phil Harvey
Figure 4: The image file appears in the lefthand column.
Step 4: Click on the image file name in the lefthand column; this will load information about the image in the right-hand side of the screen (see Figure 5). Browse through this data to discover information about the image such as date and time of its last modification, file size, and bit depth.
Figure 5: Viewing information about the image file.
Lol the next. Step 5: The radio buttons above this data allow you to explore specific information about the image. For example, choosing the 'GOS/Location' radio button would provide you with the GPS coordinates for where an image was take if they were available (in the example in Figure 6, no GPS coordinates were available for the image). | width='50%'
Figure 6: Using the radio buttons to further explore the image file.
Step 6: Fusion 360 macbook. The tabs above the radio buttons provide additional options for exploring and editing your image file. The 'edit data' tab is of particular interest (see Figure 7); this tab allows you to change the data saved to your image file, letting you (for example) add missing data known to you, such as the GPS coordinates of where an image was taken. Figure 7: The 'Edit Data' tab allows you to add or change data in the image file.
If you would like to provide feedback for this page, please follow this link to the BitCurator Wiki Google Form for the BitCurator All Step-by-Step Guides section.
Pyexiftool
Content Tools
0 notes
Text
Como extraer información de archivos de audio, video o imágenes
Como extraer información de archivos de audio, video o imágenes

Exiftool es una aplicación de linea de comando, ejecutada desde la terminal del sistema. Esta disponible para Windows, Mac y Linux. Y es totalmente gratuita.
Esta herramienta nos permite realizar diversas tareas con los archivos de audio, video y fotografía. Una muy interesante, es la de poder conocer todos los datos de los archivos multimedia; audio, video e imágenes.
Exiftoolnos permite…
View On WordPress
0 notes
Text
Organize your photos & video using exiftool
If you are as comfortable as me working with command line interfaces, you would rather have tools that work well with or without a GUI. I can get batches done much faster using the command line interface. Here I’ll show you how I convert personal media files to be organized in my collection. I would usually do this all in linux, but since most of my family uses the one windows 10 machine in the house, I do this conversion on the windows 10 box.
It has been a while since I’ve organized all the videos and photos our family has taken using various devices. #exiftool written by Phil Harvey is great to do what I want by taking the files embedded metadata and converting them to filenames. He first written it as a perl script, but now is wrapped in a Windows and Mac executable.
So I like to organize my files by:
1. year 2. day of photos 3. photo stamped with date and time
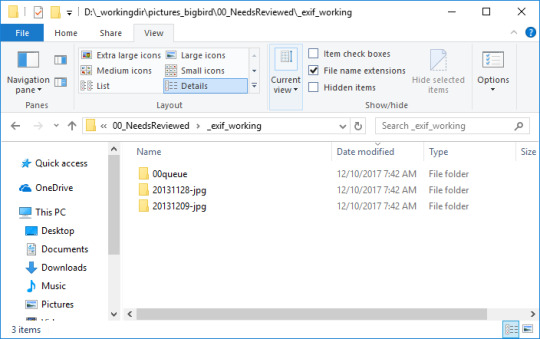
to use exiftool, I first copy all the photos/video I want to process in a directory called exifworking/00queue then to covert the format I use the following commands:
FIRST RUN THIS TO NORMALIZE THE FILES TO DATE-TIMESTAMPS
exiftool –ext [file_extension] -r "-FileName<${DateTimeOriginal}.%le" -d %Y%m%d_%H%M%S%%-.c [directory]
THEN RUN THIS TO CONVERT DIRECTORY
exiftool –ext [file_extension] -r "-directory<${DateTimeOriginal}-%le" -d %Y%m%d [directory]
so for a .jpg file set I would run the following:
exiftool –ext jpg -r "-FileName<${DateTimeOriginal}.%le" -d %Y%m%d_%H%M%S%%-.c 00queue
This converts the filename to a datetime format, then I want to organize photos shot the same day into directories
exiftool –ext jpg -r "-directory<${DateTimeOriginal}-%le" -d %Y%m%d 00queue
This will move them into your current directory, things that didn’t get processed stay in the queue. Now they are organized I copy them to a organized folder with the year stamp and done.
Some notes I had dealing with other files metadata that might be useful:
FOR AVI FILES HAD TO USE DateTimeOrginal INSTEAD OF CreateDate
FOR AVI FILE NEED TO USE THE OPTION ‘–ext AVI’ PROBABLY SAME FOR MP4
FOR MOV NEED CreateDate
TO DELETE A DIRECTORY RMDIR for /f %i in ('dir /a:d /s /b *NAMEOFDIRECTORYWILDCARD*') do rd /s /q %i
So here is a screenshot of what my directories look like post processing
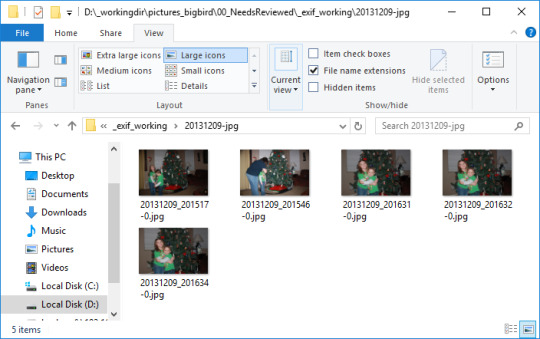
And here is a screenshot of what is contained in a directory
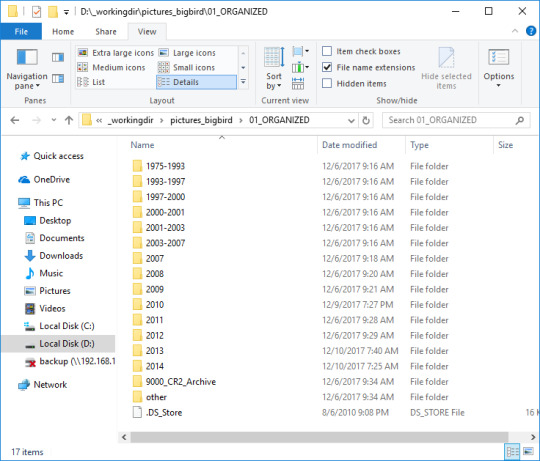
And last screenshot of my organized folder, note: my 9000... directory is for raw CR2 files I like to keep.
Hope this was helpful!
0 notes