#FormSpree
Explore tagged Tumblr posts
Visit Tumblr Blog
Explore Tumblr blogs with no restrictions, modern design and the best experience.
Last Seen Tumblr Blogs


Fun Fact
In 2020, Tumblr had 29.4 million users in the US.
Text
Easy Em Website Template
Role: I built an improved and easy to use JavaScript menu for everyone Project goal: A lot of small businesses and other site owners don’t need much more than static web pages, a contact form, and a well-functioning menu system where they can easily add and remove items. Many people have learned some HTML and CSS but not advanced into JavaScript or PHP. When I needed to expand my menu to beyond…

View On WordPress
#Contact Form#CSS#CSS3#Easy Em#eCommerce#FormSpree#Freelancing#Github#HTML#HTML5#JavaScript#Save the Oxygen#Shopify#Upwork#Web Design
0 notes
Text
Games Production (March 19th) 1/2
An Overview
This week was incredibly productive; I have put my full attention this week and last week into QuickBlock, from researching the features I had planned to add to add them to the project. I have also asked a few previous year 3 students for help with my work, as no year two student has contacted me about helping yet.
Star In The Making
I asked a previous student for a favour to help me - he will be credited in the project files. I had asked him to work on a few gameplay mechanics that I had started but didn't have the time to complete due to Quickblock being very far behind and all of my focus being directed to this.
So far, he has only shown me one video of the mechanics I requested: the addition of the power-up Object Pool and the "Magnet" Power Up. He is currently working on some SFX for the project, but this will be shown in next week's devlog.
This video also shows my canvas system working, where multiple screen sizes & shapes still have no issues with the UI.
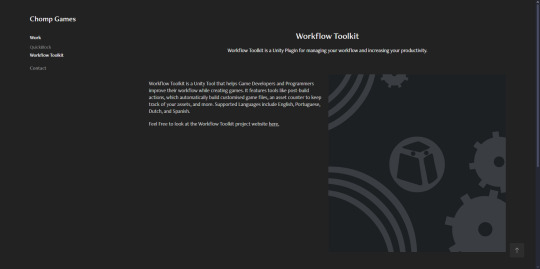
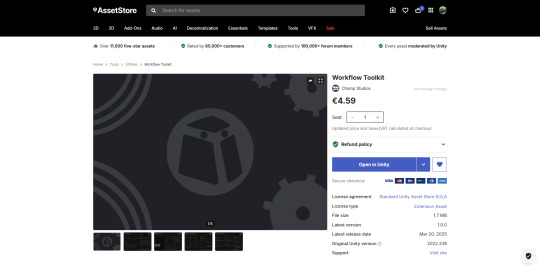
Workflow Toolkit
I didn't do anything regarding the Workflow Toolkit code - but I submitted the project and waited for the green light (or red light). The whole process took 6 days, and the queue was anxiety-inducing.
it went from 336 on the 14th march -> 359 on the 15th -> "A few business days" on the 18th.


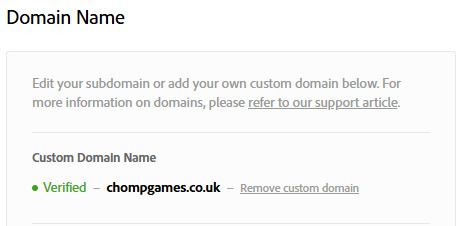
Unfortunately, I got denied as my website wasn't pointing to the correct domain, and I didn't have a contact & feedback form - so I got to work adding them to re-submit my project

Firstly, I created a temporary website on Adobe Portfolio—this will just be so everything works and the publishing checkers can make sure that I have a good website set up, as I don't have one for my Games Studio yet.


For more authenticity, while verifying, I decided to connect my domain to Adobe Portfolio's website, so I don't have that ".myportfolio" domain.
I did this through Namecheap's Custom DNS settings - Adobe Portfolio gave me some IP addresses I needed to connect.


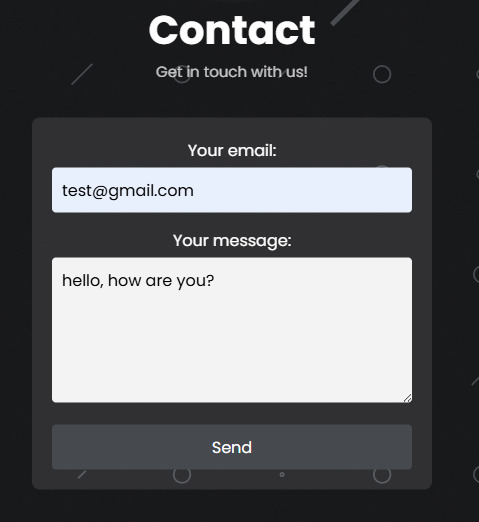
I then worked on a contact page for the workflow toolkit project website - it took a while to make and had a few issues (like the contact button not being "secure), so I switched over to a form API called FormSpree

The form itself isn't very pretty, as I just wanted to make sure I could conform to the Unity Asset Store rules, so I could re-submit with a fast track to get re-submitted.
This implementation wasn't hard, but it did take a while. The API is quite simple, but web development isn't my strong suit.


this is what it looks like when somebody submits something to this website:
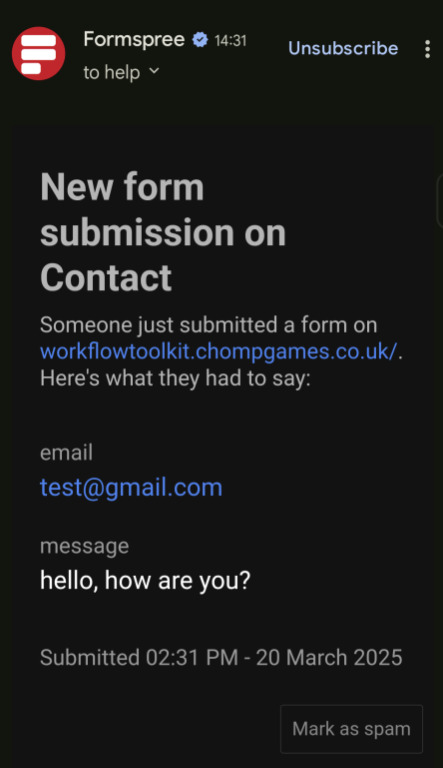
I can email them back once I get a bug report or issue.
UPDATE!!!
As for submitting the Workflow Toolkit again, 30 minutes later, I got an email ~30 minutes later telling me I had been approved! This is so exciting!

It can now be viewed, used and purchased on Unity.com as well!


Package Manager & Importer view
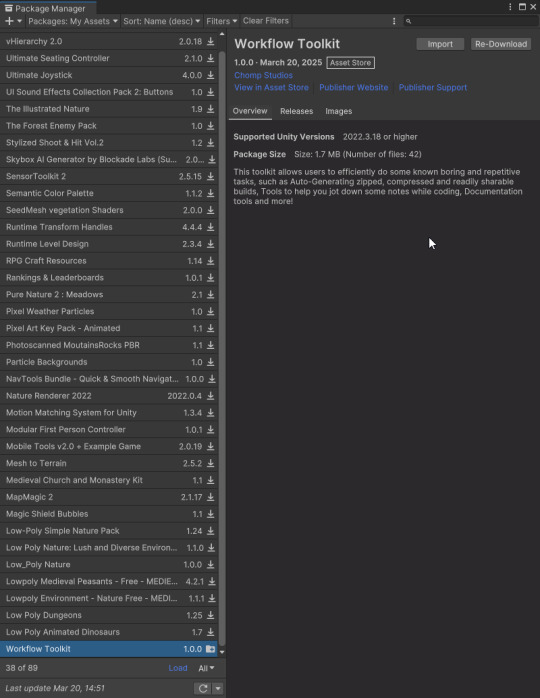
I will continue to work on the Workflow Toolkit through Year 3 and beyond, as this project has incredible potential.
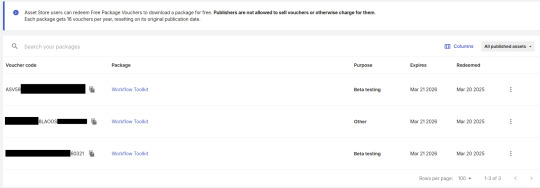
I have generated a few "Vouchers" for this project - I'm only allowed a maximum of 16 a year, so I have decided to give around 4 to beta testers who are free and willing to review my project and one to the person grading me (to test).
QuickBlock
This week, the project has received countless bits of functionality, including scalable objects, zones, widgets, default palettes, and more! These two weeks have given this project a major bump forward.
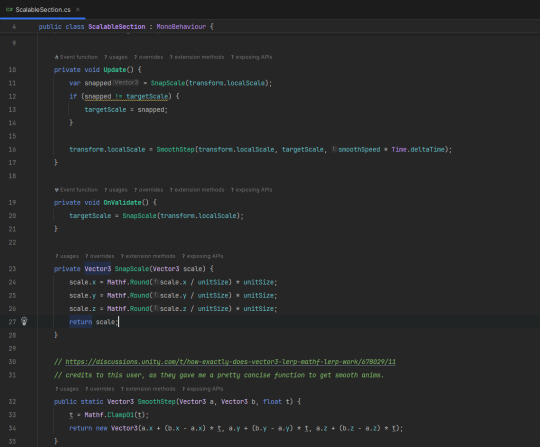
Firstly, starting off with the easiest to explain, Scalable objects are objects that are… scalable; essentially, the three "primitive" objects, Walls, Floors, and blocks, are now able to be scaled, and instead of stretching, the object just gets bigger. I had to modify the default QuickBlock shader and add some code to achieve this.
The Left (white) block is the standard, primitive block - and the Right (black) square is the testing-scalable block. As you can see, the shader is grid-based, not block-based.

The texture compresses and stretches with the white block, whereas the black block conforms to the texture.
To do this first part, I had to modify the shader to use tri-planar mapping, whereas before, it used normal UV mapping. I had to do a lot of research on how to make one, but it was worth it. I found this tutorial by Catlike Coding useful [here].
This was the first area in implementing the fully scalable object - if I didn't modify the shader, the scaling would work but look silly.
I created a simple script to animate and round scaling, with a unit size so you can control precisely how much you want to scale. For next week's submission, I will make a nicer menu setting to change the unit size and animation speed.

This is the scalable block on 0.5 units, meaning that you can half the block (go 1.5, 2, 2.5 etc)

This is the scalable block on 0.25 units, meaning you can half the block (go 0.25, 0.5, 0.75, 1, 1.25, etc.).

The wall and floor prefabs are the same but have a different structure. I'll only show these for brevity (and Tumblr's upload limit).
I find this feature quite important, as the prefabs I have might not properly suit the user's needs, and this provides at least some flexibility.
I then worked on some default/template palettes for the project, which will likely be tweaked. Even so, I need visuals to clean up the UI.
The function I made two weeks ago that generates an image for the palette is handy for this, as I can just set the images as buttons and add the function to swap the palette.

In order, you have Blue Dreams, Forest, Purple, Sunset & Volcano.
The next thing I added was Widgets - widgets are similar to my Workflow Toolkit system, but very simple - they're little windows that give you information on the project.
This could be a vital feature, as it's expandable and can provide excellent ease of use.
Only two widgets have been made so far: Notes and Project Statistics. Notes are just like notepad; you write ideas or notes and pin the window to the side. Project statistics show how many of each section you've placed, with more functionality coming.
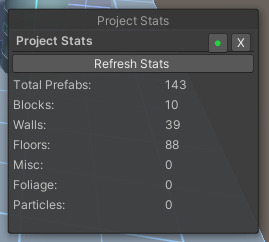

As you can see, they're pretty simple but do provide some nice functionality. I have also made it so the tabs can be dragged around and "Pinned" using the green dot button.
Thankfully, the functionality works flawlessly on both.

Part 1/2 of this weekly devlog.
0 notes
Text
Self-Hostable Form Back End – OSS Alternative to Formspree
https://github.com/FormBee/FormBee
0 notes
Text
Ever want to know what your SEO COST https://poe.com/desirelovell
Free SEO Calculator
Average Monthly Traffic:Conversion Rate (%):Average Order Value:Calculate Revenue
ROI on Lead Spend Calculator
Lead Spend:Lead Quality (%):Conversion Rate (%):Average Order Value:Calculate ROI
ROI on Lead Spend Calculator
Lead Spend:Lead Quality (%):Conversion Rate (%):Average Order Value:Calculate ROI
This HTML code creates a ROI on Lead Spend Calculator that allows users to input their lead spend, lead quality percentage, conversion rate, and average order value. The calculator then computes the qualified leads, revenue, and ROI, and displays the result.
Can you provide an example of how the ROI calculation would change if the lead quality or conversion rate were different?
Is there a way to customize the calculator to fit specific business needs, such as different metrics or formulas?
How can I use this ROI calculator to analyze and optimize my lead generation and marketing efforts?Compare
Speed to Lead Calculator
Number of Leads:Average Contact Time (seconds):Conversion Rate (%):Calculate Speed to Lead
PLAYING MAKING MY OWN BOT:
Small Business Chat AI Survey
Server-side Form Handling:
You could set up a server-side script (e.g., using PHP, Node.js, or a serverless function) to receive the form data when it’s submitted.
The server-side script would then store the survey responses in a database or a CSV file for further analysis.
Third-Party Form Submission Service:
You could use a third-party form submission service like Google Forms, Typeform, or Formspree to handle the form data.
These services provide an easy way to collect and store the survey responses, and often include features like response analysis and notifications.
Integrated CRM or Project Management Tool:
If you’re already using a customer relationship management (CRM) system or a project management tool, you could integrate the survey form with that platform.
This would allow you to store the survey data alongside other customer or project information, making it easier to analyze and act on the feedback.
Regardless of the approach you choose, it’s important to consider factors like data privacy, security, and compliance when handling the survey responses. You may also want to implement features like email notifications, response confirmation pages, and data export options to make the process more seamless for your clients.
I hope this gives you a good starting point to think about how you could integrate the survey data collection and storage into your overall small business chat AI solution. Let me know if you have any other questions!
0 notes
Photo

I drew a thank-you page for the guestbook...and realised that formspree no longer supports thank-you pages for free users _(:3」∠)_
Ah well, in a parallel universe this is what you’d have seen if you wrote a message on the guestbook...
55 notes
·
View notes
Text
Introducing the Formulate stack
This stack was released for free several weeks ago, exclusively for ThemeFlood customers. A paid version that could be used with other themes was requested and has been released through the Stacks4Stacks website. This paid version includes additional code and testing to improve the compatibility and styling with theme frameworks like Foundry and Foundation. You'll need this version of the stack if you are wanting to use Formulate with a non-ThemeFlood theme. Click here to learn more.

Contact forms are a common component in many RapidWeaver websites. However a lot of them require a PHP 'backend' to process the form data and send it to where it is required. Although most better website hosting companies support PHP, some cheap hosts either charge customers extra for this service or have configured their PHP in such an astonishingly awkward way that it renders any contact form useless. We're looking at you, GoDaddy!
On the surface, Formulate looks and works much the same as any other contact form. But a key difference is that the message data is either sent via conventional email or goes through one of two mail handling services; Formspree.io or Formbucket.com. Both of these services offer a simple and smart method to receive data from a contact form. In some instances, it is even possible for yourself or a client to login to these services and view your form submissions as they come in.
Straight away you can begin to see the benefits here - no complications with PHP, fast setup, secure and it works with virtually any email or hosting service. You can even have your messages sent to a disposable email address - like a free Gmail, Outlook or Yahoo address.
Spam protection varies, depending on what form processing service you use. The 'mail to' option supports an obfuscated email address which has surprisingly good protection. Formspree does display your email address in the form action attribute, but a paid account solves this and you get 'honeypot' protection as standard. Formbucket provides the options of both 'honeypot' and 'reCaptcha', within your bucket settings. Again you can use a free disposable email address with this stack, so if the spammers and trollers become too much to handle, just change your email address to something else. That's the same reason why many companies use rather obscure email addresses that change frequently. You can still reply to genuine messages with your normal email address.

Lots of simple form inputs are supported. You have got all your normal form inputs and a couple of specialty HTML5 ones too. Every input supports a label, placeholder text and optional 'help' text. Inputs can be dragged and changed into any order. Any number of inputs can be made mandatory. The 'submit' button at the bottom is only shown / activated when all mandatory fields are completed and the user gives their consent to your GDPR privacy disclaimer.
Formulate most definitely is not a replacement for heavyweight form stacks, like the excellent FormsPlus system from Chillidog Software. But if you need to get a simple form created, then Formulate could be just the job.
If you are using a ThemeFlood theme, Formulate remains a free stack for you to download and use with our themes.
Learn more...
1 note
·
View note
Text
Contact Page Functionality
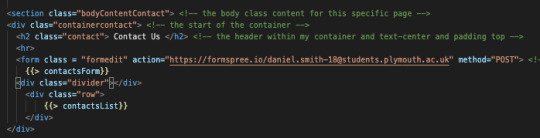
I wanted to do some research and explain possible methods for the functionality of the contact page. There is a way to run a contact page through Firebase but this seems a little complex for what we need it to do. I am thinking more of using Formspree. Formspree has been useful to me in the past with previous projects and it is very easy to use. For this project we have not setup a custom email address so for the sake of the functionality actually working, I will be using my own. Formspree was very easy to use. I simply logged into my account, made a new form and added the necessary post method to the form in HTML. Below is the before and after of this:
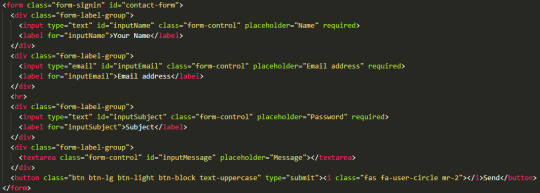

As you can see there wasn’t a great deal to change in the code from what I had already done. During the creation of this form I managed to resolve an issue I had with all three of the forms on our site. I will cover this in the next post as it is a little finicky. After the form was setup I tested it:
I was once again pleased to see it worked. On reflection of this, the contact method we chose here is suitable for the most part. In future if the site was bigger we would be looking at implementing something a bit higher level, perhaps even a live chat system. I have always found live chats to be an important element of modern websites. In an ever increasingly efficient world, users expect responses almost immediately. Live Chat service is a great way of offering these responses. Most live chats are bot based so this is a potential for sure but even the best bots will have their limitations. With a large worker base, people can be employed and designated to working on live chats. Obviously this is thinking very long term but it’s always good to plan ahead.
0 notes
Photo
Adaptive components, Firefox 79, and improving legibility with CSS
#451 — July 29, 2020
Web Version
Frontend Focus
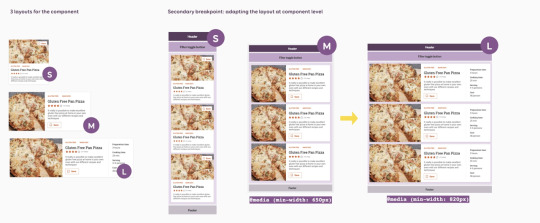
Designing Adaptive Components, Beyond Responsive Breakpoints — Thoughts on designing systems of reusable components that adapt to responsive layouts, containers, work with different content states and adapt to user needs, behaviour and context.
Stéphanie Walter
A New Beta Version of 'Can I Use' — Can I Use is a fantastic resource for checking browser compatibility for modern Web Platform features and a redesign is on the way with performance improvements, better visual accessibility, nicer URLs, dark mode support, and several more new features.
Can I Use
Faster CI/CD for All Your Software Projects Using Buildkite 🚀 — See how Shopify scaled from 300 to 1800 engineers while keeping their build times under 5 minutes.
Buildkite sponsor
Modern CSS Techniques To Improve Legibility — Advice and tips on how to improve website legibility using things such as variable fonts, contrast, spacing, etc.
Edoardo Cavazza
Happy Birthday Web Fonts — It has been a decade since the then newly-formed WebFonts Working Group published a First Public Working Draft of the Web Open Font Format (WOFF).
Vladimir Levantovsky
Firefox 79: The Safe Return of Shared Memory, New Tooling, and Platform Updates — A run through of the highlights in version 79 of Firefox. Here’s the full developer-focused round-up of changes.
Florian Scholz, Chris Mills, Harald Kirschner (Mozilla)
Introducing the Microsoft Edge Enterprise Roadmap and Release Schedule — A new Microsoft Edge release schedule for both the Beta and Stable channel releases.
Microsoft Edge Team
⚡️ Quick bits:
Apple has declined to implement 16 Web APIs in Safari due to privacy concerns (fingerprinting).
An increasing number of the top Google search results are now Google's own properties and 'direct answers'.
Use Mozilla's MDN Web Docs? The web platform documentation site just turned 15 years old.
Ever dragged a file onto a web page only for it to navigate to the file, thus replacing your current tab? Well, Chromium-based browsers are now going to open such files in a seperate new tab.
Did you know that text-decoration isn't just good for setting an underline — it has an 'overline' value too.
��� Jobs
One Application, Hundreds of Hiring Managers — Use Vettery to connect with hiring managers at startups and Fortune 500 companies. It's free for job-seekers.
Vettery
Frontend Developer at X-Team (Remote) — Join the most energizing community for developers and work on projects for Riot Games, FOX, Sony, Coinbase, and more.
X-Team
ℹ️ Interested in running a job listing in Frontend Focus? There's more info here.
📙 Tutorials & Opinion

▶ HTML: How to Make Loveliness — How much do you know about HTML’s semantics? In this 20-minute talk one of the co-editors of the HTML5.3 spec will bring you up to speed, showing you how to use HTML to make sites that work better, are faster and include more people.
Bruce Lawson
Understanding CSS Multiple Backgrounds — A detailed visual explainer of the background-image property, and how best to use it to stack multiple backgrounds.
Ahmad Shadeed
A Fetch API Tutorial for Beginners — A fairly gentle intro to using Fetch, the replacement for Ajax-based XMLHttpRequest techniques, along with a little bit of coverage of Promises.
Louis Lazaris
Over 500M End-Users Depend on Our Scalable Chat & Activity Feed APIs — Build real-time chat in less time. Rapidly ship in-app messaging with our highly reliable chat infrastructure.
Stream sponsor
Introspecting CSS via the CSS OM — Some interesting digging around by Lea. You’re unlikely to need to do this yourself but it shows how you can interrogate the browser for supported CSS properties and whether or not certain properties are shorthand forms of others. Clever stuff.
Lea Verou
Webwaste — Just what is the environmental impact of bloated websites and unnecessary assets? Gerry McGovern examines in this extract from his book World Wide Waste.
A List Apart
Natively Formatting JavaScript Dates and Times
Elijah Manor
Lazy Loading Images in Svelte
Donovan Hutchinson
🗓 Upcoming Events:
ViennaCalling (Today) — An online meetup streamed on Twitch for "all who work on the web".
Frontcon (August 12 - 14) — A frontend conf based in Latvia that's now taking a hybrid approach, offering both online and on-site attendance options.
Front-End Focus (August 17) – It's got the same name as this newsletter but it's nothing to do with us. It's from the An Event Apart team though and has some fantastic speakers lined up.
You Gotta Love Frontend (August 24-28) — This now online event will feature five talks over five days. Speakers are to be announced next week.
🔧 Code, Tools and Resources

css-sweeper: MineSweeper Implemented in CSS + HTML (No JavaScript) — Play it here. The CSS interestingly uses a combination of CSS variables (using a technique called ‘space toggle’) along with HTML checkboxes.
PropJockey
Tailzilla: Components and Online Code Editor for Tailwind CSS — This is a collection of responsive components, templates, and starter kits based on Tailwind CSS. Each component offers a split screen live preview and editable code.
Tailzilla
Formbutton: A Simple, Customizable Pop-up Form — This adds one of those bottom-corner fly-out forms that users can use to quickly communicate or add feedback.
Formspree
webcompat: Bug Reporting for the Web — An initiative by various volunteers supported by Mozilla that aims to document bugs that create inconsistent experiences across browsers.
webcompat

Water Droplets Created with SVG Filters and CSS Shadows — A very impressive end result.
Oscar Salazar codepen
by via Frontend Focus https://ift.tt/2EqFeHD
0 notes
Text
Contact Page
I then focused on adding in a contact page and this is due to the fact that if anyone had any issues or just wanted to generally talk about something personal that they could email and someone would get back to them. In order for this to work I needed to create another form similar to the sign in and sign up forms.

This is how my page looks. I haven’t added a text submission but I’d develop that down the line if I chose to come back to it.

I decided to have add number on there due to it being a mental health app and in case somebody needed to talk through their problems or for someone to feel less lonely even. As, feel that’s suitable for what my app was made up for. I have also used Formspree for the contact form so it’s working and if I was or someone was to fill in the form and press submit then it would submit the email to my Formspree email linked with Formspree.
0 notes
Link
What are GitHub pages?
GitHub pages allow you to host a website directly from your GitHub repository. It can host static websites that take HTML, CSS, and JavaScript files straight from your GitHub repository. It cannot execute server-side code like PHP so we can not add a contact form that redirects to a PHP file. That is where formspree comes in.
Steps
Step 1: Create a new repository named <username>.github.io. <username> is your GitHub username.

Note: My repo name shows an error since I already have a repository named CharalambosIoannou.github.io. Also, the repository must be set to public.
Step 2: Create your static page. Make sure the main html file is named index.html.
In my case I have created my portfolio website as can be seen from the image below.

Step 3: Navigate to formspree
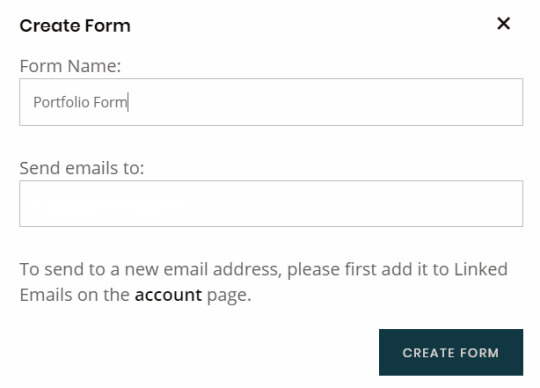
1) In formspree click the sign-up button in the top right corner and enter your email address along with a password. 2) Verify your email 3) Press the + button and enter a form name. The email input box should be auto filled with the email address used to sign up to fromspree.
4) You can then copy paste the code provided by formspree into your website.
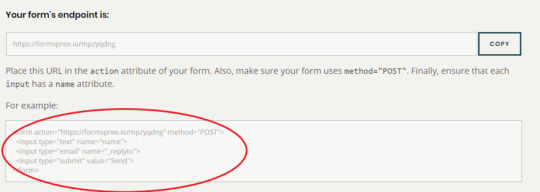
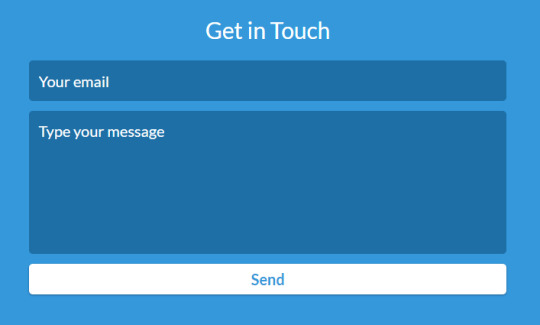
I have altered this code slightly to allow visitors to add a message as well. The code used is:
<div id="contact"> <h2>Get in Touch</h2> <div id="contact-form"> <form action="https://formspree.io/mpzyqdng" method="POST"> <input type="hidden" name="_subject" value="Contact request from personal website" /> <input type="email" name="_replyto" placeholder="Your email" required> <textarea name="message" placeholder="Type your message" required></textarea> <button type="submit">Send</button> </form> </div> </div>
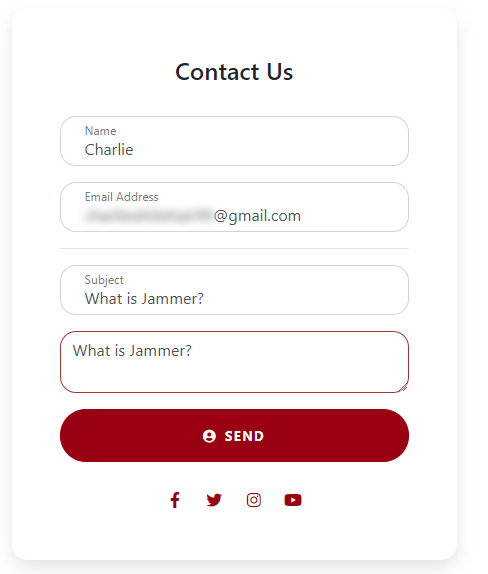
And this code produces the following result:
Step 4: Push your code to GitHub and navigate to your website by typing https://<username>.github.io/ in the URL.
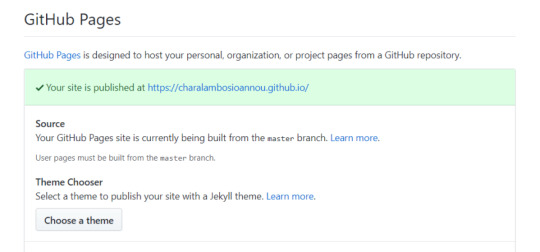
If you cannot see your website after some time has passed then go to your repository, click on settings, scroll down until you see a section named "GitHub Pages" and click on the None dropdown in the Source subsection and set it to master branch.
You know if your website is published if you see this message in the "GitHub Pages" section:
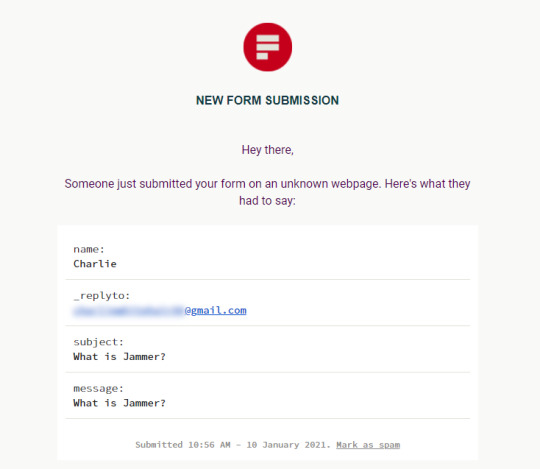
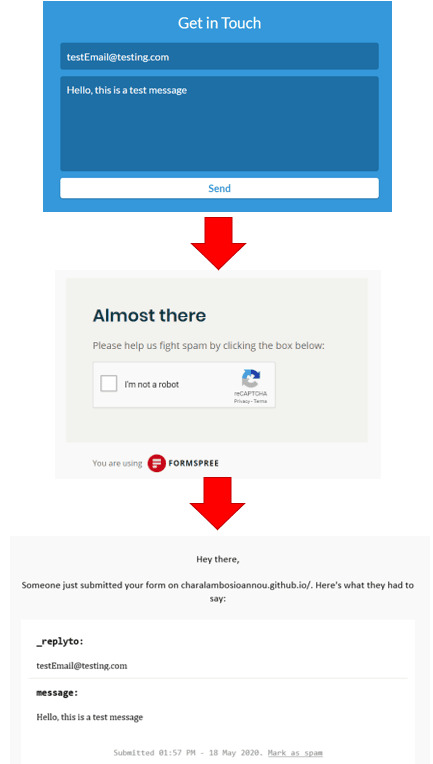
Step 5: Testing your form.
If you want to test your form, then go to your website and fill out your form. When clicking the send button we get redirected and have to authenticate that we are not a robot 🤖. When ticking the box, soon enough you will receive an email with all the details the sender has provided.
THAT’S IT!!!
I hope you find this easy and useful.
0 notes
Text

FREE TOOLS
Ever want to know what your SEO COST https://poe.com/desirelovell
FREE SEO CALCULATOR
https://desirelovell.com/free-tools/
ROI ON LEAD SPEND CALCULATOR
SPEED TO LEAD CALCULATOR
Number of Leads:Average Contact Time (seconds):Conversion Rate (%):Calculate Speed to Lead
Server-side Form Handling:
You could set up a server-side script (e.g., using PHP, Node.js, or a serverless function) to receive the form data when it’s submitted.
The server-side script would then store the survey responses in a database or a CSV file for further analysis.
Third-Party Form Submission Service:
You could use a third-party form submission service like Google Forms, Typeform, or Formspree to handle the form data.
These services provide an easy way to collect and store the survey responses, and often include features like response analysis and notifications.
Integrated CRM or Project Management Tool:
If you’re already using a customer relationship management (CRM) system or a project management tool, you could integrate the survey form with that platform.
This would allow you to store the survey data alongside other customer or project information, making it easier to analyze and act on the feedback.
Regardless of the approach you choose, it’s important to consider factors like data privacy, security, and compliance when handling the survey responses. You may also want to implement features like email notifications, response confirmation pages, and data export options to make the process more seamless for your clients.
I hope this gives you a good starting point to think about how you could integrate the survey data collection and storage into your overall small business chat AI solution. Let me know if you have any other questions!
0 notes
Text
HOW TO ADD CUSTOM GOOGLE FORMS TO YOUR STATIC SITE?
Websites created with static site generators like Jekyll or Hugo are on the rise. Their popularity is not surprising. They’re fast and secure, as there’s no data on the server side. The web server builds and serves web pages on the fly. You don’t have to worry about databases and server-side security.
office setup is the best programming which is exhaustively utilized in globe .
It is a shocking association that causes you release your best contemplations, complete things, and stay related on the go.for more subtleties visit: office.com/setup today.
You can write your posts in Markdown or HTML that gets rendered nicely with the help of templating engines (Jekyll uses Liquid, while Hugo uses Go Templates). Everything is fine until you want to add dynamic functionality to your static site, such as a Contact form. But, you don’t have to worry, as you can use an external backend like Google Forms to implement such features.
USE GOOGLE FORMS TO EMBED A CONTACT FORM
Incoming data collected by forms need to be processed by a server and stored in a database. You can find many online tutorials that recommend Formspree as a free form backend for static websites. However, the free version of Formspree sometimes bumps into issues like not forwarding form submissions to your email address. As an alternative, you can use Google Forms to add custom forms to your Jekyll, Hugo, or another static site.
In this guide, we’ll show you how to create and add a Contact form to a static HTML page (that you can later convert to a Jekyll or Hugo template). However, Google Forms is not limited to Contact forms; you can create any kind of custom forms or surveys with it. Your users won’t even know that you’re using Google Forms, as the form you create can be completely integrated with your site’s design!
Google Forms Homepage
1. CREATE A NEW FORM ON GOOGLE’S PLATFORM
Sign in to the Google Forms platform with your Google account. You can either start a new form from scratch or use Google’s
pre-made templates. As Google has a fairly good Contact form template, we’ll use that rather than starting with a blank template.
Click the template called “Contact Information” in the Template Gallery on top of the page.
Google Forms Template Gallery
The default “Contact information” template has three required fields (Name, Email, Address) and two optional ones (Phone number, Comments). We’ll keep Name and Email but replace the rest with an optional Subject and a required Message field.You can delete any field you don’t want to use by clicking the little recycle bin icon that shows up after you click on the field.
Google Forms Delete Field
Then, you can add the new input fields by clicking the + icon in the floating menu on the right. You can choose from various input types such as short answer, checkbox, dropdown, paragraph, file upload, and others.
For our custom Subject field, we use the short answer input type. For Message, we choose paragraph as input type, that allows users to enter a multi-line message. We also set the latter to required using the little switcher at the bottom of the input box.
Google Forms Add New Form Fields
By default, Google Forms require respondents to sign into their Google accounts before they fill in the form. However, we don’t want this behavior when we embed the form into our website. So, click the gear icon next to the Send button on the top of the page to access the Settings and uncheck the “Limit to 1 response” option.
Google Forms Remove Required Login
Save your settings and your Google Form is done. You can test it by copying-pasting the URL into another browser where you are not logged into your Google Account. Here, you can fill in the form with test data.
Your test message will show up in the Responses tab where you can decide what to do with each response (download, print, delete, etc.). Google Forms Test Message
2. CREATE A SIMILAR FORM ON YOUR OWN SITE
Now, you need to mirror the Google Form you created in the previous step so that it can forward data from your website to the
Google backend. Create a basic HTML form with the same form fields: Name, Email, Subject, and Message.
<form action="" method="post"> <label>Name*</label> <input type="text" placeholder="Name*" name="" required> <label>Email Address*</label> <input type="email" placeholder="Email address*" name="" required> <label>Subject</label> <input type="text" placeholder="Subject" name=""> <label>Message*</label> <textarea rows="5" placeholder="Message*" name="" required></textarea> <button type="submit">Send</button> </form>
The HTML doesn’t have to be exactly the same as Google’s, but it needs to have exactly the same form fields. You can add your own CSS classes to the form so that it’ll match your site’s design.It’ll be the name and action fields that will tie your on-site form to the Google backend.
3. ADD NAME AND ACTION VALUES TO YOUR ON-SITE FORM
Google uses custom name and action values to identify each form. The action attribute belongs to the <form> tag, while the name attributes belong to the input fields. So, you need to find these custom values and add it to the HTML.
Log out of Google (or use a different browser), as if you stay logged in it’ll be hard to do the code inspection (Google adds a lot of extra stuff to logged-in users). Load your Google Form using the form’s URL and inspect it using your browser’s developer tools. In Firefox, you can do that by right-clicking the form and clicking the “Inspect Element” option. In Chrome, you need to choose the “Inspect” option after right-clicking the element.
You need to find the <form> tag in the HTML inspector and copy the value of the action attribute into your custom HTML.
Inspect Custom Google Form
You need to do the same thing with your four input fields, too. But now, you don’t have to copy the action attribute but the name attribute of each input field.
Inspect Google Forms Input Fields
Insert the custom action and name values into your HTML:
<form action="https://docs.google.com/forms/d/..." method="post">
<label>Name*</label>
<input type="text" placeholder="Name*" name="entry.895563655" required>
<label>Email Address*</label>
<input type="email" placeholder="Email address*" name="entry.772189125" required>
<label>Subject</label>
<input type="text" placeholder="Subject" name="entry.203645991">
<label>Message*</label>
<textarea rows="5" placeholder="Message*" name="entry.190021963" required></textarea>
<button type="submit">Send</button>
</form>
Now, your on-site form is bound to the Google backend. You can test it by entering some test data into your form. Sign back
to Google Forms and check if your test response has arrived.
Google Forms Second Test
4. REDIRECT TO A CUSTOM THANK YOU PAGE
While doing the test, you’ve surely noticed that your site has redirected the user to Google’s default thank you page. If you’d rather send your respondents to your custom thank you page add the following code to the top of your form, right before the <form> tag:
<script type="text/javascript">var submitted=false;</script>
<iframe name="hidden_iframe" id="hidden_iframe" style="display:none;"onload="if(submitted) {window.location='thankyou.html';}"></iframe>
<form action="https://docs.google.com/forms/d/..."
method="post" target="hidden_iframe" onsubmit="submitted=true;">...</form>
You need to add the path to your custom thank you page as a value of the window.location() property (it’s ‘thankyou.html’ in the example above).
Note that you also have to add the target=”hidden_iframe” and onsubmit=”submitted=true;” attributes to the <form> tag.
5. CONFIGURE YOUR FORM SETTINGS
You can further adjust your form settings to better manage your incoming responses. For example, you can get email notifications for each new submission.
Navigate to the Responses tab, click the three-dot icon, and check the “Get email notifications for new responses” option. It will send an email notification to the email tied to your Google account (usually a Gmail address) whenever a new respondent submits your Contact form.
Google Forms Get Email Notifications
You can also collect your responses in a Google Spreadsheet. To do so, select the “Select response destination” and specify the spreadsheet that should collect the data (or create a new one). You can download the responses as a .csv file or print them with a click, too.
WRAPPING UP
Static websites are excellent for anyone who needs a simple web presence but doesn’t want to use a CMS like WordPress or pay for hosting. With external backends, you can also add dynamic features to your static site.
Google Forms provide you with a free solution to embed a custom Contact form to your website. If you want to take a step further in form building, read our tips on how to build better Contact forms, too. And, if you’d rather stick to dynamic sites, don’t miss out our guide on how to increase server security, either.
0 notes
Text
From Static Sites To End User JAMstack Apps With FaunaDB
About The Author
Bryan is a designer, developer, and educator with a passion for CSS and static sites. He actively works to mentor and teach developers and designers the value … More about Bryan Robinson …
To make the move from “site” to app, we’ll need to dive into the world of “app-generated” content. In this article, we’ll get started in this world with the power of serverless data. We’ll start with a simple demo by ingesting and posting data to FaunaDB and then extend that functionality in a full-fledged application using Auth0, FaunaDB’s Token system and User-Defined Functions.
The JAMstack has proven itself to be one of the top ways of producing content-driven sites, but it’s also a great place to house applications, as well. If you’ve been using the JAMstack for your performant websites, the demos in this article will help you extend those philosophies to applications as well.
When using the JAMstack to build applications, you need a data service that fits into the most important aspects of the JAMstack philosophy:
Global distribution
Zero operational needs
A developer-friendly API.
In the JAMstack ecosystem there are plenty of software-as-a-service companies that provide ways of getting and storing specific types of data. Whether you want to send emails, SMS or make phone calls (Twilio) or accept form submissions efficiently (Formspree, Formingo, Formstack, etc.), it seems there’s an API for almost everything.
These are great services that can do a lot of the low-level work of many applications, but once your data is more complex than a spreadsheet or needs to be updated and store in real-time, it might be time to look into a database.
The service API can still be in use, but a central database managing the state and operations of your app becomes much more important. Even if you need a database, you still want it to follow the core JAMstack philosophies we outlined above. That means, we don’t want to host our own database server. We need a Database-as-a-Service solution. Our database needs to be optimized for the JAMstack:
Optimized for API calls from a browser or build process.
Flexible to model your data in the specific ways your app needs.
Global distribution of our data like a CDN houses our sites.
Hands-free scaling with no need of a database administrator or developer intervention.
Whatever service you look into needs to follow these tenets of serverless data. In our demos, we’ll explore FaunaDB, a global serverless database, featuring native GraphQL to assure that we keep our apps in step with the philosophies of the JAMstack.
Let’s dive into the code!
A JAMstack Guestbook App With Gatsby And Fauna
I’m a big fan of reimagining the internet tools and concepts of the 1990s and early 2000s. We can take these concepts and make them feel fresh with the new set of tools and interactions.
A look at the app we’re creating. A signature form with a signature list below. The form will populate a FaunaDB database and that database will create the view list. (Large preview)
In this demo, we’ll create an application that was all the rage in that time period: the guestbook. A guestbook is nothing but app-generated content and interaction. A user can come to the site, see all the signatures of past “guests” and then leave their own.
To start, we’ll statically render our site and build our data from Fauna during our build step. This will provide the fast performance we expect from a JAMstack site. To do this, we’ll use GatsbyJS.
Initial setup
Our first step will be to install Gatsby globally on our computer. If you’ve never spent much time in the command line, Gatsby’s “part 0” tutorial will help you get up and running. If you already have Node and NPM installed, you’ll install the Gatsby CLI globally and create a new site with it using the following commands:
npm install -g gatsby-cli
gatsby new <directory-to-install-into> <starter>
Gatsby comes with a large repository of starters that can help bootstrap your project. For this demo, I chose a simple starter that came equipped with the Bulma CSS framework.
gatsby new guestbook-app https://github.com/amandeepmittal/gatsby-bulma-quickstart
This gives us a good starting point and structure. It also has the added benefit of coming with styles that are ready to go.
Let’s do a little cleanup for things we don’t need. We’ll start by simplifying our components.header.js
import React from 'react'; import './style.scss'; const Header = ({ siteTitle }) => ( <section className="hero gradientBg "> <div className="hero-body"> <div className="container container--small center"> <div className="content"> <h1 className="is-uppercase is-size-1 has-text-white"> Sign our Virtual Guestbook </h1> <p className="subtitle has-text-white is-size-3"> If you like all the things that we do, be sure to sign our virtual guestbook </p> </div> </div> </div> </section>); export default Header;
This will get rid of much of the branded content. Feel free to customize this section, but we won’t write any of our code here.
Next we’ll clean out the components/midsection.js file. This will be where our app’s code will render.
import React, { useState } from 'react';import Signatures from './signatures';import SignForm from './sign-form'; const Midsection = () => { const [sigData, setSigData] = useState(data.allSignatures.nodes); return ( <section className="section"> <div className="container container--small"> <section className="section is-small"> <h2 className="title is-4">Sign here</h2> <SignForm></SignForm> </section> <section className="section"> <h2 className="title is-5">View Signatures</h2> <Signatures></Signatures> </section> </div> </section> )} export default Midsection;
In this code, we’ve mostly removed the “site” content and added in a couple new components. A <SignForm> that will contain our form for submitting a signature and a <Signatures> component to contain the list of signatures.
Now that we have a relatively blank slate, we can set up our FaunaDB database.
Setting Up A FaunaDB Collection
After logging into Fauna (or signing up for an account), you’ll be given the option to create a new Database. We’ll create a new database called guestbook.
The initial state of our signatures Collection after we add our first Document. (Large preview)
Inside this database, we’ll create a “Collection” called signature. Collections in Fauna a group of Documents that are in turn JSON objects.
In this new Collection, we’ll create a new Document with the following JSON:
{ name: "Bryan Robinson", message: "Lorem ipsum dolor amet sum Lorem ipsum dolor amet sum Lorem ipsum dolor amet sum Lorem ipsum dolor amet sum"}
This will be the simple data schema for each of our signatures. For each of these Documents, Fauna will create additional data surrounding it.
{ "ref": Ref(Collection("signatures"), "262884172900598291"), "ts": 1586964733980000, "data": { "name": "Bryan Robinson", "message": "Lorem ipsum dolor amet sum Lorem ipsum dolor amet sum Lorem ipsum dolor amet sum Lorem ipsum dolor amet sum " }}
The ref is the unique identifier inside of Fauna and the ts is the time (as a Unix timestamp) the document was created/updated.
After creating our data, we want an easy way to grab all that data and use it in our site. In Fauna, the most efficient way to get data is via an Index. We’ll create an Index called allSignatures. This will grab and return all of our signature Documents in the Collection.
Now that we have an efficient way of accessing the data in Gatsby, we need Gatsby to know where to get it. Gatsby has a repository of plugins that can fetch data from a variety of sources, Fauna included.
Setting up the Fauna Gatsby Data Source Plugin
npm install gatsby-source-faunadb
After we install this plugin to our project, we need to configure it in our gatsby-config.js file. In the plugins array of our project, we’ll add a new item.
{ resolve: `gatsby-source-faunadb`, options: { // The secret for the key you're using to connect to your Fauna database. // You can generate on of these in the "Security" tab of your Fauna Console. secret: process.env.YOUR_FAUNADB_SECRET, // The name of the index you want to query // You can create an index in the "Indexes" tab of your Fauna Console. index: `allSignatures`, // This is the name under which your data will appear in Gatsby GraphQL queries // The following will create queries called `allBird` and `bird`. type: "Signatures", // If you need to limit the number of documents returned, you can specify a // Optional maximum number to read. // size: 100 },},
In this configuration, you provide it your Fauna secret Key, the Index name we created and the “type” we want to access in our Gatsby GraphQL query.
Where did that process.env.YOUR_FAUNADB_SECRET come from?
In your project, create a .env file — and include that file in your .gitignore! This file will give Gatsby’s Webpack configuration the secret value. This will keep your sensitive information safe and not stored in GitHub.
YOUR_FAUNADB_SECRET = "value from fauna"
We can then head over to the “Security” tab in our Database and create a new key. Since this is a protected secret, it’s safe to use a “Server” role. When you save the Key, it’ll provide your secret. Be sure to grab that now, as you can’t get it again (without recreating the Key).
Once the configuration is set up, we can write a GraphQL query in our components to grab the data at build time.
Getting the data and building the template
We’ll add this query to our Midsection component to make it accessible by both of our components.
const Midsection = () => { const data = useStaticQuery( graphql` query GetSignatures { allSignatures { nodes { name message _ts _id } } }` );// ... rest of the component}
This will access the Signatures type we created in the configuration. It will grab all the signatures and provide an array of nodes. Those nodes will contain the data we specify we need: name, message, ts, id.
We’ll set that data into our state — this will make updating it live easier later.
const [sigData, setSigData] = useState(data.allSignatures.nodes);
Now we can pass sigData as a prop into <Signatures> and setSigData into <SignForm>.
<SignForm setSigData={setSigData}></SignForm> <Signatures sigData={sigData}></Signatures>
Let’s set up our Signatures component to use that data!
import React from 'react';import Signature from './signature' const Signatures = (props) => { const SignatureMarkup = () => { return props.sigData.map((signature, index) => { return ( <Signature key={index} signature={signature}></Signature> ) }).reverse() } return ( <SignatureMarkup></SignatureMarkup> )} export default Signatures
In this function, we’ll .map() over our signature data and create an Array of markup based on a new <Signature> component that we pass the data into.
The Signature component will handle formatting our data and returning an appropriate set of HTML.
import React from 'react'; const Signature = ({signature}) => { const dateObj = new Date(signature._ts / 1000); let dateString = `${dateObj.toLocaleString('default', {weekday: 'long'})}, ${dateObj.toLocaleString('default', { month: 'long' })} ${dateObj.getDate()} at ${dateObj.toLocaleTimeString('default', {hour: '2-digit',minute: '2-digit', hour12: false})}` return ( <article className="signature box"> <h3 className="signature__headline">{signature.name} - {dateString}</h3> <p className="signature__message"> {signature.message} </p> </article>)}; export default Signature;
At this point, if you start your Gatsby development server, you should have a list of signatures currently existing in your database. Run the following command to get up and running:
gatsby develop
Any signature stored in our database will build HTML in that component. But how can we get signatures INTO our database?
Let’s set up a signature form component to send data and update our Signatures list.
Let’s Make Our JAMstack Guestbook Interactive
First, we’ll set up the basic structure for our component. It will render a simple form onto the page with a text input, a textarea, and a button for submission.
import React from 'react'; import faunadb, { query as q } from "faunadb" var client = new faunadb.Client({ secret: process.env.GATSBY_FAUNA_CLIENT_SECRET }) export default class SignForm extends React.Component { constructor(props) { super(props) this.state = { sigName: "", sigMessage: "" } } handleSubmit = async event => { // Handle the submission } handleInputChange = event => { // When an input changes, update the state } render() { return ( <form onSubmit={this.handleSubmit}> <div className="field"> <div className="control"> <label className="label">Label <input className="input is-fullwidth" name="sigName" type="text" value={this.state.sigName} onChange={this.handleInputChange} /> </label> </div> </div> <div className="field"> <label> Your Message: <textarea rows="5" name="sigMessage" value={this.state.sigMessage} onChange={this.handleInputChange} className="textarea" placeholder="Leave us a happy note"></textarea> </label> </div> <div className="buttons"> <button className="button is-primary" type="submit">Sign the Guestbook</button> </div> </form> ) } }
To start, we’ll set up our state to include the name and the message. We’ll default them to blank strings and insert them into our <textarea> and <input>.
When a user changes the value of one of these fields, we’ll use the handleInputChange method. When a user submits the form, we’ll use the handleSubmit method.
Let’s break down both of those functions.
handleInputChange = event => { const target = event.target const value = target.value const name = target.name this.setState({ [name]: value, }) }
The input change will accept the event. From that event, it will get the current target’s value and name. We can then modify the state of the properties on our state object — sigName, sigMessage or anything else.
Once the state has changed, we can use the state in our handleSubmit method.
handleSubmit = async event => { event.preventDefault(); const placeSig = await this.createSignature(this.state.sigName, this.state.sigMessage); this.addSignature(placeSig); }
This function will call a new createSignature() method. This will connect to Fauna to create a new Document from our state items.
The addSignature() method will update our Signatures list data with the response we get back from Fauna.
In order to write to our database, we’ll need to set up a new key in Fauna with minimal permissions. Our server key is allowed higher permissions because it’s only used during build and won’t be visible in our source.
This key needs to only allow for the ability to only create new items in our signatures collection.
Note: A user could still be malicious with this key, but they can only do as much damage as a bot submitting that form, so it’s a trade-off I’m willing to make for this app.
A look at the FaunaDB security panel. In this shot, we’re creating a ‘client’ role that allows only the ‘Create’ permission for those API Keys. (Large preview)
For this, we’ll create a new “Role” in the “Security” tab of our dashboard. We can add permissions around one or more of our Collections. In this demo, we only need signatures and we can select the “Create” functionality.
After that, we generate a new key that uses that role.
To use this key, we’ll instantiate a new version of the Fauna JavaScript SDK. This is a dependency of the Gatsby plugin we installed, so we already have access to it.
import faunadb, { query as q } from "faunadb" var client = new faunadb.Client({ secret: process.env.GATSBY_FAUNA_CLIENT_SECRET })
By using an environment variable prefixed with GATSBY_, we gain access to it in our browser JavaScript (be sure to add it to your .env file).
By importing the query object from the SDK, we gain access to any of the methods available in Fauna’s first-party Fauna Query Language (FQL). In this case, we want to use the Create method to create a new document on our Collection.
createSignature = async (sigName, sigMessage) => { try { const queryResponse = await client.query( q.Create( q.Collection('signatures'), { data: { name: sigName, message: sigMessage } } ) ) const signatureInfo = { name: queryResponse.data.name, message: queryResponse.data.message, _ts: queryResponse.ts, _id: queryResponse.id} return signatureInfo } catch(err) { console.log(err); } }
We pass the Create function to the client.query() method. Create takes a Collection reference and an object of information to pass to a new Document. In this case, we use q.Collection and a string of our Collection name to get the reference to the Collection. The second argument is for our data. You can pass other items in the object, so we need to tell Fauna, we’re specifically sending it the data property on that object.
Next, we pass it the name and message we collected in our state. The response we get back from Fauna is the entire object of our Document. This includes our data in a data object, as well as a Fauna ID and timestamp. We reformat that data in a way that our Signatures list can use and return that back to our handleSubmit function.
Our submit handler will then pass that data into our setSigData prop which will notify our Signatures component to rerender with that new data. This gives our user immediate feedback that their submission has been accepted.
Rebuilding the site
This is all working in the browser, but the data hasn’t been updated in our static application yet.
From here, we need to tell our JAMstack host to rebuild our site. Many have the ability to specify a webhook to trigger a deployment. Since I’m hosting this demo on Netlify, I can create a new “Deploy webhook” in their admin and create a new triggerBuild function. This function will use the native JavaScript fetch() method and send a post request to that URL. Netlify will then rebuild the application and pull in the latest signatures.
triggerBuild = async () => { const response = await fetch(process.env.GATSBY_BUILD_HOOK, { method: "POST", body: "{}" }); return response; }
Both Gatsby Cloud and Netlify have implemented ways of handling “incremental” builds with Gatsby drastically speeding up build times. This sort of build can happen very quickly now and feel almost as fast as a traditional server-rendered site.
Every signature that gets added gets quick feedback to the user that it’s been submitted, is perpetually stored in a database, and served as HTML via a build process.
Still feels a little too much like a typical website? Let’s take all these concepts a step further.
Create A Mindful App With Auth0, Fauna Identity And Fauna User-Defined Functions (UDF)
Being mindful is an important skill to cultivate. Whether it’s thinking about your relationships, your career, your family, or just going for a walk in nature, it’s important to be mindful of the people and places around you.
A look at the final app screen showing a ‘Mindful Mission,’ ‘Past Missions’ and a ‘Log Out’ button. (Large preview)
This app intends to help you focus on one randomized idea every day and review the various ideas from recent days.
To do this, we need to introduce a key element to most apps: authentication. With authentication, comes extra security concerns. While this data won’t be particularly sensitive, you don’t want one user accessing the history of any other user.
Since we’ll be scoping data to a specific user, we also don’t want to store any secret keys on browser code, as that would open up other security flaws.
We could create an entire authentication flow using nothing but our wits and a user database with Fauna. That may seem daunting and moves us away from the features we want to write. The great thing is that there’s certainly an API for that in the JAMstack! In this demo, we’ll explore integrating Auth0 with Fauna. We can use the integration in many ways.
Setting Up Auth0 To Connect With Fauna
Many implementations of authentication with the JAMstack rely heavily on Serverless functions. That moves much of the security concerns from a security-focused company like Auth0 to the individual developer. That doesn’t feel quite right.
A diagram outlining the convoluted method of using a serverless function to manage authentication and token generation. (Large preview)
The typical flow would be to send a login request to a serverless function. That function would request a user from Auth0. Auth0 would provide the user’s JSON Web Token (JWT) and the function would provide any additional information about the user our application needs. The function would then bundle everything up and send it to the browser.
There are a lot of places in that authentication flow where a developer could introduce a security hole.
Instead, let’s request that Auth0 bundle everything up for us inside the JWT it sends. Keeping security in the hands of the folks who know it best.
A diagram outlining the streamlined authentication and token generation flow when using Auth0’s Rule system. (Large preview)
We’ll do this by using Auth0’s Rules functionality to ask Fauna for a user token to encode into our JWT. This means that unlike our Guestbook, we won’t have any Fauna keys in our front-end code. Everything will be managed in memory from that JWT token.
Setting up Auth0 Application and Rule
First, we’ll need to set up the basics of our Auth0 Application.
Following the configuration steps in their basic walkthrough gets the important basic information filled in. Be sure to fill out the proper localhost port for your bundler of choice as one of your authorized domains.
After the basics of the application are set up, we’ll go into the “Rules” section of our account.
Click “Create Rule” and select “Empty Rule” (or start from one of their many templates that are helpful starting points).
Here’s our Rule code
async function (user, context, callback) { const FAUNADB_SECRET = 'Your Server secret'; const faunadb = require('[email protected]'); const { query: q } = faunadb; const client = new faunadb.Client({ secret: FAUNADB_SECRET }); try { const token = await client.query( q.Call('user_login_or_create', user.email, user) // Call UDF in fauna ); let newClient = new faunadb.Client({ secret: token.secret }); context.idToken['https://faunadb.com/id/secret'] = token.secret; callback(null, user, context); } catch(error) { console.log('->', error); callback(error, user, context); }}
We give the rule a function that takes the user, context, and a callback from Auth0. We need to set up and grab a Server token to initialize our Fauna JavaScript SDK and initialize our client. Just like in our Guestbook, we’ll create a new Database and manage our Tokens in “Security”.
From there, we want to send a query to Fauna to create or log in our user. To keep our Rule code simple (and make it reusable), we’ll write our first Fauna “User-Defined Function” (UDF). A UDF is a function written in FQL that runs on Fauna’s infrastructure.
First, we’ll set up a Collection for our users. You don’t need to make a first Document here, as they’ll be created behind the scenes by our Auth0 rule whenever a new Auth0 user is created.
Next, we need an Index to search our users Collection based on the email address. This Index is simpler than our Guestbook, so we can add it to the Dashboard. Name the Index user_by_email, set the Collection to users, and the Terms to data.email. This will allow us to pass an email address to the Index and get a matching user Document back.
It’s time to create our UDF. In the Dashboard, navigate to “Functions” and create a new one named user_login_or_create.
Query( Lambda( ["userEmail", "userObj"], // Arguments Let( { user: Match(Index("user_by_email"), Var("userEmail")) }, // Set user variable If( Exists(Var("user")), // Check if the User exists Create(Tokens(null), { instance: Select("ref", Get(Var("user"))) }), // Return a token for that item in the users collection (in other words, the user) Let( // Else statement: Set a variable { newUser: Create(Collection("users"), { data: Var("userObj") }), // Create a new user and get its reference token: Create(Tokens(null), { // Create a token for that user instance: Select("ref", Var("newUser")) }) }, Var("token") // return the token ) ) ) ))
Our UDF will accept a user email address and the rest of the user information. If a user exists in a users Collection, it will create a Token for the user and send that back. If a user doesn’t exist, it will create that user Document and then send a Token to our Auth0 Rule.
We can then store the Token as an idToken attached to the context in our JWT. The token needs a URL as a key. Since this is a Fauna token, we can use a Fauna URL. Whatever this is, you’ll use it to access this in your code.
This Token doesn’t have any permissions yet. We need to go into our Security rules and set up a new Role.
We’ll create an “AuthedUser” role. We don’t need to add any permissions yet, but as we create new UDFs and new Collections, we’ll update the permissions here. Instead of generating a new Key to use this Role, we want to add to this Role’s “Memberships”. On the Memberships screen, you can select a Collection to add as a member. The documents in this Collection (in our case, our Users), will have the permissions set on this role given via their Token.
Now, when a user logs in via Auth0, they’ll be returned a Token that matches their user Document and has its permissions.
From here, we come back to our application.
Implement logic for when the User is logged in
Auth0 has an excellent walkthrough for setting up a “vanilla” JavaScript single-page application. Most of this code is a refactor of that to fit the code splitting of this application.
The default Auth0 Login/Signup screen. All the login flow can be contained in the Auth0 screens. (Large preview)
First, we’ll need the Auth0 SPA SDK.
npm install @auth0/auth0-spa-js
import createAuth0Client from '@auth0/auth0-spa-js';import { changeToHome } from './layouts/home'; // Home Layoutimport { changeToMission } from './layouts/myMind'; // Current Mindfulness Mission Layout let auth0 = null;var currentUser = null;const configureClient = async () => { // Configures Auth0 SDK auth0 = await createAuth0Client({ domain: "mindfulness.auth0.com", client_id: "32i3ylPhup47PYKUtZGRnLNsGVLks3M6" });}; const checkUser = async () => { // return user info from any method const isAuthenticated = await auth0.isAuthenticated(); if (isAuthenticated) { return await auth0.getUser(); }} const loadAuth = async () => { // Loads and checks auth await configureClient(); const isAuthenticated = await auth0.isAuthenticated(); if (isAuthenticated) { // show the gated content currentUser = await auth0.getUser(); changeToMission(); // Show the "Today" screen return; } else { changeToHome(); // Show the logged out "homepage" } const query = window.location.search; if (query.includes("code=") && query.includes("state=")) { // Process the login state await auth0.handleRedirectCallback(); currentUser = await auth0.getUser(); changeToMission(); // Use replaceState to redirect the user away and remove the querystring parameters window.history.replaceState({}, document.title, "/"); }} const login = async () => { await auth0.loginWithRedirect({ redirect_uri: window.location.origin });}const logout = async () => { auth0.logout({ returnTo: window.location.origin }); window.localStorage.removeItem('currentMindfulItem') changeToHome(); // Change back to logged out state} export { auth0, loadAuth, currentUser, checkUser, login, logout }
First, we configure the SDK with our client_id from Auth0. This is safe information to store in our code.
Next, we set up a function that can be exported and used in multiple files to check if a user is logged in. The Auth0 library provides an isAuthenticated() method. If the user is authenticated, we can return the user data with auth0.getUser().
We set up a login() and logout() functions and a loadAuth() function to handle the return from Auth0 and change the state of our UI to the “Mission” screen with today’s Mindful idea.
Once this is all set up, we have our authentication and user login squared away.
We’ll create a new function for our Fauna functions to reference to get the proper token set up.
const AUTH_PROP_KEY = "https://faunad.com/id/secret";var faunadb = require('faunadb'),q = faunadb.query; async function getUserClient(currentUser) { return new faunadb.Client({ secret: currentUser[AUTH_PROP_KEY]})}
This returns a new connection to Fauna using our Token from Auth0. This token works the same as the Keys from previous examples.
Generate a random Mindful topic and store it in Fauna
To start, we need a Collection of items to store our list of Mindful objects. We’ll create a Collection called “mindful” things, and create a number of items with the following schema:
{ "title": "Career", "description": "Think about the next steps you want to make in your career. What’s the next easily attainable move you can make?", "color": "#C6D4FF", "textColor": "black" }
From here, we’ll move to our JavaScript and create a function for adding and returning a random item from that Collection.
async function getRandomMindfulFromFauna(userObj) { const client = await getUserClient(userObj); try { let mindfulThings = await client.query( q.Paginate( q.Documents(q.Collection('mindful_things')) ) ) let randomMindful = mindfulThings.data[Math.floor(Math.random()*mindfulThings.data.length)]; let creation = await client.query(q.Call('addUserMindful', randomMindful)); return creation.data.mindful; } catch (error) { console.log(error) } }
To start, we’ll instantiate our client with our getUserClient() method.
From there, we’ll grab all the Documents from our mindful_things Collection. Paginate() by default grabs 64 items per page, which is more than enough for our data. We’ll grab a random item from the array that’s returned from Fauna. This will be what Fauna refers to as a “Ref”. A Ref is a full reference to a Document that the various FQL functions can use to locate a Document.
We’ll pass that Ref to a new UDF that will handle storing a new, timestamped object for that user stored in a new user_things Collection.
We’ll create the new Collection, but we’ll have our UDF provide the data for it when called.
We’ll create a new UDF in the Fauna dashboard with the name addUserMindful that will accept that random Ref.
As with our login UDF before, we’ll use the Lambda() FQL method which takes an array of arguments.
Without passing any user information to the function, FQL is able to obtain our User Ref just calling the Identity() function. All we have from our randomRef is the reference to our Document. We’ll run a Get() to get the full object. We’ll the Create() a new Document in the user_things Collection with our User Ref and our random information.
We then return the creation object back out of our Lambda. We then go back to our JavaScript and return the data object with the mindful key back to where this function gets called.
Render our Mindful Object on the page
When our user is authenticated, you may remember it called a changeToMission() method. This function switches the items on the page from the “Home” screen to markup that can be filled in by our data. After it’s added to the page, the renderToday() function gets called to add content by a few rules.
The first rule of Serverless Data Club is not to make HTTP requests unless you have to. In other words, cache when you can. Whether that’s creating a full PWA-scale application with Service Workers or just caching your database response with localStorage, cache data, and fetch only when necessary.
The first rule of our conditional is to check localStorage. If localStorage does contain a currentMindfulItem, then we need to check its date to see if it’s from today. If it is, we’ll render that and make no new requests.
The second rule of Serverless Data Club is to make as few requests as possible without the responses of those requests being too large. In that vein, our second conditional rule is to check the latest item from the current user and see if it is from today. If it is, we’ll store it in localStorage for later and then render the results.
Finally, if none of these are true, we’ll fire our getRandomMindfulFromFauna() function, format the result, store that in localStorage, and then render the result.
Get the latest item from a user
I glossed over it in the last section, but we also need some functionality to retrieve the latest mindful object from Fauna for our specific user. In our getLatestFromFauna() method, we’ll again instantiate our Fauna client and then call a new UDF.
Our new UDF is going to call a Fauna Index. An Index is an efficient way of doing a lookup on a Fauna database. In our case, we want to return all user_things by the user field. Then we can also sort the result by timestamp and reverse the default ordering of the data to show the latest first.
Simple Indexes can be created in the Index dashboard. Since we want to do the reverse sort, we’ll need to enter some custom FQL into the Fauna Shell (you can do this in the database dashboard Shell section).
CreateIndex({ name: "getMindfulByUserReverse", serialized: true, source: Collection("user_things"), terms: [ { field: ["data", "user"] } ], values: [ { field: ["ts"], reverse: true }, { field: ["ref"] } ]})
This creates an Index named getMindfulByUserReverse, created from our user_thing Collection. The terms object is a list of fields to search by. In our case, this is just the user field on the data object. We then provide values to return. In our case, we need the Ref and the Timestamp and we’ll use the reverse property to reverse order our results by this field.
We’ll create a new UDF to use this Index.
Query( Lambda( [], If( // Check if there is at least 1 in the index GT( Count( Select( "data", Paginate(Match(Index("getMindfulByUserReverse"), Identity())) ) ), 0 ), Let( // if more than 0 { match: Paginate( Match(Index("getMindfulByUserReverse"), Identity()) // Search the index by our User ), latestObj: Take(1, Var("match")), // Grab the first item from our match latestRef: Select( ["data"], Get(Select(["data", 0, 1], Var("latestObj"))) // Get the data object from the item ), latestTime: Select(["data", 0, 0], Var("latestObj")), // Get the time merged: Merge( // merge those items into one object to return { latestTime: Var("latestTime") }, { latestMindful: Var("latestRef") } ) }, Var("merged") ), Let({ error: { err: "No data" } }, Var("error")) // if there aren't any, return an error. ) ))
This time our Lambda() function doesn’t need any arguments since we’ll have our User based on the Token used.
First, we’ll check to see if there’s at least 1 item in our Index. If there is, we’ll grab the first item’s data and time and return that back as a merged object.
After we get the latest from Fauna in our JavaScript, we’ll format it to a structure our storeCurrent() and render() methods expect it and return that object.
Now, we have an application that creates, stores, and fetches data for a daily message to contemplate. A user can use this on their phone, on their tablet, on the computer, and have it all synced. We could turn this into a PWA or even a native app with a system like Ionic.
We’re still missing one feature. Viewing a certain number of past items. Since we’ve stored this in our database, we can retrieve them in whatever way we need to.
Pull the latest X Mindful Missions to get a picture of what you’ve thought about
We’ll create a new JavaScript method paired with a new UDF to tackle this.
getSomeFromFauna will take an integer count to ask Fauna for a certain number of items.
Our UDF will be very similar to the getLatestFromFauana UDF. Instead of returning the first item, we’ll Take() the number of items from our array that matches the integer that gets passed into our UDF. We’ll also begin with the same conditional, in case a user doesn’t have any items stored yet.
Query( Lambda( ["count"], // Number of items to return If( // Check if there are any objects GT( Count( Select( "data", Paginate(Match(Index("getMindfulByUserReverse"), Identity(null))) ) ), 0 ), Let( { match: Paginate( Match(Index("getMindfulByUserReverse"), Identity(null)) // Search the Index by our User ), latestObjs: Select("data", Take(Var("count"), Var("match"))), // Get the data that is returned mergedObjs: Map( // Loop over the objects Var("latestObjs"), Lambda( "latestArray", Let( // Build the data like we did in the LatestMindful function { ref: Select(["data"], Get(Select([1], Var("latestArray")))), latestTime: Select(0, Var("latestArray")), merged: Merge( { latestTime: Var("latestTime") }, Select("mindful", Var("ref")) ) }, Var("merged") // Return this to our new array ) ) ) }, Var("mergedObjs") // return the full array ), { latestMindful: [{ title: "No additional data" }] } // if there are no items, send back a message to display ) ))
In this demo, we created a full-fledged app with serverless data. Because the data is served from a CDN, it can be as close to a user as possible. We used FaunaDB’s features, such as UDFs and Indexes, to optimize our database queries for speed and ease of use. We also made sure we only queried our database the bare minimum to reduce requests.
Where To Go With Serverless Data
The JAMstack isn’t just for sites. It can be used for robust applications as well. Whether that’s for a game, CRUD application or just to be mindful of your surroundings you can do a lot without sacrificing customization and without spinning up your own non-dist database system.
With performance on the mind of everyone creating on the JAMstack — whether for cost or for user experience — finding a good place to store and retrieve your data is a high priority. Find a spot that meets your needs, those of your users, and meets ideals of the JAMstack.
(ra, yk, il)
Website Design & SEO Delray Beach by DBL07.co
Delray Beach SEO
Via http://www.scpie.org/from-static-sites-to-end-user-jamstack-apps-with-faunadb/
source https://scpie.weebly.com/blog/from-static-sites-to-end-user-jamstack-apps-with-faunadb
0 notes
Text
From Static Sites To End User JAMstack Apps With FaunaDB
About The Author
Bryan is a designer, developer, and educator with a passion for CSS and static sites. He actively works to mentor and teach developers and designers the value … More about Bryan Robinson …
To make the move from “site” to app, we’ll need to dive into the world of “app-generated” content. In this article, we’ll get started in this world with the power of serverless data. We’ll start with a simple demo by ingesting and posting data to FaunaDB and then extend that functionality in a full-fledged application using Auth0, FaunaDB’s Token system and User-Defined Functions.
The JAMstack has proven itself to be one of the top ways of producing content-driven sites, but it’s also a great place to house applications, as well. If you’ve been using the JAMstack for your performant websites, the demos in this article will help you extend those philosophies to applications as well.
When using the JAMstack to build applications, you need a data service that fits into the most important aspects of the JAMstack philosophy:
Global distribution
Zero operational needs
A developer-friendly API.
In the JAMstack ecosystem there are plenty of software-as-a-service companies that provide ways of getting and storing specific types of data. Whether you want to send emails, SMS or make phone calls (Twilio) or accept form submissions efficiently (Formspree, Formingo, Formstack, etc.), it seems there’s an API for almost everything.
These are great services that can do a lot of the low-level work of many applications, but once your data is more complex than a spreadsheet or needs to be updated and store in real-time, it might be time to look into a database.
The service API can still be in use, but a central database managing the state and operations of your app becomes much more important. Even if you need a database, you still want it to follow the core JAMstack philosophies we outlined above. That means, we don’t want to host our own database server. We need a Database-as-a-Service solution. Our database needs to be optimized for the JAMstack:
Optimized for API calls from a browser or build process.
Flexible to model your data in the specific ways your app needs.
Global distribution of our data like a CDN houses our sites.
Hands-free scaling with no need of a database administrator or developer intervention.
Whatever service you look into needs to follow these tenets of serverless data. In our demos, we’ll explore FaunaDB, a global serverless database, featuring native GraphQL to assure that we keep our apps in step with the philosophies of the JAMstack.
Let’s dive into the code!
A JAMstack Guestbook App With Gatsby And Fauna
I’m a big fan of reimagining the internet tools and concepts of the 1990s and early 2000s. We can take these concepts and make them feel fresh with the new set of tools and interactions.
A look at the app we’re creating. A signature form with a signature list below. The form will populate a FaunaDB database and that database will create the view list. (Large preview)
In this demo, we’ll create an application that was all the rage in that time period: the guestbook. A guestbook is nothing but app-generated content and interaction. A user can come to the site, see all the signatures of past “guests” and then leave their own.
To start, we’ll statically render our site and build our data from Fauna during our build step. This will provide the fast performance we expect from a JAMstack site. To do this, we’ll use GatsbyJS.
Initial setup
Our first step will be to install Gatsby globally on our computer. If you’ve never spent much time in the command line, Gatsby’s “part 0” tutorial will help you get up and running. If you already have Node and NPM installed, you’ll install the Gatsby CLI globally and create a new site with it using the following commands:
npm install -g gatsby-cli
gatsby new <directory-to-install-into> <starter>
Gatsby comes with a large repository of starters that can help bootstrap your project. For this demo, I chose a simple starter that came equipped with the Bulma CSS framework.
gatsby new guestbook-app https://github.com/amandeepmittal/gatsby-bulma-quickstart
This gives us a good starting point and structure. It also has the added benefit of coming with styles that are ready to go.
Let’s do a little cleanup for things we don’t need. We’ll start by simplifying our components.header.js
import React from 'react'; import './style.scss'; const Header = ({ siteTitle }) => ( <section className="hero gradientBg "> <div className="hero-body"> <div className="container container--small center"> <div className="content"> <h1 className="is-uppercase is-size-1 has-text-white"> Sign our Virtual Guestbook </h1> <p className="subtitle has-text-white is-size-3"> If you like all the things that we do, be sure to sign our virtual guestbook </p> </div> </div> </div> </section> ); export default Header;
This will get rid of much of the branded content. Feel free to customize this section, but we won’t write any of our code here.
Next we’ll clean out the components/midsection.js file. This will be where our app’s code will render.
import React, { useState } from 'react'; import Signatures from './signatures'; import SignForm from './sign-form'; const Midsection = () => { const [sigData, setSigData] = useState(data.allSignatures.nodes); return ( <section className="section"> <div className="container container--small"> <section className="section is-small"> <h2 className="title is-4">Sign here</h2> <SignForm></SignForm> </section> <section className="section"> <h2 className="title is-5">View Signatures</h2> <Signatures></Signatures> </section> </div> </section> ) } export default Midsection;
In this code, we’ve mostly removed the “site” content and added in a couple new components. A <SignForm> that will contain our form for submitting a signature and a <Signatures> component to contain the list of signatures.
Now that we have a relatively blank slate, we can set up our FaunaDB database.
Setting Up A FaunaDB Collection
After logging into Fauna (or signing up for an account), you’ll be given the option to create a new Database. We’ll create a new database called guestbook.
The initial state of our signatures Collection after we add our first Document. (Large preview)
Inside this database, we’ll create a “Collection” called signature. Collections in Fauna a group of Documents that are in turn JSON objects.
In this new Collection, we’ll create a new Document with the following JSON:
{ name: "Bryan Robinson", message: "Lorem ipsum dolor amet sum Lorem ipsum dolor amet sum Lorem ipsum dolor amet sum Lorem ipsum dolor amet sum" }
This will be the simple data schema for each of our signatures. For each of these Documents, Fauna will create additional data surrounding it.
{ "ref": Ref(Collection("signatures"), "262884172900598291"), "ts": 1586964733980000, "data": { "name": "Bryan Robinson", "message": "Lorem ipsum dolor amet sum Lorem ipsum dolor amet sum Lorem ipsum dolor amet sum Lorem ipsum dolor amet sum " } }
The ref is the unique identifier inside of Fauna and the ts is the time (as a Unix timestamp) the document was created/updated.
After creating our data, we want an easy way to grab all that data and use it in our site. In Fauna, the most efficient way to get data is via an Index. We’ll create an Index called allSignatures. This will grab and return all of our signature Documents in the Collection.
Now that we have an efficient way of accessing the data in Gatsby, we need Gatsby to know where to get it. Gatsby has a repository of plugins that can fetch data from a variety of sources, Fauna included.
Setting up the Fauna Gatsby Data Source Plugin
npm install gatsby-source-faunadb
After we install this plugin to our project, we need to configure it in our gatsby-config.js file. In the plugins array of our project, we’ll add a new item.
{ resolve: `gatsby-source-faunadb`, options: { // The secret for the key you're using to connect to your Fauna database. // You can generate on of these in the "Security" tab of your Fauna Console. secret: process.env.YOUR_FAUNADB_SECRET, // The name of the index you want to query // You can create an index in the "Indexes" tab of your Fauna Console. index: `allSignatures`, // This is the name under which your data will appear in Gatsby GraphQL queries // The following will create queries called `allBird` and `bird`. type: "Signatures", // If you need to limit the number of documents returned, you can specify a // Optional maximum number to read. // size: 100 }, },
In this configuration, you provide it your Fauna secret Key, the Index name we created and the “type” we want to access in our Gatsby GraphQL query.
Where did that process.env.YOUR_FAUNADB_SECRET come from?
In your project, create a .env file — and include that file in your .gitignore! This file will give Gatsby’s Webpack configuration the secret value. This will keep your sensitive information safe and not stored in GitHub.
YOUR_FAUNADB_SECRET = "value from fauna"
We can then head over to the “Security” tab in our Database and create a new key. Since this is a protected secret, it’s safe to use a “Server” role. When you save the Key, it’ll provide your secret. Be sure to grab that now, as you can��t get it again (without recreating the Key).
Once the configuration is set up, we can write a GraphQL query in our components to grab the data at build time.
Getting the data and building the template
We’ll add this query to our Midsection component to make it accessible by both of our components.
const Midsection = () => { const data = useStaticQuery( graphql` query GetSignatures { allSignatures { nodes { name message _ts _id } } }` ); // ... rest of the component }
This will access the Signatures type we created in the configuration. It will grab all the signatures and provide an array of nodes. Those nodes will contain the data we specify we need: name, message, ts, id.
We’ll set that data into our state — this will make updating it live easier later.
const [sigData, setSigData] = useState(data.allSignatures.nodes);
Now we can pass sigData as a prop into <Signatures> and setSigData into <SignForm>.
<SignForm setSigData={setSigData}></SignForm> <Signatures sigData={sigData}></Signatures>
Let’s set up our Signatures component to use that data!
import React from 'react'; import Signature from './signature' const Signatures = (props) => { const SignatureMarkup = () => { return props.sigData.map((signature, index) => { return ( <Signature key={index} signature={signature}></Signature> ) }).reverse() } return ( <SignatureMarkup></SignatureMarkup> ) } export default Signatures
In this function, we’ll .map() over our signature data and create an Array of markup based on a new <Signature> component that we pass the data into.
The Signature component will handle formatting our data and returning an appropriate set of HTML.
import React from 'react'; const Signature = ({signature}) => { const dateObj = new Date(signature._ts / 1000); let dateString = `${dateObj.toLocaleString('default', {weekday: 'long'})}, ${dateObj.toLocaleString('default', { month: 'long' })} ${dateObj.getDate()} at ${dateObj.toLocaleTimeString('default', {hour: '2-digit',minute: '2-digit', hour12: false})}` return ( <article className="signature box"> <h3 className="signature__headline">{signature.name} - {dateString}</h3> <p className="signature__message"> {signature.message} </p> </article> )}; export default Signature;
At this point, if you start your Gatsby development server, you should have a list of signatures currently existing in your database. Run the following command to get up and running:
gatsby develop
Any signature stored in our database will build HTML in that component. But how can we get signatures INTO our database?
Let’s set up a signature form component to send data and update our Signatures list.
Let’s Make Our JAMstack Guestbook Interactive
First, we’ll set up the basic structure for our component. It will render a simple form onto the page with a text input, a textarea, and a button for submission.
import React from 'react'; import faunadb, { query as q } from "faunadb" var client = new faunadb.Client({ secret: process.env.GATSBY_FAUNA_CLIENT_SECRET }) export default class SignForm extends React.Component { constructor(props) { super(props) this.state = { sigName: "", sigMessage: "" } } handleSubmit = async event => { // Handle the submission } handleInputChange = event => { // When an input changes, update the state } render() { return ( <form onSubmit={this.handleSubmit}> <div className="field"> <div className="control"> <label className="label">Label <input className="input is-fullwidth" name="sigName" type="text" value={this.state.sigName} onChange={this.handleInputChange} /> </label> </div> </div> <div className="field"> <label> Your Message: <textarea rows="5" name="sigMessage" value={this.state.sigMessage} onChange={this.handleInputChange} className="textarea" placeholder="Leave us a happy note"></textarea> </label> </div> <div className="buttons"> <button className="button is-primary" type="submit">Sign the Guestbook</button> </div> </form> ) } }
To start, we’ll set up our state to include the name and the message. We’ll default them to blank strings and insert them into our <textarea> and <input>.
When a user changes the value of one of these fields, we’ll use the handleInputChange method. When a user submits the form, we’ll use the handleSubmit method.
Let’s break down both of those functions.
handleInputChange = event => { const target = event.target const value = target.value const name = target.name this.setState({ [name]: value, }) }
The input change will accept the event. From that event, it will get the current target’s value and name. We can then modify the state of the properties on our state object — sigName, sigMessage or anything else.
Once the state has changed, we can use the state in our handleSubmit method.
handleSubmit = async event => { event.preventDefault(); const placeSig = await this.createSignature(this.state.sigName, this.state.sigMessage); this.addSignature(placeSig); }
This function will call a new createSignature() method. This will connect to Fauna to create a new Document from our state items.
The addSignature() method will update our Signatures list data with the response we get back from Fauna.
In order to write to our database, we’ll need to set up a new key in Fauna with minimal permissions. Our server key is allowed higher permissions because it’s only used during build and won’t be visible in our source.
This key needs to only allow for the ability to only create new items in our signatures collection.
Note: A user could still be malicious with this key, but they can only do as much damage as a bot submitting that form, so it’s a trade-off I’m willing to make for this app.
A look at the FaunaDB security panel. In this shot, we’re creating a ‘client’ role that allows only the ‘Create’ permission for those API Keys. (Large preview)
For this, we’ll create a new “Role” in the “Security” tab of our dashboard. We can add permissions around one or more of our Collections. In this demo, we only need signatures and we can select the “Create” functionality.
After that, we generate a new key that uses that role.
To use this key, we’ll instantiate a new version of the Fauna JavaScript SDK. This is a dependency of the Gatsby plugin we installed, so we already have access to it.
import faunadb, { query as q } from "faunadb" var client = new faunadb.Client({ secret: process.env.GATSBY_FAUNA_CLIENT_SECRET })
By using an environment variable prefixed with GATSBY_, we gain access to it in our browser JavaScript (be sure to add it to your .env file).
By importing the query object from the SDK, we gain access to any of the methods available in Fauna’s first-party Fauna Query Language (FQL). In this case, we want to use the Create method to create a new document on our Collection.
createSignature = async (sigName, sigMessage) => { try { const queryResponse = await client.query( q.Create( q.Collection('signatures'), { data: { name: sigName, message: sigMessage } } ) ) const signatureInfo = { name: queryResponse.data.name, message: queryResponse.data.message, _ts: queryResponse.ts, _id: queryResponse.id} return signatureInfo } catch(err) { console.log(err); } }
We pass the Create function to the client.query() method. Create takes a Collection reference and an object of information to pass to a new Document. In this case, we use q.Collection and a string of our Collection name to get the reference to the Collection. The second argument is for our data. You can pass other items in the object, so we need to tell Fauna, we’re specifically sending it the data property on that object.
Next, we pass it the name and message we collected in our state. The response we get back from Fauna is the entire object of our Document. This includes our data in a data object, as well as a Fauna ID and timestamp. We reformat that data in a way that our Signatures list can use and return that back to our handleSubmit function.
Our submit handler will then pass that data into our setSigData prop which will notify our Signatures component to rerender with that new data. This gives our user immediate feedback that their submission has been accepted.
Rebuilding the site
This is all working in the browser, but the data hasn’t been updated in our static application yet.
From here, we need to tell our JAMstack host to rebuild our site. Many have the ability to specify a webhook to trigger a deployment. Since I’m hosting this demo on Netlify, I can create a new “Deploy webhook” in their admin and create a new triggerBuild function. This function will use the native JavaScript fetch() method and send a post request to that URL. Netlify will then rebuild the application and pull in the latest signatures.
triggerBuild = async () => { const response = await fetch(process.env.GATSBY_BUILD_HOOK, { method: "POST", body: "{}" }); return response; }
Both Gatsby Cloud and Netlify have implemented ways of handling “incremental” builds with Gatsby drastically speeding up build times. This sort of build can happen very quickly now and feel almost as fast as a traditional server-rendered site.
Every signature that gets added gets quick feedback to the user that it’s been submitted, is perpetually stored in a database, and served as HTML via a build process.
Still feels a little too much like a typical website? Let’s take all these concepts a step further.
Create A Mindful App With Auth0, Fauna Identity And Fauna User-Defined Functions (UDF)
Being mindful is an important skill to cultivate. Whether it’s thinking about your relationships, your career, your family, or just going for a walk in nature, it’s important to be mindful of the people and places around you.
A look at the final app screen showing a ‘Mindful Mission,’ ‘Past Missions’ and a ‘Log Out’ button. (Large preview)
This app intends to help you focus on one randomized idea every day and review the various ideas from recent days.
To do this, we need to introduce a key element to most apps: authentication. With authentication, comes extra security concerns. While this data won’t be particularly sensitive, you don’t want one user accessing the history of any other user.
Since we’ll be scoping data to a specific user, we also don’t want to store any secret keys on browser code, as that would open up other security flaws.
We could create an entire authentication flow using nothing but our wits and a user database with Fauna. That may seem daunting and moves us away from the features we want to write. The great thing is that there’s certainly an API for that in the JAMstack! In this demo, we’ll explore integrating Auth0 with Fauna. We can use the integration in many ways.
Setting Up Auth0 To Connect With Fauna
Many implementations of authentication with the JAMstack rely heavily on Serverless functions. That moves much of the security concerns from a security-focused company like Auth0 to the individual developer. That doesn’t feel quite right.
A diagram outlining the convoluted method of using a serverless function to manage authentication and token generation. (Large preview)
The typical flow would be to send a login request to a serverless function. That function would request a user from Auth0. Auth0 would provide the user’s JSON Web Token (JWT) and the function would provide any additional information about the user our application needs. The function would then bundle everything up and send it to the browser.
There are a lot of places in that authentication flow where a developer could introduce a security hole.
Instead, let’s request that Auth0 bundle everything up for us inside the JWT it sends. Keeping security in the hands of the folks who know it best.
A diagram outlining the streamlined authentication and token generation flow when using Auth0’s Rule system. (Large preview)
We’ll do this by using Auth0’s Rules functionality to ask Fauna for a user token to encode into our JWT. This means that unlike our Guestbook, we won’t have any Fauna keys in our front-end code. Everything will be managed in memory from that JWT token.
Setting up Auth0 Application and Rule
First, we’ll need to set up the basics of our Auth0 Application.
Following the configuration steps in their basic walkthrough gets the important basic information filled in. Be sure to fill out the proper localhost port for your bundler of choice as one of your authorized domains.
After the basics of the application are set up, we’ll go into the “Rules” section of our account.
Click “Create Rule” and select “Empty Rule” (or start from one of their many templates that are helpful starting points).
Here’s our Rule code
async function (user, context, callback) { const FAUNADB_SECRET = 'Your Server secret'; const faunadb = require('[email protected]'); const { query: q } = faunadb; const client = new faunadb.Client({ secret: FAUNADB_SECRET }); try { const token = await client.query( q.Call('user_login_or_create', user.email, user) // Call UDF in fauna ); let newClient = new faunadb.Client({ secret: token.secret }); context.idToken['https://faunadb.com/id/secret'] = token.secret; callback(null, user, context); } catch(error) { console.log('->', error); callback(error, user, context); } }
We give the rule a function that takes the user, context, and a callback from Auth0. We need to set up and grab a Server token to initialize our Fauna JavaScript SDK and initialize our client. Just like in our Guestbook, we’ll create a new Database and manage our Tokens in “Security”.
From there, we want to send a query to Fauna to create or log in our user. To keep our Rule code simple (and make it reusable), we’ll write our first Fauna “User-Defined Function” (UDF). A UDF is a function written in FQL that runs on Fauna’s infrastructure.
First, we’ll set up a Collection for our users. You don’t need to make a first Document here, as they’ll be created behind the scenes by our Auth0 rule whenever a new Auth0 user is created.
Next, we need an Index to search our users Collection based on the email address. This Index is simpler than our Guestbook, so we can add it to the Dashboard. Name the Index user_by_email, set the Collection to users, and the Terms to data.email. This will allow us to pass an email address to the Index and get a matching user Document back.
It’s time to create our UDF. In the Dashboard, navigate to “Functions” and create a new one named user_login_or_create.
Query( Lambda( ["userEmail", "userObj"], // Arguments Let( { user: Match(Index("user_by_email"), Var("userEmail")) }, // Set user variable If( Exists(Var("user")), // Check if the User exists Create(Tokens(null), { instance: Select("ref", Get(Var("user"))) }), // Return a token for that item in the users collection (in other words, the user) Let( // Else statement: Set a variable { newUser: Create(Collection("users"), { data: Var("userObj") }), // Create a new user and get its reference token: Create(Tokens(null), { // Create a token for that user instance: Select("ref", Var("newUser")) }) }, Var("token") // return the token ) ) ) ) )
Our UDF will accept a user email address and the rest of the user information. If a user exists in a users Collection, it will create a Token for the user and send that back. If a user doesn’t exist, it will create that user Document and then send a Token to our Auth0 Rule.
We can then store the Token as an idToken attached to the context in our JWT. The token needs a URL as a key. Since this is a Fauna token, we can use a Fauna URL. Whatever this is, you’ll use it to access this in your code.
This Token doesn’t have any permissions yet. We need to go into our Security rules and set up a new Role.
We’ll create an “AuthedUser” role. We don’t need to add any permissions yet, but as we create new UDFs and new Collections, we’ll update the permissions here. Instead of generating a new Key to use this Role, we want to add to this Role’s “Memberships”. On the Memberships screen, you can select a Collection to add as a member. The documents in this Collection (in our case, our Users), will have the permissions set on this role given via their Token.
Now, when a user logs in via Auth0, they’ll be returned a Token that matches their user Document and has its permissions.
From here, we come back to our application.
Implement logic for when the User is logged in
Auth0 has an excellent walkthrough for setting up a “vanilla” JavaScript single-page application. Most of this code is a refactor of that to fit the code splitting of this application.
The default Auth0 Login/Signup screen. All the login flow can be contained in the Auth0 screens. (Large preview)
First, we’ll need the Auth0 SPA SDK.
npm install @auth0/auth0-spa-js
import createAuth0Client from '@auth0/auth0-spa-js'; import { changeToHome } from './layouts/home'; // Home Layout import { changeToMission } from './layouts/myMind'; // Current Mindfulness Mission Layout let auth0 = null; var currentUser = null; const configureClient = async () => { // Configures Auth0 SDK auth0 = await createAuth0Client({ domain: "mindfulness.auth0.com", client_id: "32i3ylPhup47PYKUtZGRnLNsGVLks3M6" }); }; const checkUser = async () => { // return user info from any method const isAuthenticated = await auth0.isAuthenticated(); if (isAuthenticated) { return await auth0.getUser(); } } const loadAuth = async () => { // Loads and checks auth await configureClient(); const isAuthenticated = await auth0.isAuthenticated(); if (isAuthenticated) { // show the gated content currentUser = await auth0.getUser(); changeToMission(); // Show the "Today" screen return; } else { changeToHome(); // Show the logged out "homepage" } const query = window.location.search; if (query.includes("code=") && query.includes("state=")) { // Process the login state await auth0.handleRedirectCallback(); currentUser = await auth0.getUser(); changeToMission(); // Use replaceState to redirect the user away and remove the querystring parameters window.history.replaceState({}, document.title, "/"); } } const login = async () => { await auth0.loginWithRedirect({ redirect_uri: window.location.origin }); } const logout = async () => { auth0.logout({ returnTo: window.location.origin }); window.localStorage.removeItem('currentMindfulItem') changeToHome(); // Change back to logged out state } export { auth0, loadAuth, currentUser, checkUser, login, logout }
First, we configure the SDK with our client_id from Auth0. This is safe information to store in our code.
Next, we set up a function that can be exported and used in multiple files to check if a user is logged in. The Auth0 library provides an isAuthenticated() method. If the user is authenticated, we can return the user data with auth0.getUser().
We set up a login() and logout() functions and a loadAuth() function to handle the return from Auth0 and change the state of our UI to the “Mission” screen with today’s Mindful idea.
Once this is all set up, we have our authentication and user login squared away.
We’ll create a new function for our Fauna functions to reference to get the proper token set up.
const AUTH_PROP_KEY = "https://faunad.com/id/secret"; var faunadb = require('faunadb'), q = faunadb.query; async function getUserClient(currentUser) { return new faunadb.Client({ secret: currentUser[AUTH_PROP_KEY]}) }
This returns a new connection to Fauna using our Token from Auth0. This token works the same as the Keys from previous examples.
Generate a random Mindful topic and store it in Fauna
To start, we need a Collection of items to store our list of Mindful objects. We’ll create a Collection called “mindful” things, and create a number of items with the following schema:
{ "title": "Career", "description": "Think about the next steps you want to make in your career. What’s the next easily attainable move you can make?", "color": "#C6D4FF", "textColor": "black" }
From here, we’ll move to our JavaScript and create a function for adding and returning a random item from that Collection.
async function getRandomMindfulFromFauna(userObj) { const client = await getUserClient(userObj); try { let mindfulThings = await client.query( q.Paginate( q.Documents(q.Collection('mindful_things')) ) ) let randomMindful = mindfulThings.data[Math.floor(Math.random()*mindfulThings.data.length)]; let creation = await client.query(q.Call('addUserMindful', randomMindful)); return creation.data.mindful; } catch (error) { console.log(error) } }
To start, we’ll instantiate our client with our getUserClient() method.
From there, we’ll grab all the Documents from our mindful_things Collection. Paginate() by default grabs 64 items per page, which is more than enough for our data. We’ll grab a random item from the array that’s returned from Fauna. This will be what Fauna refers to as a “Ref”. A Ref is a full reference to a Document that the various FQL functions can use to locate a Document.
We’ll pass that Ref to a new UDF that will handle storing a new, timestamped object for that user stored in a new user_things Collection.
We’ll create the new Collection, but we’ll have our UDF provide the data for it when called.
We’ll create a new UDF in the Fauna dashboard with the name addUserMindful that will accept that random Ref.
As with our login UDF before, we’ll use the Lambda() FQL method which takes an array of arguments.
Without passing any user information to the function, FQL is able to obtain our User Ref just calling the Identity() function. All we have from our randomRef is the reference to our Document. We’ll run a Get() to get the full object. We’ll the Create() a new Document in the user_things Collection with our User Ref and our random information.
We then return the creation object back out of our Lambda. We then go back to our JavaScript and return the data object with the mindful key back to where this function gets called.
Render our Mindful Object on the page
When our user is authenticated, you may remember it called a changeToMission() method. This function switches the items on the page from the “Home” screen to markup that can be filled in by our data. After it’s added to the page, the renderToday() function gets called to add content by a few rules.
The first rule of Serverless Data Club is not to make HTTP requests unless you have to. In other words, cache when you can. Whether that’s creating a full PWA-scale application with Service Workers or just caching your database response with localStorage, cache data, and fetch only when necessary.
The first rule of our conditional is to check localStorage. If localStorage does contain a currentMindfulItem, then we need to check its date to see if it’s from today. If it is, we’ll render that and make no new requests.
The second rule of Serverless Data Club is to make as few requests as possible without the responses of those requests being too large. In that vein, our second conditional rule is to check the latest item from the current user and see if it is from today. If it is, we’ll store it in localStorage for later and then render the results.
Finally, if none of these are true, we’ll fire our getRandomMindfulFromFauna() function, format the result, store that in localStorage, and then render the result.
Get the latest item from a user
I glossed over it in the last section, but we also need some functionality to retrieve the latest mindful object from Fauna for our specific user. In our getLatestFromFauna() method, we’ll again instantiate our Fauna client and then call a new UDF.
Our new UDF is going to call a Fauna Index. An Index is an efficient way of doing a lookup on a Fauna database. In our case, we want to return all user_things by the user field. Then we can also sort the result by timestamp and reverse the default ordering of the data to show the latest first.
Simple Indexes can be created in the Index dashboard. Since we want to do the reverse sort, we’ll need to enter some custom FQL into the Fauna Shell (you can do this in the database dashboard Shell section).
CreateIndex({ name: "getMindfulByUserReverse", serialized: true, source: Collection("user_things"), terms: [ { field: ["data", "user"] } ], values: [ { field: ["ts"], reverse: true }, { field: ["ref"] } ] })
This creates an Index named getMindfulByUserReverse, created from our user_thing Collection. The terms object is a list of fields to search by. In our case, this is just the user field on the data object. We then provide values to return. In our case, we need the Ref and the Timestamp and we’ll use the reverse property to reverse order our results by this field.
We’ll create a new UDF to use this Index.
Query( Lambda( [], If( // Check if there is at least 1 in the index GT( Count( Select( "data", Paginate(Match(Index("getMindfulByUserReverse"), Identity())) ) ), 0 ), Let( // if more than 0 { match: Paginate( Match(Index("getMindfulByUserReverse"), Identity()) // Search the index by our User ), latestObj: Take(1, Var("match")), // Grab the first item from our match latestRef: Select( ["data"], Get(Select(["data", 0, 1], Var("latestObj"))) // Get the data object from the item ), latestTime: Select(["data", 0, 0], Var("latestObj")), // Get the time merged: Merge( // merge those items into one object to return { latestTime: Var("latestTime") }, { latestMindful: Var("latestRef") } ) }, Var("merged") ), Let({ error: { err: "No data" } }, Var("error")) // if there aren't any, return an error. ) ) )
This time our Lambda() function doesn’t need any arguments since we’ll have our User based on the Token used.
First, we’ll check to see if there’s at least 1 item in our Index. If there is, we’ll grab the first item’s data and time and return that back as a merged object.
After we get the latest from Fauna in our JavaScript, we’ll format it to a structure our storeCurrent() and render() methods expect it and return that object.
Now, we have an application that creates, stores, and fetches data for a daily message to contemplate. A user can use this on their phone, on their tablet, on the computer, and have it all synced. We could turn this into a PWA or even a native app with a system like Ionic.
We’re still missing one feature. Viewing a certain number of past items. Since we’ve stored this in our database, we can retrieve them in whatever way we need to.
Pull the latest X Mindful Missions to get a picture of what you’ve thought about
We’ll create a new JavaScript method paired with a new UDF to tackle this.
getSomeFromFauna will take an integer count to ask Fauna for a certain number of items.
Our UDF will be very similar to the getLatestFromFauana UDF. Instead of returning the first item, we’ll Take() the number of items from our array that matches the integer that gets passed into our UDF. We’ll also begin with the same conditional, in case a user doesn’t have any items stored yet.
Query( Lambda( ["count"], // Number of items to return If( // Check if there are any objects GT( Count( Select( "data", Paginate(Match(Index("getMindfulByUserReverse"), Identity(null))) ) ), 0 ), Let( { match: Paginate( Match(Index("getMindfulByUserReverse"), Identity(null)) // Search the Index by our User ), latestObjs: Select("data", Take(Var("count"), Var("match"))), // Get the data that is returned mergedObjs: Map( // Loop over the objects Var("latestObjs"), Lambda( "latestArray", Let( // Build the data like we did in the LatestMindful function { ref: Select(["data"], Get(Select([1], Var("latestArray")))), latestTime: Select(0, Var("latestArray")), merged: Merge( { latestTime: Var("latestTime") }, Select("mindful", Var("ref")) ) }, Var("merged") // Return this to our new array ) ) ) }, Var("mergedObjs") // return the full array ), { latestMindful: [{ title: "No additional data" }] } // if there are no items, send back a message to display ) ) )
In this demo, we created a full-fledged app with serverless data. Because the data is served from a CDN, it can be as close to a user as possible. We used FaunaDB’s features, such as UDFs and Indexes, to optimize our database queries for speed and ease of use. We also made sure we only queried our database the bare minimum to reduce requests.
Where To Go With Serverless Data
The JAMstack isn’t just for sites. It can be used for robust applications as well. Whether that’s for a game, CRUD application or just to be mindful of your surroundings you can do a lot without sacrificing customization and without spinning up your own non-dist database system.
With performance on the mind of everyone creating on the JAMstack — whether for cost or for user experience — finding a good place to store and retrieve your data is a high priority. Find a spot that meets your needs, those of your users, and meets ideals of the JAMstack.
(ra, yk, il)
Website Design & SEO Delray Beach by DBL07.co
Delray Beach SEO
source http://www.scpie.org/from-static-sites-to-end-user-jamstack-apps-with-faunadb/ source https://scpie.tumblr.com/post/620485446847299584
0 notes