#Foxy Freyas ramblings
Note

This u?
Hehe see what you did there!
*pulls you aside*
So ummmmmm how'd you get a photo of me!?
12 notes
·
View notes
Text
Playing strip smash bros with a group of other trans girls and it is a transcendent experience
265 notes
·
View notes
Text
I've developed (that's a stretch) something as a part of game dev that I have used for awhile now as a means of motivation, and also just to feel cool.
I call it 'Hat Switching', after what someone I mentioned it to called it.
Basically what it actually is, is using a little bit of imagination to put yourself in the shoes of someone developing what it is your game is about, it only really works for the early phases but it's still fun.
For example some cases I've used it in are, a VR mech brawler where while going in and out of the game and testing values to make the arms of the mechsuit work I imagined myself as a mechanic from something like mobile suit gundam, or while adding and testing new spells for the magic system in an educational game I've been building I imagined myself an ancient sorceress who just discovered how to harness magical power and was writing the first ever spell book for that world.
I can really recommend it if you struggle to get through the frustrating parts of things not working in those early prototyping phases or if you just want to take things a little less seriously when developing.
13 notes
·
View notes
Text
Getting in to the bus station from the rain and trying to shake water off with the same vibe as a fox getting out of the rain and to her den before shaking the water off.
2 notes
·
View notes
Text
I see people like posts on my blog and I feel like I should apologise for how my blog is or because my other posts aren't like that one but at the same time I think it's my little hell hole to put what I want in so too bad!
1 note
·
View note
Text
OwO what's this? A high effort post from me, who could've seen that coming.
So I'd like to share how I made this repair to an old bag of mine in prep for college starting again this year to avoid having to swap bags and to hopefully help with or inspire anyone to repair their old things.
The finished result:

So instead of buying a new bag in prep for year 2 of college I thought I'd just fix up my old bag that I've had for a few years now. Generally it is just a little scuffed up and any holes or tears were easy sewn shut again however there was this big hole in the netting that used to be a pocket.
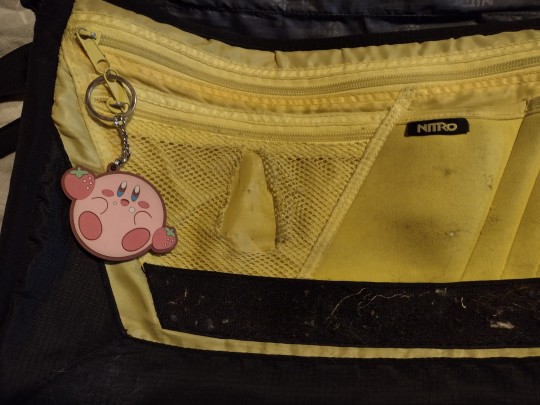
Given that I wanted to be able to use my pocket again I decided that'd be my main task after fixing the few holes.
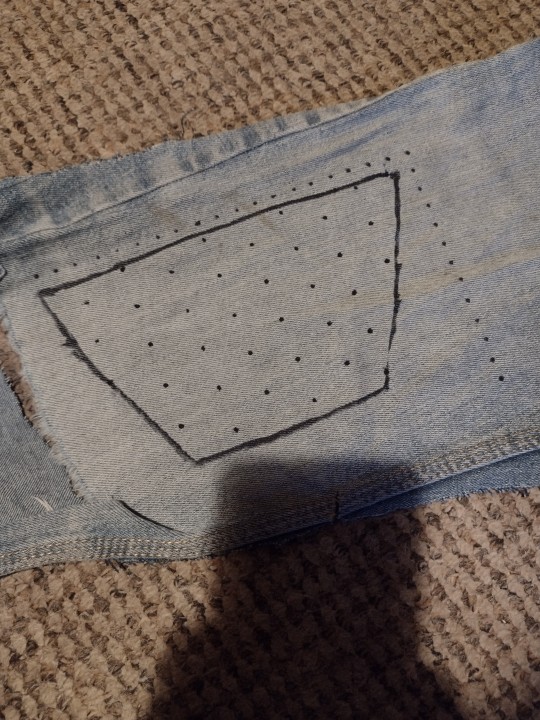
To repair it I cut some paper in the shape of the pocket. (I'm sure there better ways to do this but I just put a pin at each corner and then connected the dots with a pen before cutting on that line)

From there I drew around it on some spare material (in my case a really old pair of jeans that had alot of holes and were too small for me).

Now here's where you could just cut it out and then skip ahead to where I sewn it on however to make it stand out more and to make the bag feel more personal I decided to embroider a design to it before cutting it out.
The design I chose was (as you seen) a flower pattern since I had recently ordered thread and so had a bunch of colours which made me want to make each flower a unique colour.
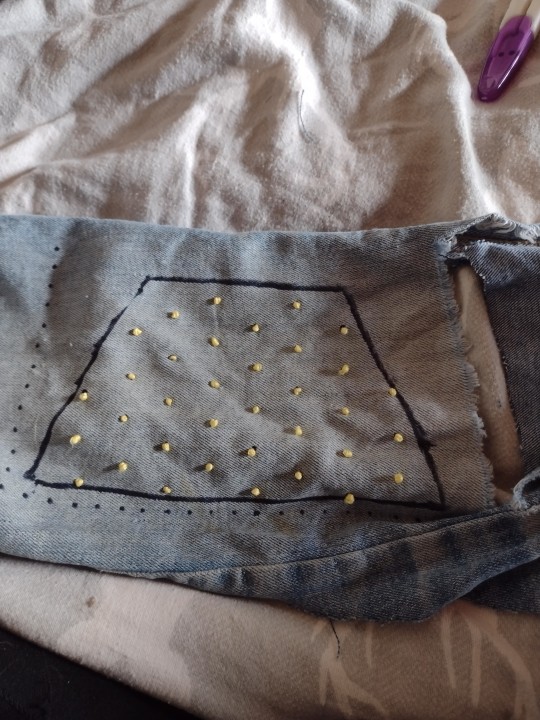
Step 1 to the embroidery was to mark it out and similar to when drawing the outline I'm sure I could have used something that wasn't Sharpie however it was what was at hand. For my design I made each flower 2 cm apart from eachother and every row alternates in height by 1 cm.
Next I started embroidering the design. For the flowers I'm using a lazy daisy design which consists of a french knot with the petals stitched around it. I'll make a tutorial on this at some point however they're nothing new and there are alot of tutorials online about how to make them. I know some people don't use the knot in the middle so just a heads up if you make something similar that it's not necessary.
It took way longer to get all the knots tied but once I finally did, it looked like this.
Next was to add the petals, this was in my opinion the best part of this project since, as I mentioned, I had ordered lots of new thread so basically had like one bundle of every colour to play with. Because of that I made each of the flowers a unique colour. Overall this part was the longest and took me a few days on and off but it was so worth it and made an end result of a lovely mess of flowers.

Finally all that was left to cut it out and sew it in place. I'll be honest I did all this last part in a night and was excited to just get going with it so I took less pictures of the process.
All I have is how it looked when it was finished but I'll atleast explain the process.
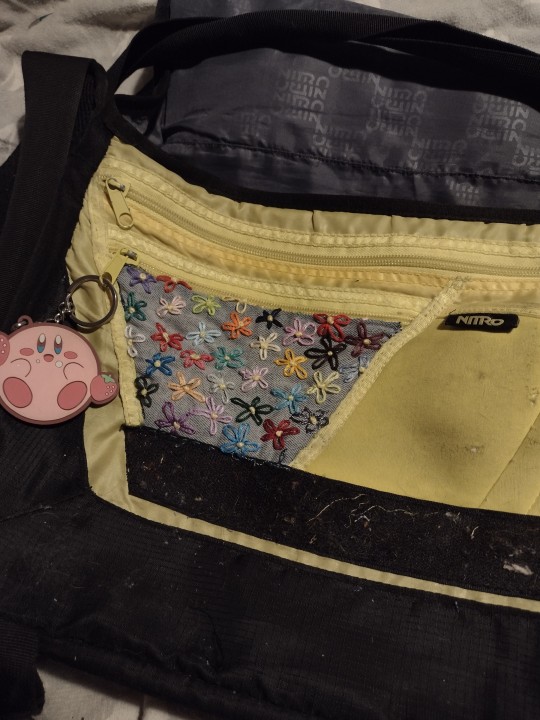
So once I had it all cut out I sized it with the bag and then pinned each corner in place, from there I got a curved needle out and used some yellow sewing thread to fix it in place. To sew it on I put the patch under the seems of the bag and then used a whip stitch to keep in place. Since my bag has a zip at the top of this pocket I just sewn it right the way around since it'd still be accessible.
After it was sewn in place that was me finished, I'm super happy with the result and it's really helpful as I've been dedicating this pocket to my earphones so when I take them out they don't pull anything else out with them. If you have any questions regarding doing a repair like this yourself feel free to ask them and I'll do my best to help out.
Happy mending!
171 notes
·
View notes
Last Seen Blogs

spatziline
Spatziline

i-hate-these-things
i hate these things!!!!!

bunbunsimp
Bunbunsimp


i-m-d-e-a-t-h
10 grudnia 🌹❤