#Freaduino
Explore tagged Tumblr posts
Visit Tumblr Blog
Explore Tumblr blogs with no restrictions, modern design and the best experience.
Last Seen Tumblr Blogs


Fun Fact
The average Tumblr user visits about 67 pages every month.
Text


Piccorobo by Vstone, Osaka (2015). "Piccorobo is an introductory bipedal robot equipped with Freaduino UNO, which is compatible with Arduino UNO. It has a simple configuration with four servo motors, and can perform movements such as walking and swinging its head. … You can have fun learning how to use Arduino and control robots."
11 notes
·
View notes
Text
Placa Arduino
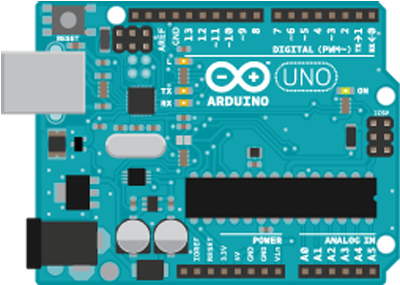
Arduino Nuestra placa ejecuta los bloques a gran velocidad. Concretamente a 16 Mhz, es decir que realiza 16 millones de operaciones por segundo. Por ello la velocidad con la que se maneja la información ha de ser tratado con una velocidad de comunicación medida en baudios por segnudo y el bucle loop se ejecutará una y otra vez sin descanso a esta velocidad de 16 MHz. Microprocesador…
View On WordPress
2 notes
·
View notes
Text
EFBlock--Elecfreaks specified pattern form programming software
Hello, welcome to the world of Arduino. Today i am going to show you a good tool for Arduino programming. And that is EFblock. EFblock is a newly developed programming language based on Google technique. It is suitable for Arduino fans with zero experience to use. You can use EFblock very conveniently without reciting commands. Just moving bricks, you can make an Arduino program. It is so funny and easy to learn. Through studying this tutorial, you can know how to use EFBlock to control Arduino board and sensors for it tells you basic and practical knowledge. You can DIY using a variety of sensors and the Arduino boards to achieve various functions and improve your creativity.
Software Interface Description
Download EFBlock
here
and install EFBlock.exe. It is very simple. You just have to keep click "next", then finish your installation. Open the software:
Simple configuration first: (at the beginning, the robot module is empty) Click on "Extension" in the menu bar and select "elecfreaks" (so the robot module isn't empty now). Here we have finished the configuration.
After configuration, let's see what happen with the software interface? Let's look at the menu bar first:
"New ": create a new project "Load Project": open up the existing project "Save Project": save the current project to a local file (suffix.Sb2). Control panel menu and extend menu. You can choose other boards here . (at the beginning, or when you find the robot module is empty, check whether the state of control panel is "Freaduino_uno" and the state of extended menu is "Elecfreaks")
Next we go for one important section: Scripts.
The scripts are divided by colors.
: Blue scripts belong to the robot module.
: Yellow scripts belong to the control module.
: Orange scripts belong to the data & instructions module.
: Green scripts belong to the digital & logical operations module.
Robot Module
The robot module is corresponding to our peripheral sensor, connect the sensor to the corresponding interface (IO) if you want to use the corresponding script blocks. Here is one illustration: We have 4 script blocks corresponding to 4 different functions:
This block is the head of your program, which must be used at the top.
This block is used for connecting.
This block represents as a numerical value.
This block is usually used to judge the condition: yes/no. Now let's go for what the text stands for. The first white circle (
)of most building blocks display the interface,which you may be puzzled about: Interface is the needle on motherboard. We use wire to connect the sensor and fill in the number of corresponding interface in the first circle, then the building blocks can be used. Arduino has two interfaces: Analog and Digital, which are abbreviated as "A" and "D" on the board.So check the letter "A"( A_ for analog and _ for digital) before you connect the sensor(e.g. A0/0). Analog :
Digital:
Such as
With "A" ahead and "0" in the circle, we should connect the button to A0 side of the board. (The color of wire & interface must be matched .) We will introduce other scripts later.
Let's light up the world of Arduino
We will start with a simple experiment: Light a lamp with flash on the Freaduino board. First we need to configure your development environment: make the motherboard communicate with computer. Operation steps: 1. Connect Aruino motherboard to computer with USB wire. 2. Open the Elecfreaks software, install the Arduino driver (skip this step if you can find the port).
3. Select the corresponding COM port.
4. The title will display "connected" after you click. 5. If you can't figure out which COM port belongs to Arduino , just launch the "port" in the device management. 6. Check whether the "elecfreaks" has been selected.
7. Drag the corresponding module to the right as below.
You will get this:
The blue blocks belong to the robot module and the yellow blocks belong to the control module.
Note: Input 13 in the white circle in place of 5 in this robot module
8. Right click the main program block and select "upload to arduino". Now we have finished our first project. Then what do you find?
0 notes
Link
We're ridiculously excited to announce that we've been approved by IMDA as a "Code for Fun" vendor for MOE schools in 2017-2018!
We'll be offering level-wide coding courses for primary and secondary schools on:
Arduino in Scratch or C, with our Freaduino library of plug-and-play parts. That means no breadboarding, and a variety of interesting and easy-to-use parts like our LCD display!
micro:bit in PXT or Python. Thousands of possibilities with our custom breakout board, enabling lots of additional sensors--the same ones as for our Arduino class!
FreaksCar in C, a new Arduino-powered robotics platform!
Teachers & school leaders: please get in touch, we'll be happy to come by for a demo and discussion! Or you can apply directly with the instructions at our excellent shortened URL, tk.sg/applyforfun.
Do you happen to enjoy looking at brochures that explain the above in greater detail in four A5 pages? Boy do we have a treat for you!!!
0 notes
Text
4 horas tratando de escribir SD en un freaduino mega adk, probé 4 librerías.
solución: switchear a 3V3 :'(

1 note
·
View note
Text
freaduino conectado:
luz, UV, fuego, gases combustibles, CO2, memoria SD

1 note
·
View note