#From mature plants take the tip cuttings. Take tip cuttings from 3-4 cm of the plant. And plant the cutting in potting mix or soil.
Text
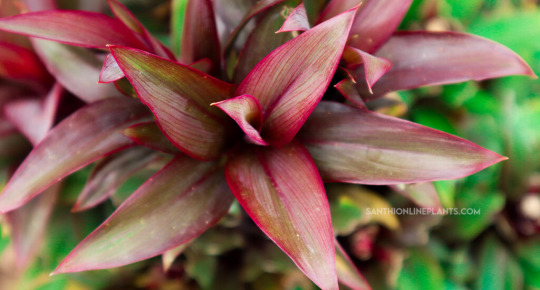
Cordyline fruticosa
The Cordyline fruticosa plants are most beautiful eye-catching evergreen perennial plants with broad leaves. Plant foliage varies in different colors such as red, pink, yellow, white & other streaks.

Good Luck plant
These cordyline fruticosa plants are commonly called Hawaiian ti plant, good luck plant, ti plant, palm lily, cabbage palm, and miracle plant belonging to Asparagaceae. This plant is often believed to bring good luck to the home.

Hawaiian ti plant
This cordyline plant variety prized & beloved especially for its colorful, long-lasting foliage with attractive stripes. The name Hawaiian ti plant name due to the reason that this croton plant believed to bring positiveness, creation, and blessing during those times in Hawaiian culture.
Benefits
The placement of ti -plant croton plant is believed to bring good luck, peace and positivity to home.
Cordyline Ti plants are pests & diseases resistant plants.
The most beautiful feature of this plant is the colorful foliage & air-purifier.
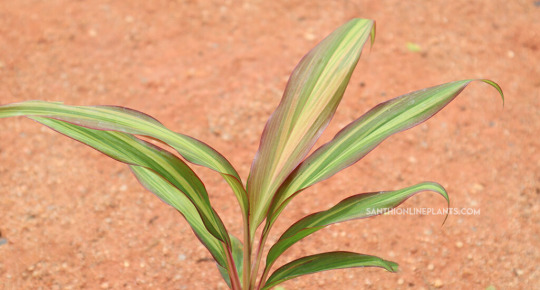
#Cordyline rumba#Andrea#Care & Maintenance#Soil#Watering#Sunlight#Propagation#This croton variety propagated through the methods such as Tip cuttings#Stem cuttings & Air-layering.#Tip Cuttings#From mature plants take the tip cuttings. Take tip cuttings from 3-4 cm of the plant. And plant the cutting in potting mix or soil.#Stem Cuttings#Placement#Repotting#Fertilizer#Dust Removal#Disease & Pest Control#These plant varieties do not contain major pests & diseases. The plant occasionally gets leaf spots#mealy bugs#spider mites#and scales are infected.#Benefits#The placement of ti -plant croton plant is believed to bring good luck#peace and positivity to home.#Cordyline Ti plants are pests & diseases resistant plants.#The most beautiful feature of this plant is the colorful foliage & air-purifier.#Cordyline fruticosa-ti plant crotons#Blog Completed By: Santhionlineplants
0 notes
Text
youtube
Woody herbs are staples in most productive gardens. Being woody herbs, it’s not much of a surprise that they can grow woody as the supple young plants you put into the ground become tough and mature. They also can lose their vigour as they become woody, after a few years not bouncing back quite as well as they once did after a hard prune.
Cuttings are the most common way to propagate plants for home gardeners as well as large-scale propagation nursery. Get this technique down, and you can apply it to almost all plants in your garden!
This can be done any time of year, except for the dead of winter. Undertaking it in spring will yield the fastest results.
Step 1: Taking the cutting
- Use sharp, fine-tipped snips to take cuttings. This prevents damage to the plant using blunt force or ripping the stem.
- Look for nice healthy tips to harvest from. You don’t want to take any stems or leaves that are sad or diseased. If your plant is diseased or struggling, taking healthy cuttings can be a good way to give it a fresh lease on life.
- If it is a hot day or you are taking lots of cuttings, it is a good idea to keep them fresh by storing the cuttings in a container with a wet towel to keep them hydrated while you work. If the stems dry out, they won’t strike.
- An ideal length for cuttings is about 10-15 cm long, or with around four nodes. Don’t worry about the length too much as you can always trim it back when you get to the planting phase if they are too long.
Step 2: Trim stems & excess foliage
- Bring your cuttings into your workstation or greenhouse. Now you can clean up the foliage and trim back the length.
- A minimum of four nodes is ideal for sage cuttings. The node is the area where leaves and stem meet. Josh can demonstrate how to find and count the nodes. Ensure the base of your cutting is cut underneath the node. This area has a higher concentration of the plant hormone, auxin, which encourages rooting.
- Trim or gently pull off the leaves from the bottom three nodes, leaving just the foliage at the top growing tip. Any extra foliage will speed up drying of cutting which is not ideal. If the leaves left are quite large, you can cut them in half to reduce the surface area. This will not harm the plant but will reduce water loss.
Step 3: Place in growing medium
- Fill pots with propagation mixture and wet well beforehand. This mix is a bit finer than conventional potting mix, it should be nice and fluffy and hold onto moisture well. Extra perlite mixed in is also a good idea as it allows the developing roots to push through and access air.
- Dip ends of stem in rooting hormone if you have it or would like to, but it is not required. If you do use it, remember that a little goes a long way.
- Stick the stems directly into the pre-prepared pots, up to the bottom of the remaining leaves. You may put several cuttings in the same pot at this early stage.
Step 4: Managing moisture
- Water in well and place the pots in your greenhouse, propagation station, or under a DIY humidity dome such as a plastic container to keep the soil moist. You can take the lid off of the humidity dome every few days to allow fresh air in and prevent root rot, but keeping the soil moist during the initial growth phase is crucial. If the cuttings dry out, the rooting with cease and the cuttings will die.
Step 5: Separate your plants!
- Rooting time required can take a couple of weeks or up to 2 months, depending on the season. How do you know if you have been successful, and the cuttings have set root? If you see new growth of leaves from the top of the plant. Also, you can give them a tug and they should hold nice and firm in the soil.
- Once your baby plants have grown a bit and developed a good root mass in their pots, you can separate them out from each other and pot up individually. After they have grown healthy roots in their individual pots, plant them out in the garden.
#gardening australia#solarpunk#Australia#propagation#how to#how to propagate#herbs#cuttings#plant cuttings#Youtube
2 notes
·
View notes
Text
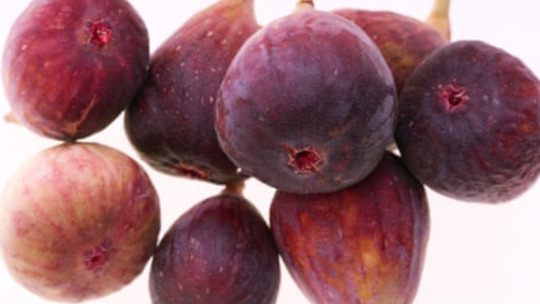
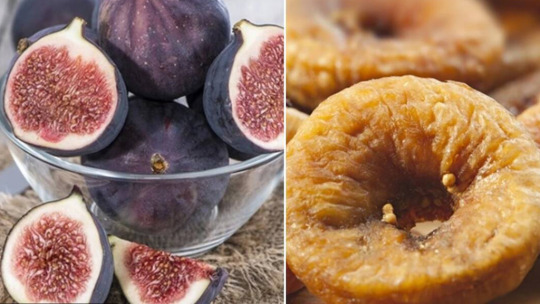
Fig
Fig
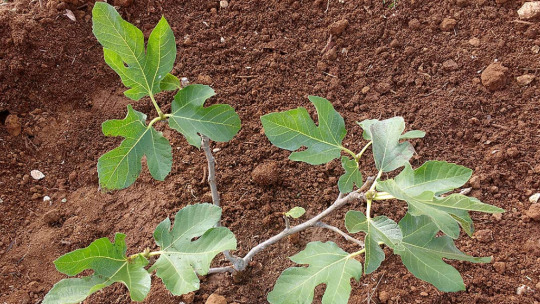
The fig tree originated from Mediterranean countries. Turkey is considered a major producer of Fig. These plants are grown in warmer regions. It is also possible to grow in temperate regions with proper indoor temperatures.
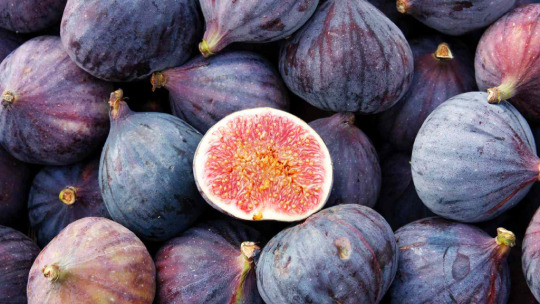
Fig tree
Fig tree produce fig fruit and this belongs to the mulberry family. And this is also considered bone friendly because it contains magnesium, calcium, and phosphorous. In, some research it is recommended that it contains 3.2 times more than other fruits.Fig benefits are greater.
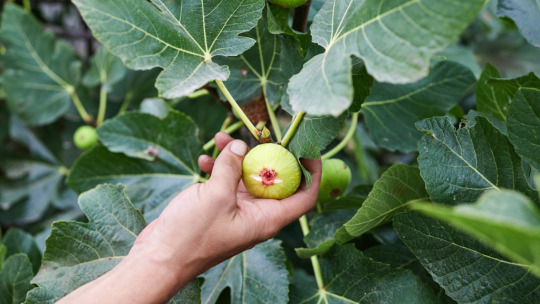
Fig varieties
There are almost +800 varieties of figs. But only a few varieties are grown for their delicious purpose.
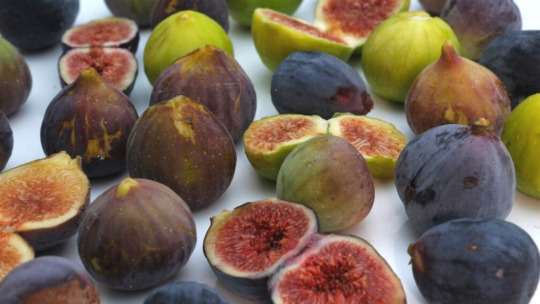
Black Mission Fig
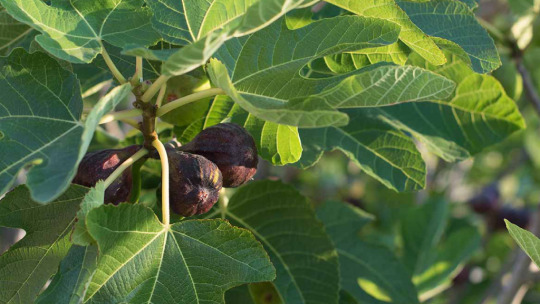
This fig fruit variety is one of the most commonly grown varieties in the world. The size of the fruit is about 3-5 cm. Initially, the skin seems to be green in color. After ripening it will change to purple or else brown in colour.
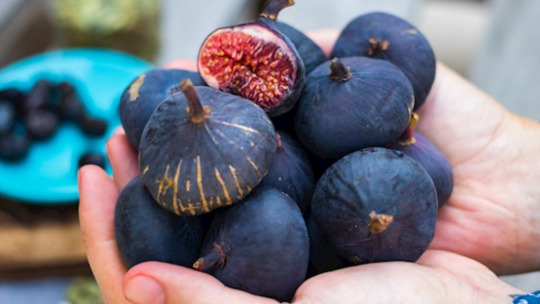
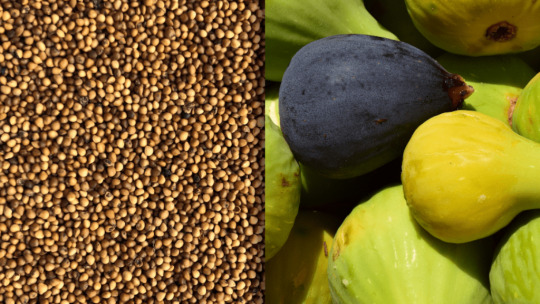
Fig seed
There are more than 1000 seeds found in a fig fruit. Seeds are produced from a single blossom.
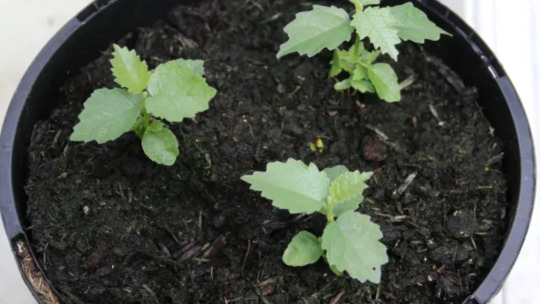
Germination
Remove a scoop of pulp and soak in water for two to three days. The true seeds are sediment that is ready to be sown directly and it will germinate quickly.
Soil
Remove a scoop of pulp and soak in water for two to three days. The true seeds are sediment that is ready to be sown directly and it will germinate quickly.
Irrigation
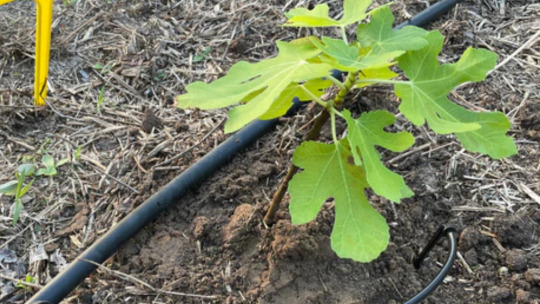
Drip irrigation is the most suitable irrigation for fig trees. A plant requires at least 13-15 liters of water a day.
Sunlight
This plant requires 6-8 hours of direct sunlight. Less amount of sunlight will produce less amount of fruits.
Planting tips
In summer trees should remain in full sun and never forget to add nitrogen fertilizer every 4 weeks. And during winter tend to move the plant to an indoor area with moist soil.
Pruning
In the first year of growth the upward portion trimmed to 50 percent. And so it will grow into a stout and large trunk.

Fertilizer
Application of good organic manure or vermicomposting monthly once around the plant.
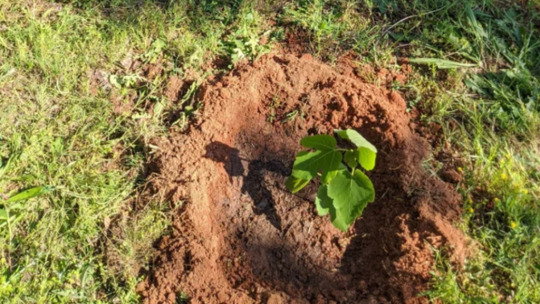
Transplanting
Only two smaller leaves should remain above the pot. After transplanting the cuttings should remain in moist soil.
Maturity indices of fig
When the fruits become soft in nature it is the right time to identify their maturity and the neck region will become wilt. If we pick the fruit before its maturity, there is a high chance of the possibility for latex to discharge. Based on the variety of plants the color will change accordingly to its maturity rate. Black mission figs should remain dark purple and calimyrna figs should remain light yellow in color to find their maturity stage.
Harvesting time
Based on weather conditions harvest time varies. In, summer time we can expect a harvest at two times. One in June month and another one in August
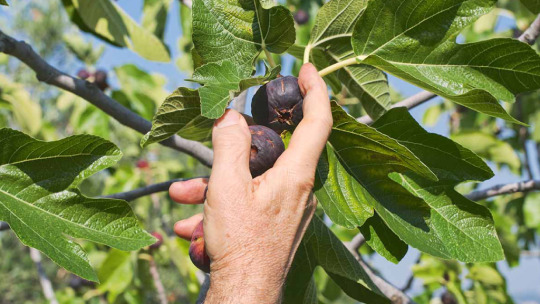
Fig Benefits
Figs are commonly rich in antioxidants which will reduce free radicals.
And also rich in potassium which regulates blood pressure levels.
Taking this fruit in every meal will regulate our body weight because fig is highly rich in fiber.
Figs are highly rich in vitamin A which helps in good vision.
The dried figs leaf is majorly used for diabetes, some skin conditions like vitiligo, & allergies.
Not only this dried figs are rich in anti-oxidants
#Fig#The fig tree originated from Mediterranean countries. Turkey is considered a major producer of Fig. These plants are grown in warmer region#fig#Fig tree#Fig tree produce fig fruit and this belongs to the mulberry family. And this is also considered bone friendly because it contains magnesium#calcium#and phosphorous. In#some research it is recommended that it contains 3.2 times more than other fruits.Fig benefits are greater.#fig tree#Fig varieties#There are almost +800 varieties of figs. But only a few varieties are grown for their delicious purpose.#fig fruit varieties#Black Mission Fig#This fig fruit variety is one of the most commonly grown varieties in the world. The size of the fruit is about 3-5 cm. Initially#the skin seems to be green in color. After ripening it will change to purple or else brown in colour.#black mission fig#Fig seed#There are more than 1000 seeds found in a fig fruit. Seeds are produced from a single blossom.#fig seeds#Germination#Remove a scoop of pulp and soak in water for two to three days. The true seeds are sediment that is ready to be sown directly and it will g#germination#Soil#Fig prefers to grow mostly in moisture and well-drained soil. Application of Bio-NPK results around the plants results in good yield.#soil#Irrigation#Drip irrigation is the most suitable irrigation for fig trees. A plant requires at least 13-15 liters of water a day.#irrigation#Sunlight#This plant requires 6-8 hours of direct sunlight. Less amount of sunlight will produce less amount of fruits.
0 notes
Text
Plant Research
Carmichaelia carmichaelia
Regions and Distribution: Marlborough
Key Features
Native brooms in the genus Carmichaelia have a variety of growth habits, from small trees to low-growing shrubs, and even one climbing species. They have characteristic ‘pea flowers’ which can be very showy in some species. Many grow in areas that have potential for afforestation, and most are susceptible to browsing by stock and feral animals. As a consequence, several species are threatened.
Shrub to 4 m tall, with slender, drooping, leafless branches.
The grooved branchlets are compressed and bear dense clusters of pink flowers in early summer.
Flowers turn into more or less flat pods up to 2 cm long that are contricted between the seeds.
Marlborough Pink Broom (C. glabrescens) also has pink flowers, but has stouter pods that are not constricted between the seeds.
Distribution and Habitat
South Island, restricted to the Awatere and Wairau catchments of Marlborough.
Pink tree broom grows on river flats and in rocky sites from sea level to 1,200 m. Young plants are often confined to areas inaccessible to browsing animals.
Threats
Habitat modification and loss.
Browse by stock and feral animals.
Regeneration failure due to browsing.
Management Opportunities
Survey for new locations.
Mark known sites.
Protection of habitat.
Collect seed from mature shrubs for propagation and replanting in appropriate sites.
Exclosures to allow seedling regeneration.
Control of stock and feral animals such as hares and goats.
Ensure that forest owners are aware of potential habitats and can recognise the species.
Monitoring Options (possible calls to action)
Check existing populations annually
Report new locations to DOC, NZPCN
https://rarespecies.nzfoa.org.nz/species/pink-tree-broom/
Carmichaelia hollowayi
Brief Description
Rare low-growing shrub with many yellowish erect leafless orange-tipped branches inhabiting limestone in the Waitaki Valley. Branches 3.5mm wide, with rounded tip. Flowers small, pea-like, white with dark purple centre, in small clusters. Fruit a long-lasting sharp-tipped dry pod containing 1-3 hard olive seeds.
Distribution
Endemic. South Island, where it is only known from limestone outcrops on the south bank of the Waitaki River.
Habitat
Limestone bluffs, outcrops, colluvium and their associated rendzina soils.
Propagation Technique
Easily grown from fresh seed. Can also be grown by hardwood cuttings but these can be slow to take root. Plants will not tolerate humid conditions, and require a sunny, well drained, fertile soil.
Threats
There are less than 250 adult plants in the wild found in three populations. Because the species suckers, exact numbers of adult plants cannot be determined and it is likely than there are far fewer than currently believed. Although two of the three known populations occur on protected or covenanted land, the species remains at serious risk at all sites from browsing animals and from competition by tall grasses, shrubs and hawkweeds. Aside from these issues recruitment failure (in part linked to weed control) seems to be critical problem.
https://www.nzpcn.org.nz/flora/species/carmichaelia-hollowayi/
Carmichaelia torulosa
Brief Description
Rare small tree or large shrub with erect leafless twigs inhabiting inland Canterbury. Trunk very short. Twigs 1.2-2.5mm wide, rounded. Flowers lavender-pink with darker veins. Fruit a dry pod containing up to 15 hard seeds and which widens where a seed is present giving a distinctive horizontally ribbed appearance.
Distribution
Endemic. New Zealand: South Island (Canterbury (Amuri Range (North Canterbury) to Te Ngawai River (South Canterbury))
Habitat
A plant of forest margins, especially riparian shrubland and low forest, and on rock bluffs. It has also been found within a wetland. Plants grow in a range of vegetation types from grassland and open shrubland to closed shrubland and low forest, though it is most commonly an emergent within open to dense shrubland.
Propagation Technique
Easily grown from seed. Difficult from cuttings. A very attractive shrub that should be more widely cultivated
Threats
Like most other New Zealand brooms this species is threatened by regeneration failure due to competition with the exotic grass swards; competition by exotic woody weeds such as gorse (Ulex europaeus L.) and broom (Cytisus scoparius(L.) Link); damage associated with plantation management (e.g., through felling trees or planting into Canterbury pink broom sites); and from deliberate and accidental spraying through its confusion as a weed species, or by its association with target species.
https://www.nzpcn.org.nz/flora/species/carmichaelia-torulosa/
0 notes
Text
How to grow Aloe vera ( Aloe Barbadensis Miller ) ?

The genus name Aloe has been derived from the Greek word, ἀλόη (alóē, “aloes”) which means "Ahalim" in Hebrew. A Scottish botanist, Philip Miller gave Aloe vera, its scientific name, Aloe vera Barbadensis Miller since the plant belongs to Barbados (eastern Caribbean island). But most experts do not believe that the plant is native to Barbados since they were supposedly brought there by Spaniards (Spain).But all of this doesn't matter anymore.Anybody can grow aloe vera wherever he or she wants to.
https://www.youtube.com/watch?v=n2qafngDVAc
Planting Aloevera Through Cuttings
You can grow Aloe vera plant through leaf cuttings but the most successful method of aloe plant propagation, is from its offsets (pups). You can remove the baby aloe plant from the mother plant as it becomes one-fifth the size of its parent and has several set of leaves.
Separating Aloe Pups
Before separating aloe pups, observe the size of the baby plant and the set of leaves it contains. Once the aloe pup attains the right size, remove the soil surrounding the base of the aloe pup.
After proper examination of the plant, determine the right spot to cut and remove the aloe pup.(it shares its root system with its parent) Now use a sharp, clean knife to cut the aloe pup away from the mother plant.
When the pup is separated from the mother aloe plant, it should have a complete root system attached with it.

You can use dry cactus potting mix or a mixture of potting soil and sand to plant the newly removed aloe pups. But before planting the aloe pups, you should leave them open in a warm place for some time (two days) to get better results.
Allow the baby plant to settle its roots for at least one week's time and then start watering your aloe pup.
Perfect Timing to Separate Aloe Pups
You can separate aloe pups to avoid damaging the root system, in late winter or early spring.
Aloe plants are firm and hardy, so if you fail to remove the pups in early spring, they will likely take it pretty well even in the growing season.
Planting Aloevera Through Seeds
The growth of aloe plants through seeds is pretty easy but the aloe plant must be four or more

years old to produce reliable seeds. The time of maturity varies from species to species, but once the plant starts to flower it is able to produce seeds. Aloe seeds are tiny, grayish brown to black and flat. Light colored white seeds are not ready to be harvested and will not germinate,so avoid using them.
Propagating Aloe Through Seeds
Aloe seeds sprout quite easily in a proper container, for seeds to sprout into seedlings.
You can use a mixture of peat and horticultural sand as a draining medium for the seeds to sprout.
Any container will do, but flat containers use less soil and create a controlled environment for seedlings,which restricts their growth and development. Lightly dampen the medium and spread the seeds about an inch apart. Cover them with a light dusting of the sand.
You need to keep the medium moderately moist in bright light, where temperatures are ideally 75° Fahrenheit (23° C.).
Mist the surface of the soil to keep it moist until you see sprouts. This may take 2 to 4 weeks depending upon the species. Young seedlings should stay on a heat source for two weeks as they develop roots.

Planting Location to Grow Aloe vera
Plant aloe vera in well drained soil since aloe vera plants are adapted for survival in dry conditions. They may rot if planted in soil that collects standing water. You can use a cactus potting mix, or create your own mix using equal parts of soil and gravel.
When planting, be sure to cover the root ball, not allowing the leaves to touch the soil. Place the aloe vera root ball just beneath the surface of the soil. The green leaves may rot if partially buried in soil.
Planting Time to Grow Aloe vera

Aloe vera plants prefer 8–10 hours of sunlight a day as they grow best in warm or hot temperatures They are capable of surviving low temperatures in a more dormant state. However, they may suffer harm if exposed to temperatures below 25ºF (-4ºC). You can start propagating aloevera in early spring or late winter because usually you will see the aloevera pups, at that time.
Grow Aloe vera in Pots
If you are planning to grow Aloe vera in a container, make sure the container has a hole in the base for water to drain through. Aloe vera plants are adapted for survival in dry conditions, and may rot if planted in soil that collects standing water. You can use a cactus potting mix, or create your own mix using equal parts soil, sand, and gravel. Place the Aloe vera root ball just below the soil surface. The sunniest windows are those facing west or south if you live in the northern hemisphere, or those facing west or north if you live in the southern hemisphere.

Spacing to Grow Aloe vera
Aloe vera plants have relatively short roots and heavy leaves. Provide several inches of space between plants, as they grow outward from the center.
How to Take Care of Aloe vera ?
The first step in aloe plant care is to realize that this plant is a succulent, native to tropical regions and does best in dry conditions. Aloevera will perform best outdoors at a sunny site where soil is loose and gritty. Since it is not frost tolerant, it cannot withstand chilling temperatures. They can also be potted, especially in spring with 8 to 10 hours of sunlight and warmth as they go dormant during winter for a prolonged period of time.
Watering to Grow Aloe vera
Aloevera plants do not require much water so let the soil dry at least two inches below the surface before watering them again. In some of the regions, during the summer season, aloevera requires watering on a daily basis (April to October). You should always remember that over watering will lead to root rot and fungus, so it is very important to avoid this.

If you've just re-potted your aloevera pup, wait two or three days before watering it. This gives the roots, time to adjust to the new soil before taking in water.
Sunny Spot to grow Aloe vera
Aloevera plants are made of 95 percent water so even a slight frost will freeze them and the plant will turn into mush. Though aloevera does fine in areas with indirect sunlight but a sunny kitchen or bathroom window will be best for your aloevera plant in pots. If you live in a warm growing zone and are planting your aloe outdoors, choose a place that gets indirect sun (six to eight hours per day).

Preventing Pests
Pests that commonly affect aloevera plant are mealy bugs, stoody molds, aphids, mites, sap-sucking insects and alternaria leaf spot. Mealy bugs are flat and brown or tan and they like to suck on the sap from aloe plants. To prevent these pests, you can use a natural, non-toxic pesticide on your aloevera plant.
Fertilizing Your Herb
Aloe plants do not usually require any fertilizer, so be careful not to over fertilize the plant as it will harm the plant's development. Aloevera plants grow vigorously from April to September so providing some fertilizer during these months can help in your aloe plant's better growth. A low nitrogen, high phosphorous and low potassium fertilizer will encourage healthy and fleashy growth of your plant. You can add one part fertilizer with five parts of water and use it on the days when you water your aloe vera plant.
Removing Weeds
The soil around the aloe plant should be free of grass and weeds so you will have to remove weeds regularly if the plant is outdoors.
How to Harvest Aloevera?
Aloevera is easy to grow and harvest. Plants that are mature and are planted in ground can be the best pick. When leaf tips of your aloe vera attain a rosy tinge, the leaf is ripe and ready to be harvested.
Picking Right Size Leaves
Large aloe plants usually have a leaf that is at least one foot (30 cm). Smaller, potted plants,have leaves that are around four inches (10 cm) long and at least one inch (2 cm) thick.
Cutting and Cleaning the Leaves

You can use a sharp knife to cut the leaf, as close as possible to the base of the plant. Aloin is a yellow-brown sap that has a bitter taste.This sap starts squirting out once the leaf is cut. After cutting you need to place the cut plant in a jar with the sliced end facing down. Wait for about 10-15 minutes so that aloin can drip out. Clean the leaf with running water, or dampen a paper towel to wipe it clean. Allow the leaf to drip-dry or wipe it gently with a clean cloth.
Chopping leaves into cubes

You can chop aloevera leaves in cubes.The cubes should be about one centimeter (1/2 inch) on all sides. This will make it easier to store and use the gel later. You can store the chopped aloe cubes for gel in a resealable container. You can keep it fresh in the refrigerator for about a week , or up to a month in the freezer.
Collecting Aloevera Gel
Before you can get at the gel core of the leaf, you'll need to remove the hard, spine

edges on both sides of the leaf.
Lay your leaf flat on a cutting board. Carefully slice away the skin of the aloe vera leaf. This is the thin, outer green layer you have removed, run your knife between it for the thick, clear gel at the center, and repeat this process for the remaining top layer by flipping the leaf.
Storing Aloevera Gel
You should have slabs of clear aloevera gel and if you see any bits of leaf left on them, trim them off, and feel free to cube the gel for easier storage by cutting them with your knife. Be sure to rinse the aloe vera gel cubes 2-3 times when you're finished to be sure that it's free of any aloe latex residue. You can store all of the gel extract you get in a new glass or bowl separate from the water you used to wash the leaves with.
Read the full article
3 notes
·
View notes
Text
Collecting & Preparing Your Healing Herbs

Herbs should be gathered early in the daytime. It needs to be during the window of the sun being warm enough to dry the dew from the plants and before the sun becomes too hot and diminishes the plants' essential oils. Annuals can be harvested until the first frost. August or one month prior to the first frost is the deadline for the pruning of perennials. The necessary tools for harvesting are a pair of scissors, a sharp knife or hand pruners. Another tool that will be required are well-fitting leather gloves which will withstand venom, sharp edges, and thorns on the plants. Refrain from cotton gloves as they deteriorate rapidly and plastic gloves will not offer the protection that is needed.
Harvesting Leaves For harvesting leaves, separate them at the stems just before the flowers are starting to form. The leaves should be free of blemishes and insect damage. To remove the leaves properly from the stem, press the stalk from the bottom up, pressing on the leaves as you go. Clip the leaves of tansy, parsley and any other herbs which have thicker leaves as this process will not be successful. If using the leaves for seasoning in food, simply place the entire stem and leaves into the dish that is being cooked. If using several herbs, they can be bound together so they can be easily removed when the dish is complete. During the peak of the growing season during the summer months, trim the plants regularly to increase the amount of new growth and branching. As a general rule for perennials, do not cut more than 1/3 of the length of the stem. The exceptions to this rule are lavender and chives which are annuals. The branches of these herbs are to be cut at the base of the plant at ground level.
Harvesting Bark When collecting bark, wait for a dry day during the fall months to cut as this will reduce the chance of mold growth. Also, the bark should never be taken from the trunk of the plant because this will result in the plant dying. Alternatively, slice the bark from the branches after the leaves have fallen and before new buds have formed. Harvesting Flowers, Fruits and Seeds Flowers should be picked and gathered when they are at the peak of their blooming and before the flowers are fully open. This will ensure the most oils and properties are present. Fruit should be picked when they start to turn black, brown, tan, or green depending on the color beforehand. This usually occurs from August through December. It is ideal to pick them before the first frost as they will be considerably sweeter the longer they are allowed to stay on the plant. If seeds are being collected, wait until the flower or pod starts to turn brown to remove and separate the seeds. They should be collected on a day that is dry and windless to help with the process. The seeds should be harvested when the seed pods look as if they are about to split. Remove the entire seed pod or flower head and then turn upside down into a paper bag. Place the bag into an area that is dry so that the seeds can properly ripen. Periodically check on the bag to ensure the seeds are ready to be separated from the pod or flower head. When most of the seeds have removed themselves, remove the remaining seeds by gently squeezing to remove. Seeds require to be cleaned before being stored. Discard any debris by shaking through a series of screens, starting with the larger first. Stack the larger screens on top of the smaller and place the seeds into the largest screened tray. Then tip and shake the seeds until the majority are located in the bottom tray of the stack. Use a small envelope to collect the seeds and label with the name and date collected. Store in an airy, dry, and cool place until ready to plant. Alternatively, they can be placed in a container that is air-tight and stored in the refrigerator. They will keep good for a minimum of 6 years.
Harvesting Roots Roots should be collected at the end of summer into the early fall months when the foliage has turned yellow and starting to die. A hand trowel and/or a fork will be required to reach the rhizomes or roots. The roots will need to come from mature plants. After removing the dirt surrounding the root, carefully lift the root while cutting away from the remaining root system. Clean the roots with water and pat dry. Store them in a well-ventilated and dry area until ready to use.
Wild Crafting Another option for harvesting is to look for the herbs in the wild. There are considerations to this method, but easily done. The first thing to consider is the rarity of the item in the wild. If there is any doubt about the abundance of the plant, do not pick it. This is an ethical item which is followed by wildcrafters, which should be respected. Also, consider the location of the plant itself. For the highest quality of healing and properties in the plant itself, it should be located in a place which is rarely visited by humans so that it has the least amount of pollution possible. This rules out plants found by the side of the road as well as areas near government agencies or farmers who do not practice organic methods.
The top herbs which are easily wild crafted are Burdock, Catnip, Chickweed, Dandelion, Goldenrod, Horehound, Plantain, St. John’s Wort and Yarrow.
Air Drying Herbs When collecting the herbs to be dried in bulk, cut anywhere from 10 – 15 stems and bind them together. Place them in an airy and warm space where they will not be disturbed. Turn the bundles upside down and leave for about 2 - 3 weeks until completely dried. The time frame depends on the amount of moisture and how many stems are in each bunch. This process works ideally for low-moisture plants such as parsley, sage, dill, thyme, basil, fennel, mint, oregano, tarragon, and rosemary. Separate the stronger flavored herbs such as sage and rosemary as the smell will infiltrate the milder herbs. It is best to keep monitoring the drying herbs to ensure that mold and mildew are not infecting the herbs as well as to check on the timeframe they need to be removed from the drying area. The higher-moisture leaves can be dried using a constructed tray with screen wire on the base of the tray. This allows for the ventilation to flow through the entire leaf at one time and they can be turned over as required to complete the drying process. This method works best with the short-stemmed herbs and individual leaves. Arrange the leaves or full stems in a single layer into the tray. Place the tray in an area that is out of the sun, well-ventilated and warm. This process takes about two weeks to complete. The best herbs that are ideal for this process are tarragon, mint, basil, and bay leaf. Air Drying Flowers If drying flowers, cover the tops with a paper bag which is labeled with the type of seed and secure shut to make sure that the seeds do not fall to the ground as the herbs dry. This process will take at least four weeks. When all the seeds have fallen into the bag, remove the bag from the flower head and transfer into a proper storage container.
Heat-Induced Dried Herbs Other ways to heat and dry the herbs are up to personal preference as they will lose their color and flavor as compared to the other drying methods. Some herbalists utilize a food dehydrator to remove the moisture from the plants within one or two days. The directions of the particular machine that is being used should be followed to ensure the plant properly dries out. If there is an oven which has settings as low as 90° Fahrenheit (32° Celsius), herbs can be dried with careful observation. The highest temperature which will allow for proper drying of the herbs is 110° Fahrenheit (43° Celsius). Place the herbs in a single layer on a flat sheet and set into the oven. Leave the door open and closely monitor the process as it varies between 2 and 4 hours. Turn the herbs halfway through the process or as necessary to ensure complete drying. Remove and cool completely before storing in the desired method. Using the microwave oven is also an option, which is for smaller batches of herbs. With this process, close observation is also required. There is a possibility of the herbs catching fire or for the plants to be scorched, losing their flavor and properties. Place the herbs in between layers of kitchen paper. Heat for a total of 4 minutes while turning over every half minute to completely dry. If the kitchen paper becomes too wet during the drying process, replace with new. Cool completely and store in the desired way. Dry Storage of Herbs Dried herbs should be placed in a ceramic or glass container which is airtight. These containers should be placed in an area away from heat and light to ensure the fragrance and flavor are preserved. If storing leaves, it is best to keep them whole as crushing them will release the flavor. For the most potency, crush or powder just before use. Properly stored herbs will continue to have potency for approximately one year. Some culinary herbs such as thyme, chives and rosemary can be trimmed and stored in the vegetable tray of the refrigerator for at least a week. To keep their flavor, wrap them in a few pieces of damp kitchen paper and store in an opened ziplock bag. Alternatively, the fresh cut herbs can be placed in a cup or jar with approximately an inch (2 cm) of water and stored in the refrigerator with a plastic bag covering the herbs. Change out the water daily, and the herbs will stay fresh using this method up to 2 weeks. Freezing Herbs Freezing is an option for some herbs, including thyme, tarragon, savory, sage, oregano, mint, lemongrass, dill, chives, rosemary, and basil. After washing the clipping, remove as much as a possible by patting dry with a clean kitchen towel or kitchen paper. If storing lemongrass or chives, chop before freezing. Arrange them in a single layer on a large flat sheet and place in the freezer. After the plant clippings have properly frozen, transfer to a freezer friendly container or bag, seal and store in the freezer until use. The frozen herbs will stay fresh up to 6 months. Frozen herbs used in cooking are able to be used without defrosting. If they are being added to a cooked meal, they will need to be defrosted to remove the excess moisture. Store Herbs in Butter or Oil Another way to preserve the flavor and taste of the cut herbs is to place them in butter or olive oil after they have been dried. For this process, all moisture needs to be removed or there is a higher risk of bacteria forming. The herbs simply need to be fully immersed in the butter or the olive oil and stored in the refrigerator. Purchasing Bulk Herbs If there is not enough room in the garden or wildcrafting is not an option, bulk herbs can be purchased easily online or in local natural food stores. Another option, if available, is to check out the local farmer's market and co-op vendors. The benefit for buying herbs in bulk is the price will be at a discount compared to buying a smaller amount, and they are able to be stored for a year until needed. One downside it there is more research required when buying bulk herbs. The way they have been cultivated may be important to you. There are also varying qualities of herbs as not all commercial herbal business follow the same guidelines as can be controlled in the home garden.
One way to know the quality of the herbs is to look at the color. It should be as close as possible to the original coloring of the plant which will ensure that it was packed shortly after being harvested. For fresh herbs, they should be green to vibrant green. The coloring of the flowers should be vivid and deep. If the package is able to be opened, this will also indicate the freshness of the herb. The fresher the herb is, the more fragrant they will be. If they have a faint smell or none at all, these herbs are likely old and should be avoided. Dosage for Adults and Children The following are two charts which will aid in determining the correct dosage for all ages and weights. Compare the two charts and adjust the dosage accordingly. For instance, if a child is 10 years old, but they are only 50 pounds (22 kg), then the lower dosage of 1.6 – 1.9 grams of herbs should be taken daily.
Dose by Age
• Age • Daily Dose Recommendation • Ground/Powdered Herbs Capsules
0 – 1 month 1/18 – 1/14 of adult dose 0.3 – 0.4 grams
1 – 6 months 1/14 – 1/7 of adult dose 0.4 – 0.9 grams
6 – 12 months 1/7 – 1/5 of adult dose 0.9 – 1.2 grams
1 – 2 years 1/7 - 1/5 of adult dose 1.2 - 1.5 grams
2 - 4 years 1/4 - 1/3 of adult dose 1.5 - 2.0 grams
4 - 6 years 1/3 - 2/5 of adult dose 2.0 - 2.4 grams
6 - 9 years 2/5 - 1/2 of adult dose 2.4 - 3.0 grams 5 - 6 capsules**
9 - 14 years 1/2 - 2/3 of adult dose 3.0 - 4.0 grams 6 - 8 capsules**
14 - 18 years 2/3 - full adult dose 4.0 - 6.0 grams 8 - 12 capsules**
18 - 60 years full adult dose 6.0 grams
8 - 12 capsules**
60+ years 3/4 of adult dose or less 4.0 - 6.0 grams 9 - 12 capsules**
* Daily Adult Dosage equals 6 grams of herbal extract. ** Capsules used with caution in children due to difficulty in swallowing. Each capsule weights 0.5 grams
Dose by Weight
• Weight • Daily Dose Recommendation • Ground/Powdered Herbs Capsules
30 - 40 lbs.
13 – 18 kg 20% - 27% of adult dose* 1.2 - 1.6 grams
40 - 50 lbs.
18 – 22 kg 27% - 33% of adult dose* 1.6 - 1.9 grams
50 - 60 lbs.
22 – 27 kg 33% - 40% of adult dose* 1.9 - 2.4 grams
60 - 70 lbs.
27 – 31 kg 40% - 47% of adult dose* 2.4 - 2.8 grams
70 - 80 lbs.
31 – 36 kg 47% - 53% of adult dose* 2.8 - 3.2 grams 5 - 6 capsules**
80 - 100 lbs.
36 – 45 kg 53% - 67% of adult dose* 3.2 - 4.0 grams 6 - 8 capsules
100 - 120 lbs.
45 – 54 kg 67% - 80% of adult dose* 4.0 - 4.8 grams 8 - 10 capsules
120 - 150 lbs.
54 – 68 kg 80% - 100% of adult dose* 4.8 - 6.0 grams 10 - 12 capsules
150 - 200 lbs.
68 – 90 kg 100% - 133% of adult dose* 6.0 - 7.9 grams 12 - 16 capsules
200 - 250 lbs.
90 – 113 kg 133% - 167% of adult dose* 7.9 - 10.0 grams 16 - 20 capsules
250 - 300 lbs.
113 – 136 kg 167% - 200% of adult dose* 10.0 - 12.0 grams 20 - 24 capsules
* Daily Adult Dosage equals 6 grams of herbal extract. ** Capsules used with caution in children due to difficulty in swallowing. Each capsule weighs 0.5 grams
0 notes
Text
How to Grow Honeysuckle
Honeysuckle (Lonicera, in the family Caprifoliaceae) is commonly found growing along roadsides or creeping up fences as ornamental plants. But these colorful and delightfully scented plants are more than just pretty decorations — they have medicinal uses as well, exhibiting powerful antiviral activity.1,2
Depending on the variety, the plants will grow as shrubs or crawling vines, and can be either deciduous or evergreen, especially those growing in warmer regions. The climbing varieties flower in the summer, while shrubby varieties flower in late winter, spring and/or summer.3
Native to temperate zones of both hemispheres, honeysuckle thrives in most U.S. states and can also be found growing in southern Asia, the Himalayas and even North Africa.4
Honeysuckle flowers, which are yellow to bright red, are known for their lovely fragrance and sweet nectar. The plants are heat-tolerant, rarely prone to pests and diseases, and known for their versatility and abundance, which makes growing and caring for them easy.5
It's important to note, however, that climbing honeysuckle varieties can produce red berries that are loved by birds but toxic to humans. If ingested, you may experience side effects such as stomach upset, vomiting, diarrhea and nausea.6,7
Popular Varieties
Two popular subspecies of honeysuckle are American honeysuckle and Japanese honeysuckle. The American native trumpet honeysuckle (Lonicera sempervirens) is a well-behaved, noninvasive plant in many U.S. areas.8 In contrast, many states like Florida and Connecticut consider Japanese honeysuckle (Lonicera japonica) to be an invasive species.9
Mexican honeysuckle (Justicia spicigera), also known as desert honeysuckle, is not a real honeysuckle10 but rather a relative of the shrimp plant, another bloom popular in Central Texas.11 While both shrubs and climbing varieties are easy to cultivate, they have different requirements in terms of soil, pruning and training:12
• Climbing varieties such as L. henryi, Halliana, Graham Thomas and L. sempervirens require fertile, well-drained soil rich in humus. Full sun will encourage greater profusion of flowers, but aphid attacks are discouraged if grown in partial shade. So, you may want to weigh out the pros and cons before planting.
Japanese honeysuckle does not require regular pruning, but you may want to control growth by cutting back shoots in spring and thinning out congested growth.
Common honeysuckle (Lonicera periclymenum) should be pruned back one-third in late summer, once it has flowered. All climbing varieties can be renovated by hard pruning to about 2 feet from the ground in early spring. Also remember that climbers need support, especially when they're young, so secure them with galvanized wire to a fence or trellis.
• Shrubby varieties such as Baggesen's Gold, L. pileata, L. fragrantissima and Winter Beauty will thrive in just about any soil type, provided it drains well, and can be planted in either full sun or partial shade.
Deciduous shrubs, such as Lonicera tatarica, should be pruned in late spring or summer, after flowering. To stimulate growth, remove old, weak stems and cut back one-third of the older branches. Make the cuts next to a new, upright shoot.
Evergreen shrubs such as Lonicera nitida or "Baggesen's Gold," which makes a nice hedge, should be pruned three times between spring and fall. Both types can be renovated in early spring by hard pruning.
Regardless of the type, adding organic compost and mulch around the base will reduce water stress, discourage powdery mildew and help the plant thrive. To encourage flowering, add a top dressing such as fish blood and bone in the spring.
Propagating Honeysuckle
Honeysuckle can be propagated either by seed, layering, softwood, hardwood or leaf bud cuttings:
• Seed — Seeds can be sown in a cold frame in the fall. An alternative is to refrigerate the seeds with a small amount of moist compost for four to 12 weeks, then germinate the seeds at a temperature of 55 to 64 degrees Fahrenheit (13 to 18 degrees Celsius).
• Softwood cuttings13 — Cut a 2- to 3-inch (5- to 7.5-centimeter) long piece from the mother plant in late spring or summer. Pinch leaves off the lower half of the cutting and remove any flowers. Make a cut just below a leaf node and dip the base in a root-promoter before planting.
• Hardwood cuttings — Evergreen shrubs can be propagated by taking an 8- to 12-inch (20- to 30-cm) hardwood cutting between fall and midwinter.
• Layering14 — Layering is commonly used to propagate honeysuckle vines. In early spring, when shoots are flexible and dormant, simply bend a 1-year-old stem to the ground and pin the shoot 6 to 9 inches from the tip, forming a U. Cover the base of the U with soil, making sure the tip is still above ground.
• Leaf bud cuttings15 — Another simple way to propagate honeysuckle vine is to cut a small section, making the first cut just above a pair of leaves and the second cut halfway between two leaf joints. Growth regulator can be used to promote roots but is not required.
Place the cutting, leaf end up, in a small pot. Keep the soil moist but well-drained in a warm, sunny area. Placing a clear plastic bag over the pot to create a mini hot-house will encourage heat and moisture retention. Once the risk for frost has passed, allow the plant to acclimate to the outdoors, then plant it in the ground.
How to Dry and Store Honeysuckle
The honeysuckle blossoms can be used for tea either fresh or dry. To dry them:16
Harvest the flowers in the morning, selecting fully formed blossoms that are about to open. They should be elongated, not the trumpet shape of mature blooms. Old, fully opened flowers may not have as many active chemical compounds as immature ones. Small, tightly closed buds will work, too.
Spread the flowers out on a tray and avoid crowding; cover them with layers of cheesecloth.
Put the tray in a place with low humidity and good air circulation for a few days to a week. Dry the flowers until they are brittle and break apart easily.
Once dried, store the flowers in an opaque, airtight container kept in a cool, dry place. Keep them out of direct light to avoid damaging the chemical compounds and essential oils. Honeysuckle tea is the easiest way to take advantage of the medicinal qualities of this fragrant plant. Simply add a handful of fresh or dried honeysuckle flowers to 4 cups of hot water. Steep for a few minutes, then drain to remove the flowers.
Honeysuckle Is a Powerful Antiviral Remedy
Honeysuckle is used in Traditional Chinese medicine (TCM),17 where it's known as Jin Yin Hua. Raw honeysuckle, honeysuckle tea and honeysuckle oil are all known for their medicinal benefits. In TCM, the honeysuckle flower is commonly used to help ease the flu, colds and sore throat.
Research18 shows it has the ability to prevent the influenza virus from replicating. The study,19 published in the journal Cell Research, found a plant microRNA called MIR2911 in honeysuckle effectively suppressed both swine flu and bird flu viruses. Importantly, the antiviral properties of MIR2911 remain after boiling, suggesting honeysuckle tea may offer effective antiviral benefits. According to the authors:20
"We suggest that as the first natural product to directly target influenza A viruses, MIR2911 is the 'virological penicillin' that serves as a novel therapeutic and preventive agent against not only influenza A, but potentially also other types of viruses."
Xiao Er Ke Chuan Ling Oral Liquid (KCL), an herbal preparation that uses honeysuckle and nine other plants, has antiviral, antibacterial and potent pharmacological actions and has been shown to help treat acute bronchitis in children.21
Honeysuckle has also been shown to have wound-healing properties.22 Aside from showing antimicrobial activity against Escherichia coli, Staphylococcus epidermidis, Staphylococcus aureus, Candida albicans and Candida tropicalis, an ointment prepared with honeysuckle extract "exhibited potent wound healing capacity as evidenced by the wound contraction in the excision wound model."
from
http://articles.mercola.com/sites/articles/archive/2018/12/07/growing-honeysuckle.aspx
source http://niapurenaturecom.weebly.com/blog/how-to-grow-honeysuckle
0 notes
Text
How to Grow Honeysuckle
Honeysuckle (Lonicera, in the family Caprifoliaceae) is commonly found growing along roadsides or creeping up fences as ornamental plants. But these colorful and delightfully scented plants are more than just pretty decorations — they have medicinal uses as well, exhibiting powerful antiviral activity.1,2
Depending on the variety, the plants will grow as shrubs or crawling vines, and can be either deciduous or evergreen, especially those growing in warmer regions. The climbing varieties flower in the summer, while shrubby varieties flower in late winter, spring and/or summer.3
Native to temperate zones of both hemispheres, honeysuckle thrives in most U.S. states and can also be found growing in southern Asia, the Himalayas and even North Africa.4
Honeysuckle flowers, which are yellow to bright red, are known for their lovely fragrance and sweet nectar. The plants are heat-tolerant, rarely prone to pests and diseases, and known for their versatility and abundance, which makes growing and caring for them easy.5
It's important to note, however, that climbing honeysuckle varieties can produce red berries that are loved by birds but toxic to humans. If ingested, you may experience side effects such as stomach upset, vomiting, diarrhea and nausea.6,7
Popular Varieties
Two popular subspecies of honeysuckle are American honeysuckle and Japanese honeysuckle. The American native trumpet honeysuckle (Lonicera sempervirens) is a well-behaved, noninvasive plant in many U.S. areas.8 In contrast, many states like Florida and Connecticut consider Japanese honeysuckle (Lonicera japonica) to be an invasive species.9
Mexican honeysuckle (Justicia spicigera), also known as desert honeysuckle, is not a real honeysuckle10 but rather a relative of the shrimp plant, another bloom popular in Central Texas.11 While both shrubs and climbing varieties are easy to cultivate, they have different requirements in terms of soil, pruning and training:12
• Climbing varieties such as L. henryi, Halliana, Graham Thomas and L. sempervirens require fertile, well-drained soil rich in humus. Full sun will encourage greater profusion of flowers, but aphid attacks are discouraged if grown in partial shade. So, you may want to weigh out the pros and cons before planting.
Japanese honeysuckle does not require regular pruning, but you may want to control growth by cutting back shoots in spring and thinning out congested growth.
Common honeysuckle (Lonicera periclymenum) should be pruned back one-third in late summer, once it has flowered. All climbing varieties can be renovated by hard pruning to about 2 feet from the ground in early spring. Also remember that climbers need support, especially when they're young, so secure them with galvanized wire to a fence or trellis.
• Shrubby varieties such as Baggesen's Gold, L. pileata, L. fragrantissima and Winter Beauty will thrive in just about any soil type, provided it drains well, and can be planted in either full sun or partial shade.
Deciduous shrubs, such as Lonicera tatarica, should be pruned in late spring or summer, after flowering. To stimulate growth, remove old, weak stems and cut back one-third of the older branches. Make the cuts next to a new, upright shoot.
Evergreen shrubs such as Lonicera nitida or "Baggesen's Gold," which makes a nice hedge, should be pruned three times between spring and fall. Both types can be renovated in early spring by hard pruning.
Regardless of the type, adding organic compost and mulch around the base will reduce water stress, discourage powdery mildew and help the plant thrive. To encourage flowering, add a top dressing such as fish blood and bone in the spring.
Propagating Honeysuckle
Honeysuckle can be propagated either by seed, layering, softwood, hardwood or leaf bud cuttings:
• Seed — Seeds can be sown in a cold frame in the fall. An alternative is to refrigerate the seeds with a small amount of moist compost for four to 12 weeks, then germinate the seeds at a temperature of 55 to 64 degrees Fahrenheit (13 to 18 degrees Celsius).
• Softwood cuttings13 — Cut a 2- to 3-inch (5- to 7.5-centimeter) long piece from the mother plant in late spring or summer. Pinch leaves off the lower half of the cutting and remove any flowers. Make a cut just below a leaf node and dip the base in a root-promoter before planting.
• Hardwood cuttings — Evergreen shrubs can be propagated by taking an 8- to 12-inch (20- to 30-cm) hardwood cutting between fall and midwinter.
• Layering14 — Layering is commonly used to propagate honeysuckle vines. In early spring, when shoots are flexible and dormant, simply bend a 1-year-old stem to the ground and pin the shoot 6 to 9 inches from the tip, forming a U. Cover the base of the U with soil, making sure the tip is still above ground.
• Leaf bud cuttings15 — Another simple way to propagate honeysuckle vine is to cut a small section, making the first cut just above a pair of leaves and the second cut halfway between two leaf joints. Growth regulator can be used to promote roots but is not required.
Place the cutting, leaf end up, in a small pot. Keep the soil moist but well-drained in a warm, sunny area. Placing a clear plastic bag over the pot to create a mini hot-house will encourage heat and moisture retention. Once the risk for frost has passed, allow the plant to acclimate to the outdoors, then plant it in the ground.
How to Dry and Store Honeysuckle
The honeysuckle blossoms can be used for tea either fresh or dry. To dry them:16
Harvest the flowers in the morning, selecting fully formed blossoms that are about to open. They should be elongated, not the trumpet shape of mature blooms. Old, fully opened flowers may not have as many active chemical compounds as immature ones. Small, tightly closed buds will work, too.
Spread the flowers out on a tray and avoid crowding; cover them with layers of cheesecloth.
Put the tray in a place with low humidity and good air circulation for a few days to a week. Dry the flowers until they are brittle and break apart easily.
Once dried, store the flowers in an opaque, airtight container kept in a cool, dry place. Keep them out of direct light to avoid damaging the chemical compounds and essential oils. Honeysuckle tea is the easiest way to take advantage of the medicinal qualities of this fragrant plant. Simply add a handful of fresh or dried honeysuckle flowers to 4 cups of hot water. Steep for a few minutes, then drain to remove the flowers.
Honeysuckle Is a Powerful Antiviral Remedy
Honeysuckle is used in Traditional Chinese medicine (TCM),17 where it's known as Jin Yin Hua. Raw honeysuckle, honeysuckle tea and honeysuckle oil are all known for their medicinal benefits. In TCM, the honeysuckle flower is commonly used to help ease the flu, colds and sore throat.
Research18 shows it has the ability to prevent the influenza virus from replicating. The study,19 published in the journal Cell Research, found a plant microRNA called MIR2911 in honeysuckle effectively suppressed both swine flu and bird flu viruses. Importantly, the antiviral properties of MIR2911 remain after boiling, suggesting honeysuckle tea may offer effective antiviral benefits. According to the authors:20
"We suggest that as the first natural product to directly target influenza A viruses, MIR2911 is the 'virological penicillin' that serves as a novel therapeutic and preventive agent against not only influenza A, but potentially also other types of viruses."
Xiao Er Ke Chuan Ling Oral Liquid (KCL), an herbal preparation that uses honeysuckle and nine other plants, has antiviral, antibacterial and potent pharmacological actions and has been shown to help treat acute bronchitis in children.21
Honeysuckle has also been shown to have wound-healing properties.22 Aside from showing antimicrobial activity against Escherichia coli, Staphylococcus epidermidis, Staphylococcus aureus, Candida albicans and Candida tropicalis, an ointment prepared with honeysuckle extract "exhibited potent wound healing capacity as evidenced by the wound contraction in the excision wound model."
from HealthyLife via Jake Glover on Inoreader http://articles.mercola.com/sites/articles/archive/2018/12/07/growing-honeysuckle.aspx
0 notes
Text
How to Grow Honeysuckle
Honeysuckle (Lonicera, in the family Caprifoliaceae) is commonly found growing along roadsides or creeping up fences as ornamental plants. But these colorful and delightfully scented plants are more than just pretty decorations — they have medicinal uses as well, exhibiting powerful antiviral activity.1,2
Depending on the variety, the plants will grow as shrubs or crawling vines, and can be either deciduous or evergreen, especially those growing in warmer regions. The climbing varieties flower in the summer, while shrubby varieties flower in late winter, spring and/or summer.3
Native to temperate zones of both hemispheres, honeysuckle thrives in most U.S. states and can also be found growing in southern Asia, the Himalayas and even North Africa.4
Honeysuckle flowers, which are yellow to bright red, are known for their lovely fragrance and sweet nectar. The plants are heat-tolerant, rarely prone to pests and diseases, and known for their versatility and abundance, which makes growing and caring for them easy.5
It’s important to note, however, that climbing honeysuckle varieties can produce red berries that are loved by birds but toxic to humans. If ingested, you may experience side effects such as stomach upset, vomiting, diarrhea and nausea.6,7
Popular Varieties
Two popular subspecies of honeysuckle are American honeysuckle and Japanese honeysuckle. The American native trumpet honeysuckle (Lonicera sempervirens) is a well-behaved, noninvasive plant in many U.S. areas.8 In contrast, many states like Florida and Connecticut consider Japanese honeysuckle (Lonicera japonica) to be an invasive species.9
Mexican honeysuckle (Justicia spicigera), also known as desert honeysuckle, is not a real honeysuckle10 but rather a relative of the shrimp plant, another bloom popular in Central Texas.11 While both shrubs and climbing varieties are easy to cultivate, they have different requirements in terms of soil, pruning and training:12
• Climbing varieties such as L. henryi, Halliana, Graham Thomas and L. sempervirens require fertile, well-drained soil rich in humus. Full sun will encourage greater profusion of flowers, but aphid attacks are discouraged if grown in partial shade. So, you may want to weigh out the pros and cons before planting.
Japanese honeysuckle does not require regular pruning, but you may want to control growth by cutting back shoots in spring and thinning out congested growth.
Common honeysuckle (Lonicera periclymenum) should be pruned back one-third in late summer, once it has flowered. All climbing varieties can be renovated by hard pruning to about 2 feet from the ground in early spring. Also remember that climbers need support, especially when they’re young, so secure them with galvanized wire to a fence or trellis.
• Shrubby varieties such as Baggesen’s Gold, L. pileata, L. fragrantissima and Winter Beauty will thrive in just about any soil type, provided it drains well, and can be planted in either full sun or partial shade.
Deciduous shrubs, such as Lonicera tatarica, should be pruned in late spring or summer, after flowering. To stimulate growth, remove old, weak stems and cut back one-third of the older branches. Make the cuts next to a new, upright shoot.
Evergreen shrubs such as Lonicera nitida or “Baggesen’s Gold,” which makes a nice hedge, should be pruned three times between spring and fall. Both types can be renovated in early spring by hard pruning.
Regardless of the type, adding organic compost and mulch around the base will reduce water stress, discourage powdery mildew and help the plant thrive. To encourage flowering, add a top dressing such as fish blood and bone in the spring.
Propagating Honeysuckle
Honeysuckle can be propagated either by seed, layering, softwood, hardwood or leaf bud cuttings:
• Seed — Seeds can be sown in a cold frame in the fall. An alternative is to refrigerate the seeds with a small amount of moist compost for four to 12 weeks, then germinate the seeds at a temperature of 55 to 64 degrees Fahrenheit (13 to 18 degrees Celsius).
• Softwood cuttings13 — Cut a 2- to 3-inch (5- to 7.5-centimeter) long piece from the mother plant in late spring or summer. Pinch leaves off the lower half of the cutting and remove any flowers. Make a cut just below a leaf node and dip the base in a root-promoter before planting.
• Hardwood cuttings — Evergreen shrubs can be propagated by taking an 8- to 12-inch (20- to 30-cm) hardwood cutting between fall and midwinter.
• Layering14 — Layering is commonly used to propagate honeysuckle vines. In early spring, when shoots are flexible and dormant, simply bend a 1-year-old stem to the ground and pin the shoot 6 to 9 inches from the tip, forming a U. Cover the base of the U with soil, making sure the tip is still above ground.
• Leaf bud cuttings15 — Another simple way to propagate honeysuckle vine is to cut a small section, making the first cut just above a pair of leaves and the second cut halfway between two leaf joints. Growth regulator can be used to promote roots but is not required.
Place the cutting, leaf end up, in a small pot. Keep the soil moist but well-drained in a warm, sunny area. Placing a clear plastic bag over the pot to create a mini hot-house will encourage heat and moisture retention. Once the risk for frost has passed, allow the plant to acclimate to the outdoors, then plant it in the ground.
How to Dry and Store Honeysuckle
The honeysuckle blossoms can be used for tea either fresh or dry. To dry them:16
Harvest the flowers in the morning, selecting fully formed blossoms that are about to open. They should be elongated, not the trumpet shape of mature blooms. Old, fully opened flowers may not have as many active chemical compounds as immature ones. Small, tightly closed buds will work, too.
Spread the flowers out on a tray and avoid crowding; cover them with layers of cheesecloth.
Put the tray in a place with low humidity and good air circulation for a few days to a week. Dry the flowers until they are brittle and break apart easily.
Once dried, store the flowers in an opaque, airtight container kept in a cool, dry place. Keep them out of direct light to avoid damaging the chemical compounds and essential oils. Honeysuckle tea is the easiest way to take advantage of the medicinal qualities of this fragrant plant. Simply add a handful of fresh or dried honeysuckle flowers to 4 cups of hot water. Steep for a few minutes, then drain to remove the flowers.
Honeysuckle Is a Powerful Antiviral Remedy
Honeysuckle is used in Traditional Chinese medicine (TCM),17 where it’s known as Jin Yin Hua. Raw honeysuckle, honeysuckle tea and honeysuckle oil are all known for their medicinal benefits. In TCM, the honeysuckle flower is commonly used to help ease the flu, colds and sore throat.
Research18 shows it has the ability to prevent the influenza virus from replicating. The study,19 published in the journal Cell Research, found a plant microRNA called MIR2911 in honeysuckle effectively suppressed both swine flu and bird flu viruses. Importantly, the antiviral properties of MIR2911 remain after boiling, suggesting honeysuckle tea may offer effective antiviral benefits. According to the authors:20
“We suggest that as the first natural product to directly target influenza A viruses, MIR2911 is the ‘virological penicillin’ that serves as a novel therapeutic and preventive agent against not only influenza A, but potentially also other types of viruses.”
Xiao Er Ke Chuan Ling Oral Liquid (KCL), an herbal preparation that uses honeysuckle and nine other plants, has antiviral, antibacterial and potent pharmacological actions and has been shown to help treat acute bronchitis in children.21
Honeysuckle has also been shown to have wound-healing properties.22 Aside from showing antimicrobial activity against Escherichia coli, Staphylococcus epidermidis, Staphylococcus aureus, Candida albicans and Candida tropicalis, an ointment prepared with honeysuckle extract “exhibited potent wound healing capacity as evidenced by the wound contraction in the excision wound model.”
from Articles http://articles.mercola.com/sites/articles/archive/2018/12/07/growing-honeysuckle.aspx
source https://niapurenaturecom.tumblr.com/post/180883218181
0 notes
Link
Captivate Your Senses With Kava Dr. Mercola If you’re visiting the Pacific Islands, you might be given a ceremonial drink called kava kava that’s made from the kava plant (Piper methysticum), a shrub that can grow up to 3 meters (9.8 feet) tall.1,2,3 The kava plant is a member of the pepper family.4 Large, green and heart-shaped leaves grow thickly on its green, red-and-black striped or spotted stems,5 and its roots, often used to make kava kava, resemble bunches of knotty, woody and hairy branches.6 Kava’s Health Benefits Kava is known for its relaxation capabilities, which may help elevate mood, well-being and contentment.7 These benefits are attributed to kavalactones, the main active ingredients in kava root. Historically, kava has also used by Pacific Islanders to help relieve pain caused by conditions like muscle and back pain, stomach problems, cystitis and urethritis, to name a few.8,9 People may also use kava powder, which can be added to water or purchased in capsule or tablet form. You can also find kava tinctures, tea bags or liquid sprays.10,11 Fancy a Cup of Kava Kava? Kava roots are ground to make kava kava, a thick brew used as a “welcome drink” and given to guests and dignitaries visiting Pacific islands like Fiji and Tonga. Kava kava is consumed during social gatherings and ceremonies to reduce inhibitions, promote better relationships between people of the community, and induce relaxation and amiability.12,13 Kava kava is typically served in a coconut shell, and is swallowed in one or two quick gulps. When drinking kava kava, always mention thoughts of gratitude, especially toward the person who served you the beverage.14 It’s advised that you consume each kava kava serving 10 minutes apart. The drink’s effects can kick in quickly because of kavain, a kavalactone present in the plant. Other effects of kavalactones may not register until after 30 minutes. However, this drink isn’t just used to foster good relationships. In fact, kava kava was traditionally used as a sedative because research shows that the kava plant itself can be ideal for alleviating anxiety, insomnia, muscle pain and benzodiazepine withdrawal, and in promoting relaxation.15,16 Kava’s Common Uses Apart from its traditional culinary uses, kava is utilized for medicinal purposes too. Pacific Islanders used kava to help ease: Menstrual discomfort Venereal disease Urinary tract infections (UTIs) Headaches Migraines Fever Chronic fatigue syndrome Attention deficit hyperactivity disorder (ADHD) Tuberculosis Psychosis Epilepsy Kava has also been used as a mouthwash to help relieve canker sores and toothaches, and as a topical ointment to help heal wounds and sores caused by leprosy.17 Although this plant has been widely used for years in these tropical islands, some people have doubts about its benefits because of various reports about kava’s potentially addictive nature.18 While published studies and books that examined kava’s qualities highlighted a lack of evidence,19 it would still be wise to regulate your kava intake since major side effects have been linked to it.20 Watch Out for Kava’s Side Effects Although kava is still available in the U.S., the Food and Drug Administration (FDA) issued a consumer advisory in March 2002 that highlights the rare but potential risk of liver failure from kava-containing products.21 In Europe, kava has already been linked to around 30 cases of people experiencing liver-related damage, including liver failure.22 It’s vital to monitor your intake of kava to prevent the complications linked to this herb, such as:23,24 Dizziness or drowsiness25 Restlessness Stomach upsets Allergic reactions like contact dermatitis and skin lesions26 Loss of appetite Partial loss of hearing Hair loss or alopecia Flaky, dry and yellowish skin discoloration Worsened depression Avoid drinking alcohol with kava, as it may cause side effects like a higher risk of impaired reflexes and liver damage.27 Refrain from drinking kava with anti-anxiety medicines, sedatives, diuretics, phenothiazine drugs, levodopa and liver-metabolized medicines. These medicines’ effects will be enhanced and may cause complications when ingested alongside kava kava.28 Kava shouldn’t be taken before doing tasks that demand a high level of attention and alertness, such as driving or operating machinery, because it may trigger drowsiness.29 If you’re thinking about adding kava to your diet, consult your physician first, and take this herb under close supervision. Do not take kava for more than four weeks. Lastly, if you fall under any of these groups, avoid kava in general:30,31 People with liver disease like cirrhosis or hepatitis People suffering from depression or bipolar disorder Parkinson’s disease patients Pregnant or breastfeeding women People who will undergo surgery (kava prolongs the anesthesia’s effect) Children Growing Kava at Home To grow kava at home, you need kava cuttings from mature plants, as they propagate easily. Ideally, kava plants should be grown in an area with partial shade32 and without exposure to direct sunlight because it causes leaf dryness. You can grow your kava cuttings either in potting bags or homemade containers, woven coconut leaf baskets or nursery beds. The Pacific Agriculture Policy Project suggests the following tips when planting kava at home:33 Pick cuttings from plants with healthy and vigorous stems, and avoid getting cuttings from plants with noticeably older, lame and unhealthy stems. Kava cuttings ideally must be one to two nodes long. You can propagate cuttings that have four nodes, too, if the stems are thinner and shorter, or if you took the kava cutting from an area near the stem’s growing tip. Always cut the stems near the plant’s nodes and not near the growing tip of the stems. Ensure that the kava stems are not showing signs of disease, insects or other pests, or rot. These plants must be planted in fertile and loose soil to allow the roots to stretch their “legs” and maximize the area. As a rule of thumb do not plant kava in a hard-packed growing medium or in too-loose soil that’ll cause it to dry out.34 When growing kava in a container, ensure that it drains well and constantly water it to add moisture. Once these plants have grown at least 20 to 30 centimeters (cm) tall (7.8 to 11.8 inches) and 2 to 6 months old, you can move them into their new home. Prior to this, ensure that your plant has already been hardened by decreasing the amount of water you provide it. If you’re transplanting cuttings grown in a potting bag, first make a 30-cm deep hole (just under 12 inches) in the soil and make the hole wide to provide enough space for both seedlings and soil. Do this quickly so they won’t dry out. It’s recommended that you transplant the kava cuttings during wet or rainy days to assist the plant in establishing roots and promote speedy recovery from the hardening process. Should the plant seem dry, add more soil and mulch around it to boost moisture. Now that this is done, you can watch your kava plants flourish. However, don’t forget to regularly water the plants, and check and remove weeds that may hinder growth.35 Must-Try Kava Recipes You can make kava tea by simmering kava roots in water, but you can also use kava powder that you can buy from online stores.36 Just make sure the powder contains kava root extract, to ensure that it’s effective. To determine if you’re using an instant mix, check if the powder completely dissolves in water without leaving any residue. If it’s clear, it’s instant.37 Traditionally, kava tea is prepared by straining 1 to 2 ounces of dried kava powder (2 to 4 tablespoons per person) in water using a nylon stocking, cheesecloth, a 1-gallon paint strainer or muslin bag. Once the powder is placed inside the strainer, hold the edges together at the top to prevent the powder from falling out. Afterward, immerse the bag in a bowl of cool water. Per 2 ounces of powder, make sure there’s a quart of water. Here comes the unique part: Knead the kava powder using your hands. It feels oily because of kava’s kavalactone levels, but the oiliness will decrease after constant kneading. Once the powder doesn’t feel oily and the water is mud-like, stop kneading. However, if you don’t feel like kneading, you can just repetitively bring the strainer bag out, squeeze it and place it back in the water. The good news is you can still make traditional kava tea even if you’re pressed for time. All you need is kava powder, water and a blender.38 Traditional Kava Tea Ingredients: 2 to 4 tablespoons of dried kava powder 1 cup water Procedure: Combine the kava powder and water. Blend together for four minutes. Pour mixture through a nylon sieve or cheese cloth. Squeeze excess liquid into a bowl. Discard the pulp afterwards and enjoy. This makes one serving.
0 notes
Text
Captivate Your Senses With Kava
If you’re visiting the Pacific Islands, you might be given a ceremonial drink called kava kava that’s made from the kava plant (Piper methysticum), a shrub that can grow up to 3 meters (9.8 feet) tall.1,2,3
The kava plant is a member of the pepper family.4 Large, green and heart-shaped leaves grow thickly on its green, red-and-black striped or spotted stems,5 and its roots, often used to make kava kava, resemble bunches of knotty, woody and hairy branches.6
Kava’s Health Benefits
Kava is known for its relaxation capabilities, which may help elevate mood, well-being and contentment.7 These benefits are attributed to kavalactones, the main active ingredients in kava root. Historically, kava has also used by Pacific Islanders to help relieve pain caused by conditions like muscle and back pain, stomach problems, cystitis and urethritis, to name a few.8,9
People may also use kava powder, which can be added to water or purchased in capsule or tablet form. You can also find kava tinctures, tea bags or liquid sprays.10,11
Fancy a Cup of Kava Kava?
Kava roots are ground to make kava kava, a thick brew used as a “welcome drink” and given to guests and dignitaries visiting Pacific islands like Fiji and Tonga. Kava kava is consumed during social gatherings and ceremonies to reduce inhibitions, promote better relationships between people of the community, and induce relaxation and amiability.12,13
Kava kava is typically served in a coconut shell, and is swallowed in one or two quick gulps. When drinking kava kava, always mention thoughts of gratitude, especially toward the person who served you the beverage.14
It’s advised that you consume each kava kava serving 10 minutes apart. The drink’s effects can kick in quickly because of kavain, a kavalactone present in the plant. Other effects of kavalactones may not register until after 30 minutes.
However, this drink isn’t just used to foster good relationships. In fact, kava kava was traditionally used as a sedative because research shows that the kava plant itself can be ideal for alleviating anxiety, insomnia, muscle pain and benzodiazepine withdrawal, and in promoting relaxation.15,16
Kava’s Common Uses
Apart from its traditional culinary uses, kava is utilized for medicinal purposes too. Pacific Islanders used kava to help ease:
Menstrual discomfort
Venereal disease
Urinary tract infections (UTIs)
Headaches
Migraines
Fever
Chronic fatigue syndrome
Attention deficit hyperactivity disorder (ADHD)
Tuberculosis
Psychosis
Epilepsy
Kava has also been used as a mouthwash to help relieve canker sores and toothaches, and as a topical ointment to help heal wounds and sores caused by leprosy.17
Although this plant has been widely used for years in these tropical islands, some people have doubts about its benefits because of various reports about kava’s potentially addictive nature.18 While published studies and books that examined kava’s qualities highlighted a lack of evidence,19 it would still be wise to regulate your kava intake since major side effects have been linked to it.20
Watch Out for Kava’s Side Effects
Although kava is still available in the U.S., the Food and Drug Administration (FDA) issued a consumer advisory in March 2002 that highlights the rare but potential risk of liver failure from kava-containing products.21 In Europe, kava has already been linked to around 30 cases of people experiencing liver-related damage, including liver failure.22 It’s vital to monitor your intake of kava to prevent the complications linked to this herb, such as:23,24
Dizziness or drowsiness25
Restlessness
Stomach upsets
Allergic reactions like contact dermatitis and skin lesions26
Loss of appetite
Partial loss of hearing
Hair loss or alopecia
Flaky, dry and yellowish skin discoloration
Worsened depression
Avoid drinking alcohol with kava, as it may cause side effects like a higher risk of impaired reflexes and liver damage.27 Refrain from drinking kava with anti-anxiety medicines, sedatives, diuretics, phenothiazine drugs, levodopa and liver-metabolized medicines. These medicines’ effects will be enhanced and may cause complications when ingested alongside kava kava.28
Kava shouldn’t be taken before doing tasks that demand a high level of attention and alertness, such as driving or operating machinery, because it may trigger drowsiness.29 If you’re thinking about adding kava to your diet, consult your physician first, and take this herb under close supervision. Do not take kava for more than four weeks. Lastly, if you fall under any of these groups, avoid kava in general:30,31
People with liver disease like cirrhosis or hepatitis
People suffering from depression or bipolar disorder
Parkinson’s disease patients
Pregnant or breastfeeding women
People who will undergo surgery (kava prolongs the anesthesia’s effect)
Children
Growing Kava at Home
To grow kava at home, you need kava cuttings from mature plants, as they propagate easily. Ideally, kava plants should be grown in an area with partial shade32 and without exposure to direct sunlight because it causes leaf dryness.
You can grow your kava cuttings either in potting bags or homemade containers, woven coconut leaf baskets or nursery beds. The Pacific Agriculture Policy Project suggests the following tips when planting kava at home:33
Pick cuttings from plants with healthy and vigorous stems, and avoid getting cuttings from plants with noticeably older, lame and unhealthy stems.
Kava cuttings ideally must be one to two nodes long. You can propagate cuttings that have four nodes, too, if the stems are thinner and shorter, or if you took the kava cutting from an area near the stem’s growing tip.
Always cut the stems near the plant’s nodes and not near the growing tip of the stems.
Ensure that the kava stems are not showing signs of disease, insects or other pests, or rot.
These plants must be planted in fertile and loose soil to allow the roots to stretch their “legs” and maximize the area. As a rule of thumb do not plant kava in a hard-packed growing medium or in too-loose soil that’ll cause it to dry out.34 When growing kava in a container, ensure that it drains well and constantly water it to add moisture.
Once these plants have grown at least 20 to 30 centimeters (cm) tall (7.8 to 11.8 inches) and 2 to 6 months old, you can move them into their new home. Prior to this, ensure that your plant has already been hardened by decreasing the amount of water you provide it.
If you’re transplanting cuttings grown in a potting bag, first make a 30-cm deep hole (just under 12 inches) in the soil and make the hole wide to provide enough space for both seedlings and soil. Do this quickly so they won’t dry out. It’s recommended that you transplant the kava cuttings during wet or rainy days to assist the plant in establishing roots and promote speedy recovery from the hardening process.
Should the plant seem dry, add more soil and mulch around it to boost moisture. Now that this is done, you can watch your kava plants flourish. However, don’t forget to regularly water the plants, and check and remove weeds that may hinder growth.35
Must-Try Kava Recipes
You can make kava tea by simmering kava roots in water, but you can also use kava powder that you can buy from online stores.36 Just make sure the powder contains kava root extract, to ensure that it’s effective. To determine if you’re using an instant mix, check if the powder completely dissolves in water without leaving any residue. If it’s clear, it’s instant.37
Traditionally, kava tea is prepared by straining 1 to 2 ounces of dried kava powder (2 to 4 tablespoons per person) in water using a nylon stocking, cheesecloth, a 1-gallon paint strainer or muslin bag. Once the powder is placed inside the strainer, hold the edges together at the top to prevent the powder from falling out. Afterward, immerse the bag in a bowl of cool water. Per 2 ounces of powder, make sure there’s a quart of water.
Here comes the unique part: Knead the kava powder using your hands. It feels oily because of kava’s kavalactone levels, but the oiliness will decrease after constant kneading. Once the powder doesn’t feel oily and the water is mud-like, stop kneading. However, if you don’t feel like kneading, you can just repetitively bring the strainer bag out, squeeze it and place it back in the water.
The good news is you can still make traditional kava tea even if you’re pressed for time. All you need is kava powder, water and a blender.38
Traditional Kava Tea
Ingredients:
2 to 4 tablespoons of dried kava powder
1 cup water
Procedure:
Combine the kava powder and water.
Blend together for four minutes.
Pour mixture through a nylon sieve or cheese cloth. Squeeze excess liquid into a bowl. Discard the pulp afterwards and enjoy.
This makes one serving.
from HealthyLife via Jake Glover on Inoreader http://articles.mercola.com/sites/articles/archive/2018/09/20/kava-herb.aspx
0 notes
Link
All About Growing Asparagus Dr. Becker By Dr. Mercola When you see asparagus standing tall and proud in neat displays at your local grocery store, you might have a hard time imagining how it is grown. It may seem even harder to imagine you could grow it in your own vegetable garden. While growing asparagus takes patience — about three years to be exact, to ensure vigorous growth and plant maturity — it is not as difficult as you may think. All the preparation and hard work you do initially will be richly rewarded when you harvest those first tender shoots. If you are planting a garden and would enjoy a versatile vegetable that is packed with vitamins and minerals, and delivers important health benefits, you most definitely should consider growing asparagus. Why Asparagus Is so Good for You Dubbed as a "feel-good" vegetable because of its mood-boosting potential, asparagus is a superfood you may want to consider not only eating more often, but cultivating in your garden. It's a nutritionally balanced vegetable that is loaded with vitamins A, E and K. One cup (180 grams) of cooked asparagus contains just 40 calories. Asparagus is also a good source of vitamins C and B, including folate. Folate helps your body make dopamine, norepinephrine and serotonin, which is why asparagus is thought to support your mood. Claims that asparagus protects against cancer are based on its high level of glutathione, a potent antioxidant. It also contains rutin, a bioflavonoid (plant pigment), which protects your small blood vessels from rupturing. It also may protect against the damaging effects of radiation. Asparagus boasts healthy levels of copper, iron, magnesium, selenium and zinc, to name a few of the minerals it contains. It also supports your digestive health, thanks to the presence of insoluble and soluble fiber, along with inulin, a prebiotic that acts as food for the beneficial bacteria in your gut. Finally, researchers have uncovered a natural angiotensin-converting enzyme (ACE) inhibitor in asparagus that appears useful for lowering your blood pressure. A 2015 study1 revealed a new sulfur-containing metabolite known as asparaptine, found in asparagus spears, which, according to the authors, acts as a "new ACE inhibitor." Interesting Facts About Asparagus More than just the look of asparagus is unique: Check out these interesting facts about this harbinger of spring.2,3 First, you may not be aware of asparagus' status as one of only a few garden-grown perennial vegetables. You need only plant it once. Cared for properly, it will return faithfully year after year, sometimes for decades. Second, it's important to know asparagus plants are monoecious, which means they can be either male or female. The difference is in their leaves and seed-bearing ability. Female plants are the seed bearers, featuring flowers that have well-developed, three-lobed pistils. Male blossoms do not bear seeds and are noticeably larger and longer. Third, although green asparagus is most common, purple and white varieties also exist. Purple varieties tend to have less fibers than green asparagus, and they also boast a higher sugar content. You may wonder how white asparagus is produced, especially because it is actually the same plant as green asparagus. The only difference is it is grown covered to inhibit the process of photosynthesis. If you've ever wondered why white asparagus is much higher priced than green, now you know. The labor involved in the blanching process drives up the cost. Notably, in continental Europe, due to its short growing season and high demand, white asparagus commands a premium price and is often slathered with vinaigrette or hollandaise.4 For the Highest Yields, Try a 'Jersey' Variety Most avid gardeners would agree that it is nearly impossible to select bad asparagus. In particular, varieties with "Jersey" in their name, which indicates they were bred in New Jersey to be all male, will produce higher yields.5 That said, since asparagus is long-lasting, it's important you select a variety that is well suited for your area. In the U.S., asparagus grows best in hardiness zones 4 to 9.6 Mother Earth News7 recommends Guelph Millennium for cold climates and Apollo and UC-157 for warm climates. Gardeners in zones 4 to 6 enjoy a wider selection of varieties, including Jersey Giant and Jersey Knight. Other popular choices include:8 Brock Imperial: a high yield variety Mary Washington: rust resistant and the most commonly found variety Princeville: does well in warmer climates Purple Passion: a sweet purple variety Tips on Choosing a Spot for Asparagus in Your Garden When making a plan to grow asparagus, carefully consider the following:9,10 Height: Since asparagus plants grow quite tall — as high as 5 feet (1.5 meters) — make sure you plant them in a location where they will not overshadow smaller neighboring plants Location: Due to its perennial nature, asparagus will come back on its own year after year, possibly for 15 to 20 years — making it a somewhat permanent fixture in your garden Soil: Asparagus thrives in lighter, compost-rich soil that drains well; a soil pH in the neutral 6.0 to 7.0 range is ideal Space: Allow about 4 to 5 feet (1.2 to 1.5 m) for each plant, although in the early years the plants won't spread out much; once established, however, you will be surprised at how much space they will fill Sun: While asparagus can tolerate some shade, you can help minimize disease and ensure more vigorous plants by placing them in direct sun; insufficient daily sunlight will result in thin spears and weak plants You also should be aware of the two options you have when planting asparagus: using seeds or 1-year-old crowns. How to Plant Asparagus From Seeds According to Rodale's Organic Life,11 while starting asparagus from seed takes patience and a few extra steps, seed-grown plants are cheaper and unaffected by transplant trauma. You can buy a whole packet of asparagus seed for roughly the same price you'd pay for a single asparagus crown. Seed-grown asparagus plants are heartier, generally out-producing those started from roots. If you grow seeds, you will also be able to selectively discard female asparagus plants and cultivate an all-male bed. Male plants generally produce higher yields than female plants. Plants can be started from seed about four weeks before the last expected frost. In northern climates, you can start seedlings indoors in late February or early March. Sow single seeds in biodegradable pots and place them in a sunny window. Early on, you may need to use bottom heat to maintain the temperature of the pots at 77 degrees F (25 C). When the seeds sprout, you can lower the temperature by about 10 degrees. When the danger of frost has passed, plant the seedlings 2 to 3 inches, or 5.1 to 7.6 centimeters (cm), deep in a nursery bed. Once tiny flowers appear, use a magnifying glass to weed out the female plants and transplant the males to their permanent location in the garden. Growing Asparagus From Crowns Most people, especially anyone new to growing asparagus, will find it easier to use crowns.12,13 If for no other reason, using crowns will eliminate the year of tedious weeding that often accompanies starting asparagus plants from seed! Crowns, which are readily available in the spring, have the appearance of an old string mop. When selecting crowns, choose ones that are fresh and firm, not mushy or withered. Skip the 2-year-old crowns due to the transplant shock they've likely experienced. Besides, they generally do not produce any quicker than the 1-year variety. Purchase the crowns only when you are ready to plant them, and plant them immediately, if possible. Digging a trench is the most common way to plant asparagus crowns. Your trench should measure about 8 to 10 inches (20.3 to 25.4 cm) deep and 18 to 20 inches (45.7 to 50.8 cm) wide. Place it at the center of the garden bed. This is the best time to work any available manure or compost material into the soil. Rodale's Organic Life suggests soaking the crowns in compost tea for 20 minutes prior to planting for improved results.14 Spread the roots out on the bottom of the trench. Be sure to space them 12 to 15 inches (30.5 to 38.1 cm) apart to ensure they will have room to grow. Cover each plant with 2 to 3 inches (5.1 to 7.6 cm) of soil, and water well. As the plants begin to grow — about two weeks later — add more dirt. Continue adding dirt on a regular basis to cover the asparagus until only a small portion of each shoot is exposed above ground and the trench has been filled completely. Maintaining Your Asparagus Garden Bed The keys to a successful annual crop of asparagus hinges on how well you maintain your garden bed. The following activities will help ensure your success:15,16,17 Weed rigorously around the plants, especially in the early years, to prevent weeds from choking out the shoots and reducing your yields Apply mulch around the plants to retain moisture, for winter protection and to help reduce the presence of weeds Water regularly during the first two years after planting; later on, when the plants have deeper roots, watering will be less critical Fertilize by top-dressing with a liquid fertilizer, such as compost tea, in both the spring and fall; some also suggest a dose of fertilizer in mid-spring due to the heavy-feeding needs of asparagus Remove and destroy the fernlike foliage prior to the appearance of any new growth because it is known to harbor diseases and pest eggs, such as those from asparagus beetles Heap up soil or mulch over the bed before shoots emerge if you desire white asparagus Cut plants to the ground each year, preferably in the fall, but most certainly before new growth starts Pests That Can Ruin Your Asparagus Crop Your No. 1 threat to a good asparagus crop is the asparagus beetle,18,19 which will chew on spears in spring and often attacks summer foliage. These beetles are characterized by their metallic blue-black shells, which feature three white or yellow spots. They measure about one-quarter of an inch (0.64 cm). Asparagus beetles lay dark eggs along plant leaves, which hatch into brown or light gray larvae featuring black heads and feet. You can remove them by hand or control them using a dust or spray. When removing beetles by hand, do so early in the morning when it's too cool for them to escape by flying away. Other potential pests include the 12-spotted asparagus beetle, which is reddish brown and bears six black spots on each wing, and the asparagus miner, which is known for the zigzag tunnels it makes on stalks. What You Need to Know About Harvesting Asparagus One of the hardest parts of cultivating asparagus is waiting for your first harvest. Here's what you need to know about harvesting this tender vegetable.20,21,22 During the first two years, because the plants need to put all their energy into establishing deep roots, gardening experts recommend you do not attempt a harvest. In year three, you can harvest finger-sized spears that are about 8 inches (20.3 cm) long for a period of four weeks. In the fourth year, you can harvest spears for up to eight weeks. Harvest in early spring, every third day or so. When the weather turns warm, depending on production, you may need to cut your asparagus twice a day. For best results, use a sharp knife to cut asparagus spears at, or directly below, ground level. Refrigerate cut asparagus promptly. Blanch spears prior to freezing. Pickling is another option. The Best Part of Growing Asparagus: Eating It! Not only is asparagus crunchy, flavorful and succulent, but also, it is good for you. Undoubtedly, the best part about growing this tasty vegetable is eating it! Tender asparagus spears are a welcome addition to every meal. Light cooking, such as steaming for eight to 10 minutes, increases the bioavailability of asparagus' healthy compounds. For breakfast, asparagus is wonderful when added to an omelet. At lunch, you can add raw or lightly steamed asparagus to a salad. For dinner, serve asparagus grilled, roasted or steamed as a compliment to any grass fed, organic meat or, my personal favorite, wild-caught Alaskan salmon. For a flavorful and healthy side dish, try my Roasted Asparagus and Fennel recipe. No matter how you serve it, asparagus is a superfood that I highly recommend become a mainstay on your shopping list. By the way, you'll be happy to know asparagus contains low levels of pesticide residue, which means you can safely purchase and eat the conventional type. Finally, if you notice an unusual odor after eating asparagus, most likely when you urinate, do not be alarmed. According to WebMD,23 only roughly 25 percent of the population possess the special gene that can detect this particular smell. If you are one of those who can, don't worry, while it may be a nuisance, there is no cause for alarm.
0 notes
Last Seen Blogs

hairy-men-lovers
Hairy Men Lovers

haliclinics
HALI Clinics- Your Health is Our Priority

u-r-still-pretty-while-choked
Let me grab that neck


half-demon-97
犬夜叉