#GTest
Explore tagged Tumblr posts
Visit Tumblr Blog
Explore Tumblr blogs with no restrictions, modern design and the best experience.
Last Seen Tumblr Blogs


Fun Fact
25% of US internet users with an annual income of $80-100K use Tumblr.
Text
Can You Get a License Without Taking Driving School in Canada?
In Canada, it is possible to get your driver's license without attending a driving school, but there are benefits to taking formal lessons from an accredited driving school. Here's a breakdown:
Can You Get Your License Without Driving School?
Yes, it is legally possible to self-study and take your driving tests without attending a formal driving school. You can learn from resources like books, online guides, or even licenseprep.ca to help you prepare for the written and road tests.
However, while self-learning is legal, it might take you longer to get your full license, and it may increase the risks associated with learning to drive. Not having professional instruction means you could miss out on key skills, techniques, and road safety knowledge that could help you pass the test and drive safely.
Why Attend a Driving School?
Although you can technically get a license without driving school, attending an accredited driving school offers several advantages:
Reduced Waiting Time Between Stages In many provinces, completing a driving school course can allow you to shorten the waiting time between your G1, G2, and G road test stages. This means you can progress through the licensing process faster.
Insurance Discounts Many insurance companies offer discounts to drivers who have completed a formal driving course. Since driving schools teach you proper driving techniques, insurers consider you less of a risk.
Expert Instruction and Safety Professional instructors can provide in-depth training and teach you how to handle situations that may not be obvious from self-learning, such as defensive driving, emergency maneuvers, and dealing with adverse conditions.
Use licenseprep.ca as Your Study Partner
Even if you decide not to attend a driving school, licenseprep.ca can still be your study partner. They offer practice tests, tips, and resources that can help you prepare for your G1, G2, or G test and give you the confidence you need to pass your driving test.
#DrivingLicense#DrivingSchool#CanadaDriving#LicensePrep#DrivingTest#RoadSafety#InsuranceDiscounts#DrivingTips#SelfLearning#G1Test#G2Test#GTest#LearnToDrive#DrivingSkills#AccreditedDrivingSchool#SafeDriving#DrivingSchoolBenefits#DrivingInCanada#DrivingJourney
4 notes
·
View notes
Text
QA Engineer(Python automation, SDET)
Job title: QA Engineer(Python automation, SDET) Company: Aptiv Job description: of experience as a QA Engineer, software tester, software developer, or other similar role. Proficiency in test frameworks (e.g…. JUnit and gTest) test automation tools (e.g. Selenium, Cucumber, and JMeter) and scripting languages. (e.g. Bash, python… Expected salary: Location: Bangalore, Karnataka Job date: Thu, 22…
0 notes
Photo
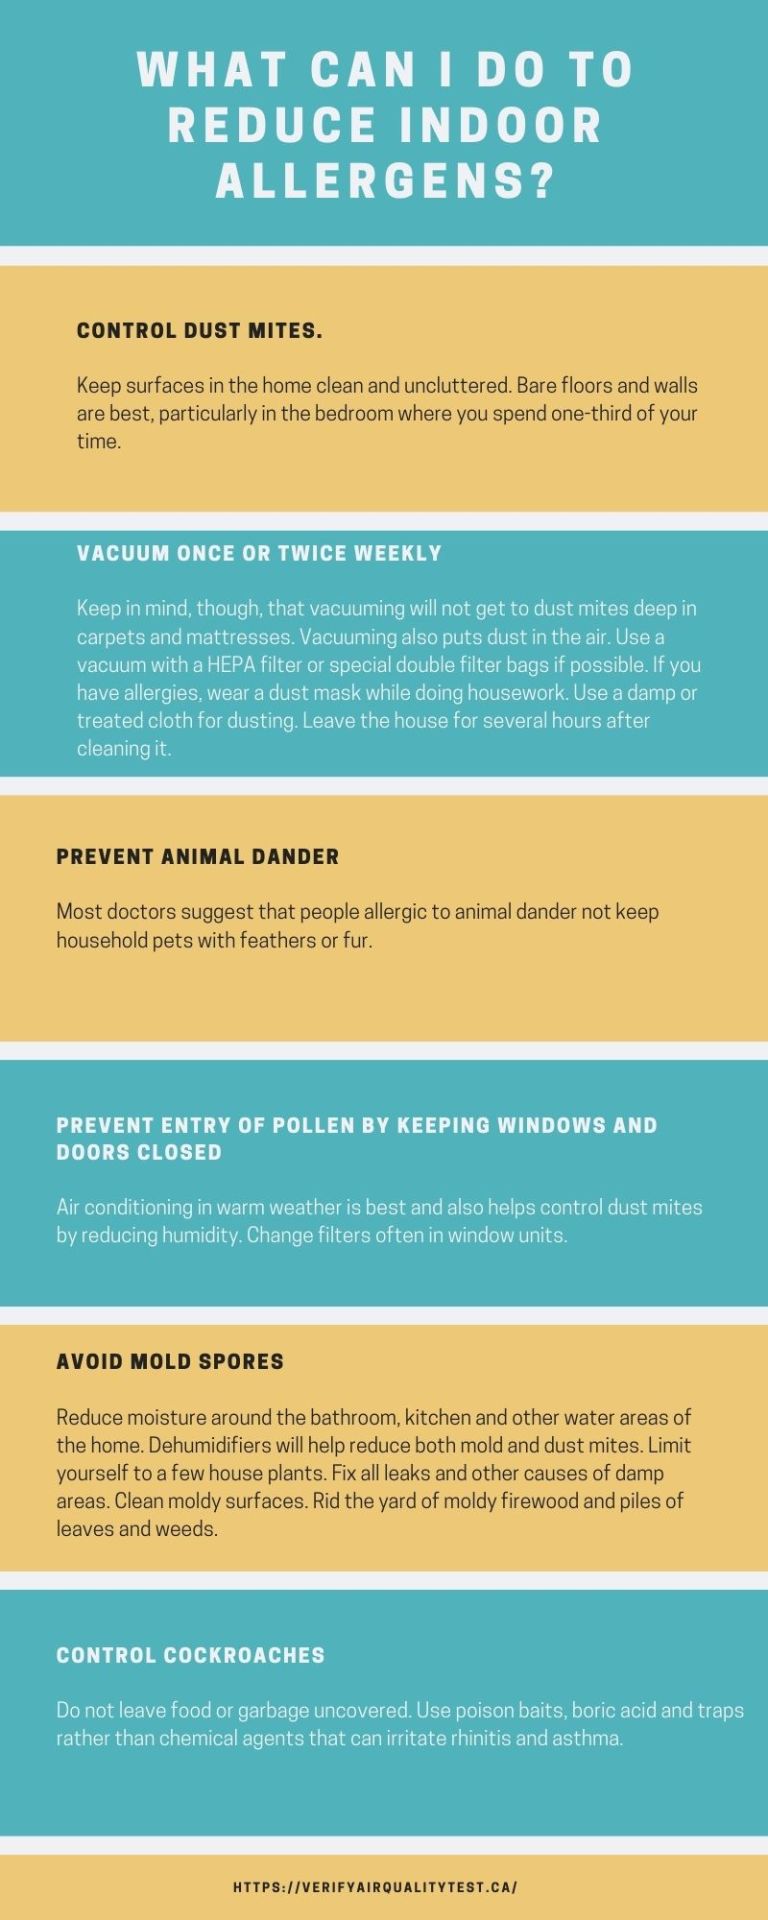
What can you do to reduce Indoor allergies? The best solution is to have an indoor environmental assessment performed or an indoor air quality test. This will provide valuable information on the status of your air quality and will also be an audit of your air quality equipment in your home. The proper ventilation system and properly functioning air filtration system is an important first step to good indoor air quality.
0 notes
Note
I am very gtestful for the time we have spent as well, my darling.
- your future husband 💕
toshi, is it okay for me to kiss you now? 🥺 👉🏽👈🏽 just a little one if it’s alright
1 note
·
View note
Video
youtube
If you're a C++ Programmer and want to write unit test for the C++ code, it's highly likely that you'll end up using Google Test. Now installing good test is an additional activity which may take some extra effort and time. However, there is a shortcut available if you're using Visual Studio on windows platform.
If you're using visual studio for your C++ development (whether you're using C++11, C++14, or C++17 / C++20 Specification), you can install C++ gtest framework for writing unit test code in for your C++ code. You can write gtest and create gmock with worrying about adding libraries or source path.
In this video, I'm talking about how you can install and make use of this shortcut. Remember this is only applicable if you intend to use Google C++ gtest / gmock framework for writing unit test code in C++. You can also use for Test Driven Development in C++
Hope this video helps you in writing unit test in C++
#google test#gtest#gmock#programming#C++11#C++14#C++17#C++20#software development#software#unit testing#testing
0 notes
Photo

why not lol #passed #Gtest #roadtest #aced #hahaha #adultlife #finalstage #happy #gooddriver
0 notes
Text
I have my G driving test Wednesday. One side of me is like whatever happens, happens. Then the other side is shitting bricks. 😬
0 notes

Text
Best Practices for Testing C++ Code

Testing is an integral part of the software development process, ensuring the correctness and reliability of your code. When it comes to C++ programming, having effective testing practices in place is crucial for producing robust and bug-free applications. In this blog post, we will explore some best practices for testing C++ code. By following these practices, you can improve the quality of your code, identify and fix issues early on, and enhance the overall stability of your software.
Write Testable Code:
One of the key aspects of effective testing is to write code that is easy to test. Here are a few practices to make your C++ code more testable:
a) Decouple Dependencies: Aim for loosely coupled components and minimize dependencies between different parts of your code. This allows you to test individual components in isolation, using mock objects or test doubles to simulate dependencies.
b) Favor Composition over Inheritance: Use composition over inheritance to create more flexible and testable code. Inheritance can introduce tight coupling, making it difficult to isolate and test individual components.
c) Separate Business Logic from Frameworks: Keep your business logic separate from any framework-specific code. This separation allows you to test the core functionality of your code without relying on the complexities of a framework.
Adopt a Testing Framework:
Choosing a reliable testing framework is essential for efficient and structured testing. There are several popular testing frameworks available for C++ development, including Google Test (gtest) and Catch2. These frameworks provide a range of features for writing and executing tests, including assertion macros, test fixtures, and test runners. Consider the specific requirements of your project and select a testing framework that best suits your needs.
Embrace Unit Testing:
Unit testing involves testing individual units or components of your code in isolation. Here are some practices to follow when writing unit tests for your C++ code:
a) Test One Thing at a Time: Each unit test should focus on testing a single piece of functionality. This ensures that tests are concise, focused, and easy to understand.
b) Cover Edge Cases: Consider both normal and boundary cases when designing your unit tests. Test for expected input ranges, edge conditions, and corner cases to ensure your code handles them correctly.
c) Use Mocks and Stubs: When testing code that depends on external resources or collaborators, use mocks or stubs to isolate the unit under test. This allows you to control the behavior of dependencies and simulate different scenarios.
d) Keep Tests Independent: Each unit test should be independent of others, meaning that the execution or outcome of one test should not affect another. This ensures that tests can be executed individually or in any order.
Apply Test-Driven Development (TDD) :
Test-Driven Development is a development approach where tests are written before the actual implementation. It follows a cycle of "red-green-refactor," where tests are initially written, code is implemented to pass those tests, and then the code and tests are refactored as needed. Adopting TDD can lead to cleaner, more maintainable code and better test coverage. Start by writing a failing test, implement the code to make the test pass, and then refactor the code to improve its design.
Automate Testing:
Automation plays a vital role in ensuring the efficiency and effectiveness of testing. Manual testing can be time-consuming and error-prone. Automating your tests allows for easy and frequent execution, making it feasible to run tests after every code change. Utilize build systems and continuous integration tools to automate the execution of your tests, ensuring that your code is continually tested for regressions and errors.
Read More : 5 Advanced C++ Concepts Every Developer Should Know
Measure Code Coverage:
Code coverage refers to the percentage of code that is exercised by your tests. It provides insights into how thoroughly your tests are testing your codebase. Aim for high code coverage to ensure that most, if not all, of your code is tested.
To measure code coverage in C++, you can use tools like gcov or LLVM's code coverage tools. These tools analyze the execution of your tests and generate reports showing which parts of your code were covered and which were not. By reviewing these reports, you can identify areas of your code that may require additional testing.
Implement Integration and System Testing:
In addition to unit testing, integration testing and system testing are crucial for testing the interactions between components and the overall functionality of your application. Integration testing involves testing the integration of multiple units or modules, while system testing ensures that the entire system meets the desired requirements.
For integration testing, consider scenarios where different components need to work together and test their interactions. Use realistic test data and simulate real-world conditions. System testing involves testing the application as a whole, verifying that all components function correctly when combined.
Include Performance and Stress Testing:
While functional testing focuses on correctness, performance and stress testing aim to evaluate how your code performs under varying conditions and workloads. By subjecting your code to heavy load, extreme inputs, or prolonged execution, you can identify performance bottlenecks, memory leaks, and other issues that may not be evident during regular testing.
Use tools like Google Benchmark or Apache JMeter to measure and analyze the performance of your code. Set up different test scenarios, monitor resource usage, and identify areas that require optimization.
Conclusion:
Testing C++ code is a crucial step in ensuring the reliability and quality of your applications. By following the best practices outlined in this blog, you can significantly improve the effectiveness of your testing efforts. Remember to write testable code, adopt a suitable testing framework, and embrace unit testing to validate the functionality of individual components. Test-driven development can help drive your development process and ensure test coverage from the start. Automation is key to executing tests efficiently, and measuring code coverage provides insights into the thoroughness of your testing. Integration and system testing validate the interactions and overall functionality of your application. Lastly, performance and stress testing uncover performance bottlenecks and ensure your code can handle real-world scenarios.
Utilizing an c++ compiler online can be a valuable tool in facilitating the testing process. These platforms offer a convenient environment for executing and debugging your code, allowing you to conduct tests in a controlled and efficient manner. By incorporating these best practices and leveraging online C++ compilers, you can develop robust and reliable C++ applications that meet the highest standards of quality.
0 notes
Text
i hate how rhythm thief’s hard mode is just stricter timing
#sna's a silly#maybe like up the tempo????? rearrange notes????#its so boring#and it just makes the game look biggwer#idk do you get smth for a ranking all of hard mode because#i will do it#i did it on normal and ill do it on hard dont gtest me#if its a fuckign postcard like mario sunshine tho no thanks
1 note
·
View note
Text
Poster Planning - Part 9

gTesting out using stencils but I don't think it's the style that I wanted and it was really difficult to cut it all out.
0 notes
Text
Cmake C

How To Use Cmake
Cmake Source Directory
Cmake_cxx_standard
C project structure and cross-platform build with CMake. Also advanced project structure using GTest (Google Test) framework for testing.
The following example demonstrates some key ideas of CMake. Make sure that you have CMake installed prior to running this example (go here for instructions). There are three directories involved. The top level directory has two subdirectories called./Demo and./Hello. In the directory./Hello, a library is built.
Recently, we have had several customers who decided to compile our C++ library under Linux. This process is documented in the README file and there is a post explaining how to compile the library with the Code::Blocks IDE. However, we hadn't yet documented how to use CMake to compile the library and use it in a program. This week, we are tackling this issue. Note: we assume that you already have a minimal knowledge of the C++ language and of our programming libraries. If it is not the case, we recommend that you start by reading our post 'How to start in C++ with Yoctopuce modules' which explains how our library works. First of all, a few words on CMake. CMake is neither a compiler nor an IDE, but it is a 'tool for managing the build process of software'. In other words, the role of CMake is not to actually build the executable, but to prepare a list of commands to be performed to generate the executable. Usually under Linux, one uses CMake to generate a GNU make file which then uses gcc or g++ to compile the source file and to create the executable.

CMake is a powerful and robust build system. You specify what you want done, not how to do it. CMake then takes that information and generates the files needed to build the system. For example, CMake can generate solution (.sln) and project files (.vcxproj) that Visual.
CMake generates makefiles which enable you to compile the application with gcc
A CMake project is composed of source files and of one or several CMakeLists.txt files containing the required information to compile the application, such as the location of the source files, the name of the executable, the libraries to be used, and so on. We could wonder why not using GNU make directly. Indeed, GNU make already enables us to describe the commands to be run to transform a .cpp file into an executable, but its syntax is very complex and becomes almost incomprehensible for large projects. As we are going to see below, the CMake syntax is much simpler, making the life of the developer easier as well. Moreover, CMake is open source and is available on almost all platforms. For these reasons, since version 1.10.42060 of our C++ library, we added a CMakeLists.txt file in the Sources subdirectory. This file contains all the compilation rules for our library. To use our C++ library in a CMake project, you only need to include this file and to reference our library with the yoctolib name.
A short example
In order to illustrate what we are saying, we are going to see all the steps to compile the following code:
#include <iostream> #include 'yocto_api.h' usingnamespace std; int main(int argc, constchar* argv[]) { string errmsg; if(YAPI::RegisterHub('usb', errmsg)!=YAPI::SUCCESS){ cerr<<'RegisterHub error: '<< errmsg <<endl; return1; } cout<<'Device list: '<<endl; YModule*module =YModule::FirstModule(); while(module !=NULL){ cout<< module->get_serialNumber()<<' '; cout<< module->get_productName()<<endl; module = module->nextModule(); } YAPI::FreeAPI(); return0; }
This code displays the serial number and the product name of all the Yoctopuce modules connected on the USB ports of the machine. For more information on the functions that are used in this example, you can read the documentation of the C++ library. We save this code in a main.cpp file that we are going to compile. To compile this code, you must have g++, CMake, and libusb-1.0-dev installed on the machine. On a Debian or Ubuntu based distribution, you can install all these packages with the following commands:
sudo apt-get update sudo apt-get install cmake sudo apt-get install build-essential gdb sudo apt-get install libusb-1.0-0-dev
Then, you must download the Yoctopuce C++ library. You can do so with Git or directly from our web site. The Sources subdirectory contains all the source files to be compiled to use our library, as well as the CMakeLists.txt file which is used by CMake. Note the path of this directory, because you will need it later on. In our case, the library is unzipped in the /home/yocto/Yoctolib.CPP/ directory and we therefore need the /home/yocto/Yoctolib.CPP/Source path.
The CMakeLists.txt file

Now that we have our main.cpp file and all the dependencies installed on the machine, we can start to write the CMakeLists.txt file for our demo application. As explained above, this file contains all the instructions to compile the application. We start by checking that the installed version of CMake is recent enough and by giving a name to the project, in our case the project is called 'Demo' and we need version 3.16 of CMake.
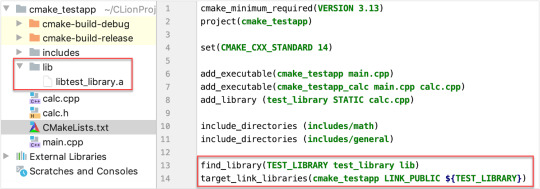
cmake_minimum_required (VERSION 3.16) project (Demo)
How To Use Cmake
Then, we define the name of the executable and the source files to be compiled. In our case, the name of the executable is demo and there is only one source file: main.cpp. There is no need to add the source files of our C++ library, as we are going to include the CMakeLists.txt file of the library.
We are only missing the instructions to include the Yoctopuce C++ library. This task is easy because we already have a CMakeLists.txt file in the Sources subdirectory. This files contains the list of all the files of the library which must be compiled as well as the flags to pass to the compiler or to the linker to generate the executable. Note: this file is present only since version 1.10.42060 of the library. If it is not present in your version, you must simply use a more recent version of our library. The add_subdirectory command with the path of the Sources subdirectory of the library enables us to add the library. In our case, the path is /home/yocto/Yoctolib.CPP/Sources/. The second parameter compiled_yoctolib defines a subdirectory that CMake uses to compile the library.
Cmake Source Directory
add_subdirectory (/home/yocto/Yoctolib.CPP/Sources/ compiled_yoctolib)
Finally, we must specify that the demo executable uses the Yoctopuce library (Yoctolib).
Here is the complete CMakeLists.txt file:
# This is a minimal CMakeLists file which includes the Yoctopuce C++ lib. cmake_minimum_required (VERSION 3.16) project (Demo) # Adds the executable called 'demo' that is built from the source files 'main.cpp'. add_executable (demo main.cpp) # Adds the Sources subfolder of the Yoctopuce C++ library. add_subdirectory (/home/yocto/Yoctolib.CPP/Sources/ compiled_yoctolib) # Links the executable to the Yoctopuce C++ library (YoctoLib). target_link_libraries (demo LINK_PUBLIC YoctoLib)
Cmake_cxx_standard
Compiling
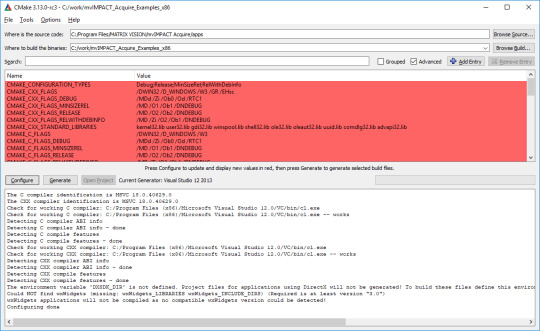
To generate the compilation files, you must run cmake:
yocto@laptop-linux:~/tmp$ cmake . -- The C compiler identification is GNU 9.3.0 -- The CXX compiler identification is GNU 9.3.0 -- Check for working C compiler: /usr/bin/cc -- Check for working C compiler: /usr/bin/cc -- works -- Detecting C compiler ABI info -- Detecting C compiler ABI info - done -- Detecting C compile features -- Detecting C compile features - done -- Check for working CXX compiler: /usr/bin/c++ -- Check for working CXX compiler: /usr/bin/c++ -- works -- Detecting CXX compiler ABI info -- Detecting CXX compiler ABI info - done -- Detecting CXX compile features -- Detecting CXX compile features - done -- Configuring done -- Generating done -- Build files have been written to: /home/yocto/tmp
To actually compile the application, you must use GNU make with the make command:
yocto@laptop-linux:~/tmp$ make Scanning dependencies of target YoctoLib [ 1%] Building CXX object compiled_yoctolib/CMakeFiles/YoctoLib.dir/yocto_accelerometer.cpp.o ... [ 97%] Linking CXX static library libYoctoLib.a [ 97%] Built target YoctoLib Scanning dependencies of target demo [ 98%] Building CXX object CMakeFiles/demo.dir/main.cpp.o [100%] Linking CXX executable demo [100%] Built target demo
There you are! the application is compiled and you can launch it with the ./demo command:
yocto@laptop-linux:~/tmp$ sudo ./demo Device list: YLTCHRL1-CD28D Yocto-LatchedRelay
You can find the source code of this example on GitHub: https://github.com/yoctopuce-examples/cmake_example
Conclusion
CMake is a very handy tool when you code in C++. It is more convivial than GNU make. For comparison purposes, the CMakeLists.txt file of our C++ library is only 14 lines long while the GNU makefile is made of 938 lines...
0 notes
Text
Add_subdirectory Cmake Example

If a library does not export any symbols, it must not be declared as a SHARED library. For example, a Windows resource DLL or a managed C/CLI DLL that exports no unmanaged symbols would need to be a MODULE library. This is because CMake expects a SHARED library to always have an associated import library on Windows. By default the library file will be created in the build tree directory.
Problem: I have a question about CMake which seems to be commonly asked here, but none of the answers seem to solve my problem. In the details subdirectory, there is a CMakeLists.txt which contains: addcustomcommand(OUTPUT part.out COMMAND foo -input=part.src -output=part. Using gtest/gmock with CMake is awesome. Not so awesome is when you don’t have a pre-built gtest/gmock available to use. This article demonstrates a convenient way to add them with automated source download and have them build directly as part of your project using addsubdirectory. The following example demonstrates some key ideas of CMake. Make sure that you have CMake installed prior to running this example (go here for instructions). There are three directories involved. The top level directory has two subdirectories called./Demo and./Hello. In the directory./Hello, a library is built.
Part 1: Reference
Integration Points
Because we use CMake to build ApprovalTests.cpp, we also provideintegration points for our users.
CMake target

Approval Tests’ CMake build exports an interface targetApprovalTests::ApprovalTests. Linking against it will add the properinclude path and all necessary capabilities to the resulting binary.
This target is provided when ApprovalTests.cpp is used as asubdirectory. Assuming that ApprovalTests.cpp has been cloned tolib/ApprovalTests.cpp:
CMake project options
ApprovalTests.cpp’s CMake project also provides some options for otherprojects that consume it.
The fileCMake/ApprovalTestsOptions.cmakedefines these options.
The options provided are:
Which targets are built
Note that these are always enabled if this is the top-level project.
APPROVAL_TESTS_BUILD_TESTING
When ON, the self-tests are run. Defaults to OFF.
APPROVAL_TESTS_BUILD_EXAMPLES
When ON, the examples are run. Defaults to OFF.
APPROVAL_TESTS_BUILD_DOCS
When ON, documentation files are generated, if Doxygen, Sphinxand mdsnippets are installed. Defaults to OFF.
These are not part of the ALL target.
Which third_party libraries are made available
Note that these are always included if this is the top-level project.
APPROVAL_TESTS_BUILD_THIRD_PARTY_CATCH2
When ON, this project’s copy of the Catch2 test framework isincluded. Defaults to OFF.
APPROVAL_TESTS_BUILD_THIRD_PARTY_DOCTEST
When ON, this project’s copy of the doctest test framework isincluded. Defaults to OFF.
APPROVAL_TESTS_BUILD_THIRD_PARTY_UT
When ON, this project’s copy of the Boost.UT test framework isincluded. Defaults to OFF.
Control the behaviour of our builds
APPROVAL_TESTS_ENABLE_CODE_COVERAGE
When ON, Approval Test’s own tests are run with code coverageenabled. This uses Lars Bilke’sCodeCoverage.cmake.Defaults to OFF.
CMake commands support
add_subdirectory()
See Use own ApprovalTests.cpp and Catch2clonesbelow, for an example usingadd_subdirectory().
Use case: This is typically for you have your own copy of theApproval Tests project directory that you want to re-use.
FetchContent
See Make CMake clone ApprovalTests.cpp andCatch2below, for an example using the FetchContentmodule.
The examples below use FetchContent_MakeAvailable(), whichrequires CMake 3.14 or above.
If you only have CMake 3.11 or above, see FetchContent (CMake3.11+)for how to use FetchContent_Populate().
Use case: This is typically for when you want CMake todownload a specific version of Approval Tests for you, behind thescenes.
ExternalProject
With CMake before 3.11, see the ExternalProjectmodule.The FetchContent examples below should help get started withExternalProject.
Use case: This is typically for when you want CMake todownload a specific version of Approval Tests for you, behind thescenes, and you are using an older version of CMake.
find_package() - not supported
There is not yet support forfind_package().
Single header or CMake Integration?
There are two main options for incorporating Approval Tests in to yourproject:
Download the single-header file from the Releasespageand, typically, add the header to your source code.
Obtain a copy of the entire ApprovalTests.cpp repository andincorporate it in to your CMake build scripts.
Options for obtaining the repository typically include:
cloning it
forking it
including it as a sub-repository
having a build tool, such as CMake, download it for you automaticallyas part of your builds
CMake Integration Benefits
We recommend using the CMake integration route, which has several userbenefits over the single header:
Automatic prevention of most of the scenarios listed inTroubleshooting MisconfiguredBuild.
Source-code compatibility with the single header download:
For convenience, we provide a wrapper header fileApprovalTests.hpp,which can be used to access all the features of this library,without having to know which features are provided by which headerfiles.
Flexibility in how many of the Approval Tests include files youinclude:
There is also the option to include just the headers inApprovalTests/that you use.
This may slightly improve build speeds.
It may occasionally provide workarounds tobugs.
Part 2: Optional Explanatory Examples
Scenarios when using Approval Tests
Context
Example Project
Suppose you are writing some tests that use ApprovalTests.cpp with theCatch2 test framework.
Your top-level CMakeLists.txt file might look something like this:
(See snippetsource)
The important thing to note, for following the examples below, is theadd_subdirectory(dependencies) line. It makes CMake load a filedependencies/CMakeLists.txt.
Each example below shows a dependencies/CMakeLists.txt, for thecorresponding scenario. All other code is identical between the exampledirectories.
Here is this exampleproject.
Example Tests
Your tests/CMakeLists.txt file might look something like this:
(See snippetsource)
This says that the libraries ApprovalTests::ApprovalTests andCatch2::Catch2 are required by the tests executable.
Here is this example project’s testdirectory.
Dependencies
How might you enable CMake to provide those libraries? In other words,what are the options for the contents ofdependencies/CMakeLists.txt?
The next few sections describe some options.
Make CMake clone ApprovalTests.cpp and Catch2
Note: The files in this section can be viewed and downloaded fromfetch_content_approvaltests_catch2.
The following is for when you just want ApprovalTests.cpp and Catch2 tobe downloaded as part of your project’s build. You don’t particularlywant to see their source code, although you’re happy if your debuggersteps in to them.
It also needs CMake 3.14 or above.
We use this dependencies/CMakeLists.txt file:
(See snippetsource)
Note the GIT_TAG values: This tells CMake which revision ofdependencies to use. The value can be a tag or a git commit ID. Here weuse master, to always test our integrations with the latest ApprovalTests code. However, it is generally recommended to pin yourdependencies to specific versions, and test behaviour before updating tonewer versions.
After CMake has generated the build files, the directory structure wouldlook something like this, where the cmake-build-debug directory isthe build space, and the cmake-build-debug/_deps contains thedownloaded and built ApprovalTests.cpp and Catch2 repositories:
Make CMake clone ApprovalTests.cpp
Add_subdirectory Cmake Examples
Note: The files in this section can be viewed and downloaded fromfetch_content_approvaltests.
The only difference between the previous example and this one is thathere we use the Catch2 header that is in the ApprovalTests.cpp project.
We use this dependencies/CMakeLists.txt file:
(See snippetsource)
We have set APPROVAL_TESTS_BUILD_THIRD_PARTY_CATCH2 to ON, sothat CMake will use the copy of Catch2 that is included in theApprovalTests.cpp repository.
There are also options to enable use of ApprovalTests.cpp’s copies ofall other supported test frameworks except GoogleTest, including:
APPROVAL_TESTS_BUILD_THIRD_PARTY_DOCTEST
APPROVAL_TESTS_BUILD_THIRD_PARTY_UT
Use own ApprovalTests.cpp and Catch2 clones
Note: The files in this section can be viewed and downloaded fromadd_subdirectory_approvaltests_catch2.
Here, instead of getting CMake to download ApprovalTests.cpp and Catch2,we have got our own clones or forks of them, which we want to use withour own tests.
In this example, the directory structure looks like this:
We use this dependencies/CMakeLists.txt file:
(See snippetsource)
Here we use add_subdirectory(). This works with older versions ofCMake, unlike the FetchContent examples above.
The above was tested with CMake 3.8.
If your directory layout differed from the above, you would change therelative paths in the add_subdirectory() lines.
Using other supported test frameworks
To save space and repetition, the examples above only show the Catch2test framework.
The same principles apply when using all the other test frameworkssupported by ApprovalTests.cpp.
Scenarios when developing ApprovalTests.cpp
Developing ApprovalTests.cpp with test framework sources
Note: The files in this section can be viewed and downloaded fromdev_approvals.
Cmake Add All Subdirectories
For Approval Tests project maintainers, it is useful to be able to editand debug both this project and the test frameworks that it dependsupon. It helps to be able to see the source of these frameworks, ratherthan just the single-header releases that are copied in to thethird_party directory here.
This also allows us to checkout different commits of any of theseprojects.
Here we want to enable and run all the ApprovalTests.cpp tests, unlikethe cases above, where we only want to run the tests of the project thatis being developed.
Consider this directory structure, where the repositories for all theseprojects are checked out side-by-side, and there is an extra directorydev_approvals/ that will contain just a CMakeLists.txt file, toset up a project containing all the other directories:
The file dev_approvals/CMakeLists.txt creates a kind of “superbuild”: one project for developing ApprovalTests.cpp and all theprojects it depends on:
(See snippetsource)
0 notes
Note
Why do you hate turin//gtested and crus//ty? Did they do something shitty?
mostly just being petty (vr/isrez/i) but theres this
1 note
·
View note
Note
she then dies down and starts to let go of her bottle she then moved to cling to her sire. “I knew it.” he gtests it out. “Phoenix?” she looks at him she beeps back.
yuour sparkling seems to be upset about not getting enough attenion
Rodimus picks her up. “Easy, Flame. Sires got a lot of captain work to do.”
59 notes
·
View notes