#GeeekPi
Explore tagged Tumblr posts
Visit Tumblr Blog
Explore Tumblr blogs with no restrictions, modern design and the best experience.
Last Seen Tumblr Blogs


Fun Fact
The total number of visits Tumblr.com received during January 2021 is 327 million.
Text
Mini Rack - 10" wide
GeeekPi 8U Server Cabinet, 10 inch Server Rack for Network, Servers, Audio, and Video Equipment, DeskPi RackMate T1 Rackmount

youtube
youtube
youtube
I am curious about the feasibility to build a home VM Server, NAS, and Work Station PC all in one rack. This would require a rethink of server components - such as power supplies and how the cables are run to the various devices. And, how the back planes and air flow would be managed.
0 notes
Text
GeeekPi Raspberry Pi Micro GPIO Terminal Block Breakout Board Module with LED
Questo e un terminale per GPIO dotato di morsetti a vite e led compatibile con la maggior parte dei Raspberry pi. Nella confezione di vendita oltre il terminale troviamo tutto il necessario per montarlo su Raspberry Pi. Premetto che sono appassionato di elettronica e ho in dotazione vari Raspberry Pi (dal 2B al 4 e Zero) e utilizzo spesso il GPIO per i miei progetti. Lo utilizzato per il…

View On WordPress
#diy#Electronics#Embedded systems#GeeekPi#GeeekPi accessories#GeeekPi product showcase#GeeekPi products#GeeekPi review#GeeekPi setup guide#GeeekPi tutorials#GeeekPi unboxing#GPIO#HAT#projects#Python programming#raspberry pi#Raspberry Pi accessories GeeekPi GPIO Terminal#Raspberry Pi community#Raspberry Pi enthusiasts#Raspberry Pi hacks#Raspberry Pi OS#Raspberry Pi projects#Raspberry Pi tips and tricks#Single-board computer#Tech Maker
0 notes
Link
What are the best 2021 Powerline Network Adapters to buy? |Best 5 List - top reviews from 4610 reviews for: 5 best Powerline Network Adapters Ethernet Connectivity Type in 2021
0 notes
Video
youtube
Building PI 4 using a GeekPI case for the Raspberry PI 2 PI 3 or P1 4
0 notes
Text
Project PH03N1X Complete Setup V3.0

"PC Rig Specifications - Project PH03N1X V3.0
CPU: AMD Ryzen Threadripper 1950X (16-cores/32-threads) OC 4.25GHz
Motherboard: ASUS ROG X399 ZENITH EXTREME
GPU: ASUS ROG GTX 1080 Ti STRIX OC Edition
RAM: 64GB (8x8GB) G.Skill TridentZ RGB DDR4 @3866MHz
SSD: 2TB Samsung 960 PRO M.2 NVMe
Main HDD: Seagate BarraCuda Pro 4TB 7200 RPM 128MB Cache
HDD 2: HGST 500GB 7200RPM HDD for old stuff
Blu-ray Drive: LG WH16NS40 Internal SATA 16x Blu-ray Disc Rewriter
Controller: ASUS ROG Front Base Panel
Cooler: NZXT Kraken X62 Rev2 280mm AIO Cooler
Power Supply: Corsair AXi Series 1500W 80 PLUS TITANIUM Fully Modular
Computer Case: Phanteks Enthoo Luxe Tempered Glass Edition (Full Tower)
Custom cables: CableMod C-Series PRO ModMesh AXi Carbon/Red
RGB Strips: 4x CableMod Addressable LED Strip 60cm daisychained
More RGB: Phanteks 2m LED RGB Strip
Even more RGB: 2x CableMod RGB/UV WideBeam Hybrid 60cm LED strips w/ kit.
AIO Sleeving: CableMod NZXT Kraken Red Sleeving Kit Series 2
Operating System: Windows 10 Pro x64 Retail
PC Rig Peripherals
Monitor: 27" ASUS ROG PG279Q WQHD 1440p 165Hz IPS
Keyboard: Corsair K95 RGB PLATINUM Cherry MX Brown
Mouse 1: Razer Mamba Tournament Edition
Mouse 2: Razer DeathAdder Elite
Mouse 3: SteelSeries Rival 600
Mousepad 1: Razer Goliathus Control (Large)
Mousepad 2: SteelSeries QcK Prism RGB
Mousepad 3: Razer Firefly Cloth RGB
Mousepad 4: ASUS ROG Scabbard XL Waterproof
Headset 1: Razer Tiamat 7.1 Surround Headset
Headset 2: HyperX Cloud Revolver S Dolby 7.1 Gaming Headset
Headset 3: SteelSeries Arctis Pro + GameDAC Gaming Headset
Headset 4: Sony Noise Cancelling Headphones WH1000XM2
Headset Stand: Razer Base Station Chroma RGB
Headset Stand: CORSAIR ST100 RGB Gaming Headset Stand
Microphone: Blue Yeti Pro Microphone w/ Pop filter by Auphonix
Audio Interface: Focusrite Scarlett 2i2 (2nd Gen)
Isolation Shield: Monoprice 602650 Microphone Isolation Shield
Webcam: Logitech BRIO 4K Webcam
VGA Holder: Cooler Master Accessory Vertical VGA Holder Kit
Stats Screen: GeeekPi 5 inch HDMI Monitor
Other: Mouse Bungee by aBell
Other: Mouse Bungee w/ RGB and 4 USB Ports by ENHANCE
Other: Blue Radius II Shock Mount for Yeti Pro + Foam Cover
Other: NEEWER Adjustable Mic Suspension Boom Stand
Other: NZXT Red Cable Management Puck"
2 notes
·
View notes
Text
GeeekPi 7 inch 1024 x 600 HDMI Screen LCD Display with Driver Board Monitor for Raspberry Pi
GeeekPi 7 inch 1024 x 600 HDMI Screen LCD Display with Driver Board Monitor for Raspberry Pi
Price: (as of – Details) Product Description This 7 inch HDMI TFT LCD display is especially designed for Raspberry Pi. With two driver boards, all you need is to plug and play. Multiple languages are supported. You may apply them to different devices such as mobile DVD, digital photo frames, car systems, multimedia applications and other audiovisual systems. Specifications: Display size: 7 inch…

View On WordPress
0 notes
Text
Kühlung des Raspberry Pi Clusters!

Seit einiger Zeit habe ich nun meine 3x #RaspberryPi, 4 #RaspberryPiPico und zwei 4'er Relaismodule zu meinem neuen Mini-Supercomputer zusammengefasst und in meinem neuen #GeeekPi Raspberry Pi Cluster Gehäuse untergebracht. Jetzt wollte ich einmal wiessen was der Ventilator des GeeekPi Gehäuses leistet. Seht selbst...
Mein Mini-Supercomputer auf der Basis von Raspberry Pi übernimmt aktuell zahlreiche Aufgaben. Alle im Detail vorzustellen ist an dieser Stelle zu umfangreich für einen Beitrag. Fest steht aber, dass das System schon einiges leistet und gerade der Raspberry Pi 4 ist hinsichtlich der Prozessor Temperatur einfach noch sensibler als bspw. die Pi 3B+ Versionen. Zudem birgt das eigentlich eher enge Gehäuse auch einen Nachteil. Die Bauteile sind sehr dicht aneinander und die Verkabelung schnürt zudem die Luftzirkulation ein.
Nun messe ich zum einen mit die CPU Temperaturen der Pi’s und lasse diese mir mit Hilfe von rpimonitor anzeigen. Zum anderen interessierte mich auch die Umgebungstemperatur. Also ein wichtiger Punkt, der in Rechenzentren stets eine große Rolle spielt. Diese Werte ermittelt mir einer der vier Pico und zeigt diese mir auf seinem Pimoroni Dispaly an.

Ist der Ventilator eine Weile ausgeschaltet messe ich über 53 Grad Celsius bei den CPU’s der Pi’s und eine Umgebungstemperatur von um die 20° C. Beginnt der Ventilator nun mit seiner Arbeit fällt die Temperatur sowohl bei den CPU’s wie auch in der Umgebung. Und das innerhalb weniger Sekunden. Nach kurzer Zeit singt die Umgebungstemeratur auf 16° C und die CPU’s der Raspberrys pendelt sich etwa bei 32/32° C ein. Das mittlere Bild zeigt zudem an, dass mein System (blaue LED’s blinken) gerade auch noch einen Job ausführt, denn er macht gerade ein Backup.
Der Ventilator des Geeek Pi Raspberry Pi Cluster Gehäuses macht also einen guten Job und die Kühlung ist wirklich satt. Wäre jedoch in diesem Gehäuse mehr Platz für die Bauteile mit mehr Abstand zueinander, so wäre die Situation insgesamt sich noch um einiges besser.
0 notes
Photo

https://ift.tt/3sJaK8y - GeeekPi 2-Pack I2C 1602 LCD Display Module 16X2 Character Serial Blue Backlight LCD Module for Raspberry Pi Arduino STM32 DIY Maker Project Nanopi BPI Tinker Board Electrical IoT Internet of Things
0 notes
Text
GeeekPi 7 inch 1024 x 600 HDMI Screen LCD Display with Driver Board Monitor for Raspberry Pi
GeeekPi 7 inch 1024 x 600 HDMI Screen LCD Display with Driver Board Monitor for Raspberry Pi
Price: (as of – Details) Product Description This 7 inch HDMI TFT LCD display is especially designed for Raspberry Pi. With two driver boards, all you need is to plug and play. Multiple languages are supported. You may apply them to different devices such as mobile DVD, digital photo frames, car systems, multimedia applications and other audiovisual systems. Specifications: Display size: 7 inch…

View On WordPress
0 notes
Link
Top 5 Best Rated Powerline Network Adapters Ethernet | 2021 Best - top reviews from 4610 reviews for: what are the top rated Powerline Network Adapters Ethernet in 2021?
#BestRatedTop5#PowerlineNetworkAdaptersEthernet#TP-Link#PowerlineNetworkAdapters#GeeekPi#AuviPal#TP-LINKUSA
0 notes
Text
Building the PiWriter868
In November of 2012, I wrote a book.
I'd participated in a global writing challenge called NANOWRIMO - National Novel Writers Month - and managed to achieve the aim of producing 50,000 words in the 30 days of November.
Since that time, it's been my ambition to not just write, but to publish. I've set that goal for myself every year when I do my year-end review. I have handwritten outlines for books and stories in various places. In attempt to kick start, I've also signed up for NANOWRIMO in subsequent years with limited writing success.
The 2012 novel also sits waiting to be edited and expanded; there's a significant time jump in it to get to the ending which I feel needs another 50 to 100,000 words to close.
It's my feeling though that a writer, just as any other craftsman, needs tools appropriate to their task.
In my more prolific teen years, that tool was Uni-ball’s Onyx fine tip pen. It was a relatively costly but happy indulgence, and helped me to fill many a copybook with teen angst. In later days that I carried a Palm PDA, Landware's GoType keyboard and eventually Palm's own portable folding keyboard were easy options for text input.
I wrote the 2012 book on the laptop that I owned at the time. And future attempts at both writing and completing another November challenge were done on an Asus Chromebook C100.
I'd stumbled at one point across a company called Astrohaus who touted their distraction-free writing machines, THE tool for keyboard-dependent writers on the go. Boasting e-ink screens like Amazon's Kindle e-reader line, long battery life, and keyboards meant for typing for long stretches, their Freewrite devices were a compelling solution to my writing goals, but for one thing. There really was no way I could justify their price as an amateur writer who had never sold a piece of work.
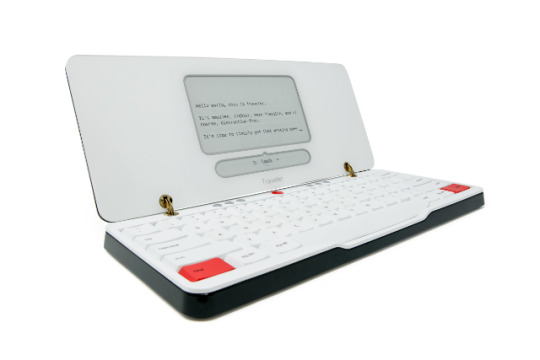
At around US$600, a single-purpose device like that would have to be paying for itself, and I'm not anywhere near where I could be in order to be making money from my work. But Astrohaus planted a seed and a need, and I was sure that I could do what was necessary to build a tool that would serve me that one main purpose - writing.
A good friend did ask while I talking to them about the build mission, why not just use the Chromebook? At the time, I had not long before performed minor surgery to replace a battery that had started to swell, and the replacement battery itself had stopped taking charge just weeks out of its stated warranty. I didn't feel up to sourcing another aftermarket battery to possibly have that go that route again. Yes, I could have coughed up the cash and bought something new. The C101, the newer version of the C100, would run me around US$330. But I liked the idea and the challenge of putting something together myself.
Research suggested that I could build something around the Raspberry Pi Zero W as its core.
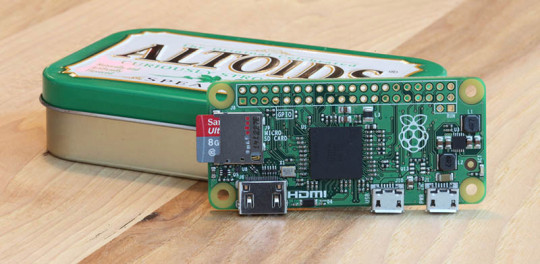
The Pi Zero is a $10 single board computer that is so small it can fit into an Altoids tin with room to spare. Powered by Raspbian, a Debian Linux based operating system tuned for the Raspberry Pi platform, it's a full computer capable of running a wealth of Linux applications, including productivity software like LibreOffice, a Microsoft Office clone.
There is a purity though to a command-line interface that had me leaning away from the windowed environment. The key experience in the final solution would be the writing of words after all. Point and click functionality would be secondary.
The best writing solution, to me and also to the people at Astrohaus apparently, was one that got out of your way and allowed you to just write.
Enter WordGrinder, a cross platform terminal-based application that runs on both UNIX and Windows, and gives me just what I need in order to write without thinking about anything but the content. The app does permit some basic formatting that isn't displayed obtrusively on the screen - except for bold and centering - none of which you need to see when drumming out content. It reminds me, honestly, of WordPerfect 5.1 for DOS, a word processor which I recall fondly.
Two other apps complete the software build.
Ranger, a file manager, makes browsing the file system and moving documents around a little easier than using the bare command line.
Alpine, a text-based email client gives the solution its connection to the world outside of it. It's own dedicated Gmail address means I can both store documents in my inbox and flip docs to and from my main machine for more comprehensive editing after creative activity is done.
One of the biggest complaints about thin, light and cheap laptops is usually the keyboard. But the RaspBerry Pi Zero W has both USB connectivity and Bluetooth, so the world of input devices is available to me. And after shopping around a bit, I landed on the Logitech K380.
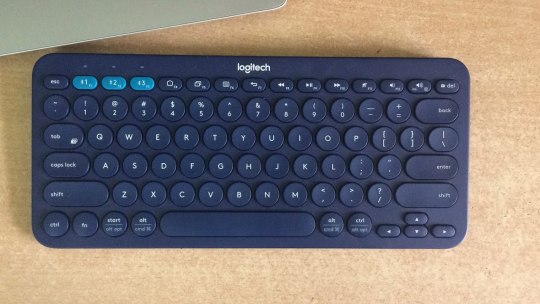
This is one of these best portable Bluetooth keyboards around. Subjectively, the typing experience on the K380 can only be beat at its size by something more expensive with mechanical keys. It’s quiet, has good key travel, is a literal joy to type on, and runs forever on a pair of AAA batteries.
The easiest way to attach a display to the Raspberry Pi is via its HDMI port. Other technical options are available, but HDMI is the easiest. In early fiddling, I was able to connect it to a 21-inch monitor and use it just like any other desktop. Sticking to a command line interface though means that a big screen isn't a necessity.
Taking lead from the Freewrite, I tried an inexpensive five-inch LCD for size. It's workable, but you don't see very much of what you're working on. Five inches could be considered a truly focused writing solution, creating a narrow window around just the current thought. But that felt way too small for me personally.
Seven inches at 1024x600 resolution proved to me to be a more optimal screen size for writing. The screen I chose by electronics manufacturer GeeekPi is pretty well constructed, and was plug and play.
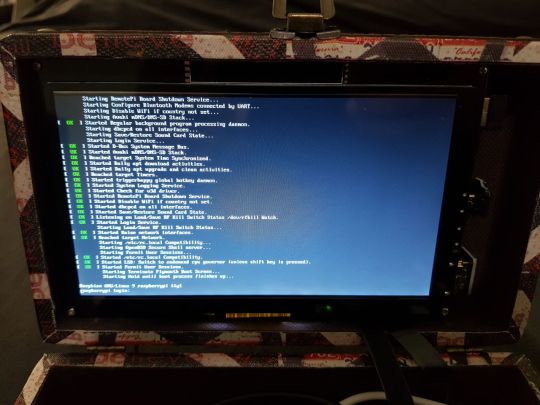
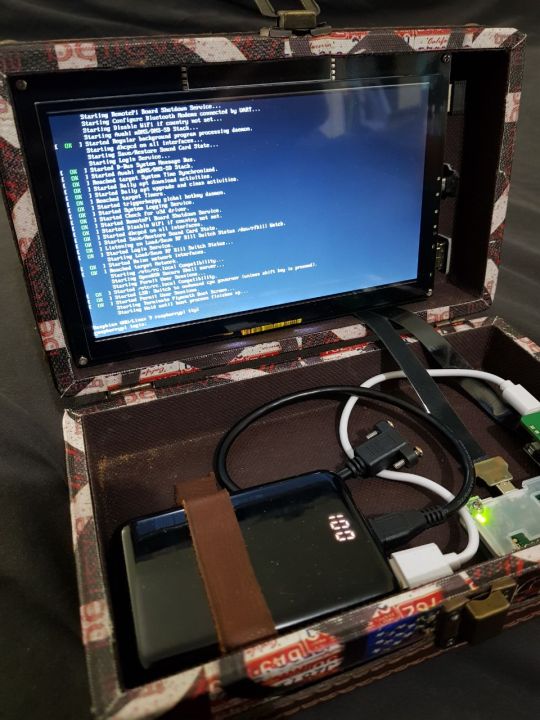
The Raspberry Pi can be powered via one of its micro USB ports, which means that a standard phone charger can power it up. That also means that it can be run off of any commodity power bank.
Most power bank have a few lights on them to give you an idea of how much power they have left. Here though it was also important for the power bank to give a more accurate read out of its remaining charge. So I paid a little more for a battery with a percentage read out. The selected 10,000 mAh battery powering the Pi Zero and seven-inch screen thus promised calculated run time of just under six hours before the battery dropped to zero percent.
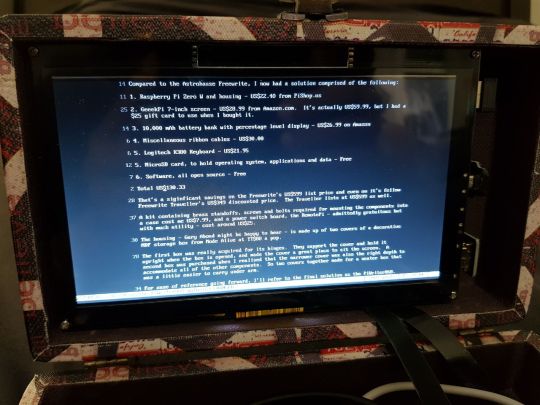
The final basic technical solution comprised the following:
Raspberry Pi Zero WH - US$14.95 from PiShop.us
Pi Zero Case Kit - US$9.99 from Amazon
GeeekPi 7-inch screen - US$28.99 from Amazon.com. The list price is actually US$59.99, but I had a $25 gift card to use when I bought it.
10,000 mAh battery bank with percentage level display - US$26.99
Miscellaneous ribbon cables for HDMI and USB connectivity - US$30.00
Logitech K380 Bluetooth Keyboard - US$21.95 from Amazon, as a certified refurb item
MicroSD card, to hold operating system, applications and data - Free, because I have a few of these knocking about
Software - Raspbian, WordGrinder, Ranger, Alpine - all open source - Free
Total outlay, before shipping and taxes - US$132.87
That's represented significant savings on the Freewrite's US$599 list price and even on it's fellow Freewrite Traveller's US$349 discounted price. The Traveller lists at US$599 as well.
A brass standoff kit for mounting the components cost an additional US$7.99, and a power switch board, the RemotePi from MSL Digital - admittedly gratuitous but with much utility - cost around US$25.
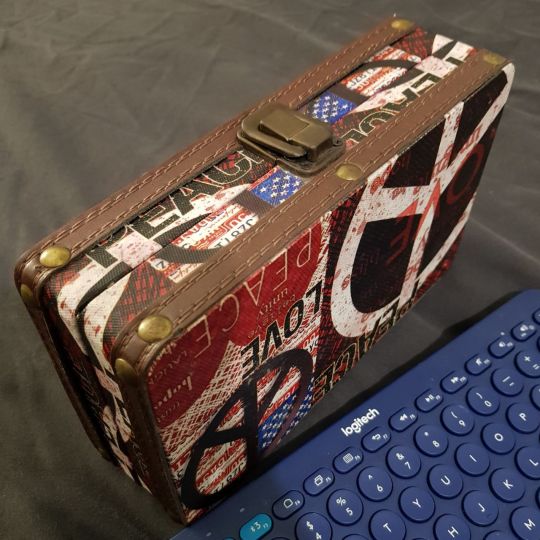
The housing - Gary Aboud might be happy to hear - is made up of two covers of a vinyl-covered MDF storage chest available at Mode Alive at TT$89.00 a pop.

Honestly, the first box was acquired for its latch and the design of its hinges. They support the cover and hold it upright when the box is open. The cover was also the perfect height, width and depth to hold the seven-inch screen.
A second box was purchased when I realised that the cover was also just the right depth to accommodate all of the other components. So two boxes were taken apart to make a slimmer box out of the two covers. The bases weren’t wasted though. They themselves were put together to make a larger storage box.
(For ease of reference going forward, I'll refer to the final solution as the PiWriter868.)
Why go through all this?
The cost saving is the biggest and most obvious reason. Granted some money was spent on components that didn’t make it into the final solution. But ultimately, the final solution does cost less than something purchased out of box to meet the stated need.
Yes, a cheap laptop can be had for less than US$200, especially if you consider refurbs and open-box options. But there are few differences between the PiWriter868 and a cheap laptop.
Every component of the PiWriter868 is replaceable, and I can choose components that fully satisfy me personally or any specific requirement.
Further, the combination of a seven-inch screen, a full-size comfortable keyboard, and six hours of battery life would be virtually impossible to find in a laptop under US$200.
If any one component of a cheap laptop were to fail, the entire thing would be headed for a landfill because cheap portables aren’t constructed for repair-ability and upgrades.
Case in point here is what I described earlier about replacing the battery in my Chromebook.
By comparison, changing the battery in the PiWriter868 is as simple as unplugging the micro USB cable and plugging it into a new battery bank. In fact, the next planned update is to replace the 10,000 mAh battery bank with a 25,600 mAh battery. That would take current estimated run time from just under six hours to somewhere in the vicinity of 14 or 15 hours. An upgrade like that wouldn’t be possible with most laptops on the market today.
Should the screen begin to go, the micro SD card begin to give problems, the switch start to behave flaky, even if the Raspberry Pi itself prove faulty over time, all components can be swapped out at cost. Again,a cheap laptop would have to be replaced in its entirely or far more expensively repaired.
Software can also be readily updated or replaced as necessary. If I found a software solution better than WordGrinder, it could be installed, configured and used. With the Freewrite, I'd be stuck with whatever they'd be providing on their platform, and in this case, also stuck with their cloud solution if I'd decided to use that as well.
At the end of the day, the PiWriter868 gives me exactly the functionality I want in a package that I can continue to tailor as I go along.
The PiWriter868 is also an argument for the use of more cost-effective technology in our schools and the country as a whole. While I use it myself as a terminal-based writing machine, it is capable of running a full GUI and GUI-based apps.

If a fully functional computer can be built around a US$15 board that can use just about any modern TV as a monitor with any inexpensive keyboard and mouse combo on the market, why are we giving children in schools thousands of dollars worth of PC equipment?
What’s keeping us from doling out inexpensive single-board computers to our school kids and allowing them to construct solutions around them while learning about deskside and other sensing technology?
What’s stopping the country from licensing a single-board computer design, manufacturing and servicing a board with a Trinbagonian stamp, and rolling them out as part of a more cost effective solution to the deskside technology needs of the public and private sector? In most cases, one needs only a word processor, spreadsheet application, presentation software, and a web browser, all of which are available.
But that discussion is for another post.
POSTSCRIPT: This text of this post was written on the PiWriter868.
0 notes
Text
GeeekPi 5V 4A Power Supply & X820 V3.0 2.5″ SATA HDD/SSD Shield Expansion Board Kit for Raspberry Pi 1 Model B+/ 2 Model B / 3 Model B / 3 Model B+
Product Description
X820 V3.zero 2.5″ SATA HDD/SSD Protect with 5V 4A Energy Provide Specification Energy provide: 5Vdc +/-5% , 4A Ports & Connectors: DC jack – 5.5×2.5mm, USB socket – USB 3.zero sort A, Energy output connector – XH2.54 2-pin Energy change connector -PH2.zero 4-pin PCB Dimension 107.5mm x 85mm
Energy Provide Unit AC 100 – 240V enter ~50 / 60Hz, 5Vdc 4A output With 2 snap-in plugs for North America (US) and Europe (EU) DC Energy Plug Dimension : 5.5*2.5mm
Notes To be used with unique energy provide unit solely WARNING: Don’t energy your Raspberry Pi by way of the Pi’s 40-pin header and micro-USB socket on the similar time.
Package deal Contains X820 V3.zero HDD enlargement board x 1 USB Jumper x 1 USB 3.zero A-Male to A-Male Information cable x 1 2-Pin Energy Connection Wire x 1 USB 2.zero A-Male to Micro B Energy Cable x 1 Spacer M2.5 x 12mm x 4 Screw M2.5 x 6mm x 8 Screw M3 x 6mm x 6 Spacer M3 x 15mm x 4 Energy Adapter 5V 4A x 1
Product Options
For Use With Raspberry Pi 1 Mannequin B+/ 2 Mannequin B / Three Mannequin B / Three Mannequin B+
Helps as much as 4TB 2.5-inch SATA arduous disk drives (HDD) / solid-state drive (SSD); Helps USB booting out of your HDD/SSD
On-board push button to regulate energy on /off (Press-ON, Maintain the button pressed not less than 2s -OFF); Powers the Raspberry Pi by way of Pi’s 40-pin header or Micro USB socket
On-board XH2.54 connector and USB energy socket to energy different units; USB 3.1 Gen1 to SATA 6Gb/s bridge controller; USB 2.zero connectivity provides plug-and-play performance in your Raspberry Pi; Fast file switch with high-speed USB 3.zero connectivity from a PC or a Mac; Exterior Self-Powered or USB bus-powered
LED purple indicator signifies powered standing and blue indicator signifies drive standing
The post GeeekPi 5V 4A Power Supply & X820 V3.0 2.5″ SATA HDD/SSD Shield Expansion Board Kit for Raspberry Pi 1 Model B+/ 2 Model B / 3 Model B / 3 Model B+ appeared first on The Ram Memory Store.
The article was originally published here! GeeekPi 5V 4A Power Supply & X820 V3.0 2.5″ SATA HDD/SSD Shield Expansion Board Kit for Raspberry Pi 1 Model B+/ 2 Model B / 3 Model B / 3 Model B+
0 notes
Text
DAS Rack für Deine Raspberry Pi’s

Was so ein richtiger #RaspberryPi Fan ist der hat nicht nur einen Pi, der hat zwei oder drei oder mehr. Bei mir sind es drei Stück und ich hatte zwei Probleme zu lösen. 1.) Ordnung in meinen Pi Salat bringen und 2.) für eine bessere Kühlung sorgen.
Auf der Suche nach einer Lösung bin ich nach einer Weile auf das GeeekPi Raspberry Pi Cluster Gehäuse gestoßen. Findet Ihr unter anderem auch bei Amazon [hier]. Ich habe es für 40€ bekommen, kann aber auch locker für 74€ über den Tresen gehen. Also ein Schnapperchen ist das Rack so oder so nicht. Rechnet man aber in meinem Fall 3 mal Gehäuse mit je einem Lüfter ist auch eine Preisfrage. Naja und ganz ehrlich - sieht das Teil nicht echt cool aus! Allein schon ohne den Lüfter eingeschaltet zu haben ist das Rack schon ein echter Hingucker. Jetzt ist dieser Version des Racks für vier Raspberrys vorgesehen und dabei spielt es keine Rolle ob Pi 3B+ oder Pi 4. Bei mir sind es ein Pi 4 und zwei Pi 3B+ und zwei Vierer Reails. Alles das ist also in dem Rack unterzubringen.

Wunschgemäß war das Rack nach ein paar Tagen geliefert. Die Vorfreude war groß und nun ging es daran alles zusammen und einzubauen und das war echt eine Evel Knievel Nummer. So schön das Teil auch ist, mit all der Verkabelung allein schon an den GPIO Leisten ist das alle ziemlich eng. Leider habe ich auch gleich zu Beginn einen Fehler gemacht und nicht darauf geachtet, dass die Trägerplatten alle nur in einer ganz bestimmten Weise in das Rack einzubauen sind. Naja - ich habe es ja gemerkt und also alles nochmal auf Anfang zurück und von vorn.

Mein Hund dazu: “Was schafft der da bloß schon wieder.”
Die Trägerplatte für die zwei Relais musste ich kurz noch unter den Bohrer legen, um die Löcher für die Ralais zu bohren. Für die Raspberrys sind die Bohrungen bereits vorhanden. Großes Manko bei dem Rack ist leider, das sehr kniffelige Zusammenstecken. Da wären Schienen für den Einschub der Trägerplatten echt eine große Verbesserung. Und man sollte sich genau überlegen ob man später nochmal drann muss, denn dann muss man das ganze Rack komplett wieder auseinandernehmen.

Also ich habe zwar selten solange Zeit für etwas aufwenden müssen, aber ich finde dennoch es hat sich gelohnt. Dazu muss man sagen habe ich auch keine Mühe gescheut den Lüfter nebst der RGB Beleuchtung auch gleich über eines der Relais laufen zu lassen. Das versetzt mich in die Lage den Lüfter nebst seiner Beleuchtung über ein Webinterface oder ein die Blynk App ein- und auszuschalten. Ich überlege mir noch ob ich das sogar noch von einander trenne, so dass ich den Lüfter und die RGB Beleuchtung jeweils seperat schalten kann. Mal sehen.

Das dieses Rack schick ist ist klar, aber was macht nun der Faktor Kühlung. Das ist etwas ganz klar messbares und siehe da, ohne Last und ohne eingeschalteten Ventilator liegt der Pi den ich getestet hatte bei über 47 Grad Celsius CPU Temperatur und mit eingeschaltetem Lüfter des Racks konnte ich zwischenzeitlich auch mal 33,25 Grad Celsius messen. Also funzt!
Etwas praktisches gibt es dann doch noch. Mit dem Rack im Lieferumfang sind nicht nur alle benötigten Teile und Schrauben und so weiter, sondern auch diese eigentlich recht nützlichen Adapter. Diese verlegen den zugang für die SD Karte mit dem OS nach hinten wo diese dann auch noch erreichbar sind, wenn das Rack zusammengebaut ist. Leider war bei mir eines der gelieferten Adapter defekt. Ich kann euch nur raten es erat zu testen bevor ihr das Rack zusammenbaut. Wer sich nicht so gut auskennt mit einem Raspberry Pi wird zudem lange suchen müssen um diesen Fehler zu finden. Kurz um der Pi blinkt zwar wie wild fährt aber das betriebssystem nicht hoch.

Da ich nicht alle vier Adapter des Lieferumfangs benötigt hatte war das kein Thema für mich. Andere werden sich aber ggf. ziemlich ärgern darüber.
Kommen wir zu meinem Fazit: Ich bin ziemlich happy mit dem Rack. Leider habe ich einige Dinge gefunden die man daran besser machen könnte. Es benötigt bspw. einfach etwas mehr Platz zwischen den Trägerplatten. Die sind jeweils 2,5 cm auseinander und das ist zu wenig für die GPIO Ports wenn Kabel drauf stecken. Ein Einschub für die Trägerplatten über eine Einschubleiste, damit man diese einzeln rausnehmen und wieder reinschieben kann, wäre eine ganz maßgebliche Verbesserung. Und natürlich sollten keine defekten Adapter mitgeliefert sein, denn das kann zu einer äzenden Fehlersuche führen. Alles in allem hat es mich rund drei Stunden gekostet alles so zum Laufen zu bringen wie ich es möchte. Allerdings habe ich auch einige Extras auf meinem Plan gehabt. Zum Schluss noch eine positive Anmerkung. Wenn der Lüfter läuft ist dieser zwar hörbar, aber es hält sich in einem akzeptablen Rahmen. direkt auf meinem Schreibtisch würde ich das nicht haben wollen. Ich bin dank Chromebook jemand der absolute Ruhe vor Lüftergeräuchen genießt. Das Rack steht ca. 1-2 Meter entfernt in einem Regal und da ist das okay.
0 notes
Text
GeeekPi 5V 4A Power Supply & X820 V3.0 2.5″ SATA HDD/SSD Shield Expansion Board Kit for Raspberry Pi 1 Model B+/ 2 Model B / 3 Model B / 3 Model B+
Product Description
X820 V3.zero 2.5″ SATA HDD/SSD Protect with 5V 4A Energy Provide Specification Energy provide: 5Vdc +/-5% , 4A Ports & Connectors: DC jack – 5.5×2.5mm, USB socket – USB 3.zero sort A, Energy output connector – XH2.54 2-pin Energy change connector -PH2.zero 4-pin PCB Dimension 107.5mm x 85mm
Energy Provide Unit AC 100 – 240V enter ~50 / 60Hz, 5Vdc 4A output With 2 snap-in plugs for North America (US) and Europe (EU) DC Energy Plug Dimension : 5.5*2.5mm
Notes To be used with unique energy provide unit solely WARNING: Don’t energy your Raspberry Pi by way of the Pi’s 40-pin header and micro-USB socket on the similar time.
Package deal Contains X820 V3.zero HDD enlargement board x 1 USB Jumper x 1 USB 3.zero A-Male to A-Male Information cable x 1 2-Pin Energy Connection Wire x 1 USB 2.zero A-Male to Micro B Energy Cable x 1 Spacer M2.5 x 12mm x 4 Screw M2.5 x 6mm x 8 Screw M3 x 6mm x 6 Spacer M3 x 15mm x 4 Energy Adapter 5V 4A x 1
Product Options
For Use With Raspberry Pi 1 Mannequin B+/ 2 Mannequin B / Three Mannequin B / Three Mannequin B+
Helps as much as 4TB 2.5-inch SATA arduous disk drives (HDD) / solid-state drive (SSD); Helps USB booting out of your HDD/SSD
On-board push button to regulate energy on /off (Press-ON, Maintain the button pressed not less than 2s -OFF); Powers the Raspberry Pi by way of Pi’s 40-pin header or Micro USB socket
On-board XH2.54 connector and USB energy socket to energy different units; USB 3.1 Gen1 to SATA 6Gb/s bridge controller; USB 2.zero connectivity provides plug-and-play performance in your Raspberry Pi; Fast file switch with high-speed USB 3.zero connectivity from a PC or a Mac; Exterior Self-Powered or USB bus-powered
LED purple indicator signifies powered standing and blue indicator signifies drive standing
The post GeeekPi 5V 4A Power Supply & X820 V3.0 2.5″ SATA HDD/SSD Shield Expansion Board Kit for Raspberry Pi 1 Model B+/ 2 Model B / 3 Model B / 3 Model B+ appeared first on The Ram Memory Store.
The article was originally published here! GeeekPi 5V 4A Power Supply & X820 V3.0 2.5″ SATA HDD/SSD Shield Expansion Board Kit for Raspberry Pi 1 Model B+/ 2 Model B / 3 Model B / 3 Model B+
0 notes