#How To Setup FTP For WordPress? (Complete Guide)
Explore tagged Tumblr posts
Visit Tumblr Blog
Explore Tumblr blogs with no restrictions, modern design and the best experience.
Last Seen Tumblr Blogs


Fun Fact
China blocked Tumblr because of pornography and censorship problems in 2013.
Text

#WordPress#FTP#WebDevelopment#WebDesign#Coding#WebsiteManagement#TechTips#HowTo#StepByStepGuide#Security#WorkflowOptimization#wpwebinfotech#How To Setup FTP For WordPress? (Complete Guide)
0 notes
Text
Maildoll Nulled Script 6.10.3

Discover the Power of Maildoll Nulled Script – Your Ultimate Email & SMS Marketing Solution In today's competitive digital landscape, effective communication with your audience is essential. If you're looking for a dynamic marketing platform that combines both email and SMS campaigns with ease, the Maildoll Nulled Script is the perfect solution. This powerful tool empowers businesses and marketers to streamline their marketing strategies, all while saving on costly licensing fees. Download it now and unlock premium features completely free. What is Maildoll Nulled Script? Maildoll Nulled Script is a comprehensive email and SMS marketing application that allows you to manage campaigns, subscribers, templates, and automation workflows effortlessly. Built for efficiency and scalability, it provides everything you need to create engaging marketing campaigns without relying on third-party platforms. Whether you're a solo entrepreneur, digital marketer, or a small business owner, Maildoll offers a cost-effective and user-friendly interface to keep your customers engaged. And with the nulled version, you get unrestricted access to all premium functionalities—completely free. Technical Specifications Language: PHP, Laravel Framework Database: MySQL Compatibility: PHP 7.3+, Apache/Nginx, MySQL 5.7+ Frontend: Bootstrap, HTML5, CSS3 SMS Gateways Supported: Twilio, Nexmo, and more Email Integrations: SMTP, SendGrid, Mailgun Top Features and Benefits of Maildoll Nulled Script Multi-Channel Marketing: Run synchronized email and SMS campaigns with high delivery rates. Advanced Analytics: Get detailed insights into open rates, click-through rates, and conversions. Template Builder: Use the drag-and-drop editor to create stunning templates with ease. Subscriber Management: Import, export, and segment your audience for targeted messaging. Campaign Automation: Automate follow-ups and schedule broadcasts to increase engagement. Developer-Friendly: Built on Laravel, making customization simple and effective. Use Cases of Maildoll Nulled Script The Maildoll Nulled Script is ideal for: Startups aiming to build a loyal customer base through email outreach. Affiliate marketers managing large subscriber lists across niches. eCommerce businesses sending transactional and promotional messages. Agencies offering white-labeled email marketing services to clients. How to Install Maildoll Nulled Script Installing the Maildoll is simple and requires minimal technical knowledge. Here's a quick guide: Download the script from nulled club. Upload the files to your server using cPanel or FTP. Set up your MySQL database and configure the .env file with the correct credentials. Run the installation wizard from your browser and follow the step-by-step instructions. Log in to your admin dashboard and start creating your campaigns. Frequently Asked Questions (FAQs) Is the Maildoll Nulled Script safe to use? Yes, as long as you download it from a trusted source like nulled club, you can safely use the script without worrying about malicious code. Can I use it for commercial projects? Absolutely. The Maildoll Nulled Script is versatile and suitable for both personal and commercial projects. You can even offer marketing services using this tool. Are updates available for the nulled version? While automatic updates may not be available, you can manually update the script by downloading the latest version from trusted platforms. How does it compare to other marketing tools? Compared to other paid tools, Maildoll offers similar—if not better—functionality without recurring costs. It’s a one-time setup that gives you lifetime access. Where can I find similar tools? If you're looking for more powerful tools like this, check out kallyas NULLED for a premium WordPress theme to match your marketing efforts. Final Thoughts The Maildoll is a game-changer for digital marketers and businesses looking to scale their outreach without breaking the bank.
With powerful automation, deep analytics, and easy integration, this tool ensures that your message reaches the right audience at the right time. Download it today and transform your email and SMS marketing like a pro.
0 notes
Text
How to Safely Delete Your WordPress Website
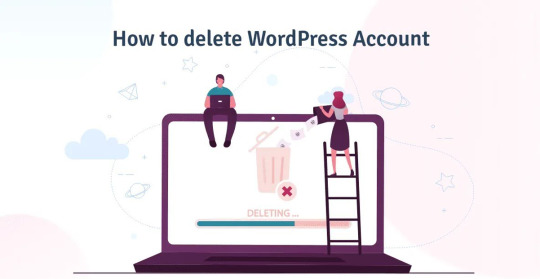
Deleting a WordPress website can be necessary for various reasons, whether you want to start fresh or no longer need the site. This guide will show you how to do it safely and effectively. Additionally, you might want to read our post on How to Delete WordPress Account to learn more about managing your WordPress setup.
Safe Steps to Delete Your WordPress Website
Back Up Your Website: It’s always smart to back up your site before deleting it. Save your content, plugins, themes, and any other important data you might need later.
Remove WordPress Files: Log into your hosting account and delete the WordPress files using an FTP client or your hosting provider’s file manager.
Delete Your Database: After deleting the files, make sure to delete the WordPress database. This can be done through phpMyAdmin, ensuring that all your data is removed.
Cancel Hosting and Domain Services: Don’t forget to cancel your hosting plan and delete the domain if it's no longer required. It’s important to know how to delete a domain on WordPress if you registered it through WordPress.com.
Remove Traces from Search Engines: After deleting your site, you may need to remove it from search engine results. Use Google Search Console to submit a removal request.
Cancel Subscriptions and Request Refunds: Make sure to cancel subscriptions and request refunds for any paid services associated with your WordPress site.
Deleting WordPress on Mobile
For those who need to know how to delete a WordPress account on your phone, the process is similar to what you’d do on a desktop. Access your account via the WordPress mobile app or a mobile browser and follow the steps to delete your site.
Final Remarks
Whether you're looking to understand how to delete a WordPress account and start over or just want to permanently remove a site, following these steps will help you do so safely. Always back up your data before beginning the process, and ensure that all steps are completed. For further assistance, feel free to explore our other resources or contact support.
0 notes
Text
How can I migrate my website to a new hosting provider
Migrating your website to a new hosting provider might seem like a daunting task, but with careful planning and execution, it can be a smooth and relatively stress-free process.

Here’s a step-by-step guide on how to migrate your website to a new hosting provider:
1. Evaluate Current Hosting and Needs
Before starting the migration process, evaluate current hosting setup and requirements. Understand the resources of the website uses, such as disk space, bandwidth, databases, and specific software versions. This will help you choose a new hosting provider that meets your needs. Additionally, note any issues you’ve encountered with your current host, such as downtime or poor customer support, to ensure your new host addresses these concerns.
2. Choose a New Hosting Provider
Research and select a new hosting provider based on your needs. Consider factors like uptime reliability, customer support, scalability, security features, and cost. Popular hosting providers include Bluehost, SiteGround, and HostGator, each offering various plans tailored to different types of websites.
3. Backup Your Website
Creating a complete backup of your website is a critical step before migration. This includes all files, databases, and configurations. You can use tools like cPanel’s backup feature, or plugins like UpdraftPlus for WordPress sites, to create backups. Ensure you have multiple copies stored securely on different devices or cloud storage.
4. Set Up Your New Hosting Environment
Once you have chosen your new host, set up your new hosting environment. This involves creating your domain and setting up your website files and databases. Most hosting providers offer a cPanel or similar control panel that makes this process straightforward. Make sure to replicate your old hosting environment as closely as possible to avoid compatibility issues.
5. Transfer Files and Databases
Next, transfer your website files and databases to the new host. You can use an FTP client like FileZilla to upload your files. For databases, you can use phpMyAdmin to export your database from the old host and import it into the new host. Some hosting providers also offer automated migration tools to simplify this process.
6. Update DNS Settings
After transferring your files and databases, update your DNS settings to point to the new hosting provider. This involves changing the nameservers for your domain to those provided by your new host. This change can usually be made through your domain registrar’s control panel. DNS propagation can take anywhere from a few hours to 48 hours, so be prepared for a short period where your website may not be accessible globally.
7. Test Your Website
Before making your new site live, thoroughly test it to ensure everything works correctly. Check all pages, links, forms, and any interactive features. Verify that your database connections are functioning properly and that your website appears as expected. This step is crucial to identify any issues that might have arisen during the transfer.
8. Update Configurations and Settings
Ensure that all configurations and settings are updated to reflect the new hosting environment. This includes updating any hardcoded URLs, database connection strings, and configuration files. For WordPress sites, you might need to update the wp-config.php file to reflect the new database credentials.
9. Monitor Your Website
Once your website is live on the new host, monitor it closely for any issues. Pay attention to website performance, uptime, and any error messages. Use monitoring tools to track your website’s health and address any issues promptly. Communicate with your new hosting provider’s support team if you encounter any problems.
10. Cancel Old Hosting Account
After ensuring that your website is functioning correctly on the new host, you can cancel your old hosting account. Before doing so, make sure that you have no residual files or databases left that you might need. Confirm that your domain is fully propagated to the new host and that there is no remaining dependency on the old host.
Additional Tips
Communicate with Both Hosts: Keep open communication with both your old and new hosting providers. They can offer valuable assistance and troubleshoot any issues that arise during the migration process.
Plan for Downtime: Schedule the migration during a low-traffic period to minimize the impact of any potential downtime on your visitors.
Secure Your Data: Ensure all data transfers are secure, using secure protocols like SFTP and HTTPS to prevent data breaches during the migration.
Use Migration Services: Many hosting providers offer migration services, sometimes for free. These services can simplify the process and reduce the risk of errors.
Migrating your website to a new hosting provider can significantly improve your site’s performance, security, and reliability. By following these steps and taking a methodical approach, you can ensure a smooth transition and continued success for your website.
The topic is just for information or knowledge purpose. If anybody in need of website development and hosting please visit at top web design company in Bangalore
#best website designers in bangalore#best website company in bangalore#website development services in bangalore#web hosting services in bangalore#web hosting company in bangalore#tech blog#cloud#hosting#website migration
0 notes
Text
Classic Website Customization Service
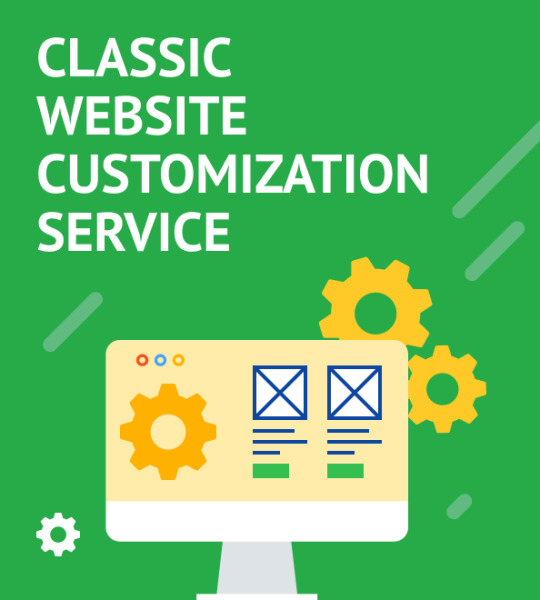
You can add this service to your basket at the bottom of the page. Just scroll to the end of the product description. Supported CMS Platforms: - WordPress - Joomla - HTML5/CSS3 Website Key Services I Offer: Fast Theme Installation on Your Web Host Don't let technicalities slow you down. I will swiftly install your chosen theme on your web host, ensuring a seamless launch. Publishing 10 Captivating Blog Posts Engage your audience with fresh, relevant content. I'll schedule 10 compelling blog posts to keep your site buzzing with activity. Website Personalisation with Branded Logos and Colour Schemes Make your mark with a unique identity. I'll infuse your website with branded logos and tailor the colour scheme to match your vision. Contact Forms and Maps Setup Stay connected with your audience. I will set up contact forms and integrate maps, enhancing user interaction. Speedy Turnaround Experience the magic within 7 to 10 business days*, and watch your website transform before your eyes. What's Included in My Classic Website Customization Service: Theme Installation on Web Hosting Get started swiftly by providing us with your hosting and FTP access details or let us assist you in selecting the best hosting solution. Hosting Setup to Match Your Theme I'll ensure your hosting perfectly complements your chosen theme, creating a seamless user experience. Default Plugin Activation and Setup Activate essential plugins to supercharge your website's functionality, ensuring a smooth operation. Demo Content Replacement Your content takes centre stage. I'll replace the demo content with your provided text and images, filling up to five web pages and ten blog posts. Theme Customization I'll add your logo and personalize the colour scheme to align with your brand's identity. Website Contact Details Setup Enhance user engagement with professionally designed contact forms and optional map integration. 3 Revisions Enjoy peace of mind with three minor revisions, valid for 30 days after project delivery. How My Classic Website Customization Service Works: Step 1: Collecting Information 🕒 from15 mins Upon confirming your order, I will reach out to gather the necessary details. I'll need access to your hosting account and the content for your pages and blog posts. I will be your guiding light throughout the process. Step 2: Completing Classic Website Customization 🕒 7 - 10 Business Days* Once I have all the required data, I'll install and customize your chosen template, keeping you in the loop at every stage. Step 3: Reviewing & Finishing Up 🕒 from 15 mins After customization, you can review and approve the results. Two free revisions are at your disposal if you wish to make changes. I'll provide you with login details to access the admin panel, allowing you to take control of your website. To Provide Classic Website Customization Service, I Need: - cPanel plus FTP and MySQL access to your hosting - Logo (preferably in .SVG) - Colour preferences - Content (images and texts) for pages and blog posts - Detailed content placement instructions 4 Top Reasons to Try Classic Website Customization Service: - If you're new to CMS platforms and hosting servers, fear not. I will handle the technicalities, delivering a fully operational website within days, not weeks. - The process is straightforward: provide hosting access, send us your content and instructions, and watch your website come to life in 7 - 10 business days.* - This Classic Website Customization Service encompasses theme installation, contact form activation, logo integration, content creation, and SEO optimization to boost your search engine ranking. - You'll have me by your side to ensure a smooth journey. If you don't have hosting, I can offer you hosting at a great price or if you prefer, I can assist you in selecting the right one. Please Note: - The service covers one website. - Advanced coding and layout modifications can be arranged for an additional fee. - Timely provision of requested information is essential to meet project deadlines. - Project kick-off or delivery time may vary slightly due to workload or unforeseen circumstances. - Three minor revisions are included, valid for 30 days after project delivery. Classic Website Customization FAQ: What does Classic Website Customization Service include? This service encompasses template installation, logo addition, colour scheme customization, contact form activation, and content creation for up to 5 pages and 10 blog posts. How long will it take to complete Classic Website Customization Service? Expect completion within 7 to 10 business days, contingent on timely content provision. Three free revisions are included. Can you deliver faster? Yes, for an additional fee, I can expedite your site's launch. Contact me to discuss your options. Can I order if I don't have all the content ready? Absolutely, you can provide content at your own pace, and I'll start when everything is ready. Need help with content? Ask me about my Content Writing Service. Will you install a template on my hosting? Yes, I can install it on existing hosting or help you select and register a compatible one if needed. Do I have to check my hosting compatibility? Yes, ensuring your hosting matches template requirements is crucial. I can guide you in making the right choice. What if I need more content pages? I offer additional customisation services for a fee. Contact me for details. Can you customise my online store? This service doesn't cover store configuration. Ask about the All-in-One Store Setup for eCommerce themes. When will you contact me? After payment, I will guide you on content submission, offering various options. What if I'm not satisfied with the final result? Three minor revisions are available for 30 days after project delivery to ensure your satisfaction. Can you help me migrate from another platform to WordPress? Certainly, I can migrate content and add functionality from other CMS platforms to WordPress. Reach out to discuss the details. * Timeline assumes that the client already has all the information and content available when the project kicks off. Delays in receiving any of the required information and content will inevitably delay the project beyond my control and for which I cannot be held responsible. Read the full article
0 notes
Text
7 Notable things to consider before buying Web Hosting
The web hosting now a days becomes really intense due to the rapidly growing in the usage of internet. Everyone on us wants their own website no matter if it’s personal website or any business website. In need of this there are so many web hosts offering web hosting services by competing each other in aspect of different features like space, bandwidth, email accounts, free domain names or more. Many of the peoples get attracts and buy web hosting instantly without knowing the details and they somehow suffer website downtime and many other issues. In this article I am going to discuss 7 important things you need to pay fully attention before buying web hosting for an online web presence.
1- Web Hosting Features:
When it comes to strong web presence, web hosting features are the most important one. From setup fee to web space, email accounts, data transfer, Database, Hosting support and all. These are the main things one must be look up before starting a website. The hosting package must be support all the languages like PHP, HTML, PERL, JAVA etc. Among all these feature competitive price is must. Get the complete information about hosting features before buying web hosting in Pakistan and worldwide.
2- Web Servers:
Web Servers are the most crucial part of web hosting because a complete website is depending upon a web server. Server are the machine where multiple files are hosted on and running. Before buying a web hosting one must ask about where the servers and data center of web hosting company are located, how frequently they take backup and what are the servers Uptime. If the machine goes wrong things may get worse. If the website backup isn’t available with web hosting company you may lost all the things about a website. Also when looking for server uptime means how your website will perform. Facing downtime means losing the potential visitor of a website as well losing the trust of a visitor or a customer.
3- Web Hosting Experience:
The experience of a web hosting company matters a lot. It’s completely like how you will perform the things on the base of practice and experience. An Experience web hosting company knows how to manage the things. They are reliable with efficient technical support also by serving multiple years they are more secure and trusted by many of customers. People interact with the experience once the most and you can easily get the reviews about experienced company.
4- Technical Support:
Working on website means you will face different issues related to emails, servers etc. In the matter technical support is the things that can help and take you out from the relevant issue. Active technical support is the pro thing in web hosting. Technical engineers knows the conditions of the servers and can guide you properly in time. So before buying a web hosting in Pakistan and other countries one must ask for technical support. Most of the companies’ offers 24/7 technical support by means of live chat, Telephonic calls and email support but many of them don’t. There is a company in Pakistan who are offering best web hosting as well their technical support is must efficient and active. They are very keen towards each of the issue of client also beyond telephonic calls and email support, one can visit them in their office and ask them to fix their issue. All and all it’s a feeling of relief that there is a team behind who is always concern to help whenever you need.
5- Competitive Price:
Price is the most obvious things everyone look up at. Competitive price with all the main hosting features is the thing need to consider before buying a web hosting. There are many web hosting companies in Pakistan offering web hosting services many of them are offering main hosting features with reasonable prices. One of them is WebSouls web hosting company where they provide maximum bandwidth and web space in such good price. So before looking up a web hosting in Pakistan and rest of the world connect with the company offering reasonable price but not the cheap cause cheap is not always the best.
6- Web Hosting Control Panel:
There are various control panel web hosting companies offers few are Cpanel, Plesk, WHM varies from programing languages & FTP (File Transfer Protocol) access to files. One must ask for control panel before buying web hosting services. A company from which I’m using web hosting in Pakistan named WebSouls. They are Official Partner of World largest and renowned C-panel in Pakistan. There web hosting services are really reliable and secured with active technical support.
7- Web Hosting types:
You are certainly need to be connect with a company which are offering all type of web hosting services according to needs and requirements like Shared Hosting, WordPress Hosting, VPS Hosting, Dedicated Server Hosting. It consider a good practice to educate the customer properly that what hosting is suitable for him after knowing the requirements of website. Unfortunately most of the web hosting companies does not educate the customer properly which suffers the client afterward. A good web host must guide the person completely with worrying about sale. If the customer is satisfied from services he will definitely share the word of mouth which will somehow make the web hosting company much trustworthy.
Final Words:
These are the 7 important but not confined points need to be under consideration before buying web hosting services. The main thing is never settle for less while its comes to your online web presence cause web hosting is something all your website will be depend upon. While looking for web hosting in Pakistan. I will recommend WebSouls, they are ranked as No. 1 Web Hosting Company in Pakistan by serving 17 years in Pakistani Web Hosting industry. I’m using their hosting services since long their servers are well managed and optimized with active local support.
1 note
·
View note
Text
How to Change the Domain Name of Your WordPress Website
How to Change the Domain Name of Your WordPress Website There are a number of ways to change the domain name of your WordPress website. These methods range from using a software tool such as Duplicator and WP Migrate DB to manually tweaking the URL address settings in PHP code. Other ways of changing the domain name of your WordPress website include using a file manager and using a GUID field in the wp_posts tables. Duplicator or WP Migrate DB change wordpress website domain name via the WordPress database You can change your domain name in the WordPress database using the Duplicator plugin. This plugin is designed to make the migration process easier and more convenient for you. It backs up your site to an offsite location and creates a new database and user at the new host. Once you've set up your new site, you can change the domain name using the Duplicator plugin. To change the domain name of your WordPress site, you first need to change the site's URL. You can do this using the Setup page of Duplicator. The Duplicator will detect the new domain name and path. After the migration is complete, you can go to the new site's admin panel and change your domain name. You'll also need to point your old domain to the new domain name using 301 redirects. Manually tweak the URL address settings in PHP code One of the most common problems that WordPress users run into is the inability to change the domain name of their site. Fortunately, this issue can be remedied easily and without too much hassle. WordPress users can change the domain name of their site by manually tweaking its URL address settings in the PHP code. This will redirect visitors and search engines to the new domain name. There are also many other features of WordPress that can be easily mastered. First, make sure your site's database has the new domain name and extension. This process is similar to the process described above but requires the use of an FTP client. To access your site's database, log in with your FTP account credentials and open phpMyAdmin. Once there, you will need to navigate to the wp-option file. It will contain the URL address and home rows of your site. Once you have made these changes, save the changes. If you are not comfortable making changes to your website's database, hire a developer to do this for you. Using a file manager There are many ways to change the domain name of your WordPress website, including using your hosting account's cPanel or terminal. Before attempting this, it is essential to create a full backup of your website, so that you can restore it if necessary. Using a file manager can be a simple way to do this. Using a file manager on your hosting account will allow you to edit existing files, without having to upload a new version of the same file. However, if you're making a substantial change to an existing file, you may find it easier to upload a new file and overwrite the existing one. To edit an existing file, click on its edit icon, which will display the file's content. Once you've finished editing, click on "Save Changes" to apply your changes. Using a GUID field in the wp_posts tables Changing the domain name of your WordPress website isn't an impossible task. However, you need to be careful while changing the domain name because it may lead to a number of problems. First, it's important to know the exact URL of your website. You can do this by checking the wp_posts table's guid field. Normally, it should be a unique string or number. However, you must be aware that some plugins and functions may use the guid column in URLs. As long as you don't modify the post ID, you can safely change the domain name of your WordPress website. Next, make sure that you have access to the wp_posts tables and understand how they work. This is important because your website's URLs are stored in several tables. It's crucial to know the meaning of each field before making changes. Also, make sure you use the correct version of the WordPress database to avoid making any errors. Using a plugin If you're having trouble with the domain name associated with your Wordpress website, you may be interested in using a plugin to change it. This will help you change the domain name of your website without changing the content of your website. However, you should be aware of the risks of accidentally breaking your website. Before you begin, you must first install the plugin, change the domain name, and then navigate to the Settings tab of your WordPress dashboard. Go to the Permalink section of the settings page. After you've done that, you should clear any cache plugins on your website, and then click Save Changes. Next, you need to update the database settings to reflect the new domain name. To do this, you will need to access phpMyAdmin, the database management program included with WordPress. Next, you need to change your site URL to the new addon domain name. Also, change your home URL to a temporary URL, and edit the site's description and login username. Read the full article
0 notes
Text
What you'll learn Learn about Webhosting and Domain name systemLearn about website setupLearn all about WordPress SetupLearn to set up emails, FTP accounts and make your website live This course is aimed towards complete beginners who want to set up their own website. If you are a complete newbie then you have come to the right place. This is the first basic course you can do to get started with your website. This course starts with a quick refresher on the website components and then quickly help you understand the concepts behind all the technicalities. After this course you will be able to get a web hosting space and domain name for your self and will be able to run you website with any help. You will learn all about email set up, cpanel and FTP. You will also get a quick little course on HTML and CSS. This course will also teach you how to set up your WordPress website or Blog. You will learn to set up Joomla and Magneto eCommerce websites. All in all this course will provide you all the tools and techniques you will need to get started on the web. Course Highlights Detail discussion on all aspects of website setup and management Does not assume any programming knowledge Covers WordPress, Joomla and Magneto Learn all about web hosting and Domain name system Be a complete Webmaster in just 3 hours Get yourself a live website with this quick and easy course. Who this course is for:Beginners who want to setup their own website
0 notes
Text
Create a blog
Blogging; how to start a blog, once you have opted your blog platform as well as up your profile. You will definitely want to customize the look and feel of the website. If possible, make use of a white background or a product like make the actual info posted during your site kick off (i.e. text, pictures, videos, beats, etc). There a literally quite a number free blog templates and themes available on the internet to customize your websites. Google search them and follow their installation instructions.
Day Two - Using recording software on pc and your outline, record the records. I recommend using free audio software such as Audacity in order to this easier still. If you made your outline in PowerPoint, use film feature to generate a slideshow video. Save your valuable audio recording in mp3 format or in mp4 format if you used Ms PowerPoint. Upload your mp3 or mp4 on the hosting account you purchased on day one. Copy and paste the url to your product in a text apply for quick research. Although it's totally how to create a blog wordpress guide for beginners at WordPress dot com, Chance to find the registering your own personal domain name so you can more power over it and you also brand your business. Select a domain name can be short, memorable and includes your business name or a keyword involved in your career. There can also be people creating a lot of greenbacks with travel blogs, fashion blogs or food blogs and all they do is blog about their interests. So why not do identical writing fan fiction on a blog? You take action anyway so why not earn some money doing everything? Know other sellers. Aside from knowing your target audience, in addition, you need to teach the people you're getting larger against in particular those who currently considered successful in selected niche. Are plenty of them scoring well in this community? What kind of programs do they provide? Why do beginners them? Are usually the techniques they're using to boost their fill out an application rate? Discover surely practice a lot of things available people. But make certain that you do not duplicate them. Be known as someone who has individuality. Many of the smaller web directories focus on the particular specific. Just because they're small, don't rule these directories out. If you want targeted traffic who was already looking for just about any web site or a product just like yours, these smaller internet directories are discover them. But on the opposite end belonging to the spectrum there's an array of large web directories covering just about every topic in the sun. So, are you able to guard against these types of situations by negotiating the terms a good affiliate tools? The answer virtually always hardly any. Why? Leverage. Have got none. Why would a huge company like Amazon ever negotiate with you versus any other affiliate? Unless you bring in huge numbers of traffic each day, they don't. Not possibility to. Remove many weeds when can take care of the them from inhibiting your plants' evolution. If you are pulling out pieces of sod, remove as much soil for the bottom once you can.
Tags: how to create a blog, start a blog
Setup Free blog: free blog setup, below are some tips in order to assist you set out to integrate social media marketing into couple of your traditional marketing and business goal. Social media should not something apart from your traditional marketing goals. Integration is key and tend to maximize your investment in all marketing, both online and offline. 17. ADD Contact form: for Finding you in touch in conjunction with your users and visitors will need have installed a reply form and so it is to be able to reach by you. there are many contact form available can certainly use all of them determined by your design contact form 7 is among the them use contact. Plugins are fairly simple to install too. You may easily click for a 'Plugins' option in your WordPress Dashboard and then choose to add new extensions. Then you will perform a search the available plugins which can upload and place. Once they're installed it's a subject of going to your plugins page and clicking Turn on.
Tags: free WordPress blog setup, setup free wordpress blog
Add Google Webmaster tools: how to add Google webmaster tools in WordPress, When you check the site, look for keyword-rich ingredients. If you don't find it, then that end up being the problem right normally. That means you have to have to include content rise in your idea. So, say a very trustworthy website links to me, and provides me using a ranking boost, and I chose to link them come back. Would that remove my give a boost to? I don't think so; to me, all of it depends on the relevance among the link. Being successful Google would at all times take into consideration the trust and authority of web sites in point. Therefore, if it saw one of the sites having hundreds of links, it would take because spam. 5) Use post title optimization widget on this web site for blogger / BlogSpot blog to be sure you heal search engine ranking. WordPress bloggers can use plugins like most in one SEO for meta tag and title optimization.
Tags: add Google webmasters tools to blog, add Google webmaster in WordPress blog
Install wordpress manually in cpanel: How to install wordpress manually in cpanel, Now examine the All-In-One SEO as well as the XML Sitemaps buttons were being just put in your world wide web. Let's start with the All-In-One Search engine optimization. Select that option now. Quick 1 button installation with fantastic scripts off of your hosting provider is least difficult way to complete this. Of course, if your hosting provider gives you MySQL databases and php and cgi access you'll how to install wp manually, however i highly recommend using the automated set. This program let's you put in popular programs like WordPress, Joomla, Mambo, Xoops, and PHP-Nuke, and the like with some clicks of the mouse button. However, in HTML, you need to have to insert "base" including your website house address. By specifying "base", the browser can direct to you'll have to site. This alerts the search engine of the primacy in your home page. Also, this action saves you time in editing inner pages. Posts are your basic blog content as well as used for standard blog entries. You can create new posts, anytime desire and regard as you want, with the site visitors read. Posts are normally arranged in chronological order and you can allow viewer comments or not, just like you keep in mind.
Tags: how to install WordPress manually beginners guide, setup wordpress blog manually in cpanel
Install wordpress plugins : How to Install WordPress plugins, Another plugin with internet affiliate in thoughts. If long ugly affiliate links drive you fully crazy then by way of the Tool for then you. Straight forward URL takes lose ugly URLs and shortens them down into manageable bite-size links. Additionally provides the flexibleness to trace every link individually thus you'll check effectiveness of individuals content and click on through. Setting up and using a Wordpress.org blog will require some technical knowledge or some money to pay someone else to do it if purchase the time or need to learn ways to do it yourself. You'll have a first will have to secure WordPress hosting or a domain name, or URL, for website is. Once you've done that, you can how to install wordpress plugins onto your domain name through your hosting control panel, or cPanel. Come across "1-click installs" or "quick installs" previously software piece. You will find WordPress or "Fantastical" within, and it is possible to fill out a simple form to how to install wordpress plugins on your chosen domain name or company name.
Tags: Install Wordpress plugins step by step guide, Install Wordpress plugins tutorial for beginners
Install wordpress themes: How to install Wordpress themes, Click to sign up with you may find four large quadrants program. Computer folders, computer files, folders in regards to the server and also the server personal files. This is important because you can work all over this placement. You also have the option to be able to and drop from your pc. Well done, you now have installed your WordPress using Fantastical. Usually this consider a couple of minutes to appear from the net. These methods in this article we have discussed is defined as just about all you have know regarding ways to install wordpress themes freed from ftp. Auto Traffic Tycoon extremely simple software built the cost in short while with profession designing. Additionally, they gives their hosting just keep your domain name including your affiliate id of click bank, Amazon, commission junction for instance., anything as such as Done easy steps your website taken just very matter of minutes .You can start getting site visitors to personal website you no need to have depend anyone for creating your service.
Tags: Install wordpress themes step by step, how to install WordPress themes for beginners
Best Website Hosting: Website hosting, your hold keeps your site available to individuals who are online. When someone types internet address in the address bar of their browser and hits enter, your website appears. When they hit enter they decide to a obtain your internet site. The browser is what people use to in things on the net. Another feature of quality web hosting that you have to look for beyond the CMS will be the level of support. While some best website hosting companies make you work around their schedule, others for example I power have the ability for you to get instances you need whenever you require it. They have the capability to do so through 24/7 IM and speak to chat, making certain a live body is always on call to answer your queries. There are computers of which are set just about be servers. These are called host computers as well to simplify things. Handful of basic to upload your website files on the hosting computer so discovered that make it available for others to view on the entire world. This is the service we call web web hosting.
Tags: best wordpress website hosting companies, top website hosting companies
Wordpress: What is WordPress, Google XML Sitemaps will produce picture XML sitemap which give search engines to index your internet site. If that sentence makes your head hurt, just know this: it makes it easier for Google to read your world-wide-web site. That's a good thing. If Google can't or doesn't read your website, that's bad. You want them to read it so could share your own with consumers that use Internet. Think about this a crucial WordPress plugins if you enjoy trading your labor and/or skills for cash. Lastly you need to point your domain name at brand new WordPress platform to build website set. Think of a domain name simply as an arrow pointing to your website. When you type a website address into your internet browser (Internet Explorer, Fire Fox, etc) your machine basically says, "Oh, you wish to open that file where there." and points at your website. Action easily accomplished even these sounds like mumbo-jumbo. You wish to find your domain name servers as part of your hosting deposit. These are typically given to you in the introductory email from signing up. Go to the account from the service you purchased your domain name, receive the spot to edit historical past of the Servers and paste them in there (typically some other two). Tags: learn wordpress, wordpress tutorials
Setup Wordpress SEO: how to setup wordpress SEO, Another technique is by developing a list building squeeze page and getting visitors to its. Use a great headline, three to five bullet points about what you are currently offering--be it a product, a program, or any giveaway--and an opt-in box, which an individual from your auto responder service, and Increase! Drive traffic to it in one of the 17 methods you can, such as blogging, writing articles, and WordPress search engine optimization. Remember that keyword research plays very important role when an individual trying to earn associated with money online so demand to pay a involving attention to this aspect of online marketing. The stronger your keyword research, the easier it can be to dominate your field of study! Tags: WordPress SEO setup, SEO for WordPress blog
Best Wordpress plugins: Wordpress plugins, WPTouch is among one of the well known WordPress mobile plugins free of cost . already in use by massive users. The great thing about WP Touch is that it's simple to deploy and configure. All you do is upload the plugins, activate it, and then go through any page of options to configure it how such as. Create a bio of one's famous marketer or leader in your field of interest and discuss their achievements, quotes, and books possess written, various other work have got produced. Companies even make their acquaintance as a result! Nice work if you can get it (and you quite possibly it advertising try)! This plugins generates a sitemap of your website which will help your WordPress site to be easily marketed in search engines by following each and every post. And also it sends pings and notifies all motors like Google whenever you published a real post.
Tags: Best wordpress plugins for small business website, most important wordpress plugins for beginners, learn more info of themes
5 notes
·
View notes
Text
WASender Nulled Script 4.5

Unlock the Power of WhatsApp Marketing with WASender Nulled Script In today’s digital landscape, reaching your audience efficiently is key. WASender Nulled Script is a revolutionary tool for marketers, entrepreneurs, and digital agencies who want to supercharge their WhatsApp marketing strategies without breaking the bank. If you're looking for a cost-effective and high-performing solution, downloading the WASender Nulled Script from our website is the smartest move you can make today. What Is WASender Nulled Script? WASender Nulled Script is a powerful bulk messaging software designed to automate WhatsApp marketing campaigns. It helps you send personalized messages, manage contacts, and build powerful drip campaigns—all from a user-friendly dashboard. As a SaaS-based tool, it eliminates the need for manual messaging and allows seamless integration with your marketing stack. Technical Specifications Script Type: PHP-based SAAS Application Framework: Laravel (Latest Version) Database: MySQL Server Requirements: PHP 8+, cURL enabled, HTTPS support Frontend: Fully responsive and mobile-ready interface Top Features and Benefits of WASender Nulled Script Here’s why marketers around the world are choosing the WASender Nulled Script: 1. Bulk WhatsApp Messaging Send thousands of messages in just a few clicks. Ideal for promotions, updates, and personalized marketing campaigns. 2. Campaign Management Track message delivery, open rates, and campaign performance through an intuitive dashboard. 3. Drip Campaigns Automate your follow-ups and schedule messages to be sent at intervals that suit your strategy. 4. Contact Management Upload contacts easily, group them, and tag them for better targeting and segmentation. 5. Multi-User System Create and manage multiple users with different access levels. Perfect for agencies handling various clients. Real-World Use Cases E-commerce Stores: Announce new product arrivals and exclusive deals. Local Businesses: Send personalized reminders, offers, or service updates. Digital Agencies: Manage campaigns for multiple clients using a single platform. Educational Institutions: Notify students about updates, events, and results. How to Install WASender Nulled Script Installing the WASender Nulled Script is simple and straightforward: Download the nulled script package from our website. Upload the files to your web server via FTP or cPanel. Configure your database and environment settings. Run the installer through your browser and follow the setup wizard. Login to your admin panel and start sending WhatsApp messages instantly. Why Choose the Nulled Version? Accessing the WASender Nulled Script from our platform means unlocking premium features at zero cost. You gain complete functionality without license restrictions, allowing full freedom and flexibility. Plus, it’s a great way to test the software before deciding to purchase a full license in the future. FAQs Is the WASender Nulled Script safe to use? Yes, the script provided on our website is thoroughly scanned and tested for safety. We ensure it’s malware-free and ready for deployment. Can I update the nulled script later? Nulled versions do not support automatic updates, but you can manually upgrade it when newer releases become available. Do I need technical skills to install the script? Basic knowledge of web hosting and FTP is sufficient. The installation process is guided and user-friendly. Is support included with the nulled version? No official support is provided, but our community is active and willing to help with troubleshooting and customizations. Final Thoughts If you’re serious about leveraging WhatsApp for business growth, the WASender offers a powerful and budget-friendly solution. Download it now and start reaching your audience faster, smarter, and with greater impact. Looking for more premium tools? Check out Yoast seo nulled to boost your WordPress SEO strategy, or explore a wide variety of nulled themes to enhance your site’s appearance.
0 notes
Photo

Download Povash | Power Wash WordPress Theme on themeforest
Description Povash | Power Wash WordPress Theme :
Download Povash | Power Wash WordPress Theme. The Theme releases on Monday eighth March 2021 By The Author template_path on Themeforest. It’s makes use of for clear,cleaner,cleansing,Cleaning Business,Cleaning Service,Concrete Cleaning,dry cleansing,home wash,Paver Cleaning,energy wash,strain wash,roof clear,wash enterprise,washing,window washing. Theme Title: Povash | Power Wash WordPress Theme Category: wordpress/company/enterprise Price: $15 Author: template_path Published Date: Monday eighth March 2021 09:49:47 AM More Info / DownloadDemo
Povash WordPress Theme is the only option for Power washing and strain washing. This tempalte have particulars pages for all energy wash and strain wash associated service like Power Washing, Window Washing, Paver Cleaning, Concrete Cleaning, House Wash. If you’re on the lookout for high-quality designed template with extra additional options in your Povash providers enterprise, so Povash template is the most suitable choice so that you can launch your web site inside very fast time.
We researched the trade and tried to create the pages a mean web site consists of. We labored on Povash to make it user-friendly, fashionable trying and coded it to the newest requirements to make it load quick and rank excessive. This template is responsive powered by Bootstrap and it examined on all main units.
Features Overview
Drag and drop web page builder – Elementor: Fast, intuitive and sensible web page builder will make your customization quick and straightforward. You structure might be prepared for publishing in a minute!
Demo content material included : Intervio is able to use from the field. Quickly set up it by way of FTP or WordPress and after you activate it you may load demo content material. Then you may add your individual content material on already designed pages.
One click on set up : Install Intervio with our highly effective one click on installer. Get your website up and working very quickly! Quick, straightforward and rocket quick!
Responsive & retina prepared : Look of your web site on cellular units is essential nowadays. So we made certain Consultpro seems to be nice each on cellular, desktop and retina screens!
WPML & Translation Ready: Intervio is appropriate with hottest WordPress plugin that helps creation of multilingual layouts. Translate your web site to any language with WPML!
Advanced typography choices : Choose any of the Google internet fonts library by way of highly effective theme choices panel! Now you may set a singular type in your model!
Compatible with Contact type 7 : Intervio is appropriate with probably the most highly effective and hottest customized contact varieties WordPress widget! create your individual varieties in seconds!
Child theme appropriate : Intervio lets you simply override default template files utilizing a toddler theme. It additionally permits you updating your theme within the protected method!
Powerful framework : Intervio relies on hottest, properly established, highly effective vafpress theme choices framework!
Detailed documentation : Extensive documentation plus nice video guides on how one can setup and customise Trucking will make your customizations tremendous straightforward and quick!
Crossbrowser compatibility : Intervio seems to be nice amongst all main browsers together with IE9+.
Full Features List
100% Fluid Responsive – Fits any machine completely
Tested on actual units
Flexible Layout
Use our demo structure or create your individual visually completely different expertise utilizing web page builder and feature-rich backend.
Unlimited Sidebars
Retina Optimized
Advanced Admin Panel
Demo Import, Content and Sliders
Social Links
Bottom Footer Widgets
Clean & Commented Code
Advanced Typography
Google Fonts – 600+ Font households obtainable
Custom Font Support
Custom Page Templates
Pixel Perfect Design
Quick & Easy Installation & Setup
Custom CSS Ready
HTML5 & CSS3
Easy Customization With Variable Content Sections
Custom Build Theme & Page Options
search engine optimization Ready
Localizable with .pot translation files
WPML Multilanguage Plugin Extended Support
Various Post Formats
Unlimited Pages
Custom Widgets and sensible admin panel for customizations
Customizable Contact Forms with Contact Form 7 help
FullDisplay screen Background Slider
Cross Browser Compatibility
Well Documented & More….
More Info / DownloadDemo #Povash #Power #Wash #WordPress #Theme
#All_Theme_amp_Template#clean#cleaner#cleaning#Cleaning_Business#Cleaning_Service#Concrete_Cleaning#dry_cleaning#house_wash#New_releases#Paver_Cleaning#power_wash#pressure_wash#roof_clean#Theme_amp_Template_new_release#wash_business#washing#window_washing#Wordpress_new_release#Wordpress_theme
0 notes
Text
Classic Website Customization Service

You can add this service to your basket at the bottom of the page. Just scroll to the end of the product description. Supported CMS Platforms: - WordPress - Joomla - HTML5/CSS3 Website Key Services I Offer: Fast Theme Installation on Your Web Host Don't let technicalities slow you down. I will swiftly install your chosen theme on your web host, ensuring a seamless launch. Publishing 10 Captivating Blog Posts Engage your audience with fresh, relevant content. I'll schedule 10 compelling blog posts to keep your site buzzing with activity. Website Personalisation with Branded Logos and Colour Schemes Make your mark with a unique identity. I'll infuse your website with branded logos and tailor the colour scheme to match your vision. Contact Forms and Maps Setup Stay connected with your audience. I will set up contact forms and integrate maps, enhancing user interaction. Speedy Turnaround Experience the magic within 7 to 10 business days*, and watch your website transform before your eyes. What's Included in My Classic Website Customization Service: Theme Installation on Web Hosting Get started swiftly by providing us with your hosting and FTP access details or let us assist you in selecting the best hosting solution. Hosting Setup to Match Your Theme I'll ensure your hosting perfectly complements your chosen theme, creating a seamless user experience. Default Plugin Activation and Setup Activate essential plugins to supercharge your website's functionality, ensuring a smooth operation. Demo Content Replacement Your content takes centre stage. I'll replace the demo content with your provided text and images, filling up to five web pages and ten blog posts. Theme Customization I'll add your logo and personalize the colour scheme to align with your brand's identity. Website Contact Details Setup Enhance user engagement with professionally designed contact forms and optional map integration. 3 Revisions Enjoy peace of mind with three minor revisions, valid for 30 days after project delivery. How My Classic Website Customization Service Works: Step 1: Collecting Information 🕒 from15 mins Upon confirming your order, I will reach out to gather the necessary details. I'll need access to your hosting account and the content for your pages and blog posts. I will be your guiding light throughout the process. Step 2: Completing Classic Website Customization 🕒 7 - 10 Business Days* Once I have all the required data, I'll install and customize your chosen template, keeping you in the loop at every stage. Step 3: Reviewing & Finishing Up 🕒 from 15 mins After customization, you can review and approve the results. Two free revisions are at your disposal if you wish to make changes. I'll provide you with login details to access the admin panel, allowing you to take control of your website. To Provide Classic Website Customization Service, I Need: - cPanel plus FTP and MySQL access to your hosting - Logo (preferably in .SVG) - Colour preferences - Content (images and texts) for pages and blog posts - Detailed content placement instructions 4 Top Reasons to Try Classic Website Customization Service: - If you're new to CMS platforms and hosting servers, fear not. I will handle the technicalities, delivering a fully operational website within days, not weeks. - The process is straightforward: provide hosting access, send us your content and instructions, and watch your website come to life in 7 - 10 business days.* - This Classic Website Customization Service encompasses theme installation, contact form activation, logo integration, content creation, and SEO optimization to boost your search engine ranking. - You'll have me by your side to ensure a smooth journey. If you don't have hosting, I can offer you hosting at a great price or if you prefer, I can assist you in selecting the right one. Please Note: - The service covers one website. - Advanced coding and layout modifications can be arranged for an additional fee. - Timely provision of requested information is essential to meet project deadlines. - Project kick-off or delivery time may vary slightly due to workload or unforeseen circumstances. - Three minor revisions are included, valid for 30 days after project delivery. Classic Website Customization FAQ: What does Classic Website Customization Service include? This service encompasses template installation, logo addition, colour scheme customization, contact form activation, and content creation for up to 5 pages and 10 blog posts. How long will it take to complete Classic Website Customization Service? Expect completion within 7 to 10 business days, contingent on timely content provision. Three free revisions are included. Can you deliver faster? Yes, for an additional fee, I can expedite your site's launch. Contact me to discuss your options. Can I order if I don't have all the content ready? Absolutely, you can provide content at your own pace, and I'll start when everything is ready. Need help with content? Ask me about my Content Writing Service. Will you install a template on my hosting? Yes, I can install it on existing hosting or help you select and register a compatible one if needed. Do I have to check my hosting compatibility? Yes, ensuring your hosting matches template requirements is crucial. I can guide you in making the right choice. What if I need more content pages? I offer additional customisation services for a fee. Contact me for details. Can you customise my online store? This service doesn't cover store configuration. Ask about the All-in-One Store Setup for eCommerce themes. When will you contact me? After payment, I will guide you on content submission, offering various options. What if I'm not satisfied with the final result? Three minor revisions are available for 30 days after project delivery to ensure your satisfaction. Can you help me migrate from another platform to WordPress? Certainly, I can migrate content and add functionality from other CMS platforms to WordPress. Reach out to discuss the details. * Timeline assumes that the client already has all the information and content available when the project kicks off. Delays in receiving any of the required information and content will inevitably delay the project beyond my control and for which I cannot be held responsible. Read the full article
0 notes
Text
The Biggest Problem With web design, And How You Can Fix It
The Best Guide To Custom Joomla Website Design By Openpotion
Table of ContentsJoomla Content Management System (Cms) - Try It For Free! - The FactsSome Of Best Joomla Page Builder - NicepageThe Facts About Joomla Web Design - Freelance Web Designer Manchester ... RevealedThe Definitive Guide to Joomla Web Design London - Timothy Graham FreelancerRumored Buzz on Joomla Web Design - Joomla Expert3 Simple Techniques For Joomla Geeks: Joomla Website Development, Joomla Web ...Best Cms Joomla Showcase And Joomla Web Design Gallery ... Fundamentals Explained

Joomla Web Design - Where To Start ...mygeneral.org
If you are thinking about using Joomla to produce your own internet visibility, you have concerned the ideal area. In the adhering to, you will find out all you need to know to get going. This step-by-step tutorial will certainly show you exactly how to install the software program on your web server and also give you an overview of the standard capability.
While Joomla being extra intricate than WordPress, it is even more beginner-friendly than Drupal (you can in fact find a comparison of the 3 below). So you if you comply with the tutorial, you need to obtain your website up and running within 3 hrs or less. Complete time to produce an internet site utilizing Drupal: Ability level: If you already have a domain name and also internet holding, miss to tip 2.
The 6-Minute Rule for Top Joomla Web Development Firms - September 2020 ...
If you do not also know where to start on this topic, read our article on just how to pick a domain. In case you simply need a refresher course, choose an internet site domain name that is basic, so it's easy to bear in mind. Besides a domain name, you'll additionally require a host service.
This aids us to keep everything up-to-date. Thanks for your assistance. You can obtain both domain name and also host from Bluehost (they likewise use a cost-free domain name for the first year). They have a quick mount for Joomla so you do not need to spend your time downloading, uploading, as well as installing it by hand through FTP.
Getting The Joomla Agency - Web Designers & Developers In Birmingham ... To Work
There are 2 ways to install and establish Joomla. 1. When you've joined and grabbed a domain at Bluehost, log into your account and also. 2. After that scroll to all-time low as well as. After that press "". 3. You'll notice that your Bluehost domain has actually been put in by default.
4. What we do need to change are the Website name as well as Website summary. Otherwise, it's going to reveal the default ones below. 5. After filling up those up, just click "". Doing so will motivate you to change your Admin name as well as password as well as fill in your Admin email. From there, just click "Install" at the base.
Everything about Joomla Website Design Services - Best Designers - Html Pro
When you do, you could be surprised to discover this message. Do not fret about it. It's just the default index.html page. Simply inspect package and also click "Mount" once again. Congratulations! You have actually simply mounted Joomla on your Bluehost domain name! If you are with an organizing company that does not have the above option, you will certainly need to go the hands-on course.
The very first step is to. This is where Joomla stores every one of your material and also it is an important part of any kind of website developed with the CMS. You ought to discover choices to create one in your host's control panel. To install Joomla, you require the adhering to information: Data source name Call of a customer connected with that database The password of that user Data source server address Once you have that, it's time to.
Rumored Buzz on Joomla Web Design - Penarth Web Design
Ensure to save the zip data to your hard disk drive and, when it's finished, remove all documents. After that, connect to your web server by Joomla means of FTP (e.g. through FileZilla) as well as post the extracted documents to where your domain name is pointing (generally the root directory site). As soon as that is ended up, it's time to go on to the next action.
If you have actually done whatever right, this must begin the Joomla installment procedure. On top, make certain to choose the right language for running your site. Below that, enter your website's name and, optionally, a summary. This is all things that will turn up in online search engine, so be conscious about it.
Not known Factual Statements About How To Build A Joomla Website, Step-by-step Tutorial ...

Web Design and Marketing Joomla Templatenicepage.com

CRETECHcretech.com
On the right, you will certainly be asked to go into the information for your Super Customer account. That is the main administrator, so be certain to enter a legitimate e-mail address, an individual name that isn't easy to presume, and also a safe password (two times). Lastly, near the bottom, you can pick to set your site's front end to offline setting after setup.
youtube
This can make good sense for development tasks as well as depends on you. When you are done, hit Next. Doing so obtains you to this display: Right here, you will require the database details from earlier. Fill every little thing in like so: In many cases, you can simply leave this as is. This is the organizing location of your database.
The 8-Minute Rule for Web Design Surrey - Surrey Web Designers - Joomla Websites
The database user name associated with your database. In this field goes the password for your MySQL data source. Right here, consist of the name of the database you intend to attach your Joomla internet site to. Unless you have good factor to transform this, you can possibly utilize the arbitrarily produced prefix provided by the installation.
0 notes
Text
New Post has been published on Strange Hoot - How To’s, Reviews, Comparisons, Top 10s, & Tech Guide
New Post has been published on https://strangehoot.com/how-to-install-xampp-server-in-windows-10-xampp-guide/
How to install XAMPP server in Windows 10 - XAMPP Guide

You might be having an idea about what is a server, even if you are a newbie in the technical field. In this article, we are going to learn “How to install XAMPP server in Windows 10” with the help of simple steps.
Before fleeing to the steps of installing the XAMPP server, let’s get the idea about what truly a XAMPP server is?
XAMPP is an all-in-one server package that supports PHP and Perl server-side programming. It also involves an email and FTP server as well as a self-signed certificate to use the apache web server in HTTPs model.
This package is available for various platforms such as Linux, Windows, Mac, and Solaris. Among all the packages the XAMPP packages most prevalently used. It was mainly developed by the Apache friends organization to hype the use of the Apache web server in the web development environment. However, in this article, we are installing it in Windows 10.
Now, let’s learn how to install XAMPP server in windows 10, step by step.
STEP 1: Open your browser and go to www.apachefriends.org.
It is an official website of Apache friends organization, where you can find various server packages specifically for various platforms and apps.

STEP 2: Go to download category
Now, search for “Download” category in the menu or you can also click on the link for which Operating System you want to download the XAMPP server, here we are downloading for Windows 10.
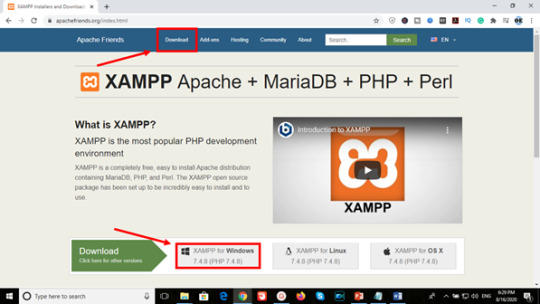
STEP 3: Download the file
In the “XAMPP for Windows” section, choose the PHP version you want to download and click on the download button.

Once you click on the download button, it immediately pops a tab signifying that the automatic download will start soon but if it doesn’t work you can on the “click here” link.

In our case, it started downloading in one tap as shown in the image below.

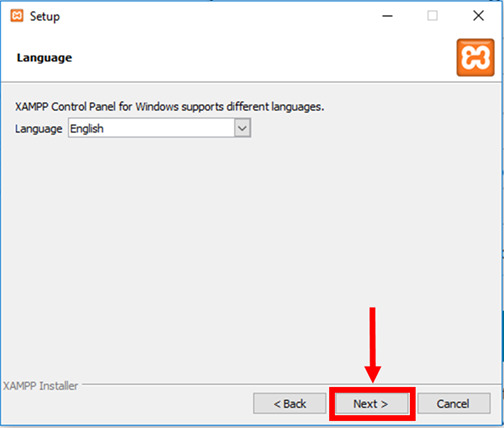
STEP 4: Run the installer
After the download finishes, run the downloaded file, this will start the XAMPP installation wizard. If you encounter any warning asking “Do you want this application to making changes to the system”, Ignore the warning and click Yes. Now, click on next in the XAMPP setup window.

STEP 5: Choose components
The “select components” windows enables you to select which components in XAMPP you want to be installed in your system. There is no compulsion of installing everything contained in XAMPP package, but feel free to install the entire package and explore on your own.

Click next to continue the installation process.
STEP 6: Select installation folder
In this step, you are required to select the folder where you want to install XAMPP. The default location for windows is drive “C” and inside “program files 84x” folder. However, if you have received any “warning” regarding UAC because of an activated UAC on your system, you would rather choose to install to a folder outside the “program files 84x” folder. The alternate method is to disable UAC (User Account Control) as an administrator through the control panel. It will open a User account settings form where you have to drag the slider to never notify.

Select the folder and click on next.
STEP 7: Select the language
In the final step, once you complete the installation process, you have to select the language among English and German. The user can select the language in which S/he is comfortable with and click on save.
STEP 8: Bitnami for XAMPP
In this window, it will show you Bitnami’s pre-packaged web applications specifically for use in XAMPP such as Joomla, WordPress, Drupal. Apache friends organization has collaborated with Bitnami for providing these pre-packaged solutions.

You can learn more about Bitnami by leaving “learn more about Bitnami for XAMPP checkbox checked, or if you want to skip this step remove the checkmark from the checkbox, and click the Next button to continue.
STEP 9: Ready to install
Now, this is the last step for starting the installation process. Click on next.

STEP 10: Welcome to XAMPP wizard
Here the progress bar will show the status of the installation wait until the installation is finished.
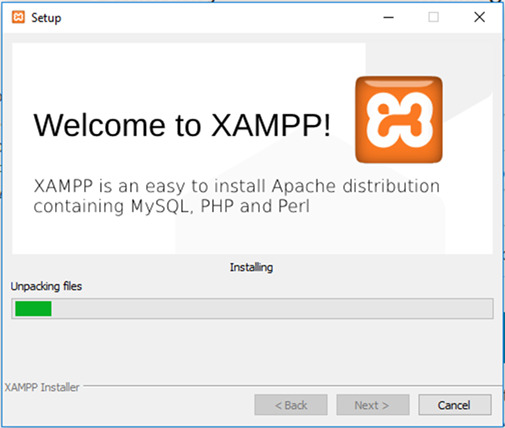
STEP 11: Installation complete
As soon as the installation process accomplishes, it pops up a window asking the user whether he or she wants to start the control panel at the current instance. Check the box “Do you want to start the Control Panel now?”, if you wish to start it and uncheck the box if you don’t want to start it at that moment and tap finish.

STEP 12: Running the XAMPP
If the user follows the whole process in a proper manner, the XAMPP will be successfully installed and the control panel will start with ease. Now, tap on the start button corresponding to Apache and MySQL.
So, this is how you can install and run XAMPP successfully on windows 10.
Read: How To Choose The Best WordPress Theme For Business.
0 notes
Text
Best Page Duplicator Plugins for WordPress
WordPress is incredibly easy to install, but if you want to move an already setup WordPress site to another server, it can be a bit of a headache. Without looking too hard, you can find heaps of amazing free WordPress plugins that add all sorts of helpful functionality to your WordPress site. Your duplicator will be an exact copy of your original page, so you can try another time if doing something wrong. Moving your WordPress site manually is one option but it can be quite time consuming and there are several steps that need to be completed to ensure a successful migration. If you make a mistake at any stage, you can easily end up with a site that looks messed up or is missing content. As an ode to the generous developers behind these plugins — and to help you to find some great free WordPress plugins for your site — we’ve collected what we consider to be the best free WordPress plugins of all time, based on both personal experience and the user reviews/their popularity at WordPress.org.
Duplicate Page

Duplicator is my personal favorite migration plugin as I find it straightforward to use and I rarely have any problems with it. You can find a full step-by-step guide on how to use it here. Whether you’re a casual user or someone who likes playing around with custom fields and post types, you should find some great free options on this list. Duplicate Page licenses you to duplicate your posts, pages similarly as your custom pots successfully just through a solitary tick. What’s more, this WordPress Duplicator Plugin attracts customer occupations to get approval to duplicate page and you can in like manner sort out to show the relationship of duplicate page in post types reasonably. However there is a little technical knowledge needed to set it up and get it working properly so if you prefer more of a visual step-by-step interface to walk you through the whole process, you might get along better with a different plugin.
Features
License User Roles To discover the chance to Duplicate Page
Change Duplicate Post Link Title
Join Post Prefix
Elective where to show clone interface
Select Duplicate Posts Status
Have after snap on clone interface
Join Post Suffix
Through and through More Filters and Features
All-In-One WP Migration

The All-in-One WP Migration plugin is designed specifically to enable easy exportation of your WordPress database, media files, plugins, and themes. There is also a find/replace database feature that makes it easy to repair broken files and links after you’ve moved your site. This module engages you to exchange your WordPress site, for instance, modules, subjects, databases with no coding data need. Furthermore, as a result of it, you can similarly move your reports at any place going with a rearranged. There is also the built-in capability to migrate WordPress to cloud services including Box, Dropbox, OneDrive, Google Drive, Amazon S3 and others. Another useful feature that makes this plugin stand out from other options is that it is fully optimized for mobile, making it easy to backup and migrate WordPress if you need to do so when you’re away from home or the office. The plugin is currently being used on over 300,000 sites and has a rating of 4.8 out of 5 stars in the WordPress repository.
Features
Mobile phone great
Charge your WordPress site
Move your site to a substitute region
Apply a limitless number of find and override exercises
fix any serialization issues
Simply Outstanding
Magnificent Plugin
Magnificent
Page and Post Clone

Now all you need is one click. you are right! If you have installed page and post clone plugin you are just one click away. Start using in a single click. this plugin can create a replica or clone of a post or page. Now you don’t need to do the styling of a new page or post from scratch.
Features
Create a page clone preserving all the content and title
Create a post clone preserving all the content and title
“Page and Post Clone” is open source software.
Widget Clone

93digital’s widget duplicator plugin adds a ‘Clone’ link at the bottom of every widget. Simply click ‘Clone’ to make a copy of the widget that you can then drag and drop to another sidebar. Navigate to Appearance – Widgets on the menu, open a widget and click the ‘Clone’ link to make a copy of the widget.
Duplicator – WordPress Migration Plugin

With over 15 million downloads Duplicator successfully gives WordPress users the ability to migrate, copy, move or clone a site from one location to another and also serves as a simple backup utility. Duplicator handles serialized and base64 serialized replacements. Standard WordPress migration and WordPress backups are easily handled by this plugin as are zero downtime migrations.
Features
scheduled Backups – backup now or schedule it. Recover from failure within minutes.
Move WordPress with Ease – bundle your site into the package. Copy package to a new host domain
Cloud Backups – Backup Dropbox, FTP, Google Drive, OneDrive, or Amazon S3 for safe storage
The post Best Page Duplicator Plugins for WordPress appeared first on The Coding Bus.
from WordPress https://ift.tt/2YwRCOc via IFTTT
0 notes