#How To Setup WiFi Extender Netgear
Explore tagged Tumblr posts
Visit Tumblr Blog
Explore Tumblr blogs with no restrictions, modern design and the best experience.
Last Seen Tumblr Blogs


Fun Fact
There are dozens of funny blogs to kill time on Tumblr.
Text
How To Setup WiFi Range Extender Netgear
Learn How to Setup WiFi Range Extender Netgear, plug it into a power outlet within the range of your existing WiFi network. Wait for the power LED to light up solid green. Connect to the extender's WiFi network on your device. Open a web browser and enter "www.mywifiext.net in the address bar. Follow the on-screen instructions to complete the setup process, including connecting the extender to your existing WiFi network.
#How To Setup WiFi Range Extender Netgear#How To Setup WiFi Extender Netgear#How To Setup Extender Netgear#Extender Netgear Setup
1 note
·
View note
Text
Step-by-Step Guide to Setting Up Your Netgear Extender!
For easy Netgear extender setup, open the web browser and type the mywifiext.net web address in the browser bar. Now, enter the login details and you reach the smart setup dashboard of the repeater. Here, visit the basic and advanced settings to configure the further settings accordingly. To know more information regarding the same, get in touch with us!

0 notes
Text
A Guide 2024 on How to Reset Netgear WiFi Extender

Method 1: Soft Reset via Web Interface

Connect to the Extender:
Ensure your device is connected to the Netgear WiFi extender network.
Open a web browser and enter the default web address “http://mywifiext.net" in the address bar.
Log In:
Enter your admin credentials (username and password) to access the extender’s web interface.
Navigate to Reset:
Locate and click on the “Settings” or “Maintenance” option.
Find the “Reset” or “Restore Factory Settings” option.
Confirm Reset:
Follow the on-screen instructions to confirm the reset.
Allow the extender to reboot, and it will be reset to its default settings.
Method 2: Hard Reset Using the Reset Button
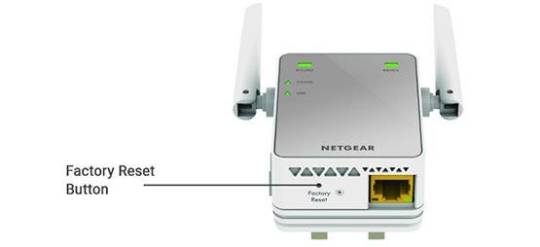
Locate the Reset Button:
On your Netgear WiFi extender, find the reset button. It is usually a small hole labeled “Reset.”
Use a Paperclip or Pin:
With the extender powered on, use a paperclip or pin to press and hold the reset button for about 10 seconds.
Release the Button:
Release the button when the LED lights on the extender start flashing.
The extender will reset to its factory settings.
Method 3: Factory Reset Using Netgear Genie App
Install Netgear Genie:
Download and install the Netgear Genie app on your smartphone or computer.
Launch the App:
Open the Netgear Genie app and log in with your extender’s credentials.
Navigate to Reset:
Find the “WiFi Settings” or “Wireless” option in the app.
Look for the “Reset” or “Restore Factory Settings” option.
Confirm Reset:
Follow the prompts to confirm the reset.
Allow the extender to reboot, completing the factory reset process.
Conclusion:
By following these three methods, you can easily reset Netgear WiFi extender and address various connectivity issues. Remember to reconfigure your extender with the appropriate settings after the reset to ensure optimal performance. Whether you prefer a soft reset through the web interface, a hard reset using the reset button, or a factory reset using the Netgear Genie app, these methods offer flexibility based on your preferences and the extender model you are using.
1 note
·
View note
Text
Seamless Connections Made Easy: MyWiFiLogon's Router and Extender Troubleshooting ? call for support +1-800-413-3531
Struggling with router and extender glitches? Look no further than MyWiFiLogon. We pride ourselves on being your go-to source for resolving connectivity challenges. Our seasoned professionals are well-versed in diagnosing and remedying a variety of network issues, ensuring that you experience seamless online interactions.call for support +1-800-413-3531

#netgearextendersetup#netgearlogin#rangeextender#wifi_extender#wifi extender#wifi connection#how to setup netgear ac1200#netgearlight
0 notes
Text

To understand How To Setup Netgear Extender, plug it into a power outlet and connect your device to the extender's temporary WiFi network. Open a web browser and go to mywifiext.net. Follow the on-screen wizard to connect it to your existing WiFi network. For teh full details, come to us!
0 notes
Text
RBR50 Orbi Router Setup With Home WiFi
Orbi RBR50 is a AC3000 tri band WiFi router which provides high speed performance. Throughout your home it gives reliable and fast WiFi coverage. RBR50 has the ability to add satellites to extend coverage. Do the Orbi RBR50 setup by two methods: By an Orbi app or via web interface.
Orbi RBR50 Router Core Function
Below are few essential functions, which you enjoy:-
Tri-Band Technology Function
Orbi utilizes tri-band technology, which includes the dedicated backhaul connection between Orbi router and its satellites.
Providing fast and stable WiFi speed even with a lot of WiFi devices connected.
Comes With Wired Connection
Get 4 gigabit ethernet port at Orbi RBR50 unit.
Easily connects an Orbi RBR50 unit with a modem for internet access.
Parental Control & Security
NETGEAR Armor function for advanced cybersecurity.
Guest WiFi network function helps to secure visitor access.
Do parental control by an Orbi application.
Easy To Configure
Orbi RBR50 unit is mainly designed for quick configuration, allowing users to make a secure WiFi network in minutes by using an Orbi application or through a web interface.
Essential Features
It covers an area up to 2000 square feet.
By adding Orbi satellites, you can expand its coverage.
It allows you to watch 4k videos, play online games, install large files without any buffer, etc.
Orbi applications give convenient access to your router’s features, including parental control, guest WiFi and network monitoring.
How To Use Orbi RBR50 Extender
Early, connect the RBR50 Orbi router with your modem which is provided by an internet service provider. After that, open the web browser or use an Orbi application to configure the Orbi network by setting up the WiFi network name and security password. Once the Orbi RBR50 setup is done, you enjoy fast and reliable WiFi coverage throughout your home.
How To Add Satellite To Orbi RBR50
First, locate Orbi satellite in the power source but closer to an Orbi router.
After that, launch the Orbi application or go to Orbi default web interface on a WiFi device.
Enter Orbi router network SSID and password.
Now, go to the add satellite mode option.
Then, consider all prompts. The Orbi application will guide you through the configuration process, which involves pushing a sync button on both router and satellite unit.
Further, open the Orbi application or WEB UI to verify the satellite appears as a ‘connected’ option.
Remove the Orbi satellite if signal strength is weak.
Hence Orbi RBR50 setup process with host modem or router is successfully done now. If you still face slow speed, RBR50 units don’t blink any light or any other issue, then try below troubleshoot tips.
Tips To Resolve Orbi RBR50 Issues
There are several kinds of issues you can face in the Orbi RBR50 unit. Let’s read solutions for every problem.
If Orbi Internet Or WiFi Is Not Working
Make sure that the modem unit must be attached with the Orbi RBR50 unit WAN port.
Contact your internet service provider for outages.
Go to Orbi default web page and look up whether the router shows an internet connection or not.
Orbi RBR50 Satellite Not Connecting
Re-Establish Orbi RBR50 Satellite
Follow below steps to re-establish RBR50 satellite
Move the RBR50 satellite closer to the router.
Push sync button on both satellite and router units.
Next, wait for the LED to turn into solid blue.
If the LED shows amber color then try to move the satellite more closer to the router.
If there is magenta LED then there is no connection between the satellite and router.
Download latest firmware
First on a WiFi device, open an Orbi application or go to the Orbi login page.
Make sure that your WiFi device must connect with the Orbi RBR50 default network.
Fill in the official username and password information.
After that, tap on network administration and then at software install.
At the end, install the latest firmware if anyone is there.
Facing Slow Internet Speed
Disable Few Interferences
Place your Orbi RBR50 router away from walls, microwaves, fridge, etc.
Use the 5GHz band for fast internet speed.
Change WiFi Channel
Go to the Orbi web interface page to change the WiFi channels.
Device Not Connects With WiFi
Power Cycle Device And Orbi RBR50 Router
From the device turn off WiFi, restart it and try to reconnect it.
Restart both Orbi router and satellite by pushing the power button.
Forget And Reconnect With Orbi WiFi Network
On your WiFi device such as computer or mobile, forget the Orbi WiFi network and reconnect with it by entering the correct WiFi password.
Orbi Web Page Not Loading
Use Wired Connection
Connect your WiFi device to the Orbi router by an ethernet cable.
Erase Browser Cache
Try to launch an Orbi login page with a different web browser or remove chrome/browser cache and cookies.
Reset Orbi To Factory Defaults
If nothing tip works to fix the issue of your device, then try to reset your Orbi router.
Look for the reset button at Orbi RBR50 router back.
Hold the reset button for 15 to 20 seconds until the power LED turns to amber.
At last, do the Orbi RBR50 setup again with the help of Orbi app or web interface.
By reading all this page information, you can install an Orbi RBR50 router with home WiFi. In future if you need any help then try to find the best tech expert for you.
0 notes
Text
0 notes
Text
0 notes
Text
Optimizing Your Network: A Guide to Netgear Extender Setup?
Inputting your Netgear WiFi extender into a power outlet that is adjacent to your current wireless internet connection is how you set it up. First, press the WPS button on your router, then on your extender. Await the LED lights turning on to show that the connection was successful. Visiting our website will be a terrific first step towards finding the answers to any additional questions you may have regarding the Netgear extender setup. If you need further help, you may connect with our specialists using the live chat option on our website.
1 note
·
View note
Text
How to Connect Setek Extender to Netgear Router?

Setek range extender is one of the famous networking devices that used worldwide. It is easy to connect range extender with router (any brand) via Ethernet cable or wirelessly (WPS button).
Here, you will go through a tour of Setek WiFi extender setup in your home. There are easy steps to complete the installation that are hardware linking with router and access the interface of the Setek device.
You will also get to know some troubleshooting tips that help you to make the extender performance and establish the connection securely. So, lets start this article with setup process first step.
0 notes
Text
How To Setup WiFi Range Extender Netgear, plug it in, connect to the default WiFi network, and launch a web browser. Visit mywifiext.net, connect to your existing WiFi network using the setup wizard, and then configure the extender's SSID and password. Once set up, insert the extender halfway between your router and the desired coverage area.
#How To Setup WiFi Range Extender Netgear#How To Setup#WiFi Range Extender Netgear#Netgear WiFi range extender
0 notes
Text
How to change mywifiext.net login password?
To secure your network, use the mywifiext.net login password change method. For this, open the web address, type mywifiext.net web address in the browser bar, and enter the admin credentials. You land on the smart Home dashboard of the router, visit the WiFi/Wireless Settings, edit the Passphrase Key/Password field, and follow instructions or visit us!
#mywifiext.net login password change#Netgear extender refused to connect#mywifiext.net not working#www.mywifiext.net#mywifiext.net login
0 notes
Text
How do I setup Netgear Ex6110?

The Netgear EX6110 setup is a fast procedure. First, connect it to a power source. Open a web browser and navigate to http://www.mywifiext.net/ after connecting your device to the extender’s WiFi network. To choose and establish a connection to your current WiFi network, adhere to the on-screen directions. After adjusting the extender’s parameters or leaving them as they are, click “Finish” to finish the configuration. Move the extender to a location with a strong WiFi signal for best coverage.
How to setup Netgear EX6110 setup manually?
When the Power LED on the Netgear EX6110 illuminates, it is ready to be used.
Make that your device is connected to the “NETGEAR_EXT” default WiFi network.
Type http://www.mywifiext.net/ or http://192.168.1.250/ into the address bar of an open web browser.
Select the WiFi network you already have and input its password by following the on-screen directions.
You may choose to use the default values or modify the extension settings.
In order to maximize WiFi coverage, move the extender and click “Finish” to finish the manual setup.
Read More:-
1 note
·
View note
Text
How to Set Up Your Netgear Extender
Step 1: Plug in Your Extender
The first step is to plug in your extender to an electrical outlet. The power LED should light up to indicate that the extender is on. If the power LED does not light up, check that the extender is plugged in correctly and that the outlet is working.
Step 2: Connect to the Extender's WiFi Network
Connect your computer or mobile device to the extender's WiFi network. The extender's default WiFi network name (SSID) is NETGEAR_EXT. The extender network either has no password or the default password is password.
Step 3: Launch a Web Browser and Enter mywifiext.net or 192.168.1.250
Open a web browser and enter mywifiext.net or 192.168.1.250 in the address bar. This will open the New Extender Setup page.
Step 4: Click or Tap NEW EXTENDER SETUP
Click or tap NEW EXTENDER SETUP to begin the setup process.
Step 5: If Prompted to Accept Terms and Conditions, Click or Tap YES or I AGREE
If you are prompted to accept the terms and conditions, click or tap YES or I AGREE to continue.
Step 6: Select Your WiFi Network
Select your home WiFi network from the list of available networks.
Step 7: Enter Your WiFi Password
Enter your home WiFi password in the Password field.
Step 8: Click or Tap NEXT
Click or tap NEXT to continue.
Step 9: Select an Extender Name
Enter a name for your extender. This name will be used to identify your extender on your network.
Step 10: Click or Tap FINISH
Click or tap FINISH to complete the setup process.
0 notes
Text
Uplift Your Home Network With Netgear EX6150 Setup
A single networking device is not enough to create a reliable network. If you are facing signal issues at your home or office then you can add netgear range extender to your network. Uplift your home network with netgear EX6150 range extender, a dual band device especially created to eliminate WiFi dead spots. Netgear ex6150 Setup helps you in forming a better network at home or office. Way to set up this range extender is super easy to follow by anyone. Even those who don't have technical knowledge can add this device into their existing network very conveniently.
Gather the detailed information from this article about the setup of netgear EX6150 range extender device. Further we mentioned step by step setup guides that help in uplifting your network without any technical help. So, what are you waiting for! Scroll down the page and read the article till the end.
Netgear EX6150 Setup Step By Step
Embark with the netgear EX6150 setup process using web UI or WPS button based methods. Both the methods are very efficient. WPS method allows you quick connection whereas Web based method allows you several customizations in the network. Check out the further specified step by step guide to add the extender in your home network and uplift your current network.
Placement & Power Up
Placement is the first step of the setup process. Adequate placement of the extender is mandatory for the smooth setup. You need to keep the extender closer to your host router device. Also you have to eliminate heavy metal objects or radio frequency devices placed around where you wish to keep the extender. Remember no to keep the extender in the corner as it interrupts signal transmission. As it is a wall plug based compact device, you don’t need additional space to place it. Once placement is decided plug-in the device into the wall outlet. Turn on the power and monitor the LED.
Configuration
Embark the setup process with any of the specified methods. Follow the guide as given:
WPS
WPS based netgear ex6150 setup is a simple method of configuring. In this method you just have to push the WPS button on the extender following which on the router. The whole setup process is 8-10 minutes out of which you need to hit the button within 2 minutes on both the extender and router. Once the connection is done successfully, the LED turns solid green.
Web
Web based netgear extender setup is not a difficult task but it's time consuming and allows you to make several changes. Check out the steps you have to follow:
Firstly take a computer/ laptop device.
Connect it with the extender’s network.
Open google chrome or other browser.
Search for www.mywifiext.net web address.
Choose a new extender setup and follow the screen.
Step next you have to connect the extender with the router using SSID & Password of the host router.
Create a password for a new network of extenders.
Check for firmware updates and make other changes.
End the setup by pressing the submit button.
Test Network
Testing the new network is very simple by using a smartphone or tablet device with WiFi enabled feature. Connect the device to the new network and then you have to surf the internet. You can watch online videos, play online games and more from different locations of your home. If needed then you have to relocate the extender strategically.
Troubleshoot Common Errors
Even with the best gadgets like netgear ex6150 extender you face trouble. If at your home you have a netgear ex6150 setup then you might experience slow network, sudden connection drop and other issues occasionally. Resolving all these errors is very simple if you know how to troubleshoot them. Here are few tips to resolve the common errors with netgear extender:
Firstly verify the host device network & then if there is an issue connect your ISP.
Thereafter check the hardware setup and if there is any damaged cable then replace it.
Relocate the extender strategically so it keeps in the range of the router and also expend signals across your space.
Further try rebooting the device to eliminate temporary issues.
Next you can try out firmware updates by accessing the extender’s login page.
Lastly you can try factory resetting the device by using the reset button. Erasing the configuration and set it up again will definitely help.
Conclusion
We conclude that the netgear ex6150 setup will uplift your existing network performance and create a network on which you can rely. There are two ways following which you can add the extender to your existing network. Netgear extender will eliminate dead zones by amplifying your router’s signals and rebroadcasting to the area where you were facing the issue. Hope the above information about the netgear range extender setup is useful for you.
0 notes