#How To Setup WiFi Range Extender Netgear
Explore tagged Tumblr posts
Visit Tumblr Blog
Explore Tumblr blogs with no restrictions, modern design and the best experience.
Last Seen Tumblr Blogs


Fun Fact
12.7% of mobile users access Tumblr.
Text
How To Setup WiFi Range Extender Netgear, plug it in, connect to the default WiFi network, and launch a web browser. Visit mywifiext.net, connect to your existing WiFi network using the setup wizard, and then configure the extender's SSID and password. Once set up, insert the extender halfway between your router and the desired coverage area.
#How To Setup WiFi Range Extender Netgear#How To Setup#WiFi Range Extender Netgear#Netgear WiFi range extender
0 notes
Text
Step-by-Step Guide to Setting Up Your Netgear Extender!
For easy Netgear extender setup, open the web browser and type the mywifiext.net web address in the browser bar. Now, enter the login details and you reach the smart setup dashboard of the repeater. Here, visit the basic and advanced settings to configure the further settings accordingly. To know more information regarding the same, get in touch with us!

0 notes
Text
Uplift Your Home Network With Netgear EX6150 Setup
A single networking device is not enough to create a reliable network. If you are facing signal issues at your home or office then you can add netgear range extender to your network. Uplift your home network with netgear EX6150 range extender, a dual band device especially created to eliminate WiFi dead spots. Netgear ex6150 Setup helps you in forming a better network at home or office. Way to set up this range extender is super easy to follow by anyone. Even those who don't have technical knowledge can add this device into their existing network very conveniently.
Gather the detailed information from this article about the setup of netgear EX6150 range extender device. Further we mentioned step by step setup guides that help in uplifting your network without any technical help. So, what are you waiting for! Scroll down the page and read the article till the end.
Netgear EX6150 Setup Step By Step
Embark with the netgear EX6150 setup process using web UI or WPS button based methods. Both the methods are very efficient. WPS method allows you quick connection whereas Web based method allows you several customizations in the network. Check out the further specified step by step guide to add the extender in your home network and uplift your current network.
Placement & Power Up
Placement is the first step of the setup process. Adequate placement of the extender is mandatory for the smooth setup. You need to keep the extender closer to your host router device. Also you have to eliminate heavy metal objects or radio frequency devices placed around where you wish to keep the extender. Remember no to keep the extender in the corner as it interrupts signal transmission. As it is a wall plug based compact device, you don’t need additional space to place it. Once placement is decided plug-in the device into the wall outlet. Turn on the power and monitor the LED.
Configuration
Embark the setup process with any of the specified methods. Follow the guide as given:
WPS
WPS based netgear ex6150 setup is a simple method of configuring. In this method you just have to push the WPS button on the extender following which on the router. The whole setup process is 8-10 minutes out of which you need to hit the button within 2 minutes on both the extender and router. Once the connection is done successfully, the LED turns solid green.
Web
Web based netgear extender setup is not a difficult task but it's time consuming and allows you to make several changes. Check out the steps you have to follow:
Firstly take a computer/ laptop device.
Connect it with the extender’s network.
Open google chrome or other browser.
Search for www.mywifiext.net web address.
Choose a new extender setup and follow the screen.
Step next you have to connect the extender with the router using SSID & Password of the host router.
Create a password for a new network of extenders.
Check for firmware updates and make other changes.
End the setup by pressing the submit button.
Test Network
Testing the new network is very simple by using a smartphone or tablet device with WiFi enabled feature. Connect the device to the new network and then you have to surf the internet. You can watch online videos, play online games and more from different locations of your home. If needed then you have to relocate the extender strategically.
Troubleshoot Common Errors
Even with the best gadgets like netgear ex6150 extender you face trouble. If at your home you have a netgear ex6150 setup then you might experience slow network, sudden connection drop and other issues occasionally. Resolving all these errors is very simple if you know how to troubleshoot them. Here are few tips to resolve the common errors with netgear extender:
Firstly verify the host device network & then if there is an issue connect your ISP.
Thereafter check the hardware setup and if there is any damaged cable then replace it.
Relocate the extender strategically so it keeps in the range of the router and also expend signals across your space.
Further try rebooting the device to eliminate temporary issues.
Next you can try out firmware updates by accessing the extender’s login page.
Lastly you can try factory resetting the device by using the reset button. Erasing the configuration and set it up again will definitely help.
Conclusion
We conclude that the netgear ex6150 setup will uplift your existing network performance and create a network on which you can rely. There are two ways following which you can add the extender to your existing network. Netgear extender will eliminate dead zones by amplifying your router’s signals and rebroadcasting to the area where you were facing the issue. Hope the above information about the netgear range extender setup is useful for you.
0 notes
Text
0 notes
Text
0 notes
Text
How to Connect Setek Extender to Netgear Router?

Setek range extender is one of the famous networking devices that used worldwide. It is easy to connect range extender with router (any brand) via Ethernet cable or wirelessly (WPS button).
Here, you will go through a tour of Setek WiFi extender setup in your home. There are easy steps to complete the installation that are hardware linking with router and access the interface of the Setek device.
You will also get to know some troubleshooting tips that help you to make the extender performance and establish the connection securely. So, lets start this article with setup process first step.
0 notes
Text
Netgear WiFi range extender setup
A Netgear WiFi range extender is a device that can help you extend the reach of your home's WiFi network. If you have areas in your home where your WiFi signal is weak or nonexistent, a range extender can be a great solution.
Here are the steps on how to set up your Netgear WiFi extender via mywifiext:
Connect your extender to a power outlet.
Connect your computer or mobile device to the extender's WiFi network.
The extender's WiFi network will have a name that is similar to your home's WiFi network name, but with an "_EXT" at the end. For example, if your home's WiFi network is called "NETGEAR," the extender's WiFi network might be called "NETGEAR_EXT."
Open a web browser and enter mywifiext.net in the address bar.
Enter the extender's default password in the password field.
The default password is usually printed on a sticker on the extender. If you have lost the sticker, you can reset the extender to factory defaults by holding down the reset button on the extender for 5 seconds.
0 notes
Text
WIFI
WiFi Repeaters: How WiFi Routers Improve Signal Strength 2023
WiFi is the answer to an escalating need for fast, reliable internet connections. The digital world has surrounded us with many gadgets that need continual communication. This is where wifi repeater help. These gadgets, often called WiFi extenders or boosters, amplify your WiFi signal and provide internet access to locations where your router cannot.
The concept of WiFi repeaters isn’t new, but its demand and application have grown exponentially in recent years. As we continue to add more wireless devices to our arsenal, the need for a strong, uninterrupted internet signal becomes more important. Therefore, understanding the role of WiFi repeaters holds the key to unlocking an efficient and effective wireless network.
Understanding how routers work as wifi repeater
The primary function of a router is to distribute the internet signal from your modem to your devices. However, routers can also double as WiFi repeaters or relayers. Your wireless signal can be strengthened by repeating it with routers.
A router repeater wirelessly connects to your network and rebroadcasts the signal. It amplifies your WiFi signal as a relay or bridge. This is especially helpful in larger homes or offices where the router’s signal may not reach every corner.

Benefits of using routers as WiFi relayers
There are a multitude of benefits to using routers as WiFi relays. Firstly, it provides better WiFi coverage. By extending the range of your WiFi signal, you can enjoy a strong internet connection even in the farthest corners of your home or office.
Second, routers may be cost-effective repeaters. Instead of buying a new router, use an old one as a repeater. Reusing and recycling equipment saves money.
Improved signal strength may boost internet speeds. While the repeater may be slower than the router, it will be far quicker than no connectivity.
A look at the best WiFi range extenders of 2015
In 2015, remarkable WiFi range extenders were released. The performance, functionality, and price of these gadgets were praised. The best WiFi range extenders of 2015 are below.
Due to its range and speed, the Opticover Wireless Range Extender was popular. It was easy to set up and compatible with most routers. The MSRM US754 WiFi Extender was another top-rated choice, known for its stable connection and user-friendly setup process.

How to set up your WiFi repeater
The procedure for setting up your WiFi repeater couldn’t be easier. Finding an appropriate spot for the repeater is the first step. Ideally, it would be midway between your router and the area you wish to cover.
The repeater must be connected to the system next. A web browser can usually access the repeater’s user interface and do these activities. In this area, provide the network’s SSID, encryption type, and password.
Differentiating between a WiFi booster, extender, and repeater
While the terms WiFi booster, extender, and repeater are often used interchangeably, there are slight differences between them. There are three devices available, each with its own method for extending the range and improving the strength of your WiFi signal.
An existing WiFi router may have its signal strength increased by using a WiFi booster. However, a WiFi extender is able to rebroadcast the WiFi signal from your router. WiFi repeaters are similar to extenders in that they both boost the signal and establish a new network. You’ll need to switch networks as you go, although the signal will be stronger at greater distances.
The Best WiFi Extenders of 2015: A Comparison
Comparing the best WiFi extenders of 2015, it’s clear that each device had its own unique strengths. The Opticover Wireless Range Extender offered excellent range and speed, while the MSRM US754 WiFi Extender was praised for its stable connection and easy setup.
The Netgear Nighthawk EX7000 Wi-Fi Range Extender stood out with its impressive speed and advanced features, although it was also the most expensive option. Ultimately, the best WiFi extender for you depends on your specific needs and budget.
WiFi Repeaters: How WiFi Routers Improve Signal Strength 2023
0 notes
Text
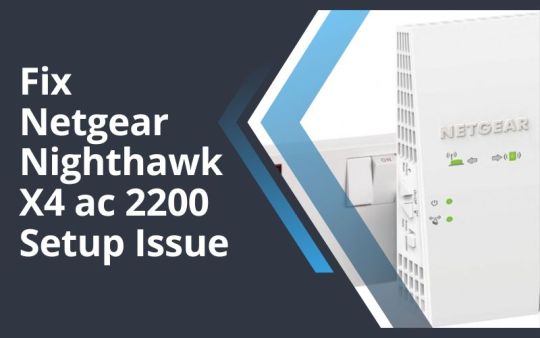
Ultimate Guide For Netgear Nighthawk X4 ac 2200 Setup Issue
Netgear Nighthawk X4 ac 2200 Setup is quite an easy and straightforward task. In this, you will get a step-by-step guide to do the same. If you are unable to find how to Netgear Nighthawk X4 ac 2200 Setup. Then you are at the right place, here you will learn how to do so. Netgear Nighthawk X4 ac 2200 is a WiFi range extender, that expands your existing WiFi range with speeds up to 2200 Mbps.
It also provides the most steady WiFi and the most instantaneous internet connection. But many users don’t know how to Netgear Nighthawk X4 ac 2200 Setup. And some of them find doing this difficult, especially, those who are non-technical. If you are one of them, then do not get upset. Below is the guide for Netgear Nighthawk X4 ac 2200 Setup. Simply go through the following instructions.
Step-by-Step Guide for Netgear Nighthawk X4 ac 2200 Setup
Netgear Nighthawk X4 ac 2200 Setup is not a complicated task as you think, it is more straightforward than you think. In this, you will get to know how to do this. With this, extender device, you can develop a better vigorous WiFi network at home. This is the most simple and effective way to extend the WiFi range of the router.
There are three methods through which you can easily Netgear Nighthawk X4 ac 2200 Setup. The first is through Netgear Installation Assistance, the second is through the WPS button, and the third is through Fastlane Technology.
Steps for Netgear the Nighthawk X4 ac 2200 Setup Via Installation Assistance
Doing this through the Netgear Installation Through is not a complicated task, it is simpler than you think. Follow the below instruction to do the same via the installation assistance.
Turn on your Nighthawk X4 ac 2200 by connecting it to the power outlet.
After this, place your wireless router near the extender.
Now you need to plug your Netgear extender into a power outlet.
Then wait for some seconds, until the extender LED light turns green.
Now you have to attach the extender to the router and launch the web browser in your system.
And then enter www.mywifiext.net in the search field, and you will see Netgear installation assistant on the screen.
After this, you have to follow the on-screen instructions and attach the Netgear extender to the existing network.
Now place your extender in the most suitable location.
If still, the connection is poor, then move the extender closer to your router, and try again. Do this, until you see the link status LED light turn white.
Once you have located the most acceptable location, then connect the other device to the extender.
Techniques for the Netgear Nighthawk X4 ac 2200 Setup through the WPS button
If you don’t want to Netgear Nighthawk X4 ac 2200 Setup through the Netgear Installation Assistance. Then here is another method to do the same, that is through the WPS button. To do this, you just need to read and follow all steps.
Turn on the WiFi extender, and place your extender close to the router in the same place.
Then plug in your Netgear WiFi extender into the power source, and wait until the power LED light on the extender turns green.
Now press the WPS on the extender, located on the rear or back side of it.
The white LED light on the Netgear Nighthawk X4 ac 2200 indicates a good connection between the router and the extender.
Now you can move your Netgear extender to a new location.
Try to place it in the location, where you have poor or weak WiFi coverage.
Ways for the Netgear Nighthawk X4 ac 2200 Setup Via FastLane Technology
Setup through FastLane Technology, allows you to enjoy maximum WiFi performance. Here are the steps to do the setup via the FastLane technology.
Firstly, connect your router to the Netgear Nighthawk X4 ac 2200.
After this, use any internet browser, and make sure that you use the latest version of your preferred browser.
After this, in the search field of the web browser, enter mywifiext.net.
Then the login page of the extender will appear, in this fill in your username and password and click on the login button.
Now when the Netgear Genie page appears, click on “Do More” and then on “FastLane.”
Then there are two options for users. The first option is, the device is connected to the extender at 2.4GHz.
And the second is, it is connected to the extender at 5 GHz, and the extender is connected to the router at 2.4 GHz.
You can choose according to your preference. And then click on the button to save the changes you made.
Binding Up
It is quite frustrating when you are unable to set up your Netgear Nighthawk X4 ac 2200. Follow the above instructions for the Netgear Nighthawk X4 ac 2200 Setup. And hopefully, this above guide will help you with the same. You just need to follow the above easy and detailed instructions as given to do the same.
Doing setups of the Netgear Nighthawk X4 ac 2200 extender is not a complicated task, it is simpler than you think. If you don’t know how to do this, then simply obey the above instructions. So, before seeking assistance from someone else, try to go through the techniques, that are given above for Netgear Nighthawk X4 ac 2200 Setup.
1 note
·
View note
Text
Netgear Access Point Setup : Find the Way

Are you unable to find How To Set Up a Netgear Wireless Router as an Access Point? Then don’t worry, you are at the right place. Here you will get to know how to do the same.Netgear WiFi extender is a wireless repeater, which is placed between the base router and the location where you want better wireless coverage.
It also expands the WiFi network, by connecting to your existing network and improving coverage. And it repeats the wireless signal from your router to expand its coverage. Netgear WiFi extender is also known as a WiFi booster. Performing Netgear Access Point Setup is not a challenging task, it is simpler than you think. If you are unable to do this on your own, then here are some simple steps to do the same. Simply go through the following guide for Netgear Access Point Setup.
Methods for How To Set Up a Netgear Wireless Router as an Access Point
If you ask yourself, what to do with unused wireless network devices, then you may need to learn How To Set Up a Netgear Wireless Router as an Access Point. Using an old router as an access point helps to extend the range of the network and eliminate those dead spots. If you don’t know How To Set Up a Netgear Wireless Router as an Access Point.
Then the following instructions will help you to do the same. Simply go through the below steps for the Netgear Access Point Setup.
Firstly, you need to cover the WAN or internet port of the secondary router with tape to prevent you from accidentally using it later.
After this, launch a web browser on the device, which is connected to the network of your router.
And then enter www.routerlogin.net on the address field of the web browser.
Now Netgear WiFi extender login page will appear, login with your default credentials i.e., username and password.
The default name of the WiFi extender is “Admin” and fill in the login information carefully because the username and password are case-sensitive.
After this basic home page or dashboard will appear on the screen.
From the homepage, click on “Advanced,” and then on “Advanced Setup.”
After this, choose “Wireless Access Point.” Some models might use slightly different menu labels, like Router / AP / Bridge Mode.
Then from the Nighthawk Pro Gaming routers, click on the “Settings” option.
And then click on “Setup,” and then choose “Wireless Access Point.”
Now select “Access Point” mode, and choose the IP Address settings on this access point.
Also, make sure that you get it from the existing router by default. Only enable fixed IP settings on this device setting if you have advanced network experience.
And if you want to do it manually, then assign a specific IP address to the router while it is in AP mode.
After doing this, click on “Apply” and lose the Internet connection between your router and your computer. Now our Netgear router is in AP mode.
Sum up
Certainly, the above instructions will help you with How To Set Up a Netgear Wireless Router as an Access Point. So, before seeking help from some, go through the above easy, and simple methods to do the same. And it is also required to follow the above steps as given.
Netgear Access Point Setup does not require too many steps, you just need to go through some simple and easy steps to do the same. From now on, you can use your Netgear as an access point.If the above steps are unable to help you with Netgear Access Point Setup. Then you may need expert assistance. Try to get in touch with Netgear experts. They will provide you with full assistance, and also help you with Netgear Access Point Setup.
0 notes
Text
How To Setup WiFi Range Extender Netgear
Learn How to Setup WiFi Range Extender Netgear, plug it into a power outlet within the range of your existing WiFi network. Wait for the power LED to light up solid green. Connect to the extender's WiFi network on your device. Open a web browser and enter "www.mywifiext.net in the address bar. Follow the on-screen instructions to complete the setup process, including connecting the extender to your existing WiFi network.
#How To Setup WiFi Range Extender Netgear#How To Setup WiFi Extender Netgear#How To Setup Extender Netgear#Extender Netgear Setup
1 note
·
View note
Text
How to change mywifiext.net login password?
To secure your network, use the mywifiext.net login password change method. For this, open the web address, type mywifiext.net web address in the browser bar, and enter the admin credentials. You land on the smart Home dashboard of the router, visit the WiFi/Wireless Settings, edit the Passphrase Key/Password field, and follow instructions or visit us!
#mywifiext.net login password change#Netgear extender refused to connect#mywifiext.net not working#www.mywifiext.net#mywifiext.net login
0 notes
Link
#WiFi Extender Setup#Net Wifi Solutions#wireless range extender setup#mywifiext.net not working#mywifi netgear#netgear live chat#my wifi ext new extender setup#setup netgear wireless extender#mywifiext default password#how to setup netgear ext#mywifiext wifi settings#Wireless range extender USA#wirelss range extender outdoor#wireless range extender for home
1 note
·
View note
Link
Here, you will get to know that how to Login Netgear Wifi Extender & setup NetGear Wifi Extender.
1 note
·
View note
Link
A WiFi range extender would be useless if these problems occurred. Your router’s signal strength will not be increased if the D-Link extender not working. Also, in such a scenario, you would not have access to high-speed internet in all areas of your home or office.
#D'LINK WIFI EXTENDER SETUP APP#D'LINK EXTENDER LOGIN#D'LINK RANGE EXTENDER SETUP#D-LINK EXTENDER NOT WORKING#DLINK EXTENDER SETUP#EXTENDER NOT WORKING#HOW TO CONNECT D'LINK EXTENDER#IP ADDRESS#IP ADDRESS 192.168.0.1#MY D'LINK EXTENDER IS NOT WORKING#MY WIFI EXTENDER NOT WORKING#NETGEAR EXTENDER NOT CONNECTING TO INTERNET#WHY IS MY D'LINK EXTENDER NOT WORKING#WHY IS MY EXTENDER NOT WORKING#WHY IS MY WIFI EXTENDER NOT CONNECTING#WHY IS MY WIFI EXTENDER NOT WORKING#WIFI EXTENDER D'LINK#WIFI EXTENDER NOT SHOWING UP
0 notes
Link
Netgear Wifi Extender Login
#Netgear Wifi Extender Login#Netgear Range Extender Setup#netgear login extender#login to netgear extender#how to setup netgear wifi extender
1 note
·
View note