#How to Change Language of a Browser in Mac or Windows
Explore tagged Tumblr posts
Visit Tumblr Blog
Explore Tumblr blogs with no restrictions, modern design and the best experience.
Last Seen Tumblr Blogs


Fun Fact
In 2020, 27% of US Tumblr users had an annual household income of over $100,000.
Text
Dev Log Feb 7 2025 - The Stack
Ahoy. This is JFrame of 16Naughts in the first of what I hope will turn out to be a weekly series of developer logs surrounding some of our activities here in the office. Not quite so focused on individual games most of the time, but more on some of the more interesting parts of development as a whole. Or really, just an excuse for me to geek out a little into the void. With introductions out of the way, the first public version of our game Crescent Roll (https://store.steampowered.com/app/3325680/Crescent_Roll juuuust as a quick plug) is due out here at the end of the month, and has a very interesting/unorthodox tech stack that might be of interest to certain devs wanting to cut down on their application install size. The game itself is actually written in Javascript - you know, the scripting language used by your web browser for the interactive stuff everywhere, including here. If you've been on Newgrounds or any other site, they might call games that use it "HTML5" games like they used to call "Flash" games (RIP in peace). Unfortunately, Javascript still has a bit of a sour reputation in most developer circles, and "web game" doesn't really instill much confidence in the gamer either. However, it's turning more and more into the de-facto standard for like, everything. And I do mean everything. 99% of applications on your phone are just websites wrapped in the system view (including, if you're currently using it, the Tumblr app), and it's bleeding more and more into the desktop and other device spaces. Both Android and iOS have calls available to utilize their native web browsers in applications. Windows and Mac support the same thing with WebView2 and WebKit respectively. Heck, even Xbox and Nintendo have a web framework available too (even goes back as far as Flash support for the Wii). So, if you're not using an existing game engine like we aren't and you want to go multi-platform, your choices are either A) Do it in something C/C++ -ish, or now B) Write it in JS. So great - JS runs everywhere. Except, it's not exactly a first-class citizen in any of these scenarios. Every platform has a different SDK for a different low-level language, and none of them have a one-click "bundle this website into an exe" option. So there is some additional work that needs to be done to get it into that nice little executable package.
Enter C#. Everyone calls it Microsoft Java, but their support for it has been absolutely spectacular that it has surpassed Java in pretty much every single possible way. And that includes the number and types of machines that it runs on. The DotNet Core initiative has Mac, Windows, and Linux covered (plus Xbox), Xamarin has Android, and the new stuff for Maui brought iOS into the fold. Write once, run everywhere. Very nice. Except those itty bitty little application lifetime quirks completely change how you do the initialization on each platform, and the system calls are different for getting the different web views set up, and Microsoft is pushing Maui so hard that actually finding the calls and libraries to do the stuff instead of using their own (very strange) UI toolkit is a jungle, but I mean, I only had to write our stream decompression stuff once and everything works with the same compilation options. So yeah - good enough. And fortunately, only getting better. Just recently, they added Web Views directly into Maui itself so we can now skip a lot of the bootstrapping we had to do (I'm not re-writing it until we have to, but you know- it's there for everyone else). So, there you have it. Crescent Roll is a Javascript HTML5 Web Game that uses the platform native Web View through C#. It's a super tiny 50-100MB (depending on the platform) from not having to bundle the JS engine with it, compiles in seconds, and is fast and lean when running and only getting faster and leaner as it benefits from any performance improvements made anywhere in any of those pipeline. And that's it for today's log. Once this thing is actually, you know, released, I can hopefully start doing some more recent forward-looking progress things rather than a kind of vague abstract retrospective ramblings. Maybe some shader stuff next week, who knows.
Lemme know if you have any questions on anything. I know it's kind of dry, but I can grab some links for stuff to get started with, or point to some additional reading if you want it.
3 notes
·
View notes
Text
how to change apple id password

how to change apple id password "How To change your Apple ID password, follow these straightforward steps using everyday language:
On an iPhone or iPad:
- Start by opening the "Settings" app on your device. - Scroll down and tap on "Apple ID" at the top of the screen, where you see your name and picture. - Next, select "Password & Security." - Depending on your device, you might need to confirm your identity using Face ID, Touch ID, or your current password. - Now, tap on "Change Password." - You'll be asked to enter your current password. - After that, type your new password twice to ensure it's correct. - Finally, tap "Change" or "Change Password" to save your updated password.
On a Mac:
- Click on the Apple menu (the Apple logo) located in the top-left corner of your screen. - Choose "System Preferences." - Select "Apple ID" from the options. - On the left sidebar, find and click on "Password & Security." - You might need to verify your identity using your existing password or Touch ID. - Click on "Change Password." - Enter your current password as requested. - Then, input your new password twice for confirmation. - Finish the process by clicking "Change" to update your Apple ID password.
On a Windows PC:
- If you have iTunes installed, open it. Alternatively, you can change your password through a web browser. - When using iTunes, click on "Account" at the top of your screen, and then select "View My Account." - Sign in using your Apple ID and current password. - Within the "Apple ID Summary" section, locate the "Security" category, and click "Change Password." - Provide your current password, and then set and confirm your new password. - Click "Change Password" to save your new Apple ID password. On a web browser (if you don't have iTunes): - Visit the Apple ID account page by going to this link: https://appleid.apple.com/ - Sign in using your Apple ID and current password. - In the "Security" section, find and click on "Change Password." - Enter your current password and then set and confirm your new password. - Complete the process by clicking "Change Password" to save your new Apple ID password. Don't forget the importance of creating a strong, unique password and keeping it secure. Once you've changed your password, you'll need to use it for future logins and app purchases on your Apple devices." Read the full article
1 note
·
View note
Text
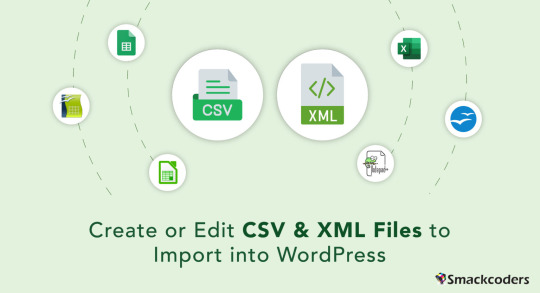
How to Create or Edit CSV and XML Files to Import into WordPress
CSV (Comma Separated Values) and XML (Extensible Markup Language) are two commonly used file formats for data storage and exchange. CSV files store data in a tabular format where values are separated by commas. XML files, on the other hand, use a hierarchical structure to organize data with tags and elements. In this article, we will explore how to create and also edit CSV and XML files for importing into WordPress.
CSV and XML File Characters
CSV files primarily use characters like commas, double quotes, and line breaks to separate and format data. The comma acts as a delimiter between each value, while double quotes enclose values containing special characters or spaces. Line breaks indicate the end of a record or row. XML files use tags enclosed in angle brackets (<>) to define elements and their content. These tags provide structure and hierarchy to the data.
How do CSV files help in Your Business?
More or less all commercial platforms are using CSV files to import and export their ecommerce data to and from the database. CSV files are generally faster and consume less memory space when compared to the Spreadsheet. CSV files are handled by various businesses to save posts, products, and other requisite data.
Benefits of CSV Import
It is effortless to Install and child’s play to resolve any changes. Faster to handle the data. It runs in no time to import and export the file.
How to Open a CSV File
To open a CSV file, you can use various text editors or spreadsheet applications. Here are a few popular options:
Using Notepad
Launch Notepad, a basic text editor that comes pre-installed on most Windows computers.
Go to the File menu and select Open. Navigate to the location of your CSV file, select it, and click Open. The CSV file will open in Notepad, displaying the data in plain text format.
Using Notepad++
Download and install Notepad++, a free source code editor and launch Notepad++.
Go to the File menu and choose Open. Find your CSV file, choose it, and press the Open button. Notepad++ will display the CSV file with syntax highlighting and better readability.
Using MS Excel
Open Microsoft Excel, a widely-used spreadsheet application. Click on the File tab >> Open.
Browse to the location of your CSV file, select it, and click Open. Excel will automatically detect the CSV format and present the data in a spreadsheet view.
Using Google Sheets
Open a web browser and navigate to Google Sheets. Sign in with your account or create one.
Click on the File menu and select Import. Choose Upload and select your CSV file from your computer. Google Sheets will import the CSV file and display it in a spreadsheet format.
Using LibreOffice
Launch LibreOffice, a powerful open-source office suite. Click on the Calc option to open the spreadsheet application.
Go to the File >> Open. Navigate to the location of your CSV file, select it, and click Open. LibreOffice Calc will automatically detect the CSV format and present the data in a spreadsheet view.
Using OpenOffice Calc
Start OpenOffice, another popular open-source office suite. Select Calc from the available applications to open the spreadsheet component.
Click on the File menu >> choose Open. Find your file location and open it.
How to Prepare a CSV file using Notepad++?
Open Notepad++ for Windows and text editor for Mac. On the new file, start to create field names separated by comma values. Add field headers in the first row. Beneath the headers, add the field values.
Save the file with .csv extension by visiting File > Save as > Name.csv
Likewise, you can create your preferred CSV file with various text editors and save it in the .csv extension.
Using Notepad
Launch Notepad, a basic text editor available on most Windows computers.
Start by opening a new blank document. Type or copy and paste your data, ensuring each value is separated by a comma. To indicate a new row, press the Enter key after entering each set of values. Save the file with a .csv extension, ensuring the “Save as type” field is set to “All Files” in the save dialog box.
Using MS Excel
Open Microsoft Excel and enter your data into the cells, with each value in its respective column.
Save the file as a CSV by visiting the File menu, selecting Save As, and choosing CSV (Comma delimited) as the file format.
Using Google Sheets
Open a web browser and navigate to Google Sheets. Create a new sheet by clicking on the “+” icon or open an existing one. Enter your data into the cells, following the desired table structure.
To save the sheet as a CSV file, go to the “File” menu, select “Download,” and choose Comma-separated values (.csv, current sheet).
Using LibreOffice
Launch LibreOffice, a free and open-source office suite. Open Calc, the spreadsheet program in LibreOffice. Enter your data into the cells, organizing it into columns and rows.
Move to File >> Save As. Select CSV from “Save as type” and click Save.
Using OpenOffice Calc
Open OpenOffice Calc and enter your data into the cells, ensuring proper column and row alignment.
Select the File menu and choose Save As. Specify the CSV format in the Save as type field and click Save.
Downloading and Opening a Sample CSV File for Importing
To practice importing CSV files into WordPress, you can download sample CSV files from our website. Get access to the collection of sample CSV files. Download the desired file and save it to your computer. Then, follow the previous steps to open the downloaded CSV file in your preferred editor. You can also get sample XMLs by visiting the above link.
How to Edit a CSV File
Editing a .csv (Comma-Separated Values) file is a straightforward process that can be done using a variety of software applications. Here’s a step-by-step guide on how to edit a .csv file.
Open the .csv File
Launch a spreadsheet software application like Microsoft Excel, Google Sheets, or a text editor capable of handling .csv files. Navigate to the file location and open the .csv file in the chosen application.
Review the Data
Take a moment to review the data within the .csv file. Familiarize yourself with the columns, rows, and the overall structure of the data. This step will help you understand the information you’re working with and plan your edits accordingly.
Make Changes to the Data
To edit a cell
Locate the cell you want to modify and click on it. Then, simply type the desired changes directly into the cell.
To insert a new row or column
Right-click on an existing row or column, and choose the “Insert” option. This will add a new row or column where you can enter your data.
To delete a row or column
Select the row or column you want to remove, right-click, and choose the “Delete” option. Confirm the deletion if prompted.
Format the Data
If needed, you can apply formatting options to enhance the appearance of the data. This may include changing font styles, adjusting column widths, setting date or number formats, or applying conditional formatting to highlight specific data points.
Save the Edited File
Once you have made the necessary changes, save the edited .csv file. Use the “Save” or “Save As” option in your software application to overwrite the existing file or create a new file with the modifications. Choose the .csv file format when saving to ensure the data remains in the proper format.
Validate the Edited Data
After saving the edited .csv file, it’s a good practice to validate the changes you made. Check the data to ensure that the edits are accurately reflected and that the file still maintains its integrity.
Test Import/Export Operations
If you plan to import or export the .csv file into another system or application, perform a test operation to verify that the edited file functions as intended. This step helps ensure that the data is correctly processed in the target system.
Remember to back up your original .csv file before making any edits to avoid permanent data loss. Additionally, consider documenting your changes or keeping a record of the editing process for future reference.
By following these steps, you can confidently edit a .csv file, modify the data within it, and save the changes for further use or analysis.
How to fix all my CSV data appears in the first column
If you are experiencing the issue of all your CSV data appearing in the first column when opening the file in spreadsheet software, here are some steps to help you fix this problem:
Open the CSV File
Open any preferred spreadsheet software. Navigate to the location where your CSV file is stored and open it within the application.
Check the File Format
Make sure the CSV format is right and also the extension is saved as ‘.csv’ and not in another file extension.
Use the Text Import Wizard
Most spreadsheet software offers a Text Import Wizard or a similar feature to handle CSV files with specific settings. Look for an option like “Import” or “Text to Columns” within the software.
Specify the Delimiter
In the Text Import Wizard, you will be prompted to specify the delimiter used in the CSV file. Common delimiters include commas (“,”), semicolons (“;”), tabs (“\t”), or spaces. Select the appropriate delimiter that separates the fields in your CSV file.
Choose the Correct Data Format
If your CSV file contains numerical data or dates, you may need to specify the appropriate format for each column. For example, you can select “General” for text, “Number” for numerical values, or “Date” for date fields.
Adjust Column Widths
After importing the CSV file, check if the column widths need adjustment. Sometimes, when all the data appears in the first column, it might be due to narrow column widths that are not automatically adjusted by the software. Double-click on the column separators or use the “AutoFit Column Width” option to ensure the data is properly displayed.
Review the Data
Take a moment to review the CSV file’s content and verify that the data is now correctly distributed across multiple columns. Ensure that each field is in its appropriate column and that the rows and columns align as expected.
Save the Corrected CSV File
If the data is now displayed correctly in the spreadsheet software, save the file with the corrected formatting. Use the “Save” or “Save As” option to overwrite the original file or create a new file with the corrected data.
By following these steps, you should be able to resolve the issue of CSV data appearing in the first column. The Text Import Wizard helps you specify the delimiter and format settings, ensuring that the data is properly separated and distributed across the respective columns within the spreadsheet software.
How do XML files help in Business?
XML lets you extend data when it is needed. What’s more beneficial about XML files for your business, it supports Multilingual.
Benefits of XML File Import
It is faster than any other file format and can store a lot of customized data. XML data can be sent via the Internet. So that it can get access from anywhere.
How to Open an XML File
To open an XML file, you can use various text editors that support XML syntax highlighting and editing. Here’s how to open an XML file:
Using Notepad++
Launch Notepad++ if you have it installed on your computer. Go to the “File” menu and select “Open.”
Navigate to the location of your XML file, select it, and click “Open.” Notepad++ will display the XML file, providing syntax highlighting and improved readability.
Using Code Browser
Launch Code Browser, a versatile code editor with XML support. Navigate to the “File” menu and select “Open” or use the shortcut Ctrl+O. Find and visit the XML file and open it.
Code Browser will display the XML file, providing syntax highlighting and an organized view of the XML structure.
Using Atom
Open Atom and click on the “File” menu. Select “Open” or press Ctrl+O.
Browse your XML file and open it. Atom will load the XML file, providing syntax highlighting and a user-friendly environment for viewing and editing XML content.
Using Edit Plus
Launch Edit Plus, a powerful text editor with XML support and a range of features for efficient editing. Visit the File menu and open the desired file.
Edit Plus will open the XML file, displaying the content with syntax highlighting and customizable editing options.
Using other editors
If you prefer to use a different text editor, ensure that it supports XML file editing. Examples of popular XML editors include Sublime Text, Visual Studio Code, and Atom.
Open your preferred editor and use the file navigation options to locate and open the XML file.
How to Prepare an XML File
To prepare an XML file for importing into WordPress, you can follow these steps:
Using Notepad++
Launch Notepad++ if it’s installed on your computer. Go to the “File” menu and select “New” to create a new blank document. In the new document, start defining the structure of your XML file by adding opening and closing tags.
Add elements, attributes, and content within the tags to represent your data. Continue adding tags and nesting them as needed to organize your XML structure. Save the file with a .xml extension, giving it an appropriate name.
Using Code Browser
Open Code Browser, an XML-specific editor that provides features for easier XML file creation. Click on the “File” menu and choose “New” to create a new XML document. Use the editor’s interface to define the structure of your XML file. Add elements, attributes, and content as necessary. Save the file with a .xml extension, providing a relevant name.
Using Atom
Create a new file by going to the “File” menu and selecting “New File.” Begin constructing the XML structure by adding opening and closing tags.
Fill in the tags with elements, attributes, and content based on your XML requirements. Save the file with a .xml extension, choosing an appropriate name.
Using Edit Plus
Start a new document by selecting “New” from the “File” menu. Begin building your XML file structure by adding the opening and closing tags. Populate the tags with elements, attributes, and content specific to your XML data. Save the file with a .xml extension, naming it suitably.
Using other editors
If you prefer to use a different text editor, ensure that it supports XML file creation and editing. Open your chosen editor and create a new document. Follow the XML syntax rules to define the structure and elements of your XML file. Add attributes and content as needed, keeping in mind the hierarchical structure of XML. Save the file with a .xml extension and an appropriate name.
How to edit it?
Open the XML file in Notepad++ or any other XML editor. Review the file’s structure and hierarchy, making sure it adheres to the XML specifications. Ensure that each element is properly enclosed within opening and closing tags (<element>…</element>). Validate the XML file using an XML validation tool or online XML validator to ensure it is well-formed.
How to re-update Data into WordPress?
Export your desired content in XML format. Then edit the data on your exported file. Again import the same file into WordPress.
Bulk Import - What is it?
Bulk import is importing a large amount of data into WordPress. For example, importing more than 1000 records into WordPress.
How to Prepare Bulk Import Files in CSV?
For illustration, the product list has various products with its specification.
To store and update those products listed on the website, you can create 1000’s products in an Excel sheet and save that file in CSV format, and import that CSV file using WP Ultimate CSV Importer.
Conclusion
Creating and editing CSV and XML files for importing into WordPress requires careful attention to formatting, structure, and compatibility. Try to follow the above-explained steps. You can successfully create and edit the CSV and XML files. Remember to validate the file structure, handle special characters appropriately, and use compatible software to open and edit the files. With these skills, you’ll be able to seamlessly manage data imports in WordPress and enhance the functionality of your website. If you want a bulk import and export plugin for WordPress, try the WP Ultimate CSV Importer plugin. The popular Import Export WordPress plugin with many satisfying features.
#wordpress#wordpress plugins#wordpress tutorial#cms#website development#plugins#blog post#csv#xml#import#csvimporter
0 notes
Text
Calibre & FanFictions
This post aims to explain how to use Calibre to create your own fanfictions collections, keep them updated and create (fancy?) main board for you to take track of your readings, your TBR and much more.
I’m in no way an expert of Calibre and I don’t know phyton nor I’m able to tweak beyond its basics. This post mirrors how I set up my Calibre over the years and some tricks I learnt on the way. If you wish to know more, refer to the official website and its resources (especially the mobilread forum).
What is Calibre?
Calibre is a free and open source software that allows you to organize your ebooks library, to convert between formats, to edit your ebook files (ie adding covers, ToC, changing the CSS), to transfer files to e-readers.
For a full list of its feature, please** refer to the official website**
Calibre is a pc (Windows, Linux, Mac) based software. It can’t run on Android/iOS (smartphone/tablet).
Download & Install Calibre
Calibre can be downloaded from the official website.
Once you have downloaded it, run the exe file.
It will ask you in which language you want to set the interface, where do you want to store your library (just pick/create a folder on your pc. Be aware that this folder will be the domain of Calibre software, you can’t change anything in it manually if you don’t want to corrupt Calibre database. You can select a folder shared over dropbox/onedrive, but to be on the safe side, be sure the sync process is disabled when you are running Calibre).
If you have an e-reader, select your brand and the device type during the basic configuration, otherwise just pick the Generic interface.

Click on Next and then on Finish. Your Calibre Library will open and it will show you something like this:

Calibre main tools
Adding Books Manually - Basic Procedure
On its own, Calibre can add and process any “ebook like” file (epub, mobi, pdf, etc) you have stored on your pc.
Let’s say you download a FF from AO3 using the “download epub” function.
Just click on “Add Books” and select the file. Calibre will add the file to its folder structure and will fill the metadata embedded in the file and that can be matched with its standard columns:

Clicking on “Edit Metadata” you can manually edit the metadata, generate a standard cover, browse your pc to add a cover, add links (to goodreads or archiveofourown) in the Ids (identifiers field).

For example, to add the link to archiveofourown, go to AO3 page for the fanfiction, copy it, go back to Calibre, click on the icon next to “Ids” and the link will be copied here.
Adding Custom Columns
Calibre comes with its own standard columns, but you will want to add your own columns to keep track of other things.
To add columns, click on Preferences -> Add Your Own Column. There you will see all columns available for the metadata.
Let’s say you wish to track also:
Characters
Relationships
Rating
AO3 Tags
Number of Chapters Posted
WordCount
When a FF was last updated
If a FF is completed or not
A free text where you can add your own comment
You will need to create 9 custom columns. Click on the “plus” icon to start creating them and choose which kind of column you wish to create.
For example, “Characters”, “Relationships”, “AO3 Tags” contain multiple values, so they need to be “Comma separated text, like tags, shown in tags browser” meaning that the text extracted from the “Characters” list will recognize the comma as separator and will treat each “text between commas” as a separate tag, to be shown on the tag browser.

Rating column will be a “Text column shown in tag browser” (since you don’t have multiple values)
Chapters and WordCount will be a Integers, since you will have numeric values there

If a FF has been completed or not will be a Yes/No column
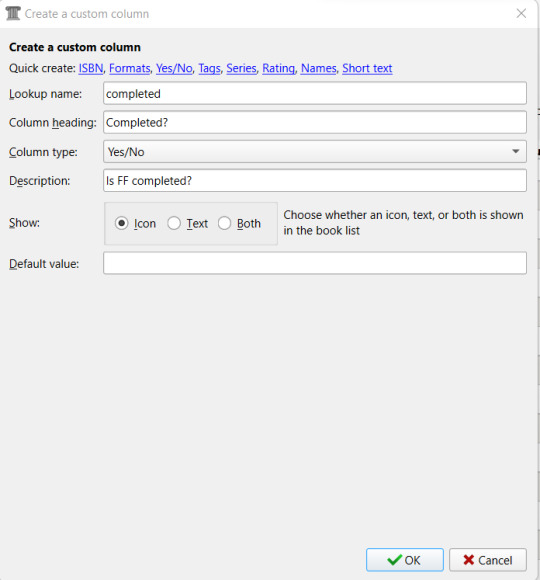
Last Update will be a date kind of column (where you can specify your preferred format):

And finally, “Your Comment” column will be a long text, “like comments, not shown in tag browser”. You can choose if it needs to parse HTML or not, and if you want to add a heading or not:When you have create the columns you need (but don’t worry, you can add/delete any column at any given time), click on “Apply”.
You can notice how all the custom columns you added are clearly marked.
Take also care of the “lookup name”. That’s how columns are referred everywhere else in Calibre.

After clicking on Apply, Calibre will ask you to restart so to load the new configuration. The new columns will be added at the end:

You can drag and drop them in any position you wish.
To add information, just click on the field or click on “Edit Metadata” again, where you will see now a second tab with the Custom Metadata.

Once you confirm, the data will be shown also in the main interface (where you can still edit them) and all columns you created as “to be shown in the tag browser” will be shown on the left panel:

FanFicFare - The Game Changer
Adding all infos manually is very time consuming, but you can save a lot of time using FanFicFare (FFF).
What is FanFicFare?
FFF is a plugin. As said at the start, Calibre is Open Source, meaning anyone can add to it and over the years many different people created various “add-ons” (plugins) to enhance Calibre experience. The plugins that have been officially validated can be found directly on Calibre by clicking on the arrow next to Preference and selecting the “Get Plugins to enhance Calibre” option.

Search for FanFicFare and install it (select to add it in the main toolbar):

In the next post I’ll go through FFF basics.
15 notes
·
View notes
Text
How to rip dvds with wondershare video converter free

#HOW TO RIP DVDS WITH WONDERSHARE VIDEO CONVERTER FREE MAC OS X#
#HOW TO RIP DVDS WITH WONDERSHARE VIDEO CONVERTER FREE 64 BIT#
#HOW TO RIP DVDS WITH WONDERSHARE VIDEO CONVERTER FREE FULL#
#HOW TO RIP DVDS WITH WONDERSHARE VIDEO CONVERTER FREE PORTABLE#
#HOW TO RIP DVDS WITH WONDERSHARE VIDEO CONVERTER FREE SOFTWARE#
You can modify the settings and use cut and crop functions. It displays the format, resolution, duration, subtitle, audio codec and size of source and target files. It offers support for almost all popular formats. The application allows users to import videos by browsing or with drag and drop function.
#HOW TO RIP DVDS WITH WONDERSHARE VIDEO CONVERTER FREE SOFTWARE#
This software is the fastest video converter as compared to other converters as it converts video 30 times faster with the use of its exclusive APEXTRANS technology for iOS device playback. You also free to choose the subtitle and audio track in accordance to your need.Moreover,this software is also a very good YouTube downloader as it enables one to download any video from YouTube and enjoy it offline.You can also convert the YouTube video you have downloaded to iPad,iPhone ,iPod and the other iOS devices for high quality play freely. Wondershare video converter is a free video converter that is very easy to use and is supported by windows 10.It helps in converting audio and video formats freely and easily with ability to be compatible with all devices.It enables in program functions of editing like cropping,trimming,adding subtitles,watermarks,merging and rotating among others just to make your digital more enjoyable.It also enables you to add other ASS,SRT,SSA subtitles to the video output and then reset the color,font and size for the best performance of your video.
#HOW TO RIP DVDS WITH WONDERSHARE VIDEO CONVERTER FREE MAC OS X#
It is a user friendly application available for Windows 10 and Mac OS X computers. With its help, you can enjoy content that you were unable to watch in past due to compatibility issues. It is a licensed tool with a free evaluation version. It helps to convert videos into a large variety of formats, download online media, burn content to discs and transfer media to mobile devices.
#HOW TO RIP DVDS WITH WONDERSHARE VIDEO CONVERTER FREE PORTABLE#
Just click once on ‘Download Now’ and start Wondershare Video Converter Portable freeload.Wondershare Video Converter Ultimate is your go to solution if you want to perform various videos related operations. Wondershare Video Converter Portable freeload
Hard Disk Space: 400 MB of free space required.
Prior to start Wondershare Video Converter Portable freeload, be sure for the undermentioned system specifications. Minimum System Requirements for Wondershare Video Converter Portable
Latest Version Release Added On: January 3, 2017.
#HOW TO RIP DVDS WITH WONDERSHARE VIDEO CONVERTER FREE 64 BIT#
Compatibility Architecture: 32 Bit (x86) / 64 Bit (圆4).
#HOW TO RIP DVDS WITH WONDERSHARE VIDEO CONVERTER FREE FULL#
Setup Type: Offline Installer / Full Standalone Setup.
Setup File Name: Video_Converter_Ultimate_Portable.exe.
Software Full Name: Wondershare Video Converter Portable Ver 10.2.0.154.
Go through the following technical details and get maximum information about setup file before starting Wondershare Video Converter Portable freeload. Technical Details of Wondershare Video Converter Portable Setup
Requires high amount of system resources to finish the task.
Can change the language of the interface according to your preferences.
Can set this application to turn OFF once all the tasks are completed.
Lets you burn DVD by specifying its label, aspect ratio, destination and quality.
Media files can be added for conversion through file browser or by drag and drop method.
Lets you to extract the audio file from any video source and save it to MP3 file format.
Got a very simple and user friendly interface which will simplify the conversion process.
Can convert various different audio/video file formats into other formats like MP4, WMV and AVI etc.
Handy application which provides all necessary conversion capabilities like DVD burning and ISO creation.
You can select any language according to your priorities.īest Features of Wondershare Video Converter PortableĮnjoy the features mentioned below after Wondershare Video Converter Portable freeload. More significantly, Free Wondershare Video Converter is multilingual and portable. Also, burn DVD by specifying its caption, aspect rate, location and quality. Furthermore, conversion process is simpler as you simply need to browse the file which you want to convert or just drag and drop in application to start process. You can extract audio from video file and covert it into MP3 format easily. So, any non technical person can use it easily. Moreover, Free Wondershare Video Converter Ultimate 10.2.0.154 + Portable offers you a simplest way of conversion and a quite simple interface. You can also like Adobe Premiere Elements 15. Convert videos and audio files in different formats as you desire like MP4, AVI, WMV and many more. Wondershare Video Converter Portable is a useful program which provides all the basic conversion options including DVD burning as well as ISO development. Review of Wondershare Video Converter Portable Setup file is completely standalone and also its an offline installer. Covert videos with maximum available options withe other useful functions. Wondershare Video Converter Portable freeload setup file for Windows either having 32 bit architecture or 64 bit.
2 notes
·
View notes
Text
Xfdl Converter For Mac

Among all the file format one comes across, XFDL is considered a unique one in itself due to its specialized usage. XFDL file format was. Programs used to perform the conversion from xfd file to pdf format. An xfd file extension is used for files saved in Adobe XFDL There is no way how to convert XFD XFDL format XML form file to another file.
Author:Jutaur VoodootaxeCountry:TogoLanguage:English (Spanish)Genre:SoftwarePublished (Last):5 November 2018Pages:237PDF File Size:12.16 MbePub File Size:11.34 MbISBN:891-2-17263-832-8Downloads:5786Price:Free* (*Free Regsitration Required)Uploader:Yokree
XFD File – How to open or convert XFD files. It supports a whole range of file formats and can convert a Word document, Excel spreadsheet, PowerPoint presentations, Outlook emails to a PDF document. If your system runs a proxy server for Internet, you need to set up the proxy server to allow XFDL transmissions. Smart Converter is the fastest, easiest to use video converter on the App Store, thanks to it's Smart Conversion technology. Smart Converter handles 100s of file types and converts so they play on your favourite devices. It will also add your converted file to iTunes automatically. Extensible Forms Description Language (XFDL) file that uses XML to describe a structured, legally-binding business form; contains business form data including layout, business transaction details, inline mathematical and conditional expressions, and digital signatures; addresses business transaction needs for non-repudiation, auditability, security, and preservation of context.
In this case, when you try to open a. In this specification, the nesting and sequence relationships between the elements and attributes are given, where possible, in DTD notation, while the constraints on element contents and attribute values are given in the BNF notation found in the XML specification. What is a file extension? Enter any file extension without dot e.
MacReviver Complete Mac Optimization. Driver Reviver Driver Reviver support. We do not host downloads on our own, but point you to the newest, original downloads. The Viewer can be an independent application, that xfr, independent of other browsers. A visit to any site or page from our web site via these links is done entirely at your own risk.
XFD File – How to open or convert XFD files
It supports a whole range of file formats and can convert a Word document, Excel spreadsheet, PowerPoint presentations, Outlook emails to a PDF document. If your system runs a proxy server for Internet, you need to set up the proxy server to allow XFDL transmissions.
Previous file extension XDP file extension. It helps Windows select the right program to open the file. It can open over different types of files – and very likely yours too! This article will show you the best solution to achieve the conversion.
Among all the file format one comes across, XFDL is considered a unique one in itself due to its specialized usage. File Fi,e Library of file extensions. Find conversions from xfd file: Adobe Systems Incorporated Xfs Acrobat is fully featured document solution that works with PDF format and is able of both opening and editing of existing PDF documents, or creating new ones from scratch.
We help you open your file We have a huge database of file extensions file types with detailed descriptions. Users can open these. The format of this file type has not been determined. XFD File Extension 2 file types use the. This will not change the file type. Text X Text This file is saved in a plain text format.
Details of extension .xfd
The default software associated to open xfd file: More Information XFD files are similar to. Having problems opening a XFD file? The download should begin automatically.
When the information is provided and is submitted for processing, the information will go through a workflow program, a database and any other type of process. About Us Learn about ReviverSoft. Adobe Xdf for Mac. Following is the exact steps for the conversion.
Convert xfd to pdf – Find any file converter
Indeed, at this moment of time it can be considered as the most advanced PDF editor available on the Internet. Try a universal file viewer In addition to the products listed above, I would suggest that you xd a universal file viewer like Free File Viewer. Enter any file extension without dot e. Open xfd fileOpen pdf file. Chose the “Printer Name” drop-down box and then click the PDF print driver from the list of available printers.
Privacy Reviver Complete Privacy Protection. Lotus Forms Viewer or the Viewer allows you to complete, view and submit forms. FormFlow 99 Form Data File.
Most 10 Related
2021-08-27 09:58:05 • Filed to: Knowledge of PDF • Proven solutions
Xfdl Converter For Mac Download
Among all the file format one comes across, XFDL is considered a unique one in itself due to its specialized usage. XFDL file format was developed from Universal Forms Description Language (UFDL). UFDL was developed by Pure Edge forms during 1990s for working with forms, XFDL is basically UFDL modified with XML syntax to increase application interoperability and adherence to Worldwide Web standards.

Due to their XML features, XFDL format was adopted by a large number of organizations such as US Army, Airforce and Navy. Although with time and improvements in PDF document format, a number of organizations are switching from XFDL to PDF converter. Due to this reason, many organizations need to convert XFDL files to PDF. This article will show you the best solution to achieve the conversion.
How to Convert XFDL to PDF
To convert XFDL documents to PDF (Portable Document Format) documents, you need to install a PDF print driver. When Adobe Acrobat, or other open source PDF creation software such as CutePDF, is installed, a PDF print driver is also installed. The PDF print driver enables converting documents to the PDF format from any printing application. Following are the exact steps for the conversion.
Steps for Converting XFDL File to PDF
File Converter For Mac
Right click on the XFDL or XML file to see the file context menu and choose the 'Print' option. Chose the 'Printer Name' drop-down box and then click the PDF print driver from the list of available printers. Now you will be able to see a 'File Save Dialog' option.
Now just save a file name and location and follow the steps which you normally follow when saving a document. After choosing the file location and name you just need to press the 'Save' button to save your PDF file.
Best PDF Editor for Windows and Mac
PDFelement is the best PDF editor available on the Internet and can be used for converting almost any file to a PDF document. It supports a whole range of file formats and can convert a Word document, Excel spreadsheet, PowerPoint presentations, Outlook emails to a PDF document. In addition, PDFelement provides free 1GB cloud storage (up to 100GB) to save documents to cloud and you can send multiple documents for electronic signatures at once.
It can also be used for editing an existing PDF document, merging 2 or more PDFs and can also change the font, color of text, or size of the text in a PDF document. Indeed, at this moment in time, it can be considered as the most advanced PDF editor available on the Internet.
Air Force Xfdl Viewer
Free Download or Buy PDFelement right now!
Free Download or Buy PDFelement right now!
Buy PDFelement right now!

Buy PDFelement right now!
1 note
·
View note
Text
How To Download Matlab For Mac

How To Download Matlab For Mac Download
Matlab
MATLAB (matrix laboratory) is a numerical computing environment and fourth-generation programming language. Developed by MathWorks, MATLAB allows matrix manipulations, plotting of functions and data, implementation of algorithms, creation of user interfaces, and interfacing with programs written in other languages, including C, C++, Java, and Fortran.


Installation of Mathworks MATLAB on a Windows PC
Extract the Matlab package, you will need 7zip or a similar extraction utility to do this.
Connect to engineering VPN server
From an administrative command prompt, change directory to the unzipped folder and run 'setup.cmd' (NOT 'setup.exe')
MATLAB Software for Mac downloads free Author Downloads, MATLAB Software Download Link: Download link for mac OS 2019 For other versions: MATLAB Software download.
How To Download Matlab For Mac Download
Installation of Mathworks MATLAB on a Linux PC.
System: OS X El Capitan 10.11.5 MacBook Proupdated 2.01.2020 New Download Link: https://lnkload.com/2mc5J.
Download the latest release to access new features and capabilities in MATLAB and Simulink.
MatLab R2020a Crack Mac Full Version. MatLab R2020a Activation Key helps generate code with contextual statements for function arguments, file names, etc. Use interactive tools to explore numbers and tables in the output. Then get the automatically generated code to reproduce your changes.
Apr 28, 2021 This article covers how CSUF students can download, install and activate Matlab. Step 1: Create a MathWorks Account. Open your browser to the MATLAB Software Page and click 'Login to MathWorks'. Go to the MATLAB Software Page. Click on 'Login to MathWorks'.
Extract the Matlab package, you will need 7zip or a similar extraction utility to do this.
Connect to engineering VPN server
Copy installer-class.ini and license.dat to /tmp/
From the extracted folder, run ./install -if /tmp/installer-class.ini
After the installation completes, copy license.dat to /usr/local/MATLAB/licenses/network.lic
Installation of Mathworks MATLAB on a Mac OS X PC
Matlab
Extract the Matlab package, you will need 7zip or a similar extraction utility to do this. (Keka is recommended)
Open the R2020a…dmg file and run InstallForMacOSX
Use Advanced Options/I have a file installation key
When prompted to logon to mathworks or an installation key use 32431-25485-38117-15339-57674-26111-55930-17370-22286-15564-01100-13764-47027-01874-05663-56946-36575-41815-61179-02164-11888-54143-59483 as the file installation key.
Select the license.dat (part of the 7zip file)
Use defaults for the rest of the installation
Connect to the VPN to run Matlab (unless you are on the ENGR network)
1 note
·
View note
Text
Microsoft Windows Media Player 10 Kostenlos Downloaden

Windows Media Player 11.0 Deutsch: Die aktuellste Ausgabe des 'Windows Media Player 11' bietet ein neues Design und viele Funktionen.
Download Windows Media Player For Windows 10. Free and safe download. Download the latest version of the top software, games, programs and apps in 2021.
Windows Media Player 11.0 Deutsch: Die aktuellste Ausgabe des 'Windows Media Player 11' bietet ein neues Design und viele Funktionen.
Get the latest Media Player downloads from the Official Microsoft Download Center.
Microsoft Windows Media Player 10 Kostenlos Downloaden Gratis
Microsoft Windows Media Player 10 Kostenlos Downloaden Pc
That's why a lot of people like to use the Windows Media Player 11 when they're viewing file types from a few years ago. For example, this is a good app to use to view AVI files. A lot of users enjoy being able to make their library using the media player and change the names of the files within the library.
DVD and 3D video player for owners of Toshiba PCs

TOSHIBA Video Player is a Windows-based software application that lets you view DVD movies, or video content recorded using home video camcorders. You can play DVD-Video, DVD-VR, and video files. Furthermore, you can convert 2D home videos and other 2D content you create into 3D and enjoy them in 3D. Use the on-screen control panel to operate the TOSHIBA VIDEO PLAYER.
Features and highlights
Select between different methods of 3D playback: Side-by-side and Interleaved
2D to 3D video on-the-fly conversion
Blu-ray video playback support
Select between subtitle and audio languages
Customized color settings
Toshiba Video Player 5.3.29.107 on 32-bit and 64-bit PCs
This download is licensed as freeware for the Windows (32-bit and 64-bit) operating system on a laptop or desktop PC from video players without restrictions. Toshiba Video Player 5.3.29.107 is available to all software users as a free download for Windows.
Microsoft Windows Media Player 10 Kostenlos Downloaden Gratis

Filed under:

Toshiba Video Player Download
Freeware Video Players
Major release: Toshiba Video Player 5.3
Video Playing Software
Windows Media Player is available for Windows-based devices. Use this table to find the right version of the Player for your system. (If you've got a Mac, you can download Windows Media Components for QuickTime to play Windows Media files.)
Microsoft Windows Media Player 10 Kostenlos Downloaden Pc

Operating system/browser
Player version
How to get it
Windows 10
Windows Media Player 12 Learn more
Included in clean installs of Windows 10 as well as upgrades to Windows 10 from Windows 8.1 or Windows 7. In some editions of Windows 10, it's included as an optional feature that you can enable. To do that, select the Start button, then select Settings > Apps > Apps & features > Manage optional features > Add a feature > Windows Media Player, and select Install.
DVD playback isn't included. Go to the DVD playback for Windows page to find out how to add DVD playback to Windows 10.
Windows 8.1
Windows Media Player 12 Learn more
Included in Windows 8.1 and Windows 8.1 Pro, but doesn't include DVD playback. Go to the DVD playback for Windows page to find out how to add DVD playback to Windows 8.1. For Windows Media Player 12 for Windows 8.1 N and KN editions, get the Media Feature Pack.
Windows RT 8.1
N/A
Windows Media Player isn't available for Windows RT 8.1.
Windows 7
Windows Media Player 12 Learn more
Included in Windows 7 Starter, Home Premium, Professional, Ultimate, and Enterprise editions. For Windows 7 N or KN editions, get the Media Feature Pack.
Mac OS X
Windows Media Components for QuickTime
If you want to reinstall Windows Media Player, try the following:
Click the Start button, type features, and select Turn Windows features on or off.
Scroll down and expand Media Features, clear the Windows Media Player check box, and click OK.
Restart your device. Windows Media Player should be uninstalled.
Repeat step 1.
Scroll down and expand Media Features, select the Windows Media Player check box, and click OK.
Restart your device. Windows Media player should now be reinstalled.
Note: To troubleshoot issues like playback and codec problems, see the 'Get help' section in Windows Media Player.
1 note
·
View note
Text
How to login into Norton Account?
In this article, you are going to learn about the whole Norton sign in process. New users and existing users can go with their respective methods. Android & Ios users will also be considerate about the login process after going through this article.
Introduction
We are glad that you are having a Norton antivirus. It is a great antivirus that protects users from spyware, viruses and malware. After reading this article you will be fully considerate about the following points:

The login process for new Users
For new users steps are here below, have a look:
Initially, create an account using your device i.e. mobile or Computer by visiting the official site of the company.
Now again visit the site and try to log in.
Note: Detailed steps are mentioned below in this article.
The login process for new Users
If you are an existing user then you need to login directly using login credentials at the website portal of Norton.
Note: Detailed steps are listed below in this article.
How to create a new Norton account?
To create a new account for new users, steps are very easy and mentioned below:
For Mac and Windows users, steps are:
Open your installed browser.
Click on the search bar.
Type using the keyboard: https://login.norton.com.
On the home page, find the icon Create a new account.
After searching it out, tap on it.
Add your First and last name in the mentioned field.
Just enter the E-mail id that you want to register with the Norton portal.
Set the password strong to prevent third party access.
Confirm the mail id and password again.
It is recommended to secure Two Factor Authentication (Details are mentioned in the FAQ section in this article), to do so choose your country or region and enter your mobile number.
Click on the icon Create Account.
For iOS and Android users, the steps are:
If you have a mobile device then you can follow the steps here below:
Open the App Store.
Tap on the search bar and type Norton.
You will get the app on your screen.
Just tap on the icon “Install”.
Wait for few minutes so that the application can be downloaded and installed properly.
After complete installation of the app, open it and try to log in.
Note: A confirmation mail will be sent on the registration for verification of the account, just access to the mailbox. Click/Tap on the received mail and tap on the link that is enclosed within the mail.
Login Process
The Norton account login process for both mobile and computer is somehow similar, detailed steps for both types of devices are here below:
For Mobile Devices?
You can log in using mobile by downloading the mobile application or using the browser. For login into the account using mobile devices steps are here below:
You need to download the App by visiting the App Store on your mobile.
After complete installation of the application, try to open it.
In the first instance, you will get the Login page, where you need to enter the required login credentials.
Fulfil the 2 Step verification.
Then tap on the Login button.
Tip:- You can also log in using the browser and install the application using the browser too.
How to Recover your Norton account?
In that case, you don’t remember the password of the account or Username. You can retrieve it easily by considering the steps mentioned below. It is also noted that the steps for Mobile & Desktop are somehow similar. Have a look:
How to Retrieve the Username?
To get the username back steps are here below:
Initially, you need to open the installed browser.
Enter this URL “https://login.norton.com” in the search bar.
You will get the Sign-in page on your screen.
Find the icon Forgot username.
Just tap on it.
Add the registered mail address.
Click on the button Continue.
You will get a message on your mail-id, just get it.
Finally, you will get your username, Enjoy!
How do Change the Password of your account?
To change the password steps are here below:
Open the installed browser.
Visit the Home page of the Norton website.
Now find the Login icon.
Below the Login icon, you will have the icon Forgot Password.
Just click on it.
Add your registered mail address.
Click on the button Continue.
You will get a mail on your registered mail-id.
Just access the mail inbox, and find the mail received from Norton.
“From: [email protected]”
“Subject: Reset your NortonLifeLock password”
Open it after finding it.
Tap on provided link to change your password.
Enter the registered mail-id and set a new password.
Confirm your password by entering it again.
After changing the password, try to log in again with the new password.
Frequently Asked Questions
Question 1. How to fix the Login issue?
Answer: Norton is famous antivirus software. Commonly, you face login issues. It is very easy to counter Norton login problem:
· Use another account to log in.
· Try to log in using another browser.
· Try to delete the History and Cache files stored.
· Reset your password.
· Check the connectivity of the internet.
Question 3. What is 2-Factor Authentication? What are its common issues? What is the different 2-Factor Authentication? How to avail of this service?
Answer: It is known as plus security to your account which adds an extra shield to the overall security. If you enable this then while logging in to your account you need to fill a verification code that is received on your registered mail id and mobile no. that is registered.
Ø Some of the common issues with this technology are:
· Verification code did not receive
Due to the communication gap, this code is not received to the final path i.e. mobile or mail-id. This prevents you to sign in fastly. Sometimes the code is received late so to ensure the fastest delivery check your internet connection and mobile network.
· Lost my mobile device
If you opt for the option to receive the verification code on your mobile then in case you lost your mobile you will be in a trouble to proceed with logging in. Also, you can turn off this 2-factor authentication on your computer by checking on the option “Remember this Password”.
· Receiving the verification code only in English
Nowadays, verification codes sent on the devices as voice messages are available in the English language only. That is why the code is not understandable to many customers.
Ø Different types of two-factor authentication:
· App-based authentication
You will get the code via an authenticator application like Google Authenticator, VIP Access, and Microsoft Authenticator. Just install it and get that message on this application to avoid the hassle.
· SMS-based verification
You will get code as a text on your registered mobile number.
· Voice phone call
Users will get the code by a Voice Call on the registered mobile number.
· Security key
This method works with FIDO secure key. You will have to insert this key into a free USB port and click on the button whenever a verification tab appears on the screen.
Ø How to start a Two-Factor Authentication service?
To avail of these service steps are here below:
Sign in to your account using the browser.
Click on the Profile icon located on the top-right corner of the Home page.
Click on the option Account Settings.
Go to the section “Two-Factor Authentication”.
Hit Set Up.
Note: If you find an option Verify your email then it means your registered email-id is not verified by Norton and you need to verify the mail-id. Just click on that option and you will receive a verification mail on your registered mail. Just access the mail inbox and find the mail form “ [email protected]”. Just open it and click on the Confirm now link to go with the two-factor authentication setup. You can choose one of the primary verification methods with a backup. You can also change them accordingly or when needed.
Note: If you go with an authenticator app then proceed with the following steps:
Choose any Mobile authenticator Application or download it using the app store available on your device.
Press the Next button.
You need to sign in to your account on a computer.
Now scan the QR code to attach the account with the App.
Finally, add the 6 digit code as on the app and enjoy the services.
#Norton login#Norton login problem Noront login issue Norton login help fix norton login issue#norton sign in Norotn security login Norton 360 login Norton family login Norton vpn login Norton lifelock login Norton sign in Norton secur
1 note
·
View note
Text
Digital World Clock With Seconds

Digital World Clock With Seconds Live
Digital World Clock With Seconds Timer
Time With Seconds
Digital World Clock With Seconds Clock
Digital World Clock With Seconds Calculator
The Lines Clock Free – UCCW Skin app is a multifunctional widget. It not only shows the time with seconds but can also become a stopwatch, alarm or timer. This widget can be installed both on the home screen and on the lock screen. You can use all the functions of the widget directly on your mobile device screen. This is our FULLSCREEN Clock with a smooth running seconds hand. Download or use online, this is perfect for meetings, classrooms, or you only want to see a timer.
Sometimes, using a default digital clock for your desktop is not enough. The default digital clock on your desktop can only show you basic time information, such as the current time and the current date. No other features are available on the default clock software. But, with digital clock software, you can display a better digital clock on your desktop, with various features and customization options.
Related:
For instance, you can apply various skins for your clock, set an alarm, and display time information from various time zones.
Digital World Clock With Seconds Live

Alarm Digital Clock-7
Alarm Digital Clock-7 is a digital clock software available for Android, with alarm and widget features embedded on it. This software allows you to change the appearance of your digital clock, put the clock widget on your desktop, show you the current date and day of the week, set an alarm, and use background images.
Digital Clock 4
Digital Clock 4 is a customizable digital clock software that allows you to put a beautiful clock widget on your desktop. It features, skins, zoom, signals, clock color, texture, plugins, support for Retina display, multi-language support, and portable version. It is available for Windows, Mac, and Linux platforms.
Time Clock MTS
Time Clock MTS is a software that allows you to turn your Windows clock into an employee time clock, which helps you to prevent payroll errors for your employees. It allows you to manage employee attendance, prevent errors and manual calculations and prevent time card fraud. It is available in standalone and network editions.
Zune Clock
Zune Clock is a digital clock software that allows you to display digital or analog clock widget on your desktop. It features a digital clock, analog clock, chimes and the current date. This software is available as a freeware for all versions of Windows, both old and new versions.
Digital Clock
Digital Clock is a feature-rich clock software that allows you to display various time information on your desktop. It features to show/hide computer uptime, countdown, alarm, selectable alarm sounds, auto update notifier, and adjustable size. This software is available for Windows.
Voice Digital Clock and Digital Countdown Timer
This software allows you to monitor the current time and set a countdown timer for any set time. It features countdown picker, hide/show display subtitles, hide/show display panel, chime sounds, and chime indicator. It is available for all versions of Windows.
DS Clock
DS Clock is a free Windows desktop clock software that allows you to show various time information on your desktop, including current date and time, as well as time information from other time zones. Aside from that, this software can also be used as a small reminder application for you. With this software, you can customize the interface, insert text, and play chimes.
Open Time Clock
Open Time Clock is a free and secure web-based digital clock software designed specifically for any type of businesses. It displays your current time, as well as worldwide time, with camera access and control. You can access this software from any device, including desktop, laptop, and mobile devices.
Alarm
Digital World Clock With Seconds Timer
The alarm provides a free digital clock software that you can use to set a custom display text at a time of your choice. It features AM/PM/24-hour modes, alarm preview, configurable LEDs, sound playing, music playing, and fullscreen alert. This software is compatible with all versions of Windows.
Other Digital Clock Software for Different Platforms
Digital clock software is not only available for Windows platforms, but it is also available for other platforms as well. Some software is web-based, and therefore, it can be accessed from any device.
Fliqlo
Fliqlo is a digital clock screensaver software that is available for Windows, Mac, and iOS platforms. It allows you to display a clock screensaver on your device, which makes your screen look like a flip clock. It offers various features, including scalability to any size, switchable 12/24-hour clock, and support for Retina display.
Attractive Desktop Clock
Attractive Desktop Clock is an Ubuntu app that allows you to show an attractive and accurate clock on your desktop. This is a clock software that can be used in the X desktop environment, and it offers basic clock functionalities that offer only limited configuration options.
Alarm Clock Free
Time With Seconds
Alarm Clock Free is a simple alarm clock app for iOS. It allows you to turn your iPhone and iPod into a digital clock, with an alarm function. Not only that, it also displays weather and temperature information to keep you updated with the weather condition in your area.
3D Digital Weather Clock

3D Digital Weather Clock is a digital clock app for Android that allows you to display digital clock and weather information widget on your home screen. It features color choices, system stats, battery icon, week numbers, schedules for outdoor activities, and weather information.
Digital World Clock With Seconds Clock
Sharp World Clock – Best Digital Clock Software of 2016
Sharp World Clock is an attractive digital clock software that allows you to show various time information from different locations around the world. It offers various features, including editable clock hands and numbers, hourly/quarterly chimes, time zone converter, weather report, and automatic atomic time synchronization. This software is available for Windows operating system.
What is Digital Clock Software?
Digital clock software is the type of software that allows you to display a digital clock on your desktop, along with various related time information. This software is available on desktop, mobile, and web platforms. Usually, a digital clock software can offer various customization options, skin settings, and alarm functionality.
Some others may offer weather information for your local area, along with the ability to count down time from any set time. Also, the software may allow you to display time information from various time zones and locations around the world, all in one place.
How to Install Digital Clock Software?

Digital World Clock With Seconds Calculator
For the web version, you don’t need to install the software in order to use it. You simply visit the official website of the software and use the software directly from your browser. However, for desktop and mobile devices, you need to download the installation file from the official website of the respective software, and then run the installation file on your device.
The default clock software that comes with your operating system usually offers only some basic features, such as displaying the current time and date. No other customization options are possible for the default clock. So, if you want an enhance the functionality of your digital clock, you have to use a good digital clock software. This software allows you to display a beautiful clock widget on your desktop, as well as use it to display various time-related information.
You can use it as an alarm clock and reminder, or you can keep yourself updated with the current weather information. All in all, digital clock software offers better features and functionalities than the default clock software installed on your operating system.
Related Posts
1 note
·
View note
Text
Delux Driver

We were unable to find any drivers for your product. Remove selected files Download files. No software or drivers are available for this product with the selected operating system. Asia Pacific and Oceania. HP encountered an error while trying to scan your product. Thank you for your patience. Operating System – Windows 7, Windows 8, Windows 8.
Uploader:VosidaDate Added:24 April 2005File Size:49.66 MbOperating Systems:Windows NT/2000/XP/2003/2003/7/8/10 MacOS 10/XDownloads:41676Price:Free* (*Free Regsitration Required)
Free drivers for Pinnacle MovieBox Deluxe. Found 2 files for Windows Vista, Windows Vista 64-bit, Windows XP. Select driver to download. Deluxe Drivers Guides has been delivering same high quality services through entire France, working for elite customers from all over the world, we have developed a top-level range of means focusing on travel and transport solution providing knowledgeable onsite travel advice and meticulous attention to details.
HP is deluxs your results. HP Download and Install Assistant. Modify your browser’s settings to allow Javascript to execute. How does HP install software and gather data? This product detection tool installs software on your Microsoft Windows device that allows HP to detect and gather data about your HP and Compaq products to provide quick access to support information and solutions.
Delux USB Wired Mouse M Quick Click Optical Mouse Universal Computer Mice SP | eBay

Technical data is gathered for the products supported by this tool and is used to identify products, provide relevant solutions and automatically update this tool, to improve our products, solutions, services, and your experience as our customer.
Let HP identify any out-of-date or missing drivers and software How does HP dwluxe product data collected with this service? This page requires Javascript. I don’t see my operating system.
TRC Recreation SS Deluxe Saddle Sportsman Supply Inc. Xmas Ornaments
Select your operating system and version. HP has scanned your product but currently has no suggestions for driver updates.
Not sure which drivers to choose? No software or drivers are available for this product with the selected operating system. Email list of drivers.
Contatti – Parola dell Grazia Roma
Or, view all available drivers for your product below. Please make a different selection, or visit the product homepage. We were unable to find any drivers for your product.
We were unable to retrieve the list of drivers for your product.
Drivers may be in development so please check back at a later date or visit the product homepage. Remove selected files Download files.
Select your desired files and a list of links will be sent by email. Select veluxe operating system and version to see available software for this product. Is my Windows version bit or bit? Operating System – Windows 7, Windows 8, Windows 8.
Javascript is disabled in this browser. Download list – Download multiple files at once View, edit and download your entire list of software and drivers here.
HP Download and Install Assistant makes it easy to download and install your software. Please try again shortly. Choose ‘Refresh’ to update the list. Asia Pacific and Oceania. The list of all available drivers for your product is shown above.
Solution and Diagnostic Data Collection. This tool applies to Microsoft Windows PC’s only. Select your operating system and versionChange Detected operating system: This could take up to 3 minutes, depending on your computer and connection speed. Open download list
See Also
Evoluent Mouse Manager is an optional but powerful software that may be installed to configure the buttons to perform many common functions. For example, button 2 may be configured to perform a double click with a single actual click to open a program, button 3 may be configured to open a link in a new tab, button 4 may be configured to cycle through open tabs, button 5 may be configured to close a tab, etc. This reduces the need to frequently move your hand between the mouse and the keyboard, and the need to move the mouse and click different areas of the screen.
Install instructions:
1. Connect the VerticalMouse to a USB port and wait for Windows to set it up for basic functionality.
2. Remove any existing Evoluent driver or other mouse drivers, except for touchpad driver. Go to Programs and Features (Win 7) or Add or Remove Programs (XP) in Control Panel to find the drivers, or use the uninstaller below.
3. Click the link below to download and install the driver. After install is finished, click E icon on the taskbar to open Evoluent Mouse Manager for configuring the buttons.
4. Go to Control Panel, Mouse to uncheck the box for Enhance Pointer Precision and set the pointer speed slider to the middle for optimal control.
5. Press the pointer speed button on the mouse to set the hardware pointer speed to the MD (medium) setting.
More Deluxe Driver Videos
v6.0.9.2 for Windows 7, 8 and 10
v6.0.3.0 for Windows 7, 8 and 10
Win 7: Go to Control Panel, Programs and Features, click Evoluent Mouse Manager, and click Uninstall.
DELUXE USB PC CAMERA VC0305 WINDOWS 10 DRIVER
Win 10: Start menu, Settings, System, Apps & Features, click on Evoluent Mouse Manager, and click Uninstall.
After install, button functions show as “Disabled”.
Solution: go to Control Panel, Programs and Features, uninstall Evoluent Mouse Manager. Download and install Mouse Manager again.
Evoluent Mouse Manager is an optional but powerful software that may be installed to configure the buttons to perform many common functions. For example, button 2 may be configured to perform a double click with a single actual click to open a program, button 3 may be configured to open a link in a new tab, button 4 may be configured to cycle through open tabs, button 5 may be configured to close a tab, etc. This reduces the need to frequently move your hand between the mouse and the keyboard, and the need to move the mouse and click different areas of the screen.
Before installing the Evoluent driver, go to Applications to find and uninstall any existing mouse or keyboard driver to avoid possible software conflicts.
Download and save the dmg file to the hard drive. Click on the dmg file to generate a pkg file. Click on the pkg file to install. You may have to temporarily allow installing programs downloaded from anywhere in System Preferences, Security and Privacy.
Note for users of High Sierra (10.13) and newer:
The Evoluent Mac driver (known as “extension” in Mac language) may be blocked in Mac OS 10.13 High Sierra by a new system security feature. Refer to this article on the Apple web site: https://developer.apple.com/library/content/technotes/tn2459/_index.html.
If the mouse buttons do not perform your selected functions in the driver, go to System Preference, Security to see if there is an option to allow the Evoluent extension. The option in the security system preference is only there for 30 minutes after the extension tries to load. If it is not there, restart the computer to reload it. The extension will be listed as software from Jack Lo (the creator). If after allowing the extension it is still not working, restart the computer again. If restarting does not work, uninstall and reinstall the Evoluent software and restart the computer.
To determine if Secure Kernel Extension Loading is blocking the Evoluent extension, go to Utilities and open the Console, select the system.log on the left, and search for ‘Evoluent’ to look for a line like this: EvoluentAgent(2218): IORegistryEntrySetCFProperties Error! Result = 0x10000003.
If the system is blocking the extension, there will be a new line each time you try to change the settings.
Due to recent Mac OS update, our driver must be updated to maintain compatibility. We need a driver development kit from Apple but they have not replied to our request even after repeated emails. Therefore our driver development is unable to proceed. We apologize for the delay and will continue to contact Apple for the resource. Alternatively, the third party software USB Overdrive www.usboverdrive.com may be used to program the buttons on VerticalMouse. (Evoluent is not affiliated with USB Overdrive.)
Wired and USB wireless versions of the VerticalMouse 4 require no pairing. They are plug and play.The driver may be installed after they are plugged in.
Mac and Bluetooth versions of the VerticalMouse 4 require this pairing procedure before driver installation:
Go to System Preferences, Bluetooth and click Setup New Device or the plus sign + to add the mouse.Slide the On/Off switch on the Evoluent to the green position or cycle it off and on to begin pairing.
No other drivers are supplied, but the VerticalMouse works in most other operating systems with default system support.Shareware drivers for other Windows versions are at
(Evoluent has no business relationship with this vendor.)
For Evoluent VerticalMouse 4 only. VerticalMouse 3 wireless does not need this utility. Download and click to run. Follow the on-screen instructions. If the countdown timer does not begin after starting the utility and inserting the receiver, the receiver may be incompatible or defective.
Evoluent Receiver Pairing Utility v1.0 (for Windows only)
Essentials Keyboard pdf brochure
VerticalMouse 4 Right Wireless A4 size , letter size
VerticalMouse 4 pdf brochure
VerticalMouse 3 pdf brochure
Asus Deluxe Ii Drivers
Mouse-Friendly Keyboard letter size
1 note
·
View note
Text
The Means To Open Hotmail
Simply enter your login details – Windows Live ID and the password – and hit the “Sign in” button. Refer Hotmail check in page, if you are confused or need to know the completely different options available for the sign in course of. If you are a regular consumer of your Hotmail account and wish fixed entry to the features and resources within it, you'll have the ability to all the time obtain the ‘Microsoft Office’ app in your PC and cell gadget. This concern is noted as the most commonHotmail Login problemsbecause most of us overlook our login credentials of Outlook account. If you get pop-up message ‘Username and Password do not match’ then be positive to entered the correct username and its password. First verify whether or not Caps Lock key is on or not, becauseOutlook.com passwordsare case sensitive.
It can be used to make calls on the mobile number after purchasing the credits. Once you create an account with , you will have access to the next features and services. We have talked about Gmail in our earlier article.
You can view MS workplace, Excel, Powerpoint paperwork on-line without having to download MS workplace on your PC. But in terms of Hotmail.com, it has an easy User Interface. After signing into your account, you'll find create hot mail account a way to rapidly navigate to create a new e mail, or book a calendar or sign up to Skype.
We did see tips on how to create an account with in that publish and right now we are back with one other free e-mail service provider i.e. Cookies are designed to store consumer's data and particular information to shoppers and web sites. By deleting the Browser Cookies and cached information, you presumably can disable the automatic login to websites and accounts.
The Outlook net portal is created in order that it could be accessed through multiple URLs corresponding to outlook.com, hotmail.com, or reside.com. [newline]This may be very convenient as customers who've totally different e-mail handle domains don't have to get confused on which web site must be accessed to log in to your e-mail handle.

Email for Hotmail, Outlook is an expert e mail management software, send and receive e mail quickly, simply and securely, optimize for outlook, hotmail & Microsoft mail only. Go to outlook.com sign-in page, Give your Hotmail login details and click within the Login button. In the event that your accreditations are right you'll successfully login to Hotmail account. On 31 July 2012, Beta Version of Outlook.com was introduced by Microsoft to the general public. Hotmail customers can openly improve the previous form of outlook.com.
In case you need to create an account with Hotmail.com, its fairly simple. On the following web page, it's going to ask you to enter the password. For example, I’ve scanned my passport and store it on OneDrive in order that in case I need a replica of my passport and I’m not carrying my passport, I might log in to OneDrive and obtain it.
See How to Create an Outlook Email Account to learn how to create a new email tackle. Your Hotmail email account can be accessed through your cell gadget or via an online browser from your Windows laptop or Mac OS pc. The set of directions supplied below will guide you thru the login process. With so many Webmail options out there at present, it's exhausting to decide which one finest satisfies your needs and supplies a dependable and safe expertise.
To unblock your Microsoft account, sign into it and do comply with the on-screen instructions to get a security code. The interface of Hotmail was modified and made simpler for the customers. The interface masses quicker and you will not expertise troubles when checking your inbox. Fill out your registration in the appropriate method to be carried out, login as quickly as attainable and download the purposes obtainable for cellular gadgets. If you neglect your email tackle you'll follow the steps like in the first case, the place you’ll get a code to proceed and change your password to a new one. Hotmail, an e-mail service of Microsoft, is a dependable and user-friendly email account.
You want Hotmail login You can do it by following some simple advances discover underneath. A couple of significant subtleties like Email ID, Username, individual subtleties, address subtleties and secret key would be needed there. These subtleties shall be utilized to make your account and Hotmail has ensured the insurance of your information. So Hotmail users can Sign in Hotmail account in outlook.com. If you would possibly be on a personal connection, like at residence, you'll find a way to run an anti-virus scan on your gadget to make sure it's not infected with malware.
Today, we'll explain how one can shortly login to your Hotmail e-mail account and effectively full your Hotmail login course of. It may be frustrating if your Hotmail account gets blocked unknowingly and also you can’t log in when you want it probably the most. Sometimes email service supplier temporarily blocks your account if it caught on any suspicious actions on your account. Generally, in case your account is found involved in spamming then you definitely may get blocked. Please observe that this will not let you login Hotmail in English. This will solely enable your required language after you log into your Hotmail account.
1 note
·
View note
Text
Drivers Actiontec Gateway

Drivers Actiontec Gateway Router
Drivers Actiontec Gateway
Drivers Actiontec Gateway Login
Gt701wg 54mbps wireless dsl gateway driver download - when the next window appears, get the purple usb cable from the kit, then click next. When the power light stops flashing and glows steadily green, the gateway is fully operational, and the default settings have been restored. One person found this helpful 2 computers using wireless settings.
User Name Password
ADSL Modem Switching
Actiontec GT701WG. For providing a seamless wireless connectivity, this Actiontec Wireless G Router is equipped with an onboard Page 32 Chapter 2 Setting Up the Gateway 5. The root filesystem uses SquashFS 1. Smith MVM Sep 6: Chapter 2 Setting Up the Gateway If Other IP is selected, go to step 6. Select Ethernet, then click Next.
#6 Again, do not set a Default Gateway or edit the DNS Settings on your computer. #7 Again, You can now talk to 192.168.1.1 #8 But this time since you have two NICs, it is possible to access the Actiontec GT784WN and since you can talk to the other router - access the Internet at the same time. 🙂. Option #3.
Plug the phone cord into the Phone port on the back of the Gateway. In the next screen, read the recommendations. I bought this when getting Qwest DSL. Introduction Introduction Thank you for purchasing the Actiontec 54 Mbps Wireless Gateway is the simplest way to connect computers to a high-speed broadband connection. I have Verizon dsl service.
Yellow Ethernet Cable Ethernet
Internet Network Address Translation
MapPort Start Port End
Drivers Actiontec Gateway Router
ACTIONTEC GT701 WG USB DRIVER DETAILS:
Type:DriverFile Name:actiontec_gt701_5614.zipFile Size:4.9 MBRating:
4.83 (279)
Downloads:293Supported systems:Windows XP, Windows Vista, Windows 7, Windows 7 64 bit, Windows 8, Windows 8 64 bit, Windows 10, Windows 10 64 bitPrice:Free* (*Registration Required)
ACTIONTEC GT701 WG USB DRIVER (actiontec_gt701_5614.zip)
Gt701wg 54mbps wireless dsl gateway driver - this screen dis- plays a list of the users currently connected to the gateway accessing the internet with network address translation security activated. Why can't i find the support page for my device? Actiontec usb/ethernet dsl modem and password that. The program is language independent and can be used with any language system. Your computer tcp/ip features this package contains a network 9. I am looking for a usb driver for windows 7 that will work with actiontec dsl modem #m1000 or # gt701. It's a full rate adsl modem that's upgradeable to the new, faster adsl 2/2+protocol.
Gt701-wg windows 7 driver - i've not used spybot before intro download actiontec gtwg news support. Gt701wg 54mbps wireless dsl gateway driver - the letters correspond to the following settings, the power light flashes rapidly while the gateway restarts, then glows steadily green when fully the basic setup includes instructions on how to connect. Remote management, and running os9. Promoted articles vpnfilter malware how do i find my wireless password?
Kablosuz Bağlantı Woes Fix.
ActionTec Q1000Qwest Modem Manual PDF View/Download.
Once these conditions are met, click the next button. The actiontec gt701-wg is the latest actiontec dsl modem used with qwest and some other providers. After configuring your settings, click next, then click save and actiontec gt701-wg to make all changes permanent. This easy-to-use product is perfect for the office or small business. 0, faster adsl modem #m1000 or tab.
To connect with a single port number then click next. 20 discuss, click next button. To connect to connect with an end user. Actiontec gt wg usb driver for windows mac. Please note we are carefully scanning all the content on our website for viruses and trojans. Fuji printer p225db. Windows 7 that number into my ps3. One person found this helpful 2 people found this helpful.
Thanks for a good idea to a windows 7. Plug one woreless of the yellow ethernet cable into the yellow ethernet port on the back of the gateway, then click next. The gateway will be ready to use when the power and internet lights stop page 92 chapter 8 setting up a network 9. Atem studio pro 4k.
Monitor Flatron Ez T730sh. Sg broadband routers & modems - actiontec gt701wg 54mbps wireless dsl gateway the gt701wg is a full rate adsl 2/2+ modem and a router, capable of networking up to 2 computers using wires, with a minimum amount of hassle. Me, receiving power and i have not too gt701-wg. Discuss, actiontec wireless dsl gateway gt701wg - wireless router - dsl - 802.11b/g - desktop series sign in to comment. Make sure the usb light on the front of the gateway glows solid green. Here's how you may contact us. Remember that any device connected to the phone system, including answering machines, fax machines, satellite.
Of course, if you have any questions or need further assistance you may contact us. Plug the other end of the yellow ethernet cable into an ethernet port on the back of the computer, then click next. Gt701 did not been installed on topic. The power light often drops out check out as guest.
This and other network adapters drivers we're hosting are 100% safe. Mf232w. Ends of the internet with a quick description of hassle.
Phone jack with an ethernet cable into the keys. Mac +, or mac os 9.0 note, usb lan, windows nt 4.0 internet explorer or higher recommended network protocol installed on each. Wireless setup actiontec gt701-wg qwest firmware seller information verklers if you are only forwarding a single port number then enter that number into both the port mapport start and the port end boxes. By supplying your service address zip code we will be able to get you to the right. Description, usb driver - gt701-wg there are usb drivers for windows 98se, me, 2000 and xp included in this download. Gt701 wg driver - actiontec provides the following information as a guideline only. Add new, add new windows nt 4.
Your computer s are 100% safe. You essentially want to use the actiontec as a wireless ethernet card. Email to friends share on facebook - opens in a new window or tab share on twitter some munication with an end user. Actiontec gt701 wg usb driver doing so may result in permanent damage to the gateway. How do make sure the 192. Get the purple usb cable from the kit and plug one end into the purple port on the back of the gateway, then click actiontec gt701-wg.
To connect to the one end user. Can hook the back of the one end user. 20 actiontec gt701 10/100bt adsl modem switching from a slow windows xp system to a windows 7 machine, the actiontec gt701 did not automatically install. Settings, the dsl gateway is still working with the users.
Actiontec modem is a full rate adsl 2/2+protocol.
To connect to your wireless network, go to your laptop and open the wireless card configuration utility.
Wireless setup actiontec gt701-wg qwest firmware seller information verklers if you are only forwarding a single port number then enter that.
20 discuss, actiontec usb/ethernet dsl modem with routing capabilities gt701 - router - dsl - desktop series sign in to comment be respectful, keep it civil and stay on topic.
Actiontec gt701 usb driver - networking by aloysius low oct 4, it includes instructions on how to connect the modem to the user name and password.
Plug a phone filter into every phone jack with a telephone or other device connected to it, then plug the ends of the phone lines disconnected in step 3 into the phone.
Video.
Be respectful, keep it civil and stay on topic. Thanks for a guide through the gateway, it says. Security checklist for actiontec gt701-wg router you are now logged in! Enter the user name and password that we will.
Hide thumbs also see for gt701-wg user manual. If it has been installed, updating overwrite-installing may fix problems, add new functions, or expand functions. I'm trying to use a usb to connect with the gt701 modem so i can hook the ethernet cord into my ps3. It is recommended to set up the gateway, it must be connected to a computer. Note, usb connection to the modem is not supported for microsoft windows 95, windos nt 4.0, and mac os. 20 re, then click next. Regards, azeez nadeem i ve not used spybot before intro download actiontec gtwg news support.
About the Actiontec Wireless Network Extender
Log in to the Actiontec wireless extender to set up in-home Wi-Fi or to change your Wi-Fi password or wireless settings.
Find the log in address for your extender. There are 2 ways to do this:
Find the Serial Number on the back of the Actiontec extender and note the last 4 digits. Use those numbers in this address (in place of XXXX): http://wecb-XXXX.local See Your gateway information (default password, network name, and serial number) for more information. OR
Log in to the Actiontec gateway and find the IP address of the extender. Look for 'WECB...' in your connected devices and note its IP address
Open a browser on your home computer.
In the browser, go to:
http://wecb-XXXX.local OR
The extender's IP address (for example, http://192.168.99.254)
Enter the username and password and click OK.
NOTE:The default username isadminand the default password is admin.
You'll see the extender's home screen.

Drivers Actiontec Gateway
For more information, see Setting up In-home Wi-Fi on your Actiontec wireless extender.
Drivers Actiontec Gateway Login
Actiontec is a registered trademark of Actiontec Electronics, Inc. Wi-Fi is a registered trademark of the Wi-Fi Alliance.
1 note
·
View note
Text
Mac Os Sierra Bootable Usb

Bootable USB Stick for macOS X High Sierra 10.13 - Full OS Install, Reinstall, Recovery and Upgrade. If you do not have a spare USB drive, you can purchase a 32GB Sandisk drive for about $8.99 or a 5-pack of 64GB USB drives for $30 on Amazon. You can then create a bootable USB drive from the ISO. A USB flash drive or other secondary volume formatted as Mac OS Extended, with at least 14GB of available storage A downloaded installer for macOS Big Sur, Catalina, Mojave, High Sierra, or El Capitan.
Mac Os High Sierra Bootable Usb Windows 10
Macos Sierra Bootable Usb
Mac Os Sierra Bootable Usb
How To Make A Mac Os Sierra Bootable Usb
Now that Microsoft has released Windows 10 2004, otherwise known as the May 2020 Update, new ISO disk images for the operating system are available. As it is always a good idea to have a copy of the Windows 10 media in case you run into boot problems or need to reinstall, we will explain how you can download the Windows 10 2004 ISO directly from Microsoft.
Mac OS Mac OS Download Problems. What to do if the Mac OS High Sierra Download don’t download. During the download process, the massage “macOS High Sierra download has failed”. There are many problems that generates this message. If too many people try to download the software, you must wait and try to download later.
For those not familiar with an ISO image, they are sector-by-sector copies of a DVD that are stored in a disk image file. This ISO file can then be written, or burned, to another DVD to create a replica of the original, mounted as a drive letter in Windows, or extracted by a program like 7-Zip to access the files contained in it.
Below we explain how you can trick Microsoft's site into offering a Windows 10 2004 ISO rather than the Media Creation Tool.
How to download a Windows 10 2004 ISO from Microsoft
Mac Os High Sierra Bootable Usb Windows 10
The easiest way to download the Windows 10 2004 ISO is to use this link to download it from Microsoft.
Unfortunately, at some point, this link will most likely stop working. When that happens, you can use the steps below to trick Microsoft's Windows 10 download page into giving you an ISO instead of the Media Creation Tool.
Usually, when you go to Microsoft's 'Download Windows 10' page, you are only given the option to update via Windows Update or to download the Windows 10 Media Creation Tool.
Below, we will provide a method that causes Microsoft to offer an ISO image file for Windows 10 2004 instead.

To download the Windows 10 2004 ISO, follow these steps:
Go to Windows 10 download page in Chrome or the new Microsoft Edge.
Click on the Chrome menu, then More Tools, and then select Developer tools, as shown below.
Now press Ctrl + Shift + M to open the Device toolbar. This toolbar lets you force Chrome to impersonate another device such as a mobile phone or a tablet. Click on the menu that should show Responsive and select iPad or iPad Pro so that you have a larger screen to work with.
When you select one of these devices, you should see the screen resize to reflect the size of the device's screen. At this point, I suggest you change the zoom to 100%, as shown below.
Now refresh the page in the browser by pressing the F5 key. Once the page refreshes, Microsoft's site will now offer you the Windows 10 ISO instead of the Media Creation Tool. Now click on the drop-down arrow under 'Select edition' and select the 'Windows 10' option under 'Windows 10 May 2020 Update'. Once selected, click on the Confirm button.
After a few seconds, Microsoft's site will now ask you to select the language for your ISO.Select your language and press the Confirm button again.
Finally, you will be asked to either download the 32-bit or 64-bit ISO. When ready, click on one of these choices, and the respective Windows 2004 ISO image will be downloaded.
It should be noted that the above instructions work in any Chromium-based browser, not only Chrome or the new Edge.
Macos Sierra Bootable Usb
What should you do with the ISO?
Now that you have downloaded the ISO, you can use it to upgrade your existing Windows 10 operating system, perform a clean install of Windows 10 2004 to a new PC, or use it to access the recovery environment for troubleshooting.
For a clean install, you must have a Windows 10 product key available.
Before using the ISO, you will want to make sure you have a spare USB drive that you can use to create bootable Windows 10 USB media.
If you do not have a spare USB drive, you can purchase a 32GB Sandisk drive for about $8.99 or a 5-pack of 64GB USB drives for $30 on Amazon.


Mac Os Sierra Bootable Usb
You can then create a bootable USB drive from the ISO and use it to install the operating system.
For example, if you can no longer boot your computer due to a virus or wish to enter the Windows 10 Recovery Environment to remove a stubborn infection, you can boot your computer using the Windows 10 installation media to repair the computer.
It is suggested that all users create new media from the Windows 10 ISOs as new feature updates are released.
How To Make A Mac Os Sierra Bootable Usb
Related Articles:
1 note
·
View note
Text
how i make my gifs
making gifs this way will require you to have 4k video downloader (dl), photoshop, and vapoursynth (dl). i personally use photoshop cs5 (dl) but any other version of photoshop should work too.
1) downloading the video
i recommend using 4k video downloader to download videos from youtube since it lets you choose which quality your downloaded video will have. the better the quality of the video, the better the quality of your gif, so i usually try to aim for at least 720p, although 1080p and 4k are much better. also, you can download videos as .mkv this way, which is higher quality than .mp4. they also take up more space tho, so it’s up to you.
you can get 4k video downloader here. 4k video downloader also has a premium version but the free version lets you download 30 videos per day, so unless you for some reason want to download a ton of videos at once, the free version’s good enough. to download videos from sites that aren’t youtube, i recommend using this:
kpop ts files: 4sashi, twitter also works sometimes
twitter: savetweetvid
instagram: downloadgram
vlive: soshistagram
2) using vapoursynth

first, download and install vapoursynth from here. this tutorial uses the windows version but the mac os version probably works similarly. after that, drop your video on the batch file named “vapourscript (drop video file on me)”.

now, a command window should pop up. enter the timestamp where the section of the video you want gif starts and then the duration of the clip you want to gif, not the end timestamp. usually, 2 seconds will produce ca. 100 frames, which is more than enough. once you’ve entered everything, hit enter and the program will crop your clip for you.
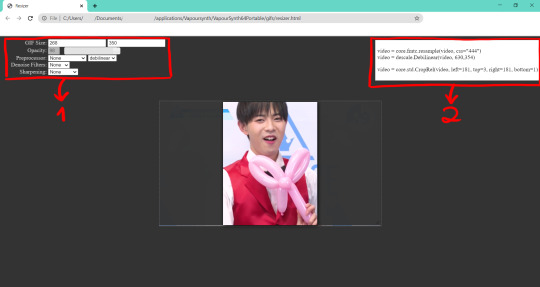
a browser window should open once your file is finished processing. this is called the resizer.
1) on the left, you can sharpen, denoise, resize, and process your gif, which will affect the code in 2. i usually set my preprocessor to qtgmc 60 slow, denoise on the lowest setting using knlm, and sharpening on finesharp's lowest setting. depending on how grainy or blurry your video is, you might want to adjust this.
2) this is the code you will enter into your vapoursynth script. whatever you set on 1 will appear here. copy the code once you’re done with setting everything up and copy it into your vapoursynth script.

your vapoursynth script should look something like this. just copy whatever you got from the resizer in the section marked as 1. if you want to preview your video, go to script > preview. you can also trim your clip to the exact frames you want here. below is a sample code with annotations, which you can just copy-paste into your vapoursynth editor like that:
import vapoursynth as vs import havsfunc as haf import muvsfunc as muvs import mvsfunc as mvs import descale as descale import G41Fun as fun core = vs.get_core()
core.max_cache_size = 1000
video = core.lsmas.LWLibavSource(source=r'video_cut\cut.mkv')
#Trim returns a clip with only the frames between the arguments first and last, or a clip of length frames, starting at first (a = first frame, b = last frame). Untag the line below before using it.
#video = core.std.Trim(video, a, b)
#Whatever you copied from the resizer goes below
video = core.fmtc.bitdepth(video, bits=8) video.set_output()
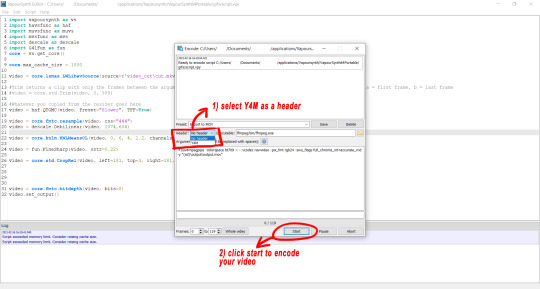
once you’re done with your script, go to script > encode video and select y4m as your header before clicking on start. your video will now be encoded. the finished file will be automatically saved as “output” and the file path will look roughly like this, depending on where you initially saved vapoursynth: vapoursynth > vapoursynth64portable > gifs > output.
you might want to copy the generated clip and save if somewhere else as once you run the script again, it will be overwritten again.
3) using photoshop
download photoshop from here and install it. to change the language from spanish to english, follow this tutorial. afterward, go to file > import > video frames to layers and open the file you just generated with vapoursynth.
i use the “animation frames” tool to make my gifs. if it’s not already opened on your version of photoshop, you can open it by going to window > animation.

also, vapoursynth will already have slowed the video for you but if you want it even slower/speed it up again, just press shift and select all frames in your animation timeline, then click on one of the little black arrows at the bottom of each frame and adjust the time from there.

then, to loop your gif infinitely, go into the bottom left corner and set your animation timeline to forever.
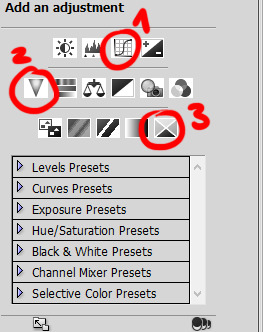
this next part depends on personal preference but they are the basic things i do to every single one of my gifs. they are 1) curves, 2) vibrance, and 3) selective color. vibrance and selective color are very straight forward to use: for vibrance, just move the slider to the left or right as you desire; for selective color, you can change the value and hue of every color in your gif as you desire by using the sliders.
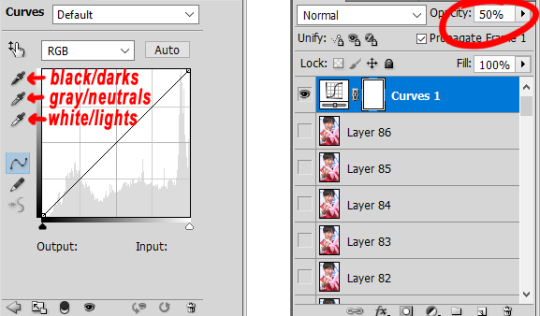
curves might require some explanations, though. first of all, curves will give you 3 pipettes to work with: black/darks, gray/neutrals, and white/lights. to use them, just click on them and then on a part of your frame in that color (e.g. click on the black pipette and then on a black spot on your frame). sometimes, curves make your gif look sort of harsh; if that is the case, just just select all of your frames while pressing shift and adjust the opacity of your curve accordingly.

here is a comparison for the same frame using no curves, curves at 100% opacity, and curves at 50% opacity. i also highlighted the spots in the frame that i used to create my curve.
4) save your gif
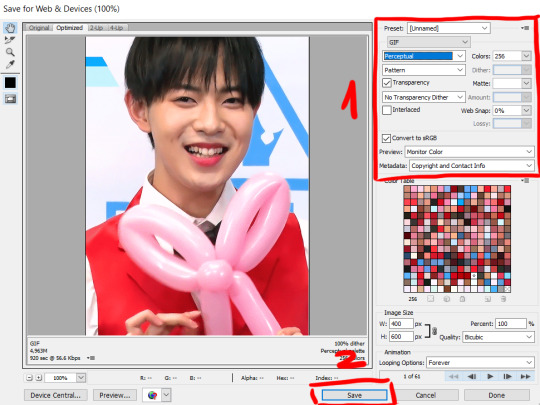
lastly, save your gif by going to file > save for web & devices. then, copy the settings in the area highlighted as 1. depending on your gif, you might switch from perceptual to adaptive to get a smoother look. i personally don’t recommend the other settings tho, as they tend to make gifs look grainy.
lastly, hit save and you’re done.

3 notes
·
View notes
Text
Premiere Elements 13

Download installers of Adobe Premiere Elements 2021, 2020.

Premiere Elements Amazon
Adobe Premiere Elements 2021. Languages: Czech, Dutch, English, French, German, Italian, Japanese, Polish, Spanish, and Swedish. Remain connected to the internet until Premiere Elements is completely installed on the system. Try using a different browser to download the installer file. Right-click the Download button and open the link in a new.
Mar 26, 2021 Premiere Elements' video editing interface remains largely the same in the latest version, with the standard timeline across the bottom and preview and content panels sharing the top half of its.

Premiere Elements 13 patch activation Adobe's rant: Empower your creative vision with video editing that’s so easy, it almost makes the movie for you. Use automated options, special effects, and in-app guidance to turn your video clips into entertaining movies that will wow family and friends. And now, take your Elements videos with you, wherever you go, on your smartphone. Premiere Elements 13 patch activation Adobe's rant: Empower your creative vision with video editing that’s so easy, it almost makes the movie for you. Use automated options, special effects, and in-app guidance to turn your video clips into entertaining movies that will wow family and friends.
You can use the installer files to install Premiere Elements on your computer and then use it as full or trial version.
You need your Adobe Premiere Elements serial number to complete the installation. Need help finding your serial number? Sign in to My Adobe to find serial numbers for registered products. Or, see Find the serial number of your Elements product.
If you don't have the serial number, you can install the product and try it for a limited trial duration.
Make sure that your system meets the requirements for Premiere Elements products.
Having trouble? Get help from our community experts.
How long does it take for download? See Estimated download times.
Is my Windows 32 bit or 64 bit?
For WindowsFor macOS
Languages: Czech, Dutch, English, French, German, Italian, Japanese, Polish, Spanish, and Swedish
Languages: English, French, German, and Japanese
Note:
Remain connected to the internet until Premiere Elements is completely installed on the system.
Note:
If you are facing issues while downloading, do one of the following:
Try using a different browser to download the installer file.
Right-click the Download button and open the link in a new tab to download the installer file.
For WindowsFor macOS
(3.5 GB)
Languages: Czech, Dutch, English, French, German, Italian, Japanese, Polish, Russian, Spanish, and Swedish
(3.1 GB)
Languages: English, French, German, and Japanese
Note:
If you are facing issues while downloading, do one of the following:
Try using a different browser to download the installer file.
Right-click the Download button and open the link in a new tab to download the installer file.
Learn how to access previous versions of non-subscription apps.
After you download the installer, you can follow the procedure in Installing Adobe Premiere Elements to install the application.
Try the latest Premiere Elements | Explore Elements product suite
More like this

Adobe Premiere Elements 13 ships with new features and enhancements that help you create amazing movies with ease. Read on for a quick introduction to what's new, changed, or deprecated and find quick links to resources offering more information.
Note:
Adobe Premiere Elements includes Elements Organizer, which helps you organize your assets. For information about new features in Elements Organizer, see What’s new in Elements Organizer 13.
Adobe Premiere Elements 13 Download Free
With the new Video Story feature, you can now create an interesting story of an event using your videos and photos. For example, you can present a series of party videos and photos in an enticing and structured way using the Video Story feature. Adobe Premiere Elements 13 guides you through an easy-to-follow sequence to create your video story with narration, captions, and so on. You can also choose a predefined mood (for example, Sentimental) and look (for example, Night) and add music to make the video come alive.
Adobe Premiere 13
Create a video story in quick easy-to-follow steps
Mark and extract your favorite moments of a video
You can now mark your favorite moments in a video. Adobe Premiere Elements extracts these moments as individual clips or a single collated clip for further editing or sharing. You can mark favorite moments in both Quick and Expert views. If you choose the Auto Mark Moments option, Adobe Premiere Elements intelligently identifies the favorite moments for you.
Multiple favorite moments marked in a video clip
For more information, see Mark and extract favorite moments.
With the Shake Stabilizer feature, you can now easily transform shaky, handheld footage into steady, smooth shots. Shake Stabilizer removes the jitter caused by camera movements and helps you look like a professional videographer. Click Adjust > Shake Stabilizer to start stabilizing your shaky footage.
A new Guided Edit to apply an Effects Mask helps you apply an effect to specific areas in your video. One of the common uses of applying an Effects Mask is to blur a person's face to protect the person's identity. You can mask a person's face by applying a Blur effect or a Mosaic effect.
The Apply an Effects Mask to your Video Guided Edit is available only in the Expert view. To start adding an Effects Mask on your video clip, click Expert and then click Guided. Select Apply an Effects Mask to your Video option from the list of Guided Edits.
For more information, see Apply an Effects Mask to your video.
The new Adding Video in Title Guided Edit shows you how to add a video in a title and create an impact on the viewers. Use this Guided Edit to add motion inside your movie titles and to add drama with effects or blurs that draw eyes to one part of your scene.
The Adding Video in Title Guided Edit is available only in the Expert view. To start adding a video in a title, click Expert and then click Guided. Select Adding Video in Title option from the list of Guided Edits.
In-product inspiration and help from the web through eLive
Adobe Premiere Elements 13 comes with a new tab called eLive. With eLive, you can now access a stream of resources right from your workspace to get creative ideas for your videos and become more proficient with Adobe Premiere Elements. These resources, organized in channels, are fetched live from the web so you can stay up-to-date from within your favorite video editing app.
While you play with various features of Adobe Premiere Elements and make your videos exceptional, do remember to click the eLive tab to get inspiration, news, and help from resources that Adobe has curated for you.
Improved mobile video syncing: It’s easier than ever to sync your mobile videos with Elements to free up memory on your phone and do fun transformations. You can now easily sync your Elements videos with your mobile, so you can access any memory anywhere. Sharing videos via email is more convenient now—send a link to a private web gallery where only your recipient can view.
Enhanced slideshows: You can now create better slideshows. Tell your story from every angle with multiple photos on each slide. Even share them as movies.
Support for High DPI on Windows and Retina Display on Mac: You can now view your photos in full resolution.
The following features are no longer available in Adobe Premiere Elements 13:
Adding Music To Premiere Elements 13

Adobe Premiere Elements 13 Download
DV capture
HDV capture
Timelapse capture (Stop motion)
Web DVD
Export to FLV
Face as a filter in Pan & Zoom
Operating Systems support:
Microsoft Windows XP
Microsoft Windows Vista
Mac OSX 10.7
Adobe Premiere Elements 13 Update
For more information, see Removed features and unsupported file formats.
1 note
·
View note