#How to Install/remove SQL Tools
Explore tagged Tumblr posts
Visit Tumblr Blog
Explore Tumblr blogs with no restrictions, modern design and the best experience.
Last Seen Tumblr Blogs


Fun Fact
28.6 is the average number of monthly visits per US mobile user.
Text
How Secure Is Your WordPress Website?

With over 40% of the web powered by WordPress, it’s no surprise that it's also a prime target for hackers and bots. While WordPress is a secure platform at its core, many websites become vulnerable due to poor practices, outdated plugins, or weak hosting setups. So, how secure is your WordPress website — really? Let’s dive into the key factors that affect WordPress security and how you can protect your site.
1. Are You Using Strong Login Credentials?
The easiest way for hackers to get in is through weak usernames and passwords. Avoid “admin” as a username and use a complex, unique password. Consider enabling two-factor authentication for an extra layer of protection.
2. Is Your WordPress Core Updated?
WordPress regularly releases updates that fix bugs and security vulnerabilities. If you're not updating your WordPress core, you're leaving the door open for attacks.
3. What About Plugins and Themes?
Outdated or poorly coded plugins are among the top reasons for WordPress site breaches. Always use plugins from trusted sources, update them regularly, and remove any that you’re not actively using.
4. Have You Installed a Security Plugin?
Tools like Wordfence, Sucuri, or iThemes Security can detect malware, block malicious IPs, and notify you of suspicious activity in real-time. These act as the first line of defense against threats.
5. Do You Have Regular Backups?
Backups won’t prevent attacks, but they can save your website in case one happens. Use plugins like UpdraftPlus or Jetpack Backup to schedule automated backups.
6. Is Your Hosting Provider Secure?
Not all hosting environments are equal. Choose a provider that offers SSL, firewall protection, malware scanning, and regular server updates.
7. Are You Using HTTPS?
If your website isn’t using an SSL certificate (HTTPS), both users and Google will flag it as untrustworthy. Most hosting providers now offer free SSL certificates — make sure yours is enabled.
8. File Permissions and Database Security
Set correct file permissions and secure your wp-config.php file. Also, regularly monitor your database and consider changing the default WordPress table prefix to make SQL injections harder.
9. Monitor User Activity
If multiple users access your dashboard, use a plugin to monitor and log activity. This helps you catch suspicious behavior before it becomes a serious issue.
10. Avoid Nulled Themes and Plugins
Tempted to download a premium plugin for free? Don’t. Nulled software often contains hidden malware that compromises your entire website.
Final Thoughts
Securing your WordPress website isn’t just about installing a few plugins — it’s about adopting a proactive, layered approach to safety. If you’re unsure whether your site is truly secure or need professional help hardening it, a WordPress Development Company in Udaipur can perform a full security audit and implement best practices tailored to your needs.
0 notes
Text
SQL Tutorial for Beginners: Learn How to Query Databases
In today’s data-driven world, almost every application, website, or business process involves data in some form. From your favorite e-commerce platform to your personal banking app, data is stored, managed, and retrieved using databases. To interact with these databases, we use a powerful language called SQL.
If you’re a beginner looking to learn how to query databases, you’re in the right place. This SQL tutorial will introduce you to the basics of SQL (Structured Query Language) and explain how you can use it to communicate with databases—no programming experience required.

What is SQL?
SQL stands for Structured Query Language. It’s the standard language used to store, retrieve, manage, and manipulate data in relational databases—databases that store data in tables, much like spreadsheets.
Think of a relational database as a collection of tables, where each table contains rows and columns. Each column has a specific type of data, like names, dates, or prices, and each row is a record (an entry) in the table.
Why Learn SQL?
SQL is one of the most in-demand skills for developers, data analysts, data scientists, and even marketers and business professionals. Here’s why learning SQL is a great idea:
Universal: It’s used by nearly every industry that deals with data.
Easy to Learn: SQL has a relatively simple and readable syntax.
Powerful: SQL allows you to ask complex questions and get exactly the data you need.
Great for Career Growth: SQL knowledge is a key skill in many tech and data-focused roles.
Core Concepts You Need to Know
Before jumping into actual queries, it’s helpful to understand some key concepts and terminology:
1. Tables
A table is a collection of data organized in rows and columns. For example, a Customers table might include columns like CustomerID, Name, Email, and Phone.
2. Rows
Each row in a table is a record. For example, one row in the Customers table could represent a single person.
3. Columns
Each column represents a specific attribute of the data. In our example, Email is a column that stores email addresses of customers.
4. Queries
A query is a question you ask the database. You use SQL to write queries and tell the database what information you want to retrieve.
Basic SQL Commands for Beginners
Here are the most commonly used SQL statements that beginners should become familiar with:
1. SELECT
The SELECT statement is used to read or retrieve data from a table. It’s the most commonly used SQL command.
Example (in simple English): "Show me all the data in the Customers table."
2. WHERE
The WHERE clause helps you filter results based on specific conditions.
Example: "Show me all customers whose country is Canada."
3. ORDER BY
You can sort the data using the ORDER BY clause.
Example: "Show customers sorted by their names in alphabetical order."
4. INSERT INTO
This command adds new records (rows) to a table.
Example: "Add a new customer named Alice with her email and phone number."
5. UPDATE
This modifies existing records in a table.
Example: "Change the phone number of customer with ID 10."
6. DELETE
This removes records from a table.
Example: "Delete the customer with ID 15."
A Real-Life Example: Online Store
Imagine you run an online store, and you have a table called Products. This table includes columns like ProductID, Name, Category, and Price.
With SQL, you could:
Find all products in the “Electronics” category.
List the top 5 most expensive products.
Update the price of a specific product.
Remove discontinued items.
SQL allows you to manage all of this with a few clear instructions.
How to Practice SQL
Learning SQL is best done by doing. Fortunately, there are many free and interactive tools you can use to practice writing SQL queries without needing to install anything:
Tpoint Tech (tpointtech.com/sql-tutorial)
W3Schools SQL Tutorial (w3schools.com/sql)
LeetCode SQL problems (great for more advanced practice)
Mode SQL Tutorial (mode.com/sql-tutorial)
These platforms let you write and test queries directly in your browser, often with real-world examples.
Final Thoughts
SQL is a foundational tool for anyone working with data. Whether you're a developer managing back-end systems, a data analyst exploring customer trends, or a marketer analyzing campaign results, knowing how to query databases will empower you to make smarter, data-driven decisions.
This beginner-friendly tutorial is just the first step. As you become more comfortable with SQL, you'll be able to write more complex queries, join multiple tables, and dive into advanced topics like subqueries and database design.
0 notes
Text
A Guide to Creating APIs for Web Applications

APIs (Application Programming Interfaces) are the backbone of modern web applications, enabling communication between frontend and backend systems, third-party services, and databases. In this guide, we’ll explore how to create APIs, best practices, and tools to use.
1. Understanding APIs in Web Applications
An API allows different software applications to communicate using defined rules. Web APIs specifically enable interaction between a client (frontend) and a server (backend) using protocols like REST, GraphQL, or gRPC.
Types of APIs
RESTful APIs — Uses HTTP methods (GET, POST, PUT, DELETE) to perform operations on resources.
GraphQL APIs — Allows clients to request only the data they need, reducing over-fetching.
gRPC APIs — Uses protocol buffers for high-performance communication, suitable for microservices.
2. Setting Up a REST API: Step-by-Step
Step 1: Choose a Framework
Node.js (Express.js) — Lightweight and popular for JavaScript applications.
Python (Flask/Django) — Flask is simple, while Django provides built-in features.
Java (Spring Boot) — Enterprise-level framework for Java-based APIs.
Step 2: Create a Basic API
Here’s an example of a simple REST API using Express.js (Node.js):javascriptconst express = require('express'); const app = express(); app.use(express.json());let users = [{ id: 1, name: "John Doe" }];app.get('/users', (req, res) => { res.json(users); });app.post('/users', (req, res) => { const user = { id: users.length + 1, name: req.body.name }; users.push(user); res.status(201).json(user); });app.listen(3000, () => console.log('API running on port 3000'));
Step 3: Connect to a Database
APIs often need a database to store and retrieve data. Popular databases include:
SQL Databases (PostgreSQL, MySQL) — Structured data storage.
NoSQL Databases (MongoDB, Firebase) — Unstructured or flexible data storage.
Example of integrating MongoDB using Mongoose in Node.js:javascriptconst mongoose = require('mongoose'); mongoose.connect('mongodb://localhost:27017/mydb', { useNewUrlParser: true, useUnifiedTopology: true });const UserSchema = new mongoose.Schema({ name: String }); const User = mongoose.model('User', UserSchema);app.post('/users', async (req, res) => { const user = new User({ name: req.body.name }); await user.save(); res.status(201).json(user); });
3. Best Practices for API Development
🔹 Use Proper HTTP Methods:
GET – Retrieve data
POST – Create new data
PUT/PATCH – Update existing data
DELETE – Remove data
🔹 Implement Authentication & Authorization
Use JWT (JSON Web Token) or OAuth for securing APIs.
Example of JWT authentication in Express.js:
javascript
const jwt = require('jsonwebtoken'); const token = jwt.sign({ userId: 1 }, 'secretKey', { expiresIn: '1h' });
🔹 Handle Errors Gracefully
Return appropriate status codes (400 for bad requests, 404 for not found, 500 for server errors).
Example:
javascript
app.use((err, req, res, next) => { res.status(500).json({ error: err.message }); });
🔹 Use API Documentation Tools
Swagger or Postman to document and test APIs.
4. Deploying Your API
Once your API is built, deploy it using:
Cloud Platforms: AWS (Lambda, EC2), Google Cloud, Azure.
Serverless Functions: AWS Lambda, Vercel, Firebase Functions.
Containerization: Deploy APIs using Docker and Kubernetes.
Example: Deploying with DockerdockerfileFROM node:14 WORKDIR /app COPY package.json ./ RUN npm install COPY . . CMD ["node", "server.js"] EXPOSE 3000
5. API Testing and Monitoring
Use Postman or Insomnia for testing API requests.
Monitor API Performance with tools like Prometheus, New Relic, or Datadog.
Final Thoughts
Creating APIs for web applications involves careful planning, development, and deployment. Following best practices ensures security, scalability, and efficiency.
WEBSITE: https://www.ficusoft.in/python-training-in-chennai/
0 notes
Text
How to Learn Power BI: A Step-by-Step Guide
Power BI is a powerful business intelligence tool that allows users to analyze data and create interactive reports. Whether you’re a beginner or looking to enhance your skills, learning Power BI can open doors to career opportunities in data analytics and business intelligence. For those looking to enhance their skills, Power BI Online Training & Placement programs offer comprehensive education and job placement assistance, making it easier to master this tool and advance your career.

Here’s a step-by-step guide to mastering Power BI.
Step 1: Understand What Power BI Is
Power BI is a Microsoft tool designed for data analysis and visualization. It consists of three main components:
Power BI Desktop – Used for building reports and dashboards.
Power BI Service – A cloud-based platform for sharing and collaborating on reports.
Power BI Mobile – Allows users to access reports on smartphones and tablets.
Familiarizing yourself with these components will give you a clear understanding of Power BI’s capabilities.
Step 2: Install Power BI Desktop
Power BI Desktop is free to download from the Microsoft website. It’s the primary tool used to create reports and dashboards. Installing it on your computer is the first step to hands-on learning.
Step 3: Learn the Power BI Interface
Once installed, explore the Power BI interface, including:
Home Ribbon – Where you access basic tools like importing data and formatting visuals.
Data Pane – Displays the data tables and fields available for reporting.
Visualizations Pane – Contains different chart types, tables, and custom visuals.
Report Canvas – The workspace where you design and organize your reports.
Getting comfortable with the interface will make learning easier.
Step 4: Import and Transform Data
Power BI allows you to connect to various data sources like Excel, SQL databases, and cloud applications. Learning how to:
Import data from multiple sources.
Use Power Query Editor to clean and shape data.
Handle missing values, remove duplicates, and structure data for analysis. It’s simpler to master this tool and progress your profession with the help of Best Online Training & Placement programs, which provide thorough instruction and job placement support to anyone seeking to improve their talents.

Data transformation is a crucial step in building accurate and meaningful reports.
Step 5: Create Visualizations
Power BI provides multiple visualization options, including:
Bar charts, pie charts, and line graphs.
Tables, matrices, and cards.
Maps and custom visuals from the Power BI marketplace.
Experimenting with different visualizations helps you present data effectively.
Step 6: Learn DAX (Data Analysis Expressions)
DAX is a formula language used in Power BI to create calculated columns, measures, and custom calculations. Some key DAX functions include:
SUM() – Adds values in a column.
AVERAGE() – Calculates the average of a set of values.
IF() – Creates conditional calculations.
Mastering DAX enables you to perform advanced data analysis.
Step 7: Build and Publish Reports
Once you’ve created a report, learn how to:
Organize multiple pages in a dashboard.
Add filters and slicers for interactive analysis.
Publish reports to Power BI Service for sharing and collaboration.
Publishing reports makes them accessible to teams and decision-makers.
Step 8: Explore Power BI Service and Cloud Features
Power BI Service allows you to:
Schedule automatic data refreshes.
Share dashboards with team members.
Implement row-level security for restricted data access.
Learning cloud-based features enhances collaboration and security in Power BI.
Step 9: Join Power BI Communities
Engaging with the Power BI community can help you stay updated with new features and best practices. You can:
Follow the Microsoft Power BI blog for updates.
Participate in Power BI forums and LinkedIn groups.
Attend webinars and join Power BI user groups.
Networking with other Power BI users can provide valuable insights and learning opportunities.
Step 10: Get Certified and Keep Practicing
If you want to showcase your expertise, consider obtaining a Microsoft Power BI Certification (PL-300: Power BI Data Analyst). Certification enhances your resume and validates your skills.
To stay ahead, keep practicing by working on real-world datasets, building dashboards, and experimenting with advanced Power BI features. Continuous learning is the key to becoming a Power BI expert.
By following these steps, you can systematically learn Power BI and develop the skills needed to analyze and visualize data effectively. Happy learning!
0 notes
Text
How to Use Security Headers to Protect Your CMS Website
Content Management Systems (CMS) such as WordPress, Joomla, and Drupal are integral to countless websites, providing incredible flexibility and ease of use. However, this convenience also brings significant security challenges. As cyber threats become increasingly sophisticated, it’s crucial to implement robust security measures to protect your CMS-powered site, your data, and your business reputation.
Recognizing Common Threats
Understanding the threats facing your CMS website is the first step in securing it. Common risks include:
Core Software Vulnerabilities: Outdated CMS versions often have security gaps that hackers can exploit.
Insecure Plugins and Themes: While third-party plugins and themes enhance functionality, they can introduce vulnerabilities if not updated regularly or obtained from trusted sources.
Brute Force Attacks: Cybercriminals may try to gain unauthorized access by systematically guessing usernames and passwords.
SQL Injection and Cross-Site Scripting (XSS): These attacks exploit vulnerabilities in web applications to manipulate databases or inject malicious scripts.
DDoS Attacks: Distributed Denial of Service attacks flood your website with excessive traffic, making it inaccessible to legitimate users.
Implementing Effective Security Measures
To mitigate these risks, adopt a multi-layered security approach:
Keep Software Updated: Regularly update your CMS, plugins, and themes to protect against known vulnerabilities. These updates often include critical security patches.
Enhance Authentication: Use strong, unique passwords and implement two-factor authentication (2FA) to add an extra layer of protection.
Choose Secure Hosting: Select a hosting provider that offers robust security features, such as firewalls, malware scanning, and automated backups.
Manage Plugins and Themes: Limit the number of plugins and themes installed on your website. Regularly audit and remove any that are outdated or no longer needed.
Enable HTTPS Encryption: Secure communications between your site and its visitors with SSL/TLS certificates, ensuring that sensitive data is encrypted.
Deploy a Web Application Firewall (WAF): A WAF helps filter and monitor HTTP traffic, defending your site against common threats like SQL injection and XSS.
Control User Permissions: Assign user roles carefully and limit access to only those necessary for their tasks to prevent unauthorized actions.
Monitor and Respond to Incidents: Use monitoring tools to detect unusual activities or breaches. Develop a clear incident response plan to address any security issues swiftly.
Conclusion
In today’s digital landscape, securing your CMS website is essential. By proactively implementing these security measures, you can protect your site from a range of cyber threats and ensure the safety of your data and business.
At 5ine, we are committed to helping you navigate the complexities of website security. As a leading provider of CMS website development services in Bangalore, we specialize in creating secure, high-performance websites tailored to your needs. Reach out to us today to enhance your online security and safeguard your digital assets. Your website’s protection is our priority.
0 notes
Text
Understanding How Cyber Attacks Happen

In today's digitally driven world, cyber attacks have become an ever-present threat, targeting individuals, businesses, and governments alike. Understanding how these attacks occur is crucial for bolstering cybersecurity defenses and mitigating potential risks. In this blog, we'll delve into the various methods and techniques used by cybercriminals to launch attacks and compromise systems.
Introduction to Cyber Attacks
A cyber attack refers to any deliberate attempt to exploit vulnerabilities in computer systems, networks, or software to compromise data, steal information, or disrupt operations. These attacks can take various forms and are perpetrated by individuals, organized crime groups, state-sponsored actors, and even insiders with malicious intent.
Read Also-online betting se bank account kese unfreeze karaye
Common Methods of Cyber Attacks
Malware: Malware, short for malicious software, is a broad category of software designed to infiltrate systems and cause harm. This includes viruses, worms, Trojans, ransomware, and spyware. Malware is typically delivered through email attachments, malicious websites, or infected USB drives.
Phishing: Phishing attacks involve tricking individuals into divulging sensitive information such as usernames, passwords, or financial details. Attackers masquerade as legitimate entities, often via email or fake websites, and persuade recipients to click on malicious links or provide personal information.
Denial-of-Service (DoS) and Distributed Denial-of-Service (DDoS) Attacks: These attacks aim to disrupt the normal functioning of a website or network by overwhelming it with a flood of traffic. In a DoS attack, a single source is used to flood the target, while a DDoS attack employs multiple compromised devices, creating a distributed network of attackers.
Man-in-the-Middle (MitM) Attacks: MitM attacks occur when a cybercriminal intercepts communication between two parties to eavesdrop, modify, or steal data. This is often achieved by compromising network devices or exploiting vulnerabilities in communication protocols.
SQL Injection: SQL injection attacks target websites and web applications that use a database backend. By inserting malicious SQL queries into input fields, attackers can manipulate the database, extract sensitive information, or even execute arbitrary commands on the server.
Social Engineering: Social engineering tactics exploit human psychology to deceive individuals into divulging confidential information or performing actions that compromise security. This may involve pretexting, baiting, or eliciting information through impersonation or manipulation.
Read Also- online gaming se bank account kese unfreeze karaye
Anatomy of a Cyber Attack
While the specific techniques employed in a cyber attack may vary, the general process typically follows these stages:
Reconnaissance: Attackers gather information about the target, including its infrastructure, systems, and potential vulnerabilities. This may involve scanning network ports, conducting OSINT (open-source intelligence) research, or probing for weaknesses.
Weaponization: Once vulnerabilities are identified, attackers craft or acquire malicious tools and payloads tailored to exploit those weaknesses. This could involve developing custom malware, phishing emails, or exploit kits.
Delivery: The malware or malicious content is delivered to the target's systems or users through various channels, such as email attachments, compromised websites, or removable media. Social engineering techniques may be employed to increase the likelihood of successful delivery.
Exploitation: Upon execution, the malware exploits vulnerabilities in the target's systems or applications to achieve its objectives, which may include stealing data, encrypting files for ransom, or establishing persistent access for future attacks.
Installation: The malware installs itself on the compromised systems, often evading detection by antivirus software or other security measures. It may establish communication with command-and-control (C&C) servers to receive instructions from the attacker.
Command and Control: The attacker gains control over the compromised systems, allowing them to remotely execute commands, exfiltrate data, or launch further attacks. This control is maintained through communication channels established with the C&C infrastructure.
Actions on Objectives: With access to the target's systems or data, the attacker proceeds to carry out their objectives, which may range from data theft and financial fraud to system disruption or espionage. The duration and extent of these actions depend on the attacker's goals and motivations.
Read Also- binance trading se bank account kese unfreeze karaye
Conclusion
Cyber attacks pose a significant threat to individuals, organizations, and societies at large, with potentially devastating consequences. By understanding the methods and techniques employed by cybercriminals, as well as the stages of a typical attack, individuals and organizations can better prepare themselves to detect, prevent, and mitigate the impact of cyber threats. Vigilance, education, and proactive security measures are essential in the ongoing battle against cybercrime.
0 notes
Text
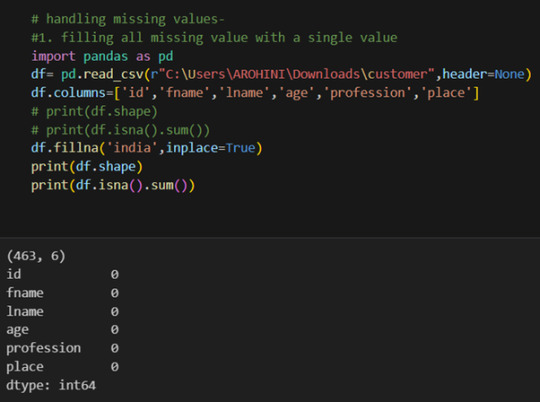
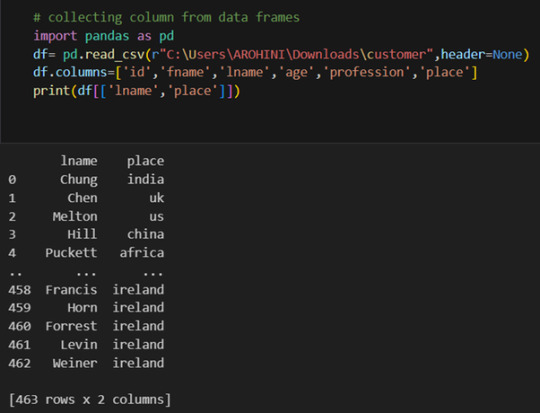
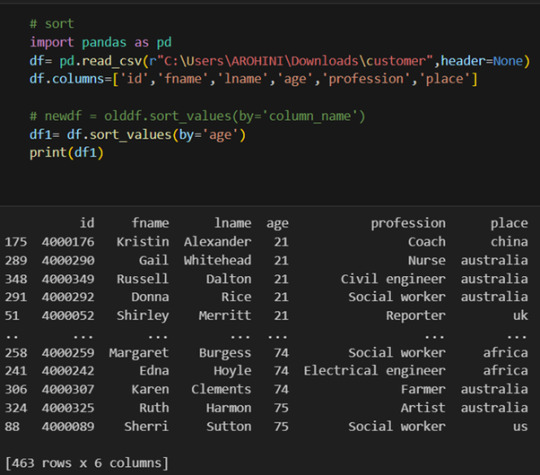
Beginner’s Guide: Data Analysis with Pandas
Data analysis is the process of sorting through all the data, looking for patterns, connections, and interesting things. It helps us make sense of information and use it to make decisions or find solutions to problems. When it comes to data analysis and manipulation in Python, the Pandas library reigns supreme. Pandas provide powerful tools for working with structured data, making it an indispensable asset for both beginners and experienced data scientists.
What is Pandas?
Pandas is an open-source Python library for data manipulation and analysis. It is built on top of NumPy, another popular numerical computing library, and offers additional features specifically tailored for data manipulation and analysis. There are two primary data structures in Pandas:
• Series: A one-dimensional array capable of holding any type of data.
• DataFrame: A two-dimensional labeled data structure similar to a table in relational databases.
It allows us to efficiently process and analyze data, whether it comes from any file types like CSV files, Excel spreadsheets, SQL databases, etc.
How to install Pandas?
We can install Pandas using the pip command. We can run the following codes in the terminal.

After installing, we can import it using:

How to load an external dataset using Pandas?
Pandas provide various functions for loading data into a data frame. One of the most commonly used functions is pd.read_csv() for reading CSV files. For example:

The output of the above code is:
Once your data is loaded into a data frame, you can start exploring it. Pandas offers numerous methods and attributes for getting insights into your data. Here are a few examples:
df.head(): View the first few rows of the DataFrame.
df.tail(): View the last few rows of the DataFrame.
http://df.info(): Get a concise summary of the DataFrame, including data types and missing values.
df.describe(): Generate descriptive statistics for numerical columns.
df.shape: Get the dimensions of the DataFrame (rows, columns).
df.columns: Access the column labels of the DataFrame.
df.dtypes: Get the data types of each column.
In data analysis, it is essential to do data cleaning. Pandas provide powerful tools for handling missing data, removing duplicates, and transforming data. Some common data-cleaning tasks include:
Handling missing values using methods like df.dropna() or df.fillna().
Removing duplicate rows with df.drop_duplicates().
Data type conversion using df.astype().
Renaming columns with df.rename().
Pandas excels in data manipulation tasks such as selecting subsets of data, filtering rows, and creating new columns. Here are a few examples:
Selecting columns: df[‘column_name’] or df[[‘column1’, ‘column2’]].
Filtering rows based on conditions: df[df[‘column’] > value].
Sorting data: df.sort_values(by=’column’).
Grouping data: df.groupby(‘column’).mean().
With data cleaned and prepared, you can use Pandas to perform various analyses. Whether you’re computing statistics, performing exploratory data analysis, or building predictive models, Pandas provides the tools you need. Additionally, Pandas integrates seamlessly with other libraries such as Matplotlib and Seaborn for data visualization
#data analytics#panda#business analytics course in kochi#cybersecurity#data analytics training#data analytics course in kochi#data analytics course
0 notes
Text
DOWNLOAD ORACLE APEX 20.2

Unlock Low-Code Development Power: Download Oracle APEX 20.2
Oracle Application Express (APEX) is a powerful, low-code development platform for building enterprise-grade web applications. Version 20.2 offers exciting new features and enhancements. Let’s explore how to download and get started with this impressive tool.
Where to Find Oracle APEX 20.2 Downloads
Official Website: Oracle provides dedicated download pages for APEX releases. Visit the APEX downloads section on the official Oracle website: https://www.oracle.com/tools/downloads/apex-downloads/
Prior Release Archives: If you need to download APEX 20.2 specifically, you’ll find it in the archives: https://www.oracle.com/tools/downloads/apex-all-archives-downloads/
Download Steps
Find the Link: On either the main downloads page or the archives, locate the download link for Oracle APEX 20.2.
Accept Agreement: You’ll likely need to accept Oracle’s licensing agreement before proceeding.
Start the Download: The download should begin automatically.
System Requirements
Before downloading, ensure you meet the system requirements for Oracle APEX 20.2. You’ll need:
Supported Database: Oracle Database (version 11gR2 or later)
Web Server: Oracle REST Data Services (ORDS) or an embedded PL/SQL gateway (EPG)
Web Browser: Modern, standards-compliant browser (Chrome, Firefox, Edge, etc.)
Installation Considerations
Oracle APEX 20.2 can be installed in various ways:
Oracle Cloud: Deploy an instance on Oracle Cloud Infrastructure.
On-premises: Install APEX on your local or company-owned server infrastructure.
Hosted workspace: Request a workspace at apex.oracle.com for quick testing and development.
What’s New in APEX 20.2
Here’s a taste of the enhancements you’ll find in Oracle APEX 20.2:
New Card Component: Build visually appealing and flexible card-based layouts.
Faceted Search Enhancements: Offer refined search experiences for users.
Automation: Simplify tasks and workflows with powerful automation capabilities.
Performance Improvements: Enjoy increased speed and efficiency in your APEX applications.
Start Building with APEX
After downloading and installing, you’re ready to begin your APEX journey! Oracle provides excellent documentation and community resources.
Official Documentation: https://docs.oracle.com/en/database/oracle/application-express/20.2/
Oracle APEX Community: [invalid URL removed]
In Summary
Oracle APEX 20.2 empowers developers with a potent low-code platform for building sophisticated web applications. Download it to learn how it accelerates web development.
youtube
You can find more information about Oracle Apex in this Oracle Apex Link
Conclusion:
Unogeeks is the No.1 IT Training Institute for Oracle Apex Training. Anyone Disagree? Please drop in a comment
You can check out our other latest blogs on Oracle Apex here – Oarcle Apex Blogs
You can check out our Best In Class Oracle Apex Details here – Oracle Apex Training
Follow & Connect with us:
———————————-
For Training inquiries:
Call/Whatsapp: +91 73960 33555
Mail us at: [email protected]
Our Website ➜ https://unogeeks.com
Follow us:
Instagram: https://www.instagram.com/unogeeks
Facebook: https://www.facebook.com/UnogeeksSoftwareTrainingInstitute
Twitter: https://twitter.com/unogeeks
0 notes
Text
Start Your SQL Journey Today: Beginner's Tutorial for Programming Newbies
Are you eager to dip your toes into the vast world of programming? If so, SQL (Structured Query Language) is an excellent place to start! Whether you're an aspiring data analyst, a business professional looking to enhance your skills, or simply curious about databases, SQL offers a straightforward entry point into the realm of programming. In this beginner's tutorial, we'll take you through the basics of SQL in a simple and easy-to-understand manner, so you can kickstart your SQL journey with confidence.
Understanding SQL: A Brief Introduction
SQL, often pronounced as "sequel," is a specialized programming language designed for managing and manipulating relational databases. Relational databases store data in tables consisting of rows and columns, and SQL allows users to perform various operations on these databases, such as querying, updating, inserting, and deleting data.
Setting Up Your Environment
Before diving into SQL, you'll need to set up your environment. Fortunately, getting started with SQL is hassle-free, as there are several user-friendly platforms and tools available for beginners. One popular option is SQLite, a lightweight, self-contained SQL database engine that requires minimal setup. You can download SQLite for free and install it on your computer to begin practicing SQL queries right away.
Learning the Basics: SQL Syntax
SQL syntax may seem intimidating at first glance, but fear not – it's much simpler than it appears. Let's break down some fundamental SQL commands to get you started:
SELECT Statement: The SELECT statement is used to retrieve data from a database. You can specify which columns you want to retrieve and apply conditions to filter the results. Example:
sql
Copy code
SELECT column1, column2 FROM table_name WHERE condition;
INSERT Statement: The INSERT statement is used to add new records to a table. Example:
sql
Copy code
INSERT INTO table_name (column1, column2) VALUES (value1, value2);
UPDATE Statement: The UPDATE statement is used to modify existing records in a table. Example:
sql
Copy code
UPDATE table_name SET column1 = value1 WHERE condition;
DELETE Statement: The DELETE statement is used to remove records from a table. Example:
sql
Copy code
DELETE FROM table_name WHERE condition;
Creating Your First Database
Now that you're familiar with some basic SQL commands, let's create your first database. Imagine you're building a simple address book application. We'll create a table named "contacts" to store contact information, including names, phone numbers, and email addresses.
Creating a Table: We'll use the CREATE TABLE statement to define the structure of our "contacts" table. Example:
vbnet
Copy code
CREATE TABLE contacts (
id INTEGER PRIMARY KEY,
name TEXT,
phone TEXT,
email TEXT
);
Inserting Data: Next, we'll use the INSERT INTO statement to add some sample data to our table. Example:
sql
Copy code
INSERT INTO contacts (name, phone, email) VALUES ('John Doe', '123-456-7890', '[email protected]');
INSERT INTO contacts (name, phone, email) VALUES ('Jane Smith', '987-654-3210', '[email protected]');
Retrieving Data with SELECT Statements
Now that we've created our database and populated it with some data, let's retrieve information from the "contacts" table using the SELECT statement.
Selecting All Columns: To retrieve all columns from the table, we can use the asterisk (*) wildcard. Example:
sql
Copy code
SELECT * FROM contacts;
Filtering Results: We can use the WHERE clause to filter the results based on specific conditions. Example:
sql
Copy code
SELECT * FROM contacts WHERE name = 'John Doe';
Updating and Deleting Data
In real-world scenarios, you may need to update or delete existing data in your database. Let's explore how to do this using SQL.
Updating Records: Suppose John Doe's phone number has changed. We can use the UPDATE statement to modify his phone number. Example:
sql
Copy code
UPDATE contacts SET phone = '555-123-4567' WHERE name = 'John Doe';
Deleting Records: If Jane Smith decides to remove her contact information from our address book, we can use the DELETE statement to delete her record. Example:
sql
Copy code
DELETE FROM contacts WHERE name = 'Jane Smith';
Conclusion: Your SQL Journey Begins Here
Congratulations! You've taken your first steps into the exciting world of SQL. In this beginner's tutorial, we covered the basics of SQL syntax, creating databases and tables, inserting and retrieving data, and updating and deleting records. Remember, practice makes perfect – continue experimenting with SQL queries and exploring its capabilities to further enhance your skills. With dedication and persistence, you'll soon become proficient in SQL and unlock endless opportunities in the field of data management and analysis. So, what are you waiting for? Start your SQL journey today and embark on an exciting adventure into the world of databases and programming!
0 notes
Text
How to Visualize Data Using Tableau: A Beginner-Friendly Guide for 2025

In today’s digital age, businesses, analysts, and professionals rely heavily on data to make smart decisions. But raw data can be overwhelming and hard to understand without the right tools. That’s where Tableau comes in. Whether you're just starting out or looking to sharpen your skills, mastering data visualization with Tableau course can help you uncover patterns, share insights, and tell compelling stories with data.
This guide will show you how to visualize data using Tableau in a clear, practical way. You’ll learn how to get started, create dashboards, choose the right chart types, and avoid common mistakes—all while keeping the experience intuitive and enjoyable.
What is Tableau and Why Is It So Popular?
Tableau is a leading data visualization and business intelligence platform that allows users to connect, explore, and visualize data without needing advanced programming knowledge. Its drag-and-drop interface and real-time analytics capabilities make it one of the most accessible and powerful tools in the data world.
People from all industries—from finance to marketing to healthcare—use Tableau to turn complex datasets into interactive visuals. You can connect Tableau to various sources like Excel, Google Sheets, SQL databases, or cloud storage services and build customized dashboards that make data easy to understand and act upon.
Why Choose Tableau for Data Visualization?
Tableau stands out in the crowded field of data tools for several reasons. Its intuitive design lets users focus on insights rather than coding. Its flexibility allows for deep analysis across different data types and platforms. And its interactive features make dashboards more engaging for users and decision-makers alike.
For instance, imagine you’re tracking customer engagement over time. With Tableau, you can easily pull data from your CRM, highlight trends using a line graph, add filters to drill down by region or product, and instantly share the results with your team—all without writing a single line of code.
Getting Started: Installing and Setting Up Tableau
To begin, head over to theTableau website and download either Tableau Public (free) or Tableau Desktop (a more advanced paid version with a trial option). Once installed, open the software and familiarize yourself with the interface.
You’ll notice a clean, drag-and-drop workspace and a navigation pane that lets you connect to data sources, create new worksheets, and build dashboards. Don’t worry if it looks unfamiliar—Tableau is designed to be beginner-friendly, and you’ll get the hang of it quickly.
Connecting to Your Data Source
After launching Tableau, the first step is to connect your data. Click “Connect” on the start screen and select the file or database you want to use. This could be an Excel file, a CSV, Google Sheets, or a cloud database.
Once connected, Tableau will show a preview of your dataset. Check for formatting issues, rename any unclear column headers, and make sure the data types (such as dates or numbers) are correctly identified. If you’re working with a messy spreadsheet, Tableau’s built-in Data Interpreter can help clean it up for you.
Preparing Your Data Before Visualization
Clean, well-organized data is the foundation of any good visualization. Before jumping into charts, spend time reviewing and preparing your dataset. Remove duplicates, handle missing values, and create calculated fields if needed (for example, profit margins or growth rates).
It’s also helpful to categorize your data into dimensions (such as regions or product names) and measures (like sales or revenue). This distinction is key to using Tableau’s visual tools effectively and helps guide how you’ll tell your story through visuals.
Choosing the Right Visualization Type
Not all charts are created equal, and choosing the wrong one can make your data harder to understand. Tableau offers many types of visualizations, but it’s important to pick the one that best matches the question you’re trying to answer. Here are a few common examples:
Bar Charts: Great for comparing different categories.
Line Charts: Perfect for showing trends over time.
Pie Charts: Useful for displaying proportions, though best kept simple.
Heat Maps: Ideal for identifying intensity or density across areas.
Scatter Plots: Best for examining relationships between variables.
Let’s say you want to compare sales performance across regions over a year. A line chart with filters by region might work well. But if you want to visualize market share among different products, a pie chart might be more appropriate—though it’s generally best to use them sparingly.
Building Your First Visualization
Once your data is ready, it's time to build your first visual. Drag dimensions and measures into the “Rows” and “Columns” shelves. Tableau will automatically generate a visualization based on your selections. You can also use the “Show Me” panel for suggestions based on the data structure.
Add color, labels, and tooltips to highlight important details. Apply filters to focus on specific time periods or categories. As you experiment, you’ll see how quickly raw numbers can turn into a visual story that’s easy to understand and share.
Creating Interactive Dashboards That Tell a Story
Dashboards allow you to combine multiple visualizations into one interface. This is useful when you want to explore data from several angles or present a full picture to stakeholders.
To create a dashboard, click on “Dashboard” in the top menu and choose “New Dashboard.” Drag your worksheets onto the layout space. You can add filters, legends, and actions that let users click through different parts of the data.
This is where Tableau really shines. You can build dashboards that update in real-time, respond to user input, and even display differently depending on the device (desktop, tablet, mobile).
Tips for More Effective Tableau Visualizations
After getting the basics down, keep these tips in mind to make your visualizations more impactful:
Keep it simple: Avoid visual clutter. Use whitespace and limit the number of visuals per dashboard.
Use color with purpose: Reserve bold colors for highlights or outliers, and keep your color scheme consistent.
Label clearly: Make sure your audience doesn’t have to guess. Every axis, filter, or label should serve a purpose.
Focus on the story: Every dashboard should answer a question or support a decision. Structure your visuals to guide users from one insight to the next.
Publishing and Sharing Your Work
Once you’re happy with your dashboard, you can either save it locally or publish it online. Tableau Public lets you host dashboards for free, while Tableau Server and Tableau Online offer secure sharing options for teams and organizations.
You can share a direct link, embed dashboards on websites, or export them as PDFs. When sharing sensitive data, make sure to configure permissions properly to control who can view or edit the content.
Conclusion
Learning how to visualize data with Tableau isn’t just a technical skill—it’s a way to communicate more effectively in a world that’s driven by data. Whether you’re analyzing sales numbers, customer feedback, or website traffic, Tableau gives you the tools to transform that data into insights that matter.
0 notes
Text
Master SQL for Data Science Complete Guide – Steps, Roadmap, and Importance of SQL
Introduction
In today's data-driven world, SQL (Structured Query Language) has become an essential tool for anyone involved in data science. Whether you are a beginner or an experienced data scientist, mastering SQL is crucial for extracting valuable insights from databases efficiently. This comprehensive guide will take you through the necessary steps, roadmap, and the significance of SQL in the field of data science. And if you are looking to kickstart your data science journey, consider enrolling in Skillslash Academy's Data Science Course in Pune, which provides comprehensive training and certification.

Getting Started with SQL
SQL, the language of databases, provides a powerful way to manage and manipulate data. To begin your journey into mastering SQL for data science, the first step is to install and configure SQL on your system. You can choose from various SQL implementations, such as MySQL, PostgreSQL, or Microsoft SQL Server, based on your requirements.
Once you have SQL set up, it's essential to familiarize yourself with the basic SQL syntax. SQL follows a straightforward structure, and its primary command is the SELECT statement, which is used to retrieve data from databases. To filter and sort the data, you can use WHERE and ORDER BY clauses, respectively.
Working with SQL Functions
SQL functions play a crucial role in data manipulation and analysis. Aggregate functions like COUNT, SUM, AVG, MIN, and MAX allow you to perform calculations on groups of data. String functions help in manipulating and extracting information from text fields, while date and time functions assist in handling date-related data.
Joins and Unions
In real-world scenarios, data often resides in multiple tables. SQL joins enable you to combine data from different tables based on common columns. There are various types of joins, such as inner joins and outer joins, each serving different purposes. Additionally, the UNION operator allows you to combine the results of two or more SELECT queries.
Subqueries and Nested Queries
Subqueries, also known as nested queries, are queries within queries. They allow you to break down complex problems into smaller, more manageable parts. Correlated subqueries depend on the outer query's results, whereas nested queries are independent.
Data Manipulation with SQL
Data manipulation is a critical aspect of SQL, as it involves inserting, updating, and deleting data in databases. You'll learn how to add new records to tables, modify existing data, and remove unwanted entries. Furthermore, understanding how to alter table structures is essential for database maintenance.
Advanced SQL Techniques
To optimize your SQL performance, you need to delve into advanced techniques. Indexing helps speed up data retrieval, and views provide a way to store complex queries as virtual tables. Stored procedures and functions aid in reusing code and streamlining database operations.
SQL for Data Analysis
Data analysis is at the heart of data science. SQL allows you to aggregate data, pivot tables, and handle missing data effectively. These skills are vital for extracting meaningful insights and supporting decision-making processes.
SQL for Data Visualization
While SQL excels at data manipulation, it can also be integrated with visualization tools to create stunning data visualizations and interactive dashboards. Communicating insights visually enhances data understanding and aids in effective communication.
Real-world Applications of SQL in Data Science
SQL's practical applications in data science are vast. Whether it's predicting customer behavior, segmenting users, or performing market basket analysis, SQL is a fundamental tool in turning raw data into actionable insights.
SQL Best Practices and Tips
As with any programming language, adhering to best practices is essential for writing maintainable and efficient SQL code. Proper naming conventions, writing optimized queries, and guarding against SQL injection are among the practices that will elevate your SQL skills.
Conclusion
Mastering SQL is an indispensable skill for anyone aspiring to excel in data science. This guide has provided you with a comprehensive roadmap to navigate through the world of SQL step by step. By understanding SQL functions, joins, subqueries, and advanced techniques, you'll be well-equipped to analyze data, create visualizations, and solve real-world problems efficiently.
FAQs
Q: Is SQL difficult to learn for beginners?
A: SQL has a relatively simple syntax, making it accessible for beginners. With practice and dedication, anyone can master SQL.
Q: Which SQL implementation should I choose for data science?
A: The choice of SQL implementation depends on your project requirements and preferences. Popular options include MySQL, PostgreSQL, and Microsoft SQL Server.
Q: Can I use SQL for big data analysis?
A: SQL is suitable for managing and analyzing large datasets. However, for big data, you may also consider specialized tools like Hadoop and Spark.
Q: What is the difference between SQL and NoSQL databases?
A: SQL databases are relational and use structured query language, while NoSQL databases are non-relational and offer flexible data models.
Q: Are SQL skills in demand in the job market?
A: Yes, SQL skills are highly sought after in the job market, especially in data-related roles.
Get Started with Skillslash Academy's Data Science Course!
If you're serious about pursuing a career in data science, consider enrolling in Skillslash Academy's Data Science Course in Pune. This comprehensive training program covers everything from SQL fundamentals to advanced data analysis techniques. By the end of the course, you'll gain the expertise needed to excel in data science and earn a valuable certification.
0 notes
Text
Mysql Workbench Download Mac

MySQL Database Service. MySQL Database Service is a fully managed database service to deploy cloud-native applications using the world’s most popular open source database. It is 100% developed, managed and supported by the MySQL Team.
Mysql Workbench Commands
Workbench For Mac
Please note that SQL Workbench/J has no relation to the product MySQL Workbench which is maintained and owned by Oracle. If you are looking for MySQL Workbench support please contact Oracle.
SQL Workbench/J - Downloads. Please note that SQL Workbench/J has no relation to the product MySQL Workbench which is maintained and owned by Oracle. If you are looking for MySQL Workbench support please contact Oracle. SQL Workbench/J requires Java 8 or later. Using Java 11 or later is highly recommended, especially with High-DPI screens. MySQL Workbench for macOS is distributed as a DMG file. The file is named mysql-workbench-community-version-osx.dmg, where version is the MySQL Workbench version. MySQL Workbench provides platform support for the latest version of macOS only (see supported platforms).The previous version continues to be supported for a transition period of six months after each new version of. Oct 08, 2018 Steps to Install MySQL Workbench 8.0 on Mac OS X Mojave Step 1. Download the Installer. Follow this link to download the latest version of MySQL Workbench 8.0 for Mac. When I write this article, the Workbench version 8.0.12 is available. Download mysql workbench mac, mysql workbench mac, mysql workbench mac download free.
SQL Workbench/J requires Java 8 or later
Using Java 11 or later is highly recommended, especially with High-DPI screens. Build 127 is the last build to support Java 8. Starting with the next build, Java 11 will be required.
Stable release
Current stable release: Build 127, 2020-08-22 (Release History)
The generic package contains the jar file, the manual (HTML and PDF), shell scripts for Linux/Unix based systems (including MacOS) to start the application as well as a Windows® launcher and sample XSLT scripts.
The download includes the language files for English and German. The application's language can be changed from within the options dialog (Tools -> Options).
If you want to import or export Microsoft Excel files (XLS, XLSX) or import OpenOffice Calc documents, download the 'Generic package including all optional libraries' (approx. 30MB). If you are in doubt which one to use, download that.
Please see Creating a macOS executable for a short description on how to build a macOS executable using 'Automator'.
Change in the directory layout!
Starting with build 125 all additional libraries (e.g. for Excel exports) are expected in the sub-directory ext relative to the directory where sqlworkbench.jar is located. The location of the JDBC drivers is not affected by this.
If you download the archive 'with optional libraries', the libraries will automatically be extracted into the ext subdirectory and you can remove the existing libraries from directory where sqlworkbench.jar is located.
Generic package for all systems including all optional libraries (sha1)
Generic package for all systems without support for importing or exporting Excel or OpenOffice spreadsheets (sha1)
Source code (sha1)
Please note:
If you have copied the jar files for the Excel and OpenOffice support before, please delete all existing files from the ext subdirectory before extracting the new archive as some of the library names have changed.
Older versions can be downloaded from the download archive
You can subscribe to the RSS Feed to receive information about new releases
If you are having problems unzipping the distribution archive with WinZip, please read this.
Mysql Workbench Commands
Current development build: 127.1 ( 2020-10-18)
Workbench For Mac
1 note
·
View note
Text
Download Ad Blocker For Mac Free

Written by Eyeo GmbH
Free Ad Blocker Windows 7
Ad Blocker For Mac Safari Free Download
Best Free Ad Blocker Mac
Ad Blocker For Macbook Air
Best Free Ad Blocker
Category: Productivity
Release date: 2019-11-27
Licence: Free
Software version: 2.1.0
File size: 19.24 MB
Compatibility: Windows 10/8.1/8/7/Vista and Mac OS X 10.12.6
Adblock Plus for Safari for PC and Mac Screenshots
Adblock for Mac, free and safe download. Adblock latest version: Block ads in Google Chrome. UBlock, the fastest, most powerful ad blocker for Mac is here. UBlock blocks all annoying pop-ups and ads while you browse on your Mac. It’s simple, easy-to-install, and best of all- completely free. Download uBlock ad blocker for Mac and browse faster today.
Key Features
Latest Version: 2.1.0
Licence: Free
Rated 3/5 By 740 People
What does Adblock Plus for Safari do? Adblock Plus for Safari is a totally free ad blocker that allows you to block annoying ads on your favorite websites and video channels. Simply install the app, and see the web in a better way. No more pop-ups, banners or autoplay ads. The Adblock Plus app for Mac supports great websites with Acceptable Ads (on by default). Don’t want to see any ads? Simply deactivate Acceptable Ads. You can also have the option to whitelist websites you trust.By downloading and installing the application, you agree to our Terms of Use. https://adblockplus.org/terms
Download for MacOS - server 1 --> Free
Download and Install Adblock Plus for Safari
Download for PC - server 1 --> MAC:


Download for MacOS - server 1 --> Free Thank you for visiting our site. Have a nice day!
PC Compactibility/Requirements for Installation
Compactible OS list:
Windows 10
Windows 8.1
Windows 7
Windows Vista
Free Ad Blocker Windows 7
Requirements for MacOS Installation
Ad Blocker For Mac Safari Free Download
Intel, 64-bit processor, OS X 10.7 or later.
Compactible OS list:
OS X 10.10: Yosemite
OS X 10.11: El Capitan
macOS 10.12: Sierra
macOS 10.13: High Sierra
macOS 10.14: Mojave8
macOS 10.15: Catalina
Adblock Plus for Safari - how do I download the app on PC?
If you want to download the software on your pc or mac, you could either first visit the Mac store or Windows AppStore and search for the app OR you can easily use any of the download links we provided above under the 'Download and Install' header section to download the application
Adblock Plus for Safari - Is it safe to download?
Yes. The app is 100 percent (100%) safe to download and Install. Our download links are from safe sources and are frequently virus scanned to protect you
By Glendale2x
New framework seems to have performance issues
This version of ABP for the new Safari framework unfortuantely seems to kill performance on my computers. Maybe it’s partially related to them being a bit older (one is a Mid 2011 Mini, the other is a 2012 iMac), but with ABP enabled I can’t even open a new tab/window and type a URL into the bar and expect Safari to accept the input without having to hold down the return key until it goes or wait a minute after opening a new tab or window. I also noticed that using Twitter was jumpy and lagged even with simple typing, it felt like all the dynamic content it relies on was just struggling to be processed through whatever framework Apple is forcing. Hopefully the devloper can figure out the performance issues because it’s really, really bad now.
By Ramblin'Rose
why isn’t this working?
I have ABP and it wasn’t perfect but worked fairly well for my needs. Recently, it simply disappeared. (I see someone else said that could be from the latest iOS update, but I don’t have that on my desktop yet). When I tried to reinstall, it showed me two boxes to check. The way I read it, if you checked the box that said you wanted the icon visible in the toolbar, it would be able to read sensitive information of all kinds on any page. What good is an app of any kind that allows for that?! As it was, with only the one box checked, it only blocked very few ads, and I was still getting requests from sites to be whitelisted without being able to fnd any way to do it. I’ve got all kinds of garage showing up on my Facebook page, and you guys have ruined what was a reasonable product. WHY?
By PeopleRsad
Still works for me
Almost didn’t download the new version based on the recent reviews, however after looking at the other apps here that claim to be ad blockers I didn’t’t see too many alternatives. I decided to go ahead and get the new version and so far its pretty much the same as the old version, lots of ads blocked. I’m happy, just make sure you go through the simple set-up.
By achilds19
Works well but
After much research, I understand the issue with Apple changing the rules on the devs so they had to build this app from scratch. Works well for me so far, except for one annoying problem. I use Yahoo mail and it's not hiding the ad that appears in the top line of the inbox even with unchecking the Acceptable Ads box, which is super annoying. I know the devs are watching these reviews, so if someone can point me to an extension or something that will fix that, I'd appreciate it. Was using AdGuard and it fixed that problem, but that app behaves like spyware and is constantly running in the background even after you close Safari.
Advertisement
Adguard for Mac v.1.1.0Adguard is the first standalone adblocker for Mac OS X. It is an ultimate program has all the features to ensure more efficient and comfortable use of the Internet. Ad blocking, phishing and malware protection, and privacy protection!
SlimBoat for Mac v.1.1.6SlimBoat is a fast and secure FREE web browser software with a lot of powerful features, such as intelligent form filler, popup blocker, adblocker, social network integration, download manager, web page translation, quick search and site groups.
Safari AdBlocker for Mac OS v.1.9.8.6The only 64-bit adblocker built for Mac OS X 10.5+ to integrate directly into Safari, for minimum disruption to your browsing experienceMain Features- Adblock Plus subscription support- Right-click to block images, and frames- Automatic ...
Vivaldi for MacOS v.3.2.1967The Vivaldi browser lets you be in control of how your browser looks, feels and works. It does not track you, adapts to your style with features that you need and has values that you can stand by.
Maiar Browser v.80.0.1.40Maiar is an extremely fast and privacy-friendly browser for the modern web. It loads major websites 2-8 times faster than Chrome and Safari. Maiar can block ads without modules or extensions.
Izenda Ad Hoc - Express Edition v.4.0Izenda Ad Hoc - Agile Business Intelligence for ASP.NETLiberate Your Organization's Relational Data Today!Izenda Ad Hoc empowers business users to directly explore relational data from a web browser. * Intuitive and Completely Web-Based AJAX Report ...
Avian Freeware Suite v.0.1Avian Freeware Suite (AFS) provides two things: Developers with libraries for Java Swing Widgets, XML handling, Fortran95 and Pascal; End users (Medical students, doctors, scientists) with productivity tools they can use (quizzes, XML databasing & ...
IP Blocker v.20050403IP Blocker is an incident response tool that automatically updates access control lists on Cisco routers and other devices. Web and command line interfaces are both supported, as is logging, email notification, and automatic expiration of ...
QR-Code Maker Freeware v.1.0.0Use QR-Code Studio to create QR codes for free. An assistant simplifies the creation of QR codes for mobile tagging, social media and more. The generated QR-Codes are available immediately as BMP, GIF, JPG, PNG and TIFF graphic file.
Freeware Advanced Audio Coder v.2.2.7FAAC is an Advanced Audio Coder (MPEG2-AAC, MPEG4-AAC). The goal of FAAC is to explore the possibilities of AAC and exceed the quality of the currently best MP3 ...
Zhang Hong's Freeware v.1.0[1] English-Portuguese-Chinese Dictionary [2] Japanese-English-Chinese Dictionary [3] MP3 Sponge [4] JPG Sponge [5] RedDays [6] RadSensor [7] descriptions and updates: ...
Mimosa Scheduling Software Freeware v.6.5.8Mimosa is a scheduling and event planning software application for use to create timetables in any kind of school and university of varying type and size. It is also used to schedule conferences and work-shifts in business and industry environments.
Flash Banner Maker for Mac v.1.00With AnvSoft Flash Banner Maker for Mac, you can easily create gorgeous flash banners in SWF format and html file for flash intros or for building website. You can add any image backgroud from your hard drive and choose from the 50+ animation effects for.
BiblePlayer for iPod v.1.1Take God’s Word to Go! Do you need to have a daily dose of bible scriptures? Or maybe you need a bible reading plan? Now you can read and listen to the King James version of the Bible on your iPod with this new freeware program. Bibleplayer ...
Mach-O OSAX v.0.1Mach-O OSAX is a scripting addition for CodeWarrior which provides different samples. The package is completly freeware and the source code is ...
QuickCart v.2.2QuickCart 2.2 is regarded as a flexible and handy program which is designed to run your own web shop. Freeware and easy to use e-commerce solution is designed to run Your own web shop. As a database it uses files structure so that the SQL database is ...
Flippagemaker PDF to Flash (SWF) for Mac v.1.0.0Flippagemaker Free PDF to Flash (SWF) for Mac is freeware for Mac users to convert pdf to swf flash video. Create Macromedia Flash (SWF) file from Adobe PDF file for embedding into web page easily.
DVDSmith Movie Backup v.1.0.0DVDSmith Movie Backup is DVD Decrypter, DVD copying Freeware to backup, clone or copy DVD movie to computer as DVD folder and removes all the protections (CSS, RC, RCE, APS, UOPs and Sony ARccOS) while copying.
Hubblescreensavermac v.1.0'Hubble Space Telescope (Mac) free screensaver containing 99 high quality NASA-ESA space images. Screensaver designed by the Creative Department, an award winning advertising and interactive agency based in Cincinnati. Fully functional freeware.' ...
MediaHuman Audio Converter MAC v.1.8MediaHuman Audio Converter is a freeware for Mac OS X. It can help you in case you need to convert your music in WMA, AAC, WAV, FLAC, OGG or Apple Loseless format. This program was designed to simplify as much as possible the process of conversion.
Best Free Ad Blocker Mac

Freeware Ad Blocker software by TitlePopularityFreewareLinuxMac
Ad Blocker For Macbook Air
Today's Top Ten Downloads for Freeware Ad Blocker
Best Free Ad Blocker
Zoiper Webphone ZOIPER webphone is fully-compliant with Internet Explorer,
1000apps NetVibes Widget Avec ce Widget vous pourrez rechercher des logiciels ,
Vivaldi for MacOS The Vivaldi browser lets you be in control of how your
QR-Code Maker Freeware Use QR-Code Studio to create QR codes for free. An assistant
Flash Banner Maker for Mac With AnvSoft Flash Banner Maker for Mac, you can easily
PC Protect Your PC First screensaver application protecting your PC from
Flippagemaker PDF to Flash (SWF) for Mac Flippagemaker Free PDF to Flash (SWF) for Mac is freeware
DVDSmith Movie Backup DVDSmith Movie Backup is DVD Decrypter, DVD copying
Maiar Browser Maiar is an extremely fast and privacy-friendly browser for
BiblePlayer for iPod Take God’s Word to Go! Do you need to have a daily
Visit HotFiles@Winsite for more of the top downloads here at WinSite!
2 notes
·
View notes
Text
Ensuring the Security of Your CMS Website: Essential Strategies for Protection
In the dynamic realm of the digital world, Content Management Systems (CMS) are the foundation for numerous websites, providing unparalleled flexibility and ease of use. However, this convenience brings along significant security concerns. As cyber threats continue to evolve, protecting your CMS-powered website is crucial to safeguard your data, reputation, and business operations.
Recognizing the Threats
Understanding the threats that CMS-powered websites face is vital before implementing mitigation strategies. Popular CMS platforms like WordPress, Joomla, and Drupal are frequent targets for cybercriminals due to their extensive usage. Common threats include:
Core Software Vulnerabilities: Outdated CMS versions often contain security flaws that are easy targets for hackers.
Insecure Plugins and Themes: While third-party plugins and themes enhance functionality, they can introduce vulnerabilities if not updated regularly or sourced from reputable developers.
Brute Force Attacks: Hackers may attempt to gain unauthorized access by systematically guessing usernames and passwords.
SQL Injection and Cross-Site Scripting (XSS): These methods exploit vulnerabilities in web applications to manipulate databases or execute malicious scripts.
DDoS Attacks: Distributed Denial of Service attacks can flood your website with traffic, making it inaccessible to legitimate users.
Proactive Security Measures
Mitigating these risks requires a comprehensive approach that includes both preventive and responsive actions. Here’s how you can keep your CMS-powered website secure:
Regular Updates: Keep your CMS updated with the latest versions, as these often include patches for known vulnerabilities. Promptly update all plugins, themes, and third-party components.
Strong Authentication: Enforce the use of complex passwords and consider implementing two-factor authentication (2FA) to add an extra security layer.
Secure Hosting: Select a reputable hosting provider that prioritizes security and offers features such as firewalls, malware scanning, and regular backups.
Plugin Vigilance: Limit the number of installed plugins and themes to minimize potential vulnerabilities. Regularly audit and remove unused or outdated extensions.
HTTPS Encryption: Protect the communication between your website and its visitors by implementing SSL/TLS encryption, securing sensitive data transmitted over the network.
Web Application Firewall (WAF): Use a WAF to filter and monitor HTTP traffic, protecting your website from common attacks like SQL injection and XSS.
User Permissions: Restrict user privileges to only what is necessary for their roles, reducing the risk of unauthorized access or accidental data manipulation.
Monitoring and Incident Response: Implement robust monitoring tools to detect suspicious activities or anomalies. Have a well-defined incident response plan to quickly address security incidents.
Conclusion
In today’s digital age, securing your CMS-powered website is imperative. By proactively implementing the measures outlined above, you can significantly reduce the risks posed by cyber threats, protecting your data, reputation, and business continuity.
At 5ine, we recognize the critical importance of website security in an interconnected world. As a leading provider of CMS website development services in Bangalore, we specialize in creating secure, high-performance websites tailored to your unique needs. Contact us today to strengthen your online presence and protect your digital assets. Your website’s security is our top priority.
0 notes
Text
Sql Tools For Mac

Download SQL Server Data Tools (SSDT) for Visual Studio.; 6 minutes to read +32; In this article. APPLIES TO: SQL Server Azure SQL Database Azure Synapse Analytics (SQL Data Warehouse) Parallel Data Warehouse SQL Server Data Tools (SSDT) is a modern development tool for building SQL Server relational databases, databases in Azure SQL, Analysis Services (AS) data models, Integration. SQLite's code is in the public domain, which makes it free for commercial or private use. I use MySQL GUI clients mostly for SQL programming, and I often keep SQL in files. My current favorites are: DBVisualizer Not free but I now use. Oracle SQL Developer is a free, development environment that simplifies the management of Oracle Database in both traditional and Cloud deployments. It offers development of your PL/SQL applications, query tools, a DBA console, a reports interface, and more.
Full MySQL Support
Sequel Pro is a fast, easy-to-use Mac database management application for working with MySQL databases.
Perfect Web Development Companion
Whether you are a Mac Web Developer, Programmer or Software Developer your workflow will be streamlined with a native Mac OS X Application!
Flexible Connectivity
Sequel Pro gives you direct access to your MySQL Databases on local and remote servers.
Easy Installation
Simply download, and connect to your database. Use these guides to get started:
Get Involved
Sequel Pro is open source and built by people like you. We’d love your input – whether you’ve found a bug, have a suggestion or want to contribute some code.
Get Started
New to Sequel Pro and need some help getting started? No problem.
-->
APPLIES TO: SQL Server Azure SQL Database Azure Synapse Analytics (SQL Data Warehouse) Parallel Data Warehouse
SQL Server Data Tools (SSDT) is a modern development tool for building SQL Server relational databases, databases in Azure SQL, Analysis Services (AS) data models, Integration Services (IS) packages, and Reporting Services (RS) reports. With SSDT, you can design and deploy any SQL Server content type with the same ease as you would develop an application in Visual Studio.
SSDT for Visual Studio 2019
Changes in SSDT for Visual Studio 2019
The core SSDT functionality to create database projects has remained integral to Visual Studio.
With Visual Studio 2019, the required functionality to enable Analysis Services, Integration Services, and Reporting Services projects has moved into the respective Visual Studio (VSIX) extensions only.
Note
There's no SSDT standalone installer for Visual Studio 2019.
Install SSDT with Visual Studio 2019
If Visual Studio 2019 is already installed, you can edit the list of workloads to include SSDT. If you don’t have Visual Studio 2019 installed, then you can download and install Visual Studio 2019 Community.
To modify the installed Visual Studio workloads to include SSDT, use the Visual Studio Installer.

Launch the Visual Studio Installer. In the Windows Start menu, you can search for 'installer'.
In the installer, select for the edition of Visual Studio that you want to add SSDT to, and then choose Modify.
Select SQL Server Data Tools under Data storage and processing in the list of workloads.

For Analysis Services, Integration Services, or Reporting Services projects, you can install the appropriate extensions from within Visual Studio with Extensions > Manage Extensions or from the Marketplace.
SSDT for Visual Studio 2017
Changes in SSDT for Visual Studio 2017
Sql Server Data Tools For Mac
Starting with Visual Studio 2017, the functionality of creating Database Projects has been integrated into the Visual Studio installation. There's no need to install the SSDT standalone installer for the core SSDT experience.
Now to create Analysis Services, Integration Services, or Reporting Services projects, you still need the SSDT standalone installer.
Install SSDT with Visual Studio 2017
To install SSDT during Visual Studio installation, select the Data storage and processing workload, and then select SQL Server Data Tools.
Sql Management Studio For Mac
If Visual Studio is already installed, use the Visual Studio Installer to modify the installed workloads to include SSDT.
Launch the Visual Studio Installer. In the Windows Start menu, you can search for 'installer'.
In the installer, select for the edition of Visual Studio that you want to add SSDT to, and then choose Modify.
Select SQL Server Data Tools under Data storage and processing in the list of workloads.
Install Analysis Services, Integration Services, and Reporting Services tools
To install Analysis Services, Integration Services, and Reporting Services project support, run the SSDT standalone installer.
The installer lists available Visual Studio instances to add SSDT tools. If Visual Studio isn't already installed, selecting Install a new SQL Server Data Tools instance installs SSDT with a minimal version of Visual Studio, but for the best experience, we recommend using SSDT with the latest version of Visual Studio.
SSDT for VS 2017 (standalone installer)
Important
Before installing SSDT for Visual Studio 2017 (15.9.6), uninstall Analysis Services Projects and Reporting Services Projects extensions if they are already installed, and close all VS instances.
Removed the inbox component Power Query Source for SQL Server 2017. Now we have announced Power Query Source for SQL Server 2017 & 2019 as out-of-box component, which can be downloaded here.
To design packages using Oracle and Teradata connectors and targeting an earlier version of SQL Server prior to SQL 2019, in addition to the Microsoft Oracle Connector for SQL 2019 and Microsoft Teradata Connector for SQL 2019, you need to also install the corresponding version of Microsoft Connector for Oracle and Teradata by Attunity.
Release Notes
For a complete list of changes, see Release notes for SQL Server Data Tools (SSDT).
System requirements
Microsoft Sql Tools For Mac
SSDT for Visual Studio 2017 has the same system requirements as Visual Studio.
Available Languages - SSDT for VS 2017
Sql Server Tools For Mac
This release of SSDT for VS 2017 can be installed in the following languages:
Considerations and limitations
You can’t install the community version offline
To upgrade SSDT, you need to follow the same path used to install SSDT. For example, if you added SSDT using the VSIX extensions, then you must upgrade via the VSIX extensions. If you installed SSDT via a separate install, then you need to upgrade using that method.
Offline install
To install SSDT when you’re not connected to the internet, follow the steps in this section. For more information, see Create a network installation of Visual Studio 2017.
First, complete the following steps while online:
Download the SSDT standalone installer.
Download vs_sql.exe.
While still online, execute one of the following commands to download all the files required for installing offline. Using the --layout option is the key, it downloads the actual files for the offline installation. Replace <filepath> with the actual layouts path to save the files.
For a specific language, pass the locale: vs_sql.exe --layout c:<filepath> --lang en-us (a single language is ~1 GB).
For all languages, omit the --lang argument: vs_sql.exe --layout c:<filepath> (all languages are ~3.9 GB).
After completing the previous steps, the following steps below can be done offline:
Run vs_setup.exe --NoWeb to install the VS2017 Shell and SQL Server Data Project.
From the layouts folder, run SSDT-Setup-ENU.exe /install and select SSIS/SSRS/SSAS.a. For an unattended installation, run SSDT-Setup-ENU.exe /INSTALLALL[:vsinstances] /passive.
For available options, run SSDT-Setup-ENU.exe /help
Note
If using a full version of Visual Studio 2017, create an offline folder for SSDT only, and run SSDT-Setup-ENU.exe from this newly created folder (don’t add SSDT to another Visual Studio 2017 offline layout). If you add the SSDT layout to an existing Visual Studio offline layout, the necessary runtime (.exe) components are not created there.
Supported SQL versions
Project TemplatesSQL Platforms SupportedRelational databasesSQL Server 2005* - SQL Server 2017 (use SSDT 17.x or SSDT for Visual Studio 2017 to connect to SQL Server on Linux) Azure SQL Database Azure Synapse Analytics (supports queries only; database projects aren't yet supported) * SQL Server 2005 support is deprecated, move to an officially supported SQL versionAnalysis Services models Reporting Services reportsSQL Server 2008 - SQL Server 2017Integration Services packagesSQL Server 2012 - SQL Server 2019
DacFx
SSDT for Visual Studio 2015 and 2017 both use DacFx 17.4.1: Download Data-Tier Application Framework (DacFx) 17.4.1.
Previous versions
Unix Tools For Mac
To download and install SSDT for Visual Studio 2015, or an older version of SSDT, see Previous releases of SQL Server Data Tools (SSDT and SSDT-BI).
See Also
Next steps
After installing SSDT, work through these tutorials to learn how to create databases, packages, data models, and reports using SSDT.
Get help
1 note
·
View note
Text
How to set up command-line access to Amazon Keyspaces (for Apache Cassandra) by using the new developer toolkit Docker image
Amazon Keyspaces (for Apache Cassandra) is a scalable, highly available, and fully managed Cassandra-compatible database service. Amazon Keyspaces helps you run your Cassandra workloads more easily by using a serverless database that can scale up and down automatically in response to your actual application traffic. Because Amazon Keyspaces is serverless, there are no clusters or nodes to provision and manage. You can get started with Amazon Keyspaces with a few clicks in the console or a few changes to your existing Cassandra driver configuration. In this post, I show you how to set up command-line access to Amazon Keyspaces by using the keyspaces-toolkit Docker image. The keyspaces-toolkit Docker image contains commonly used Cassandra developer tooling. The toolkit comes with the Cassandra Query Language Shell (cqlsh) and is configured with best practices for Amazon Keyspaces. The container image is open source and also compatible with Apache Cassandra 3.x clusters. A command line interface (CLI) such as cqlsh can be useful when automating database activities. You can use cqlsh to run one-time queries and perform administrative tasks, such as modifying schemas or bulk-loading flat files. You also can use cqlsh to enable Amazon Keyspaces features, such as point-in-time recovery (PITR) backups and assign resource tags to keyspaces and tables. The following screenshot shows a cqlsh session connected to Amazon Keyspaces and the code to run a CQL create table statement. Build a Docker image To get started, download and build the Docker image so that you can run the keyspaces-toolkit in a container. A Docker image is the template for the complete and executable version of an application. It’s a way to package applications and preconfigured tools with all their dependencies. To build and run the image for this post, install the latest Docker engine and Git on the host or local environment. The following command builds the image from the source. docker build --tag amazon/keyspaces-toolkit --build-arg CLI_VERSION=latest https://github.com/aws-samples/amazon-keyspaces-toolkit.git The preceding command includes the following parameters: –tag – The name of the image in the name:tag Leaving out the tag results in latest. –build-arg CLI_VERSION – This allows you to specify the version of the base container. Docker images are composed of layers. If you’re using the AWS CLI Docker image, aligning versions significantly reduces the size and build times of the keyspaces-toolkit image. Connect to Amazon Keyspaces Now that you have a container image built and available in your local repository, you can use it to connect to Amazon Keyspaces. To use cqlsh with Amazon Keyspaces, create service-specific credentials for an existing AWS Identity and Access Management (IAM) user. The service-specific credentials enable IAM users to access Amazon Keyspaces, but not access other AWS services. The following command starts a new container running the cqlsh process. docker run --rm -ti amazon/keyspaces-toolkit cassandra.us-east-1.amazonaws.com 9142 --ssl -u "SERVICEUSERNAME" -p "SERVICEPASSWORD" The preceding command includes the following parameters: run – The Docker command to start the container from an image. It’s the equivalent to running create and start. –rm –Automatically removes the container when it exits and creates a container per session or run. -ti – Allocates a pseudo TTY (t) and keeps STDIN open (i) even if not attached (remove i when user input is not required). amazon/keyspaces-toolkit – The image name of the keyspaces-toolkit. us-east-1.amazonaws.com – The Amazon Keyspaces endpoint. 9142 – The default SSL port for Amazon Keyspaces. After connecting to Amazon Keyspaces, exit the cqlsh session and terminate the process by using the QUIT or EXIT command. Drop-in replacement Now, simplify the setup by assigning an alias (or DOSKEY for Windows) to the Docker command. The alias acts as a shortcut, enabling you to use the alias keyword instead of typing the entire command. You will use cqlsh as the alias keyword so that you can use the alias as a drop-in replacement for your existing Cassandra scripts. The alias contains the parameter –v "$(pwd)":/source, which mounts the current directory of the host. This is useful for importing and exporting data with COPY or using the cqlsh --file command to load external cqlsh scripts. alias cqlsh='docker run --rm -ti -v "$(pwd)":/source amazon/keyspaces-toolkit cassandra.us-east-1.amazonaws.com 9142 --ssl' For security reasons, don’t store the user name and password in the alias. After setting up the alias, you can create a new cqlsh session with Amazon Keyspaces by calling the alias and passing in the service-specific credentials. cqlsh -u "SERVICEUSERNAME" -p "SERVICEPASSWORD" Later in this post, I show how to use AWS Secrets Manager to avoid using plaintext credentials with cqlsh. You can use Secrets Manager to store, manage, and retrieve secrets. Create a keyspace Now that you have the container and alias set up, you can use the keyspaces-toolkit to create a keyspace by using cqlsh to run CQL statements. In Cassandra, a keyspace is the highest-order structure in the CQL schema, which represents a grouping of tables. A keyspace is commonly used to define the domain of a microservice or isolate clients in a multi-tenant strategy. Amazon Keyspaces is serverless, so you don’t have to configure clusters, hosts, or Java virtual machines to create a keyspace or table. When you create a new keyspace or table, it is associated with an AWS Account and Region. Though a traditional Cassandra cluster is limited to 200 to 500 tables, with Amazon Keyspaces the number of keyspaces and tables for an account and Region is virtually unlimited. The following command creates a new keyspace by using SingleRegionStrategy, which replicates data three times across multiple Availability Zones in a single AWS Region. Storage is billed by the raw size of a single replica, and there is no network transfer cost when replicating data across Availability Zones. Using keyspaces-toolkit, connect to Amazon Keyspaces and run the following command from within the cqlsh session. CREATE KEYSPACE amazon WITH REPLICATION = {'class': 'SingleRegionStrategy'} AND TAGS = {'domain' : 'shoppingcart' , 'app' : 'acme-commerce'}; The preceding command includes the following parameters: REPLICATION – SingleRegionStrategy replicates data three times across multiple Availability Zones. TAGS – A label that you assign to an AWS resource. For more information about using tags for access control, microservices, cost allocation, and risk management, see Tagging Best Practices. Create a table Previously, you created a keyspace without needing to define clusters or infrastructure. Now, you will add a table to your keyspace in a similar way. A Cassandra table definition looks like a traditional SQL create table statement with an additional requirement for a partition key and clustering keys. These keys determine how data in CQL rows are distributed, sorted, and uniquely accessed. Tables in Amazon Keyspaces have the following unique characteristics: Virtually no limit to table size or throughput – In Amazon Keyspaces, a table’s capacity scales up and down automatically in response to traffic. You don’t have to manage nodes or consider node density. Performance stays consistent as your tables scale up or down. Support for “wide” partitions – CQL partitions can contain a virtually unbounded number of rows without the need for additional bucketing and sharding partition keys for size. This allows you to scale partitions “wider” than the traditional Cassandra best practice of 100 MB. No compaction strategies to consider – Amazon Keyspaces doesn’t require defined compaction strategies. Because you don’t have to manage compaction strategies, you can build powerful data models without having to consider the internals of the compaction process. Performance stays consistent even as write, read, update, and delete requirements change. No repair process to manage – Amazon Keyspaces doesn’t require you to manage a background repair process for data consistency and quality. No tombstones to manage – With Amazon Keyspaces, you can delete data without the challenge of managing tombstone removal, table-level grace periods, or zombie data problems. 1 MB row quota – Amazon Keyspaces supports the Cassandra blob type, but storing large blob data greater than 1 MB results in an exception. It’s a best practice to store larger blobs across multiple rows or in Amazon Simple Storage Service (Amazon S3) object storage. Fully managed backups – PITR helps protect your Amazon Keyspaces tables from accidental write or delete operations by providing continuous backups of your table data. The following command creates a table in Amazon Keyspaces by using a cqlsh statement with customer properties specifying on-demand capacity mode, PITR enabled, and AWS resource tags. Using keyspaces-toolkit to connect to Amazon Keyspaces, run this command from within the cqlsh session. CREATE TABLE amazon.eventstore( id text, time timeuuid, event text, PRIMARY KEY(id, time)) WITH CUSTOM_PROPERTIES = { 'capacity_mode':{'throughput_mode':'PAY_PER_REQUEST'}, 'point_in_time_recovery':{'status':'enabled'} } AND TAGS = {'domain' : 'shoppingcart' , 'app' : 'acme-commerce' , 'pii': 'true'}; The preceding command includes the following parameters: capacity_mode – Amazon Keyspaces has two read/write capacity modes for processing reads and writes on your tables. The default for new tables is on-demand capacity mode (the PAY_PER_REQUEST flag). point_in_time_recovery – When you enable this parameter, you can restore an Amazon Keyspaces table to a point in time within the preceding 35 days. There is no overhead or performance impact by enabling PITR. TAGS – Allows you to organize resources, define domains, specify environments, allocate cost centers, and label security requirements. Insert rows Before inserting data, check if your table was created successfully. Amazon Keyspaces performs data definition language (DDL) operations asynchronously, such as creating and deleting tables. You also can monitor the creation status of a new resource programmatically by querying the system schema table. Also, you can use a toolkit helper for exponential backoff. Check for table creation status Cassandra provides information about the running cluster in its system tables. With Amazon Keyspaces, there are no clusters to manage, but it still provides system tables for the Amazon Keyspaces resources in an account and Region. You can use the system tables to understand the creation status of a table. The system_schema_mcs keyspace is a new system keyspace with additional content related to serverless functionality. Using keyspaces-toolkit, run the following SELECT statement from within the cqlsh session to retrieve the status of the newly created table. SELECT keyspace_name, table_name, status FROM system_schema_mcs.tables WHERE keyspace_name = 'amazon' AND table_name = 'eventstore'; The following screenshot shows an example of output for the preceding CQL SELECT statement. Insert sample data Now that you have created your table, you can use CQL statements to insert and read sample data. Amazon Keyspaces requires all write operations (insert, update, and delete) to use the LOCAL_QUORUM consistency level for durability. With reads, an application can choose between eventual consistency and strong consistency by using LOCAL_ONE or LOCAL_QUORUM consistency levels. The benefits of eventual consistency in Amazon Keyspaces are higher availability and reduced cost. See the following code. CONSISTENCY LOCAL_QUORUM; INSERT INTO amazon.eventstore(id, time, event) VALUES ('1', now(), '{eventtype:"click-cart"}'); INSERT INTO amazon.eventstore(id, time, event) VALUES ('2', now(), '{eventtype:"showcart"}'); INSERT INTO amazon.eventstore(id, time, event) VALUES ('3', now(), '{eventtype:"clickitem"}') IF NOT EXISTS; SELECT * FROM amazon.eventstore; The preceding code uses IF NOT EXISTS or lightweight transactions to perform a conditional write. With Amazon Keyspaces, there is no heavy performance penalty for using lightweight transactions. You get similar performance characteristics of standard insert, update, and delete operations. The following screenshot shows the output from running the preceding statements in a cqlsh session. The three INSERT statements added three unique rows to the table, and the SELECT statement returned all the data within the table. Export table data to your local host You now can export the data you just inserted by using the cqlsh COPY TO command. This command exports the data to the source directory, which you mounted earlier to the working directory of the Docker run when creating the alias. The following cqlsh statement exports your table data to the export.csv file located on the host machine. CONSISTENCY LOCAL_ONE; COPY amazon.eventstore(id, time, event) TO '/source/export.csv' WITH HEADER=false; The following screenshot shows the output of the preceding command from the cqlsh session. After the COPY TO command finishes, you should be able to view the export.csv from the current working directory of the host machine. For more information about tuning export and import processes when using cqlsh COPY TO, see Loading data into Amazon Keyspaces with cqlsh. Use credentials stored in Secrets Manager Previously, you used service-specific credentials to connect to Amazon Keyspaces. In the following example, I show how to use the keyspaces-toolkit helpers to store and access service-specific credentials in Secrets Manager. The helpers are a collection of scripts bundled with keyspaces-toolkit to assist with common tasks. By overriding the default entry point cqlsh, you can call the aws-sm-cqlsh.sh script, a wrapper around the cqlsh process that retrieves the Amazon Keyspaces service-specific credentials from Secrets Manager and passes them to the cqlsh process. This script allows you to avoid hard-coding the credentials in your scripts. The following diagram illustrates this architecture. Configure the container to use the host’s AWS CLI credentials The keyspaces-toolkit extends the AWS CLI Docker image, making keyspaces-toolkit extremely lightweight. Because you may already have the AWS CLI Docker image in your local repository, keyspaces-toolkit adds only an additional 10 MB layer extension to the AWS CLI. This is approximately 15 times smaller than using cqlsh from the full Apache Cassandra 3.11 distribution. The AWS CLI runs in a container and doesn’t have access to the AWS credentials stored on the container’s host. You can share credentials with the container by mounting the ~/.aws directory. Mount the host directory to the container by using the -v parameter. To validate a proper setup, the following command lists current AWS CLI named profiles. docker run --rm -ti -v ~/.aws:/root/.aws --entrypoint aws amazon/keyspaces-toolkit configure list-profiles The ~/.aws directory is a common location for the AWS CLI credentials file. If you configured the container correctly, you should see a list of profiles from the host credentials. For instructions about setting up the AWS CLI, see Step 2: Set Up the AWS CLI and AWS SDKs. Store credentials in Secrets Manager Now that you have configured the container to access the host’s AWS CLI credentials, you can use the Secrets Manager API to store the Amazon Keyspaces service-specific credentials in Secrets Manager. The secret name keyspaces-credentials in the following command is also used in subsequent steps. docker run --rm -ti -v ~/.aws:/root/.aws --entrypoint aws amazon/keyspaces-toolkit secretsmanager create-secret --name keyspaces-credentials --description "Store Amazon Keyspaces Generated Service Credentials" --secret-string "{"username":"SERVICEUSERNAME","password":"SERVICEPASSWORD","engine":"cassandra","host":"SERVICEENDPOINT","port":"9142"}" The preceding command includes the following parameters: –entrypoint – The default entry point is cqlsh, but this command uses this flag to access the AWS CLI. –name – The name used to identify the key to retrieve the secret in the future. –secret-string – Stores the service-specific credentials. Replace SERVICEUSERNAME and SERVICEPASSWORD with your credentials. Replace SERVICEENDPOINT with the service endpoint for the AWS Region. Creating and storing secrets requires CreateSecret and GetSecretValue permissions in your IAM policy. As a best practice, rotate secrets periodically when storing database credentials. Use the Secrets Manager helper script Use the Secrets Manager helper script to sign in to Amazon Keyspaces by replacing the user and password fields with the secret key from the preceding keyspaces-credentials command. docker run --rm -ti -v ~/.aws:/root/.aws --entrypoint aws-sm-cqlsh.sh amazon/keyspaces-toolkit keyspaces-credentials --ssl --execute "DESCRIBE Keyspaces" The preceding command includes the following parameters: -v – Used to mount the directory containing the host’s AWS CLI credentials file. –entrypoint – Use the helper by overriding the default entry point of cqlsh to access the Secrets Manager helper script, aws-sm-cqlsh.sh. keyspaces-credentials – The key to access the credentials stored in Secrets Manager. –execute – Runs a CQL statement. Update the alias You now can update the alias so that your scripts don’t contain plaintext passwords. You also can manage users and roles through Secrets Manager. The following code sets up a new alias by using the keyspaces-toolkit Secrets Manager helper for passing the service-specific credentials to Secrets Manager. alias cqlsh='docker run --rm -ti -v ~/.aws:/root/.aws -v "$(pwd)":/source --entrypoint aws-sm-cqlsh.sh amazon/keyspaces-toolkit keyspaces-credentials --ssl' To have the alias available in every new terminal session, add the alias definition to your .bashrc file, which is executed on every new terminal window. You can usually find this file in $HOME/.bashrc or $HOME/bash_aliases (loaded by $HOME/.bashrc). Validate the alias Now that you have updated the alias with the Secrets Manager helper, you can use cqlsh without the Docker details or credentials, as shown in the following code. cqlsh --execute "DESCRIBE TABLE amazon.eventstore;" The following screenshot shows the running of the cqlsh DESCRIBE TABLE statement by using the alias created in the previous section. In the output, you should see the table definition of the amazon.eventstore table you created in the previous step. Conclusion In this post, I showed how to get started with Amazon Keyspaces and the keyspaces-toolkit Docker image. I used Docker to build an image and run a container for a consistent and reproducible experience. I also used an alias to create a drop-in replacement for existing scripts, and used built-in helpers to integrate cqlsh with Secrets Manager to store service-specific credentials. Now you can use the keyspaces-toolkit with your Cassandra workloads. As a next step, you can store the image in Amazon Elastic Container Registry, which allows you to access the keyspaces-toolkit from CI/CD pipelines and other AWS services such as AWS Batch. Additionally, you can control the image lifecycle of the container across your organization. You can even attach policies to expiring images based on age or download count. For more information, see Pushing an image. Cheat sheet of useful commands I did not cover the following commands in this blog post, but they will be helpful when you work with cqlsh, AWS CLI, and Docker. --- Docker --- #To view the logs from the container. Helpful when debugging docker logs CONTAINERID #Exit code of the container. Helpful when debugging docker inspect createtablec --format='{{.State.ExitCode}}' --- CQL --- #Describe keyspace to view keyspace definition DESCRIBE KEYSPACE keyspace_name; #Describe table to view table definition DESCRIBE TABLE keyspace_name.table_name; #Select samples with limit to minimize output SELECT * FROM keyspace_name.table_name LIMIT 10; --- Amazon Keyspaces CQL --- #Change provisioned capacity for tables ALTER TABLE keyspace_name.table_name WITH custom_properties={'capacity_mode':{'throughput_mode': 'PROVISIONED', 'read_capacity_units': 4000, 'write_capacity_units': 3000}} ; #Describe current capacity mode for tables SELECT keyspace_name, table_name, custom_properties FROM system_schema_mcs.tables where keyspace_name = 'amazon' and table_name='eventstore'; --- Linux --- #Line count of multiple/all files in the current directory find . -type f | wc -l #Remove header from csv sed -i '1d' myData.csv About the Author Michael Raney is a Solutions Architect with Amazon Web Services. https://aws.amazon.com/blogs/database/how-to-set-up-command-line-access-to-amazon-keyspaces-for-apache-cassandra-by-using-the-new-developer-toolkit-docker-image/
1 note
·
View note