#How to Power Your Camera with NP-F Battery
Explore tagged Tumblr posts
Visit Tumblr Blog
Explore Tumblr blogs with no restrictions, modern design and the best experience.
Last Seen Tumblr Blogs


Fun Fact
Tumblr posted its first advertisements in May 2012 and subsequently earned $13M in revenue.
Text
SMALLRIG NP-F Battery Adapter Mount Plate Kit (Advanced Edition)
Questo è un adattatore per batterie NP-F, che si può usare con diverse fotocamere e videocamere. Nella confezione ci sono: l’adattatore, un cavo jack con attacco per Canon R5 / R5C and BMPCC 4K / 6K / 6K Pro -4340, due viti, una vite con innesto rapido, una brugola e dei foglietti illustrativi. L’adattatore è fatto di alluminio e ha sopra l’attacco per le batterie NP-F e una fessura per inserire…

View On WordPress
#Adapter Plate for BMPCC 4K/6K#Best NP-F Battery Solutions for Mirrorless Cameras#How to Power Your Camera with NP-F Battery#NP-F Battery#np-f battery adapter#np-f battery charger#side post battery adapter#SMALLRIG NP-F Battery Adapter Plate Professional Edition 3168#SMALLRIG NP-F Battery Adapter Review
0 notes
Text
Sony Alpha 7 IV Overheating? Solving common problems

At AWPRO, we’re passionate about helping photographers and videographers get the most from their gear. The Sony A7 IV is a powerhouse, but like any advanced camera, it comes with its own quirks. Here’s a practical guide to common A7 IV issues and how AWPRO can help you solve them, so you can focus on capturing your best moments.
Eye Autofocus (Eye AF) Inaccuracy
Problem: Some users notice that Eye AF occasionally misses the subject’s eye, focusing instead on nearby features like cheeks or eyelashes. This can be frustrating, especially for portrait and event photographers.
Solution:
Try switching between AF-C and AF-S modes to see which works best for your subject.
Use a slightly higher f-stop for more depth of field.
Update your firmware regularly—AWPRO’s expert team can assist you with updates and troubleshooting.
Need more help? Visit AWPRO for personalized advice and hands-on demonstrations with Sony lenses and bodies.
Overheating During Video Recording
Problem: Extended 4K video sessions can sometimes trigger overheating warnings, especially in warm environments or when using tight camera cases.
Solution:
Set “Auto Power Off Temp” to “High” in the menu for longer recording times.
Flip out the LCD screen and remove any tight cases to help with heat dissipation.
Our in-store experts at AWPRO can recommend the best accessories for heat management and even show you how to optimize your setup for long shoots.
Battery Drain Issues
Problem: Some photographers experience faster-than-expected battery drain, particularly with heavy video use or wireless features enabled.
Solution:
Activate Airplane Mode to disable Wi-Fi/Bluetooth when not needed.
Always carry spare batteries AWPRO stocks genuine Sony NP-FZ100 batteries and battery grips for extended shooting.
If you suspect a faulty battery, our team can test and replace it for you on the spot.
Rolling Shutter and Burst Rate Limitations
Problem: Rolling shutter can be noticeable in 4K video, and burst rates drop with lossless/uncompressed RAW.
Solution:
Our knowledgeable staff can help you select the right settings for your shooting style and recommend compatible accessories or alternative models if your workflow demands higher performance.
Conclusion
The Sony A7 IV stands out as a powerful hybrid camera, offering impressive performance for both photographers and videographers. However, like any advanced tool, it comes with its own set of challenges—from Eye Autofocus inconsistencies and overheating during long video sessions to burst rate limitations and firmware quirks.
Choose AWPRO for your next purchase and experience the difference in exceptional service, genuine products, and a passionate community dedicated to your creative journey.
0 notes
Text
4K Camcorder Video Camera Vlogging Camera Recorder with Microphone 30MP 3″ LCD Touch Screen 18X Digital Zoom YouTube Camera with Remote Control
Price: $159.99 - $139.99 (as of Jan 31,2021 03:12:47 UTC – Details)

Why select us?
▶Ultra HD 4K video, 30.0 megapixels picture ▶3.0 inches 270-degree rotatable contact display ▶4-128 GB excessive velocity class 10 SD card Storage help(SD card Not included within the package deal) ▶External microphone ▶Remote management ▶Webcam ▶LED fill mild ▶LCD display: 3.0 inch with contact display ▶18X digital zoom (MAX) ▶Continuous capturing ▶Use whereas charging ▶Electronic Anti-shake operate ▶Self-timer ▶Face detection ▶Face magnificence
How to make use of webcam operate:
1.Connect the digital camera and your pc with a USB cable 2.Select the webcam operate. If your operation is appropriate, however the webcam operate shouldn’t be potential, it might be that the USB interface has inadequate energy provide, which makes this operate unusable. The answer is to plug the USB cable into the USB port on the again of the host pc. Please word: ① When the digital camera is used as a webcam operate and can’t transmit sound, it’s essential to set up a microphone that may transmit sound to the pc (the microphone contained in the package deal can’t be used to transmit sound on the community) ② When you plug the USB cable into the USB port on the again of the host pc, the USB cable could also be too quick, and you might want to switch an extended USB cable.
Specifications:
Lens: Fixed lens F / 2.6, f = 7.0mm Focus vary: 3.3ft ~ infinity Image Format: JPEG Resolution: 30M, 24M,20M Camcorder Video Format: MP4 Resolution: UHD 4K(24FPS), UHD 2.7K(30FPS), FHD 1080P(60FPS) Power provide: 1500mAh Lithium-ion battery NP-40 Weight: Approx. 9.70 oz
Accessories:
→Video digital camera x1 →Microphone x1 →Remote Control x1 →Lithium battery (1500mAh) x2 →USB cable x1 →User handbook x1 →Camera bag x1 →Lens cowl x1 →Handhold Stabilizer x1 →Lens hood x 1
▶【Microphone & Handheld Stabilizer】The included exterior stereo microphone with 3-pole 3.5mm jack supplies nice audio high quality whether or not you’re standing in entrance or behind the vlogging digital camera. You can detach the exterior microphone, and file video with the built-in microphone as a substitute. This Video digital camera comes with a handhold stabilizer makes this 4K vlogging digital camera steady throughout recording. ▶【Fill Light & Use While Charging】Two LED fill lights with an efficient space of three.3ft are geared up on this vlog digital camera to make sure that you shoot clear photographs and movies in low-light circumstances. This mini camcorder comes with a 1500mAh rechargeable battery which might be sustain-ably used for 60-90 minutes of steady recording. Recording movies whereas charging by an influence financial institution or energy provide means no extra worries in regards to the battery draining. ▶【Webcam】This digital camcorder has a webcam performance permitting use on Skype in addition to live-streaming on YouTube, Facebook, and many others. You might have the webcam operate whenever you need to video chat with your mates or household with out the necessity to buy a separate webcam. ▶【Mufti-Function Camcorder】This is a multifunctional video digital camera with face detection, self-timer, distant management, face magnificence, anti-shake, steady capturing, and 20 sorts of particular results. You can seize your loved ones’s most valuable reminiscences with the Linnse 4K camcorder. Record vital occasions, appropriate for Family leisure, Family’s Trip, Wedding, YouTube Videos, Birthday Party, Sports Events, Tourist Attractions and so forth. Lightweight and simple to hold.
source https://ultimatefreecourses.com/4k-camcorder-video-camera-vlogging-camera-recorder-with-microphone-30mp-3-lcd-touch-screen-18x-digital-zoom-youtube-camera-with-remote-control/
0 notes
Photo


4K Camcorder, ORDRO AC3 Ultra HD Video Camera 1080P 60FPS IR Night Vision Camcorder and WiFi Camera Recorder 3.1’’ IPS Touch Screen Digital Camcorders with Microphone Wide Angle Lens
Ultra HD 4K Video Camera Camcorder: With 4K ultra HD resolution, ORDRO HDR-AC3 can perform extremely high quality image and capture wonderful moment. With 3.1 inches IPS touch panel, this camcorder can perform the higher quality and vivid images and videos. Support Wi-Fi connection: Video and photo can be controlled and shared by downloading APP (LzxViewer) on smart phone (support for Android or IOS system). Wi-Fi is not to connect to your router
Video Camera AC3 with Sony IMX258 CMOS Sensor: IMX258 is 13M sensor, the maximum pixels is 24M by interpolation, and it adopts Exmor RS technology. With the high-sensitivity sensor, it can sense the surrounding environment and delicately handle complex light. With fast image capture rate and image processing capability, it can enhance image clarity to perform more naturally vivid and lifelike image quality. (Tips: Please keep the video camera steady when recording)
IR Night Vision Recording and Wide Angle Lens: It can perform nature and high definition image in dark environment by during on IR light and LED light. This video camera is equipped with a professional 2-in-1 0.39x (with macro lens) wide angle lens for a wider range of shooting. Use the macro lens for close up shots such as plants and animals, etc. (Tips: The wide-angle lens is mainly used for long-range shooting, the macro lens for close up shots)
ORDRO CM520 External Microphone is Mount on the Camcorder Hot Shoe: With the exclusive hot shoe design, it can support to attach an external microphone or LED light. The microphone can accurately pick up the sound, eliminate the noise and NCR noise reduction during recording, bringing you purer sound quality. (Tips: Please use the mic adapter to connect external microphone with camcorder. Show in picture #8)
Accessories (Show in picture #7): a Microphone, a Remote Control, a Battery Charger, 2 Lithium Batteries, a 72mm Wide Angle Lens, a 1 to 2 Mic Adapter, a Lens Hood, a Camera Holder, a Lens Cover, a Camera Bag, a Camera Bag Strap, a Card Reader(random color), a Micro USB Cable, a USB Cable, an HDMI Cable, an English User Manual. (Memory card need to buy separately). We offer ONE YEAR warranty and excellent customer service. Please do not hesitate to contact us if you have any questions
Product Description

ORDRO HDR-AC3 4K Camcorder Specification:
Sensor: Sony IMX258 CMOS Sensor (The maximum pixels is 24M by interpolation, and it adopts Exmor RS technology)
Image Resolution: 24M / 20M / 16M / 13M / 10M / 7M(HD) / 5M / 3M / 2M(HD) / VGA
Video Resolution: UHD: 3840*2160 "DAR" (24fps), QHD: 2560*1440 (30fps), FHD: 1920*1080 (60fps), HD: 1080*720 (120fps), VGA: 640*480 (30fps)
External Storage: Supports 128GB SD Card (Class 10 or above recommended) -SD card is not included-
Image Format: JPEG
Video Format: H.264 / MP4
LCD Screen: 3.1" IPS LCD touch screen
Camera Lens: f=4.88mm, FNo:2.2
HD Output: USB2.0 / HDMI
Self-Timer: 2s / 5s / 10s
LED Light: <1.0m range
Exposure: EV-3.0 ~ EV+3.0
Sensitivity: Auto
Anti-Shake: Yes
Hot Shoes: Yes
Face Detection: Yes
Zoom: 30X digital zoom (No Optical Zoom)
Charging Current: 800mA
TV Output System: NTSC / PAL
Auto Power Off: Off / 180 sec / 300 sec / 600 sec
Time Lapse: Off / 1 sec / 3 sec / 5 sec
Battery Life: Taking Video≤ 90mins, taking photos≤ 150mins
Battery: NP-120 Lithium battery (3.7V, 1700mAh), equipped with two batteries
IR Light: 1 x LED IR CUT dual filter, change your photo from color to black and white
Remote Control: Yes (please remove the wide angle lens otherwise when use remote control, otherwise, IR signal hole will be covered by the lens)

ORDRO External Microphone CM520:
1. Mount the microphone on the camcorder hot shoe position, insert the 3.5mm mic cable into the camera by the 1 to 2 MIC adapter.
2. External microphone switch: "OFF" is for power off, "0dB" is for normal pickup, "+10dB" is for sensitivity enhancement pickup, it is suitable for long distance pickup.
3. When you switch from "OFF to "0dB" or "+10dB" on the microphone, the light will turn green. When battery is low power, the green light will flash, please charging.
4. When installing the shotgun microphone, please slide the microphone slowly into the camera's hot shoe connector and then tighten the screws. If you want to remove the shotgun microphone, please be gentle to slowly slide it out and do not pull hard.
5. Please be sure to fully insert the microphone connector into adapter, and the microphone icon will appear on the camcorder screen. If not, the camera will not pick up any sound.
6. Note: This is a monophonic microphone, not used for smartphone.

13MP CMOS Sensor:
Sony IMX258 CMOS Sensor: IMX258 is 13M sensor, the maximum pixels is 24M by interpolation, and it adopts Exmor RS technology. With the high-sensitivity sensor, it can sense the surrounding environment and delicately handle complex light. With fast image capture rate and image processing capability, it can enhance image clarity to perform more naturally vivid and lifelike image quality.

4K Ultra High Definition Quality:
4K UHD: With 4K resolution (UHD 3840*2160 "DAR" 24fps), ORDRO HDR-AC3 can shoot exquisite and clear images with rich color and high-contrast performance. <<We recommend recording video at 2K resolution, because the 4k video file is too large, if you don't play it on 4K TV, it will reduce the video effect.>>

3.1'' IPS Touch Screen:
IPS Touch Screen: HDR-AC3 uses 3.1'' IPS high-definition capacitive touch panel, which provides 71% NTSC wide color gamut, and has 1,152,000 dots, 300 ppi. It has better colour accuracy and better performance of displaying images and videos in rich, smooth colour gradations than ordinary screen.

Time Lapse:
Photo series and video frames mode,compress everything in a short period of time no matter how long.
Time-lapse mode, the process of slowly changing objects or scenes is compressed into a short period of time, showing fantastic and brilliant sight that is usually undetectable by the naked eye.
E.g: Total 144 frames, 72 hours reproduce the growing of flower bud in 6 seconds (4K@24 fps).
Price $262.00
https://amzn.to/2W3RRk4 click this link then you buy this product or full details.Thanks for you.
#ORDRO HDR-AC3 4K Camcorder#4K Camcorder#4K Camcorder HDR-AC3#Camera#4k resolution#4k resolution camera
0 notes
Text
The Evolution Of The Mirrorless Hybrid Camera With The Fujifilm X-T4
The new Fujifilm X-T4 Mirrorless Hybrid is the latest offering from Fujifilm.
As you’ve seen if you’re tapped into camera/production social media and it’s resulting blogosphere, Fujifilm recently announced the successor to the Fujifilm X-T3, one of the most popular cameras it has ever produced. We shot a project for a Los Angeles NPR station two years ago and had a chance to use our client’s Fujifilm X-T2 as a gimbal and B camera, gathering various moving b-roll footage around the station as we shot interviews with our A camera in their on-air studio. Overall, I found the X-T2, despite some glaring video omissions, to be a pleasant camera to use with some nice results.
The Fujifilm X-H1 Mirrorless Hybrid had more video-driven features and IBIS but was larger than the X-T series bodies and it still lacked some video features.
I then covered the launch of the Fujifilm X-H1, a more video-centric model with in-body image stabilization (IBIS) and a few more video features. After using the X-H1 a bit and speaking with the engineering team that was over from Japan at Fujifilm’s offices in Los Angeles, I knew that Fujifilm was close to introducing a camera that, while primarily a still camera, would have enough solid video features to be useful for me.
The Panasonic Lumix GH4 was our first 4K-capable mirrorless hybrid. It had some great video features but some fatal flaws, as well, for our needs.
My Mirrorless Hybrid History
A bit of background: I owned the Panasonic GH4, it was our first 4K camera, but I found that the Micro Four Thirds imager seemed to be too noisy for my shooting style, and I found the skin tones lacking, with a pastel quality that had to do with the noise reduction the GH4 applied. I also had experience shooting with my producing partner’s Sony A7 II on a few shoots and while I found its high ISO ability to be useful for low-light shooting (we shot some footage in a dark nightclub for a documentary where we couldn’t light the shots), I found its constant overheating when shooting 4K and its color science to not be appealing to me.
I have a DSLR, the Canon EOS 80D, that wasn’t a bad video camera, but it only shot 1080 and I found the footage to be marginal when any kind of grading or even mild color correction was applied. As we were heading into production for a docu-series that we wanted to produce in 4K, I was on the hunt for a 4K-capable mirrorless hybrid. I really liked the Panasonic GH5; it was a big improvement over the GH4, but its autofocus wasn’t very good even though the rest of its features were very appealing for video shooting.
Full-frame mirrorless hybrids like this A7 II allowed Sony to capture a huge portion of the mirrorless market, but the A7 line has languished as competitors have moved ahead with specifications and capability.
I was planning on using whichever mirrorless hybrid we ended up with primarily on a gimbal and as a handheld, in a cage mount for shooting in cars, on small boats in the ocean or in other locations where bringing in our A cameras, the Canon C300 MKII and the C200, fully rigged, would be too conspicuous.
The Fujifilm X-T3 has been a resounding success for Fujifilm simply because it was a great camera at a very good price with amazing capabilities as both a still and video camera.
Enter The X-T3
When Fujifilm introduced the X-T3 in late 2018, I knew that it could be a good contender to serve as the gimbal and B camera for our docu-series. It seemed that Fujifilm had improved on the X-T2 and X-H1 video capabilities with the exception that the X-T3 lacked IBIS. But it had improved autofocus, the ability to use the AF while shooting 4K, great color science, a very detailed and good looking sensor called the X-Trans 4 and not only a way to shoot Flog, Fujifilm’s log format, but also the ability to shoot using Fujifilm simulation presets.
I knew that Flog would generally yield the most dynamic range, but I had seen some YouTube clips shot using the X-T3’s film presets that I thought looked very good too. With the X-T3, Fujifilm introduced a new film simulation called Eterna that looked to be a great starting spot for light grading and color correction. The other intriguing thing was that the X-T3 shot 10-bit H.265. 10-bit, which has gone from being considered an exotic high bit rate to what’s now considered standard fare in mirrorless camera video, but at the time of the X-T3’s introduction, 10-bit 4K wasn’t common. The ability to shoot at up to 400 Mbps made other competing camera’s 4K data rates (100 Mbps on all Sony A7 variants!) look weak and inadequate for post-production.
The Fujifilm X-T3: Likes
Small Size, Lightweight – These are important when operating on a gimbal all day.
Cost/Value Equation – With some of the competition coming in at close to $4,000, $1,299 on sale was appealing.
Color Science – The X-T3 colors are very appealing to me. Flog is Fujifilm’s log profile; it’s mildly flat but easy to expose for. The film simulations are also interesting and fun to work with for certain projects.
Specs – 4K DCI and UHD at up to 60p, data rates up to 400 Mbps, 10-bit 4:2:0 H.265 8-bit H.264 recording options and up to 120 fps in FHD. These place the Fujifilm X-T3 side by side or better than almost every other mirrorless hybrid available.
Construction/Tactile/Ergonomics – The X-T3 has a personality. It’s not a computer-with-a-lens feeling camera like some of its competition. It also has dedicated old-school rotating knobs and dials for selecting the most commonly changed parameters. The construction is robust with lots of metal used instead of plastic.
Good Lens Adaptability – We bought two Fujinon XF lenses, the XF 18-55mm f/2.8-4.0 OIS and the XF 16mm f/1.4 WR, but we also bought the Fringer Pro X mount to EF adapter so we can use any of our dozen Canon EF S and EF lenses with the X-T3. Not all operate perfectly in AF, but most do.
Detail – I was impressed with the amount of detail that the X-T3 records to 4K with its almost 6K sensor. This detail lends a very precise look to the images without being cold and sterile.
The Micro HDMI video output on the Fujifilm X-T3 is one of the weakest features of an otherwise great camera.
The Fujifilm X-T3: Dislikes
Terrible Battery Life – The too small NP-W126S 1,260 mAh batteries run out after only about 20 to 25 minutes of shooting video. That problem can be solved with the addition of the Fujifilm X-T3 battery grip, but that added a few hundred dollars to the bottom line.
29:59 and 19:59 Recording Limits – Shooting documentary coverage, the recording time limits became a nuisance at times.
AF Challenges – When we bought the X-T3, with its initial 2.0 Firmware, the AF functions were usable. Not as good as our Canon C200, 80D, 300 MKII and not as good as the latest Sony A7 variants. But usable, better than the Panasonic GH5, if you kept an eye on it. We waited months for bug reports and user feedback to update the X-T3’s FW to 3.01, hearing no major negatives, but once we started shooting gimbal using the AF-C focus settings, we began to notice an AF pulsing. When you framed up an interview, for instance, the AF on the X-T3 would constantly micro-adjust itself, resulting in the subject seeming to mostly be in focus, but you’d notice a constant slight shifting in the background focus.
XF Lens Issues When Shooting Video – We rented several different Fujinon XF lenses for various shoots and noticed that besides the AF pulsing described above, all of the Fujinon XF zooms also had focus delay where when you zoomed the lens, it would often take the camera an extra second or two to actually locate the subject and snap into focus. This focus delay, coupled with the exposure compensation that Fujifilm engineers into every zoom lens, makes using the X-T3 with XF zooms a not very pleasant experience with constant exposure shifts visible in your footage. Every time you shift the focal length of the zoom lens, the lens and body shift the exposure to compensate for there being less light at longer focal lengths, even if every setting on the camera is in manual mode.
Micro HDMI Video Output – I can’t say enough bad things about how terrible, fragile and unreliable the micro HDMI video output on the X-T3 is. Fujifilm used it to save space, but it has almost become a rite of passage for the X-T3 owner to have to ship their X-T3 back to Fujifilm repair to fix and/or replace the micro HDMI connection.
No Video Waveform – The X-T3 has a histogram, but no video waveform monitor. The histogram merely displays pixel brightness distribution from dark to light pixels. No marking, calibration or scale. Without a video waveform, it can be difficult to accurately judge exposure and lighting on skin tones.
The Fujifilm X-T4 adds the most requested feature from Fujifilm users—IBIS!
On To The X-T4
Since I haven’t yet had a Fujifilm X-T4 made available to me for review, I can’t verify a few small details about the new X-T4, but looking at Fujifilm’s specifications, press photos, YouTube videos and the like, I can surmise what I believe the X-T4 to be. Cutting to the chase, in a nutshell, the X-T4 is basically an X-T3 with a slightly larger body, same exact sensor and video specs save for the fact that it can now shoot 240 fps in FHD versus 120 fps on the X-T3. Fujifilm added a new ETERNA Bleach Bypass film simulation, a flippy screen for Vloggers, a significantly larger battery and IBIS. There has been much consternation that the X-T4 also loses the 3.5mm headphone jack from the X-T3, which was replaced with a USB C dongle.
How Does The X-T4 Address Limitations For The Pro Video Shooter?
Here are the main points that I found lacking in the X-T3.
Terrible Battery Life – The X-T4 upgrades Li-ion battery NP-W235, at 2,350 mAh, nearly doubling the battery power of the X-T3 battery. It remains to be seen how much additional battery drain the IBIS function on the new X-T4 battery results in.
29:59 and 19:59 Recording Limits – The X-T4 doesn’t change or eliminate these limits.
AF Challenges – The X-T3 recently received a 3.20 FW update that tamed the focus pulsing other than when using Flog in low light. It appears the X-T4 utilizes basically the same technology with similar results.
XF Lens Issues When Shooting Video – Unfortunately, these issues are tied to the XF lenses themselves, not just the X series bodies, so they remain.
Micro HDMI Video Output – Fujifilm retained the fragile micro HDMI video output.
No Video Waveform – Fujifilm didn’t add a video waveform monitor, retaining the same histogram display as the X-T3.
I predict the Fujifilm X-T4 will be just as big of a hit as the X-T3 was, if not bigger. It adds user-requested features to the already excellent X-T3 and a slightly higher price with a slightly larger body to house the IBIS.
My Take On The Fujifilm X-T4
The headline feature of the X-T4 is IBIS. The X-H1 had IBIS but was a physically larger body than the X-T3 and not the X-T4. Fujifilm implemented magnetic IBIS which, according to preliminary tests, works pretty well. That said, most but not all pros utilize a gimbal, motion control slider or a Steadicam-like device to fluidly move the camera. IBIS seems to be more of a hobbyist feature, but it can be useful in certain situations, taming the micro jitter that’s painfully apparent when shooting 4K especially. I’ve tried shooting handheld with our X-T3 without the accompanying cage, monitor microphone and external battery system that all together add up to making our X-T3 handheld rig weigh about 6 to 7 pounds depending on the lens. Trying to shoot handheld with the X-T3, even with a wide-angle lens, results in a lot of micro jitters that the IBIS in the X-T4 will tame.
A feature that has been used to hook a lot of still shooters coming into the world of mirrorless hybrids is the full-frame sensor. I debate even including this point, but all of the Fujifilm X series bodies use an S35 sensor. If you shoot a lot of low light and need high gain without as much grain, FF sensors are superior in low light. That said, the Fujifilm X-T3 does well up to about ISO 2,500, which is plenty of gain for all but the darkest situations. Since the X-T4 uses the same sensor, it’s fair to say the ISO performance is probably roughly the same as the X-T3. Most but not all video/digital cinema pros are able to light the majority of their scenes, but if you shoot weddings, events or constantly shoot in other situations where you want or need to shoot at ISO 12,500 or higher, do yourself a favor and buy an FF camera.
Moving on from sensor size, the X-T4 appears to be more of a good thing and one the most interesting mirrorless hybrids out there. The value equation is still excellent with the X-T4 body retailing for $1,699 in the United States. IBIS was easily the most requested feature at all of the Fujifilm Summits and from feedback from Fuji user groups. The second most requested feature was a flippy screen versus the tilt screen on the X-T3. The additional battery horsepower is much welcomed, although until we get a hands-on review unit, it’s hard to say what the recording times will be.
Overall, if you’re buying your first mirrorless hybrid, the X-T4 appears to be an across-the-board winner, with a great value equation and features for $1,699. If you’re obsessed with shooting in the dark, look elsewhere for a full-frame camera. If you own the X-T3, the real question is, is it money well spent to sell off your X-T3 and upgrade to the X-T4?
For us, the answer is no. We have tamed the short battery record times of the X-T3 with the external battery grip that adds two more batteries to the internal X-T3 battery. We power the X-T3 from the DC output of our gimbal, so short battery times aren’t a factor anymore. Same with IBIS, we have the Zhiyun Crane 2 gimbal, so we don’t really need IBIS. We don’t need the flippy screen because (thankfully) we don’t Vlog. Objectively, the X-T4 is an iterative upgrade, but it’s an upgrade of an already very good camera that probably edges into great territory for pro video/digital cinema shooters.
The post The Evolution Of The Mirrorless Hybrid Camera With The Fujifilm X-T4 appeared first on HD Video Pro.
https://www.hdvideopro.com/blog/the-evolution-of-the-mirrorless-hybrid-camera-with-the-fujifilm-x-t4/
0 notes
Text
ANDYCINE A6 Plus 4K Video Monitor Review
With LUT Preview and a new touch screen, the ANDYCINE A6 Plus 4K monitor provides video productions with an affordable and practical solution.
I received the ANDYCINE A6 Plus monitor in 2019, after using the original A6 monitor for most of the year. For a predominant Sony mirrorless and Panasonic EVA-1 shooter, having an external monitor is useful for the larger screen size, but also the additional monitoring features.
The monitor accepts HDMI inputs/loop outputs from 480p, 1080/60p, 4K/30p up to DCI 4K/24p (4096×2160), which makes this affordable monitor accessible to a range of cameras.
Advancing on the first generation A6 monitor, the A6 Plus has a number of new features that brings it in line with competition from the likes of SmallHD, SWIT and Atomos.
First up, let’s look at the LUT Preview feature
Whether you film with a Sony (SLOG), Panasonic (VLOG), Canon (C-LOG) or any other camera, filming in a LOG colour profile can pose some problems when it comes to judging exposure and essentially what the final shot will look like.
The A6 Plus overcomes this with the new LUT Preview tool; there are 4 pre-installed preview LUT’s (pulldown to REC709) for the common LOG profiles which include:
LOG-C (ARRI)
VLOG (Panasonic)
SLOG2 (Sony)
SLOG3 (Sony)
Although this feature doesn’t include other standard LOG profiles from the likes of Canon, Fujinon, Blackmagic or JVC, I would assume that with a firmware update, these could be included. One thing to bear in mind is that you should update the firmware to V1.0.7 (link here).
Additionally, much like the SWIT and SmallHD monitors it is now possible to import custom LUT’s via an SD card. If you’re shooting for a specific look or colour pallete, this is an ideal way of previewing the footage on the monitor while shooting in LOG in camera.
vimeo
After discussions with the ANDYCINE team, it is only possible to import 8 LUT’s at a time. That’s not a huge library, but it is 8 more than what as possible before. Things to note when installing your custom LUT’s:
SD card needts to be in FAT32 or NTFS format.
Maximum 8 LUT files in CUBE format.
The LUT file names must be complete and in either English or Arabic.
To install the LUT’s, insert the SD card into the A6 Plus monitor, double tap the screen to bring up the main menu, then select the ‘Colour’ menu (RGB wheel).
Lut Switch should be ‘On’, and then select ‘Initializing’ under the Lut Import (SD). The LUT’s will then be imported and show as ‘Complete’.
ANDYCINE A6 Plus Monitoring Tools
Enlarging the cameras built in screen isn’t the only feature of an external monitor. The A6 Plus has a range of additional features that can aid with focus, exposure and audio levels. These include:
Histogram.
Focus Assist (with focus level and colour selection).
Zebras from 1% to 100%.
Monochorme.
False colour (2 modes).
Grids.
I use the Focus Assist tool all the time when I shoot with the Panasonic EVA-1 because the viewfinder on the camera isn’t very reliable. This ‘peaking’ feature is a great addition to ensure you nail focus every time, especially when filming with a shallow depth of field.
Pinch zoom is particularly useful for quickly checking focus or particular details in the frame.
False Colour is another advanced monitoring feature that aids with exposure, always aiming for the subject to be in the middle grey range.
New Updated Menu
The new menu design is far more advanced than the previous A6 model. The touch screen aides this greatly, meaning you can make any display or LUT changes quickly. The menu is intuitive, meaning it updates and expands depending on the settings you are changing.
vimeo
The fast access menu is displayed by swiping up in the bottom zone of the screen. This displays your common settings, I have Focus Assist, False Colour, Histogram, Lut Switch, Nine Grid and Markers on mine. By double tapping the setting you can customize your quick menu too.
Filming Anamorphic With The ANDYCINE A6 Plus
YES, it is possible to monitor a ‘de-squeezed’ image using the A6 Plus. As more cameras include anamorphic filming modes (notably the Panasonic GH5/S1H and Blackmagic), the A6 provides the ideal monitoring tool to de-squeeze your footage in the following modes:
1.25x
1.33x
1.5x
2.0x
2.0x mag
Unfortunately I haven’t been able to test this feature out.
Additional Tools and Features
I’ll often use the A6 Plus when I film with a gimbal, so the size and weight of the monitor is of course important. It is possible to flip the display horizontally and vertically depending on your rigging preferences.
You may be framing your shots for a particular aspect ratio (especially as more and more content is shot in ‘portrait’ for social media content. Although the A6 Plus doesn’t have a 9:16 or 1:1 aspect ratio display included, it does have the following built in:
70%
80%
90%
16:9
16:10
4:3
5:4 (close to Facebook/Twitter/Instagram formats)
1.85:1
2.35:1 (widescreen)
Filming With The ANDYCINE A6 Plus
The A6 Plus has been my go-to monitor for filming across the world, as I mentioned above the Panasonic EVA-1 viewfinder leaves much to be desired, so a larger, brighter and featureful monitor like the A6 Plus is a reliable choice.
A lot of my filming involves fast changing locations and setups, so the higher brightness (500cd/m2) and 1000:1 contrast ratio is beneficial for filming outdoors. The backlight brightness can also be controlled by swiping left or right to decrease or increase the intensity.
When filming in New York, the A6 Plus was used with the Panasonic EVA-1 as the main monitor, it provided the clarity of focus and exposure needed when I was shooting in a dark conference area and outdoors on the streets.
The touch screen monitor is quickly accessible by double-tapping, but quick features can also be accessed by pressing the menu button or swiping, which is much easier than navigating through a complex menu.
The power consumption of the A6 Plus is very good, and I can often use the monitor for a whole shoot before needing to swap out the battery. It is also possible to power the monitor via 12V D-tap, LP-E6 or NP-F (Sony type) batteries.
Final Thoughts and Should You Buy The ANDYCINE A6 Plus?
If you film with a Sony mirrorless camera like the A7III, or the GH5, or even the Blackmagic Pocket Cinema Camera 4K/6K, this a great external monitor for you. It is smaller and cheaper than the SmallHD or Atomos competitors, and is just as featureful. The new A6 Plus’ menu is very easy to navigate, with clear and understandable text. This makes it even easier to install and load up your own custom LUTs.
The A6 Plus is certainly an upgrade from the less than favourable EVA-1 viewfinder, pinch zoom is fast and accurate and the battery life is a big plus point for long filming days.
What I would like to see in new firmware updates or models include 10-bit display, more in-built LUT’s for common cameras, higher brightness and HDR capabilities. What I have come to learn is that the ANDYCINE team are very easy to communicate with, answering any of my queries very quickly, and that they listen to feedback. The advancements from the original A6 monitor to the A6 Plus are great, and I look forward to seeing more from ANDYCINE in the future.
If you have any questions about the A6 Plus or how I have been filming with it, please comment below. You can purchase the ANDYCNE A6 Plus here.
#ANDYCINE A6 Plus#Andycine a6 4K monitor#A6 Plus 4K monitor#video monitor#camera monitor#4k monitor#vlog monitor#vlogging monitor#LUT display#Sony a7iii monitor#Panasonic GH5 monitor#Blackmagic Pocket Cinema Camera monitor#4k monitor.#Sony a7sII#Panasonic EVA-1#Surrey filming#Surrey video production#video production#camera kit#filming lodno#filming london#filming in new york#on camera 4k monitor#filming in log
0 notes
Text
Shooting With Sony’s New RX100 VII Premium Compact Camera
Few markets are collapsing as fast as the one for compact cameras, aka point-and-shoots. Sales are declining at double-digit percentages year over year. But products in a few niches within the compact market continue to battle to hold their own. One is the high-end, premium-price segment, typified by Sony’s RX100. The popular and capable model is now in its seventh generation: the new Sony RX100 VII ($1,298). It is the most powerful, but also the most expensive model of the RX100 so far. We put a review unit from Sony through its paces by using it as our primary camera for a couple of weeks.
Sony RX100 VII by the Numbers
Early generations of the RX100 were limited by a short zoom range. The last couple versions, including the Mark VII, have addressed that by providing a 24mm-200mm equivalent zoom — enough for most applications.
The actual sensor in the RX100 hasn’t changed as much, but it has been updated. The VII features a 20.1MP 1-inch format sensor and, as you’d expect, can capture RAW or JPEG or both. However, the Mark VII features a redesign of its EXMOR sensor and pairs it with Sony’s high-performance Bionz X processor, which helps provide its impressive frame rate. The camera has optical and digital image stabilization and a Zeiss-branded, 15-element, variable f/2.8 to f/4.5 aperture lens. It has an impressive close focus capability down to 8 cm (3.15 inches) — although that is only when zoomed out.
The RX100 VII does an excellent job of preserving small details. Unfortunately, it is a little hard to appreciate here as the images have been resized for the web.
The Mark VII has a native ISO range from 100 to 12800, with the option of extending up to 25600. Shutter speeds up to a reasonable 1/2000s and down to 30s are possible, and even faster ones can be achieved by relying on the electronic shutter. Power users will appreciate a variety of built-in bracketing and interval shooting options. Videos can be recorded in 4K at up to 30fps or 1080p at 120fps. Unfortunately, it doesn’t support 4K at 60fps.
In addition to fielding a relatively large sensor and high-quality lens, the RX100 VII differentiates itself from mid-range compacts by its speed. It is fully capable of 20fps, even at full resolution with autofocus, and can support bursts of 7 frames at a very impressive 90fps. Supporting that is one of the very best autofocus systems we’ve seen in a compact camera. Sony claims focusing times as low as .02 second, and from using the camera I believe them. In many cases focus is essentially instant — supported by 357 phase-detect and 425 contrast detect sensors. Along with that, you get real-time subject tracking.
The RX100 VII does a good job of dealing with many tricky scenes, like this one with sun and shade.
Another feature photographers used to traditional cameras will love is a high-quality pop-up viewfinder with 100 percent image coverage. There is even a diopter adjustment for the EVF, a nice feature to find in a compact camera. Unlike some other models that require both popping-up and then extending the viewfinder the RX100 VII only needs a quick push on the EVF slider to have it ready. Its pop-up flash is similarly easy to operate. The rear LCD can be tilted up and down, making for easier off-angle shooting. You also have lots of AF area and metering options so you can customize the operation of the camera to fit your particular shooting style or situation.
Image stabilization works well. This image was taken zoomed in to nearly 200mm, with a 1/8th-second shutter speed, and is still reasonably sharp.
Connectivity includes micro USB, micro HDMI, Bluetooth, and a jack for an external microphone. It also supports NFC for one-touch remote operation and one-touch sharing. As you’d expect, the Mark VII also comes with a wide variety of shooting mode presets, and an impressive 37 screens of menu settings. The NP-BX1 battery pack is rated to be good for 240-310 shots depending on whether you are using the monitor or viewfinder, and of course how much use you make of them. That isn’t world-beating but should get most people through the day. Similarly, the 40-70 minute movie endurance should be enough for most users.
Shooting With the Sony RX100 VII
The most daunting aspect of shooting with the camera is the massive number of controls, modes, and settings. This is made more complicated because not all modes and settings are compatible with each other. On the bright side, simply setting the camera to Intelligent Auto does an impressive job in most circumstances.
When in Landscape mode, the camera often blew out highlights, especially bright blue skies. In contrast, in Intelligent Auto mode, it did a better job of tone mapping and color preservation, as you can see from the similar image below:
This image was taken a few feet away from the previous one, but IA mode is able to preserve all the highlight detail and color — although at the loss of some of the shadow detail.
This high-dynamic-range scene also gave the camera some trouble in accurate highlight rendering, but it did do a good job of preserving some details in both highlight and shadow areas.
The RX100 VII features a broad array of autofocus options. Like its menu system in general, they can be somewhat overwhelming. Most users are familiar with a few basic options, but the VII adds a variety of Face, Eye, Smile, and Tracking AF choices, including a specialized Animal Eye AF mode. Be forewarned that you’ll want to practice with these modes before trying to set one up in real-time while your subject is getting bored or starts to wander off while you fiddle.
That said, the intelligent focus was reliable and fast. It also did a nice job of tracking moving subjects like cars and bicycles.
As you’d expect from Sony, the RX100 VII is also a highly capable video camera. The ability to output up to 100Mbps over HDMI and the inclusion of an external microphone jack mean that it will find a home in the kit of a lot of videographers. The only tradeoff here is a lack of 60fps recording at 4K resolution.
To give you a sense of what it means to have a 24mm-200mm zoom range, here is a shot of Fry’s Electronics at 24mm, followed by zooming into 200mm on the store’s sign:
Fry’s Electronics captured with a Sony RX100 VII @ 24mm
Fry’s Electronics captured with a Sony RX100 VII zoomed in to 200mm
Should You Buy a Sony RX100 VII?
For starters, the RX100 VII may be the very best camera you can fit in a pocket. It has most of the features you’d expect on a mirrorless or even entry-level DSLR. But you’re paying for the privilege, so you have to decide your budget can handle the $1,298 price tag. You’ll also need to spend some time learning the controls on the camera, and getting it set up the way you like it. Once you do, you’ll have a powerful and flexible image creation tool that is a lot smaller and lighter than buying into an interchangeable lens system.
[Image credit: David Cardinal]
Now Read:
Will Phones Soon Finish Off the Camera Market?
Mobile Photography Workflow: Pushing the Envelope With Lightroom and Pixel
LG Patents Smartphone With 16 Cameras, Because Sure, Why Not
from ExtremeTechExtremeTech https://www.extremetech.com/electronics/302302-sony-rx100-vii-premium-compact-camera-review from Blogger http://componentplanet.blogspot.com/2019/11/shooting-with-sonys-new-rx100-vii.html
0 notes
Video
vimeo
Hiking in the Alps - Shot on BMPCC4K from Matteo Bertoli on Vimeo.
Last week my wife and I went to the Alps and I decided to bring the BMPCC4K with me. On the second day we did one of the most exhausting and beautiful hike I've ever done. We went up to Rifugio Garibaldi. The total time going up and down was about 7h. This is my 3rd time doing that hike and every time I forget about how long it is! Of course I didn't have a full rig, but just the camera, cage, handle, Power Junkie by Blindspot with 2 NP-F970 batteries (and dummy battery) and a Canon FD 24mm f/2.8. I didn't even bring the monitor and I completely forgot my Tiffen Variable ND. Everything fit perfectly in my backpack, which wasn't too heavy. All the wide shots were filmed during that hike, while the long shots of the mountains were filmed on a separate day with the camera full rigged, on the tripod and with my Canon FD 70-210. The PJ by Blindspot is actually a very smart solution and I was able to shoot pretty much 7h with only 2 batteries. Definitely a smart solution if you wanna keep your camera lightweight.
As far as exposure goes I mainly exposed by eye, but always checking my false colors to be sure I wasn't overexposing. Keeping everything in the pink/green is good and if you have to underexpose a bit, that's ok. With digital cameras is way easier to recover shadows than highlights, that's why I don't recommend ETTR. A video about exposure will definitely come out at some point in September. I've been traveling since July 27th and I'll be back in California on September 18th, so I'll do my best. Everything was shot at ISO 400.
As far as color goes I used the BUTTERY Natural Rec709 and then I played around with contrast, WB and tint. Everything was edited and graded in DaVinci Resolve 16.
GET THE BUTTERY LUTs COLLECTION here: butteryfilms.com/luts
Music by Michael Cameneti (on Musicbed)
Get a free trial of the best music for your videos: share.mscbd.fm/matteobertoli
My favorite gear: amazon.com/shop/matteobertolime
Build your BMPCC4K cinema rig:
- BMPCC 4K: amzn.to/2Lw4pYL
- Canon FD 70-210 f/4: amzn.to/2XaBdPt
- Canon FD 24mm f/2.8: amzn.to/2X81bTz
- Laowa 9mm f/2.8: venuslens.net/product/9mm/ref/352/?campaign=9mmf/2.8
- Canon Fd to Micro 4/3 Speedbooster: amzn.to/2TTgSbx
- Blindspot Power Junkie: amzn.to/2KLOzdR
- Blindspot Canon LP-E6 Dummy battery: amzn.to/2KKa8vk
- SLR Magic 8mm f/4 (139$!): amzn.to/2VFbZEe
- Tiffen Variable ND: amzn.to/2XEH10t
- Voigtlander 17.5mm f/0.95: amzn.to/2V6ZBgQ
- SmallHD Focus: amzn.to/2Ra3ZNf
- Smallrig Wooden Handle: smallrig.com/smallrig-right-side-wooden-handle-with-arri-rosette-1941.html?afmc=b4
- Smallrig Rosette Handle Kit: smallrig.com/smallrig-shoulder-rig-handle-kit-2002.html?afmc=b4
- DandO Batteries Bundle USE: MATTEO15 AT CHECKOUT FOR A 15%OFF: dandolighting.com/collections/discount-bundles/products/two-95wh-sony-v-mount-broadcast-replacement-lithium-ion-batteries-d-tap-connector-and-dual-charger
- PDMOVIE Wireless Follow Focus Live Air: amzn.to/2W6BdvB
- 8Sinn BMPCC4K Cage + Top Handle: amzn.to/2GYnDpX
- Samsung T5: amzn.to/2JZTUht
- 8Sinn Vmount Plate: amzn.to/2BE5lWN
- Camvate Cheese Plate: amzn.to/2SiNJ9K
- Dtap to BMPCC 4K: amzn.to/2V61z19
- 8Sinn VCT Shoulder Plate: bhphotovideo.com/c/product/1407021-REG/8sinn_8_vct14ss_vct_universal_shoulder_base.html
- 8Sinn rods: amzn.to/2LuMqlL
- VCT Plate: amzn.to/2RjetKk
- Manfrotto Tripod: amzn.to/2ShjRut
- Manfrotto 502 Head: amzn.to/2BCtr3T
- Bright Tangerine Donut: amzn.to/2BAVKQw
- Tilta Matte Box: amzn.to/2BFLM0i
- NiSi ND: amzn.to/2RhrjIE
- Tiffen Black Pro Mist 4x5.65: amzn.to/2QND0rl
- Smallrig Cage for SmallHD Focus: smallrig.com/smallrig-monitor-cage-for-smallhd-focus-2095.html?afmc=b4
- Super Takumar 50mm f/1.4: amzn.to/2Ex1Bc6
- 8Sinn SSD Holder: amzn.to/2EvPAno
Thanks to my patrons:
Taj Константин Bryan Davide The Rubord Conspiracy Kimon Millar Nikolai Rodrigo Shahriar Silvester Serban Philipp Erica Chad Jared Brandon Michael Chillm Christian
Follow me:
matteobertoli.me facebook.com/matteobertolifilmmaker instagram.com/matteobertoli twitter.com/matteobertoli
0 notes
Photo

New Post has been published on https://www.updatedc.com/2018/11/23/tilta-bmpcc-4k-cage-hands-on-interbee-2018/
Tilta BMPCC 4K Cage hands on – Interbee 2018

Tilta has given us a sneak peek at their upcoming camera cage solution for the Blackmagic Design Pocket Cinema Camera 4K at Interbee 2018 in Japan.
The cage is made from Aluminium Alloy 6061, and has been designed to be ergonomically form fitting to the camera. The big highlight with the Tilta system is the vast amount of modularity and fexability it offers. You can customize it to whatever needs you may require. Such as mounting the Samsung T5 SSD drive for external USB recording to adding a number of powering options to power the camera and accessories, such as the Nucleus-N.
There will be differnt side handles available as well, which look to be quite useful when paired together with the upcoming Nucleus-N motor. Unfortunately Tilta didn’t have any of the side handles that we could see at the show.
SIDE HANDLES
Tilta has three side handle options. The MHC-1, MHC-2 & MHC-3.
The MHC-3 is a basic handle with no electronics. The MHC-1 houses an LP-E6 battery and features a finger wheel for controlling a motor like the Nucleus-N. The MHC-2 side handle adopts the larger Sony NP-F style battery, has a finger focus wheel and also adds a mounting slot for the Samsung T5 SSD. The MHC-2 has an additional output port to power the camera and additional accessories.
MORE POWER OPTIONS
Tilta also has two battery baseplate options, for a Sony F970 battery or a V-mount battery. The baseplates are designed to be mounted underneath the camera and provide extra long battery life while also powering other accessories. As a lightweight option, they also have a Sony NP-F battery plate which attaches via a single 1/4″ thread and has a DC output port for powering the camera.
If you are shooting outdoors, in bright conditions, you can add the Tilta Sunhood which also features a removable SSD holder. An extension is available for complete block out. In a nice touch, there is an access window so you can still use the touchscreen. There will be two sunhoods available. One is a lightweight solution and the other one will be a more professional solution according to Tilta.
Tilta has also come up with their own USB-C cable thst can be connected and then screwed in to both the Samsung SSD drive as well as the BMPCC 4K body. Tilta has also made locking solutions for other inputs such as the HDMI port.
With a starting price of only USD $69 for the half cage and $99 for the full cage, the system is quite affordable. Add the top handle and you’re still at $178 USD. Pre-orders will open soon and some of the componenets will be available in the first few weeks of December. Below you can see the prices for all the available parts that are available.
To see how it compares on price, here are a few other cage systems for the BMPCC 4K.
8Sinn BMPCC 4K cage��– $279 USD without top handle LockCircle System Cage – €299 Euro without top handle Smallrig BMPCC 4K Cage – $99 without top handle, available for $69 on pre-order Wooden Camera BMPCC 4K Unified Cage – $350 USD with top handle
Two different finishes
The Tilta BMPCC 4K cage will be available in two finishes. One will be matte black and another will be the Tactile color that can be seen above.
While the price for the Tilta cage looks quite low comparatively, pricing for the additional accessories and modules are yet to be released so you could end up spending more than some of the other options.
The Tilta cage and accessories were well made and very well thought out. I like how everything is modular and you can just buy the individual pieces that you need without having to buy everything.
Have you received your BMPCC 4K? are you using it without a cage or will you be kitting it for production use?
0 notes
Text
Fujifilm X-H1 vs X-T2: 8 key differences you need to know
Visit Now - http://zeroviral.com/fujifilm-x-h1-vs-x-t2-8-key-differences-you-need-to-know/
Fujifilm X-H1 vs X-T2: 8 key differences you need to know
Fujifilm’s just taken the wraps of its new X-H1, its new flagship X Series camera. Question is though, how does it compare to the fabulous X-T2, a camera that the X-H1 sits above in the range.
Both share the same 24.3MP X-Trans CMOS III sensor, so which camera’s the one for you? Let’s take a look at some of the key differences.
X-H1 vs X-T2: In-body image stabilization
While the X-T2 relies on specific lenses for image stabilization (those designated OIS), the X-H1 for the first time in a X Series camera features in-body image stabilization, that promises to offer up to an impressive 5.5-stop compensation.
X-H1 vs X-T2: Viewfinder and rear screen
Image 1 of 2
Fujifilm X-H1 rear
Image 2 of 2
Fujifilm X-T2 rear
The X-T2’s electronic viewfinder impressed when we tested it, but the X-H1 is that bit better. While both are the same size at 0.5-inches roughly, the X-H1’s resolution of 3.69-million dots is an improvement over the X-T2’s already impressive 2.36-million dots.
Interestingly, the 0.75x magnification offered on the X-H1 is a slight regression on the X-T2’s 0.77x magnification, but both have a display lag time of just 0.005 seconds and a refresh rate of 100fps. The minor difference here is that the X-T2 achieves this frame rate in a Boost mode (and requires the VPB-XT2 battery grip), and would otherwise by running at 60fps.
Both sport a 3.0-inch, 1.04-million dot rear display with a clever three-directional tilting mechanism, but the X-H1 has the advantage of a touchscreen interface.
X-H1 vs X-T2: Build quality
Image 1 of 2
Fujifilm X-H1 front
Image 2 of 2
Fujifilm X-T2 front
Just like the X-T2, the X-H1 is dust and water-resistant, as well as being able to operate in temperatures as low as 14°F / -10°C. However, the X-H1 also features 25% thicker magnesium alloy compared to the X-T2, while the camera also features a high quality, scratch-resistant coating.
The X-H1 is a bigger camera overall as well, measuring 139.8mm (W) x 97.3mm (H) x 85.5mm (D) compared to the X-T2’s dimension’s of 132.5 x 91.8 x 49.2mm, while it’s also a little heavier at 673g compared to the X-T2’s weight of 507g.
X-H1 vs X-T2: Controls
The design of the X-H1 is a bit of a departure from the X-T2, and borrows some design elements from the medium format GFX 50S.
The most obvious addition to the X-H1 is a much more pronounced handgrip, while there’s now a 1.28-inch LCD on the top of the camera, emulating the design of the GFX 50S and displays key shooting information. This does mean that the handy exposure compensation dial on the X-T2 has disappeared.
There’s also the arrival of a dedicated AF-On button at the rear of the camera for back-button focusing, while the buttons on the rear of the X-H1 have been enlarged and improvements made to the grip of the front and rear command dials.
X-H1 vs X-T2: Autofocus
Both the X-H1 and X-T2 both feature the same hybrid AF system that employs both phase-detection and contrast-detection points.
This sees up to 169 phase-detect points arranged in a large square formation (13 x 13) in the centre of the frame that’s supplemented by two grids of 6 x 13 contrast-detect points either side to deliver a total of 325 focusing points across a large area of the frame.
With the X-H1 though, Fujifilm has improved the AF algorithms. This has led to the low-light limit for phase-detection points improved by approximately 1.5 stops from 0.5EV to -1.0EV, while the performance at minimum aperture has also been expanded from f/8 to f/11. For instance, phase-detection AF can now be used when using the XF100-400mm f/4.5-5.6 R LM OIS WR with the a XF2X TC WR teleconverter.
There’s also be major improvements made to the AF-C performance while operating in zoom, which should make the X-H1 more suited to shooting fast moving subjects.
X-H1 vs X-T2: Video
Both the X-H1 and X-T2 offer 4K recording (3840 x 2160), but the X-H1 also offers DCI 4K (4096 x 2160) at up to 24p. The X-H1 also has the edge when capturing Full HD footage, capable of shooting at up to 120p compared to the X-T2’s 60p.
Fujifilm’s also doubled the bit rate on the X-H1, increasing it from the X-T2’s 100Mbps to 200Mbps, while it also offers a 400% dynamic range setting and a ETERNA film simulation mode that simulates cinematic film, creating understated colors and rich shadow tones according to Fujifilm.
X-H1 vs X-T2: Burst shooting speed
While you’d expect the X-H1 to have an advantage here, they’re both the same, with a top burst shooting speed of 14fps (with the electronic shutter), dipping to 8fps should opt for the mechanical shutter.
Both see a boost in performance if you attach their respective battery grips, with both the X-H1 and X-T2 capable of shooting at 11fps with the mechanical shutter activated. There’s no performance gain if you use the electronic shutter.
X-H1 vs X-T2: Battery
Both cameras use Fujifilm’s NP-W126S Li-ion battery (good news if you’re planning to have both cameras in your kit bag), but the X-T2 has the slightly better battery life of 340 shots compared to 310 shots for the X-H1.
This can be attributed to a number things, but perhaps the larger viewfinder and in-body stabilization are going to drain the power of the X-H1 a little more.
0 notes
Text
How to Connect Accsoon Seemo 4K to Iphone?

What is Accsoon Seemo 4K?
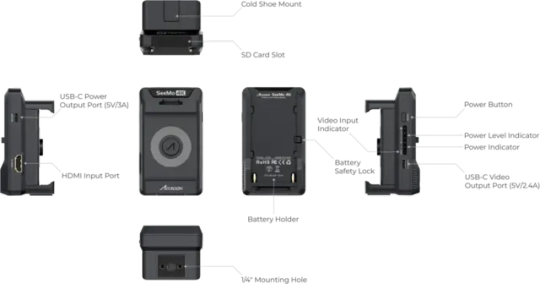
Accsoon Seemo 4K HDMI Video Capture Terminal for Iphone enhances your mobile filmmaking with this Innovative HDMI video transmitter adapter. Capture striking 4K 30fps footage directly on your iPhone or iPad, entirely with an SD card recording for backup and power supply to your device. Enjoy experienced-level review with features like waveforms, zebra stripes, and focus climax.
Stream live comfortably with RTMP/SRT streaming and develop your creative prospects with LUTs and other leading tools. Its compact design and functional mounting options make it the perfect on-the-go counterpart. Experience the future of mobile video production with Accsoon Seemo 4K.
Set free your creative hidden with the Accsoon Seemo 4K. Get yours today and discover why it’s a requisite for content creators. Explore our competing Accsoon Seemo 4K price in Dubai at Awpro.
Features Of Accsoon Seemo 4K
Use Your iPhone as a Camera Monitor
SEE App Provides Monitoring Tools
Livestream in 4K
Instant Social Sharing via iPhone
Powered by Optional Sony NP-F Battery
Doubles as an iPhone Charger
SD Card Reader for Fast File Transfers
Cold Shoes with USB-C Power Output
90° Tilt with Cold Shoe Adapter
For this configuration, you will need:
An iOS device
HDMI camera or other HDMI source
Seemo 4K adapter
Seemo 4K Lightning to USB-C cable (included) or USB-C cable
HDMI cable
Sony F-Type battery
How to Connect Accsoon Seemo 4K with Iphone?
Use an HDMI cord to connect the Seemo 4K connector to the HDMI camera.
Depending on the port type on your iOS device, use a USB-C to USB-C or USB-C to Lightning cord for connecting the Seemo 4K adapter to it.
On your Apple device, launch the Switcher application.
Start the Seemo 4K adapter.
Press the Plus (+) symbol. (only to iPhone)
Tap the button New Livestream.
Either choose Vertical or Horizontal.
Tap Enter Studio.
In the lower-right corner, tap the Inputs tab (the box with the arrow icon).
The device's built-in camera feature will be immediately replaced with the Seemo 4K adapter.
The Seemo 4K camera can be found under "Built-In Sources" (i.e., "Seemo 4K") on the Inputs tab.
To link the Seemo 4K to the gadget, tap it.
The Seemo 4K will now appear as a camera angle in the Sources panel.
Tap the Seemo 4K angle to display it in the live feed.
Conclusion
Video makers that want to improve their mobile performances should not be without the Accsoon SeeMo 4K. By providing an extensive system for recording, storage, and distributing high-quality video content, it accelerates the mobile film making process. Awpro is the best camera store in Dubai, UAE. Get yours today to experience the future of mobile video production.
0 notes