#How to edit birthday on Facebook without providing ID
Explore tagged Tumblr posts
Visit Tumblr Blog
Explore Tumblr blogs with no restrictions, modern design and the best experience.
Last Seen Tumblr Blogs


Fun Fact
69% of Tumblr users are millennials.
Text
#Facebook birthday change without ID#Changing birthdate on Facebook without identification#Update birthday on Facebook without ID verification#Modify birthdate on Facebook no ID needed#How to edit birthday on Facebook without providing ID#Changing birthdate on FB without identification proof#Facebook profile birthdate update without ID
0 notes
Text
How to make income online without investment

Welcome, in this article you will learn how to make your first online income without the need to invest or pay any cent, just follow step by step.
I will show you how to profit from things you already know and earn income from all over the world in a foreign currency while sitting at the comfort of your home.
All you need to have is a strong desire to work and earn, 15 minutes of your time, and to know basic English,
and do not worry YOU WILL NOT PAY A SINGLE RUPEES TO ANYONE, on the contrary, you will be paid.
If you are able to read this guide and understand it, you will be able to work from home and make a very high income, just follow the steps I will show in this guide.
What you need to do exactly is to provide a service, and as a housewife or a student with no profession you will be able to provide many services and I will show you how.
First I will list some services you may provide then I will explain how to get the customers, from all over the world, who will pay you for your services.
What services you may provide if you have no experience of any work before?
1- Voice Over: many companies make animation videos and they require to ad voice to them, so they will need someone to provide them with a (voice-over service) in which they will give you a ready-made text, and all you need to do is to read this text and record it, with your mobile phone, recorded it in an audio file and send it to them and they will pay you for that.
You will always get paid in advance and before you start the work and the payment range between INR 350 to 750 for reading 150 words.
The more words you read the more you get paid, Which means if you read 300 words so your payment will be ranging between INR 750 to INR 1500 …etc.
2- Teaching: You are good at math, you know cooking, you know how to dance…etc. you can teach anything that you know and are you good at it.
Let's assume you are a housewife, and you are good at making Biryani, you can earn by teaching people how to make Biryani, now someone will try to use his rusted brain and say hey but cooking classes are all over the internet and for free, why they would pay me for it?
Well, they will pay you for it if you provide them something not available on the internet, and how is that? well, mention in your service that you will teach them LIVE, the class will be LIVE through a WhatsApp video call ( which is free ), so they will not just follow recorded instructions but you (the teacher) will be as present with them in their own kitchen, watching what they are doing and instruct them in what to do next, so you will guide them a step by step, from the start of the preparation of the ingredients, till male is done and ready to eat.
That does not exist anywhere on the internet, does it?
The payment for such a service can range from INR 750 to INR 1,500. For teaching one person over a video call, how to cook one single dish such as Biryani.
Let's assume that you are good at math, you can 1- Teach math, this is one service, 2- Solve students homework, this is another service,
you are good at a certain language, you can provide easy writing or article writing service, you know 2 languages such as English and Hindi, then you can provide a translation service, from English to Hindi, and another translation service from Hindi to English.
3- Video Review: many companies provide certain products or services, and they want to market their products or services by showing a video for someone who will say that their product or service is really great.
So, in this service the company/the buyer will send you a text which you need to video record yourself while reading it, of course, you should not show that you are reading from a paper, you should look natural speaking from your mind.
The payment for such a service can range from INR 350 to INR 3,000 depends on the length of the video, it starts with INR 350 for 150 words or 30 seconds of recording.
The more words you read or the longer you record the more you get paid.
Now From Where to get buyers ??
This is the 15 minutes I want you to spend, I want you to follow the instructions with me step by step, do not just read, but do what I do while reading,
Now go open your mobile phone and do as do below.
1- Open your mobile phone, make sure you are connected to the internet.
2- Open any browser on your phone, like Google Chrome or Safari.
You must use your phone as on computer the menus locations are different.
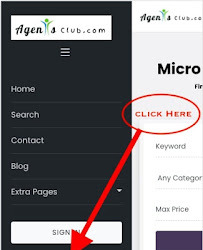
3- Type in the address bar of the browser this address: AgentsClub.com
4- When the website AgentsClub.com has opened :
From the top right there are 3 dashes click them
( see image )

A new menu will show on the left side, from that menu click on Register.
( see image )
A new page will open with 2 options, Buyer and Seller, you need to select one of them,
As a service provider, you are a ( Seller ) so, you need to select Seller.
( See Image )

In the next window, you need to fill a small form, as follows
User name: must be a unique name it may include numbers but it should not have spaces.
This will be the name you will use to log in to this website.
I suggest you something which you will not forget, and it will be unique,
which is to use the first part of your email id as your user name, the first part which is before the @ sign.
So if your email id is: [email protected]. then you can use the name joe007 as your user name
In this way, you will make sure it is unique as well as you can remember it easily.
Then fill in your first name, last name email id, and choose whatever password you wish to use.
Then select I’m not a robot, and also select Accept Terms & conditions.
Then scroll down to the button Register, and click it.
( see image )

Once you registered, you will be logged in to your account, now
From that page top right, click on the 3 dashes,
( See image )

A new menu on the side will show, from this menu select ( Extra Pages )
( See image )

After you click on ( Extra Pages ) a menu will popup, from that menu select ( Add job )
( see image )

On the next page, you will get a list of packages to choose from, select
The first one, which is the FREE package.
( see Image )

The form will open, I will describe what to fill in each field,
What you will fill in will be different than what I will fill in the form, because you will be providing a service different than mine.
So take what I will fill here as an example, and fill your own service in the same way.
I will provide a service where I will sing a happy birthday to the name the buyer will provide me, I will sing it
While wearing a spiderman suit, and I also can put balloons and colorful decorations on the background if the buyer is ready to pay extra for that.
That was my service now here is how I will fill it.
Title: I will sing a happy birthday song while wearing a spiderman suit.
About this Gig: I will sing a happy birthday to anyone you want while wearing my Spiderman suit. And I can use a decorated background if you want
( See image )

Keywords: Song, happy birthday
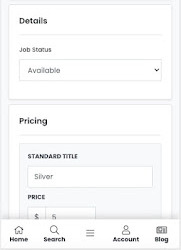
Job Status: Available
Pricing
Standard Title: Silver
Price $ : 5
As the website is for worldwide, they are using a common currency, which is the US dollars,
So in our services, we will also list our prices with US dollars, buyers ( from all over the world ) will pay us
With US dollars, the amount will be credited to our AgentsClub account with US dollars exactly in the very
Same currency the buyer has paid, but when we request to withdraw our earning from AgentsClub, AgentsClub
Will send it to us in its equivalent local currency.
For example, if you live in India, and you have made earning of $10, when you request to withdraw this $10 from AgentsClub to your Bank account, AgentsClub will Send you its equivalent in Indian currency, which is ( at the time of writing this book ) is 745 Indian Rupees.
(See image)
Description: Delivered in 3 days
Premium Title: Gold
Price $ : 10
Description: Delivered in 24 hours.
I will also click on the button ( Add Add-on ) which will open another small form.
( see image )

The following are the fields of the ( Add Add-on ) button
Add-on title : Extra
Price $ : 10
Description: I will sing in front of a decorated wall with colorful balloons
( see image )

Photo :
For the photo, I will upload the following photo

And here is it after uploading :

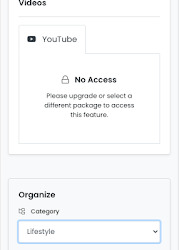
Videos :
You will see the videos are disabled with a message ( NO Access ) and that is because you are a free member
If your service requires you to upload a video or videos, to your job post, then you can upgrade your membership,
From free to any other membership, you can do that from inside your AgentsClub account.
Organize
Category: Lifestyle
( see image )
Make your ad stand out: I will leave them as they are I will not select any option on them, as I want to
Make this totally free for you, later when we earn from this website we can choose such extra services.
Now click on the button ( Save Changes )
( see image )

We are done, creating our service!.
After you click on Save Changes, the page will open on our service ( gig is another name for a service ),
with the edit mode so if you want to edit anything you can edit it.
The second step ( Marketing our service ).
Now we need to do quick marketing to our service.
From the same page where it shows your gig/service details, scroll down till the end,
there you will be able to see social network sharing icons of Twitter, Facebook, and a Plus sign.
(See images)

Click on the Twitter icon to share your gig/service link to Twitter, once you are done do the same with FaceBook,
then also click on the Plus sign to open more social network sharing icons.
When the plus sign clicked there will be social sharing icons for Pinterest, Linked In, and WhatsApp.
Click on them one at a time to share your gig/service with the maximum number of people.
Now we are totally done!.
We have created a listing for our service and we have made some marketing for it, now what is next?
What is next?
As a free member with AgentsClub.com, you are allowed to post 2 gigs, so now you go and post another service,
A completely new different service from your very same account, by following the very same steps mentioned above.
Also do not forget to do a social sharing for the second service when you are done.
After that you are completely done, you need to do nothing more, go live your life the way you want, and just keep checking
Your emails for any orders.
When any buyer interested in your service he will pay for it to buy it, the payment will go to AgentsClub.com, and AgentsClub will send you an email regarding the order.
At this time you need to go to the website AgentsClub.com and login to your account, and click on ( My Orders ) from the right side menu from inside your account, to view the orders you just received.
Now, you must click on ( Accept Order ), so the seller will get an email that you have started the work on his order.
You need to do the service as you have described it, in your job listing, and deliver it to the buyer.
and ask the buyer to give you a 5-star rating if he is happy with your service.
It is usually done in this way: assuming you made a video for the customer.
You upload the video, through the AgentsClub order page itself, where the buyer has left you instructions regarding what he exactly wants. Upload his work and (on the very same page) write a message saying: Here is your work completed, I hope you like it if there is any problem please tell me I will get it fixed. And if you are happy with my work then please leave me a 5 stars rating. Thank you.
Then mark the work as completed.
Now when the buyer views your service he will usually write you a review and mark the service/gig by received.
The second the buyer mark your service by received the very same second the amount which the buyer has paid for the service
gets transfers to your AgentsClub.com account.
Which you can request to withdraw at any time you want to your bank account.
Some may wonder how a $5 which is INR 350 service can make me INR 50,000 a month?
Well let us assume you have 2 services, their basic plan is $5 and their premium is $10, with some extras of $5
Let us assume you get 3 orders daily one premium and one basic and one basic with an extra that is. a total of $25
25 x 30 days = $750 and that is at the current rate equal to INR 56,118
Remember that mountains are made of huge rocks and these huge rocks are made of tinny pieces of sand.
So a tinny piece of sand can make a huge mountain, so do not misestimate the $5 especially when there are
So many orders.
If you do not know how many USD equal to your own currency, you can use google, in this way :
Assuming your currency is Indian Rupees, and you want to charge like INR 1,000 for your service,
and you do not know how much the INR 1,000 make in US dollars,
then go open google and in the google search box type: INR 1000 to USD
And click enter.
Google will give you the result according to your current rate.
( see image )
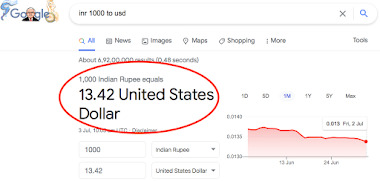
As you can see from the above image, the INR 1,000 is equal to $13.42.
BUT, you should NOT put a service rate as $13.42 not even as $13 or $14
The services rate on the AgentsClub website is incremental of 5, so you can put any figure, which is incremental of 5,
such as 5, 10, 15, 20, 25 ….etc. up to 995, as a price, you want to charge for your service,
And Yes you can charge $995 if you have a service that worth such amount.
Now back to our previous example, in which, what we want to charge is not incremental of 5, it is 13.42 then what we should do?
In such a case, we either charge $10 or we charge $15.
Get started now and head over to AgentsClub website
0 notes
Photo
12 Best Android Photo App Templates
App templates are the perfect solution for inexperienced coders who want to create apps but don’t yet have the skill. And for the experienced developer pressed for time.
They come with core functions already implemented for you, so you can customise the app easily and add the elements you think are most important to the app's code.
one of the many mobile Android photo app templates on CodeCanyon
Top Selling Android Photo App Templates (for 2020 on CodeCanyon)
Bring your app to life with one of these popular Android photo app templates. Focus on what will make your app unique.
Here are a few of the best-selling Android photo app templates available on CodeCanyon for 2020.
Here is why you should take advantage of the premium App templates on CodeCanyon:
App templates are affordable—much of the code is already written for you.
The templates come with all the features you need to create your own mobile app.
The heavy lifting has been done so you can focus on creating the app you want by customizing and adding elements that will make your app unique.
The templates come with documentation—all you need to do is follow the instructions.
10 Best Android Photo App Templates
1. Photo Frame Editor
If you’ve been looking for a template to create an app with a wide selection of digital photo framing options, then check out the Photo Frame Editor. The Editor offers frames for every occasion, including birthdays, Valentines, Christmas, weddings, etc.
It supports all screen resolutions available on mobiles and tablets. Users are able to zoom in and zoom out, rotate their photo 360°, and drag it easily into the selected photo frame. Framed photos can shared on social media, and also saved and used as digital wallpaper. For ad revenues, it is compatible with AdMob and StartApp.
2. Natural Frames
If you’re somewhat of a nature lover and prefer a template that offers frames that are a bit more earthy, then Natural Frames might be more your cup of tea. The template doesn’t use photo frames in the same way that the Photo Frame Editor template does, rather it enables users to superimpose their photos within a nature shot in such a way that they’re framed by nature.
The template has over 20 natural frames. It also offers a number of fonts and effects that users can experiment with to further embellish their images. Photos can be taken with camera or selected from existing gallery. Enhanced images can be shared via a variety of social networks. It comes integrated with Admob.
3. Photo Hoardings
The Photo Hoardings template takes photo framing to new heights. Apps created with this template allow users to create a splash screen by digitally embedding their photos in impossible places like a billboard, the side of a bus, or the back of a truck.
It has a clean and easy-to-use interface and has selection of over 25 hoarding frames available. Images can be shared via variety of social networks, messengers, email, etc.
4. Photo Mirror Effect
The Photo Mirror Effect template allows you to create a new app in a matter of minutes with just a basic knowledge of Java programming. As its name suggests, the app allows the end user to create a mirror image effect with their photos.
Users can choose between mirror or water effect, move image left to right or up and down to perfect the mirroring effect, and spice up their photos with 10 photo effect filters. And there is an option to make some money through ads with AdMob.
5. Funny Face Maker
The Funny Face Maker app template helps developers create one of those incredibly silly and irresistible apps that allow users to construct funny pictures of themselves, their friends and family. The template provides a huge array of quirky and amusing objects and effects for developers to select for inclusion in their app.
For the end user, the app is very easy to use. Using a drag-and-drop system, users can resize and move the object(s) as needed, and save the image. They just need to take a photo with their camera or select the photo they want to manipulate from their photo library, and then select the fun object or objects they want to use.
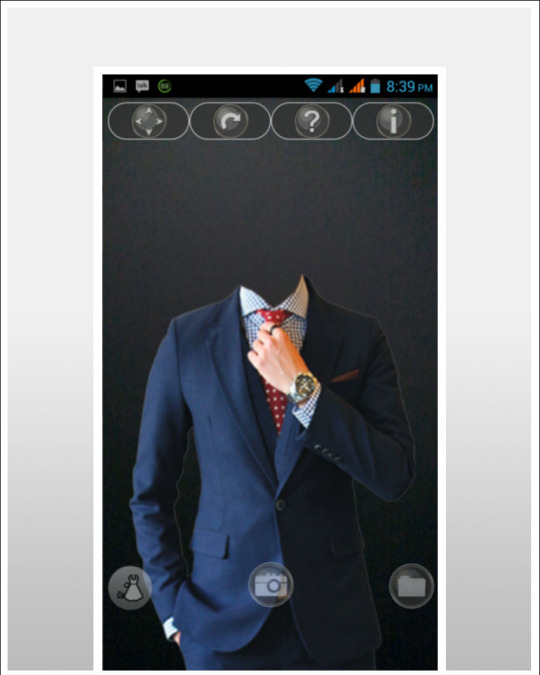
6. Men In Suit Photo Maker
The Men In Suit Photo Maker app template is in the same vein as the Funny Face Maker template. It’s intended to deliver a bit of lighthearted entertainment to the end user, by allowing them to match a face to a wide selection of snazzy suits and presumably to share the results with friends and family.
It comes with a simple guide for customization. You can Also make some revenue through banner and interstitial ads.
.
7. Photo Editor
Photo collage apps make it so very easy to recombine photos. Developers can customize the Photo Editor app template to create their own wonderful or wacky app that allows end users to cut backgrounds and subject matter in any photograph and interchange them with others.
The app provides over 15 HD backgrounds that you can include in the app. You can remove the actual photo background and replace it with any background you wish. Cut people out and put them on another background. And swap faces by cutting out one person's face and pasting it on another. And yes, share your creations on social media.
8. Photo Collage Maker
Photo Collage Maker helps developers create a fabulous photo collage app easily and quickly. This template comes with the ability for users to drag and drop photos from their photo library, edit them, and then arrange them in one of a wide selection of collage styles.
Users can make collages from up to three images. They can select their frame style, size, and colour, as well as adding text to their creation. It also comes with over 50 bundled frames, built-in sharing via WhatsApp, Facebook and more. It's integrated with AdMob.
9. Baby Costume Photo Editor
Developers can now bring joy and smiles by using Baby Costume Photo Editor app template to create a baby photo app. With this app users can create status or profile images of cute lovely babies in their families using a stunning sticker collection to decorate baby images.
They can also wrap baby photos with custom costume cards and write text with different colors and fonts. In addition they can choose portrait layouts to create insta-stories, or square layouts for profile or instafeed.
This app works offline. It has an in-app content management system that makes it easy to share and delete. It is Admob Integrated with Banner, interstitial & Rewarded Video Ads.
10. Photo Frame Editor Offline
Last but definitely not least, remember the first photo app template on this list? This is the offline version! This application can work without internet connectivity also.
The features and functionalities are the same. This app is very fast because of in-built photo frames. The built-in editor offers frames for every occasion, including birthdays, Valentines, Christmas, weddings and more. This is the template you need to create an app with a wide selection of digital photo framing options!
Free Android Photo App Templates for Download in 2020
While many free apps don´t come with all features and functionalities, they are also great way to begin building your app. They come with a skeleton code and detailed documentation.
The free templates below should get you up and running on your next project.
1. Filters Sample Android App Template
This image editing app template only has bare minimal functionalities. It has working filters, splash screen, and edit screen. These give you a head start in developing your image editing app. The UI is coded using native Java code that builds in Android studio & Eclipse. It also comes with clear documentation and editable Photoshop files.
2. ID Photo Free
ID Photo App is a great choice if you want to make photos for any type of documents like passports, identity cards, or driver licenses. It has a simple interface that comes with layout templates of different types of documents of different countries. It processes and generates a printable graphic file for your document by using photos from your gallery or photos you instantly take from your phone camera. Download it from Google Play Store.
Getting the Most Out of App Templates
1. Understand the Purpose of Your App
Clarity of your intention is important when it comes to creating an app. What service do you want your app to provide? What problem do you want to solve? Is it purely for entertainment - bring good cheer to users as they kill time? Is it to educate? Is it to simplify tasks? Do you want it to bring revenue? Brainstorm.
2. Explore All the App Template Has to Offer
Study the app template thoroughly, know its strengths and weaknesses, then customize it by adding to the code. This is perfect especially if you're a novice coder with little experience because it's the best opportunity to experiment with your ideas.
3. Teach Others How to Build Apps
There are many people who want to build apps but they don't know where to start because they have no coding experience. You can offer detailed instructions to others on your blog or vlog on how to build apps they want by using app templates.
Choose Your Premium Android App Templates Now!
If you are looking to build Android photo apps there are plenty of other great options to choose from at CodeCanyon.
These feature rich Android photo app templates come with functionalities that will help you build an app that standouts. You will definitely find something that fits your needs.
Premium Android App Templates from CodeCanyon
CodeCanyon is an online marketplace that has hundreds of Android app templates, for every kind of mobile app. You can save days, even months, of effort by using one of them.
If you have trouble deciding which template on CodeCanyon is right for you, these articles should help:
App Templates
20 Best Android App Templates of 2019
Nona Blackman
Android SDK
10 Best Android Game Templates
Ashraff Hathibelagal
App Templates
15 Best eCommerce Android App Templates
Nona Blackman
Material Design
Best Material Design Android App Templates
Nona Blackman
by Franc Lucas via Envato Tuts+ Code https://ift.tt/2ZDBNE6
0 notes
Text
How to get a phone (LINE Mobile)
It’s been nearly two years since I got my contract with OCN and since then other companies have started to offer monthly contracts! In Japan, most phone contracts require a valid visa for at least 2 years (the length of the contract) and the prices for even cheap plans can be 5,000 yen or more! With monthly contracts you can cut that cost in half and still get LTE/4G data!
You can read my previous tutorial using OCN here.
Requirements: basic Japanese, a Japanese phone number (doesn’t have to be your own), a Japanese address, visa, be over 20 years old, credit card (any country)
note. This method takes about a week so if you are looking to switch to Line Mobile from another company make sure you have a phone or some sort of data plan in the meantime.
Step 0. About Line mobile. Compared to OCN, Line Mobile is about the same price although the two services offer very different features!
a * next to a point means that it differs from OCN
Pros
Cell phone number for calling and receiving calls
Data anywhere, LTE too!
Can cancel or change your plan at any time
*Can receive texts/verify you phone number with apps
*No need to download any external apps
*Can verify age on Line so people can add you by ID
*Can check balance online via the Line app
*All data used on the Line messaging app is free and does not count towards your data limits
*Line Mobile is very new and thus really small so if you need to call customer service there’s virtually no waiting time (at least right now).
Customer service hotline open everyday from 10am - 7pm 365 days a year!
Cons
No cell phone email
You need a credit card, it can be American/foreign, but you need a credit card
The sign up/management site is completely in Japanese
You need to pay for the phone up front since it’s not on contract, which can be very pricey
You must be 20+ years old
Note: if you want to skip all of these steps you can do this whole process in person at Akihabara.
Step 1. Buying the phone. You can buy a phone through Line mobile or you can buy your own unlocked (sim-free) phone OR use a docomo phone.
WARNING! If you plan to buy a phone outside of Japan, make sure to check if it will work in Japan. You can do this by checking the compatibility on sites like Frequency Check or Will My Phone Work. Make sure you’re checking compatibility with “NTT Docomo” in Japan when looking on these sites!
I bought a sim-free phone from South Korea. I got the brand new Samsung Galaxy S8 EXO edition because I’m a piece of EXO trash and they’re my kings.

So with a new phone in hand take note about which size SIM card it takes. Phones will take either Standard SIM, MicroSIM, or Nano SIM. Remember, you can always get SIM card adaptors if your SIM is too small, but if it’s too big then you will need to cut it down.
Step 1.5. Buying an “Entry Package”. If you wanna save some money and have some time, run down to your nearest Bic Camera or Yodobashi and ask for a “Line Mobile Entry Package”. This is an envelope with a serial number inside it that you can just buy at the store. Buying this package in the store costs about 1,200 yen and will waive the 3,000 yen application fee when you apply online. I highly recommend buying one of these to save some money!
**not every Bic Camera or Yodobashi has these packages! There’s a list on the website, but I’d honestly just ask the staff.

The package is just an envelope.

WARNING: Once you open the package/break the seal, it cannot be returned.

Inside is the serial number you need for your application.
Step 2. Apply Online. Now here’s the main part of this whole process!


Head over to the Line mobile website and click the button on the top right the say, “申し込み”

When you click it, it’ll show you a list of steps/talk about the process a little. Scroll to the very bottom of the page.

Click the long green button to head over to the application.

Here you will be prompted to either apply without an entry code or with one. If you bought the “entry package” from Bic Camera or Yodobashi you can click the second option. If not, you will need to pay 3,000 yen for the application fee.

If you chose the second option you will be prompted to enter in your 12 digit code. Do that now and press “次へ進む” to continue.

Next you need to choose what you would like. Choose the left option if you would like to buy a phone AND SIM card and choose the right if you just want the SIM card (this means you already have a SIM free phone or a docomo phone).

Scroll down and you will see plan options.
Left: “Line Free” plan offers free usage of data using the Line messaging app and 1 GB of data for other apps. You can also add on texting and calling.
Middle: The “Communication Free” plan offers free usage of data using the Line messaging app, Facebook, Twitter, and Instagram. You can choose between 3GB, 5GB, 7GB, or 10GB of data for other apps. You also get texting and have the option of adding calling.
Right: The “Music+” plan offers free usage of data using the Line messaging app, Facebook, Twitter, Instagram, and the Line Music app. You can choose between 3GB, 5GB, 7GB, or 10GB of data for other apps. You also get texting and have the option of adding calling.

Naturally I’m going to choose the communication free plan and get 3GB and add on calling so I can use the number to make and receive calls.

Next you choose your SIM card size. My Galaxy S8 takes a nano SIM.

There are also add-on services.
Phone insurance (500 yen/month)
Answering machine (300 yen/month)
Call waiting/put people on hold (200 yen/month)
Call forwarding (free)
International calling (free)
International roaming aka. using data overseas (free)
*note. The international calling and roaming is “free”, but it just means access to those services are free. If you are calling overseas or using roaming you will need to pay for those services. It’s free to have ACCESS to them, not to use them.

At the bottom of the page it’ll display your total bill. If that’s alright you can choose “次げ進む”.

Next Line mobile gives you the option to get a new number OR to keep your old one. If you have a contract with another phone company (NOT a 050/OCN phone) and would like to keep that number, choose the right option. If you’re like me and don’t have a phone number, you can choose the left option.

Now you can enter your name. Write your name in English letters at the top and katakana at the bottom. Then select your gender, “男性 (boy)” or “女性 (girl)”. Then input your birthday.

Further down you will see a place for your zip code. Put in your zip in the format “1234567″ (no hyphen). Press the grey button that says “住所の自動入力” to have the first part of your address put in automatically. You will still have to write your “Choume” and building number and name manually.
WARNING: Input your address EXACTLY how it appears on your ID! So even though writing “1-23-45″ is correct for letters, your ID will most likely write it like “1丁目23番45号” so write it how it appears on your ID!
Next write your phone number. This can be an OCN number, but it needs to be a number you will be able to call/receive calls from!

Next you need to input your email. Put it in once and then a second time to make sure there’s no mistakes. Then you will be asked if you want to receive email updates. “受け取る (receive)” if you want the latest line mobile news/email magazines and “受け取らない (don’t receive)” if you’d rather not.

Next it will ask you if you are applying for yourself or another person. Choose “利用と契約者が同じです (The user is the same as the applicant)” if you are applying for yourself and “利用と契約者が違います (The user and applicant are different)” if you are applying for someone else (you will need to input their information).
The next question will ask how you want to receive your contract. Choose “電子交付(ウェブ表示) (Receive electronically/viewable by web)” or “書面交付 (郵送)(Receive by mail)”. Naturally I chose electronically.

Click all of these options to say you agree to terms of service cuz no one reads that anyway. Click “次へ進み” to move on.

FINISHED! ... Almost. Line Mobile will send you an email.
Step 3. Verify email and submit ID. You should get an email from Line mobile with a link.

The email will look like this and it will contain a link. Click that link to continue the application process.

Next you will need to provide photos of your ID. You ID can be anything as long as it has a photo and it’s official. Your passport, residence card, Japanese driver’s license, or MyNumber card are fine. The ID must be government issued!

Click the box that says “ここをクリックして���ップロド” to upload your photos. If you’re submitting a card, make sure you upload the FRONT AND BACK! When that’s done, press “進む” to continue.

You will be directed to a payment page. This is where you set up your payment for your contract. You can change this later if you get a new card, but you must use a credit (or debit card is fine).
Click the pictures of the card logos to go to the payment selection screen in a separate pop-up window (make sure pop ups aren’t blocked!)

The top option is credit card and the bottom option is LINE Pay. If you don’t have LINE pay just click the top option.

Input your name, card number, expiration date, and security code. When you’re done with that, press “登録する” to register the card.

It will show this screen and press “次へ” to finalize the card you inputted and the pop-up will automatically close.

Next you get to make an ID and password. Write this down and make sure you remember it! You will need it to check your contract and such.

After doing that you will be brought to a page where you will be asked to confirm your contract details. If all looks well you can press the green button at the bottom and...

Your application will be complete! Now you wait for
Step 4. Confirm your identity.

After your application is viewed and checked, if there is any problem you will get an email asking for you to call customer service. You will typically have 3 days to call the customer service before your application is automatically cancelled.
Make note of the Email subject (it will say L100 or some sort of number, that’s the inquiry number you need) and call customer service and they will typically ask you to tell them your name and phone number. You will need to speak Japanese for this part.
A few hours later, they will call the phone number you told them and just ask “is this...”. Just say yes and they will thank you for your time.
Step 5. Receive your SIM card and set up your phone.

You will receive your sim card in the mail about 2-5 days after your identity is confirmed. You must be home to receive this package, it will not be left in your mailbox.

You will get a user manual and the SIM card.

On the SIM card holder there will be a phone number (if you got SMS/calling). This is your new phone number, don’t forget it!
Put the new SIM card into your phone.
Line mobile has a tutorial in Japanese here with pictures. If you are like me and had a contract with OCN, this set up process is the same as with OCN.

Bring up your “settings” menu on your phone. Choose “mobile networks”, keep in mind this may be under “connections”.

From this menu, choose “access point names”.

Choose “add” to add a new access point.

Name: (type any name you want) APN: line.me Username: line@line Password: line Verification type: PAP or CHAP

Don’t touch any other settings besides those.
Select this network and you should have LTE/4G! YEHET! Keep in mind you may need to restart your phone or remove/re-insert your SIM card. If data is still not working, try turning your mobile data on and off or switching airplane mode on or off. It actually took me quite some time to get it to work for my S8.
ENJOY YOUR NEW PHONE AND ALL THAT JUNK! WAAHHOOO!!!

I love my Galaxy S8! THE EXOS! (photo borrowed)
4 notes
·
View notes
Text
Licensing Contributor Felipe Alves on outdoor travel photography
Felipe Alves is an outdoor travel photographer who lives in Oakland, California. He was born in São José do Rio Preto, São Paulo, Brazil, where he spent 10 years of his life growing up.
Q: What first inspired you to start shooting?
A: What inspired me to start shooting was being a long distance from home.
I wanted to share my memories with the people I cared for who couldn’t be present with me. I remember taking pictures of my little brother in Brazil and mailing them to the United States so my auntie and uncle could see what he was like. I’d have pictures of him smiling, playing with toys, going outside to the park—you know, memories.
There was no internet or Facetime back then. Receiving the developed photographs and looking back on snippets of your life felt so rewarding, and I always wanted to share them.
Q: On your website, you mention that you spent the first ten years of your life in Brazil. How has that experience influenced your approach to photography?
A: I am constantly trying to document things. At a friend’s birthday, I’ll have my camera. Going on a hike or to a beach, I’ll have my camera. Anywhere and everywhere.
I was 10 years old when I moved here, and whenever I spoke to my grandparents, all they wanted to know was how we were doing, how tall were we now. Documenting everything for them was my way of making sure we never felt apart.
As a kid, my grandparents would show me photos of their grandparents, and it always amazed me how I could travel back in time with a still image, so I always try to do the same. You can never have too many photographs, because each one will tell a story.
Q: Now that you’re in California, do you find the creative community reflects the Bay Area’s diversity?
A: California is amazing. You can truly meet anyone from anywhere in the world here—specifically in the Bay Area, and I love it.
With different people from different backgrounds, the creative community strengthens in diversity. You can literally find an artist for anything you need—the options are limitless. Powerful creatives with different stories to tell, different journeys faced, all together for one passion, which is to create/share/inspire/ but ultimately express their art. Photographers, videographers, musicians, painters, actors, so many of us with so many different styles—it’s beautiful!
Q: California is a beautiful place to call home and has so many different landscapes from lush green forests to deserts to mountains, and of course, the ocean. Do you have favorite photography spots in the area?
A: When I was in High School, my environmental science teacher once said that we do not explore our backyard enough. Whether that is your city, your county, your state—go out and explore because our world is so big.
California is a state that allows you to explore so many landscapes, and to be honest, I love them all. However, my favorite place in California would be Yosemite. You can go there during the summer and after a long hike, rest your feet in the water. If you go during the winter, you see it snowy white, during the autumn with beautiful yellow foliage, and during the spring, when the snow melts, the waterfalls roar louder. Definitely my favorite.
Q: Your photography focuses a lot on wonderful and awe-inspiring landscapes, what is the best way to prepare for an outdoor shoot?
A: From experience, the best way to prepare for an outdoor shoot is to make sure you have your timing locked down. If the photo you want is on top of the mountain during the sunset, make sure you give yourself enough time to drive to the location, hike up the mountain, set up your camera, and fully enjoy the sunset without the need for excessive rushing to set up your gear. It’s much less painful this way.
Travel light. Don’t pack everything—bring only the essentials so you’re never carrying heavy equipment while moving from place to place.
Q: You often use natural light to highlight the relationship between a subject and the landscape, what are some things you like the most about working this way?
A: I’ve noticed that the light captured in photographs issues different emotions when someone views it, the mood changes.
I enjoy the sunset and sunrise hours because it gives this timeless feel to the photograph without any harsh lighting. If you shoot the same subject around midday and again during sunset hours, you will most often find yourself drawn to the photo with the dreamy lighting. Everything looks more epic during these special hours.
Q: What would you say to anyone who wants to stand out as an outdoor, travel photographer?
A: Make sure to enjoy the outdoors too.
Don’t get caught up on attempting to get the “best” outdoor travel photograph, and forget what brought you outside in the first place. If you are enjoying yourself at that moment, your photograph will probably convey the same feeling.
And, of course, never stop exploring.
You will only become a good travel photographer if you are constantly shooting and constantly exploring. New locations provide new photographs, new photographs provide more experience, and with more experience, you’ll naturally become better and build a great portfolio along your journey.
Q: Travel photography is always in commercial demand, what are some tips you have picked up from licensing this type of content on 500px?
A: In addition to shooting beautiful landscapes, it’s always a plus when you have a model or subject in your pictures. Make sure your model is wearing something that is license-friendly with no logos of any kind, and that they sign the model release form for your photos.
Whenever a model is present, the photograph becomes more relatable. The model helps the viewer understand the scale and surroundings of where the photo was taken. For example, how big the waterfall is compared to a human.
Another good tip is to make sure to never overexpose, and always shoot in RAW format so you can bring back lots of the details when editing.
Q: Speaking of travel, what is one destination that delivered beyond your expectations?
A: My last travel destination before the outbreak of the virus was Iceland. I will recommend this Nordic island to anyone for the rest of my life. I was there for the first time in February 2020. It was cold, it was windy, but it was beyond beautiful. You will never find similar landscapes anywhere else in the United States.
I saw frozen fields of lava rocks, huge waterfalls, hot springs, ice caves, mountain ranges, northern lights, and glaciers floating in the water. The country is so rich with different landscapes and coastal views, it was insane. I will most definitely go back during the summer season when the sun provides more daylight, and the roads are less frozen.
Q: Do you have advice or recommendations for others who may want to visit Iceland?
A: If you go to Iceland, no matter what people say, make sure to visit Blue Lagoon. It’s a little expensive but worth the experience. Considered to be one of 25 Wonders of the World, it’s an experience that can’t be missed. You will be bathing in a spa powered by geothermal activity, which is really unique!
Pack layers because Iceland is very cold and very open. Book tours to visit ice caves. The ice is already melting, and many of the caves are disappearing, so the sooner you go, the better.
Lastly, experience it all and have fun creating memories and documenting your journey.
Not on 500px yet? Click here to learn about Licensing with 500px.
Related
!function(f,b,e,v,n,t,s) {if(f.fbq)return;n=f.fbq=function(){n.callMethod? n.callMethod.apply(n,arguments):n.queue.push(arguments)}; if(!f._fbq)f._fbq=n;n.push=n;n.loaded=!0;n.version='2.0'; n.queue=[];t=b.createElement(e);t.async=!0; t.src=v;s=b.getElementsByTagName(e)[0]; s.parentNode.insertBefore(t,s)}(window, document,'script', 'https://connect.facebook.net/en_US/fbevents.js'); fbq('init', '324942534599956'); fbq('track', 'PageView'); window.fbAsyncInit = function() { FB.init({ appId : 322474681237501, xfbml : true, version : 'v2.1' }); }; (function(d, s, id) { var js, fjs = d.getElementsByTagName(s)[0]; if (d.getElementById(id)) return; js = d.createElement(s); js.id = id; js.src = "http://connect.facebook.net/en_US/sdk.js"; fjs.parentNode.insertBefore(js, fjs); }(document, 'script', 'facebook-jssdk')); Source link
Tags: Alves, Contributor, Felipe, Licensing, Outdoor, photography, Travel
from WordPress https://ift.tt/3aT3xsg via IFTTT
0 notes
Link
In this very special bitcoin-heavy edition of the Daily Byte: a stable bitcoin, Yellen's not buying, a bitcoin exchange gone wrong, and the Feds are in the bitcoin business. Plus, private transactions on the main Ethereum blockchain.
It's the 10th anniversary of the Bitcoin white paper. Here's some of what's happening in Bitcoin news a decade later:
Bitcoin Is Now the Least Volatile Since 2016
Bloomberg is reporting that bitcoin's price is currently the most stable it has been since late 2016. The 30-day volatility of the coin has hit levels last seen in December 2016, with volatility projected to get lower still.
Per CoinMarketCap, the 24-hour trading volume has been largely stable for the last 15 days, at approximately $3.4 billion, with bitcoin showing stable pricing before suffering a downturn Monday.
There are contrasting theories to what this means. Some feel that bitcoin's current stability means that the coin has finally hit "the floor" – its theoretical absolute minimum price – or is close to finding it. Others feel that the flat pricing may be a staging period to a possible price rally, as those investors trigger-shy about jumping into a turbulent bitcoin market might find appeasement in the current calm.
Regardless, as the reserve currency of the crypto market, bitcoin pricing will affect the trading performance of most other coins, including Ether. So. Here's to the best.
Yellen Not Buying Bitcoin
Not everyone sees stability in the market. Janet Yellen, US Federal Reserve chair from 2014 to 2018, spoke Monday at the Canada Fintech Forum, and said she still thinks price volatility is an issue: "[F]or something to be a useful currency, it needs to be a stable source of value, and bitcoin is anything but."
Yellen had more to say about Satoshi's invention: "Very few transactions are actually handled by bitcoin, and many of those [that] do take place on bitcoin are illegal, illicit transactions."
We don't know where she's getting her numbers, but speaking of illegal transactions....
American Man Faces 5 Years In Prison for Illegally Selling Bitcoin
A United States citizen has pleaded guilty to operating an unlicensed money-transmitting business. The man – according to the United States Attorney's Office for the Southern District of California – admitted to selling "hundreds of thousands of dollars in Bitcoin to over 1,000 customers throughout the United States from January 2015 to April of 2016."
Jacob Burrell Campos acknowledged that he ran a crypto exchange without registering the operation with the Financial Crimes Enforcement Network of the U.S. Department of Treasury (FinCEN) and without applying the necessary anti-money laundering and know-your-customer protections. Burrell advertised his exchange on Localbitcoins.com – a site for P2P bitcoin trading – and communicated with customers via encrypted email and text messages. He also charged a five percent fee above the prevailing exchange rate.
In addition, Burrell violated international money transfer rules by transferring the currency gathered – which he stashed in Mexico – with a US precious metal trader. Despite transferring over a million dollars USD daily, he avoided having to report it by sending it in parcels under $10,000.
Burrell will be sentenced on February 11, 2019, and faces up to five years of imprisonment. He will forfeit more than $800,000 as part of his plea agreement.
"Unlicensed money transmitting businesses, especially those operating at or near the border, pose a serious threat to the integrity of the US banking system, and provide an 'open door' for criminals to utilize such businesses to launder the proceeds of their illicit activities," said U.S. attorney Adam Braverman via a press release. "The Department of Justice will continue to investigate and prosecute all individuals and businesses that seek to evade the licensing and anti-money laundering requirements under federal law."
US Government Maintains Its Own Bitcoin Fork
From the "Did you know?" file, the United States government has been maintaining its own fork of the Bitcoin Core software.
To research the potential of a government-controlled blockchain, the National Institute of Standards and Technologies (NIST) launched a project to explore if modest modifications to the Bitcoin blockchain would be enough to create an open blockchain that could support a national cryptocurrency. Using a permissioned blockchain, for example, would give users a coin that must be verified by its "owner," while a fully decentralized blockchain would be governed by consensus and not the needs of the nation.
In a paper published by NIST in September, Peter Mell argues that a public blockchain can be used for national crypto use, provided that changes are made to the mining and authorization processes. The fear is that using the current bitcoin model would open the system up to a potential "51 percent attack" from a hostile nation. The NIST model introduces the concept of "roles" to bitcoin transactions, allowing control over how the protocol can be changed and how the pool of coins can be spent:
"In our system, only accounts with roles can issue transactions and only accounts with the currency manager role can create other accounts with roles (with one important exception, discussed later). Thus, the genesis transaction is the transaction that enables all other transactions."
To test this out, NIST created and maintained its own bitcoin fork. The fork is marked purely for research and is not currently traded on.
EY Unveils Zero-Knowledge Proof Solution for Ethereum
We couldn't leave you without at least one Ethereum story today, even if it is Bitcoin's birthday. Accounting firm EY has announced that it has developed a tool that would allow private transactions on the public version of the Ethereum blockchain.
Such a technology would make it unnecessary for enterprise users to establish permissioned versions of the blockchain to safeguard their data.
In a press release Tuesday, the firm announced that its EY Ops Chain Public Edition prototype would be "the world's first implementation of zero-knowledge proof (ZKP) technology on the public Ethereum blockchain."
Paul Brody, EY global innovation leader, said:
"Private blockchains give enterprises transaction privacy, but at the expense of reduced security and resiliency. With zero-knowledge proofs, organizations can transact on the same network as their competition in complete privacy and without giving up the security of the public Ethereum blockchain."
The protocol would allow for the enterprise use of Ethereum transactions and tokens, while cloaking the transaction data. The protocol will support tokens "similar" to the ERC20 and ERC721 standards.
Included with the ZKP prototype is the EY Blockchain Private Transaction Monitor, which records transaction history. The privacy tools will be released in 2019.
We will return to our regular programming tomorrow. Happy birthday, Bitcoin.
Frederick Reese is a politics and cryptocurrency reporter based in New York. He is also a former teacher, an early adopter of bitcoin and Litecoin, and an enthusiast of all things geeky and nerdy.
ETHNews is committed to its Editorial Policy
Like what you read? Follow us on Twitter @ETHNews_ to receive the latest Daily Byte, bitcoin or other Ethereum technology news.
window.fbAsyncInit = function() { FB.init({ appId : '1761887554082917', xfbml : true, version : 'v2.7' }); }; (function(d, s, id){ var js, fjs = d.getElementsByTagName(s)[0]; if (d.getElementById(id)) {return;} js = d.createElement(s); js.id = id; js.src = "http://connect.facebook.net/en_US/sdk.js"; fjs.parentNode.insertBefore(js, fjs); }(document, 'script', 'facebook-jssdk'));
0 notes
Photo

Airline websites don’t care about your privacy
If you asked a friend if it is alright that his Date of Birth is known to a stranger, probably there are going to make a joke about it; “only if they send me a birthday gift”. But, what about their passports number?, an information security training researcher asks.
Now imagine that you try to check-in for your flight online, and see the error message”This booking does not exist”. Then the call center person repeats the same words. This has to be a mistake! You check your email, and there it is an email confirmation of cancellation. But you didn’t do it. This is not a far-fetched scenario this really happened.
An organization with a primary Digital Product that lacks even the basic data security practices is living in a utopian world where people leave their safe open and never expect a burglar to walk in.
Last year while an information security training expert was booking travel for my family, he stumbled across a few data-security practices that, as an information security advocate, make him worried. When the expert voiced the concerns to Emirates team, this conversation took place:

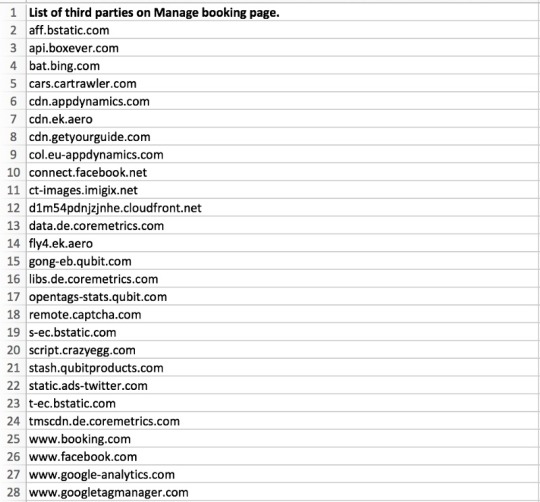
For a normal person, when you book your flight through Emirates, Domestic or International, there are approximately 300 data points related to your booking.
The moment you click on manage preferences to select a seat or meal for your trip or to Check-in to your flight, your Booking ID and Last name is passed on to approximately 14 different third-party trackers like Crazy egg, Boxever, Coremetrics, Google, and Facebook among others, information security training specialists said.
Details
After I completed the booking on Emirates, I received an e-mail confirmation.
The body of the email contained Manage booking. The information security training expert proceeded to select seats and meal by clicking on the Manage Booking button and reached the Manage Preference page. This was pretty straightforward.
While as a user, he saw the normal behavior of clicking a link and reaching the landing page “Manage Preferences”, in the background a redirection chain took place.
While Manage Booking link was supposed to be exclusive to him (the user and the website), this link was also shared with numerous third party trackers implemented by Emirates on their webpages.
The insecureness of HTTP has been talked about over and over again, especially when it comes to maintaining the authenticity of the content and protection against interlopers. But in short, HTTP links are a Data Privacy nightmare. So, not only was Emirates passing on user information to the self-implemented third party trackers, but also allowing network adversaries to have access to the supposedly “Private” page.
What kind of information can third-parties access?
Anyone who has access to these links can not only read but also edit the information.
For example, they can now:
Change or Cancel flight
Change seat or meal preference
Add more products to the booking
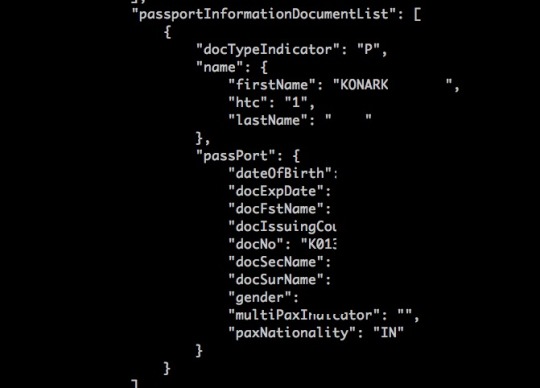
Change or add Passport Information
Change or add Frequent Flyer Information, etc.
Note: In October 2017, fields such as Passport Number, Email Id and Telephone number were shown to be masked on the User Interface but were not obfuscated in source code. The web app has been revamped since then and these fields are now obfuscated.
Masked fields in plain text. (October 2017)
The information security training professional take a peek into the mobile app and see if the past catches up with the present. Passport Number, Email ID and Telephone number in plain text. What was obfuscated on the web app was easy to access on the mobile app.
This issue is not only limited to Emirates, a lot of airlines like Lufthansa, KLM (last checked on October 2017) suffer from the same issues.
Every website uses third party trackers for improving their product and provide better web-usage experience. Data leaks are often considered collateral-damage and sometimes not even considered at all while implementation of such trackers.
Most of these third-parties are present on a lot of other websites and use long term identifiers like cookies etc to track users across domains. Now because one of the websites, in this case Emirates, leaks private information, these companies now potentially can not only link the user’s activity across web, but also identify who the user is.
The questions that need answering by Emirates (and others) are: Why was my booking information passed on to these third parties without my explicit consent? Why do these third parties need to receive this information? Is Emirates even aware that sensitive user information is being leaked to these third parties? Who are these third parties? What are they doing with user information?
In the wake of responsible behavior, on discovering these serious security flaws that violate user-data privacy, the information security training expert decided to flag them to Emirates through Twitter DM in October 2017. Please note that he could not find a dedicated channel for reporting security bugs on Emirates website.
The Social Media Team immediately responded to his Twitter DM with a canned response but he was not ready to give up hope. The information security analyst also wrote an email to the Product Manager highlighting the security flaws. He was met with a deafening silence.
As of (2018–03–03) lot of these issues still persists.
This is a serious violation of privacy; there is no point during the whole booking process, where he agreed upon sharing any of this personal information with any of these websites.
The privacy policy of Emirates itself is not very clear. It does mention some of the of these services, but not all or what data being shared with them.
Unfortunately, the information security training researcher could not find a way to opt-out of this system provided by Emirates. Finally he had to fall back on using privacy preserving browser extensions.
As an information security analyst understand the need to use third party services for optimizing and enhancing not only the Digital Product but also how user interacts with the product.
It is not the usage of third party services that is of concern here in this case but the implementation of these services. Emirates has the control of their website and what the website shares with third party services. It is this control that needs to be exercised to limit the leakage of User information.
It is not a mammoth task; it is just a matter of commitment to preserving the basic right to privacy.
The information security training expert gives some examples:
Private pages should have noindex Meta tags.
Limit the presence of third-party services on private pages.
Referrer-Policy on pages with sensitive data.
Implement CSP and SRI. Even with a huge footprint of third-party services CSP, SRI are not enabled on Emirates.com
User needs to be informed when sensitive information like passport, contact details etc. is updated, edited, or deleted.
Domain for sending e-mails: track.emirates.email, should have a valid certificate. https://track.emirates.email/
fuente:https://medium.freecodecamp.org/how-airlines-dont-care-about-your-privacy-case-study-emirates-com-6271b3b8474b
0 notes
Text
Bob Marley's Birthday
Bob Marley Pinterest
Bob Marley Quotes
<!-- /* Rotating Fade Marquee Version 1.0 November 14, 2011 Will Bontrager Software, LLC http://www.willmaster.com/ Copyright 2011 Will Bontrager Software, LLC This software is provided "AS IS," without any warranty of any kind, without even any implied warranty such as merchantability or fitness for a particular purpose. Will Bontrager Software, LLC grants you a royalty free license to use this software provided this notice appears on all copies. */ // Leave the next line as is (customization is further below): var RM_content = new Array(); //////////////////////////////////////////////////////////// // // Customization section. // // Three places to customize. // // Place One: // Specify the content for each message, one per line, between // quotation marks and parenthesis. Example (with ______ // representing the content): // RM_content.push("______"); // Content may contain HTML code (like links and CSS), even // image tags. // If the content itself contains quotation marks, precede // each quotation mark with a backslash character. // Example: He said, \"five!\" RM_content.push("One good thing about music, when it hits you, you feel no pain. -Bob Marley"); RM_content.push("Don't gain the world and lose your soul, wisdom is better than silver or gold... -Bob Marley"); RM_content.push("Emancipate yourselves from mental slavery, none but ourselves can free our minds! -Bob Marley"); RM_content.push("When one door is closed, don't you know, another is open. -Bob Marley"); RM_content.push("Open your eyes, look within. Are you satisfied with the life you're living? -Bob Marley"); // Place Two: // Specify the number of seconds to pause between displaying // one marquee and the next. A decimal number is acceptable. var RM_PauseBetweenEach = 4.5; // Place Three: // Transitions are from 100% opacity to 0%, then from 0% to 100%. // // Two transition preferences can be specified. The number of // transition steps per fade and how fast the steps shall // occur. // For the steps, the larger the number, the smoother and slower // the transition. // For the speed, the lower the number the faster the transition. var RM_TransitionSteps = 25; // Number of steps per fade. var RM_TransitionSpeed = 50; // How fast the steps shall occur. // End of customization section. //////////////////////////////////////////////////////////// RM_TransitionSteps = parseInt( (100 / RM_TransitionSteps) + .5 ); var RMlastPointer = RM_content.length - 1; var RMopacity = 100; var RMpointer = 0; var RMfader; var RMdiv; var RMie; function RM_StartRotateMarquee() { RMdiv = document.getElementById("RM_FadeInOutContentDiv"); RMie = (RMdiv.filters) ? true : false; RMdiv.innerHTML = RM_content[RMpointer]; setTimeout( "RM_NextContent()", parseInt(RM_PauseBetweenEach*1000) ); } function RM_NewOpacity() { if( RMie ) { RMdiv.filters.alpha.opacity = RMopacity; } else { RMdiv.style.opacity = RMopacity/100; } } function RM_FadeOut() { RMopacity -= RM_TransitionSteps; if( RMopacity < 1 ) { RMopacity = 0; } RM_NewOpacity(RMopacity); if( RMopacity < 1 ) { clearInterval(RMfader); RM_SwitchContent(); } } function RM_FadeIn() { RMopacity += RM_TransitionSteps; if( RMopacity > 99 ) { RMopacity = 100; } RM_NewOpacity(RMopacity); if( RMopacity > 99 ) { clearInterval(RMfader); setTimeout( "RM_NextContent()", parseInt(RM_PauseBetweenEach*1000) ); } } function RM_NextContent() { RMfader = setInterval( "RM_FadeOut()", parseInt(RM_TransitionSpeed) ); } function RM_SwitchContent() { RMpointer++; if( RMpointer > RMlastPointer ) { RMpointer = 0; } RMdiv.innerHTML = RM_content[RMpointer]; RMfader = setInterval( "RM_FadeIn()", parseInt(RM_TransitionSpeed) ); } function RM_AddOnloadEvent(f) { if(typeof window.onload != 'function') { window.onload = f; } else { var cache = window.onload; window.onload = function() { if(cache) { cache(); } f(); }; } } RM_AddOnloadEvent(RM_StartRotateMarquee); //-->
Watch Bob Marley
#BOBMARLEY
(function(d, s, id) { var js, fjs = d.getElementsByTagName(s)[0]; if (d.getElementById(id)) return; js = d.createElement(s); js.id = id; js.src = "//connect.facebook.net/en_US/sdk.js#xfbml=1&version=v2.5&appId=750905305006219"; fjs.parentNode.insertBefore(js, fjs); }(document, 'script', 'facebook-jssdk'));
#BOBMARLEY Tweets !function(d,s,id){var js,fjs=d.getElementsByTagName(s)[0],p=/^http:/.test(d.location)?'http':'https';if(!d.getElementById(id)){js=d.createElement(s);js.id=id;js.src=p+"://platform.twitter.com/widgets.js";fjs.parentNode.insertBefore(js,fjs);}}(document,"script","twitter-wjs");
/** * RECOMMENDED CONFIGURATION VARIABLES: EDIT AND UNCOMMENT THE SECTION BELOW TO INSERT DYNAMIC VALUES FROM YOUR PLATFORM OR CMS. * LEARN WHY DEFINING THESE VARIABLES IS IMPORTANT: https://disqus.com/admin/universalcode/#configuration-variables */ /* var disqus_config = function () { this.page.url = PAGE_URL; // Replace PAGE_URL with your page's canonical URL variable this.page.identifier = PAGE_IDENTIFIER; // Replace PAGE_IDENTIFIER with your page's unique identifier variable }; */ (function() { // DON'T EDIT BELOW THIS LINE var d = document, s = d.createElement('script'); s.src = '//myurbanvibezcom.disqus.com/embed.js'; s.setAttribute('data-timestamp', +new Date()); (d.head || d.body).appendChild(s); })();
Please enable JavaScript to view the comments powered by Disqus.
0 notes