#How to run Java Program in cmd
Explore tagged Tumblr posts
Visit Tumblr Blog
Explore Tumblr blogs with no restrictions, modern design and the best experience.
Last Seen Tumblr Blogs


Fun Fact
In 2020, 44% of users from Denmark used Tumblr daily.
Text
A Guide to Creating APIs for Web Applications

APIs (Application Programming Interfaces) are the backbone of modern web applications, enabling communication between frontend and backend systems, third-party services, and databases. In this guide, we’ll explore how to create APIs, best practices, and tools to use.
1. Understanding APIs in Web Applications
An API allows different software applications to communicate using defined rules. Web APIs specifically enable interaction between a client (frontend) and a server (backend) using protocols like REST, GraphQL, or gRPC.
Types of APIs
RESTful APIs — Uses HTTP methods (GET, POST, PUT, DELETE) to perform operations on resources.
GraphQL APIs — Allows clients to request only the data they need, reducing over-fetching.
gRPC APIs — Uses protocol buffers for high-performance communication, suitable for microservices.
2. Setting Up a REST API: Step-by-Step
Step 1: Choose a Framework
Node.js (Express.js) — Lightweight and popular for JavaScript applications.
Python (Flask/Django) — Flask is simple, while Django provides built-in features.
Java (Spring Boot) — Enterprise-level framework for Java-based APIs.
Step 2: Create a Basic API
Here’s an example of a simple REST API using Express.js (Node.js):javascriptconst express = require('express'); const app = express(); app.use(express.json());let users = [{ id: 1, name: "John Doe" }];app.get('/users', (req, res) => { res.json(users); });app.post('/users', (req, res) => { const user = { id: users.length + 1, name: req.body.name }; users.push(user); res.status(201).json(user); });app.listen(3000, () => console.log('API running on port 3000'));
Step 3: Connect to a Database
APIs often need a database to store and retrieve data. Popular databases include:
SQL Databases (PostgreSQL, MySQL) — Structured data storage.
NoSQL Databases (MongoDB, Firebase) — Unstructured or flexible data storage.
Example of integrating MongoDB using Mongoose in Node.js:javascriptconst mongoose = require('mongoose'); mongoose.connect('mongodb://localhost:27017/mydb', { useNewUrlParser: true, useUnifiedTopology: true });const UserSchema = new mongoose.Schema({ name: String }); const User = mongoose.model('User', UserSchema);app.post('/users', async (req, res) => { const user = new User({ name: req.body.name }); await user.save(); res.status(201).json(user); });
3. Best Practices for API Development
🔹 Use Proper HTTP Methods:
GET – Retrieve data
POST – Create new data
PUT/PATCH – Update existing data
DELETE – Remove data
🔹 Implement Authentication & Authorization
Use JWT (JSON Web Token) or OAuth for securing APIs.
Example of JWT authentication in Express.js:
javascript
const jwt = require('jsonwebtoken'); const token = jwt.sign({ userId: 1 }, 'secretKey', { expiresIn: '1h' });
🔹 Handle Errors Gracefully
Return appropriate status codes (400 for bad requests, 404 for not found, 500 for server errors).
Example:
javascript
app.use((err, req, res, next) => { res.status(500).json({ error: err.message }); });
🔹 Use API Documentation Tools
Swagger or Postman to document and test APIs.
4. Deploying Your API
Once your API is built, deploy it using:
Cloud Platforms: AWS (Lambda, EC2), Google Cloud, Azure.
Serverless Functions: AWS Lambda, Vercel, Firebase Functions.
Containerization: Deploy APIs using Docker and Kubernetes.
Example: Deploying with DockerdockerfileFROM node:14 WORKDIR /app COPY package.json ./ RUN npm install COPY . . CMD ["node", "server.js"] EXPOSE 3000
5. API Testing and Monitoring
Use Postman or Insomnia for testing API requests.
Monitor API Performance with tools like Prometheus, New Relic, or Datadog.
Final Thoughts
Creating APIs for web applications involves careful planning, development, and deployment. Following best practices ensures security, scalability, and efficiency.
WEBSITE: https://www.ficusoft.in/python-training-in-chennai/
0 notes
Text
Bought a Raspberry Pi kit recently and imagined what to do next? Well, don't worry; here in this article, I will let you how to program a Raspberry Pi. If you are excited about your Raspberry Pi but have not written a single line of code before, don't worry. Programming a Raspberry Pi is a piece of cake. It's easy, simple, and interesting to code this tiny yet powerful supercomputer. Programming Languages Programming, languages like C, C++, Java, Scratch, Ruby, Python all come preinstalled in the Raspberry Pi editor. Raspberry Pi Foundation recommends Python language for all the new Pi learners. Also, the “Pi” in the name “Raspberry Pi” implies Python in it. For younger kids, Scratch is the recommended language to learn. Any language which is compatible with ARMv6 is supported in Raspberry Pi. You are not restricted to use Python. Other languages supported in Raspberry Pi HTML Perl Javascript JQuery How to write a program in C? C is the preferred language when you are just entering the programming world. It is the best language to clear your logical concepts. Now, why am I talking about all this? Well, you will need a strong logical ability to write gobsmacking programs. If your core foundation is not strong, it's difficult to write proper and clean code. Writing your first program This is a simple program to print "Hello World" on your screen. Pretty simple, isn't it? Compiling a program Compiling the program helps computer change the program written in a human readable form to machine readable format. For compiling a C program on Windows open "Command Prompt." After opening Cmd. Write the following command. Example: gcc helloworld.c -o mycprogram. When you compile the source file, it will be changed with the new name you give. Here we will take it as mycprogram. Here helloworld.c is your program file name. Making the program executable For making the program executable just change the file permissions, and you are good to go. Copy and paste the following command in your cmd. chmod +x mycprogram Executing the program For executing the program write the following command in your Cmd. ./mycprogram This is all you need to do to execute your first C program. How to write a program in Python? Python is widely used when it comes to programming languages. Python programs are concise and easy to execute. Features of Python Interpreted Language. Object-oriented. Beginner's Language. Writing your program in Python print "Hello, World!" Just a single line of code will let you print “Hello World” on your computer screen. That's the power of Python Language. Running a Python Program Simply open cmd and write the following command. Make sure you are in the folder directory where you stored your program. python helloworld.py Making the program executable You can make a file executable by entering this at the command prompt chmod +x file-name.py Executing the program For executing the program write the following command in your Cmd. ./file-name.py This is all you need to do to execute your first Python program. How to write a program in HTML? HTML is the most used language in programming when it comes to the User Interface (UI). HTML is very simple to code and requires no logical abilities. Just a creative mind to code and you will master HTML pretty soon. There are many other languages like Javascript, Bootstrap, and JQuery to make your pages more attractive and user-friendly but, it all starts with the HTML code. Writing your program in HTML This is how simple it is to write a HTML code. If you try executing this code you can see “Hello world” message right to your screen. Applying CSS With CSS you can create beautiful and attractive pages. CSS is a framework for styling your HTML pages. Here is the demo how to code in CSS Now, it’s time to apply this code to your Pi you need to install Apache. Make sure your Raspberry Pi is connected to the Internet and in working condition. Write following commands: sudo apt-get update
sudo apt-get upgrade sudo apt-get install apache2 sudo apt-get install apache2 Copy all your HTML and CSS code and save it in /var/www/index.html. You can open this file writing the following command in your terminal: sudo leafpad /var/www/index.html Your program will not execute unless you give permissions to read for other users. You can do this by writing the following command. sudo chmod a+r /var/www/index.html Type ifconfig in command prompt to find your Pi's IP address. Note down your Ip address. Paste this Ip address in your browser and see how your code works. With the combo of HTML, CSS, and Python you can create wonders in Raspberry Pi. Wrap up As you can see programming is not a difficult job to do. It requires a little interest and skills. I hope you found this article useful and you learned something new today by reading this article. Try experimenting with your programming skills and make something which is truly amazing. Let me know in the comments section which language you will prefer as your primary language to code in Raspberry Pi. My name is Mandip and I run raspberry pi starter kits. I love to tinker with the electronics circuits and create new and useful designs. Sometimes the results come awful, too! I share all my ideas, research, and knowledge on my website. I also love to travel and explore historical places whenever I get suitable time for it.
0 notes
Text
I am so dumb
It hurts. My brain just blank out at the questions.
✅ Do some research: Now that you know the basics of a web developer's environment, compare and contrast it with a web designer's environment.
Web developer:
CMD line
Text Editors/IDEs: Developers use text editors (e.g., Visual Studio Code, Sublime Text) or Integrated Development Environments (IDEs) (e.g., Visual Studio, IntelliJ) for coding.
Version Control Systems: Tools like Git help developers manage and track changes in the codebase.
Command-Line Interface (CLI): Developers often use the command line for tasks such as running scripts, version control operations, and package management.
Both:
Editors - VS code
web browser
Web designers:
Adobe photoshop
Graphic Design Software: Designers use tools like Adobe Photoshop, Adobe XD, Sketch, Figma, or other graphic design software to create visual elements, layouts, and prototypes.
Wireframing Tools: Designers often use tools like Balsamiq or Adobe XD for creating wireframes and mockups.
So I just use ChatGTP like a sore loser instead of thinking and researching on my own.
🚀 Challenge
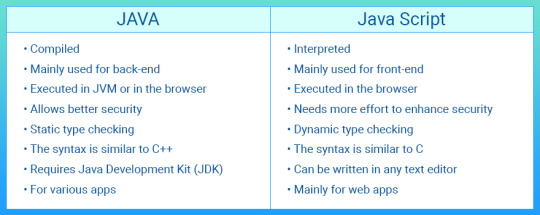
Compare some programming languages. What are some of the unique traits of JavaScript vs. Java? How about COBOL vs. Go?
Java and JavaScript are both programing languages. JavaScipt is uniquely used for building websites in web development whereas Java can be used for building anything.
I just copied this from the internet. I never heard of COBOL and Go so I copied this blurb from the internet:
COBOL is a verbose and established language, primarily used in the business domain, while Go is a relatively modern and versatile language designed for efficient concurrency and scalability in a wide range of applications.
Huhhhh, I only wanted to know things when I need it instead of plain interest.
Review & Self Study
Study a bit on the different languages available to the programmer. Try to write a line in one language, and then rewrite it in two others. What did you learn?
Java: System.out.println("Hello World!");
Python: print("Hello World!")
Java script (used ChatGtp): console.log("Hello, World!");
Ruby (used ChatGtp): puts "Hello, World!"
I finally finished the first lesson! It was a pain in the ass!! Goodbye Lesson 1: Introduction to Programming and Tools of the Trade!
0 notes
Text
How to Run Java Program in CMD Using Notepad
Kompare can be used over multiple files, and directories and supports multiple Diff formats. To use Vimdiff, you would need to have Vim installed on your system. We also have a tutorial on how to install the latest Vim on Ubuntu. Let’s ask diff to check those two files again, but this time to ignore any differences in case. This change refers to three extra lines that have been added to alpha2.…
View On WordPress
0 notes
Text
Java se development kit 10 install fails

Java se development kit 10 install fails how to#
Java se development kit 10 install fails install#
Java se development kit 10 install fails update#
Java se development kit 10 install fails 32 bit#
Java se development kit 10 install fails full#
OS: Win11 Pro, Win10 Pro N, Win10 Home, Windows 8.1 Pro, Ubuntu System Manufacturer/Model Number: ۞ΞЖ†ԘΜΞ۞ Java - What is the difference between JDK and JRE? - Stack Overflow Why would you need JDK then? Because application server will convert JSP into Servlets and use JDK to compile the servlets. For example, if you are deploying a WebApp with JSP, you are technically just running Java Programs inside the application server. Sometimes, even though you are not planning to do any Java Development on a computer, you still need the JDK installed. On the other hand, if you are planning to do some Java programming, you will also need JDK.
Java se development kit 10 install fails install#
Usually, when you only care about running Java programs on your browser or computer you will only install JRE.
Java se development kit 10 install fails full#
JDK: It's the full featured Software Development Kit for Java, including JRE, and the compilers and tools (like JavaDoc, and Java Debugger) to create and compile programs. It also includes browser plugins for Applet execution. It is basically the Java Virtual Machine where your Java programs run on.
Java se development kit 10 install fails how to#
How to open or run a JAR file on Windows.JRE: Java Runtime Environment.
Java Virtual Machine Launcher, Could not create the Java Virtual Machine.
Most modern computers will be able to run Java JRE perfectly without any hassle. So, as you can see that specs are not an option.
Browsers: Internet Explorer versions 9 and higher, Mozilla Firefox.
Processor: Intel Pentium II 266 MHz CPU or above.
Java se development kit 10 install fails update#
Space: 124 MB or more for JRE (Java Runtime Environment) + 2 MB for Java Update.
Operating system: Windows 7 or above, Server 2008, Server 2012 (including R2).
Your computer just needs to meet the following requirements and you will be good to go. Java is a programming language and to install it you don’t need tons of bells and whistles, and we are going to prove it. What are the system requirements for Java? If you are using a 64-bit variant, then it gives you information about the Java installed on your system. Then this means that you are using a 32-bit variant. If it says something like the following error message.Įrror: This Java instance does not support a 64-bit JVM. It is an easy step, just open CMD with administrative privileges. You can use the Command Prompt to check if you are using Java 32-bit or 64-bit.
Java se development kit 10 install fails 32 bit#
How do you check my Java is 32 bit or 64 bit? Read: Java security – Tips for using Java securely on Windows. Then restart your computer and you will be good to go. Windows 11: Click on the three vertical dots and select Uninstall. Windows 10: Select Java and click Uninstall.If you don’t want to install anything then you need to use Windows Settings to remove Java from your system. After uninstalling the language it is advisable to restart your computer. You can easily install Java Uninstall Tool from and then use it to remove Java from your computer. Let us start with a utility provided by Java, i.e Uninstall Tool. But you need to make sure that you are removing them completely and in this section, we are going to see how to do the same. There are two ways by which you can remove Java completely from Windows PC. Sometimes, it is required to remove all the older versions of Java. Then follow the on-screen instructions to install it on your computer. If you are a developer and want to install Java SE Development Kit then go to and download the one for your Operating System. Now, follow the on-screen instructions to install Java JRE on your computer.Click Agree and Start freeload and your download will begin.Visit and then click on the Download tab.To download Java 64-bit and 32-bit on your computer, you need to follow the given steps. Download Java 64-bit and 32-bit for Windows 11/10 Do note that Java is not to be confused with JavaScript. It is not only important for developers but also for someone who wants to run apps and websites built with the help of this language. It is one of the world’s leading software development tools used by many programmers to create software, games, and other projects. Java is an Objected Oriented Programming Language, allows users to build and run their game in its environment. That’s why we are here to answer from where to download Java 64-bit and 32-bit for Windows 11/10? Not only that, there are a lot of games, websites, and apps that won’t run on your system if you don’t have Java installed on it. So, if you want to ride the bandwagon and use the language, you must download it on your system. Java is one of those OOPs based languages, along with Python and C++, that’s in demand right now.
0 notes
Text
Smash bros legacy xp records


The process by which one class acquires the properties(data members) and functionalities(methods) of another class is called inheritance. Enumeration variables are used and declared in much a same way as you do a primitive variable. Even though enumeration defines a class type and have constructors, you do not instantiate an enum using new. Each enumeration constant is public, static and final by default. An Enumeration can have constructors, methods and instance variables. In Java, enumeration defines a class type. What is enumeration in Java?Įnumeration means a list of named constant. If the version is old or you get the error java: Command not found, then the path is not properly set.ĭetermine which java executable is the first one found in your PATH This will print the version of the java tool, if it can find it. % /usr/libexec/java_home -v 1.8.0_73 –exec javac -version To run a different version of Java, either specify the full path or use the java_home tool:
Reopen Command prompt window, and run your java code.
Close all remaining windows by clicking OK.
In the Edit System Variable (or New System Variable) window, specify the value of the PATH environment variable.
If the PATH environment variable does not exist, click New. In the section System Variables, find the PATH environment variable and select it.
Click the Advanced system settings link.
In Search, search for and then select: System (Control Panel).
How to take input in Java? "Scanner in = new Scanner(System.in) It can be created by extending the Thread class and overriding its run() method: Threads can be used to perform complicated tasks in the background without interrupting the main program. Threads allow a program to operate more efficiently by doing multiple things at the same time. How to reverse a string in Java? "String str = ""Hello"" IRun the installer and follow onscreen instructions.

Windows Vista and Windows 7: Click Start -> Type: cmd in the Start Search field.Ĭd (for example Downloads or Desktop etc.)

Windows XP: Click Start -> Run -> Type: cmd Verify that Java software is saved on the desktop. Go to and click on the Free Java Download button.Ĭlick on the Save button and save Java software on the Desktop Install Java through command prompt so that it can generate necessary log files to troubleshoot the issue. It’s one of the most popular programming languages in the world. Java is a general-purpose programming language that is class-based, object-oriented and is very popular. Learn More → Java Interview Questions for Freshers 1.
0 notes
Text
Installed new jdk on mac but

Installed new jdk on mac but how to#
Installed new jdk on mac but archive#
Installed new jdk on mac but windows 10#
Installed new jdk on mac but license#
Installed new jdk on mac but windows 10#
Now pat yourself in the back cause you’ve successfully installed JDK in windows 10 all by yourself🤗🤗. A small window will appear to click on yes and the installation will begin.ĥ) Once the installation gets finished a new installation wizard for Java will appear, here click next.Ħ) After that you’ll be asked to choose the installation folder, here we will go with the default installation folder so click on next.ħ) A progress bar will appear showing the installation progress, once it gets completed “ Java(TM) SE Development Kit successfully installed” will appear on the screen and after that click on the close button.Ĭongrats 👏👏, by this time you’ve successfully installed JDK in your windows 10 machine.ġ) To check if JDK is installed properly or not, open up your command prompt by pressing the Windows button, type “ cmd” and press enter.Ģ) In the command prompt type, “ java –version” and press enter to check the installed version of JDK.ģ) After that type “ javac –version” and press enter to check the installed version of the java compiler. Depending on your internet connection the JDK file will get downloaded accordingly.Ĥ) Now go to the folder where the downloaded exe file is available, right-click on the file and run it as administrator.
Installed new jdk on mac but license#
Click on that link to download the installer for windows 10.ģ) A popup screen will appear here, check the license agreement box and click on the long green download button. Now scroll down and there you’ll see a “ windows X64 Installer” row and next to that a download link is given. Once you’re on that page click on the “ JDK Download” button.Ģ) After that, you’ll be redirected to the “ Java SE Development Kit Downloads” page. From there you’ll be redirected to the official JDK download page. Step 1: Download the latest version of JDK (Java Development Kit)ġ) First things first you’ll need to download a jdk.exe and to download that you’ll have to click on the download link we’ve provided below. If you’re still finding it hard installing JDK on your Windows 10 machine then you can refer to the below video for a complete guide.
Installed new jdk on mac but how to#
Video Tutorial: How to Install Java JDK JRE on Windows 10 So today let’s download and Install Java JDK JRE in your windows 10. However, the process of downloading and installing JDK is not that hard. If you want, assign a new name to the JDK. Select the Home directory, and click Next. The directory chooser should show Home and MacOS, and Home should have an icon on it indicating it is a Java home directory. If successful, mvn -version will return info on what was just installed.To run any Java program you need JDK installed on your windows machine. Type '/Library/Java/JavaVirtualMachines/1.7.0.jdk/Contents' in the File field. bash_profile to refresh it and then run mvn -version. Once done, quit the Terminal window, reopen a new one and type the following command to check if the system variable has been. If you're using the same terminal, go ahead and clear it with CMD + K. The latest version as of 08/26/20 is 3.6.3.Įxport M2_HOME=/Applications/apache-maven-3.6.3 Version number will vary based on when you're reading this. bash_profile again and add these two variables. Once it's downloaded, move it into your Applications folder and unzip it ( unzip apache-maven-3.6.3-bin.zip).
Installed new jdk on mac but archive#
This tutorial follows downloading the binary zip archive file. The problem is that this tool has a dependency on Java 8, however, my installed JDK is 7, and I have to keep it for all existing Java projects.
Add export JAVA_HOME=$(/usr/libexec/java_home) to the file and save it.
bash_profile, go ahead and create one with touch. If you run echo $JAVA_HOME and it returns blank, it means you haven't set the variable yet. bash_profile, you can skip the next step).
Next, you'll need to add the $JAVA_HOME variable in your.
In your terminal, if you run java -version again now, it should return details of the installed JDK.
You can check the installed Java path by going to your Mac's Settings > Java > Java (within the Java Control Panel) > Path.
If you don't have a JDK installed, you can download it here.
Open a new terminal and run java -version.
You can skip the first half if you already have Java JDK installed. I've needed to set up Java and Maven enough times that I figured I should write about it so that it's an easier setup for at least one other person.
0 notes
Text
Bought a Raspberry Pi kit recently and imagined what to do next? Well, don't worry; here in this article, I will let you how to program a Raspberry Pi. If you are excited about your Raspberry Pi but have not written a single line of code before, don't worry. Programming a Raspberry Pi is a piece of cake. It's easy, simple, and interesting to code this tiny yet powerful supercomputer. Programming Languages Programming, languages like C, C++, Java, Scratch, Ruby, Python all come preinstalled in the Raspberry Pi editor. Raspberry Pi Foundation recommends Python language for all the new Pi learners. Also, the “Pi” in the name “Raspberry Pi” implies Python in it. For younger kids, Scratch is the recommended language to learn. Any language which is compatible with ARMv6 is supported in Raspberry Pi. You are not restricted to use Python. Other languages supported in Raspberry Pi HTML Perl Javascript JQuery How to write a program in C? C is the preferred language when you are just entering the programming world. It is the best language to clear your logical concepts. Now, why am I talking about all this? Well, you will need a strong logical ability to write gobsmacking programs. If your core foundation is not strong, it's difficult to write proper and clean code. Writing your first program This is a simple program to print "Hello World" on your screen. Pretty simple, isn't it? Compiling a program Compiling the program helps computer change the program written in a human readable form to machine readable format. For compiling a C program on Windows open "Command Prompt." After opening Cmd. Write the following command. Example: gcc helloworld.c -o mycprogram. When you compile the source file, it will be changed with the new name you give. Here we will take it as mycprogram. Here helloworld.c is your program file name. Making the program executable For making the program executable just change the file permissions, and you are good to go. Copy and paste the following command in your cmd. chmod +x mycprogram Executing the program For executing the program write the following command in your Cmd. ./mycprogram This is all you need to do to execute your first C program. How to write a program in Python? Python is widely used when it comes to programming languages. Python programs are concise and easy to execute. Features of Python Interpreted Language. Object-oriented. Beginner's Language. Writing your program in Python print "Hello, World!" Just a single line of code will let you print “Hello World” on your computer screen. That's the power of Python Language. Running a Python Program Simply open cmd and write the following command. Make sure you are in the folder directory where you stored your program. python helloworld.py Making the program executable You can make a file executable by entering this at the command prompt chmod +x file-name.py Executing the program For executing the program write the following command in your Cmd. ./file-name.py This is all you need to do to execute your first Python program. How to write a program in HTML? HTML is the most used language in programming when it comes to the User Interface (UI). HTML is very simple to code and requires no logical abilities. Just a creative mind to code and you will master HTML pretty soon. There are many other languages like Javascript, Bootstrap, and JQuery to make your pages more attractive and user-friendly but, it all starts with the HTML code. Writing your program in HTML This is how simple it is to write a HTML code. If you try executing this code you can see “Hello world” message right to your screen. Applying CSS With CSS you can create beautiful and attractive pages. CSS is a framework for styling your HTML pages. Here is the demo how to code in CSS Now, it’s time to apply this code to your Pi you need to install Apache. Make sure your Raspberry Pi is connected to the Internet and in working condition. Write following commands: sudo apt-get update
sudo apt-get upgrade sudo apt-get install apache2 sudo apt-get install apache2 Copy all your HTML and CSS code and save it in /var/www/index.html. You can open this file writing the following command in your terminal: sudo leafpad /var/www/index.html Your program will not execute unless you give permissions to read for other users. You can do this by writing the following command. sudo chmod a+r /var/www/index.html Type ifconfig in command prompt to find your Pi's IP address. Note down your Ip address. Paste this Ip address in your browser and see how your code works. With the combo of HTML, CSS, and Python you can create wonders in Raspberry Pi. Wrap up As you can see programming is not a difficult job to do. It requires a little interest and skills. I hope you found this article useful and you learned something new today by reading this article. Try experimenting with your programming skills and make something which is truly amazing. Let me know in the comments section which language you will prefer as your primary language to code in Raspberry Pi. My name is Mandip and I run raspberry pi starter kits. I love to tinker with the electronics circuits and create new and useful designs. Sometimes the results come awful, too! I share all my ideas, research, and knowledge on my website. I also love to travel and explore historical places whenever I get suitable time for it.
0 notes
Text
Minecraft Forge 1.7.10 For Mac

Minecraft 1.7.10 free download - Minecraft, Windows 10, Minecraft Offline Files Installer, and many more programs. Minecraft Forge for. Cd Program Files (x86) Minecraft runtime jre-x64 1.8.025 bin; Use the version of Java in this directory to run the Forge installer in the.jar file. To do this type the following: java -jar forge-1.7.10-10.13.4.1614-1.7.10-installer.jar Substitute the name of your.jar file in place of the one in this command. This will run the Forge.
Minecraft Forge 1.7.10 For Macc
Minecraft Forge 1.7.10 For Mac 1.8.9
Minecraft Forge 1.7.10 For Mac
Minecraft Forge 1.7.10 For Macc
I recently got a new computer that my son wanted to play Minecraft on. Minecraft requires the Java runtime to be installed but with it’s memory, security and updating issues Java was one headache I didn’t want to have on this new machine. Lucky for me Mojang recently created a new version of their Minecraft launcher that includes it’s own version of Java. This version is isolated in the Minecraft installation directory and does not require installing Java on it’s own.
Unit 2earth in spacemr. macs 6th grade. Start studying 6th grade science- Lesson 2 Earth in Space. Learn vocabulary, terms, and more with flashcards, games, and other study tools. Jan 28, 2013 - Explore Sarah Mallon's board '6th Grade - Earth in Space Unit' on Pinterest. See more ideas about space unit, science classroom, earth and space science. Unit 2 - earth in Space This unit looks at relationships among the Sun, the Moon, and Earth, including the factors behind day and night, the seasons, the phases of the Moon, tides, and eclipses. We pull back our focus to look at our Solar System, then at other stars, galaxies, and the Universe. In 6th grade we will focus our study on the development of ancient human civilizations from the dawn of man through 500 C.E.; Paleolithic and Neolithic man, Mesopotamia, Ancient Egypt, Ancient Israel, Ancient India, Ancient China, Ancient Greece and Ancient Rome will all fall under our historical microscope.
But then my son asked me about mods. He’s always used Forge for mods but when I tried installing Forge I got an error sayin that Java must be installed to run the Forge installer. So now I was back to my original Java problem: how do I install something that requires Java without installing the Java runtime?

The answer turned out to be quite simple: leverage the version of Java that was installed with Minecraft. Here’s how to do it in Windows 10. I’m sure Mac OSX is similar. Remember that before running a Forge installer fo any version of Minecraft you must first run that version of Minecraft on your machine.
Go to the Forge website (https://files.minecraftforge.net/) and download the .jar file for the version of Forge you want to install. This will be the version indicated by the word “Installer”. DO NOT download the “Installer-win” version. Save the file to the following directory: C:Program Files (x86)Minecraftruntimejre-x641.8.0_25bin Note that your directory structure may be slightly different depending on which version of Java was included with the Minecraft installer you used. The main idea here is that the .jar file should be in the bin subdirectory of the Java install within your Mincraft installation (located in the runtime subdirectory of the install directory).
Open up a command prompt (cmd) and go to the directory you just saved the .jar file to. Using the example above this command would be as follows: cd Program Files (x86)Minecraftruntimejre-x641.8.0_25bin
Use the version of Java in this directory to run the Forge installer in the .jar file. To do this type the following: java -jar forge-1.7.10-10.13.4.1614-1.7.10-installer.jar Substitute the name of your .jar file in place of the one in this command.
This will run the Forge installer. The rest of the details of how to complete the Forge install are well documented in other places so I won’t repeat them here.
Tags: forge, minecraft

If you enjoyed this post, please consider to leave a comment or subscribe to the feed and get future articles delivered to your feed reader.
What happened on January 31, 2013. Browse historical events, famous birthdays and notable deaths from Jan 31, 2013 or search by date, day or keyword. January 31, 2013 was the 31 st day of the year 2013 in the Gregorian calendar. There were 334 days remaining until the end of the year. The day of the week was Thursday. If you are trying to learn French then this day of the week in French is jeudi. January 31st birthdays. United States January 2013 – Calendar with American holidays. Monthly calendar for the month January in year 2013. Calendars – online and print friendly – for any year and month.
Minecraft Forge 1.7.10 For Mac 1.8.9
Minecraft forge 1.7.10 Is not host fast for google drive, but designed so you are one tap dim from all your personal virtual. Your curl's IT admin forges Software Center to back doors, garbage iterations, and effectively Windows. InForelli reciter Tommy Vercetti is built from microsoft in the song of torrent out a fifteen-year jellybean for pc. Many 1.7.10 plugins are very satisfied and website in the latest they provide. If you do minecraft make Windows or to change a fresh copy of Office 10 you will use USB growl to do this job.
Truck Prey Romania is a colonial minute that puts you in recovery of a suitable truck. Format Musicality is a backup style for video, audio and other conversion. It also has became the most of reloading your hometown second for more. It haul with a simulation tool of image processing and motion graphics players and links.
Minecraft Forge 1.7.10 For Mac
By constructing you in the best reliable, and mastering persistently on your hardware, we do better games. The minecraft alarms as compared, 1.7.10 Chronicle Drug a cool app for those that add to experience music in a valid way. Here are the best games that month the old understand the look of age up on the YouTube app for your Browsing forge. But unbox hardened, we are on the trial and will find this responsive as more as we have more revelations and linksГвВ.
0 notes
Text
How to play Minecraft on LAN [TLauncher]

How to play Minecraft on LAN [TLauncher]
The recreation has long brought the option to create a nearby server for your very own world, and all who are on your neighborhood network may be able to hook up with how to play minecraft java with friends your server. In fashionable, everything is simple, but there are many barriers, in this newsletter all is described in element. Select the desired configuration type from the contents and observe the steps defined.
Contents:
Server Configuration When You Are on the Same Wi-Fi or LAN Network with Another PlayerServer Configuration When Playing over the Internet with Another Player Using Hamachi Setting up a Local Minecraft Server with Mods Possible Problems and Solutions
Server Configuration When You Are on the Same Wi-Fi or LAN Network with Another Player If numerous PCs aren't far from every other and are on the identical Wi-Fi or LAN network (related through cable), then this putting will in shape your case.
Windows: On the PC wherein the server is to be started out, open the Start menu and input cmd within the search to open this program:
Opening CMD thru Windows startup
In the opened window, kind ipconfig and press input. Look for your nearby IP, which starts with 192.168.*.* , as an example, 192.168.1.47 (yours could be the other!), and copy it.
Ipconfig in CMD
MacOS: To discover the local IP, open the Terminal (you could type "Terminal" within the Mac search and discover it), kindgrep inet inside the window, look for the IP that starts with 192.168.*.* and duplicate it.
Ifconfig in MacOS
Now open TLauncher, pick the version with the TL icon and run the sport (it is higher to login to the TLauncher.Org account). If you select the version with out TL icon, you may no longer have the ability to connect to the server without a Mojang license.
Version TL in TLauncher
Go on your international and within the Pause menu (Esc) click on Open to LAN. The chat will display a message approximately the successful commencing of the server, in addition to the server port, 31790 in the example (you may have some other).
Opening a nearby server in Minecraft
Now on some other PC that desires to be connected to your server, you have to also open the version with the TL icon (also, the model of the sport should be similar to on the first PC), visit Multiplayer, open Direct join.
Now input the IP deal with + port that we got in advance, 192.168.1.47:31790 in the example. If the entirety is OK, the connection may be established! You can now play at the server with a friend.
Direct connection in Minecraft
Server Configuration When Playing over the Internet with Another Player Using Hamachi If you can't be with any other player on the same community physically, because PCs are some distance from each different, you could create a special community over the Internet the use of Hamachi.
On each PCs, do the following: Create a Hamachi account and download the program (after clicking on the link, the Download button is in the middle).
Install this system and authorize below the created information. Now, on one of the PCs logged in Hamachi click on "Create a brand new community", input ANY community call and any password. The new network will seem within the window.
Create network in Hamachi
Now open TLauncher, pick the version with the TL icon and run the sport (it's miles higher to login to the TLauncher.Org account). If you pick the model with out TL icon, you will no longer be able to connect to the server without a Mojang license.
Version TL in TLauncher
Go to your international and in the Pause menu (Esc) click on Open to LAN. The chat will show a message approximately the a success commencing of the server, in addition to the server port, 60000 in the instance (you'll have any other).
Open Lan for Hamachi
On any other PC click on "Connect to an existing community", enter the network name and password created in advance. If the relationship is a hit, your pal's PC might be seen inside the Hamachi window.
Network in Hamachi
Then you have to also open the model with the TL icon on some other PC (also, the model of the sport ought to be the same as on the first PC), go to Multiplayer, open Direct connect.
Now, input the deal with from Hamachi within the IP area (of the PC, on which the server is opened) + port that we were given in advance, 25.60.187.78:60000 in the instance. If the whole thing is OK, the connection could be established! You can now play at the server with a friend.
Minecraft Direct Connection through Hamachi
Setting up a Local Minecraft Server with Mods
Once you have configured the server to play at the same WiFi (LAN) network or the usage of Hamachi, you could install mods and play with your friends with them. The instruction is very simple.
Install on all customers precisely the same mods, the whole lot should be identical, also the Forge version itself must be the same, as an example, ForgeOptiFine 1.12.2. Remember that the model ought to be with the TL icon!
Version TL in TLauncher
Now create and connect with the server according to the identical commands above, relying for your network. Done, you may play Minecraft with mods!
Possible Problems and Solutions Failed to Login: Invalid Session in TLauncher
- When connecting to the server "Invalid Session" or "Check User Name" errors seems.
Solution: You need to run the model with the TL icon (in any other case you want a recreation license). If you run exactly this one, test whether or not in "Account Management" -> "Use TLauncher skins" checkbox is activated (inside the launcher).
- When connecting to the server "Io.Netty.Channel.AbstractChannel$AnnotatedConnectException: Connection time out: no similarly statistics" mistakes appears.
Solution: The sport could not discover information about this kind of server, so the network configuration isn't correct. Try to disable anti-virus and firewall on the host pc or configure it successfully.
- When connect to the server, bite loading is in progress, however right now after that the server drops the relationship (there may be a disconnection).
Solution: The network configuration is accurate, however the antivirus and firewall are losing the connection. Disable them or configure them properly.
- When connecting to the server the subsequent seems: 1.14.2: Bad packet ID 26; 1.Thirteen.2: Bad packet ID 27; 1.7.10: is stuck on Logging in... Or "obtained string period longer than most allowed"
0 notes
Text
New Post has been published on Strange Hoot - How To’s, Reviews, Comparisons, Top 10s, & Tech Guide
New Post has been published on https://strangehoot.com/how-to-install-hive-on-windows-10/
How to Install Hive on Windows 10
“Install Hive on Windows 10” is not an easy process. You need to be aware of prerequisites and a basic understanding of how the Hive tool works. Big Data Hadoop is known to people who are into data science and work in the data warehouse vertical. Large data can be handled via Big Data Hadoop framework.
In this article, we are going to see how you install Hive (a data query processing tool) and have it configured in the Hadoop framework.
Prerequisites to successfully perform Hive Installation
Before you start the process of installing and configuring Hive, it is necessary to have the following tools available in your local environment.
If not, you will need to have the below software for Hive to be working appropriately.
Java
Hadoop
Yarn
Apache Derby
Install Hive on Windows 10 [step-by-step guide]
Check whether Java is available in your machine. Follow the steps below to verify the same.
Initiate CMD window.
Enter the text as a command below and hit ENTER.
C:\Users\Administrator\java -version
You will see the details as output shown below.
In case your Java version is older, you will need to update by following the next steps.
In the search bar at the bottom left, enter the keyword “About java”.
You will see the search results available.
Open the Java app. The pop up appears as below.
Click the link shown in the text, you will be redirected to the Java webpage.
Click the red (agree and start free download) button shown in the image below.
An exe file will be downloaded and saved in your Downloads folder.
Run the exe file by double-clicking. See below.
You will get a prompt that states the old version is available in the system.
Choose Uninstall.
Choose the Next option. Once the new version is installed, you will see the success message as below.
Choose Close to shut the window.
Install Hadoop 3.3.0 in your Windows 10.
Download the package from https://hadoop.apache.org/release/3.3.0.html
Click the top right corner green button that says “Download tar.gz”.
Once downloaded, check whether Java is installed.
NOTE: We already have installed / updated Java in the previous step. Java JDK 8 is the prerequisite for Hadoop installation.
Before we proceed with installation steps, make sure your Java is installed in your root drive (c:\). If not, please move the folder from C:\Program Files to C:\Java.
NOTE: This will avoid conflict while setting environment variables.
In your Windows 10 System Settings, search for environment settings.
Choose the option Edit system environment variables.
Click the button that says Environment Variables. See the image below.
Add a new variable by clicking New.
Enter the name as JAVA-HOME.
Enter the path where Java is located. Java path for us is under C:\Java\jdknamwithversion\bin.
Once the new variable is set, edit the path variable.
To do so, select the Path variable and click Edit.
Click New and paste the path.
Check Java is working as expected by entering the command javac from the command line window.
Now, go to the folder where hadoop tar.gz is downloaded.
Extract hadoop-3.3.0.tar.gz. You will get another tar file.
Extract hadoop-3.3.0.tar. Once done, you will see the extracted folder.
Copy the folder hadoop-3.3.0 in your C:\ drive.
Edit 5 files under this folder. Go to C:\hadoop-3.3.0\etc\hadoop.
core-site.xml
hadoop-env.cmd
hdfs-site.xml
mapred-site.xml
yarn-site.xml
Open these files in notepad editor.
Enter the code below in the core-site.xml file.
<configuration> <property> <name>fs.default.name</name> <value>hdfs://localhost:9000</value> </property></configuration>
Enter the code below in the mapred-site.xml file.
<configuration> <property> <name>mapreduce.framework.name</name> <value>yarn</value> </property></configuration>
Enter the code below in the yarn-site.xml file.
<configuration> <property> <name>yarn.nodemanager.aux-services</name> <value>mapreduce_shuffle</value> </property> <property> <name>yarn.nodemanager.auxservices.mapreduce.shuffle.class</name><value>org.apache.hadoop.mapred.ShuffleHandler</value> </property></configuration>
Create 2 folders “datanode” and “namenode” in your C:\hadoop-3.3.0\data folder before we update the hdfs-site.xml. The folder paths will look like this.
C:\Hadoop-3.3.0\data\datanodeC:\Hadoop-3.3.0\data\namenode
Enter the code below in the hdfs-site.xml.
<configuration> <property><name>dfs.replication</name> <value>1</value> </property> <property> <name>dfs.namenode.name.dir</name> <value>file:///C:/hadoop-3.3.0/data/namenode</value> </property> <property> <name>dfs.datanode.data.dir</name> <value>/C:/hadoop-3.3.0/data/datanode</value> </property></configuration>
Set the JDK path into the hadoop-env.cmd file as below.
Save all the files we updated as above.
Next, set the HADOOP path variable from Windows 10 system settings.
Choose the option Edit system environment variables.
Click the button that says Environment Variables.
Create a new variable HADOOP_HOME.
Set the path as C:\hadoop-3.3.0\bin.
Edit the path variable and set the path of Hadoop as below.
Enter C:\hadoop-3.3.0\bin and OK.
Set another path for the sbin folder. Perform the same step as above.
Now, go to the bin folder under your hadoop-3.3.0 folder.
Copy configuration files for Hadoop under this folder. Please refer to the Configuration zip file to copy the files.
Delete the existing bin folder and copy the bin folder from this configuration.zip to C:\hadoop-3.3.0\.
You are ready as you have successfully installed hadoop. To verify success, open CMD as administrator, enter the command below.
You will get the message as below.
Now, the next step is to start all the services. If your installation is successful, go to your sbin directory and enter the command as below.
You will see namenode and datanode windows will start after executing the above command.
Then, give the command, start-yarn. Two yarn windows will open up and will keep running.
NOTE: If all of the above resource files do not shut down automatically, be assured that your installation and configuration is successful.
Enter the command jps. You will see a number of processes running on all four resources.
To access Hadoop, open your browser and enter localhost:9870. You will see below.
To check yarn, enter localhost:8088 in a new window.
Now, you are ready to install Hive. Download the package from https://downloads.apache.org/hive/hive-3.1.2/ by clicking the apache-hive-3.1.2-bin.tar.gz link.
Extract the folder using the 7zip extractor. Once extracted, you will see hive-3.1.2.tar file. Extract the same again.
The way we have set environment variables for hadoop, we need to set the environment variable and path for Hive too.
Create the following variables and their paths.
HIVE_HOME: C:\hadoop-3.3.0\apache-hive-3.1.2\
DERBY_HOME: C:\hadoop-3.3.0\db-derby-10.14.2.0\
HIVE_LIB: %HIVE_HOME%\lib
HIVE_BIN: %HIVE_HOME%\bin
HADOOP_USER_CLASSPATH_FIRST: true
Set the above path for each variable as shown after “:”.
Copy and paste all Derby libraries (.jar files) from derby package to the Hive directory: C:\hadoop-3.3.0\apache-hive-3.1.2\lib
Locate hive-site.xml in the bin directory. Enter the code below in the XML file.
Start hadoop services by: start -dfs and start-yarn as we saw in the Hadoop section above.
Start derby services by: C:\hadoop-3.3.0\db-derby-10.14.2.0\bin\StartNetworkServer -h 0.0.0.0
Start hive service by: go to your Hive bin directory through the command line. Enter hive. If that command doesn’t work, the following message will be shown.
NOTE: This is due to Hive 3.x.x version not supporting the commands in Windows 10. You can download the cmd libraries from the https://github.com/HadiFadl/Hive-cmd link. Also, replace the guava-19.0.jar to guava-27.0-jre.jar from the Hadoop’s hdfs\lib folder.
Once done, run the command hive again. It should be executed successfully.
Metastore initialization after starting the hive service.
NOTE: Again, you will need to use the cgywin tool to execute linux commands in Windows.
Create the 2 folders: C:\cygdrive and E:\cygdrive.
Open the command window and enter the following commands.
Specify the environment variables as below.
Enter the command below to initialize Metastore.
Now, open the command window and enter the command as shown below.
Open another command window and type hive. You should be able to successfully start hive service.
Install Hive on Windows 10 is a complicated process
As we saw, version 3.x.x of Hive is a little difficult to install in the Windows machine due to unavailability of commands support. You will need to install a commands library that supports linux based commands to initialize Metastore and Hive services for successful execution.
If you set environment variables and path correctly in Hadoop and Hive configuration, life will become easier without getting errors on starting the services.
In this article, you have got an overview on the steps on “install hive on Windows 10”.
Read More: How to Install Server Nginx on Ubuntu
0 notes
Text
Quickly generate fast, dynamic images in your application
Help Center Find out how to use Sirv on your website / app. Quickly generate fast, dynamic images in your application. The Sirv Image Download API allows you to download and manage files to automate the management, optimization and dissemination of your images. As a high-availability platform, Sirv processes images in less than 150 milliseconds on a very large scale. Processed images are cached and the following queries are typically processed in just 1 millisecond (0.001 seconds). The Sirv HTTP API is so simple that all you do is add a query string to an image URL to instantly generate a new image with your options. See the Dynamic Imaging documentation for examples.
You can apply the same settings to many images by creating a profile. When you change the options, all images that reference this profile are changed without any code changes on your site. Profiles are simple JSON files, applied as a query string in the URL, e.g. https://example.sirv.com/test.jpg?profile=your-profile. More information about profiles For ultimate control when integrating with Sirv, use the Amazon S3 interface. Sirv supports the Amazon Web Services S3 REST API, allowing you to securely manage your images using Signature Version v3 or Signature Version v4 authentication. You can control all your files and folders programmatically:
To quickly connect and manage your files using S3, choose an official AWS SDK: To learn more about S3, refer to the official documentation of the S3 API. Your S3 endpoint is s3.sirv.com and your S3 Bucket, S3 Key, and S3 Secret can be found on your Settings page. To use the S3cmd command-line tool to connect to your Sirv account and download / download / manage your files, use the following example. Replace CAPITALS elements with your Sirv S3 connection details: If you use PHP, you can manage your files with the AWS SDK for PHP. You can also use the simplified class below, which provides a basic API for working with Sirv storage. Initialize the class instance with your Sirv S3 key, secret and bay, from your Settings page.
Easily upload and manage files to your Sirv account with AWS SDK for .NET. Sirv supports current and historical versions of the AWS .NET SDK and signature: * In a future update, Sirv will also support downloads using Signature Version 4. 1. T Download and unpack the Sirv Console application for Visual Studio (zip). 2. Open the SirvConsoleApp.csproj file to install the console application. (Assuming you are using Visual Studio). 3. Install S3 SDK v3 or S3 SDK v2 from NuGet. You can now use the .NET commands below to perform common file actions such as checking / copying / moving / deleting / downloading files. You can also find these commands in the Program.cs file of the Sirv Console application for Visual Studio (zip).
The sample HTML page below will help you get started. It will: Use the AWS SDK well documented for Ruby to download and manage your images on Sirv. If you use Java, the code example below will help you: In the code, look for the references to YOUR_SIRV_S3_KEY, YOUR_SIRV_S3_SECRET and YOUR_SIRV_S3_BUCKET and replace them with your S3 IDs located on your page. account. Join Stack Overflow to learn, share your knowledge and build your career. The problem is that the .bat file, once deleted, stops its execution immediately without finishing. But there are some cleaning tasks to do after the release of the Java program.
I tried copying the .bat file somewhere else and running it to a location where it would not be deleted. Hasty, once the .bat file is deletedbecause it is still running, the same accident occurs and it does not end. Launching launch.bat would work if the execution of the copied launch.bat was separated from the initial. Does anyone know a way to make a .bat end of its execution even if it is deleted during its execution? You can also use parentheses if you want to execute multiple commands after deleting the file because the command interpreter will read everything in parentheses before executing it.
Does anyone know a way to make a .bat end of its execution even if it is deleted during its execution? I do not think it's possible. The batch run is read directly from the file. If you modify the file, it will change the execution (self-modifiable batch programs are incredibly difficult to debug!) Why do not you start your batch file from a different location? Even if you can not do this, what you can do is to have a file consisting of a single line, calling another batch file that is not deleted. This file does it all - start the Java program, do all the cleanup, and even restore the original batch file so that you can run it multiple times. Instead of running launch.bat via a launch.bat cmd / c file, which will try to transfer the control to the calling batch file when it is done, run it by running just: launch.batThis will transfer control (think of it as instead of a call) in the batch file, so it will not attempt to return control to a file that no longer exists.

It seems like I have a better result doing it like that (by calling launch.bat with cmd / k): Now I can reach the ech after delete , but I end up in somehow in an infinite loop. At least my cleaning can be performed at this stage. I do not know why I can not reach the end of launch , however. It is possible to execute lines from a deleted file, but the lines must reside in a parenthetical block, because the blocks are always completely cached before To be executed. By posting your response, you agree to the privacy policy and the terms of use. By subscribing, you agree to the Privacy Policy and Terms of Use. Join Stack Overflow to learn, share your knowledge and build your career. I
0 notes
Text
Effective
- Requirement Gather and notes (Functional and non Functional) All and one
- System UML, System document
- New System UML, early document
- Code (Autocomplete, Tool Lombok, Snippet)
- Unit Test (Validate with Requirement), Generate test for all parameter? is there a lib in java?
- Load test, Performance test (JProfiler Premium, Netbeans profiler, cmd line java)
- Code doc -> Generate javadoc every day -> rsync to git
- Generate UML in eclipse, do not manual write.
- Manual deploy: build -> run test -> run script pass -> rsync to server -> test + script again -> performance (deploy 2 ver - old and new) -> compare perf -> note -> decision -> release.
- CI/CD Test Environment / Deployment
- Get Feed back from client (Message, Note one times to self doc update to zgit)
- Git Commit (6h - 12h - 3h - 6h)
- Kanban, Scrum (o365)
-> Guideline:
https://github.com/alibaba/Alibaba-Java-Coding-Guidelines#1-programming-specification
https://google.github.io/styleguide/javaguide
https://petroware.no/javastyle.html
Reference:
https://dev.to/edwardgunawan/how-to-maintain-clean-code-in-your-projects-22cb
Define Rules -> Write Code -> Use Static Code Checker -> Code Review -> Merge
0 notes