#I SUPER RECOLORED HIM BECAUSE THE BLUES LOOKED WEIRD FOR MY EDITING
Photo
지민 (Jimin) 'Like Crazy' Official Teaser
#pjm#park jimin#jimin#jimin gif#gif#like crazy#bangtanarmynet#armysource#networkbangtan#btsgif#btsedit#kpopccc#userbangtan#annietrack#heyryen#I SUPER RECOLORED HIM BECAUSE THE BLUES LOOKED WEIRD FOR MY EDITING#like crazy more like we fuckin'
2K notes
·
View notes
Text

For this gif tutorial I’m going to try to keep it as basic as possible, I may add a few tips for coloring at the end, but for the most part this is going to be how I make my basic gif. Also I’m not going to use my vapoursynth to process the video beforehand, just because I know not everyone uses it and it’s harder to learn. This is going to be just a downloaded mp4 video through the gif process. Don’t let the idea that this is a BASIC TUTORIAL fool you, I’m going to try to teach you a lot of things. It’s gonna get wordy, but i will try my hardest to keep the process easy. I’m just going to explain what things do instead of having you just copy + paste my method and not know what it means. okay? okay.
Before we start though, if you plan of giffing live stages you either need to accept the they will not be super crisp and clear OR learn how to use avisynth/vapoursynth to resize the videos without quality loss.
If you just want to gif music videos or variety shows then this should still give you HQ gifs.
Other notes:
try to ONLY use 1080p and up video if possible, maybe 720p if you’re really desperate, but anything under that... it’s not going to look good at all, so try to avoid using them.
The Photoshop I am using is PS 2020, so all my screenshots will be from that version and with my weird set up. But I’ve been using pretty much the same method since cc 2015 so other than the fact that some placements and names are tweaked, it’s the same. (If you can’t find something on your version shoot me an ask and I’ll try to help! And asks I get on this tutorial I’ll link HERE for future reference)
CUTTING VIDEO
To cut videos I’ll just use my quicktime player.
I use edit > trim to select the portion of the video I plan to gif and save that as it’s own new mov file.
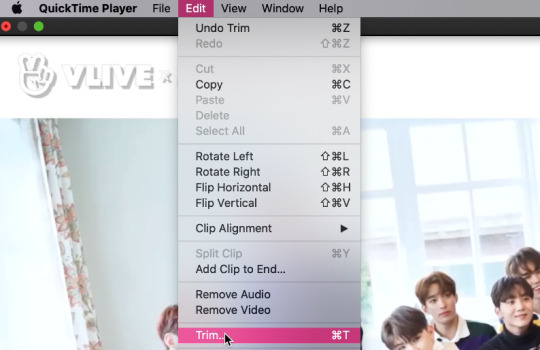
which pops up this tab

that you just slide until the part you want to gif is selected

then just save it as a new video and your done with part 1
ENTER PHOTOSHOP
Now what we’ll do is open our photoshop and import that clip into layers
FILE > IMPORT > VIDEO FRAMES TO LAYERS and select your video.
A small pop up will appear to show the clip you’re opening, you can trim it further here or just keep going by clicking okay
my setup is weird for drawing BUT you should have it looking remotely like this:

The things you will DEFINITELY need to see are TIMELINE, LAYERS, ADJUSTMENTS. If you don’t have these sections you can add them to your screen by clicking on the WINDOW tab at the very top menu bar and clicking on them

LAYERS - this is pretty self explanatory but each row is a layer in the gif. the more layers the bigger the gif will end up, the longer it plays. So bigger clips will have more layers and end up as larger gifs in the end.

TIMELINE - This is where you can edit the gifs timing (make it faster or slower)
We’ll be doing a bit of work with it so it’s important to know it well
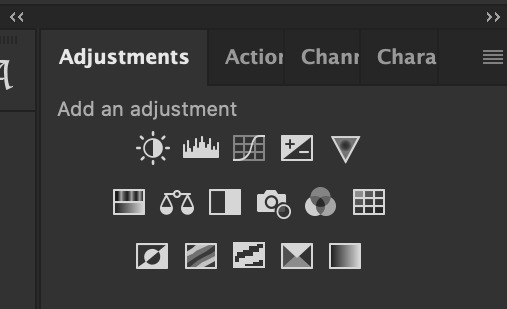
ADJUSTMENTS - Best friend and worst nightmare. this is where ALL the tedious recoloring is done. VERY rarely would you not use these. 99.9% of kpop things are filmed through a green or blue lense so you’ll want to fix that to not have ghost idols
So, Let’s make a gif
Step 1 - In the top right corner of your timeline is a set of lines, click there and then click SELECT ALL FRAMES

under each frame is a time stamp (this video’s is 0.04) this decides how fast each clip goes by, or how quickly the gif moves. Personally I prefer slower gifs, but I say anywhere between 0.04-0.06 is a decent speed.
Step 2 - with all the frames selected, click on the small down arrow next to any of the frames and change the speed to your liking. (I’m going to use .06)
Step 3 - in that same tab of lines we’ll now click CONVERT TO VIDEO TIMELINE, which will change our Timeline to look like this:

Step 4 - Back in our very TOP menu we’ll click SELECT > ALL LAYERS, then on the TOP menu click FILTER > CONVERT FOR SMART FILTERS (this might take your computer a minute since our File is still pretty large.) Now our Time line will look like this:

Step 5 - Sharpening
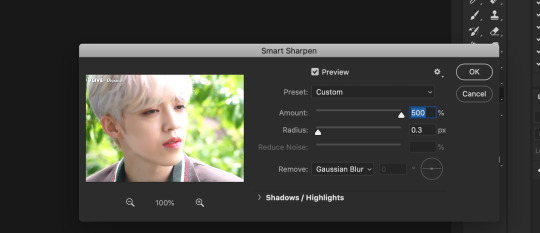
This one is VERY MUCH something you’re going to have to play with to get your settings to be how you like them. It’s also where I’d use topaz adjustments, BUT since I said we’re doing basic PS gif we’re just going to be using smart sharpening. SO:
in the TOP munu again, click FILTER > SHARPEN > SMART SHARPEN
A pop up window will appear and you can edit the settings to your liking. Mine:
Step 6 - Resize your gif or crop it to tumblrs standards: big singal gifs have a 540px width || Two gifs use 268px || and three gifs use 177/178px
To do this we’ll use the crop tool and type in our dimensions in the menu bar:

and then crop to your liking. (this doesnt resize the gif it just crops to the correct ratio so we still have to shrink the gif)
Next, we’ll resize the gif to that size in the TOP menu click IMAGE > IMAGE SIZE a pop up menu will appear and you’ll type in your resize ratio and click enter.
Now technically thats a gif. it’s TECHNICALLY done. but mine is white washed and there are words on it that I dont want so onto the coloring and blurring.
First I’m going to show you how I blur text on gifs. because text is EVERYWHERE in kpop content and it’s hideous and I hate it. so lets kill it.
BLURRING LETTERING
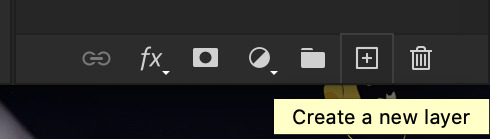
First we’re going to add a new blank layer to our LAYER TAB by clicking the little box with the + inside at the bottom
Sometimes doing this can mess up the timeline’s selection but its SUPER easy to fix so lets do that.
So in our timeline we have these two bars on each side that select what part of the gif will play. this is also where you can readjust your gif if it has extra frames at the end, or it ends up being too large and you have to make the gif smaller to save it. Just click and drag the bars back to where our gif actually ends, and all is fixed!

Now on our new layer we’re gonna take a paint brush (one of the ones with a lot of fade NOT the solid circle ) and paint over where the words are like so:

MAKE SURE ITS ON OUR BLANK LAYER AND NOT THE GIF LAYER!!
I know it looks stupid but trust me okay.
Now in your LAYER tab we’re going to duplicate our gif layer by right clicking on it and selecting duplicate.
Then we’re going to drag the new gif layer so that it’s above the paint layer in our LAYER tab :
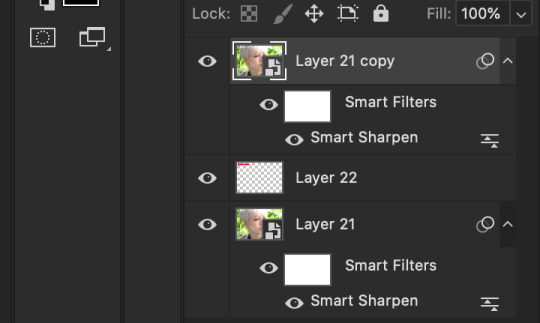
Now, right click on the top gif layer and select CREATE CLIPPING MASK. it should put a little down arrow to the left of the picture, toward the paint layer. This means the gif is ONLY visible where that paint is now.
So we’re going to click on FILTER in the TOP menu again (while we still have that top gif selected!) and Go to BLUR > GAUSSIAN BLUR. a pop up menu will appear and you can just drag the radius until the text is as blurry as you want it to be. (also IF you missed part of the text, you can just go add more paint to your paint layer and it will blur wherever you paint!)
so now my gif is like so:
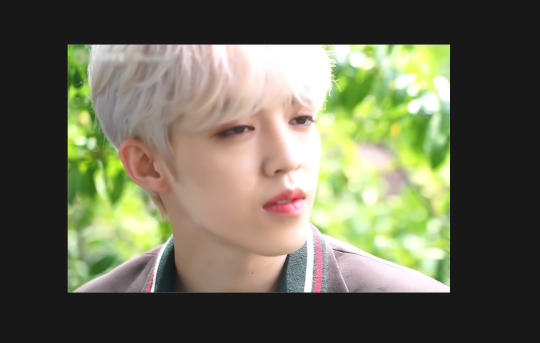
So now we’ll color him, because he’s pretty washed out.
ADJUSTMENTS
This is where I’m going to be the least specific about what I do and more about what tools do, so that you can learn how to color things the way you like them!
The Adjustment tab on Photoshop has 16 options but I’m really only going to talk about 6 of them. We’ll do it in order though. All the actual adjustment tools will open in the PROPERTIES tab
Brightness / Contrast - Pretty self explanatory, but definitely should be toward the end of your coloring, as if can effect the quality a lot. Small adjustments do A LOT so don’t go crazy,
Levels - Levels is all about the balance of how dar or light your gifs will be if you adjust in the RGB layer it will adjust for the entire image, but if you change the selection to RED/GREEN/BLUE it will adjust just those colors hues. Also there are three small droppers to the left of the graph. using those you can select which part of the gif you want the image to recognize as the lightest/darkest part of the gif, and the tool will adjust the gifs coloring to that point. ( play with those droppers! magic happens i swear!)
Curves - Kind of like levels but instead of how light or dark the entire image is it works more on contrast. REALLY play with the curves options, i’m sure most things you can do with other tools can also just be done in curves if you’re patient enough to learn
Vibrance / Saturation - Vibrance will make duller parts of an image higher contract and brighter and saturation will make everything a more neon shade. or in reverse lowering vibrance will dull out the things that were already neutral and saturation will dull out the more vibrant parts of the image (usually reds)
Color Balance - Good for fixing tones. so if a live stage is SUPER BLUE!!!!! you can readjust and calm down the blues to dull them out or get rid of them completely. Again play with this its insane what it can do
Selective Color - adjusts the different colors in your image without touching the other colors. if you wanna touch the reds, make them pinker but not change the blues and greens, you do it here
If you want MORE drawn out explanations of what each of the 16 adjustment layers do here and here are actual articles you can look at. But it’s all about practice. playing with all the adjustments alone and together. Finding out what you like to do!
Now when you gif is ALLLLL colored and you’re ready to save it we do FILE > EXPORT > SAVE FOR THE WEB and a whole new window of options pops up. I’ll give you two examples of how to play with those options and then we’re done!

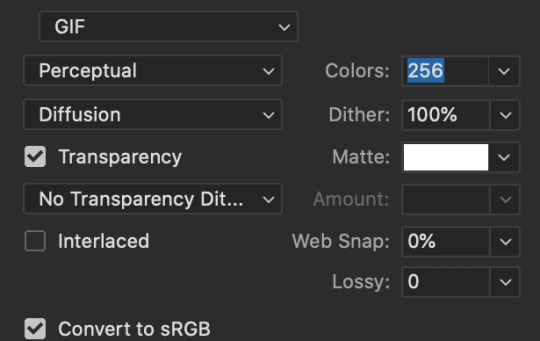
keep in MIND tumblr’s gif limit is 10MB which is pretty huge now, but still watch your gif size!!!!
AND SAVE your done!

I hope this was helpful! Let me know if you have any questions,again I’ll have an ask tag for it and it’ll get linked HERE if people end up needing help!
Happy giffing!!!
#drm.pst#drm.txt#Gif tutorial#this is LONG okay please be aware of that before you open it#als i did NOT reread it because it took me 3 hours to type out so it's probably a grammatic nightmare#BUT i'm JUST under a new milestone so i'm gifting this early because i had the patience to do it today lmao
97 notes
·
View notes
Last Seen Blogs

terrantravelsportland
Terran Travels

tiawatsonart
Tia Watson

toddbirchard-architect
TODD BIRCHARD

matureaussie1946
Untitled