#I have too many effect brushes but they're fun so meh
Text
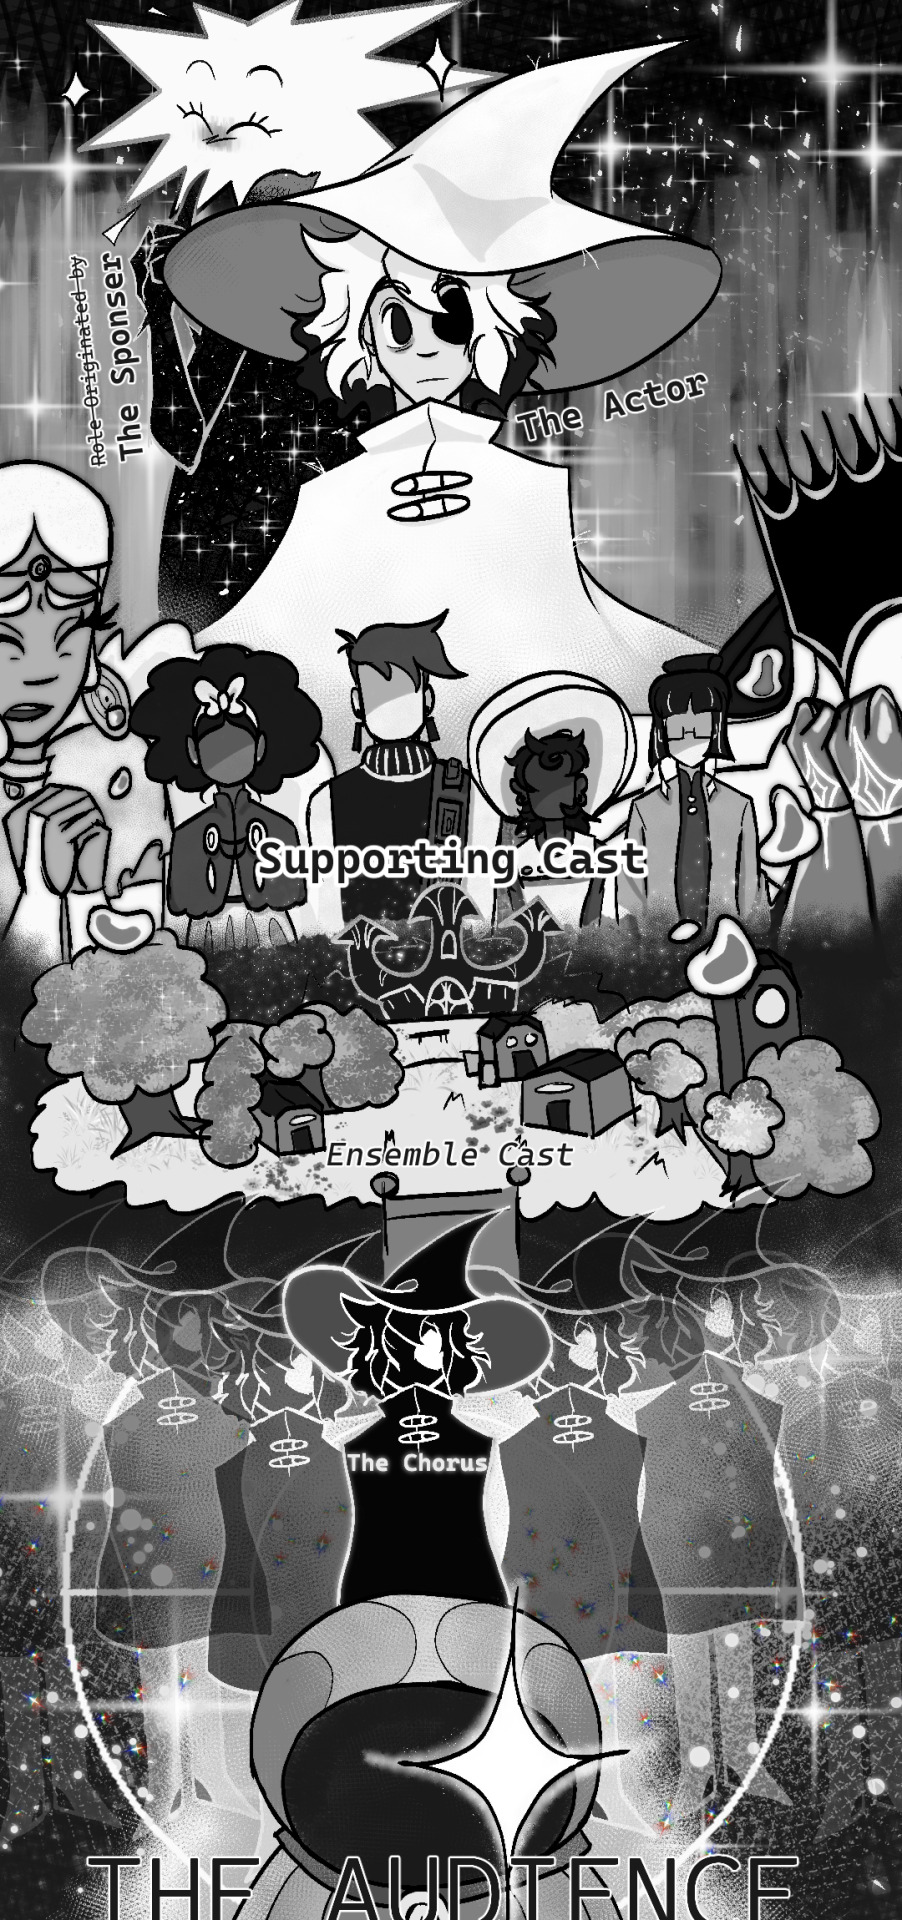
> The Show Must Go On
#today the last day of my sick leave and I went into a fugue state and apparently made this#in stars and time#isat spoilers#isat#isat siffrin#isat loop#isat mirabelle#isat isabeau#isat bonnie#isat odile#isat head housemaiden#isat the king#isat mal du pays#isat change god#the bottom text being cut off is on purpose so don't worry about that#I have too many effect brushes but they're fun so meh#I may also post a textless version but the role labels are also like the concit of this so who knows#fun fact! origionaly i was gonna label sif's role as 'understudy' ^-^#jack.png#jack.txt
164 notes
·
View notes
Text
#showyourprocess
From planning to posting, share your process for making creative content!
To continue supporting content makers, this tag game is meant to show the entire process of making creative content: this can be for any creation.
RULES — When your work is tagged, show the process of its creation from planning to posting, then tag 5 people with a specific link to one of their creative works you’d like to see the process of. Use the tag #showyourprocess so we can find yours!
I was tagged by @baoshan-sanren for this word of honor set (thank you!!!)
I'll be tagging:
@cescedes for this wangxian set with really interesting blue coloring
@thatgothsamurai for this fanart of Wen Kexing that lives in my head rent free at all times
@yvlan for this lovely lwj set
@ostardust for this heartrending wangxian set (especially the last gif with the blue coloring in the trees)
@absentia123 for this aesthetic edit of Wen Ning
no pressure, especially if you’ve been tagged already or if you made the edit a while ago!!
I was very excited about this set. I started thinking about it when I was writing a meta about Zhou Zishu that included the line "A ghost and an assassin, two entities who should never see the light of day, walk side by side in the human realm."
I thought that could serve as a summary for the drama as a whole, so I tweaked the wording and turned it into a gifset.


Process:
1. Choose moments -
gif 1 was Zhou Zishu as an assassin, so it had to be ep 1
gif 2 had to parallel gif 1 with a shot of Wen Kexing looking towards the camera, and I wanted a moment with the red robes, so ep 31
gif 3 has the text "step into," so I chose the moment in 32 when Zishu steps towards Kexing for a visual pun
gif 4 had to be episode 37 when they're diffused in light (I found 37 on tumblr, downloaded it, and cropped it to avoid the subtitles)
That also meant the set started with Zhou Zishu's first appearance and ended with the final shot of the whole show, and it set up a nice color gradient of dark to light.
2. Import video frames to layers in photoshop - I have the raw .mp4 files downloaded, dm me if you want to know where to get them. I use frame animation, so I then selected 63 frames for each gif and set the frame rate to 0.07. I really like all gifs in a set to be the same length, and I think 0.07 usually looks natural and smooth, so I try to have my number of frames as multiples of 7. Does that matter? Probably not, but it makes me feel better.
3. Create smart object from layers
4. Add base coloring - for Word of Honor, I borrow @zhouszishu 's coloring as a base, which they shared here. I do my own coloring for cql sets, but their WoH base coloring is gorgeous and I like saving time.
5. Add text - I used Trajan Pro Bold, which is a basic font that comes with photoshop. I tried using a fancy font I downloaded from the internet first, but then I realized I didn’t know what I was doing and gave up. :)
6. Sharpen gif - I follow this glossy sharpening tutorial
And now for the fun part -- figuring out how to add effects!! I am a photoshop newbie in many ways, so I was looking at tutorials while doing this.
The process was largely the same on each gif, so I'll break down the most complicated one:
I had the base gif and the base coloring, and I wanted to make the background red.

Following this tutorial, I used a giant soft brush (300-400 pixels, 0% hardness) and colored the background red, then set the blending mode to color. I did the same thing in black around the edges, but with blending mode soft light. There was still some blue showing through between the ribs of the fan, so I used hue/saturation to desaturate the blues to make it less obvious.
Then I added the text and set the blending mode on the text to "difference" to get the effect of reversing whatever is behind it.

I then added a gradient mask (solid to transparent), clipped the mask to the text layer, and played around with it until the gradient was visible, but you could still read the text. And we end up with this!!
I then repeated that with each gif, and made additional adjustments on each, including using a giant soft brush in black around the border of gif 1 to make the rooftop less visible and intensifying the greens in gif 3
I had subtly different versions of gif 1 and gif 4 saved, because I wanted the text to dissolve into the background, but also to make sure you could still read it. I also made an alternate version of gif 3. I like to save multiple versions and usually an alternate gif or two to make sure I actually like the way things look when they're uploaded. So I made this:

But I decided that final version was more satisfying even though the text placement is meh, because he actually completes the movement before the loop restarts.
And that's it!! Nothing too complicated, and I am in awe of so many other creators on this site. But thanks for tagging me!
5 notes
·
View notes
Last Seen Blogs

incorrect-steven-universe
I Never Did That! Steven, are you telling lies?

neuromedical
dr. Gem

seerweb
seerweb
ossielv
Ossiel V

shineee-eexo-blog
kkaebsong yehet