#I prefer the mulching and plastic bin collection much more
Text
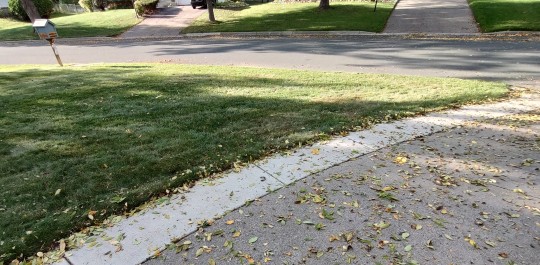
This is a pleasant time of year.
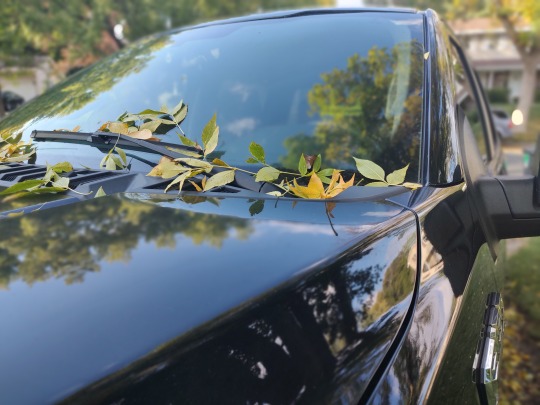
Leaves have started to fall. That feature of nature I could easily live without. However, it gets me outside and moving. Collecting the leaves brings me satisfaction. Seeing the green grass appear again... ahhhhhh.
Of course tomorrow afternoon little evidence of my work will remain.
It's mostly a Wednesday routine. Trash and yard waste collection here is on Thursdays. The day before I get out my Toro Super Recycler Muncher Shredder mower. I mulch and collect leaves in the mower's bag, then fill the large plastic yard waste container to the brim.
If I skip no more than one or two Wednesdays each fall I can get a full season's worth of leaves in that container before weekly service ceases for winter. It gives me joy if I don't end up putting excess leaves in those heavy paper bags we have to use nowadays. (You have to buy those things!)
Today's yard work is now done. The mower has been cleaned of dust. The big bin is down at the curb. My step count is up. The hot shower I'll soon take will feel well deserved, much nicer than a "just getting ready for office work" shower.
Not coincidentally, this is also the beginning of the Wednesday evening martini--eventually changing to Manhattan--season
#Things that make me feel good#I remember years ago seeing people put 20-40 lightly packed plastic garbage bags of leaves at the curb#I prefer the mulching and plastic bin collection much more#Someday I would not mind having a smaller lawn and a larger bit of land where I could just dump leaves#Or live in a condo
38 notes
·
View notes
Text
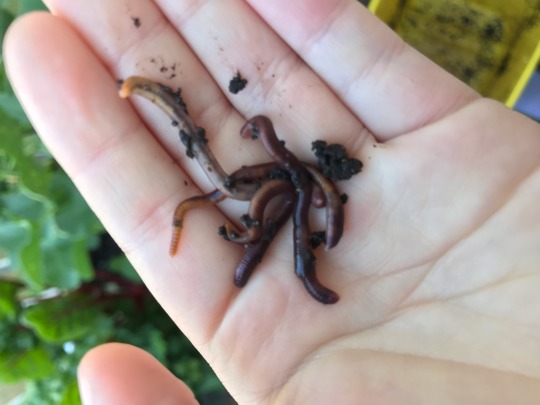
Worm Bin Tutorial
Disclaimer: the information I’m giving is based on my own personal experience and research. Some of the things that work for me may not work in a different setup. If you’re interested in learning more, I’d highly recommend the book “Worms Eat My Garbage” by Mary Appelhof.
Why have a worm bin?
It’s a great way to dispose of organic matter while minimizing methane emissions! Landfills aren’t set up for aerobic decomposition, so food scraps in landfills often give off a ton of methane emissions when decomposing, which is a pretty potent greenhouse gas! Also, worm castings are an excellent fertilizer/mulch/soil amendment.
A worm bin is super low-maintenance once you figure out what you are doing. It doesn’t smell bad and can be kept indoors—I keep mine by my desk in the winter! And I think it’s pretty fun. Also, your trash won’t smell as bad when it isn’t full of rotting food!
Making the Worm Bin
Really what you need here are two containers. One of them you put a bunch of holes in, and that sits inside the other container. The holes are important because they allow for drainage of water (which is then caught by the external container) and diffusion of oxygen. I used some kitty litter buckets for this, and they work great! The lid is really useful.

Pro-tip: you don’t need a drill to make the holes. If you have a knife or razor blade, you can press it into the plastic and rotate it, which makes nice, round holes.
The bin with holes in it sits inside the other bin, but there should be space for water drainage/collection and air permeation.
Worms
The worms you want in general are “red wrigglers” or Eisenia fetida. These are sometimes sold as bait worms, but in my experience the “red worms” are actually European Nightcrawlers (labeled “ENC”). Those can also work, but they prefer different conditions from red wigglers (I believe they live deeper in the soil) so they might not be as successful. You also need a lot of worms to start out with, like a pound of worms. I had the best success going to a local vermiculture business and getting a pound of mixed worms (red wigglers, European night crawlers, and Indian blues). I think the mix is useful since having a couple different species makes the bin more resilient.
Note: buying local is really beneficial here. When worms are sold online and shipped, the sellers “dehydrate” them a bit to help lower weight and prevent overheating. The worms will be perfectly healthy after you give them moist bedding again, but you’re going to miss out on bacteria and other beneficial critters that could come with the worms if they are fresh.
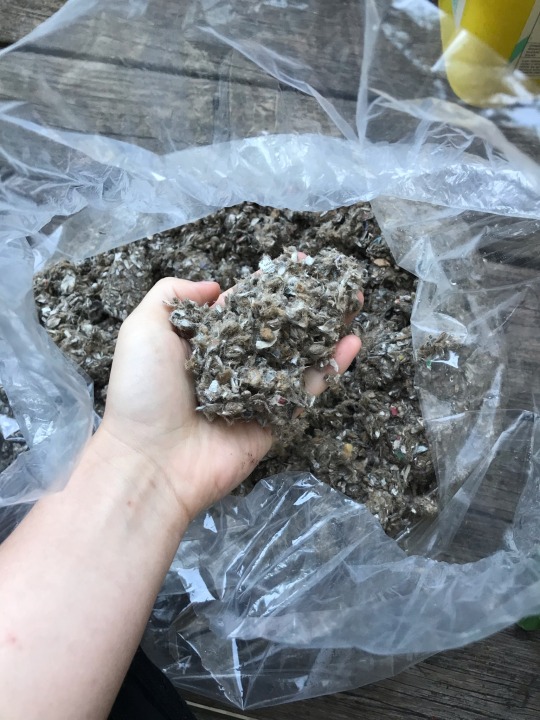
Setting up the Bin
An important thing I have learned from experience: you can’t just put food and worms in a bin and expect things to work. You also need bedding. Bedding is filler material, like newspaper or coconut coir. I mostly use newspaper I buy from a local vermiculture business. I tried ripping my own paper and once it got wet it turned into a solid layer, whereas the pre-ripped newspaper I buy has a fluffy consistency.
I’ve also tried using peat moss as bedding, but that didn’t work so well—I got a huge spike in the more population (maybe from acidic conditions?). Peat moss also isn’t great for the environment in general.
The bedding is important because worms shouldn’t eat too much food or too much of their own poop (castings) as both are bad for them. Bedding should be topped off when possible. When you add food to the bin, use a shovel to bury it in the bedding. This helps things rot properly, prevents mold and bad smells, and keeps away critters like fruit flies.
Other Critters
Your worm bin can and should have other critters in it! Some in my bin include mites and springtails, who both help the worms break down organic matter. However, there should be a balance between other critters and the worms. If something appears to be taking over, you might have a problem. I’ve also had fruit flies in my bin—this didn’t end up being a huge problem as long as I only opened the lid of the bin outdoors.
Worm Bin Maintenance
Once you get going, the worm bin doesn’t require much maintenance. I keep a freezer bag in my freezer and fill it up with food scraps, and once it seems the worms are mostly finished with the last feeding, I’ll thaw the bag and feed them again. (Freezing is helpful because it’s a convenient way to preserve the scraps, but it also helps to kickstart breaking down, since freezing damages things.) Be careful not to over-feed the worms, as this can lead to a sour bin and/or string-of-pearls (which is a pretty disturbing worm ailment).
Also be careful of what you feed the worms. You can look up lists of dos and donts online, but in general, stick to plant matter, and don’t feed them aromatic herbs or citrus. Also make sure to feed the worms plenty of crushed eggshells, as this provides grit and halos to regulate the pH of the worm bin.
The worms should be kept in a location with temperatures that are comfortable to humans. They don’t do well if conditions are too cold or too warm.
Make sure to dump out any water that accumulates and add bedding when it’s needed. I use this to water plants, and I haven’t had any negative effects, but some people will say you shouldn’t do that.
Once the bin starts to get full, you can remove worm castings. There are fancy ways to do this, but I just dig through the bin and scoop out any areas that are nearly all worm castings and then remove any worms/eggs that are in the castings by hand. The castings can be mixed in with potting soil or used on top like a mulch. (Although be careful: Ive heard worms are an invasive species in some areas so check before you potentially introduce them to the ground.)
Conclusions
So that’s it! If you want more information, I encourage you to do your own research. Although try to seek out multiple sources—not all the information out on the internet (or even in books) has been properly vetted. I can also try my best to answer questions based on my own experience, but I’m still relatively new at this.
47 notes
·
View notes
Text
Money-Saving tips for beginning Gardeners
Our approach to frugal gardening isn’t just to look for great deals on gardening products. We also try to limit our use of purchased inputs like water and electricity. Today I’ll share 10 strategies that allow us to get excellent results while spending very little money on products and other inputs.
The first strategy to save is to have your soil tested before buying fertilizers and amendments. People often think of a soil test as a way to learn what they need to add to the soil, but more often than not the real value is in learning what not to add. When you know what your soil doesn’t need you can avoid buying unnecessary fertilizers and amendments and save money in the process. In our case even though we haven’t used store-bought fertilizers for many years a soil test showed high or very high levels of most nutrients, and all we do is add compost worm castings and mulch to the garden. With nutrient levels as high as they are we can actually use less compost in order to bring them down. If you live in the United States, low-cost professional soil testing is available at your local Agricultural Extension office. Some states even offer free testing, either way, soil testing can save you a lot of money over the long run by helping you to identify what products you don’t need. You may even find like we did that no additional fertilization is needed.gardening for beginners
The second strategy to reduce your gardening costs is to make your own compost from free local resources. The amount of compost you’ll need will vary depending on your soil test results, but if the results show your soil needs more organic matter and nutrients, a good target is to produce enough compost to cover your garden beds with a half-inch to an inch of compost per year. When soil is deficient in nutrients, compost alone can often correct the deficiencies and the good news is that you can usually find all of the compost inputs you need without spending a penny. The best place to start looking for free compost ingredients is on your home property. You can use kitchen scraps, autumn leaves, grass clippings, and other yard waste. If this isn’t enough material to produce a half-inch to an inch of compost per year you can look for free local resources in your community. Where we live there’s an amazing abundance of free resources for compost and as many of you probably know when I started I was on a mission to find as many as I could. I scavenged for leaves, woodchips, grass clippings, used coffee grounds, brewery grains, and horse manure. You may have different free resources where you live, but if you look hard enough you can usually find more than enough to make all the compost you’ll need.
The third strategy is to mulch garden beds using free local organic resources. Mulching has numerous benefits including saving water, feeding the soil, food web, controlling weeds, and reducing erosion, and all of these benefits can be achieved without spending a penny on products. Some of our favorite free local mulch ingredients are autumn leaves, wood chips, grass clippings, chop and drop garden waste, ground eggshells, and small amounts of used coffee grounds. Free straw isn’t available where we live, but we would definitely use it if it was. Now let’s look at four specific ways that mulch saves you money. First, it covers the soil which reduces evaporation and holds moisture in. As a result, you’re gonna have a lower water bill. Secondly, it slowly releases nutrients into the soil which means you can use less fertilizer. Third, you may have heard about how great worm castings are for your soil, but fortunately, you don’t have to buy them. A better approach is to mulch your garden beds. Mulch feeds worms and gives them an excellent habitat, and protects them from temperature extremes. Mulching will significantly increase your native earthworm population and the number of worm castings in your garden. Fourth, fungi will form and benefit symbiotic relationships with a number of plants. The plants provide the fungi with carbohydrates and B vitamins and the fungi provide the plans with an increased uptake of water and nutrients. However, the best way to promote mycorrhizae in your garden isn’t to buy mycorrhizae products, instead, it’s simply to grow a broad diversity of plants that form mycorrhizal associations and to use course mulch like wood chips and leaves which create an environment in which native mycorrhizal fungi flourish.
The fourth money-saving strategy is to grow nitrogen-fixing cover crops. We haven’t used any nitrogen fertilizer for many years, thanks in part to these crops. Late every summer we plant about five dollars worth of covers crop seeds. The plants grow, fix nitrogen in the soil, and then they’re killed by the winter cold. If your winters aren’t cold enough to kill your cover crops you’ll need to chop and drop them before they go to seed. In addition to fixing nitrogen, cover crops prevent erosion and increase organic matter in the soil.
Our fifth money-saving strategy is to grow in polycultures to reduce pests and disease problems and therefore reduce pesticide costs. We choose not to use any conventional pesticides and we also rarely use organic ones. Yet our plants have very few pests and disease problems. Polycultures help make this possible, it is more difficult for pests to find their preferred plans and wreak havoc. If we planted all of our squash plants in the same location you can imagine how much easier would be for powdery mildew to spread from plant to plant then it would be if the plants were scattered around the garden in a variety of locations. Simply put, monocultures create the perfect environment for pests to find their food source, lay eggs and, reproduce while polycultures make their work of destruction much more difficult.
My sixth money-saving tip is to grow plenty of edible perennials and self-sowing annuals. Perennial crops are ones that you plant once and they come back year after year on their own. Whereas self-sowing annuals only live one season, but they produce and drop enough seed that they effectively sell so another crop for the next season. These plants save us money because they only have to be planted once and they come back year after year with minimal care and no additional cost. Some very popular perennials were growing include asparagus, strawberries, blueberries, blackberries, and Asian pears.
Our seventh money-saving tip is to save seeds. We keep our seed costs down by saving seeds for a wide variety of crops including tomatoes, peppers, eggplants, cucumbers, squash, pumpkins, kale, collard greens, and mustard greens. These are not only some of our favorite crops but the seeds are very easy to save. We store the seeds in small plastic bags and airtight containers to improve their longevity and store the containers in a cool dark cabinet.
The eighth tip is to grow most crops from seed rather than buying plant starts. You can often buy about a hundred seeds for the price of a plant start. So the savings are significant. The savings are even greater if you use saved seeds. Direct sowing brings even greater savings, although we start tomatoes, peppers, and eggplants in the grow room we start most of our plants directly in the soil. As a result, we don’t have to add more lights and shelves to our grow room. We save on electricity and we don’t have to buy seed starting trays and potting soil for crops that are directly sown in.
The ninth money-saving tip is to reuse, repurpose, and upcycle. Over the years we’ve used fallen trees as garden bed borders, built a compost bin from discarded pallets and another from tree branches, built cold frames from old storm windows and scrap wood, and started plants in repurposed cottage cheese and yogurt containers. The possibilities for repurposing reusing and upcycling are endless.
Our tenth money-saving strategy is to conserve water. We usually get plenty of rain here in the Chicago area but we still take measures to reduce our use of tap water. In the garden as just discussed we mulch our garden beds. Mulching is the easiest way to significantly reduce water use in the garden and it doesn’t cost a thing if you use free local resources. Second, we harvest rainwater from the roof with a rain barrel and use it to water the garden. Third, we reuse water whenever possible. For example, we save the water that we used to rinse our produce and we water our plants with it. We also reuse the water that’s collected by the dehumidifier that we sometimes run in our basement. If we lived in a more drought-prone area we could take even more measures. For example, I would consider installing a greywater system that safely diverts some wastewater from the house into the garden. I’d also build wicking beds instead of traditional raised beds, wicking beds hold a reservoir of water under the soil and the water is wicked up from the bottom resulting in much less water loss to evaporation.
1 note
·
View note
Text
Best garden shredder 2021: rid your yard of branches, twigs and leaves
With this year’s dead bits hacked out, your garden is now trimmed and spruced in readiness for next spring. But what’ll you do with all those cuttings? Or perhaps you have a body to dispose of? Either way, that’s where the best garden shredders come in.
To assist you, we’ve called in cluster of well-received domestic models and put them through their paces using a variety of pruned vegetation. And it’s okay; we were joking about disposing of bodies. These domestic machines are nowhere near powerful enough for that.
You're reading: Best garden shredder 2021: rid your yard of branches, twigs and leaves
As we do when we’re rating any sort of garden tool or piece of machinery, such as the best pressure washers, best cordless lawn mowers or best garden tools, we’ve also supplied some buying advice below on what you should be looking out for in a garden shredder. This will help you find the right product for your needs.
What is the best garden shredder?
All nine of the models tested are good machines but our top choice is the quiet and keenly-priced Cobra QS2500, a model that is very similar in both design and function to the doggedly determined Bosch AXT 25 TC but quite a bit cheaper.
If you’re on an even tighter budget, the Einhell GC-KS 2540 is surprisingly effective even if it does scream like a banshee.
The petrol-powered Titan 15HP Petrol Chipper Shredder Mulcher, the mid-priced Bosch AXT RAPID 2200, the tall-standing Stihl GHE 355 and chunky Makita UD2500 all have their charms, too.
(Image credit: Cobra)
1. Cobra QS2500
The best garden shredder for value and performance
Specifications
Weight: 26.9kgs
Power source: Mains
Cutting capacity: 40mm
Collection box: 50 litres
Reasons to buy
+Great performance+Exceptionally quiet+Large collection box
Reasons to avoid
–Doesn’t cut some larger branches all the way though
Straight to the one spot with a silver bullet, the Cobra QS2500 is our new favourite garden shredder for performance, low noise level and price. Similar in both design and function to our former number one, the popular Bosch AXT 25 TC, this shredder impresses in a number of ways but mostly price, which is way below that of the Bosch.
This writer has used the Cobra QS2500 on a number of occasions and it has excelled every time. On at least two occasions I fed it about 25 beech tree branches with full foliage one after another and it just kept on churning, crucially without making a racket in the process. This model accepts branches of up to 4cm in diameter but I just rammed in any size of branch that fitted the portal. At no time did I have to reach for the reverse button to free up a jam.
Being of the drum variety, the Cobra is exceptionally quiet in operation – in fact it makes less noise than a cordless lawnmower. Its drum simply churns continuously, chucking the remnants of bushes and trees into its ample 50-litre collection box.
Granted, the fully-leafed beech branches I tested it with remained in one mangled piece as opposed to being completely cut all the way through, but that didn’t bother me because I wasn’t considering using the mulched results as garden fertiliser. Instead I simply poured the contents into my garden-waste bin.
If you’re after a top-performing garden shredder that is almost as quiet as a field mouse while being relatively cheap to buy, then this one comes highly recommended.
2. Bosch AXT 25 TC
The best high-end garden shredder
Specifications
Weight: 30.5kgs
Power source: Mains
Cutting capacity: 45mm
Collection box: 53 litres
Reasons to buy
+Superbly efficient+Very quiet+Well designed
Reasons to avoid
–Heavy and ungainly–Not cheap
Bosch shredders dominate the market and with good reason. They’re very well built, efficient and generally reliable. Rather like an enormous, masticating juicer, this quiet, electric-powered 2,500 watt turbine model uses a bladed drum that spins relatively slowly under massive torque, trapping, crushing and cutting branches up to 45mm in diameter against a solid plate.
This model handles both wood and leafy material as was amply demonstrated when I fed it half a fig tree, green fruit and all. It chopped and crushed the whole thing into tiny pieces and deposited them into the box below ready for easy disposal in the garden bin or compost heap – some shredding aficionados will even spread the nutritious remains over flowerbeds.
Rather considerately of Bosch, this heavyweight model comes ready-built with the wheels already attached, so all you need to do is clip in the top hopper, ensure the 53-litre collection box is properly engaged, switch it on and shred. The top of the chute has a wider access than others in this roundup and that makes it generally easier to stuff in branches of a more unwieldy nature, while the included tamper helps release mutinous vegetation.
Granted, it’s very top-heavy and quite tricky to move around the garden ��� the wheels aren’t really wide enough apart – but at least it splits in two for easier storage.
If you have a mixture of both woody and leafy materials, this Bosch is your best bet. It justifies its slightly higher price by being extremely effective, easy to use and quiet enough to not disturb the neighbours.
To see how this shredder fares against a top rival product, then take a look at T3’s Bosch AXT 25 TC vs Einhell GH-KS 2440 comparison feature.
(Image credit: Einhell)
Read more: How to Get Rid of Grasshoppers: Natural Grasshopper Control | Epic Gardening
3. Einhell Electric Shredder GC-KS 2540
An efficient budget-priced option for seasonal use
Specifications
Weight: 13.5kgs
Motor: 2,500 W
Power source: Mains
Cutting capacity: 40mm
Collection box: No
Reasons to buy
+Good price+Surprisingly effective+Easy to manoeuvre
Reasons to avoid
–Really noisy–Requires some assembly
You’re not going to get Bosch-like build quality at this price but what you will get is an extremely efficient multi-talented shredder that mulches both woody and leafy material in a thrice. Just be sure to keep tree branches below the 45mm maximum diameter and snip off any extraneous branches or they won’t fit through the feeder portal.
The 2,500-watt Einhell uses a pair of fast spinning blade to cut through vegetation but larger pieces of hardwood and too many leaves will likely block the chute which means reaching for the included tamper. It’s quite a scary machine, mind, since it literally slices through cuttings and branches in quite a violent and exceedingly noisy manner (thank heavens the blades are well out of ’arm’s way). Thankfully, a motor circuit breaker switch cuts in to protect it from overloading.
The Einhell performed surprisingly well when fed a pile of long, thick rose branches, chopping the whole lot up into small 5mm pieces with only the occasional hiccup. Although it’s equipped with a discharge funnel, you will need to place a sheet of tarpaulin or a large plastic trug (B&Q do an excellent range, btw) underneath the chute to catch all the clippings.
If you only do occasional pruning and don’t require the brute force of a Bosch or Titan, then this is a good budget-priced starting point. It’s light enough to easily wheel around the garden, small enough for shed storage and it performed better than some of the more expensive competition.
4. Bosch AXT Rapid 2200
Another, cheaper Bosch classic
Specifications
Weight: 12kgs
Power source: Mains
Cutting capacity: 40mm
Collection box: No
Reasons to buy
+Efficient chopper+Easy to manoeuvre
Reasons to avoid
–No collection box
If you can’t afford the all-conquering Bosch AXT 25 TC, give this cheaper but equally useful alternative a whirl. It’s a lot more mobile for start though you will need a box, tarpaulin or garden trug (one of those handy round soft plastic garden tidies that garden centres sell) underneath it to collect the ejected detritus.
The Rapid 2200 uses tough laser-cut blades to slice through vegetation (preferably of the harder, drier variety) in a thrice. It’ll happily swallow branches up to 40mm in diameter though you may need to trim a few stems in order to feed those branches of a more ungainly persuasion into the hopper.
This model is quite reminiscent of the much cheaper B&Q model we’re quite smitten with above. But, given it’s a Bosch with a whopping 2200 watt motor attached, we (perhaps ill advisedly) assume it will last quite a bit longer. But don’t take our word for it.
You can compare this garden shredder to the other top-rated Bosch unit in this guide in T3’s Bosch AXT 25 TC vs Bosch AXT Rapid 2200 comparison feature.
(Image credit: Ryobi)
5. Ryobi RSH3045U 3000W Silent Impact Shredder
A powerful garden shredder with large collection bin
Specifications
Brand: Ryobi
Maximum power: 3000W
Container size: 55L
Power source: AC
Colour: Hyper Green
Reasons to buy
+Mid-tier price point+Big 3000W shredding power+Large 55L collection bin
Reasons to avoid
–Not a looker
This Amazon exclusive garden shredder offers big shredding power and a large collection bin. It does so, too, for a very firmly mid-tier price point as well, meaning it can be bagged for much less than some other premium models.
With 3000W of cutting power at your disposal with the Ryobi RSH3045U 3000W Silent Impact Shredder, you’ve got enough grunt to go through all but the largest of garden detritus, with two reversible, hardened steel blades designed to shred branches, brambles, and shrubs to a fine mulch.
The mulch ends up in the collection bin, which as aforementioned is large, and there is a safety plunger that pushes any material fed into the machine into the its blades, thereby allowing the user’s fingers to stay well clear. A strong safety feature if ever we saw one.
The only real down side of this shredder is how it looks, which is not particularly premium, as too the fact that it certainly isn’t “silent”. You won’t need ear defenders or anything, but including silent in the name is definitely a bit cheeky.
Overall, though, a garden shredder that delivers plenty of bang for you buck.
(Image credit: Stihl)
6. Stihl GHE 355
Great multi-functional model for all garden materials
Specifications
Weight: 30kgs
Power source: Mains
Cutting capacity: 35mm
Collection box: No
Reasons to buy
+Tackles both woody and leafy stuff+Stihl efficiency and build+Easy to move around
Reasons to avoid
–Extremely tall–No chippings collection box–Makes quite a racket
Got a garden with a mixture of hard-wooded trees, firs, shrubs and rubbery plants? Step tight this way because this tall-standing, multi-functional model does the lot by dint of a unique ‘blade rotation reversal system’ that deals with both hard and soft materials.
For leaves, twigs and palm fronds, flick the switch on the front and shove some greenery into the large opening. The blades spin at high speed ripping everything to shreds. Likewise, when it comes to the harder stuff, turn the knob to the branch setting, feed in anything up to 35mm in diameter and out comes a pile of tiny wood chippings ready for the compost heap, the borders or the green wheelie bin.
This model doesn’t come with a collection box though it does at least feature a guard hood. I’d advise placing a garden tarpaulin underneath the exit chute so you don’t end up with a garden full of chippings and mulched leaves.
The Stihl GHE 355 is an extremely efficient shredder-cum-chipper but it costs over £100 more than the Bosch and, at 1.41 metres, is taller and a whole lot louder. But, hey, it’s a Stihl so you can safely expect it to shred till the cows come home.
7. Dirty Pro Tools Garden Shredder
A lot of shredding power for very little money
Specifications
Weight: 15kgs
Power source: Mains
Cutting capacity: 40mm
Collection box: Yes
Read more: Tips On How To Keep Kangaroos Away: Learn About Plants Kangaroos Don’t Eat
Reasons to buy
+Cheap yet effective+Has collection box
Reasons to avoid
–Blades blunt quickly
Dirty Pro Tools probably had a massive laugh after they came up with their name, but it is now dawning on them that they are stuck with it forever.
Never mind, their ‘dirty’ garden shredder may or may not be ‘pro’ but it is equipped with a powerful 2,500 watt engine that should be able to shred most things short of a crowbar.
Users queue up to applaud the way this cheap ’n’ chunky chaff chewer gulps down branches up to 40cm in diameter and then farts them out into a large 50-litre box as little wooden chips.
Ironically, the more seemingly lightweight likes of leaves can cause it to choke, splutter and come to a halt, so stick to the heavy stuff. You can clear blockages easily enough by unscrewing a knob and gaining access to the blades. I’d advise doing this with the machine switched off, but it’s a free country.
As is the case with most shredders, you’ll save a lot of hassle by just getting the ol’ leaf blower out, assembling them in a neat pile, then bagging them up.
At this price you’re not going to be getting the best quality components and, sure enough, one common online complaint with this shredder is that its blades blunt quickly. On the other hand (which I thankfully still have), to get something that shreds as well as this for a shade over £100 is quite a rare treat.
8. Makita UD2500
Keenly-priced shredder with collection box
Specifications
Weight: 27.6kgs
Power source: Mains
Cutting capacity: 45mm
Collection box: 67 litres
Reasons to buy
+Pleasingly quiet+Large collection box
Reasons to avoid
–Struggles with moist materials–Pretty damn heavy
This smart-looking electric model is about same size and weight as the Bosch and just as well built, though some assembly is required, including fitting the wheels.
However, it doesn’t tackle as many different materials as the Bosch and struggles with anything that has high moisture content like large leaves and soft springy branches. In other words it’s best suited to harder woods and larger branches without too much greenery.
I fed it the same type of rose branches that the cheap B&Q model made such light work of and it jammed up a few times requiring me to hit the reverse button to free up some of the leafy congestion.
Also, it doesn’t come with a tamper which would have felt somewhat safer than using a stick to coax in some of the more rebellious stuff. It eventually swallowed the lot but closer inspection of the huge 67-litre collection bin revealed that it had simply crushed rather than cut the branches. And that meant I wasn’t able to spread the remnants over the flowerbeds.
However, it made a much better fist of dealing with a couple of 30mm hardwood branches – like the Bosch and B&Q, it accepts diameters of up to 45mm – once I’d cut off a few gnarly twigs to get the branch through the small hopper opening.
It was pretty quiet, too, which seemed to please the neighbours.
The Makita’s price falls somewhere between the Bosch and B&Q. It’s a Which? Best Buy but it loses a bit of ground for me due to its relative lack of versatility.
9. Titan Pro 15HP Petrol Chipper Shredder Mulcher
Multi-talented, petrol-powered behemoth
Specifications
Weight: 103kgs
Power source: Petrol
Cutting capacity: 75mm
Collection box: No
Reasons to buy
+Chips large branches+Tackles most foliage+Lots of power
Reasons to avoid
–Expensive–Huge and extremely heavy–Ear-shatteringly noisy
An altogether more serious proposition, this costly, petrol-driven brute annihilates anything up to 75mm in diameter. We’re talking proper tree branches here, the kind of stuff other domestic shredders fear.
If you own your own forest, or at least have a very large garden with loads of trees and shrubs, this could well be the shredder for you.
Just be sure you’re fit enough and have a decent sized outhouse or shed to store it in because, despite having wheels, the machine weighs 103kgs and the feed hopper is about head height. Also, it spits everything directly on to the ground so your best bet is to use a tarpaulin to collect all the chippings or you’ll make a right old mess of the lawn.
The Titan comes with two main portals. The top chute accommodates leaves and twigs up to 10mm and uses a ‘flail arm’ system to mulch them into tiny fragments.
Look to the side and there’s a circular portal for branches up to 75mm diameter: simply shove in a branch and out comes a pile of wood chippings of near sawdust consistency. Unfortunately, the side chute only accepts straight branches so some sawing will inevitably be required.
The downside to all this is that the Titan is huge, heavy, ugly and noisy and it uses an electric-start 15hp four-stroke engine that will, at times, require some TLC. If you can stand the racket – and your closest neighbours are either a long way away, or profoundly deaf – then this beaver of the shredding community is right up your garden path.
How to buy the best garden shredder for you
It’s one thing hacking away at your overgrown hedges, trees and shrubbery but another when you’re then faced with an unwieldy pile of branches, twigs, leaves and other garden detritus that somehow needs to be disposed of. You could spend ages snipping all the twigs and branches to a manageable size for disposal in the green waste bin or at your local council dump. Or you could invest in the best garden shredder.
Let’s cut to the chase. These domestic shredders aren’t like those machines the council uses when pruning trees in the street, or like the one Peter Stormare feeds Steve Buscemi into in that memorable scene from Fargo.
Most of the models here won’t handle anything thicker than 45mm in diameter so you can forget stuffing in a tree trunk. You will also need to snip off stiff twigs and large stubby bits or the branch simply won’t fit through the hopper’s opening slot.
Think hard about whether you really need a shredder in the first place and whether you have room. Many people will likely only use it once a year and the rest of the time you’ll need somewhere to store it.
There are two main types of shredder: impact and drum. Impact shredders use sharp, fast-spinning blades to cut into garden waste and can process a wider variety of materials, including most hard wood branches and fresh, moist cuttings and leaves. However, they are extremely noisy and their blades will eventually blunt if used excessively. They can also jam up if asked to process too much at a time.
Drum (or quiet) shredders tend to crush the material using a slow rotating, bladed wheel that traps plant matter against a solid plate before cutting it into little pieces. Drum shredders make far less noise but aren’t considered as effective at dealing with leafy materials.
Most shredders are equipped with a reverse switch to release trapped vegetation (it happens a lot) and some are equipped with a handy tamper to help force undisciplined branches into the portal of death.
Be careful how you insert branches as they jiggle about violently while they’re being swallowed. If it’s a thorn-covered branch and you’re holding on to it, lacerations are a real risk. You’re advised to wear gloves and goggles or sunglasses. A stylish, hi-viz jacket is optional.
These are the best pizza ovens
Source: https://livingcorner.com.au
Category: Garden
source https://livingcorner.com.au/best-garden-shredder-2021-rid-your-yard-of-branches-twigs-and-leaves/
0 notes
Text
Mulch Your Grass Clippings for a Healthy Lawn
The verdict is in from gardeners, environmentalists, and scientists: Don’t bag your grass clippings. Let them mulch your yard. Your lawn and the environment will both be happier for it.
In the not-too-distant past, the standard advice was the opposite. We thought bagging was better and believed grass clippings contributed to thatch buildup. We also preferred the look of a lawn without the ragged bits of mown grass.
Some research and a bit of technology overcame both of those objections.
Turfgrass researchers found that properly trimmed lawn clippings do not cause thatch. So new mowing blades were invented to chop the grass blades into finer pieces that are harder to see and decompose more quickly.
So today the norm is “grasscycling” — returning the cut blades of grass right back to the soil.
“Overall, it is better to mulch because the nutrients remain in the soil,” said Teris Pantazes, CEO of the Baltimore-based handyman community site, EFynch.com.
“Avoiding the bagging of cuttings will help the environment – avoiding the need for this waste material to enter landfills,” said Thomas O’Rourke, of the garden advice site DeckingHero.com.
Changing standard favors mulching
“I would say that the standard has changed over time as people have begun to recognize the nutritional benefit of mulch on their lawns,” O’Rourke said.
“Bagging is definitely neater because there will be no clumps of grass left over,” said Luke Truetken, owner of Luke’s Landscape & Maintenance of McKinney, Texas. “However, it’s not necessarily the best thing. Mulching allows the clippings to revitalize the lawn with nutrients as they decay. If done correctly, it also doesn’t reduce the neat appearance, either.“
5 benefits of lawn mulching
There are at least five benefits to mulching your grass clippings.
1. Grass clippings are a natural fertilizer.
By mulching, you reduce your lawn’s fertilizer needs. “Mulching re-introduces essential minerals to your lawn that would otherwise be lost,” O’Rourke said. “For example, nitrogen, phosphorus and potassium are all preserved by utilizing the mulch, reducing the need for artificial fertilizers to keep your lawn looking healthy. “
Leaving the mulch in your lawn returns several pounds of nutrients to your lawn each season.
Lawn Clipping Nutrients
Type of nutrientAmount mowed off in one growing season (per 1,000 square feet) Nitrogen4.8 pounds Phosphorous0.7 pounds Potassium2.6 pounds Sources: Sources: The Lawn Institute, James B. Beard, "Turfgrass: Science and Cluture"
That’s “a considerable amount when typical recommendations suggest 2 to 5 pounds of actual nitrogen per 1,000 square feet of lawn annually,” notes Oregon State University’s Extension Service. Lawn clipping mulch allows you to skip the time and expense of a nitrogen fertilizer cycle while still maintaining a healthy lawn.
2. Clippings hydrate.
Mulching lawn clippings “helps lawns stay hydrated in high-heat and drought conditions,” said Cassy Aoyagi, president and co-owner of FormLA Landscaping of Los Angeles.
“Grass is 80 percent water, so in essence, you’re watering your lawn a bit by leaving them there,” said Allen Michael, editor of SawHub.com, a site for do-it-yourselfers.
3. Mulching reduces landfill use.
Mulching your yard clippings reduces dump fees and keeps yard waste out of already-strained landfills. “Bagging is not so environmentally friendly unless you have a compost pile, which most people do not have,” Truetken said. “Some cities collect yard waste for composting, but usually it just ends up in the landfill.”
“You’re reducing landfill waste by not bagging, and cutting back on plastic, since the bag will inevitably be plastic,” Michael said.
The mulching of yard trimmings has been a success story for landfills. A 2018 report from the U.S. Environmental Protection Agency, shows Americans generate about 34.7 million tons of yard trimmings per year. That’s 69.4 trillion pounds. But just 10.8 million tons end up in landfills, down from 27 million in 1980.
In part, that’s because the norm has changed, and people either mulch or compost their trimmings from grass plants. Also, state governments have taken action to keep yard trimmings out of their landfills. According to data from The Composting Council, 25 states have regulations limiting or banning yard clippings in landfills. The states are: Arkansas, Connecticut, Delaware, Florida, Georgia, Illinois, Iowa, Maryland, Massachusetts, Michigan, Minnesota, Missouri, Nebraska, North Carolina, Ohio, Pennsylvania, South Carolina, South Dakota, Vermont, New York and Wisconsin.
4. Mulching is less work.
“Bagging is additional work as you need to stop frequently and empty the bag,” Truetken said.
5. Mulch is a natural weed killer
Weed control is important. The mulch layer will be less than an inch thick, but regular mowing and mulching provide a barrier to weed seeds, preventing them from taking root.
When you should bag your lawn trimmings
The experts allow for some exceptions to the general “don’t bag your clippings” rule.
For one, says O’Rourke, “If you haven’t cut your lawn in a while, don’t be afraid to bag some of your clippings. Leaving too much excess grass on your lawn can block sunlight leading to patchiness and discoloration.”
Also, a new lawn grown from seed may be too delicate to withstand a coating of trimmings.
The University of Minnesota Extension service suggests mulching is not appropriate if you’re giving your lawn a big trim. In no case should you ever remove more than one-third of the length of your grass in any single mow. But if you’re following the “one-third rule” and the cut grass is still long, remove it.
“As a general rule, grass clippings of an inch or less in length can be left on your lawn where they will filter down to the soil surface and decompose quickly,” according to the Minnesota Extension Service. “Remove longer clippings because they can shade or smother grass beneath, causing lawn damage.”
“Shorter grass bits will break into the soil more easily, unlike longer ones,” said Pol Bishop of Fantastic Gardeners, a London-based lawn service company. “So next time you mow your lawn you will know if you should keep the grass clippings on or not.”
There is another exception. Go ahead and bag the clippings if your lawn has a thick layer of thatch — a half-inch or more. According to the Missouri Extension Service, “A layer more than 1/2 inch thick will prevent clippings from coming into contact with soil microorganisms,” preventing the clippings from breaking down.
How to compost lawn clippings
If you do decide to remove the trimmings, you can use grass clippings as part of your compost pile. They will then convert into fertile soil for your garden beds, raised beds and vegetable garden plots.
Composting has become a common practice for lawn clippings. According to the EPA, “Composting was negligible in 1980, and it rose to 23.4 million tons in 2015.”
“Grass falls into the ‘green’ portion of what is necessary for successful composting, said Michael, whose site includes a compost bin guide. “Along with water and some ‘browns,’ such as paper, cardboard, sawdust, or leave clippings, you have the makings for successful composted soil.” Dry leaves, wood, and straw are other “browns” that will balance out your grass clippings.
Since fresh grass clippings are about 80 percent water, you may not need to water the compost pile when blending in the clippings. Dry grass may require sprinkling some water on the compost pile.
Missouri’s extension service recommends a 1:1 to 2:1 ratio of brown to green. Be sure the clippings are pesticide free before adding the organic matter to the compost pile.
Mulching equipment: Mowers and blades
If you or your lawn care pro mow frequently with a sharp blade, a regular lawn mower with a standard “2 in 1” blade is sufficient for most mulching needs. The mulch may clump a bit and create larger pieces, but for ordinary lawns, that’s fine.
But if you are looking for finer, clump-free mulch, consider a mulching blade kit or a mulching motor.
Mulching blades are sometimes called “3-in-1” blades since they have an extra duty. They not only discharge to the ground or to the side, but they also mulch.
They are designed with multiple cutting edges and a shape that keep grass suspended under the deck of the lawn mower. So the clippings get hit several times by the blade. The result is mulch in such tiny pieces that it is nearly invisible.
Mulching blade kits are available for as little as $20, but shop carefully, as they are often brand-specific and not universal. As always, if you are planning to put your hands under a mower, disconnect the spark plug or electric cord to prevent accidental starting.
Dedicated mulching mowers tend to have larger engines better able to handle the multiple cuts, and “decks” (the metal awning over the blade) designed to facilitate the process
A few newer mowers even allow you to control the level of mulching, so that some of the grass returns to the lawn, and some is bagged.
No matter which blade you have, keep it sharp. Experts advise sharpening the mower blade at least yearly, and more often if your lawn is big or you mow frequently. The rule of thumb is to sharpen the blade once for every 25 hours of use.
“Keeping the blade sharp will also improve mulching, as well as helping the grass stay healthier,” Truetken said.
The post Mulch Your Grass Clippings for a Healthy Lawn appeared first on Lawnstarter.
from Gardening Resource https://www.lawnstarter.com/blog/lawn-care-2/mulch-grass-clippings-healthy-lawn/
0 notes
Text
What is the Best Mulch to Prevent Weeds?
All Photos By Shelley Dedauw
The best mulch to prevent weeds depends on where the mulch lies, what else you need it to do…and, of course, cost.
What is the most important factor for a successful garden? I asked my friend, Kathy, a master gardener through the local university in Reno around the time I planned my first Nevada garden. I’d grown food under my mother’s tutelage before I turned 18, but this was the first time I depended on the soil to feed my own children.
Her answer was one simple, strong word: “Mulch.”
She didn’t tell me to wait until last frost or to avoid beefsteak tomatoes within our erratic growing seasons. Nor did she tell me to amend my soil yearly, adding copious amounts of organic material. These are also crucial factors. But her knowledge gleaned through the Cooperative Extension and her own experience, told me to cover my dirt.
Mulching is the simple act of covering soil with a protective layer. Materials can be organic or manmade, compostable or semi-permanent. Whether it’s applied to avoid drought, discourage weeds, or keep bulbs warm, the focus is on what lies beneath.
If you need more convincing, the U.S. Department of Agriculture’s Natural Resources Conservation Service says mulching is one of the easiest and most beneficial things you can do for your soil, and the Arbor Day Foundation says mulching is a newly planted tree’s “best friend.”
Ready to Start Your Own Backyard Flock?
Get tips and tricks for starting your new flock from our chicken experts. Download your FREE guide today! YES! I want this Free Guide »
Mulching Lessons Learned
Even after Kathy’s admonition, it didn’t immediately sink in. I never learned how to lay mulch in Mom’s garden. We pulled weeds both morning and early evening, and then rested when midday sweltered. Perhaps that was Mom’s way of keeping three teenagers busy during summer vacation. Mulching could have reduced that weeding tenfold. And mom didn’t worry about watering; we had a well, weren’t in a drought, and she had trained her kids how to efficiently move a sprinkler.
That year I grew jack-o-lantern pumpkins. Did I mention this was my first year cultivating in Nevada? Jack-o-lanterns are fun to grow, but they don’t have much culinary value. And I can purchase three jack-o-lanterns at the supermarket for how much I paid the water authority to grow a single plant.
Pumpkin leaves spread out full and green within June, fed by an intermittent sprinkler beneath the vines. But July was cruel. Plump and smooth in the morning, the leaves shriveled by midday.
I’m not proud of what I did. I watered more. That’s not the right answer when you garden in a desert. Sure, it plumps those leaves back up super-fast. But then you receive the water bill.
Kathy’s single word returned to me during the second week of wilting-and-watering. Dipping deep into the mower bin, I retrieved grass clippings and laid them on a tarp overnight. In the morning, I packed them tight around the stems. Leaves didn’t shrivel that afternoon and I didn’t turn the hose on until the next day. I could go two to three days between watering sessions instead of running out in panic to feed my failing pumpkins.
Why We Mulch the Way We Do
Moisture retention keeps plants alive, allows you to work elsewhere instead of answering to your garden’s every need, and promotes healthy fruit.
Did you know two factors for tasty heirloom tomatoes are variety and water control? The first is simple: some tomato varieties just taste better than others. But a second and newly discovered factor is how much water the plant receives when fruit forms. Well-irrigated tomato plants result in watery fruit. That’s why hydroponically grown produce is so tasteless. The secret is to give the tomato only the water it needs and not a drop more. But if you’re unsure of the amount, or have a busy lifestyle, “just enough” can easily become “holy cow, my plants are dying!” And compensating by overwatering after a dry stretch causes cracking.
“Just enough” water is made simpler by using drip lines and mulch. Run the drip line along the soil with emitters near each plant. Cover soil and hose with mulch. Then watch your plants for a few days to see how they fare. If they wilt in the heat, it’s more effective to add more mulch than increase water flow.
Summer heat upsets crops like carrots, which like warm tops and cool roots. Winter frost kills bulbs or pushes them out of the ground. A thick layer of organic material regulates soil temperature.
Weed suppression is a third reason to mulch, especially in gardens that get enough moisture. More water means more weeds. And the reason mulching suppresses them follows the basics of photosynthesis: plants need sunlight for growth. Vegetables above the mulch already stretch tall in the light but recently germinated seeds have to fight their way through. The best mulch to prevent weeds is whatever keeps back the light. If the layer is thick enough, weeds don’t stand a chance.
Clockwise: A mulched raspberry bush, mulched garlic, and mulched carrots.
The Cheapest Methods
It’s not necessary to purchase expensive mulch unless you have aesthetic requirements. Homeowner associations may require you surround perennials with attractive bark or rocks. Vegetable gardening is different, especially if you’re growing food to save money.
The best mulch to prevent weeds is also the cheapest. Free materials that also benefit soil include compost, leaves, sawdust or wood chips, straw or grass clippings. Search online classifieds or get to know local farmers, offering to buy hay bales that have gotten wet. Collect leaves in the fall and store in plastic garbage bags to use in the next year’s garden. Contact tree care companies about receiving the chipped results of their labors.
Never use herbicide-treated grass clippings. A good friend accepted lawn trimmings from her church and used them as garden mulch. When her vegetables died, she realized the church had applied a weeding/feeding solution to the lawn but had failed to tell her. Though she disposed of the clippings, some remained in her soil. Those herbicides mean she can only plant bladed grasses, such as corn, within those spots for a couple years.
If you’re using straw, look for bales that don’t have seed heads still attached…unless you want to grow wheat. I didn’t mind so much when grains sprouted beside my garlic. I let them ripen then pulled them for the chickens. But the next year’s bales had even more seeds and wheatgrass became the first crop of spring. Also, find organic bales if possible, because some wheat is sprayed with glyphosate herbicide right before harvest so spikelets mature at the same rate. Glyphosate will kill your broadleaf crops.
Those Manmade Mulches
Weed cloth, tomato plastic, and rubber mulch promise weed suppression or increased growth, but do they really work?
I’ve used weed cloth once and was not happy with the results. If I’d spread it beneath perennials, out of walkways, I’d have been happier. But the black fabric heated up my soil in the summer and tore beneath my gardening shoes. I only used it once. But a tear-resistant weed cloth can help northern gardens with shorter growing seasons.
The same with paper weed layers. Advertising claims were promising: it would warm the soil to increase growth and could be tilled in after harvest. But it crackled and tore. Soon the soil heated up too much. Tilling was more of a hassle than just ripping the paper up and throwing it away. I didn’t purchase it again.
Layers made from recycled tires or plastics must be removed at the end of the season, or they can pollute the ground. To some gardeners, this is worth the work. Others would rather be organic with material that can eventually become more soil.
The only plastic mulch I’ve ever used is that red tomato film, which promises increased yield because it reflects the right kind of light onto the plants. And though I’ve used it for five years, I can’t testify whether it truly increases yields. More important factors came into play each year such as soil amendment and blossom drop due to high temperatures. Whether or not it actually works, I do like it for two reasons: It’s easy to unfold, pin into place, and plant the seedlings into holes cut within the film. And it suppresses weeds everywhere except where light shines through the holes. If you do use plastic mulch, poke holes in it so water can pass through.
The Good, the Ugly and the Just Plain Bad
Every mulch material has its flaws. Straw can harbor insects that crawl into the little tubes. Grass clippings may mold and compact. Peat moss may be unsustainable and wood chips may turn sour or attract termites.
Some gardeners use old carpet, leaving it in the garden year after year instead of removing it as it drops fibers. Carpet can disintegrate with frequent watering. Recycled paper may be used as a weed barrier but it’s necessary to use newsprint with soy-based black ink. Decomposing paper can raise soil acidity as well.
A highly debated form of mulch is cocoa shells. This may be the best mulch to prevent weeds if you don’t have pets…but avoid it if you do. Cocoa shells retain a little theobromine, the ingredient in chocolate that’s toxic to pets. Some companies treat their cocoa shells, removing the fat that carries the theobromine, which also diminishes the sweet smell. If you use cocoa mulch, be sure it’s treated so it’s nontoxic.
And though some gardeners will tell you to never use hay because it contains weed seeds, others prefer it because it adds more nutrients to the soil when it decomposes.
In my experience, the best mulch to prevent weeds is whatever improves soil after harvest. This includes compost, straw, and leaves. The worst are those that must be removed because it can be difficult to get every piece. Removing mulch after harvest adds unnecessary labor if compostable material can be used instead.
What you use for mulch depends on where you’re using it, your budget, if you intend to remove it or till it in, and whether you want organic or manmade products. Research the pros and cons to each type before choosing the right one for your garden.
Lazy Desert Mulching
After reading article after article and trying product after product, I learned to keep it simple. I work hard on my garden to attain maximum yield, but I don’t have time to waste. I don’t need to create more work.
Seeds sown into bare ground grow a couple inches before they meet the mulch. Grass clippings land around tiny carrots while leaves pack against tall, slender onion greens. Transplants sink into the soil and, within minutes, straw packs against the stems. Potatoes grow six inches, are hilled up and grow again. When I cannot hill any more, I apply straw to reduce watering and allow even more growth. And deep mulch gardening doesn’t end there. When summer heat reaches triple digits, soaker hoses point downward and more straw lays atop to keep every precious drop where it belongs.
By harvest, I’m exhausted. I’ve spent hours each day cultivating, weeding, watering and preserving the vegetables. With sagging shoulders, I scan the tired and frost-damaged plot while chickens pace behind me, eager to reach fallen tomatoes. Autumn cleanup is simple: Remove the plants chickens can’t eat. And open the gate. Poultry claws dig deep into that organic layer, separating it so my hens can find pests hoping to overwinter.
Then cold weather hits. I’m not worried. I used to be embarrassed by my lazy cleanup techniques until I read an article about how keeping a cover is crucial for soil health. The entire land gets a rest.
And in the spring, the shovel digs deep, mixing chicken droppings with decomposed leaves, straw and grass. It all rests beneath the surface to feed beneficial microbes and create nitrogen for the next round of crops.
What have you found to be the best mulch to prevent weeds? Let us know in the comments section.
Originally published in Countryside July/August 2016 and regularly vetted for accuracy.
What is the Best Mulch to Prevent Weeds? was originally posted by All About Chickens
0 notes
Text
What is the Best Mulch to Prevent Weeds?
All Photos By Shelley Dedauw
The best mulch to prevent weeds depends on where the mulch lies, what else you need it to do…and, of course, cost.
What is the most important factor for a successful garden? I asked my friend, Kathy, a master gardener through the local university in Reno around the time I planned my first Nevada garden. I’d grown food under my mother’s tutelage before I turned 18, but this was the first time I depended on the soil to feed my own children.
Her answer was one simple, strong word: “Mulch.”
She didn’t tell me to wait until last frost or to avoid beefsteak tomatoes within our erratic growing seasons. Nor did she tell me to amend my soil yearly, adding copious amounts of organic material. These are also crucial factors. But her knowledge gleaned through the Cooperative Extension and her own experience, told me to cover my dirt.
Mulching is the simple act of covering soil with a protective layer. Materials can be organic or manmade, compostable or semi-permanent. Whether it’s applied to avoid drought, discourage weeds, or keep bulbs warm, the focus is on what lies beneath.
If you need more convincing, the U.S. Department of Agriculture’s Natural Resources Conservation Service says mulching is one of the easiest and most beneficial things you can do for your soil, and the Arbor Day Foundation says mulching is a newly planted tree’s “best friend.”
Our best chicken secrets revealed with this FREE guide!
Even old pros say they got dozens of tips for their flocks by reading this guide.
YES! I want this Free Guide »
Mulching Lessons Learned
Even after Kathy’s admonition, it didn’t immediately sink in. I never learned how to lay mulch in Mom’s garden. We pulled weeds both morning and early evening, and then rested when midday sweltered. Perhaps that was Mom’s way of keeping three teenagers busy during summer vacation. Mulching could have reduced that weeding tenfold. And mom didn’t worry about watering; we had a well, weren’t in a drought, and she had trained her kids how to efficiently move a sprinkler.
That year I grew jack-o-lantern pumpkins. Did I mention this was my first year cultivating in Nevada? Jack-o-lanterns are fun to grow, but they don’t have much culinary value. And I can purchase three jack-o-lanterns at the supermarket for how much I paid the water authority to grow a single plant.
Pumpkin leaves spread out full and green within June, fed by an intermittent sprinkler beneath the vines. But July was cruel. Plump and smooth in the morning, the leaves shriveled by midday.
I’m not proud of what I did. I watered more. That’s not the right answer when you garden in a desert. Sure, it plumps those leaves back up super-fast. But then you receive the water bill.
Kathy’s single word returned to me during the second week of wilting-and-watering. Dipping deep into the mower bin, I retrieved grass clippings and laid them on a tarp overnight. In the morning, I packed them tight around the stems. Leaves didn’t shrivel that afternoon and I didn’t turn the hose on until the next day. I could go two to three days between watering sessions instead of running out in panic to feed my failing pumpkins.
Why We Mulch the Way We Do
Moisture retention keeps plants alive, allows you to work elsewhere instead of answering to your garden’s every need, and promotes healthy fruit.
Did you know two factors for tasty heirloom tomatoes are variety and water control? The first is simple: some tomato varieties just taste better than others. But a second and newly discovered factor is how much water the plant receives when fruit forms. Well-irrigated tomato plants result in watery fruit. That’s why hydroponically grown produce is so tasteless. The secret is to give the tomato only the water it needs and not a drop more. But if you’re unsure of the amount, or have a busy lifestyle, “just enough” can easily become “holy cow, my plants are dying!” And compensating by overwatering after a dry stretch causes cracking.
“Just enough” water is made simpler by using drip lines and mulch. Run the drip line along the soil with emitters near each plant. Cover soil and hose with mulch. Then watch your plants for a few days to see how they fare. If they wilt in the heat, it’s more effective to add more mulch than increase water flow.
Summer heat upsets crops like carrots, which like warm tops and cool roots. Winter frost kills bulbs or pushes them out of the ground. A thick layer of organic material regulates soil temperature.
Weed suppression is a third reason to mulch, especially in gardens that get enough moisture. More water means more weeds. And the reason mulching suppresses them follows the basics of photosynthesis: plants need sunlight for growth. Vegetables above the mulch already stretch tall in the light but recently germinated seeds have to fight their way through. The best mulch to prevent weeds is whatever keeps back the light. If the layer is thick enough, weeds don’t stand a chance.
Clockwise: A mulched raspberry bush, mulched garlic, and mulched carrots.
The Cheapest Methods
It’s not necessary to purchase expensive mulch unless you have aesthetic requirements. Homeowner associations may require you surround perennials with attractive bark or rocks. Vegetable gardening is different, especially if you’re growing food to save money.
The best mulch to prevent weeds is also the cheapest. Free materials that also benefit soil include compost, leaves, sawdust or wood chips, straw or grass clippings. Search online classifieds or get to know local farmers, offering to buy hay bales that have gotten wet. Collect leaves in the fall and store in plastic garbage bags to use in the next year’s garden. Contact tree care companies about receiving the chipped results of their labors.
Never use herbicide-treated grass clippings. A good friend accepted lawn trimmings from her church and used them as garden mulch. When her vegetables died, she realized the church had applied a weeding/feeding solution to the lawn but had failed to tell her. Though she disposed of the clippings, some remained in her soil. Those herbicides mean she can only plant bladed grasses, such as corn, within those spots for a couple years.
If you’re using straw, look for bales that don’t have seed heads still attached…unless you want to grow wheat. I didn’t mind so much when grains sprouted beside my garlic. I let them ripen then pulled them for the chickens. But the next year’s bales had even more seeds and wheatgrass became the first crop of spring. Also, find organic bales if possible, because some wheat is sprayed with glyphosate herbicide right before harvest so spikelets mature at the same rate. Glyphosate will kill your broadleaf crops.
Those Manmade Mulches
Weed cloth, tomato plastic, and rubber mulch promise weed suppression or increased growth, but do they really work?
I’ve used weed cloth once and was not happy with the results. If I’d spread it beneath perennials, out of walkways, I’d have been happier. But the black fabric heated up my soil in the summer and tore beneath my gardening shoes. I only used it once. But a tear-resistant weed cloth can help northern gardens with shorter growing seasons.
The same with paper weed layers. Advertising claims were promising: it would warm the soil to increase growth and could be tilled in after harvest. But it crackled and tore. Soon the soil heated up too much. Tilling was more of a hassle than just ripping the paper up and throwing it away. I didn’t purchase it again.
Layers made from recycled tires or plastics must be removed at the end of the season, or they can pollute the ground. To some gardeners, this is worth the work. Others would rather be organic with material that can eventually become more soil.
The only plastic mulch I’ve ever used is that red tomato film, which promises increased yield because it reflects the right kind of light onto the plants. And though I’ve used it for five years, I can’t testify whether it truly increases yields. More important factors came into play each year such as soil amendment and blossom drop due to high temperatures. Whether or not it actually works, I do like it for two reasons: It’s easy to unfold, pin into place, and plant the seedlings into holes cut within the film. And it suppresses weeds everywhere except where light shines through the holes. If you do use plastic mulch, poke holes in it so water can pass through.
The Good, the Ugly and the Just Plain Bad
Every mulch material has its flaws. Straw can harbor insects that crawl into the little tubes. Grass clippings may mold and compact. Peat moss may be unsustainable and wood chips may turn sour or attract termites.
Some gardeners use old carpet, leaving it in the garden year after year instead of removing it as it drops fibers. Carpet can disintegrate with frequent watering. Recycled paper may be used as a weed barrier but it’s necessary to use newsprint with soy-based black ink. Decomposing paper can raise soil acidity as well.
A highly debated form of mulch is cocoa shells. This may be the best mulch to prevent weeds if you don’t have pets…but avoid it if you do. Cocoa shells retain a little theobromine, the ingredient in chocolate that’s toxic to pets. Some companies treat their cocoa shells, removing the fat that carries the theobromine, which also diminishes the sweet smell. If you use cocoa mulch, be sure it’s treated so it’s nontoxic.
And though some gardeners will tell you to never use hay because it contains weed seeds, others prefer it because it adds more nutrients to the soil when it decomposes.
In my experience, the best mulch to prevent weeds is whatever improves soil after harvest. This includes compost, straw, and leaves. The worst are those that must be removed because it can be difficult to get every piece. Removing mulch after harvest adds unnecessary labor if compostable material can be used instead.
What you use for mulch depends on where you’re using it, your budget, if you intend to remove it or till it in, and whether you want organic or manmade products. Research the pros and cons to each type before choosing the right one for your garden.
Lazy Desert Mulching
After reading article after article and trying product after product, I learned to keep it simple. I work hard on my garden to attain maximum yield, but I don’t have time to waste. I don’t need to create more work.
Seeds sown into bare ground grow a couple inches before they meet the mulch. Grass clippings land around tiny carrots while leaves pack against tall, slender onion greens. Transplants sink into the soil and, within minutes, straw packs against the stems. Potatoes grow six inches, are hilled up and grow again. When I cannot hill any more, I apply straw to reduce watering and allow even more growth. And deep mulch gardening doesn’t end there. When summer heat reaches triple digits, soaker hoses point downward and more straw lays atop to keep every precious drop where it belongs.
By harvest, I’m exhausted. I’ve spent hours each day cultivating, weeding, watering and preserving the vegetables. With sagging shoulders, I scan the tired and frost-damaged plot while chickens pace behind me, eager to reach fallen tomatoes. Autumn cleanup is simple: Remove the plants chickens can’t eat. And open the gate. Poultry claws dig deep into that organic layer, separating it so my hens can find pests hoping to overwinter.
Then cold weather hits. I’m not worried. I used to be embarrassed by my lazy cleanup techniques until I read an article about how keeping a cover is crucial for soil health. The entire land gets a rest.
And in the spring, the shovel digs deep, mixing chicken droppings with decomposed leaves, straw and grass. It all rests beneath the surface to feed beneficial microbes and create nitrogen for the next round of crops.
What have you found to be the best mulch to prevent weeds? Let us know in the comments section.
Originally published in Countryside July/August 2016 and regularly vetted for accuracy.
What is the Best Mulch to Prevent Weeds? was originally posted by All About Chickens
0 notes
Text
What is the Best Mulch to Prevent Weeds?
All Photos By Shelley Dedauw
The best mulch to prevent weeds depends on where the mulch lies, what else you need it to do…and, of course, cost.
What is the most important factor for a successful garden? I asked my friend, Kathy, a master gardener through the local university in Reno around the time I planned my first Nevada garden. I’d grown food under my mother’s tutelage before I turned 18, but this was the first time I depended on the soil to feed my own children.
Her answer was one simple, strong word: “Mulch.”
She didn’t tell me to wait until last frost or to avoid beefsteak tomatoes within our erratic growing seasons. Nor did she tell me to amend my soil yearly, adding copious amounts of organic material. These are also crucial factors. But her knowledge gleaned through the Cooperative Extension and her own experience, told me to cover my dirt.
Mulching is the simple act of covering soil with a protective layer. Materials can be organic or manmade, compostable or semi-permanent. Whether it’s applied to avoid drought, discourage weeds, or keep bulbs warm, the focus is on what lies beneath.
If you need more convincing, the U.S. Department of Agriculture’s Natural Resources Conservation Service says mulching is one of the easiest and most beneficial things you can do for your soil, and the Arbor Day Foundation says mulching is a newly planted tree’s “best friend.”
Updated Composting Guide: Learn to compost chicken manure!
Avoid common composting mistakes with this Free Guide. Successfully make your own garden gold with help from our experts. YES! I want this Free Report »
Mulching Lessons Learned
Even after Kathy’s admonition, it didn’t immediately sink in. I never learned how to lay mulch in Mom’s garden. We pulled weeds both morning and early evening, and then rested when midday sweltered. Perhaps that was Mom’s way of keeping three teenagers busy during summer vacation. Mulching could have reduced that weeding tenfold. And mom didn’t worry about watering; we had a well, weren’t in a drought, and she had trained her kids how to efficiently move a sprinkler.
That year I grew jack-o-lantern pumpkins. Did I mention this was my first year cultivating in Nevada? Jack-o-lanterns are fun to grow, but they don’t have much culinary value. And I can purchase three jack-o-lanterns at the supermarket for how much I paid the water authority to grow a single plant.
Pumpkin leaves spread out full and green within June, fed by an intermittent sprinkler beneath the vines. But July was cruel. Plump and smooth in the morning, the leaves shriveled by midday.
I’m not proud of what I did. I watered more. That’s not the right answer when you garden in a desert. Sure, it plumps those leaves back up super-fast. But then you receive the water bill.
Kathy’s single word returned to me during the second week of wilting-and-watering. Dipping deep into the mower bin, I retrieved grass clippings and laid them on a tarp overnight. In the morning, I packed them tight around the stems. Leaves didn’t shrivel that afternoon and I didn’t turn the hose on until the next day. I could go two to three days between watering sessions instead of running out in panic to feed my failing pumpkins.
Why We Mulch the Way We Do
Moisture retention keeps plants alive, allows you to work elsewhere instead of answering to your garden’s every need, and promotes healthy fruit.
Did you know two factors for tasty heirloom tomatoes are variety and water control? The first is simple: some tomato varieties just taste better than others. But a second and newly discovered factor is how much water the plant receives when fruit forms. Well-irrigated tomato plants result in watery fruit. That’s why hydroponically grown produce is so tasteless. The secret is to give the tomato only the water it needs and not a drop more. But if you’re unsure of the amount, or have a busy lifestyle, “just enough” can easily become “holy cow, my plants are dying!” And compensating by overwatering after a dry stretch causes cracking.
“Just enough” water is made simpler by using drip lines and mulch. Run the drip line along the soil with emitters near each plant. Cover soil and hose with mulch. Then watch your plants for a few days to see how they fare. If they wilt in the heat, it’s more effective to add more mulch than increase water flow.
Summer heat upsets crops like carrots, which like warm tops and cool roots. Winter frost kills bulbs or pushes them out of the ground. A thick layer of organic material regulates soil temperature.
Weed suppression is a third reason to mulch, especially in gardens that get enough moisture. More water means more weeds. And the reason mulching suppresses them follows the basics of photosynthesis: plants need sunlight for growth. Vegetables above the mulch already stretch tall in the light but recently germinated seeds have to fight their way through. The best mulch to prevent weeds is whatever keeps back the light. If the layer is thick enough, weeds don’t stand a chance.
Clockwise: A mulched raspberry bush, mulched garlic, and mulched carrots.
The Cheapest Methods
It’s not necessary to purchase expensive mulch unless you have aesthetic requirements. Homeowner associations may require you surround perennials with attractive bark or rocks. Vegetable gardening is different, especially if you’re growing food to save money.
The best mulch to prevent weeds is also the cheapest. Free materials that also benefit soil include compost, leaves, sawdust or wood chips, straw or grass clippings. Search online classifieds or get to know local farmers, offering to buy hay bales that have gotten wet. Collect leaves in the fall and store in plastic garbage bags to use in the next year’s garden. Contact tree care companies about receiving the chipped results of their labors.
Never use herbicide-treated grass clippings. A good friend accepted lawn trimmings from her church and used them as garden mulch. When her vegetables died, she realized the church had applied a weeding/feeding solution to the lawn but had failed to tell her. Though she disposed of the clippings, some remained in her soil. Those herbicides mean she can only plant bladed grasses, such as corn, within those spots for a couple years.
If you’re using straw, look for bales that don’t have seed heads still attached…unless you want to grow wheat. I didn’t mind so much when grains sprouted beside my garlic. I let them ripen then pulled them for the chickens. But the next year’s bales had even more seeds and wheatgrass became the first crop of spring. Also, find organic bales if possible, because some wheat is sprayed with glyphosate herbicide right before harvest so spikelets mature at the same rate. Glyphosate will kill your broadleaf crops.
Those Manmade Mulches
Weed cloth, tomato plastic, and rubber mulch promise weed suppression or increased growth, but do they really work?
I’ve used weed cloth once and was not happy with the results. If I’d spread it beneath perennials, out of walkways, I’d have been happier. But the black fabric heated up my soil in the summer and tore beneath my gardening shoes. I only used it once. But a tear-resistant weed cloth can help northern gardens with shorter growing seasons.
The same with paper weed layers. Advertising claims were promising: it would warm the soil to increase growth and could be tilled in after harvest. But it crackled and tore. Soon the soil heated up too much. Tilling was more of a hassle than just ripping the paper up and throwing it away. I didn’t purchase it again.
Layers made from recycled tires or plastics must be removed at the end of the season, or they can pollute the ground. To some gardeners, this is worth the work. Others would rather be organic with material that can eventually become more soil.
The only plastic mulch I’ve ever used is that red tomato film, which promises increased yield because it reflects the right kind of light onto the plants. And though I’ve used it for five years, I can’t testify whether it truly increases yields. More important factors came into play each year such as soil amendment and blossom drop due to high temperatures. Whether or not it actually works, I do like it for two reasons: It’s easy to unfold, pin into place, and plant the seedlings into holes cut within the film. And it suppresses weeds everywhere except where light shines through the holes. If you do use plastic mulch, poke holes in it so water can pass through.
The Good, the Ugly and the Just Plain Bad
Every mulch material has its flaws. Straw can harbor insects that crawl into the little tubes. Grass clippings may mold and compact. Peat moss may be unsustainable and wood chips may turn sour or attract termites.
Some gardeners use old carpet, leaving it in the garden year after year instead of removing it as it drops fibers. Carpet can disintegrate with frequent watering. Recycled paper may be used as a weed barrier but it’s necessary to use newsprint with soy-based black ink. Decomposing paper can raise soil acidity as well.
A highly debated form of mulch is cocoa shells. This may be the best mulch to prevent weeds if you don’t have pets…but avoid it if you do. Cocoa shells retain a little theobromine, the ingredient in chocolate that’s toxic to pets. Some companies treat their cocoa shells, removing the fat that carries the theobromine, which also diminishes the sweet smell. If you use cocoa mulch, be sure it’s treated so it’s nontoxic.
And though some gardeners will tell you to never use hay because it contains weed seeds, others prefer it because it adds more nutrients to the soil when it decomposes.
In my experience, the best mulch to prevent weeds is whatever improves soil after harvest. This includes compost, straw, and leaves. The worst are those that must be removed because it can be difficult to get every piece. Removing mulch after harvest adds unnecessary labor if compostable material can be used instead.
What you use for mulch depends on where you’re using it, your budget, if you intend to remove it or till it in, and whether you want organic or manmade products. Research the pros and cons to each type before choosing the right one for your garden.
Lazy Desert Mulching
After reading article after article and trying product after product, I learned to keep it simple. I work hard on my garden to attain maximum yield, but I don’t have time to waste. I don’t need to create more work.
Seeds sown into bare ground grow a couple inches before they meet the mulch. Grass clippings land around tiny carrots while leaves pack against tall, slender onion greens. Transplants sink into the soil and, within minutes, straw packs against the stems. Potatoes grow six inches, are hilled up and grow again. When I cannot hill any more, I apply straw to reduce watering and allow even more growth. And deep mulch gardening doesn’t end there. When summer heat reaches triple digits, soaker hoses point downward and more straw lays atop to keep every precious drop where it belongs.
By harvest, I’m exhausted. I’ve spent hours each day cultivating, weeding, watering and preserving the vegetables. With sagging shoulders, I scan the tired and frost-damaged plot while chickens pace behind me, eager to reach fallen tomatoes. Autumn cleanup is simple: Remove the plants chickens can’t eat. And open the gate. Poultry claws dig deep into that organic layer, separating it so my hens can find pests hoping to overwinter.
Then cold weather hits. I’m not worried. I used to be embarrassed by my lazy cleanup techniques until I read an article about how keeping a cover is crucial for soil health. The entire land gets a rest.
And in the spring, the shovel digs deep, mixing chicken droppings with decomposed leaves, straw and grass. It all rests beneath the surface to feed beneficial microbes and create nitrogen for the next round of crops.
What have you found to be the best mulch to prevent weeds? Let us know in the comments section.
Originally published in Countryside July/August 2016 and regularly vetted for accuracy.
What is the Best Mulch to Prevent Weeds? was originally posted by All About Chickens
0 notes
Last Seen Blogs

oneimmposiblefilmfreehdfull-hk
碟中谍7:致命清算(上)~線上看 〚HD.1080p〛完

drellaout
The Weird Me

i-hanheng-nicole
无标题


spunknown
Shiny!