#Indian biometric ID
Text
Use of E-Governance to Empower Governance in Developing Nations through Indian Technology
In today’s fast-paced digital era, governance is evolving at lightning speed, especially in developing nations. At the heart of this transformation is India, a nation that’s not just embracing technology to enhance governance within its borders but is also extending this digital revolution across Asia and beyond. E-governance, where technology meets public administration, is becoming a game-changer, and India’s initiatives are lighting the way for developing nations around.
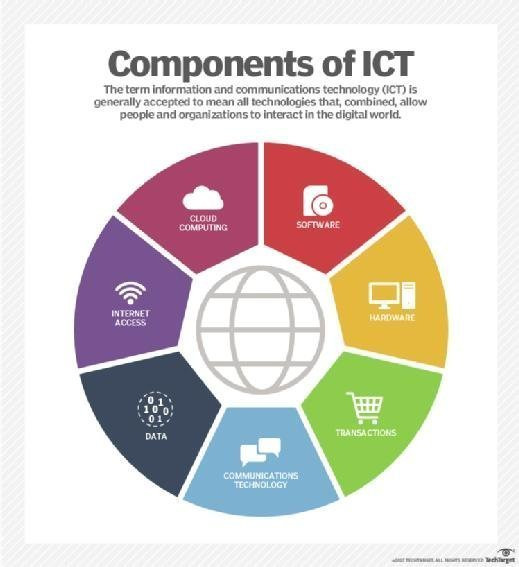
To start with the basics, E-governance isn’t just another tech buzzword; it’s the foundation of modern public administration. By integrating information and communication technology (ICT) into government processes, e-governance makes governmental services more efficient, transparent, and accessible. For developing nations often stuck in the web of bureaucracy and corruption, e-governance is a good mechanism for smooth functioning
India, with its vast and diverse population, has developed a robust e-governance framework that’s now being adapted and implemented by other developing countries. And why not? India’s commitment to sharing its technological expertise and resources is making a tangible difference in the way governance is executed globally.
India’s e-governance journey kicked off with the National e-Governance Plan (NeGP) in 2006, designed to make all government services accessible to citizens electronically. Fast forward to today, and the Digital India initiative stands as a testament to the country’s relentless push towards digital empowerment. Take the Aadhaar system, for example, the world’s largest biometric ID system or the Government e-Marketplace (GeM). These are not just systems, they're transformative tools that are redefining the relationship between the government and its citizens. But here’s where it gets even more interesting: India’s impact isn’t confined to its borders. Through various partnerships and agreements, India is exporting its e-governance mechanisms and ideas to developing nations, helping them build and strengthen their own governance frameworks.

India’s global role in promoting e-governance is backed by a series of strategic international collaborations. Take the India-Uganda Memorandum of Understanding (MoU) on e-Governance signed in 2018. Under this agreement, India is providing technical assistance to Uganda, helping East African nations develop and implement e-governance frameworks that could revolutionize their public administration.
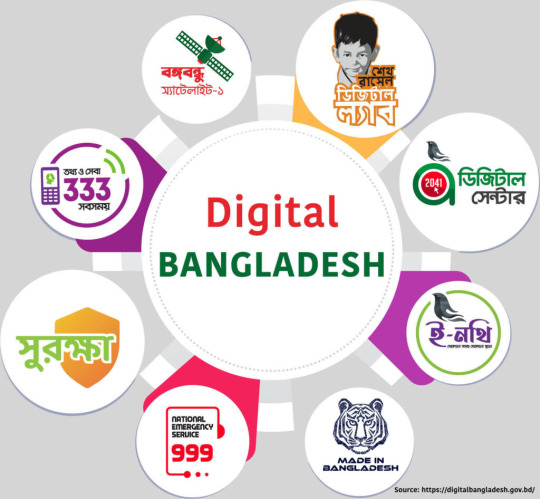
And that’s not all. India has also partnered with countries like Rwanda and Bangladesh to deploy its e-governance solutions. In Rwanda, India’s Center of Excellence in Software Development & Training (CESDT) is at the forefront, offering e-governance training and solutions that are already enhancing the efficiency of the Rwandan government making it efficient and citizen friendly. Meanwhile, in Bangladesh, India’s support has been pivotal in the success of the ‘Digital Bangladesh’ initiative, driving significant improvements in both service delivery and citizen engagement.
India’s legal framework for e-governance is constantly evolving to keep pace with the country’s growing digital landscape. The Information Technology (IT) Act, 2000, laid the groundwork by recognizing electronic records and digital signatures making it easier for data entry at the same time enabling digital transactions and communications within government operations.
The Digital India initiative, launched in 2015, further accelerated e-governance by promoting digital infrastructure, enhancing digital literacy, and driving the delivery of services through digital channels. This initiative is setting a precedent for other developing countries, many of which are eager to replicate India’s success.
India’s contribution to e-governance in developing nations goes beyond just providing technology. It’s about capacity building, training, and sharing best practices. This holistic approach ensures that e-governance systems aren’t just implemented but are sustainable in the long run. Taking another example in account, the Indian Technical and Economic Cooperation (ITEC) program, it’s been instrumental in training government officials from developing nations in e-governance, enabling these countries to develop tailored e-governance frameworks that fit their unique contexts. Moreover, India’s use of open-source software in many of its e-governance solutions makes these technologies more accessible and customizable for other countries. This democratization of technology is crucial for empowering governance in nations with limited resources and providing them with a democratic framework.
From my perspective, India’s e-governance initiatives are a shining example of how technology can be harnessed for smooth governance. The true strength of e-governance lies in its ability to make governments more accountable, transparent, and responsive to the needs of their citizens. For developing nations, where these qualities can be in short supply, e-governance can spark profound and lasting change. What truly stands out to me is India’s willingness to share its successes with other nations making it easier for other nations to implement policies and avoiding the process of reconstructing it. This isn’t just technology transfer, it's about fostering a culture of good governance and empowering countries to take control of their own destinies at the same time providing citizens with a sovereign future. In a world where digital divides can deepen inequalities, India’s e-governance initiatives can help in the future.
The future of governance is undeniably digital, and India is almost at the forefront of this shift. As more developing nations embrace e-governance, we can expect to see significant improvements in public administration, citizen engagement, and overall governance. But this progress will depend on continued investment in digital infrastructure, training, and international collaboration. India’s e-governance journey is far from complete, and its role as a global leader in this field will only grow with the help of innovations like these. By continuing to share its experience and resources, India is not just empowering governance in developing nations but is also contributing to a more equitable and digitally connected world.
#tech#aiandtech#governance#egovernance#bangladesh#uganda#foreign policy#foreign aid#aid#sovereignty#conflict#inovation
0 notes
Text
What is the Process for Sending Money Within India?

In India, sending money domestically is a streamlined process thanks to the country’s robust financial infrastructure and advanced technology. Various methods and channels are available for domestic money transfer, each catering to different needs and preferences. Here, we will explore the process of sending money within India, highlighting key methods, steps, and considerations.
1. Bank Transfers
One of the most common methods for domestic money transfer in India is through bank transfers. This process involves transferring funds directly from one bank account to another. Here’s how it typically works:
Initiation: The sender logs into their online banking account via a bank’s website or mobile app. Alternatively, they can visit a branch or use an ATM to initiate the transfer.
Details Entry: The sender enters the recipient's bank account number, branch details, and the amount to be transferred. For online transactions, they may also need to provide the recipient's IFSC (Indian Financial System Code) code, which identifies the specific branch of the bank.
Verification: The sender may be required to enter a transaction password or OTP (One-Time Password) sent to their mobile number for verification.
Processing: Once verified, the bank processes the transaction, which typically completes within a few hours or the same day, depending on the type of transfer (e.g., NEFT, RTGS, IMPS).
2. National Electronic Funds Transfer (NEFT)
NEFT is a widely used method for domestic money transfers in India. It is managed by the Reserve Bank of India (RBI) and allows for secure, electronic transfers between banks.
Batch Processing: NEFT operates in batches, with transactions being processed in hourly intervals. This means that transfers are not instantaneous but are completed in the batch cycle.
Limitations: NEFT does not have any minimum or maximum limit, making it suitable for both small and large transactions.
Availability: NEFT is available 24x7, including weekends and holidays, providing flexibility for users.
3. Real Time Gross Settlement (RTGS)
RTGS is designed for high-value transactions and is ideal for urgent and time-sensitive transfers. Here’s how RTGS operates:
Immediate Settlement: Unlike NEFT, RTGS processes transactions in real time, ensuring that the funds are transferred instantly between banks.
Minimum Limit: RTGS transactions usually have a minimum limit (e.g., ₹2 lakhs) and no upper limit, making it suitable for large-value transfers.
Availability: RTGS is available during banking hours and is generally used for transactions requiring immediate settlement.
4. Immediate Payment Service (IMPS)
IMPS offers a fast and convenient way to transfer money instantly, 24x7. It is managed by the National Payments Corporation of India (NPCI) and operates through various channels.
Instant Transfer: IMPS allows for immediate fund transfers between bank accounts, making it ideal for urgent transactions.
Accessibility: Users can access IMPS through mobile banking apps, internet banking, and even ATMs.
Limits: IMPS typically has transaction limits set by individual banks, which can vary.
5. Mobile Wallets and Payment Apps
The rise of digital wallets and payment apps has revolutionized domestic money transfers. Apps like Paytm, Google Pay, PhonePe, and others offer a user-friendly interface for sending money quickly.
Linking Accounts: To use these apps, users need to link their bank accounts or credit/debit cards to their digital wallet.
Sending Money: Users can transfer money by entering the recipient's mobile number or UPI (Unified Payments Interface) ID. The process is generally straightforward and involves entering the amount and authorizing the transaction with a PIN or biometric verification.
Instant Transactions: Transfers using these apps are usually instant, providing immediate credit to the recipient’s account.
Considerations and Security
When sending money domestically within India, there are several important considerations:
Transaction Fees: While some methods like NEFT and IMPS may have minimal or no fees, others like RTGS or certain payment apps may charge fees depending on the amount and frequency of transactions.
Security: Ensure that you use secure and verified channels for transactions. Avoid sharing sensitive information and use strong passwords and two-factor authentication to protect your financial data.
Recipient Details: Double-check the recipient’s details before confirming the transaction to avoid errors and potential loss of funds.
Conclusion
The process of sending money within India is versatile and efficient, offering various methods to suit different needs. Whether using traditional bank transfers, NEFT, RTGS, IMPS, or modern mobile wallets and payment apps, users have access to a range of options that ensure swift and secure domestic money transfers. Understanding each method’s features and selecting the appropriate one based on the transaction’s urgency, amount, and convenience can enhance the overall experience and effectiveness of money transfers in India.
1 note
·
View note
Text
The global demand for Facial Recognition was valued at USD 6215.2 Million in 2023 and is expected to reach USD 22208.9 Million in 2032, growing at a CAGR of 15.20% between 2024 and 2032.Facial recognition technology, a subset of biometric systems, has rapidly transitioned from science fiction to everyday reality, transforming various industries and enhancing security measures worldwide. The facial recognition market, projected to grow at a significant rate over the next few years, is driven by advancements in artificial intelligence (AI), increased demand for surveillance systems, and the burgeoning need for personalized user experiences.
Browse the full report at https://www.credenceresearch.com/report/facial-recognition-market
Market Overview
Facial recognition technology involves the identification or verification of individuals using their facial features. This technology employs AI algorithms and machine learning techniques to analyze and match facial patterns from digital images or video frames against a database of known faces. The global facial recognition market was valued at approximately USD 3.8 billion in 2022 and is expected to reach USD 9.6 billion by 2027, growing at a compound annual growth rate (CAGR) of 20.2% during the forecast period.
Key Drivers of Growth
1. Enhanced Security and Surveillance: Governments and law enforcement agencies are increasingly adopting facial recognition systems for surveillance, criminal identification, and public safety. The ability to quickly and accurately identify individuals in crowds makes it an invaluable tool in preventing and responding to crimes and terrorist activities.
2. Technological Advancements: Continuous improvements in AI and machine learning have significantly enhanced the accuracy and speed of facial recognition systems. Innovations such as 3D facial recognition, which captures and analyzes facial contours, and deep learning algorithms have reduced false positives and improved overall reliability.
3. Increasing Adoption in Various Industries: Beyond security, facial recognition technology is being embraced across diverse sectors. In retail, it enables personalized shopping experiences by recognizing returning customers and suggesting products based on their preferences. In healthcare, it aids in patient identification and streamlining administrative processes. Financial institutions use it for secure and convenient customer authentication.
4. Contactless Solutions Post-Pandemic: The COVID-19 pandemic has accelerated the adoption of contactless technologies, including facial recognition. With the need to minimize physical contact, businesses and organizations are integrating facial recognition for touchless access control, attendance tracking, and transaction authentication.
Regional Insights
North America currently dominates the facial recognition market, driven by significant investments in security infrastructure and technological advancements. The United States, in particular, has witnessed widespread adoption in airports, public transportation, and law enforcement agencies. Europe follows closely, with increasing implementation in border control and national ID programs.
Asia-Pacific is poised for substantial growth due to the rising demand for surveillance systems in countries like China and India. China's extensive use of facial recognition for public security and smart city initiatives highlights the region's potential. Meanwhile, the Indian market is witnessing growth with the government's push towards digital identification and smart city projects.
Challenges and Concerns
Despite its numerous benefits, the facial recognition market faces several challenges and concerns:
1. Privacy and Ethical Issues: The widespread use of facial recognition technology raises significant privacy concerns. Unauthorized surveillance and data breaches can lead to misuse of personal information. There is an ongoing debate about the ethical implications of using such technology, particularly in public spaces.
2. Regulatory Hurdles: Governments worldwide are grappling with the need to regulate facial recognition technology to balance security needs and privacy rights. In some regions, strict regulations and bans on the use of facial recognition in certain contexts have been implemented, which could hinder market growth.
3. Bias and Accuracy: AI algorithms used in facial recognition systems have been criticized for potential biases, particularly against certain demographic groups. Efforts are underway to improve the accuracy and fairness of these systems to ensure equitable treatment across different populations.
Future Prospects
The future of the facial recognition market looks promising, with continued advancements in AI and machine learning expected to further enhance the technology's capabilities. Integration with other biometric systems, such as voice and fingerprint recognition, could lead to more robust multi-modal authentication solutions. Moreover, as privacy concerns are addressed through improved regulations and ethical standards, the adoption of facial recognition technology is likely to become more widespread and accepted.
Key Players
FaceFirst, Daon, Inc.
Cognitec Systems GmbH.
Fujitsu
NEC Corporation
FacePhi
Onfido
Aware, Inc.
NVISO
Thales
Ayonix Corporation (Ayonix) (Japan)
Neurotechnology (Lithuania)
Daon (Ireland)
Stereovision
Imaging, Inc. (SVI)
Techno Brain (Dubai)
Innovatrics (Bratislava)
Segmentation
By Technology Type:
2D Facial Recognition
3D Facial Recognition
Facial Analytics
By Component:
Hardware:
Cameras
Sensors
Scanners
Software:
Facial Recognition Algorithms
Database Management
Modeling and Analytics
By Application:
Access Control and Authentication
Security and Surveillance
Emotion Recognition
Payment and Transaction Processing
Attendance Tracking
Customer Experience and Marketing
Healthcare
Others
By End-User Industry:
Government and Public Sector
Retail
Banking, Financial Services, and Insurance (BFSI)
Healthcare
Education
Transportation
Hospitality
Residential
Others
By Deployment Mode:
On-Premises
Cloud-Based
By Vertical Integration:
Integrated Solutions (Facial Recognition as Part of a Larger System)
Standalone Facial Recognition Systems
By Application Area:
Law Enforcement and Public Safety
Retail Security
Border Control and Immigration
Consumer Electronics
Smartphones and Mobile Devices
Automotive
Social Media and Entertainment
Healthcare
Others
By Region
North America
The U.S
Canada
Mexico
Europe
Germany
France
The U.K.
Italy
Spain
Rest of Europe
Asia Pacific
China
Japan
India
South Korea
South-east Asia
Rest of Asia Pacific
Latin America
Brazil
Argentina
Rest of Latin America
Middle East & Africa
GCC Countries
South Africa
Rest of Middle East and Africa
Browse the full report at https://www.credenceresearch.com/report/facial-recognition-market
About Us:
Credence Research is committed to employee well-being and productivity. Following the COVID-19 pandemic, we have implemented a permanent work-from-home policy for all employees.
Contact:
Credence Research
Please contact us at +91 6232 49 3207
Email: [email protected]
Website: www.credenceresearch.com
0 notes
Text
Everything You Need To Know About Aadhaar Verification
Aadhaar verification is now vital. It is part of many administrative and financial processes in India. Over a billion people are enrolled. The Aadhaar system is the world's largest biometric ID system. Understanding Aadhaar verification is key.
It's crucial for navigating India's complex identity authentication. This guide covers the key aspects of Aadhaar verification. It includes its benefits and the verification process.
Table of Contents
Understanding Aadhaar
What is Aadhaar Verification?
What is the unique identification authority of India (UIDAI)?
Which Indian ministry oversees the Unique Identification Authority of India (UIDAI) and its operations related to Aadhaar?
Who has been appointed CEO of the Unique Identification Authority of India (UIDAI)?
Why is Aadhaar Verification Important?
How Aadhaar Verification Works?
Authentication Services
Step-by-Step Process of Aadhaar Verification
Documents Required for Aadhaar Card Verification
Why is Aadhaar card verification important?
Aadhaar Information
1. Demographic information
2. Biometric information
How to Update Aadhaar Card Details Online?
How to update the name, address, gender, and date of birth details online?
What can you change in an Aadhaar card online?
How can you update the address in Aadhaar without document proof?
How to Update Your Aadhaar Card Details at the Aadhaar Enrolment Centre?
How to Update Mobile Number in Aadhaar Card?
How to Change/Update Name in Aadhaar?
How to update the date of birth (DoB) on Aadhaar card?
What are the documents required for updating aadhaar information?
How do you enroll for Aadhaar?
What is the procedure to complete the Aadhaar enrolment process?
How to enroll for Child/Baal Aadhaar?
How do you Update Aadhaar?
How to Apply for Aadhaar Without Any Documents?
How to check the status of Aadhaar Application Online?
How to Get Your e-Aadhaar?
How to do Aadhaar Card Verification?
Common Uses of Aadhaar Verification
Use-cases for Aadhaar Card in India
Benefits of Aadhaar Verification
Benefits of Aadhaar Card for Government Process
Benefits of Aadhaar Card for Resident
Benefits of Linking Aadhaar
How can avail government subsidies and benefits through Aadhaar?
Challenges and Limitations
Aadhaar Verification in Financial Services
Aadhaar Verification in Government Services
Aadhaar Verification in Telecom Sector
Troubleshooting Common Issues
Legal Aspects of Aadhaar Verification
Future of Aadhaar Verification
Why is Identity Important for Services?
How Do Governments Verify Identity?
The Aadhaar Project: India's National ID
Identity and the Internet (Web 1.0 & Web 2.0)
Decentralized Identity (Web 3.0)
Digital ID and AI (Web 4.0?)
Aadhaar and Right to Privacy – Some Key Points
Supreme Court Rulings
Changes to the Aadhaar Act
Initial Concerns with Right to Privacy and Aadhaar
Conclusion
Frequently Asked Questions
What is Aadhaar Verification?
Why is Aadhaar Verification Important?
How Can I Verify My Aadhaar Number Online?
What Information Do I Need to Verify My Aadhaar Number?
Is There a Fee for Aadhaar Verification?
Can I Verify Someone Else’s Aadhaar Number?
What Should I Do If My Aadhaar Verification Fails?
How Can I Update My Aadhaar Details?
How Long Does It Take to Update Aadhaar Details?
Is Aadhaar Verification Mandatory for All Services?
Can NRIs and Foreigners Verify Their Aadhaar?
What Is e-KYC and How Is It Related to Aadhaar Verification?
How Secure Is the Aadhaar Verification Process?
What Happens If My Aadhaar Is Misused?
Where Can I Get Help with Aadhaar Verification?
What is an Aadhaar PVC Card?
How Can I Apply for an Aadhaar PVC Card?
What Are the Features of the Aadhaar PVC Card?
How Can I Check My PAN Card Status Using My Aadhaar Number?
How to do KYC online?
How to check KYC status?
How Can I Download an Aadhaar Card Online?
How to Download an Aadhaar Card Without an OTP?
Understanding Aadhaar
Overview
Aadhaar is a 12-digit unique identification number. The Unique Identification Authority of India (UIDAI) issues the number. Aadhaar launched in 2009. It aims to provide a single, strong, and easy-to-check identity document. It is for India's residents.
History
The government started the Aadhaar project to establish a universal identity infrastructure. Both the government and private sector could use it. The first Aadhaar number was issued in 2010. It has expanded to cover a large portion of the Indian population.
Importance
Aadhaar is a foundational ID. It links services and systems to a single, verifiable identity. It is key to ensuring that subsidies, benefits, and services reach the right people. They make direct contact with them in a streamlined manner.
What is Aadhaar Verification?
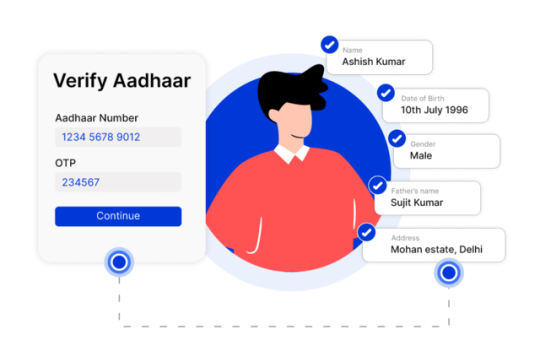
Also called Aadhaar Authentication. It is validating a person's identity using their Aadhaar number. It involves cross-checking the given information with the UIDAI's database. This is to confirm the identity's authenticity.
Many companies and organizations need people to show ID. They need it to get services, subsidies, or benefits. However, checking if these identity documents are correct can be hard.
Aadhaar Authentication helps. It provides an easy way to check someone's identity online. And, it's instant and works from anywhere. India's Unique Identification Authority, a government agency, offers this service. It confirms customer identities with swift authentication. They can also check the identity of their employees or anyone else. They use Aadhaar, which helps ensure the right people get the services, subsidies, or benefits they need. It also helps them get the access they need.
What is the unique identification authority of India (UIDAI)?

The Unique Identification Authority of India (UIDAI) is a government agency. It handles implementing the Aadhaar scheme. The scheme aims to give a unique ID number to every resident of India. This number is called Aadhaar. It is a 12-digit unique identifier. The system links to the person's biometric and demographic data.
Which Indian ministry oversees the Unique Identification Authority of India (UIDAI) and its operations related to Aadhaar?
The Indian government created the Unique Identification Authority of India (UIDAI). It was created on July 12, 2016. It was set up under a law called the Aadhaar Act 2016. UIDAI is part of the Ministry of Electronics and Information Technology. It gives everyone in India a unique identification number called Aadhaar.
Who has been appointed CEO of the Unique Identification Authority of India (UIDAI)?
Amit Agrawal is the CEO of the Unique Identification Authority of India (UIDAI). He has worked in important government jobs in India. He focused on technology, finance, and education. He was also an Additional Secretary. He worked in the Ministry of Electronics and Information Technology.
He also served in the Ministry of Finance. He has led tax and education departments in Chhattisgarh. He has also had other roles in state and local governments. Amit studied at the Indian Institute of Technology Kanpur. He has been on the boards of many technology, banking, and insurance companies.
Purpose - The main objective of Aadhaar verification is to check if the person is who they claims to be.
Aadhaar is a special 12-digit number given to every Indian resident as proof of identity.
Helps make sure the right people get government benefits and reduces cheating.
Aadhaar makes it easier to open bank accounts. It also helps people get financial services, especially in rural areas.
Linking PAN with Aadhaar makes it easier to file taxes and is necessary for paying income tax.
Aadhaar allows digital authentication. This is for services like getting mobile connections and using online banking.
Helps provide accurate population data to create better government policies.
Usage - Aadhaar verification is used in many sectors. These include banking, telecom, and government. It makes processes faster and more secure.
Why is Aadhaar Verification Important?
[wptb id=3711]
How Aadhaar Verification Works?
[wptb id=3715]
Authentication Services
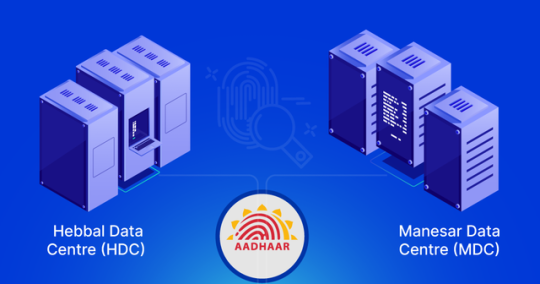
UIDAI offers online, real-time authentication. It does so through two data centers: Hebbal Data Centre (HDC) and Manesar Data Centre (MDC). The centers work together. They ensure that services like authentication and e-KYC are always available.
CIDR can handle millions of logins every day. It can increase capacity as needed. Many providers use Aadhaar in their systems. It helps them deliver faster, better services across India.
Let us have a clear look as below:-
What Aadhaar Authentication Will DoWhat Aadhaar Authentication Will Not Do✅ Authentication against resident’s data in UIDAI’s CIDR❌ Authentication against resident’s data on smart card✅ Return response to requesting agencies as Yes/No❌ Return personal identity information on residents✅ Initiate request over mobile network, landline network and broadband network❌ Remain restricted to broadband network✅ Require aadhaar for every authentication request reducing transactions to a 1:1 match❌ Search for aadhaar based on details provided requiring 1: N match
Step-by-Step Process of Aadhaar Verification
[wptb id=3722]
Documents Required for Aadhaar Card Verification
Identification Proofs - You can use documents such as a passport, PAN card, voter ID, or driving license as IDs.
Address Proofs - You can use documents as proof of address. These include a utility bill, bank statement, or rental agreement. These documents must be current and valid.
Why is Aadhaar card verification important?
Your Aadhaar card is very important. It helps prove who you are, get government benefits, open bank accounts, get SIM cards and more. Check your Aadhaar card. This keeps your info correct and safe from misuse or theft.
Aadhaar Information
1. Demographic information
Name
Date of birth/age
Address
EID- the enrolment number
Barcode
2. Biometric information
Photograph
Iris scan (both eyes)
Fingerprints (all ten)
[wptb id=3733]
How to Update Aadhaar Card Details Online?
You can update your name, date of birth, address, and gender details online. However, your mobile number must be linked to the Aadhaar to make the changes.
How to update the name, address, gender, and date of birth details online?
Step 1 - Visit the official website of UIDAI
Step 2 - Click on the 'Update Demographic Data and Check Status’. Log in to the portal using your Aadhaar and the OTP sent to your mobile number.
Step 3 - Enter the Aadhaar number and the captcha.
Step 4 - Click on 'Send OTP' and Enter the OTP that is sent to your registered mobile number.
Step 5 - Next, select 'Update Demographics Data'.
Step 6 - Select the relevant options on the next page and click on 'Proceed'.
Step 7 - The changes can be made on the next page. Upload the relevant document.
Step 8 - Next, you must review the details that have been entered.
Step 9 - Next, submit the change request. You can use the Update Request Number (URN) to track the status of the address change.
What can you change in an Aadhaar card online?
You can update your address, name, gender, and birthdate. You can also update your email ID and home address. Also, you can update your marital status, fingerprints, and IRIS date. But, to make the adjustments online, you must link your Aadhaar to your cell phone number.
How can you update the address in Aadhaar without document proof?
Use the 'Request for Aadhaar Validation Letter’. The process involves:-
Step 1 - Resident Initiates Request
As a resident, you must log in by providing your Aadhaar details.
The Verifier Aadhaar details must be entered.
An SRN will be sent.
Step 2 - Address Verifier Consents
Click on the link that is sent to the registered mobile number.
Log in with the Aadhaar details.
Provide consent.
Step 3 - Address Verifier Consents
A Verifier Consent is sent to the registered mobile number.
Login by providing the SRN.
Preview the address details.
Change the language if needed.
Submit the request.
Step 4 - User Secret Code to Complete
A post will be sent with a letter and the Secret Code.
Login to the address update portal.
Change the address with the help of the Secret Code.
Check the address and submit.
A URN will be provided to check the status of the request.
How to Update Your Aadhaar Card Details at the Aadhaar Enrolment Centre?
Get the correction form from the nearest Aadhaar Enrolment Center and fill it out.
Attach the required documents and submit the form.
Pay Rs. 25 to update the address on your Aadhaar Card.
You will get an acknowledgment slip. Keep this slip for future reference.
How to Update Mobile Number in Aadhaar Card?
Go to the Aadhaar Seva Kendra.
Fill out the Update/Correction Form and add your new mobile number.
Submit the form.
Provide your biometrics to confirm your information.
Pay Rs. 50 as the fee.
You will get an acknowledgment slip with an Update Request Number (URN).
Use the URN to check the status of your request.
It takes 30 days to update your new mobile number in Aadhaar's database. No additional documents are needed for this update.
How to Change/Update Name in Aadhaar?
Visit the Aadhaar Enrolment/Update Center.
Fill out the Aadhaar Update Form.
Enter your current mobile number on the form.
The staff will process your request.
Receive an acknowledgment slip with your Update Request Number (URN).
Pay a fee of Rs. 50.
How to update the date of birth (DoB) on an Aadhaar card?
Go to a nearby Aadhaar Enrolment Center.
Fill out the Aadhaar Update Form with your birth date.
Submit the form along with proof of date of birth.
Provide your biometrics for verification.
Get a receipt with your Update Request Number (URN).
Check the update status online using the URN.
Pay a fee of Rs. 50.
Your DoB will be updated within 90 days.
What are the documents required for updating aadhaar information?
Identity Proof: PAN Card, Passport, Driving License, Voter ID, etc.
Relationship Proof: Passport, PDS Card, MNREGA Job Card, Pension Card, etc.
Date of Birth Proof: Birth Certificate, School Leaving Certificate, Passport, PAN Card, etc.
Address Proof: Bank Passbook/Statement, Ration Card, Voter ID, Insurance Policy, etc.
How do you enroll for Aadhaar?
Go to any authorized Aadhaar Enrolment Center or Permanent Enrolment Centre.
Find a list of Aadhaar Enrolment Centers on the UIDAI website.
Over 10,000 post offices and bank branches can also enroll people for Aadhaar. This makes it easier.
What is the procedure to complete the Aadhaar enrolment process?
Go to the Aadhaar website to find a nearby enrolment center.
Fill out the form with your details.
Submit the necessary documents.
Provide your fingerprints and eye scan.
Get an acknowledgment slip after enrolment.
Your Aadhaar card will be mailed to your address.
Enrolling for Aadhaar is free and not mandatory.
How to enroll for Child/Baal Aadhaar?
Go to the UIDAI website to find the closest enrolment center.
Take the child’s birth certificate to the enrollment center.
Provide the Aadhaar number of one parent for authentication, as Baal Aadhaar will be linked to it.
Fill out the Baal Aadhaar application form with all details and a mobile number.
A photo of the child will be taken; no biometrics are needed for children under five.
Get an acknowledgment slip after completing the steps.
Baal Aadhaar will be sent to the address. A verification SMS will be sent to the mobile number.
How do you Update Aadhaar?
You can update Aadhaar either at an enrolment center or online. Here are the main reasons to update Aadhaar:
Change personal details like name, age, date of birth, mobile number, address, or photo.
Update biometric data like iris scans and fingerprints.
You can update your address online. For other personal details and biometric updates, you must visit an enrolment center.
How to Apply for Aadhaar Without Any Documents?
If you don't have any documents, you can still apply for Aadhaar using these methods:
Head of Family (HoF) Application: If a family member has a valid Aadhaar, they can provide documents. The documents show their relationship to you. Your Aadhaar will be processed after these details are verified.
Introducer-based Application: If you have no proof of identity or address, an Introducer appointed by a Registrar can help you enroll. You can find an Introducer at the Aadhaar Enrolment Centre.
For more details, you can check your Aadhaar status online.
How to check the status of Aadhaar Application Online?
Steps to Check Aadhaar Card Status:
Go to the official UIDAI website.
Log in using your username and password.
Click on 'Check Aadhaar Status' under the 'My Aadhaar' section.
Enter your enrolment number and the time of enrolment.
Type in the captcha code and click 'Check Status'.
How to Get Your e-Aadhaar?
To make Aadhaar more accessible, UIDAI offers e-Aadhaar. It's an electronic version of your Aadhaar card in PDF format. You can download it from the UIDAI website.
You can access e-Aadhaar using:
Your Aadhaar number
Your Virtual ID (VID)
Your Enrolment ID (EID)
Check the UIDAI website for a step-by-step guide on how to download and print your e-Aadhaar card.
How to do Aadhaar Card Verification?
Steps to Verify Aadhaar Card:
Go to the official UIDAI website.
Click on the ‘My Aadhaar’ section.
Select ‘Verify an Aadhaar Number’ under ‘Aadhaar Services’.
Enter your Aadhaar number and the captcha code.
Click ‘Proceed and Verify Aadhaar’.
Follow the instructions on the next page to finish the process.
If there is a mistake, you can call UIDAI's toll-free number 1947 for help.
Check the website for a guide on how to view your authentication history.
Common Uses of Aadhaar Verification
[wptb id=3757]
Use-cases for Aadhaar Card in India

Benefits of Aadhaar Verification
[wptb id=3764]
Benefits of Aadhaar Card for Government Process
[wptb id=3772]
Benefits of Aadhaar Card for Resident
Each person has a unique Aadhaar number. Their biometrics are linked. So, there are no duplicate records in the government database.
You carry Aadhaar as a digital copy with convenience. You can verify it anywhere by contacting the UIDAI database.
Aadhaar provides security for mobile banking and payments with two-factor authentication.
Aadhaar card serves as universal proof of identity, address, and age.
Empowers low-income individuals to tap government programs with Aadhaar card convenience.
Benefits of Linking Aadhaar
[wptb id=3778]
How can avail government subsidies and benefits through Aadhaar?
[wptb id=3786]
Challenges and Limitations
[wptb id=3793]
Aadhaar Verification in Financial Services
[wptb id=3797]
Aadhaar Verification in Government Services
[wptb id=3802]
Aadhaar Verification in Telecom Sector
[wptb id=3805]
Troubleshooting Common Issues
[wptb id=3810]
Legal Aspects of Aadhaar Verification
[wptb id=3816]
Future of Aadhaar Verification
Identity tells us who we are in our communities. It includes things like our language, culture, religion, education, and job. These details make up our personal identity
Why is Identity Important for Services?
For governments and institutions to give us services like education, healthcare, banking, jobs, and travel, they need to know who we are. This is why they use "Know Your Customer" (KYC) checks. KYC makes sure we are who we say we are before we can open bank accounts, get loans, or buy SIM cards.
How Do Governments Verify Identity?
Governments and institutions give us services. These include education, healthcare, banking, jobs, and travel. These help prove who we are. As technology grows, digital identity checks are becoming more important.
The Aadhaar Project: India's National ID
Aadhaar is a successful digital ID system in India. It has given 1.3 billion people a unique number. Aadhaar allows online identity verification, making it cheap and easy. It has reduced verification costs from Rs 500 to just Rs 3. This system supports many online checks and is a key part of India’s digital infrastructure.
Identity and the Internet (Web 1.0 & Web 2.0)
When the internet started, it was hard to know who was who online. A famous cartoon showed a dog saying, "On the internet, nobody knows you’re a dog." Early on, people could easily create many online accounts. Later, Google and Facebook let us use one login for many sites. This made things easier but raised privacy concerns.
Decentralized Identity (Web 3.0)
Now, with blockchain technology, Web 3.0 offers a new way to manage identity. People can control their own credentials without needing big companies like Google. This system uses technologies like Verifiable Credentials (VC) and Digital ID standards (DID). They keep data private and secure on a decentralized ledger.
Digital ID and AI (Web 4.0?)
Artificial Intelligence (AI), especially Generative AI, brings new challenges. AI can create fake media that looks real, making it hard to trust online identities. We need a way to prove if someone is human. Aadhaar’s biometric checks are great for this. They can tell if a person is real or an AI robot. This keeps our transactions safe and trustworthy.
India's Aadhaar project helps us prove our identity securely. It ensures that we can trust who we interact with online. This is especially important as AI continues to develop.
Aadhaar and Right to Privacy – Some Key Points
Privacy Concerns Many people worry about privacy because Aadhaar data is kept online. Linking Aadhaar to bank accounts and payment apps has raised questions. They are about the Right to Privacy.
Supreme Court Rulings
The Supreme Court ruled that Aadhaar data cannot be stored for more than six months. Before, the Aadhaar Act allowed storing data for five years.
The Court changed Section 2(d) of the Aadhaar Act. This stopped the government from keeping transaction data.
The Court also said the government needs to create a strong data protection law quickly.
Changes to the Aadhaar Act
Some parts of the Aadhaar Act were removed. For example, they removed Section 57. It lets private companies check Aadhaar data. The Court said this was unconstitutional.
The Supreme Court said this on September 26, 2018. They said Aadhaar brings benefits to the poor and respects people's dignity. But, it disagreed with making Aadhaar linking mandatory for certain other areas.
Initial Concerns with Right to Privacy and Aadhaar
With more cyber-attacks and data leaks, people worry about their Right to Privacy. It is a basic right for everyone in the country. In December 2018, the Government passed the Data Protection Bill. The decision about the Right to Privacy by the Supreme Court served as the basis.
The government needs to understand all aspects of the right to privacy. It must ensure data safety. This includes protecting against unauthorized access. It also includes guarding against spying. It addresses unauthorized use of personal data and physical privacy breaches. If the Government follows the Supreme Court's advice, it will protect people's privacy. Using minimal data and biometrics will keep everyone's right to privacy safe.
Conclusion
Aadhaar verification is vital. It ensures accurate and secure identity authentication in India. Despite challenges. But, its benefits are clear. It streamlines services, cuts fraud, and boosts security. Technology and policies are changing. Aadhaar verification will keep playing a key role in India's digital landscape. It will help make governance and service delivery more efficient.
Frequently Asked Questions
What is Aadhaar Verification?
Aadhaar verification confirms an individual's Aadhaar number and its info. It uses their biometrics or demographic data.
Why is Aadhaar Verification Important?
It ensures the Aadhaar number is valid and belongs to the person claiming it. This helps prevent fraud and misuse of identity.
How Can I Verify My Aadhaar Number Online?
You can check your Aadhaar number online. Go to the UIDAI website and click on ‘My Aadhaar’ and then ‘Verify an Aadhaar Number.’
What Information Do I Need to Verify My Aadhaar Number?
You need your 12-digit Aadhaar number. You also need the security captcha code shown on the verification page.
Is There a Fee for Aadhaar Verification?
No, verifying your Aadhaar number online through the UIDAI website is free of charge.
Can I Verify Someone Else’s Aadhaar Number?
Yes, you can verify someone else's Aadhaar number. You can do this if you have their consent and the needed details (Aadhaar number and captcha code).
What Should I Do If My Aadhaar Verification Fails?
If your Aadhaar verification fails, check if you have entered the correct details. If the problem continues, you may need to visit an Aadhaar Enrolment/Update Center for more help.
How Can I Update My Aadhaar Details?
You can update your Aadhaar details by visiting an Aadhaar Enrolment/Update Center. You need the necessary documents. Then, you must fill out the update form.
How Long Does It Take to Update Aadhaar Details?
After you submit your update request, it can take up to 90 days for the changes to appear in the Aadhaar database.
Is Aadhaar Verification Mandatory for All Services?
You must do Aadhaar verification for some services. These include opening bank accounts, applying for passports, and getting government subsidies. But, it is not mandatory for all services.
Can NRIs and Foreigners Verify Their Aadhaar?
NRIs with valid Aadhaar numbers can verify their Aadhaar details. Foreigners are not eligible for Aadhaar and thus cannot undergo Aadhaar verification.
What Is e-KYC and How Is It Related to Aadhaar Verification?
E-KYC (electronic Know Your Customer) is a paperless process. It verifies the identity and address of individuals using their Aadhaar details. It is a quick and secure method for identity verification.
How Secure Is the Aadhaar Verification Process?
Aadhaar verification is very secure. It uses advanced encryption to protect data and privacy.
What Happens If My Aadhaar Is Misused?
If you suspect misuse of your Aadhaar, you should contact UIDAI. Report the issue right away. You can also lock or unlock your biometrics at the UIDAI website. This is for extra security.
Where Can I Get Help with Aadhaar Verification?
For help with Aadhaar verification, you can visit the UIDAI website. You can also call their helpline at 1947 or visit an Aadhaar Enrolment/Update Center.
What is an Aadhaar PVC Card?
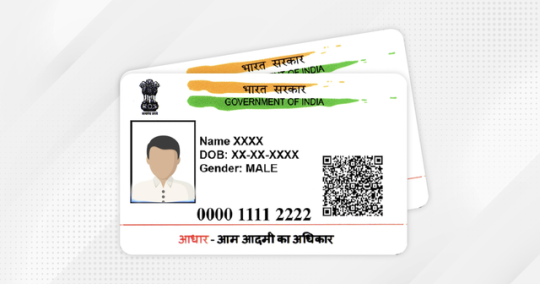
An Aadhaar PVC card is a tough and handy form of the Aadhaar card. It is printed on PVC (polyvinyl chloride) material. It has the same information as the regular Aadhaar card. This includes the Aadhaar number, photo, details, and a QR code for easy verification. The PVC card is more robust and easier to carry than the paper version.
How Can I Apply for an Aadhaar PVC Card?
You can apply for an Aadhaar PVC card online through the UIDAI website. Here are the steps:
Visit the official UIDAI website.
Click on the "Order Aadhaar PVC Card" option under the 'My Aadhaar' section.
Enter your 12-digit Aadhaar number or 16-digit Virtual ID (VID) and the security captcha.
Click on "Send OTP" and enter the OTP received on your registered mobile number.
Verify your details and make the payment of Rs. 50.
After you pay, you will get an acknowledgment. You can track your PVC card delivery.
What Are the Features of the Aadhaar PVC Card?
The Aadhaar PVC card includes several security features to prevent forgery and misuse. These features include:
Secure QR code with photograph and demographic details.
Hologram for authenticity.
Micro-text and Ghost image.
Issue date and print date.
Guilloche pattern.
It is also waterproof and tough. This makes it a convenient form of ID to carry.
How Can I Check My PAN Card Status Using My Aadhaar Number?
Visit the Official Website: Go to the Income Tax e-filing website or the NSDL PAN service portal.
Go to the PAN Status Check. Look for the option to check PAN status. It's usually under 'Quick Links' or 'Services'.
Enter Aadhaar Details: Select the option to check PAN status using Aadhaar. Enter your 12-digit Aadhaar number in the required field.
Submit and Verify: Enter the captcha code for security verification. Then, click 'Submit' or 'Check Status'.
View Status: The website will show your PAN card application's status. It will say if it is active, in process, or otherwise.
How to do KYC online?
Visit the Service Provider's Website. Go to the website of the bank or company that needs KYC.
Locate the KYC Section: Find the section for KYC or account verification. This is often found under 'My Account' or 'Services'.
Choose Online KYC Option: Select the option for online KYC, often labeled as 'e-KYC' or 'Digital KYC'.
Enter Required Details. Fill in your personal details as asked. Include your name, date of birth, and Aadhaar number.
Verify Your Identity: Authenticate your identity using your Aadhaar number. This usually involves receiving an OTP (One-Time Password) on your registered mobile number. Enter the OTP to verify.
Upload Documents. Upload digital copies of the needed documents. These include your Aadhaar card, PAN card, or passport. They prove your identity and address.
Submit the application. After entering all details and uploading documents, submit your KYC application.
You will get a confirmation message or email. Once you complete your KYC, it will come.
How to check KYC status?
Visit the Bank’s Website. Go to the bank, financial institution, or service provider's official website. It's where you submitted your KYC.
Find the KYC Status Section. Look for an option that says 'Check KYC Status' or something similar. It resides beneath the 'Services' or 'Account' sections on the page.
Enter Required Details. Enter your registered mobile number, customer ID, or other requested info. This will allow us to locate your KYC records.
Submit Information: Click on 'Submit' or 'Check Status' to proceed.
View KYC Status. Your status will appear on the screen. It will show the status when it is done. It will show if it is in progress or needs more action.
How Can I Download an Aadhaar Card Online?
Visit the UIDAI Website: Go to the official UIDAI website (https://uidai.gov.in).
Go to the 'My Aadhaar' Section: Under the 'My Aadhaar' menu, select 'Download Aadhaar'.
Enter Your Details: Choose one of the options: 'Aadhaar Number', 'Enrolment ID (EID)', or 'Virtual ID (VID)'. Then, enter the respective number and the security captcha.
Request OTP: Click on 'Send OTP'. An OTP (One-Time Password) will be sent to your registered mobile number.
Enter OTP: Enter the OTP received on your mobile phone in the provided field.
Download Aadhaar: After verifying the OTP, click on 'Download Aadhaar'. You will download your e-Aadhaar PDF.
Open the PDF: The downloaded Aadhaar card PDF is password protected. To open it, enter the password. It is the first four letters of your name in CAPITAL letters followed by your birth year in YYYY format (e.g., JOHN1985).
How to Download an Aadhaar Card Without an OTP?
Download the mAadhaar App: Install the mAadhaar app from the Google Play Store or Apple App Store.
Open the App: Launch the app and set a 4-digit PIN for security.
Add Your Aadhaar Profile: Enter your 12-digit Aadhaar number or scan the QR code on your Aadhaar card.
Use biometric authentication in the app: It verifies your identity. You can do this using your fingerprint or facial recognition.
Download Aadhaar: Once verified, you can get your Aadhaar card from the app.
Or, visit an Aadhaar Enrolment Center with your Aadhaar number. Request a printout of your Aadhaar card there. You can do this without an OTP.
0 notes
Text
GST: Biometric-based Aadhaar authentication for new registrations
The largest biometrics identity system in the world is called Aadhaar, and it was implemented as a universal identity system by the Indian government. Every Indian citizen is given a unique 12-digit ID number that is connected to their biometric information, such as finger prints, iris scans, and facial photos. The goal of this massive effort is to streamline multiple services and advantages by…

View On WordPress
0 notes
Text
A Comprehensive Guide to Obtaining a UAE Work Visa for Indian Professionals
Securing a work visa in the UAE opens doors to exciting career opportunities in one of the world's fastest-growing economies. For Indian professionals, navigating the UAE work visa process involves understanding requirements, preparing necessary documents, and following procedural steps meticulously. This guide aims to provide a thorough overview to facilitate a smooth application process.
Understanding UAE Work Visas: The UAE offers several types of work visas tailored to different employment categories:
Employment Visa: Sponsored by a UAE employer for long-term employment contracts.
Investor Visa: For entrepreneurs and investors establishing businesses in the UAE.
Freelancer Visa: Available for self-employed individuals in specific sectors.
Application Process:
Sponsorship: Obtain sponsorship from a UAE-based employer or entity, which initiates the visa application process.
Required Documents:
Valid passport with a minimum validity of 6 months.
Passport-sized photographs.
Signed job offer or employment contract specifying terms and conditions.
Educational certificates and professional qualifications (attested if required).
Medical fitness certificate from an approved medical center.
Police clearance certificate from the home country (if applicable).
Completed visa application form.
Visa Fees and Processing Time: Visa fees vary based on the visa type and duration. Processing typically takes several weeks to months, depending on the completeness of the application and UAE authorities' workload.
Residence Permit (Emirates ID): Upon arrival in the UAE, visa holders must obtain a residence permit (Emirates ID) to legally reside and work in the country. This involves additional documentation and biometric registration.
Tips for Successful Application:
Ensure all documents are accurate, complete, and comply with UAE visa requirements.
Communicate effectively with the sponsoring employer or entity throughout the application process.
Stay informed about any updates or changes in UAE visa regulations.
Conclusion: Obtaining a UAE work visa marks the beginning of an enriching professional journey for Indian nationals. By understanding the visa process and preparing diligently, professionals can maximize their opportunities in the UAE's dynamic and multicultural environment.
0 notes
Text
10 Essential Steps to Track Your Spain Visa Application from India
Navigating the visa application process can be a daunting task, especially when tracking your application's progress. For Indian citizens applying for a Spain visa, having a clear understanding of the tracking process is crucial. Here, we provide an in-depth guide on the ten essential steps to track your Spain visa application from India.
1. Understand the Visa Application Process
Before delving into the tracking methods, it's vital to understand the entire visa application process. The Spanish visa application involves several stages, including document submission, biometric data collection, and visa interview. Familiarizing yourself with these steps will help you track the status more effectively.
2. Submission at the Spain Visa Application Center
The first step in tracking your Spain visa application is to submit your documents at the Spain Visa Application Center (VAC) in India. The VAC is responsible for receiving your application and forwarding it to the Spanish consulate. Ensure you receive a receipt or acknowledgment with a reference number, as this is crucial for tracking purposes.
3. Obtain the Application Reference Number
When you submit your application at the VAC, you will receive an application reference number. This number is essential for tracking the status of your visa application. Keep this number safe, as you will need it throughout the tracking process.
4. Use the BLS International Tracking Service
BLS International is the official service provider for Spain visa applications in India. You can track your visa application status through their website. Visit the BLS International website, navigate to the tracking section, and enter your application reference number along with your date of birth. The tracking tool will provide you with the current status of your application.
5. Track Your Application on the Spanish Consulate Website
In addition to the BLS International tracking service, you can also check the status of your application on the official website of the Spanish consulate in India. The consulate website often has a dedicated section for visa application tracking. Enter your reference number and other required details to view the latest updates.
6. Email and SMS Notifications
During the application process, you can opt to receive email and SMS notifications regarding your visa application status. This service is usually available at the time of submission at the VAC. By subscribing to this service, you will receive real-time updates on the progress of your application directly to your email or mobile phone.
7. Contact the Visa Application Center
If you encounter any issues or have specific queries regarding your visa application, you can directly contact the Spain Visa Application Center. They have dedicated helplines and email support to assist applicants. Provide your reference number and other necessary details for a prompt response.
8. Visit the Visa Application Center in Person
For applicants who prefer a more personal approach, visiting the Visa Application Center in person is an option. You can inquire about the status of your application and seek any clarification needed. Remember to carry your application reference number and identification documents when visiting.
9. Understanding Status Messages
When tracking your visa application, you will come across various status messages such as 'Application Received,' 'In Process,' 'Under Review,' 'Decision Made,' and 'Passport Ready for Collection.' Understanding these statuses will help you know where your application stands and what to expect next.
10. Collecting Your Passport
Once your visa application is processed, and a decision is made, you will be notified to collect your passport from the VAC. Make sure to check the collection timings and carry the required documents, including the acknowledgment receipt and a valid ID, to retrieve your passport.
Tips for a Smooth Tracking Experience
Double-check your application reference number: Ensure that you enter the correct reference number when tracking your application to avoid any errors.
Keep your documents organized: Maintain a file with all the necessary documents, receipts, and communication related to your visa application.
Be patient: The visa processing time can vary depending on several factors. Regularly check the status but avoid excessive worrying.
Conclusion
Tracking your Spain visa application from India involves several steps, from obtaining your reference number to understanding the status messages. By following these essential steps and utilizing the available resources, you can efficiently monitor the progress of your application and be prepared for each stage of the process.
1 note
·
View note
Text
The Evolution and Significance of PVC ID Cards in India
In the rapidly evolving landscape of identification and security, PVC ID cards have emerged as a crucial tool in India. As technology advances and the need for secure identification grows, PVC ID cards are becoming the standard for various applications, from corporate environments to educational institutions and government services. This blog explores the evolution, significance, and future of PVC ID cards in India, highlighting their benefits and widespread adoption.

A Brief History of PVC ID Cards in India
The journey of identification cards in India has seen a significant transformation over the years. Initially, paper-based IDs were the norm, but they were prone to damage and forgery. The introduction of PVC (Polyvinyl Chloride) ID cards marked a revolutionary change, offering a durable, tamper-resistant solution. These cards are not only more secure but also versatile, capable of incorporating various technologies such as magnetic stripes, barcodes, and smart chips.
Why PVC ID Cards?
Durability and Longevity: PVC ID cards are known for their durability. Unlike paper or laminated cards, PVC cards can withstand wear and tear, making them ideal for long-term use. This durability is particularly important in India, where climatic conditions can be harsh and variable.
Enhanced Security: Security is a primary concern in identification. PVC ID cards can be embedded with various security features such as holograms, watermarks, and microtexts, making them difficult to counterfeit. These features are crucial in preventing fraud and ensuring the authenticity of the ID.
Cost-Effective: While the initial cost of PVC ID card production might be higher compared to paper cards, their longevity makes them a cost-effective solution in the long run. They do not require frequent replacements, saving both time and money.
Versatility: PVC ID cards can be customized to suit different needs. They can incorporate technology like RFID for access control, magnetic stripes for data storage, and even smart chips for multi-purpose applications. This versatility makes them suitable for a wide range of sectors, including corporate offices, educational institutions, healthcare, and government agencies.
Applications of PVC ID Cards in India
Corporate Sector: In the corporate world, PVC ID cards are essential for employee identification and access control. Many companies integrate these cards with their security systems to manage access to different areas within the workplace, ensuring only authorized personnel can enter sensitive zones.
Educational Institutions: Schools, colleges, and universities in India use PVC ID cards for student and staff identification. These cards often double as library cards, meal cards, and access cards for various facilities, streamlining campus management.
Healthcare: Hospitals and clinics use PVC ID cards for patient identification and management. These cards can store critical information, including medical history, which can be accessed quickly during emergencies.
Government Services: The Indian government has adopted PVC ID cards for various services. For instance, the Aadhaar card, a crucial identification tool for Indian citizens, is now available in a PVC format. This enhances its durability and ease of carrying.
The Future of PVC ID Cards in India
As India continues to digitize its infrastructure, the role of PVC ID cards is set to expand further. The integration of advanced technologies like biometrics and contactless smart chips is on the horizon, promising even greater security and functionality. Additionally, with the rise of mobile ID solutions, PVC cards might evolve to complement digital identification methods, providing a hybrid approach to secure identification.
Conclusion
PVC ID cards have become an indispensable part of India's identification landscape. Their durability, security features, and versatility make them ideal for a wide range of applications, from corporate environments to educational institutions and government services. As technology continues to advance, PVC ID cards will likely incorporate even more sophisticated features, ensuring they remain a vital tool for secure and reliable identification in India.
Whether you're a business owner looking to enhance your security protocols or an educational institution aiming to streamline your operations, investing in PVC ID cards is a forward-thinking move. Embrace the future of identification with PVC ID cards and ensure your organization stays ahead in the ever-evolving landscape of security and identification.
0 notes
Text
Screencheck India
ScreenCheck INDIA is a leading security solutions provider in INDIA and the whole of the Indian subcontinent. Our presence is evident in all the major cities in INDIA. ScreenCheck INDIA focuses on the upliftment of society with innovative technology solutions that streamlines people's life.
ScreenCheck INDIA, a division of the Centena Group, provides end-to-end solutions in identification, biometrics, security, and tracking in all the major cities across the country. Our company distributes the world's leading brands and offers end-to-end solutions in ID Card Issuance, Time & Attendance, Access Control, Video Surveillance, Smart Card Solutions, RFID, and other areas. Our products and solutions serve the government, corporate, educational, manufacturing, oil and gas, retail, and other industries.
Apart from a biometric attendance system, Our arsenal also has people counting machines, ID card printers, passport scanners, RFID readers and antennas. On the whole, we have a wide range of digitized security solutions for enterprises of all sizes.
Winning customers love providing top-end delivery options made ScreenCheck one of the leading companies in India in terms of growth, Innovation and Human Capital. Our global domain expertise and local market knowledge, over the years, made ScreenCheck the most preferred Identification and Security partner in the region.
0 notes
Text
Pan Card Apply Online
A Permanent Account Number (PAN) card is a crucial document for Indian citizens, serving as a unique identifier for financial transactions, tax filings, and other official purposes. If you need to apply for a PAN card, the good news is that the process can be completed online, providing a convenient and efficient way to obtain this essential document. This guide will walk you through the steps to Pan card apply online, ensuring a smooth and successful application process.
What is a PAN Card?
A PAN card is issued by the Indian Income Tax Department and contains a unique 10-digit alphanumeric identifier. It’s required for various financial activities, including opening bank accounts, filing income tax returns, buying property, and conducting large financial transactions. Whether you’re an individual, a business owner, or a foreign national with financial interests in India, a PAN card is a must-have document.
Who Needs a PAN Card?
The following individuals and entities typically need a PAN card:
Indian citizens above the age of 18 who are earning an income.
Business entities operating in India.
Foreign nationals with business interests in India.
Individuals conducting high-value financial transactions.
Step 1: Choose an Authorized Agency:
To apply for a PAN card online, you need to use one of the authorized agencies: NSDL (National Securities Depository Limited) or UTIITSL (UTI Infrastructure Technology and Services Limited). Both agencies offer online application services for new PAN cards. This guide focuses on the NSDL process, but the steps are similar for UTIITSL.
Step 2: Visit the NSDL Website:
Visit the NSDL e-Governance website’s PAN section. Here, you can find various options for applying for a PAN card, including new applications, corrections, and reprints. Choose the “New PAN — Indian Citizen” option to apply for a new PAN card online.
Step 3: Complete the Online Application Form:
Fill out the online application form with your personal information. You will need to provide details such as your full name, date of birth, address, father’s or mother’s name, and other relevant information. If you’re applying for a PAN card for a business entity, you may need additional information like the company’s registration number.
Step 4: Provide Supporting Documents:
To complete your application, you must upload supporting documents for identity and address verification. Commonly accepted documents include:
Proof of Identity: Passport, Aadhaar card, voter ID, or driving license.
Proof of Address: Utility bill, bank statement, ration card, or passport.
Proof of Date of Birth: Birth certificate, school leaving certificate, or passport.
Ensure the documents are clear, legible, and in the correct format as specified by NSDL.
Step 5: Make the Payment:
After completing the application form, you must make the payment for the PAN card application. The fee varies depending on whether you’re applying from within India or from abroad. Payment can typically be made using credit/debit cards, net banking, or other online payment methods.
Step 6: Submit the Application:
Once you’ve filled out the form, uploaded the required documents, and made the payment, submit your application. NSDL will generate an acknowledgment receipt with a unique 15-digit number. Keep this number for tracking your application and future reference.
Step 7: Verify Your Application:
After submitting your application, you may need to complete a verification process. This could involve a physical verification of your documents or a biometric verification using Aadhaar-based e-KYC. Follow the instructions provided by NSDL to complete this step.
Step 8: Receive Your PAN Card:
Once your application is processed and verified, your PAN card will be dispatched to your registered address. This process may take several weeks, depending on the verification process and postal delivery times. Ensure someone is available to receive the PAN card to avoid delays.
Conclusion:
Applying for a PAN card online is a convenient way to obtain this essential document. By following the steps outlined above and providing accurate information and supporting documents, you can successfully complete the application process. Whether you’re an individual, a business owner, or a foreign national with financial interests in India, a PAN card is a crucial tool for conducting financial transactions and complying with tax regulations. With this guide, you can apply PAN card online and take advantage of the benefits it offers.
0 notes
Text
Navigate the Digital Wave with a Specialized Online MBA in Fintech
The financial landscape in India is experiencing a similar transformation as the global market. Mobile wallets like Paytm and PhonePe are ubiquitous, and platforms like BharatPe are redefining lending for small businesses. This surge in Fintech adoption presents a wealth of opportunities for Indian professionals seeking to upskill or launch careers in this dynamic field.
An accredited online MBA specializing in Fintech can be your passport to success in the Indian Fintech revolution. It equips you with the knowledge, skills, and credentials to not only understand the intricacies of the local market but also thrive in the global Fintech ecosystem. Whether you're a seasoned banking professional in Mumbai or a recent graduate in Bangalore, a specialized online MBA can be your competitive edge.
Why Choose Fintech as Your Specialization in India?
The Indian Fintech market is booming, projected to reach a staggering $1 trillion by 2025. Here's why specializing in Fintech with an online MBA presents a compelling opportunity:
Immense Growth Potential: Be a part of this high-growth sector where innovation is key to success. Fintech is poised to revolutionize financial inclusion and access for millions of Indians.
Lucrative Career Options: Fintech jobs in India offer competitive salaries and excellent career progression. A specialized online MBA positions you for success in a field where talent is highly sought-after by both established financial institutions and disruptive startups.
Shape the Future of Indian Finance: Don't just be a bystander in this exciting transformation. Become a leader who helps shape the future of Indian Fintech with your specialized expertise and understanding of the local market.
Diverse Career Paths: The Indian Fintech industry offers a wide range of career paths, from developing mobile payment solutions to managing risks in the burgeoning P2P lending space. Find your niche and contribute to the financial empowerment of millions.
Beyond Textbooks: A Practical Approach for the Indian Market
A well-designed Fintech MBA goes beyond theoretical frameworks and dives deep into the practical application of technology within the Indian context. Here are some key areas you can expect a top online program to cover, tailored for the Indian market:
Understanding UPI and Aadhaar: Gain a comprehensive understanding of India's Unified Payments Interface (UPI) and its role in driving financial inclusion. Learn how to leverage Aadhaar, the world's largest biometric ID system, for secure and efficient financial transactions.
Navigating Regulatory Landscape: Master the intricacies of India's evolving Fintech regulations, including those pertaining to data privacy, digital KYC (Know Your Customer), and cryptocurrency trading.
Focus on Rural Fintech: Explore the challenges and opportunities of providing financial services to underserved rural populations in India. Learn about innovative Fintech solutions catering to this crucial segment.
Local Case Studies and Industry Insights: Analyze real-world examples of successful Indian Fintech companies like PhonePe and Zerodha. Gain insights from industry leaders and experts on the specific challenges and opportunities within the Indian market.
Learning Beyond Lectures: Experiential Opportunities Tailored for India
Many accredited online MBA programs with Fintech specializations go the extra mile to provide valuable hands-on learning experiences relevant to the Indian context:
Guest Lectures from Indian Fintech Leaders: Learn from the CEOs and founders shaping the Indian Fintech landscape. Gain insights into the local market dynamics and entrepreneurial strategies for success.
Case Studies of Indian Fintech Startups: Analyze real-world examples of disruptive Indian Fintech companies like BharatPe and Slice. Learn how these startups are solving financial challenges specific to the Indian market.
Fintech Simulations focused on Indian Scenarios: Simulate the challenges of launching a new micro-investment platform in India or develop a regulatory framework for the burgeoning digital lending space. These projects allow you to apply your learnings and hone your problem-solving skills within the Indian context.
Examples of Top-Ranked Online MBAs with Fintech Specializations in India:
Here are a few examples of well-respected online MBA programs with strong Fintech specializations that cater to the Indian market:
Indian Institute of Management Calcutta (IIM Calcutta) Online MBA: This prestigious institution offers an online MBA with a Fintech specialization, focusing on the specific needs of the Indian financial services sector.
XLRI Jamshedpur Online MBA: Renowned for its HR specialization, XLRI also offers an online MBA with a Fintech concentration. This program delves into the intersection of technology and human resources within the Indian Fintech space.
Symbiosis Centre for Distance Learning (SCDL) Online MBA: SCDL offers a UGC-approved online MBA program with a Fintech specialization. The program features a strong focus on the regulatory and technological landscape of Indian Fintech.
Remember, this is just a starting point. Numerous accredited online MBA programs in India offer Fintech specializations. Researching and finding the program that best aligns with your specific career aspirations.
0 notes
Text
Your Ultimate Guide to Obtaining a Singapore Visa from India
Are you planning an exciting trip to Singapore from India? Navigating the visa application process is a crucial step in ensuring a smooth and hassle-free journey. Whether you're traveling for leisure, business, or to visit family and friends, understanding the requirements and procedures for obtaining a Singapore visa is essential. In this comprehensive guide, we'll walk you through everything you need to know to secure your Singapore visa from India.
Understanding the Types of Singapore Visas
Before diving into the application process, it's essential to determine which type of visa suits your purpose of travel. Singapore offers various visa categories tailored to different travel intentions, including:
1. Tourist Visa (Short-Term Visit Pass)
Ideal for individuals planning to explore Singapore's attractions, experience its vibrant culture, or visit family and friends for a short duration.
2. Business Visa (Business Visit Pass)
Designed for entrepreneurs, professionals, and business travelers attending meetings, conferences, or exploring potential business opportunities in Singapore.
3. Work Visa (Employment Pass, S Pass, Work Holiday Pass)
For individuals seeking employment opportunities or intending to work in Singapore, each visa type caters to different levels of expertise and employment terms.
4. Student Visa (Student's Pass)
Applicable for international students enrolled in educational institutions or courses approved by the Singapore government.
5. Dependent Pass
Issued to spouses and children of individuals holding valid Singapore work visas or permanent residency.
Visa Application Process for Indian Citizens
Now that you've identified the most suitable visa category for your trip, let's delve into the step-by-step process of applying for a Singapore visa from India:
1. Determine Your Visa Eligibility
Before initiating the application process, review the eligibility criteria specific to your chosen visa type. Ensure you meet the requirements regarding purpose of visit, duration of stay, financial sufficiency, and other relevant factors.
2. Gather Required Documents
Collect all necessary documents, including passport-sized photographs, passport copies, visa application forms, travel itinerary, financial statements, and any additional documents specified by the Singapore Immigration & Checkpoints Authority (ICA).
3. Complete the Online Application
Visit the official website of the Singapore ICA or authorized visa facilitation centers to access the online visa application portal. Fill out the application form accurately, providing truthful information as per the instructions provided.
4. Pay Visa Fees
Upon completing the application form, proceed to pay the applicable visa fees using the designated payment methods. Ensure timely payment to avoid delays in processing your visa application.
5. Submit Application and Biometrics
After paying the visa fees, schedule an appointment (if required) to submit your application and biometric data at the nearest Singapore visa application center. Attend the appointment on the scheduled date and time to complete the submission process.
6. Track Application Status
Monitor the status of your visa application online using the provided reference number or tracking ID. Stay informed about any updates or additional requirements communicated by the authorities.
7. Receive Visa Approval
Upon successful processing of your visa application, you will receive notification regarding the approval of your Singapore visa. Collect your visa documents from the designated center or opt for courier delivery services if available.
Obtaining a Singapore visa from India is a straightforward process when approached with thorough preparation and adherence to the prescribed guidelines. By understanding the different visa types, fulfilling eligibility criteria, and following the step-by-step application process, you can embark on your Singaporean adventure with confidence and peace of mind.
0 notes
Text
Navigating the Process of Indian Visa: A Step-by-Step Guide
What is the process for an Indian Visa?
Each state in India is a vast and diverse entity in itself, resembling a nation. Take your time to explore this immense and captivating country. The positive aspect is that obtaining visas is a straightforward process, providing ample time for your exploration.
Discover all the essential information about visa requirements for India, covering everything from the application process for e-Visas to details about overland travel and extending your stay. Depending on your nationality, you have two options for applying for an India visa:
Visit the nearest Indian Embassy or Consulate in your country.
Apply online through the Visa Collect website.
Here are the steps you need to follow for each option:
Applying for an India Visa at an Embassy or Consulate
This option is suitable for those who prefer to apply in person or who need a visa category that is not available online.
To apply for an India visa at an Embassy or Consulate, you need to:
Choose the right visa type for your travel purpose. India offers various visa categories, such as tourist, business, student, employment, medical, emergency, and others. Each category has its own requirements and conditions, so make sure you understand them clearly before applying.
Collect all the required documents and evidence. You will need to provide some standard documents, such as your passport, passport-sized photos, visa fee payment receipt, invitation letter (if applicable), proof of accommodation, and financial documents. The exact documents may vary depending on your visa category, so check the official website for more details.
Fill out the online application form. You can access the form through this link. You need to enter all the information accurately and truthfully, as any mistakes or inconsistencies can cause problems with your application. You can save your form as a draft and complete it later if you need more time. Once you submit the form, you will receive an Application ID, which you need to keep for future reference.
Submit your application and documents at the Embassy or Consulate. You need to make an appointment and bring your printed application form, documents, and passport to the Embassy or Consulate. You may also need to undergo an interview or biometric verification. The processing time and fee may vary depending on your visa category and nationality.
What are the mandatory requirements for an India visa?
To apply for an India visa, you will need to prepare the following documents:
A passport that is valid for at least six months from the date of your arrival in India.
A completed and signed application form, which you can download from the official website of the Indian embassy or consulate in your country.
A recent passport-size photo, which should be glued to the application form.
A copy of your previous India visa, if you have visited India before.
Proof of income, such as a bank statement, tax return, or salary slip, to show that you have sufficient funds to cover your expenses in India.
A proof of residence, such as a utility bill, lease agreement, or property deed, to show that you have a permanent address in your country of origin.
A copy of your onward air ticket, to show that you have a confirmed flight out of India.
A proof of visa fee payment, which you can make online or at the nearest branch of the designated bank.
Process for applying for an India Visa Online
This option is convenient and fast for those who are eligible for an e-visa or an electronic travel authorization (ETA). To apply for an India visa online, you need to:
Select the appropriate e-visa or ETA category for your travel purpose. India offers four types of e-visas: e-Tourist Visa, e-Business Visa, e-Medical Visa, and e-Medical Attendant Visa. India also offers an ETA for those who are transiting through India or visiting for a short duration. Each category has its own eligibility criteria and validity period, so make sure you check them carefully before applying.
Gather all the necessary documents and information. You will need to upload some standard documents, such as your passport, passport-size photo, visa fee payment confirmation, invitation letter (if applicable), and medical certificate (if applicable). The exact documents may differ depending on your e-visa or ETA category, so consult the official website for more information.
Complete the online application form. You can access the form through this link. You need to fill in all the details correctly. You can save your form as a draft and finish it later. Once you submit the form, you will receive an Application ID, which you need to keep for future reference.
Receive your e-visa or ETA by email. You will receive your e-visa or ETA by email within a few days or hours, depending on your e-visa or ETA category and nationality. You need to print out your e-visa or ETA and carry it with you when you travel to India. You also need to present your passport and other documents at the immigration checkpoint.
How to Apply for an India Visa
If you are planning to visit India, you will need to obtain a visa from the Indian authorities. The visa application process involves the following steps:
Pay the Visa Fee: The visa fee depends on the type and duration of the visa you want to apply for. You can find out the basic fee for your visa during the online application process. You will also have to pay additional fees, such as service charge, VAT, and other fees, depending on your visa type. You can calculate the total fee by choosing ‘Yes’ when prompted by the system. Please note that the visa fee is usually non-refundable, even if you cancel your application or get a different visa than you requested.
Attend the Appointment: You will have to book an appointment at a visa application center, embassy, or consulate, where you will submit your documents and biometric data. You should arrive on time and bring all the required documents with you. You will also have to provide your fingerprints and photographs. You should follow the instructions given by the staff, behave professionally, and ask for help if needed. You should also make sure that your documents are well-arranged and submitted as per the guidelines.
Wait for Visa Processing: The processing time for your visa application may vary depending on the visa type, your nationality, and the current workload. Normally, paper visas take 3 to 5 working days to process for standard cases. However, some categories of applications may take longer, especially if they need clearance from the authorities. These categories include non-UK passport holders living in the UK for less than two years (minimum 6-8 working days), Pakistani nationals (minimum 7-8 weeks), and applicants from Sri Lanka, China, Bangladesh, Afghanistan, and holders of UK Travel documents (minimum 15 working days).
Collect Your Visa: Once your visa application is approved, you will be notified by email or phone. You can then collect your visa from the place where you applied. You should check your visa details carefully and make sure they match your travel plans.
Travel to India: Before you travel to India, you should verify your visa details and make sure they are valid for your trip. You should also have your visa ready to show to the immigration officers when you arrive in India. You should also be aware of the visa conditions and follow the Indian immigration rules during your stay. This will help you avoid any problems or penalties while visiting India.
How to Get an India Visa Online
Getting an India visa online is easy and convenient. Just follow these simple steps:
Fill Out the Indian Visa Application Form
Enter all the information in the visa application form as per the instructions. Make sure that the details such as names, addresses, and dates of birth are correct and match your passport and supporting documents.
Check Your Application Carefully
Before you submit your application, review and check the information you have entered for any mistakes or inconsistencies. Any errors or discrepancies can cause your visa application to be delayed or rejected.
Save Your Application as a Draft
You can save your application form as a draft in the online system. This is helpful if you need to get more information or documents before you submit your application. However, you cannot make any changes to your application form once you submit it.
Get Your Application ID
After you submit your application form successfully, you will get an Application ID. This ID is automatically generated and is important for any future communication or queries about your visa application. Keep this Application ID safe and handy.
Pay the Visa Fee Securely
After you confirm your application details, you can start the payment process by clicking on “Pay Now.” The payment gateway is not under the control of the Visa Online application. You can use the trusted PayPal gateway to pay your visa fee, which accepts different currencies and payment modes.
Upload Your Passport and Documents
After you pay the visa fee, you will have to provide some additional information depending on your visa type and purpose of visit. You can easily upload these documents using a secure link that will be sent to your email.
Get Your Indian Visa Online Approval
You will normally get a decision on your Indian Visa within 1-4 days. If your visa application is approved, you will receive your Indian Visa Online in PDF format in your email. You should print a copy of your visa and carry it with you when you travel to the airport.
#australia visa#student visa#visaapplication#study visa#visaservices#visaprocess#visaconsultants#visaapproval#visa consultancy services
0 notes
Text
Navigating the Passport Process: Acquiring a Panamanian Passport & Visa Requirement
If you're considering obtaining a Panamanian passport, the Panama consulate in India, situated in New Delhi, is your primary point of contact. You can reach out to them via phone or email, and their website offers comprehensive details on visa requirements, fees, and processing times.
The Panamanian passport is gaining widespread popularity among avid travelers and business enthusiasts, thanks to its visa-free entry to over 150 countries. This feature makes it an invaluable asset for those desiring international mobility. To assist you in securing your Panamanian passport, follow this step-by-step guide:

Gather Necessary Documents: Start by collecting essential documents, including your Indian passport, proof of address, proof of income, and a copy of your Indian voter ID card or Aadhar card.
Fill Out Application Forms: Visit the Panama Embassy in Delhi or the Panama Consulate in India's website to download the required application forms. Ensure accuracy and completeness when filling them out.
Appointment: Contact the embassy or consulate to schedule an appointment. Be prepared to provide biometric data, such as fingerprints, and bring a passport-sized photograph.
Interview: Attend an interview at the embassy or consulate. This step is crucial to verify your identity and intentions behind obtaining a Panamanian passport.
Wait for Processing: The processing time for a Panamanian passport can vary, typically taking a few weeks to a few months. Exercise patience during this period.
Collect Your Passport: Once your Panamanian passport is ready, you will receive notification to collect it from the embassy or consulate. Ensure you have a valid reason for obtaining the passport, whether for business, travel, or investment purposes.
With support available from the Panama Embassy in Delhi and the Panama Consulate in Mumbai
throughout the process, residents of India can now easily become Panamanian passport holders. This achievement unlocks new opportunities for travel and international business ventures. Remember to adhere to all regulations and guidelines provided by the embassy or consulate during the application process, and soon, your dream of holding a Panamanian passport can become a reality.
1 note
·
View note
Text
FOR USA AND BANGLADESHI CITIZENS - INDIAN ELECTRONIC VISA Fast and Urgent Indian Government Visa - Electronic Visa Indian Application Online - দ্রুত এবং দ্রুত ভারতীয় অফিসিয়াল ইভিসা অনলাইন আবেদন.

FOR USA AND BANGLADESHI CITIZENS - INDIAN ELECTRONIC VISA Fast and Urgent Indian Government Visa - Electronic Visa Indian Application Online - দ্রুত এবং দ্রুত ভারতীয় অফিসিয়াল ইভিসা অনলাইন আবেদন.
As of my last knowledge update in January 2022, the process for obtaining an Indian visa for Bangladesh citizens involved applying through the official website of the Indian Visa Online .
(https://www.indian-visa-online.com/bn/visa/). Please note that procedures and requirements may change, so it's essential to verify the current process through the official channels.
Here are general steps that were applicable as of my last update:
Visit the Official Website: Go to the official Indian Visa Online website (https://www.indian-visa-online.com/bn/visa/).
Select the Visa Type: Choose the type of visa you are applying for. There are various categories, including tourist, business, medical, etc.
Fill in the Application Form: Complete the online application form with accurate information. Make sure to have all the required documents, such as passport details, travel itinerary, and a recent passport-size photograph.
Payment of Visa Fees: Pay the visa fee through the available online payment methods. Visa fees can vary depending on the type and duration of the visa.
Schedule an Appointment: Some visa categories may require scheduling an appointment at the nearest Indian embassy or consulate. Check the specific requirements for your visa category.
Submit the Application: After completing the online application and payment, submit the application. You may receive a confirmation email with an Application ID, which you can use to track the status of your application.
Print the Application Receipt: Print the application receipt, which includes the Application Reference Number (ARN). You will need to present this receipt when you visit the Indian embassy or consulate.
Visit the Indian Embassy or Consulate: Depending on the type of visa, you may need to visit the Indian embassy or consulate for biometric data collection and document submission. Bring the printed application receipt, original documents, and a copy of your visa application.
Track Application Status: You can track the status of your visa application online using the Application Reference Number.
It's crucial to check the official website or contact the Indian embassy/consulate in Bangladesh for the most up-to-date and accurate information regarding the visa application process and requirements. Please note that visa policies and procedures can change, so it's advisable to verify the latest information from official sources.
0 notes
Text
An anonymous hacker hacked into the database containing digital identification numbers and other personal information of around 815 million Indians based on citizens' coronavirus screening data linked to Aadhaar numbers registered with the Indian Council of medical research (ICMR).
📍Source: 100percentfedup.com/digital-id-sys…
In 2021, the Indian government issued unique 12-digit identity numbers, called Aadhaar, for its approximately 1.3 billion people. Aadhaar, considered the world's largest biometric digital identification system, was originally designed to provide a unique identification number to every Indian citizen and reduce problems of duplication, forgery or theft of documents. identity in government programs.
0 notes
Last Seen Blogs

jenni-small-writer
Jennie's diary

bianca-archive
Bianca

lysanderisbackbitches
Lysander is back

thenarator
The Narator's Corner

its-gerard-perera
It's me Gerard