#Installing visual studio on a mac
Explore tagged Tumblr posts
Visit Tumblr Blog
Explore Tumblr blogs with no restrictions, modern design and the best experience.
Last Seen Tumblr Blogs


Fun Fact
The most popular pages on Tumblr are about Minecraft, GIFs, and David J. Peterson.
Text
just woke up from a bizarro nightmare:
i found a visual novel adjacent indie game called "All-in One", made by a tumblr user techy-vrissy or something like that; naturally i wanted to stream it (i had my OBS open and running the whole time, giving me immense anxiety throughout the nightmare)
it was a very niche game, so i wanted to make it more known by making a carrd for it with links to download it as well as synopsis and character info
for some reason i only had a free unvoiced version and wanted to get a premium paid one with professional voice over by japanese anime studio
that's where the weird stuff began - every time i googled the name of the game, it would glitch the page into something scary and unsettling (the two distinct examples i remember is a fake chinese food restraunt order with 4th wall jokes throughout it, and AI-generated pictures of interiors made entirely out of dogs textures but it looked more like gore than a funny collage)
at some point i also for some reason accidentally re-named a handful of characters in the unvoiced version and wanted to change them back, and that took forever to figure
some character names i remember were The D°g Boy and Paripi Bitch Ren (okay then...)
no matter what i did i couldn't find a page to download the game at all, not even the version i had initially so i could at least restore the names to the original ones
in the end i found that apparently the game was coded, and i cannot stress enough the absurdity of it, by writing thousands upon thousands of Reddit comments with character text, image links and movement descriptions python-style in unending reply chain
i found the links eventually on a forum made by the creator and the top pinned post was "3000 frequently asked questions"
there i read that it couldn't be downloaded for Windows anymore, it was discontinued in favor of an experimental operating system similar to Mac, that risked everything being wiped off my computer during the installation process and required a pretty beefy hardware that I didn't have
i woke up really angry and sore
37 notes
·
View notes
Text
The Legendary ThinkPad T480s

I recently got myself an old Lenovo ThinkPad T480s for just $230—a real steal for this iconic machine. The model I got had the i7-8650u and 16GB RAM. Even though it’s about 7 years old, the ThinkPad T480s still holds legendary status among laptop enthusiasts. A quick search on YouTube and you will find a ton of recent videos praising its robust build, exceptional keyboard, and solid performance. There's almost a cult like following for this ThinkPad.


Right after purchasing, I opened up the laptop for some essential maintenance. I disassembled the heat sink/heat pipe/fan assembly and thoroughly cleaned the fan with a brush and compressed air duster. After cleaning off the old thermal paste from the heat sink and CPU using IPA, I reapplied some Kryonaut Thermal Grizzly paste to ensure optimal cooling performance.


Over the next two days, I set it up with Ubuntu and installed a bunch of development tools like Visual Studio Code, Python, Jupyter Notebook, and Arduino IDE. Additionally, I configured VirtualBox to run a Windows 10 Pro VM for flexibility.
To enhance seamless workflow between my ThinkPad and Mac, I configured Syncthing for effortless file synchronization and CopyQ for shared clipboard functionality. For backup, I am using Timeshift for system snapshots and Déjà Dup for user files. Installed Gnome Sushi and Imagemagick to make file preview work like on a Mac. It's also nice that the Ubuntu dock can be configured to look similar to a Mac.
On top of that, I also installed xremap to do some key remapping for things like copy, paste, quit, etc. to make Ubuntu work more like a Mac, just because the Mac is my main machine and all those key strokes are like muscle memory already. Keep having to change as I switch between using the 2 was a real pain.


That’s it, a brand new old ThinkPad. The ThinkPad T480s remains a fantastic laptop even after all these years, providing stellar performance and an exceptional Linux experience. It’s the perfect budget-friendly yet powerful laptop for developers, makers, and Linux enthusiasts alike.

Below are some videos you can check out:
youtube
youtube
2 notes
·
View notes
Note
could you go into a little bit of detail about vapoursynth as a program if you don't mind? because the vapoursynth i'm familiar with runs solely with the command line interface using python and i have a feeling thats not what people are talking about but i could be wrong honestly 😅 and was just curious if you minded explaining what you used it for (and maybe how it's set up a bit so i know if i'm thinking of the right vapoursynth?)
yeah sure! to preface, i have a mac computer. if youre asking these questions as a gif maker, ie u want vapoursynth installed, and you have a mac, it is gnarly to install. i have coding background and consider myself tech savvy and it was hell, lmao. if you have windows, it's apparently easy as pie. lucky them.
yes, the vapoursynth i use/am talking about runs via python code (for macs) but not entirely python interface, like you dont need visual studio code or any app like that. at least for mac users, you have to download "vapoursynth editor" (and a lot of other stuff ie files that make vapoursynth run) from a vapoursynth tutorial for macs (like i said earlier, windows may be different bc i have a mac). this is the tutorial that contains the link to download "vapoursynth editor" and more for mac. btw, vapoursynth from this tutorial also currently works with the latest mac OS software, ventura 13, which is what i have. vapoursynth editor is like another version of vs code, or at least thats how i like to think about it.
this is what it looks like when i open "vapoursynth editor":
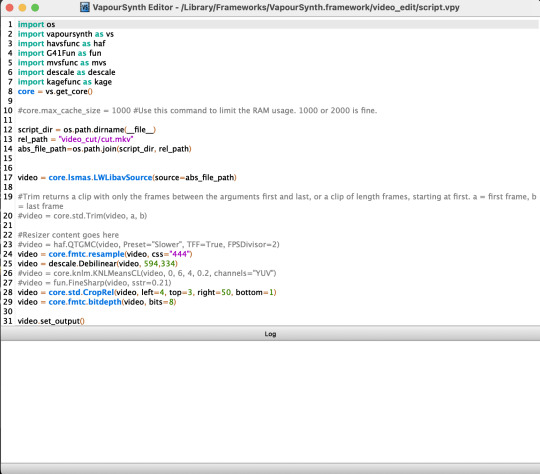
so, very similar to vs code.
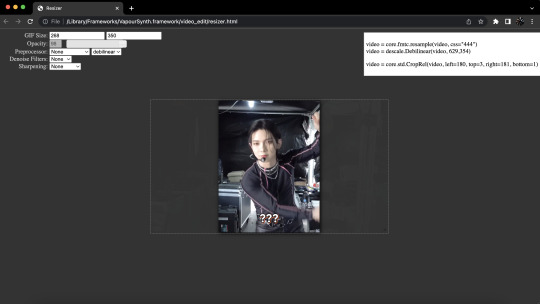
this is what the app itself looks like (the one on the right):

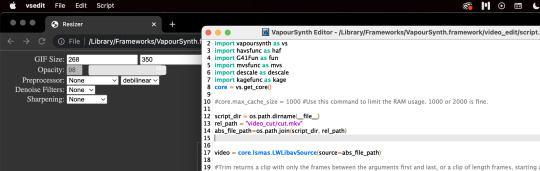
the white robot dude is where you drop in the video that you want vapoursynthed (for lack of better word lol), which also comes in that link i shared. i used to use vapoursynth for cropping and sharpening/smoothing kpop videos to turn into gifs on photoshop, but now i just use it for cropping because i like photoshop's sharpening more. once i click and drag the video i'd like to crop/edit/sharpen into the white robot dude, i mess around with the video's dimensions, sharpening quality, etc. this is what that interface looks like to do that:
and when im done, i copy the code from the top right corner into vapoursynth editor, the screenshot from earlier that looks like vs code. to save the video with the settings you want...
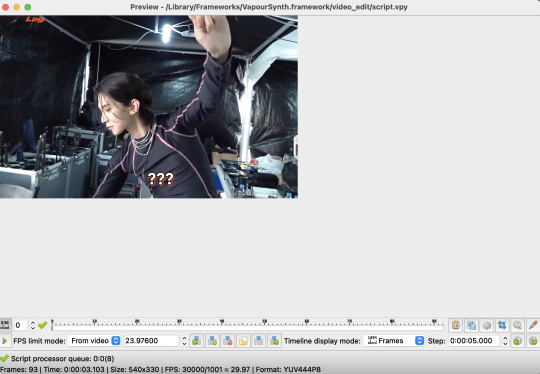
i go to "script" in the top left corner of my computer,

and hit preview, just to see if the sharpening/smoothing settings i selected look ok with the video. this is what preview looks like:
if im satisfied, i go back to script in the top left corner, but this time i hit encode video. this pops up:

i usually edit the very last bit of the code in the argument block (the output/output.mov) to something like, output/a-clever-name-so-ik-which-video-this-is.mov, and then i hit start in the bottom right corner and my computer sharpens/smoothens/crops the video.
when you say "explain how vapoursynth is set up" i'd imagine that means how to install it (on a mac)? please correct me if im wrong (by sending another ask), but if thats the case then the tutorial i linked explains it all!
i hope i hit everything you wanted anon, and send me another ask if you want to hear more about something in particular or want a more detailed vapoursynth tutorial, or something. thanks!
6 notes
·
View notes
Text
Visual Impact: LED Video Walls Transform Brand Engagement Globally

The global LED video walls market is on a high-growth trajectory, poised to expand at a robust CAGR of 11.3% from 2022 to 2031. Valued at over US$ 18.2 Bn in 2021, the market is projected to surpass US$ 53.4 Bn by the end of 2031, driven by the increasing emphasis on digital connectivity, brand communication, and immersive display technologies across diverse industries.
Market Overview: LED video walls comprising direct view and fine pitch LED displays are transforming the visual communications landscape in corporate, educational, and public environments. Offering high-definition visuals, enhanced color reproduction, and impressive energy efficiency, these displays are being extensively deployed across indoor and outdoor settings for branding, messaging, and audience engagement.
From stadiums and retail stores to university campuses and control rooms, LED video walls are becoming a go-to solution for organizations looking to captivate audiences and deliver dynamic content.
Market Drivers & Trends
1. Digital Connectivity Surge: Post-COVID-19 urbanization and digitization trends have accelerated the demand for robust visual communication tools. LED video walls are at the forefront of this transformation, enabling real-time, interactive, and high-resolution communication across sectors.
2. Brand Engagement in Retail: Retailers are increasingly using LED video walls to create immersive customer experiences. Narrow pixel pitch technology enables detailed imagery even from close viewing distances, making these displays ideal for retail environments.
3. Smart Advertising in Automotive and BFSI: From showcasing vehicles to running financial ads at ATMs and branches, the automotive and BFSI industries are embracing LED displays as high-ROI platforms.
Latest Market Trends
Customization and Modularity: Vendors are offering customized LED tiles in varying sizes, shapes, and resolutions for both indoor and outdoor use.
SMD Technology Dominance: Surface-Mount Device (SMD) technology is setting new standards in indoor LED video wall applications with better viewing angles and brightness levels.
Eco-friendly Innovations: Manufacturers are integrating energy-efficient and recyclable components in their product lines.
Key Players and Industry Leaders
The global LED video walls market is consolidated with a few large-scale players dominating the space. Key players include:
Barco NV
Daktronics, Inc.
Delphi Display Systems, Inc.
Electronic Displays, Inc.
Leyard Optoelectronic Co. Ltd.
LG Display Co. Ltd.
Lighthouse Technologies, Ltd.
Panasonic Corporation
Shenzhen Dicolor Optoelectronics Co Ltd.
Shenzhen Unilumin Group Co. Ltd
Toshiba Corporation
ViewSonic Corporation
Mitsubishi Electric Corporation
These companies are actively investing in R&D, strategic collaborations, and product launches to maintain competitive advantage and capture emerging opportunities.
Recent Developments
Barco NV launched TruePix in 2022, delivering next-gen visual excellence and seamless display experiences for control rooms and boardrooms.
ViewSonic introduced all-in-one direct view LED displays (up to 216") with integrated control systems, simplifying installation and enhancing usability.
Leyard & Planar released a new low-power flat panel LED series with improved installation speed and energy efficiency, targeting AV integrators and display professionals.
Explore core findings and critical insights from our Report in this sample - https://www.transparencymarketresearch.com/sample/sample.php?flag=S&rep_id=10271
Market Opportunities
Significant growth opportunities exist in:
Media & Entertainment: From broadcasting studios to event venues, demand for high-resolution visual storytelling tools is surging.
Sports Venues: Global sports events like FIFA World Cup and the Olympics are fueling installations in stadiums and fan zones.
E-commerce Advertising: Brands like Nike, Zara, and MAC Cosmetics are leveraging LED displays in digital storefronts to maximize impact and conversion rates.
Future Outlook
By 2031, the LED video walls market is expected to become an integral part of urban infrastructure, retail, and digital media ecosystems. Technological innovations—such as AI-integrated content control and ultra-fine pixel pitch displays—will further enhance the applicability of these systems in mission-critical environments.
Increased deployment in smart cities, virtual events, and interactive learning will open new avenues for market players. Sustainability, cost-efficiency, and AI-driven content adaptability will shape the next-generation LED display solutions.
Market Segmentation
By Deployment Type:
Indoor
Outdoor
By Service Type:
Installation
Repairing/Maintenance
Rental
By End-use Industry:
Media & Entertainment
Sports
Education
Retail
BFSI
Hotel & Restaurants
Building & Construction
Others (Automotive, Transportation)
By Region:
North America
Europe
Asia Pacific
Middle East & Africa
South America
Regional Insights
North America led the global market in 2021, fueled by high adoption rates in the U.S. and Canada. The Asia Pacific region, including China, Japan, and India, is emerging as a high-growth territory, thanks to rapid urbanization, expanding retail infrastructure, and tech-savvy consumer bases.
Europe is witnessing growing demand from education and hospitality sectors. Meanwhile, markets in Middle East & Africa and South America are slowly gaining traction despite challenges such as political instability and infrastructure constraints.
Why Buy This Report?
This in-depth LED Video Walls Market report offers:
Comprehensive Market Analysis: Includes both qualitative and quantitative insights across all major segments.
Industry Forecasts (2022–2031): Helps stakeholders anticipate market trends and shifts.
Company Profiles: Detailed benchmarking of key players based on financials, product offerings, strategy, and innovation.
Regional Breakdown: Country-wise forecasts across five continents.
Opportunity Mapping: Identification of high-growth sectors and emerging technologies.
Whether you're an investor, manufacturer, distributor, or policymaker, this report provides the tools you need to make informed, strategic decisions in a rapidly evolving visual communication landscape.
Explore Latest Research Reports by Transparency Market Research: Semiconductor ICP-MS System Market: https://www.transparencymarketresearch.com/semiconductor-icp-ms-system-market.html
Metal Oxide Varistors (MOV) Market: https://www.transparencymarketresearch.com/metal-oxide-varistors-market.html
Safety Programmable Controller Market: https://www.transparencymarketresearch.com/safety-programmable-controller-market.html
Pulsed Laser Deposition Systems Market: https://www.transparencymarketresearch.com/pulsed-laser-deposition-systems-market.html
About Transparency Market Research Transparency Market Research, a global market research company registered at Wilmington, Delaware, United States, provides custom research and consulting services. Our exclusive blend of quantitative forecasting and trends analysis provides forward-looking insights for thousands of decision makers. Our experienced team of Analysts, Researchers, and Consultants use proprietary data sources and various tools & techniques to gather and analyses information. Our data repository is continuously updated and revised by a team of research experts, so that it always reflects the latest trends and information. With a broad research and analysis capability, Transparency Market Research employs rigorous primary and secondary research techniques in developing distinctive data sets and research material for business reports. Contact: Transparency Market Research Inc. CORPORATE HEADQUARTER DOWNTOWN, 1000 N. West Street, Suite 1200, Wilmington, Delaware 19801 USA Tel: +1-518-618-1030 USA - Canada Toll Free: 866-552-3453 Website: https://www.transparencymarketresearch.com Email: [email protected]
0 notes
Text
How to Install
Looking for easy, step-by-step guides on how to install everything from software to home devices? Our "How to Install" blog provides clear, beginner-friendly instructions to help you get things up and running without the hassle. Whether you're setting up a new app, assembling tech gadgets, or configuring tools, we simplify the process for you. Each post is written with accuracy and user convenience in mind.
How to Install How to Install Printers Without CD How to Install Webcam Drivers How to Install SSH How to Install Pixelmon How to Install OptiFine How to Install Fabric How to Install Zend Framework with XAMPP on Windows How to Install Roblox on Chromebook How to Install Roblox Studio How to Install Firefox on Mac How to Install Firefox on Linux How to Install Firefox on Windows How to Install Java Step-by-Step Guide for Beginners How to Install Java on Mac Follow Full Process Ultimate Guide How to Install Java for Minecraft Easy Step Guide for How to Install VPN for Privacy How to Install VPN Server Virtual Private Network How to Install VPN on Router A Step-by-Step Guide : Complete Guide for How to Install Anaconda How to Install Anaconda on Linux Complete Guide How to Install Anaconda on Mac: A Step-by-Step Guide How to Install Anaconda on Ubuntu: A Step-by-Step Guide How to Install Anaconda on Windows How to Install npm A Step-by-Step Guide for Beginners How to Install npm on Ubuntu Step-by-Step How to Install NVM on Ubuntu Tips, and Explanations How to Install npm on Windows Solve Common Issues How to Install NVM on Windows Troubleshooting Tips How to Install npm on Visual Studio Code How to Install Node.js on Your Machine How to Install Node.js on Linux Step-by-Step Guide How to Install Node.js on Mac Step-by-Step Guide How to Install Node Modules on Angular How to Install Node.js on Ubuntu The Latest Version How to Install Node.js on Windows Get started Full Method How to Install APK File on Your Android Device Complete Guide on How to Install APK on Android TV How to Install APK on Chromebook Step by Step Process How to Install APK on iOS A Comprehensive Guide How to Install IPA on iPhone A Complete Guide How to Install APK on Windows 10 Complete Guide How to Install Git A Step-by-Step Guide for Beginners How to Install Git Bash A Complete Step-by-Step Guide How to Install Git on Visual Studio Code How to Install GitHub Simple Step-by-Step Process How to Install Git on Mac Step-by-Step Guide How to Install Git on Linux A Step-by-Step Guide How to Install Git on Ubuntu Step-by-Step Guide How to Install Git on Windows A Simple Guide How to Install Docker How to Install Docker on Linux How to Install Docker on Mac How to Install Docker Daemon Mac How to Install Docker on Ubuntu How to Install Docker Compose on Ubuntu 20.04 How to Install Docker Compose on Windows How to Install Docker on Windows How to Install WordPress How to Install WordPress on Ubuntu How to Install WordPress Plugins How to Install WordPress on Windows 10 How to Install Kodi on Firestick How to Install Exodus on Kodi How to Install The Crew on Kodi How to Install XAMPP on Mac
0 notes
Text
iMac 27-Inch | Anti Glare | Anti Bluelight Screen Guard-pxin.in
Title: Protect Your iMac with PXIN’s 27-Inch Anti-Glare, Anti-Blue Light Screen Guard
Meta Description: Shield your iMac 27-inch display with PXIN’s anti-glare, anti-blue light screen guard. Reduce eye strain and protect your screen without compromising clarity.
Introduction
Apple’s iMac 27-Inch is known for its stunning Retina display, color accuracy, and premium build. But even the best screens need protection—both for your eyes and the display itself. The iMac 27-Inch | Anti Glare | Anti Blue Light Screen Guard from PXIN is designed to safeguard your screen from reflections, smudges, and harmful light emissions while preserving the high-resolution brilliance of your iMac.
Whether you’re a designer, developer, writer, or business user, this screen guard helps create a more comfortable and secure workspace for your iMac.
Why Your iMac Needs a Screen Guard
High-performance doesn’t mean high protection by default. Without a proper screen guard, your iMac is exposed to:
💡 Glare from windows or overhead lighting
👁️ Blue light exposure causing digital eye strain
🦠 Dust, fingerprints, and smudges
⚠️ Surface scratches and long-term screen wear
The PXIN screen guard offers a practical and sleek solution to all of these problems—tailored specifically for the iMac 27-inch screen.
Key Features of PXIN’s iMac 27-Inch Screen Guard
✅ Precision Fit for iMac 27-Inch
Custom-designed to match the dimensions and curvature of Apple’s 27-Inch iMac, this screen guard offers edge-to-edge protection without interfering with the screen’s clarity, camera, or brightness.
✅ Anti-Glare Coating
A matte surface reduces unwanted reflections from ambient light sources. Whether you're working in a bright studio or near a window, you get clearer, more comfortable viewing.
✅ Blue Light Filtering
The guard blocks up to 60% of harmful blue light, helping to reduce eye fatigue, dry eyes, and sleep disruption caused by long hours in front of your screen.
✅ Scratch & Smudge Protection
Made from durable, high-quality PET material, the screen guard protects your iMac’s display from scratches, fingerprints, and everyday dust—preserving its pristine look.
✅ Easy, Bubble-Free Installation
With static-cling or adhesive options, the guard is easy to apply, reposition, and remove—without leaving any residue. It installs cleanly in minutes and blends seamlessly with your iMac’s sleek design.
Ideal For:
🎨 Graphic designers needing color accuracy without glare
💼 Business users spending long hours on spreadsheets or documents
🧑💻 Developers and coders working in bright offices or studios
🏠 Remote workers managing productivity at home
📚 Students attending online classes or studying late into the night
Why Choose PXIN?
PXIN is India’s trusted name for premium screen protection solutions. Their products are designed with precision, built from top-grade materials, and tested to ensure comfort, clarity, and durability.
When you choose PXIN’s iMac 27-Inch Screen Guard, you get:
👁️ Enhanced eye comfort
💡 Glare-free visual clarity
🛡️ Durable display protection
⚙️ Easy installation and maintenance
🚚 Fast shipping across India
Final Thoughts
Apple’s 27-inch iMac is a serious investment—and it deserves serious protection. With PXIN’s iMac 27-Inch | Anti Glare | Anti Blue Light Screen Guard, you’ll protect your display, reduce eye strain, and maintain peak productivity—all without affecting the screen's performance.
It’s the perfect blend of form, function, and protection.
Shop Now
👉 Get your iMac screen guard today at pxin.in and protect what powers your work.
Target SEO Keywords:
iMac 27 Inch Anti Glare Screen Guard
Anti Blue Light Screen Protector for iMac
iMac screen protector India
PXIN iMac accessories
Apple iMac 27-inch screen guard India
Blue light filter for Mac desktop
0 notes
Text
VJ software
FREE
Krita for concept creation
Inkscape for vector design
OpenToonz and Pencil2D Animation
Blender for 3D animation
Natron for compositing
OBS Studio for live streaming
ShareX for screencasting
OpenShot Video Editor for streamlined video editing.
VPT – Toolkit free projection mapping tool. Have to learn it, for creating shows, comes with all the essentials you need, like OSC, midi, audio analysis. Built using C++ if you are a creative coder this can be your tool of choice to create mind-blowing shows.
Synthesia Live – Live Visuals - good for audio-reactive generative visuals. Free
NOT FREE
Resolume - widely used easy for beginners - Resolme Arena for video mapping, LED installs - good starting place
Modul8 - for Mac - easy connects with MadMapper for video projection - can control lights etc
MixEmergency - connects to Serato series of software. Easy, can send and receive high definition video streams, can mix video between computers, easily change between Video DJs, mix with 3 or more decks
VUO – Interactive Media for creating new media installations. VUO is similar to creative coding tools like Processing, OpenFrameworks, TouchDesigner, etc. It comes with easy to use modules that can get you started with a variety of interactive video projects without any coding.
Painting with Light – Video Art for generating content on the fly. video mapping tool for static and moving images through any video projector onto 3D physical objects.
NotchVFX – Real Time Graphics a real-time production software. Works with a media server - make motion graphics, real-time tracking, virtual worlds and a whole lot more. Real time/live.
VDMX live video input, quartz compositions, custom layout, audio analysis for live visuals, audio-reactive content, music events
Arkaos full-blown VJ software inc projection mapping, musicians like it, inks directly with Pioneer Pro DJ network.
CoGe VJ – VJ Tool limit is the computing power of your machine/graphics card. connects with software like Quartz, IFS generator, VUO image generators, Syphon sources for live camera and other inputs.
VVVV – Interactive Media - toolkit, a node based software that opens up the creative abilities of your hardware. Allowing you to create just about anything you can visualize. Live data input, motions tracking, OpenCV, multi-screen projection. Create live media environments.
Sparck – Immersive Content - immersive interactive spatial augmented reality installation, can project real-time generated virtual content. It helps you to turn your world into a 360° VR environment no matter the shape of your surfaces.
Smode Studio – Interactive Media Server VJ software along with a media server. Control visuals using Audio, Midi, OSC and display directly or use the power of Smode with spout to run visuals into your VJ software
MPM - open source framework for 3D projection mapping using multiple projectors. It contains a basic rendering infrastructure and interactive tools for projector calibration.
Visution – Projection Mapping versatile video projection mapping software. Allows interaction by pixel rather than other tools which restrict you with grid points. The good part is Mapio2 allows you to throw virtually any video format into your media playlist. For multi-screen setups, projection mapping and permanent installs with a show mode and autostart.
Vioso – Projection Mapping - to align multi projection set ups
Scalable Display – Auto Projection Alignment & Blending uses a camera to automatically wrap and align projectors up to 16 from a single PC. For a permanent installation, this can be very useful, reducing on-site visits and provide robust software to align and wrap your image.
Edge – Media Server - for video mapping. Use this for permanent installations for advertising, museums, retail and other places where you need a robust solution. Edge C is a video server, Edge DS is for digital signage
Mapstard – Media Server This is a timeline controlled video server, not really for live VJing. For controlled shows, where you have pre-defined content to play. DMX functionalities allow timeline control.
Dataton Watchout – Media Server Works on a network of computers connecting your main machine to control slave machines. Allowing you to connect as many projectors as your hardware can handle. Easily create timeline shows, similar to using video editing tools. This is a great option for corporate shows where you need to run content on cue. Watchout display output only works if you buy their dongle.
Millumin – can be used as a media server, can load 3D models for mapping, control light fixtures, connect with external controllers, timeline your show and much more.
Ai Server – Media Server Integrates with leading hardware and software that run behind the console for large scale setups, permanent installs. Integrates with NotchVFX for your real-time shows.
Disguise – Media Server
D3 media server for light shows, do the whole show with this.
Hippotizer – Media Server
Hippotizer - media server for pixel mapping to projection mapping, small scale to large scale
Comes from https://limeartgroup.com/the-mega-list-of-vj-software-and-tools/
Malika Maria
Starting creative coding - what kit do I need?
0 notes
Text
📁 HiFiSampler on MacOS (ft. chevrefee)
Today's tutorial will be going over the installation for Hifisampler for MacOS. This was made in collaboration with chevrefee who helped me through the entirety of the install so it was all made possible with their help! Before we get into the specifics of installation we will be going over the currently tested MacOS environments and explain the differences in installation.
For users of Silicon MacOS that are on Sonoma, it is recommended to use the distributed client. Make sure you download both the resampler and client zip files.
For Intel MacOS and Silicon MacOS that are on Ventura and Sequoia, refer to the window’s exe installation method. To prep the environment for the installation please refer to my resampler tutorial before proceeding with this tutorial.
Link ▶︎ https://keitaiware.com/post/766063532617973761/resamplers-on-macos
MacOS that are on versions before Ventura cannot natively support this resampler. Consider using Bootcamp and following an installation guide for Windows.
What you will need in order to begin the installation. . .
Anaconda
Python 3.10
Section 1, “Installing necessary files.”
Install the general Hifisampler installer.
To check if Anaconda is installed to your system, open Terminal and run the command . . .
conda -V
This command will run back what version of anaconda you have installed.
We will now create the conda environment inside Terminal. To set up the conda environment,
conda create -n py10 python=3.10 anaconda
Now that the environment has been created, we will now activate it and install all the necessary modules. *(numpy, scipy, resampy, onnxruntime, soundfile pyloudnorm, librosa, soundfile)
pip install numpy, scipy, resampy, onnxruntime, soundfile pyloudnorm, librosa, soundfile
Our next install will be separate from these modules.
pip3 install torch torchvision
To continue with the preparation, we will need to install the correct version of numpy. In order to do this, we will need to uninstall our existing version to replace it with the correct version.
pip uninstall numpy pip install numpy==1.26.4
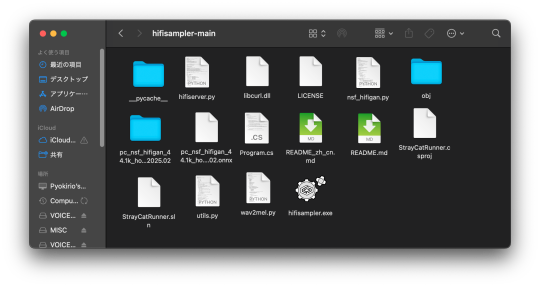
Section 2, “Organizing the resampler folder.”
After this, your environment is almost set to run hifisampler! Before we run the necessary files inside python we will be organizing our resampler folder for hifisampler. We will place the entire hifisampler-main folder into the resampler folder.
/Users/Username/Library/OpenUtau/Resamplers
Section 3, Setting up the resampler
For Silicon MacOS on Sonoma * (see Section 6)
Sonoma users on Silicon MacOS can directly download the client file instead of generating a .sh (shell) file. Put the unzipped hifisampler_client_MacOS_ARM64.zip folder into your hifisampler-main folder.
For other Macs . . .
You will need to generate an .sh (shell) to run the resampler.exe. In order to generate the .sh file you can follow my MacOS resampler tutorial here.
Link ▶︎ https://keitaiware.com/post/766063532617973761/resamplers-on-macos
After creating the .sh file, simply drop it into the hifisampler-main folder. Note that the RELPATH for the resampler in the .sh file should be just hifisampler.exe, with no additional paths before it * (not hifisampler-main/hifisampler.exe).
Section 4, “Installing the HiFiGAN dependency.”
Now we will install the HiFiGAN OpenUTAU dependency.
https://github.com/openvpi/vocoders/releases/tag/pc-nsf-hifigan-44.1k-hop512-128bin-2025.02
To install the HiFiGAN dependency, simply drag and drop the .oudep into the OpenUtau UI.
Now we will route the dependency paths inside of the hifiserver.py, to do this, we will right-click and open the file with IDLE or IDLE3 (whichever comes up for you). Using Visual Studio Code is also viable.
Inside of the IDLE view, use CMND+F and search for “HiFIGAN Not Found.” From here, we will look for the onnx_default_path and the ckpt_default_path. We will set the paths to the pc_nsf_hifigan_44.1k_hop512_128bin_2025.02.onnx and model.ckpt. Here below is an example of what to expect.

The area we will be focusing on is highlighted in blue.
Section 5, “Running the HiFiGAN Server.”
Your environment should be set up to run the HiFiGAN server now! For any missing modules in this step you can satisfy the errors by running. . .
pip install [module name]
There isn’t a preferred set of steps, but I tend to set up the HiFiGAN server before opening OpenUtau. To run the HiFiGAN server, we will activate the conda environment.
conda activate py10
Now we will run the server activation command.
python /Users/Username/Library/OpenUtau/Resamplers/hifisampler-main/hifiserver.py
You can also drag and drop the hifiserver.py file to the Terminal window instead of manually typing the pathname.

After Terminal finishes loading the server, you can open OpenUtau and load in your preferred UST and singer. Set your resampler to classic by hitting the cog icon, and select the hifisampler-main/hifisampler_client_MacOS_ARM64/hifisampler (Sonoma) or hifisampler-main/hifisampler.sh from the resampler tab.
Note: In order to render with hifisampler, you will need to open Terminal and run the conda activation command with the hifiserver activation command.
conda activate py10
With the python hifiserver.py activation command.
python /Users/Username/Library/OpenUtau/Resamplers/hifisampler-main/hifiserver.py
Section 6, “General Resampler Usage and Other Additions.”
As this resampler uses neural networks, it will take up more memory to process. If you find that your renders keep freezing, try freeing your memory before attempting to restart the render.
This tutorial has only been tested out on these MacOS:
Intel on Ventura
Silicon M2 on Sonoma
Silicon M2 Max on Sequoia (x2)
In theory, there will be no difference when using M1/M2/M3 chips of the same OS version. We theorize that the cause of uncertainty on whether a user can use the client file or not is based on the OS version used. We have yet to test on Silicon Ventura. Hachimisampler is a resampler from the same developer that shares the neural network system with hifisampler. It is said to work better on Jinriki voicebanks. If you would like to use this resampler instead, the installation procedure will be the same, with an addendum that wrapping the .exe with a .sh file is mandatory for all users since no dedicated client exists.
If you have already installed hifisampler beforehand, you can skip to Section 5 to use it, replacing the hifiserver.py with hachiserver.py instead.
1 note
·
View note
Text
Xamarin App Development: A Practical Guide

In today’s fast-paced digital world, cross-platform app development with Xamarin has become a go-to solution for businesses and developers. Whether you’re an aspiring developer or an entrepreneur looking to build an app, understanding Xamarin mobile app development can give you a competitive edge.
In this guide, I’ll take you through everything you need to know about Xamarin app development—from what it is, why it’s popular, and a step-by-step development guide, to best practices and a comparison with other frameworks like Xamarin vs React Native. Let’s dive in!
What is Xamarin?
Xamarin is an open-source framework by Microsoft that allows developers to build cross-platform mobile applications using a single codebase. It integrates seamlessly with .NET and C#, enabling apps to run smoothly on iOS, Android, and Windows.
Key Features of Xamarin:
Single Codebase: Write once, deploy everywhere.
Native-Like Performance: Uses native APIs for a smooth experience.
Built-in UI Components: Supports Xamarin App UI/UX Design best practices.
Microsoft Support: Backed by a strong developer community.
Why Choose Xamarin for App Development?
Choosing the right development framework is crucial for building high-performing mobile apps. Here are some benefits of Xamarin app development:
Cross-Platform Compatibility: Develop for Android, iOS, and Windows with a single codebase.
Cost-Efficiency: Saves time and money compared to native development.
Seamless Integration: Works well with Azure, Visual Studio, and .NET Core.
Faster Development: Pre-built UI components speed up development.
High Performance: Offers near-native performance with minimal lag.
If you're working with an experienced Xamarin app development company, you can leverage these benefits to create scalable and future-proof apps.
Also Read: Xamarin App Development: A Practicle Guide @ Mobulous
Step-by-Step Xamarin App Development Guide
If you're ready to start Xamarin mobile app development, follow these steps:
Step 1: Set Up the Development Environment
Before you begin, install the necessary tools:
Visual Studio (Windows or Mac)
Xamarin SDK
.NET Core SDK
Android/iOS emulators
Step 2: Create a New Xamarin Project
Open Visual Studio and create a new project.
Select Xamarin.Forms for a cross-platform solution.
Set up the iOS and Android dependencies.
Step 3: Design the App UI
Good UI/UX design is essential for a smooth user experience. Use XAML for designing layouts and follow Xamarin app UI/UX design principles:
Use Material Design for Android.
Follow Apple's Human Interface Guidelines for iOS.
Optimize UI for different screen sizes.
Step 4: Implement Business Logic
Use MVVM (Model-View-ViewModel) architecture for code separation.
Implement API calls and data storage using SQLite or Firebase.
Optimize app navigation and user interactions.
Step 5: Test the App
Use Xamarin Test Cloud or built-in Visual Studio emulators to check performance, responsiveness, and functionality.
Step 6: Optimize Performance
Xamarin performance optimization techniques include:
Reducing app size using linker settings.
Optimizing memory usage and garbage collection.
Implementing lazy loading for images and data-heavy operations.
Step 7: Deploy and Maintain
Once your app is tested and optimized, publish it on the Google Play Store, Apple App Store, or Microsoft Store. Keep improving it based on user feedback and regular updates.
Xamarin Best Practices for High-Performance Apps
To build a robust Xamarin app, follow these best practices:
Use Dependency Injection: Improves scalability and testability.
Leverage Caching: Speeds up app performance and reduces API calls.
Optimize UI Rendering: Avoid unnecessary UI elements that slow down the app.
Use Native Code When Needed: Utilize platform-specific functionalities for better performance.
Monitor App Performance: Use tools like Xamarin Profiler and App Center.
Xamarin vs Other Cross-Platform Frameworks
When choosing a cross-platform framework, you might wonder how Xamarin vs React Native compares.

Which One Should You Choose?
Choose Xamarin if you’re a .NET developer and need high performance with native UI.
Choose React Native for faster development and a strong JavaScript ecosystem.
Choose Flutter for beautiful custom UIs and Google-backed updates.
How Mobulous Can Help with Xamarin Development
As a leading Xamarin app development company, Mobulous specializes in building scalable, high-performance cross-platform apps. Our expert developers follow the best Xamarin development guide to create apps that are:
User-Friendly – Prioritizing UI/UX design for better engagement.
Performance-Optimized – Implementing best practices to ensure smooth functionality.
Scalable & Secure – Future-proof solutions tailored for your business.
Whether you need a business app, eCommerce solution, or enterprise software, Mobulous has got you covered!
FAQs
Q:1. Is Xamarin good for mobile app development?
Yes! Xamarin mobile app development is great for cross-platform applications, offering native performance, code reusability, and Microsoft support.
Q:2. How does Xamarin compare to React Native?
Both are great for cross-platform development, but Xamarin uses C# and .NET, while React Native is based on JavaScript. Xamarin is better for apps requiring high performance and native UI.
Q:3. What are the key benefits of Xamarin?
Code reusability (90%)
Near-native performance
Integration with .NET and Microsoft tools
Large developer community and support
Q:4. How can I optimize my Xamarin app for better performance?
Reduce app size with linker settings
Use lazy loading for images
Optimize memory management and garbage collection
Minimize UI overdraws
Conclusion
Xamarin app development is a powerful solution for businesses looking to build high-quality cross-platform apps efficiently. By following best practices for Xamarin developers, optimizing performance, and leveraging Microsoft’s robust ecosystem, you can create a scalable and high-performing application.
If you're looking for an experienced Xamarin app development company, Mobulous can help bring your ideas to life. Contact us today for a consultation!
Read Our Informative Blog’s:
https://negiseogaurav.weebly.com/blog/best-mobile-app-development-company-for-enterprises-in-india
https://sites.google.com/view/negiseogaurav/our-latest-blogs/best-mobile-app-development-company-for-enterprises-in-india
https://negiseogaurav.odoo.com/blog/our-latest-blog-1/best-mobile-app-development-company-for-enterprises-in-india-13
https://gauravnegi.godaddysites.com/f/best-mobile-app-development-company-for-enterprises-in-india
#Features of Xamarin Application Development#Importance of Xamarin in Cross-Platform Development#Xamarin Application Development#What is Xamarin Application Development?
1 note
·
View note
Text
How to Write the Perfect PHP Script for Your Web Development Class
PHP (Hypertext Preprocessor) is a widely-used server-side scripting language that powers millions of websites and applications.
Its versatility, ease of use, and integration capabilities with databases make it a popular choice for web developers.
If you’re enrolled in a web development class, mastering PHP is essential for creating dynamic and interactive web pages.

In the initial stages of learning PHP, many students encounter challenges that can hinder their progress.
This is where AssignmentDude comes in. Offering expert assistance in PHP homework, AssignmentDude provides personalized support tailored to your learning needs with PHP assignment help.
Whether you’re struggling with basic syntax or complex database interactions, our team of experienced tutors is here to help you navigate through your assignments and enhance your understanding of PHP programming.
At AssignmentDude, we understand that mastering PHP requires practice and guidance.
Our services are designed to empower you with the skills needed to tackle real-world projects confidently.
From understanding fundamental concepts to implementing advanced features, our dedicated tutors are committed to helping you succeed in your web development journey.
As you embark on this learning path, remember that seeking help is not a sign of weakness but rather a proactive step toward mastering the art of programming.
With AssignmentDude’s support, you can overcome obstacles and develop a strong foundation in PHP that will serve you well throughout your career.
Understanding the Basics of PHP
Before diving into writing scripts, it’s crucial to understand the fundamentals of PHP. This section will cover the essential concepts that every beginner should know.
What is PHP?
PHP is a server-side scripting language designed primarily for web development but also used as a general-purpose programming language.
It allows developers to create dynamic content that interacts with databases and can handle user input effectively.
Why Use PHP?
Cross-Platform Compatibility: PHP runs on various platforms (Windows, Linux, macOS), making it versatile for different server environments.
Database Integration: PHP seamlessly integrates with databases like MySQL, PostgreSQL, and SQLite, allowing for efficient data management.
Open Source: Being open-source means that PHP is free to use and has a large community contributing to its continuous improvement and support.
Ease of Learning: The syntax of PHP is similar to C and Java, making it relatively easy for beginners to pick up.
Setting Up Your Development Environment
To start writing PHP scripts, you’ll need a suitable development environment. Here’s how to set it up:
Install XAMPP/WAMP/MAMP: These are popular packages that include Apache server, MySQL database, and PHP interpreter.
XAMPP: Cross-platform solution available for Windows, Linux, and macOS.
WAMP: Windows-specific solution.
MAMP: Mac-specific solution.
Create Your Project Directory:
Navigate to the htdocs folder within your XAMPP installation directory (usually found at C:\xampp\htdocs on Windows).
Create a new folder for your project (e.g., my_first_php_project).
Choose an IDE or Text Editor:
Popular choices include Visual Studio Code, Sublime Text, or PhpStorm. These editors provide syntax highlighting and debugging tools that enhance your coding experience.
Writing Your First PHP Script
Now that your environment is set up, let’s write your first simple PHP script.
Step 1: Create a New File
Open your text editor or IDE.
Create a new file named index.php in your project directory.
Step 2: Write Basic PHP Code
Add the following code to index.php:
php
<!DOCTYPE html>
<html lang=”en”>
<head>
<meta charset=”UTF-8">
<meta name=”viewport” content=”width=device-width, initial-scale=1.0">
<title>My First PHP Page</title>
</head>
<body>
<h1>Welcome to My First PHP Page!</h1>
<?php
echo “Hello, World! This is my first PHP script.”;
?>
</body>
</html>
Step 3: Run Your Script
Start the Apache server using XAMPP Control Panel.
Open your web browser and navigate to http://localhost/my_first_php_project/index.php.
You should see “Welcome to My First PHP Page!” followed by “Hello, World! This is my first PHP script.” displayed on the page.
Understanding Basic Syntax
PHP scripts can be embedded within HTML code. The opening tag <?php indicates the start of a PHP block, while ?> marks its end. Here are some key points about PHP syntax:
Variables: Variables in PHP start with a dollar sign ($). For example:
php
$name = “John Doe”;
echo $name; // Outputs: John Doe
Data Types: Common data types include strings, integers, floats, booleans, arrays, and objects.
Comments: Use comments to document your code:
php
// This is a single-line comment
/* This is a
multi-line comment */
Control Structures
Control structures allow you to control the flow of execution in your scripts.
Conditional Statements
Conditional statements execute different blocks of code based on certain conditions:
php
$age = 18;
if ($age >= 18) {
echo “You are an adult.”;
} else {
echo “You are not an adult.”;
}
Looping Statements
Loops enable repetitive execution of code blocks:
For Loop:
php
for ($i = 0; $i < 5; $i++) {
echo “Number: $i<br>”;
}
While Loop:
php
$count = 0;
while ($count < 5) {
echo “Count: $count<br>”;
$count++;
}
Working with Functions
Functions are reusable blocks of code that perform specific tasks.
Defining Functions
You can define functions using the function keyword:
php
function greet($name) {
return “Hello, $name!”;
}
echo greet(“Alice”); // Outputs: Hello, Alice!
Built-in Functions
PHP comes with numerous built-in functions for various purposes:
String manipulation functions like strlen(), str_replace(), etc.
Array functions like array_push(), array_merge(), etc.
Handling Forms and User Input
One of the key aspects of web development is handling user input through forms.
Creating HTML Forms
You can create forms using standard HTML elements:
xml
<form action=”process.php” method=”post”>
Name: <input type=”text” name=”name”><br>
Age: <input type=”number” name=”age”><br>
<input type=”submit” value=”Submit”>
</form>
Processing Form Data in PHP
To process submitted form data:
php
// process.php
if ($_SERVER[“REQUEST_METHOD”] == “POST”) {
$name = $_POST[‘name’];
$age = $_POST[‘age’];
echo “Name: $name<br>”;
echo “Age: $age<br>”;
}
Form Validation and Security
Always validate user input before processing it:
php
if (!empty($name) && filter_var($age, FILTER_VALIDATE_INT)) {
// Process valid input
} else {
echo “Invalid input.”;
}
Working with Databases (MySQL)
Integrating databases into your applications allows for dynamic data management.
Connecting to MySQL Database
To connect to a MySQL database using PDO (PHP Data Objects):
php
try {
$pdo = new PDO(‘mysql:host=localhost;dbname=my_database’, ‘username’, ‘password’);
} catch (PDOException $e) {
echo “Connection failed: “ . $e->getMessage();
}
Performing CRUD Operations
CRUD stands for Create, Read, Update, Delete operations on database records.
Create Operation
php
$sql = “INSERT INTO users (name, age) VALUES (:name, :age)”;
$stmt = $pdo->prepare($sql);
$stmt->execute([‘name’ => ‘John’, ‘age’ => 30]);
Read Operation
php
$sql = “SELECT * FROM users”;
$stmt = $pdo->query($sql);
while ($row = $stmt->fetch()) {
echo $row[‘name’] . “<br>”;
}
Update Operation
php
$sql = “UPDATE users SET age = :age WHERE name = :name”;
$stmt = $pdo->prepare($sql);
$stmt->execute([‘age’ => 31, ‘name’ => ‘John’]);
Delete Operation
php
$sql = “DELETE FROM users WHERE name = :name”;
$stmt = $pdo->prepare($sql);
$stmt->execute([‘name’ => ‘John’]);
Object-Oriented Programming (OOP) in PHP
OOP allows for more organized code through encapsulation and inheritance.
Defining Classes and Objects
You can define classes using the class keyword:
php
class User {
public $name;
public function __construct($name) {
$this->name = $name;
}
public function greet() {
return “Hello, {$this->name}!”;
}
}
$user = new User(“Alice”);
echo $user->greet(); // Outputs: Hello, Alice!
Inheritance in OOP
Inheritance allows one class to inherit properties and methods from another class:
php
class Admin extends User {
public function greet() {
return “Welcome back, Admin {$this->name}!”;
}
}
$admin = new Admin(“Bob”);
echo $admin->greet(); // Outputs: Welcome back, Admin Bob!
Error Handling in PHP
Handling errors gracefully is crucial for maintaining application stability.
Using Try-Catch Blocks
You can catch exceptions using try-catch blocks:
php
try {
// Code that may throw an exception
} catch (Exception $e) {
echo ‘Caught exception: ‘, $e->getMessage(), “\n”;
}
Best Practices for Writing Clean Code
Writing clean code improves maintainability and readability:
Use Meaningful Variable Names: Choose descriptive names for variables and functions.
Keep Functions Short: Each function should perform one task only.
Comment Your Code: Use comments judiciously to explain complex logic but avoid over-commenting obvious code.
Follow Coding Standards: Adhere to consistent coding standards such as PSR (PHP Standards Recommendations).
Advanced Topics in PHP
As you become more comfortable with basic concepts in PHP scripting, it’s time to explore some advanced topics that will enhance your skills further.
Working with Sessions
Sessions allow you to store user information across multiple pages during their visit to your website.
Starting a Session
To use sessions in PHP:
php
session_start(); // Must be called before any output is sent
$_SESSION[‘username’] = ‘JohnDoe’;
Accessing Session Variables
To access session variables on another page:
php
session_start();
echo $_SESSION[‘username’]; // Outputs: JohnDoe
Destroying Sessions
To end a session when it’s no longer needed:
php
session_start();
session_destroy(); // Destroys all data registered to a session
File Handling
PHP provides functions for reading from and writing to files on the server.
Writing Data to Files
You can write data to files using fopen() and fwrite() functions:
php
$file = fopen(“example.txt”, “w”);
fwrite($file, “Hello World!”);
fclose($file);
Reading Data from Files
To read data from files:
php
$file = fopen(“example.txt”, “r”);
$content = fread($file, filesize(“example.txt”));
fclose($file);
echo $content; // Outputs: Hello World!
Using Composer
Composer is a dependency manager for PHP that simplifies package management.
Installing Composer
To install Composer globally on your system:
Download Composer installer from getcomposer.org.
Follow installation instructions based on your operating system.
Using Composer
To create a new project with Composer:
Navigate to your project directory in the terminal.
Run:
bash
composer init
Follow prompts to set up your project configuration.
You can then require packages by running:
bash
composer require vendor/package-name
Security Best Practices
Security should always be a priority when developing web applications with PHP. Here are some key practices:
Input Validation
Always validate user inputs before processing them:
php
$name = filter_input(INPUT_POST, ‘name’, FILTER_SANITIZE_STRING);
$age = filter_input(INPUT_POST,’age’, FILTER_VALIDATE_INT);
if (!$age) {
die(“Invalid age provided.”);
}
Prepared Statements
Use prepared statements when interacting with databases to prevent SQL injection attacks:
php
$stmt = $pdo->prepare(“SELECT * FROM users WHERE email=:email”);
$stmt->execute([‘email’ => $_POST[‘email’]]);
$user = $stmt->fetch();
Password Hashing
Never store passwords as plain text; always hash them before saving them in the database:
php
$passwordHash = password_hash($passwordInput , PASSWORD_DEFAULT);
// Store `$passwordHash` in the database instead of plain password.
To verify passwords during login:
php
if (password_verify($passwordInput ,$passwordHash)) {
echo ‘Password is valid!’;
} else {
echo ‘Invalid password.’;
}
Debugging Techniques
Debugging is an essential skill for developers when things don’t work as expected.
Enabling Error Reporting
During development phases enable error reporting by adding this line at the top of your script:
php
error_reporting(E_ALL);
ini_set(‘display_errors’, 1);
This will display all errors directly on the page during development which helps identify issues quickly but should be disabled on production sites.
Using Debugging Tools
Tools such as Xdebug provide advanced debugging capabilities including stack traces which help trace issues back through function calls leading up until an error occurs.
Real-World Applications of PHP
Understanding how PHP fits into real-world applications will solidify your knowledge further.
Content Management Systems (CMS)
Many popular CMS platforms such as WordPress are built using PHP. Learning how these systems work can provide insights into best practices for building scalable applications.
WordPress Development: You might want to explore creating themes or plugins which involves understanding hooks and filters within WordPress’s architecture.
E-commerce Platforms
Building e-commerce websites often involves complex functionalities like user authentication systems along with payment gateway integrations which rely heavily on secure coding practices learned through mastering core concepts in PHP development.
Example Project Idea: Create an online store where users can register accounts; add products into their cart; checkout securely using payment gateways like PayPal or Stripe integrated via API calls handled through backend scripts written in php!
RESTful APIs
PHP can also be used to build RESTful APIs which allow different applications or services communicate over HTTP protocols seamlessly exchanging data formats like JSON or XML making it easier integrate third-party services into existing applications without much hassle!
Here’s an example snippet demonstrating how you might set up routes within an API built using php:
php
header(‘Content-Type: application/json’);
$requestMethod=$_SERVER[“REQUEST_METHOD”];
switch ($requestMethod) {
case ‘GET’:
// Handle GET request
break;
case ‘POST’:
// Handle POST request
break;
case ‘PUT’:
// Handle PUT request
break;
case ‘DELETE’:
// Handle DELETE request
break;
default:
http_response_code(405); // Method Not Allowed
break;
}
Common Pitfalls When Learning PHP
As you learn more about writing scripts in php here are some common pitfalls students often face along their journey!
Not Understanding Scope: Variables defined inside functions have local scope meaning they cannot be accessed outside those functions unless explicitly returned or declared global which leads many beginners confused when trying access them elsewhere leading errors being thrown unexpectedly!
Overusing Global Variables: While globals may seem convenient they make tracking down bugs much harder since any part could change its value at any time leading unpredictable behavior instead try pass values around via function parameters whenever possible!
Ignoring Security Measures: Failing implement proper security measures opens doors malicious attacks such as SQL injections so always sanitize inputs validate data before processing anything coming from users!
Neglecting Documentation & Comments: As projects grow larger keeping track becomes increasingly difficult without proper documentation so take time write clear comments explaining logic behind decisions made throughout codebase helps others understand intentions behind design choices later down line!
Not Testing Thoroughly Enough Before Deployment: Always test thoroughly before deploying anything live since bugs missed during development phases could cause significant issues once exposed real-world scenarios especially if sensitive information involved!
Conclusion
Writing perfect PHP scripts requires understanding fundamental concepts as well as best practices in coding standards while avoiding common pitfalls along way!
By mastering these skills through practice seeking help when needed — like utilizing resources from AssignmentDude — you can excel not only within classroom settings but also beyond them into real-world projects! Submit Your Assignment Now!
Remember that learning programming is an ongoing journey filled with challenges opportunities growth embrace each challenge as chance improve skills further!
If you ever find yourself stuck overwhelmed by assignments related specifically C++ don’t hesitate reach out AssignmentDude expert assistance tailored specifically students just like YOU! Together we’ll ensure success throughout entire learning process!
#do my programming homework#programming assignment help#urgent assignment help#assignment help service#final year project help#php assignment help#python programming
0 notes
Text
HeistGeist Release: Unleash Your Skills in this Story-Driven Cyberpunk RPG

HeistGeist release for the story-driven cyberpunk RPG game is gearing up for Linux, Mac, and Windows PC. Thanks to the brilliant work of Doublequote Studio. Due to release on Steam soon. Doublequote Studio is gearing up to release HeistGeist, a story-driven cyberpunk RPG with a twist. Since it’s all about pulling off high-stakes heists, using cards to fight and hack your way through the action. And the best part? Linux players get to dive into this futuristic world on November 11th, 2024. In the HeistGeist release, you’ll play as Alexandra, a street-smart thief who’s been double-crossed after a heist gone wrong. Now, she’s on the run and needs to get back what’s hers. It’s time to assemble your crew of specialists and plan some seriously intricate heists. While facing off against some of the toughest corporate enemies. What’s in store? Expect a unique post-cyberpunk setting, with locations that are both real and futuristic, inspired by the 2040s. With a fully voiced cast of 14 characters, you’ll feel immersed in the gripping story filled with twists, drama, and cyberpunk intrigue.
HeistGeist - Release Date Trailer
youtube
The Gameplay Forget traditional skill trees — the HeistGeist release switches it up with card-based combat. You’ll have more than 40 different cards at your disposal, making every fight a strategic puzzle. Whether you’re combining cards for powerful attacks or hacking into corporate servers, the game’s all about thinking ahead and making every move count. When it’s time to hack, you’ll dive into cyberspace, where you can run programs, install viruses, and breach servers using unique card-based puzzles. Each choice you make during a heist matters, so you’ll need to be on your toes to pull off the perfect job. RPG Goodness Build your deck to match your playstyle, and don’t forget to augment your abilities with cyberware that boosts your attributes. The customization is key, letting you tweak how you approach each mission. And if the gameplay wasn’t enough, HeistGeist is loaded with hand-drawn visuals that really pop, plus an original soundtrack release by Robert Bruckmayer. Due to melt your brain in the best way. So, mark your calendars — November 11th is when it all goes down. Get ready to plan, hack, and fight your way through this epic story-driven cyberpunk RPG game. Coming to Linux, Mac, and Windows PC on Steam.
#heistgeist#story-driven#cyberpunk rpg#linux#gaming news#doublequote studio#ubuntu#mac#windows#pc#unity#Youtube
1 note
·
View note
Text
VeryUtils JavaScript Spreadsheet HTML5 Excel Viewer for Web Developers
VeryUtils JavaScript Spreadsheet HTML5 Excel Viewer for Web Developers.
In the dynamic world of web development, the need for versatile tools that can handle complex data manipulation and visualization is paramount. Enter VeryUtils JavaScript Spreadsheet HTML5 Excel Viewer—a powerful online Excel component designed to operate entirely within web applications. Written completely in JavaScript, this component replicates the full functionality of Microsoft Excel, enabling web developers to read, modify, and save Excel files seamlessly across various platforms, including Windows, Mac, Linux, iOS, and Android.
✅ What is VeryUtils JavaScript Spreadsheet HTML5 Excel Viewer?
VeryUtils JavaScript Spreadsheet HTML5 Excel Viewer is a comprehensive and flexible Excel viewer designed specifically for web developers. It allows users to perform data analysis, visualization, and management directly within a web application. The interface is highly intuitive, making it easy for users to interact with data as they would in Microsoft Excel, but without the need for standalone software installations. Whether you're handling complex spreadsheets or simple data entries, this JavaScript-based control offers all the functionality you need.
✅ Key Features of VeryUtils JavaScript Spreadsheet HTML5 Excel Viewer
Seamless Data Analysis and Visualization VeryUtils JavaScript Spreadsheet provides a full range of Excel-like features, including data binding, selection, editing, formatting, and resizing. It also supports sorting, filtering, and exporting Excel documents, making it a versatile tool for any web-based project.
Compatibility with Microsoft Excel File Formats This control is fully compatible with Microsoft Excel file formats (.xlsx, .xls, and .csv). You can load and save documents in these formats, ensuring data accuracy and retaining styles and formats.
Highly Intuitive User Interface The user interface of VeryUtils JavaScript Spreadsheet is designed to closely mimic Microsoft Excel, ensuring a familiar experience for users. This minimizes the learning curve and allows for immediate productivity.
✅ Why Choose VeryUtils JavaScript Spreadsheet HTML5 Excel Viewer?
High Performance VeryUtils JavaScript Spreadsheet is optimized for performance, capable of loading and displaying large datasets efficiently. It supports row and column virtualization, enabling smooth scrolling and fast access to data.
Seamless Data Binding The component allows seamless binding with various local and remote data sources such as JSON, OData, WCF, and RESTful web services. This flexibility makes it easier to integrate into different web applications.
Hassle-Free Formatting Formatting cells and numbers is made simple with VeryUtils JavaScript Spreadsheet. It supports conditional formatting, which allows cells to be highlighted based on specific criteria, enhancing data readability and analysis.
Transform Data into Charts With the built-in chart feature, you can transform spreadsheet data into visually appealing charts, making data interpretation more intuitive and insightful.
Wide Range of Built-In Formulas The JavaScript Spreadsheet comes with an extensive library of formulas, complete with cross-sheet reference support. This feature, combined with a built-in calculation engine, allows for complex data manipulations within your web application.
Customizable Themes VeryUtils JavaScript Spreadsheet offers attractive, customizable themes like Fluent, Tailwind CSS, Material, and Fabric. The online Theme Studio tool allows you to easily customize these themes to match your application's design.
Globalization and Localization The component supports globalization and localization, enabling users from different locales to use the spreadsheet by formatting dates, currency, and numbers according to their preferences.
✅ Additional Excel-Like Features
Excel Worksheet Management You can create, delete, rename, and customize worksheets within the JavaScript Spreadsheet. This includes adjusting headers, gridlines, and sheet visibility, providing full control over the data layout.
Excel Editing The component supports direct editing of cells, allowing users to add, modify, and remove data or formulas, just as they would in Excel.
Number and Cell Formatting With options for number formatting (currency, percentages, dates) and cell formatting (font size, color, alignment), users can easily highlight important data and ensure consistency across their documents.
Sort and Filter VeryUtils JavaScript Spreadsheet allows users to sort and filter data efficiently, supporting both simple and custom sorting options. This makes it easier to organize and analyze data according to specific criteria.
Interactive Features • Clipboard Operations: Supports cut, copy, and paste actions within the spreadsheet, maintaining formatting and formulas. • Undo and Redo: Users can easily undo or redo changes, with customizable limits. • Context Menu: A right-click context menu provides quick access to common operations, improving user interaction. • Cell Comments: Add, edit, and delete comments in cells, enhancing collaboration and data clarity. • Row and Column Resizing: The resize and autofit options allow for flexible adjustments to row heights and column widths.
Smooth Scrolling Even with a large number of cells, the JavaScript Spreadsheet offers a smooth scrolling experience, ensuring that users can navigate large datasets effortlessly.
Open and Save Excel Documents The JavaScript Spreadsheet supports Excel and CSV import and export, allowing users to open existing files or save their work with all the original styles and formats intact.
Supported Browsers VeryUtils JavaScript Spreadsheet is compatible with all modern web browsers, including Chrome, Firefox, Edge, Safari, and IE11 (with polyfills).
✅ Demo URLs:
Open a black Excel Spreadsheet online, https://veryutils.com/demo/online-excel/
Open a CSV document online, https://veryutils.com/demo/online-excel/?file=https://veryutils.com/demo/online-excel/samples/test.csv
Open an Excel XLS document online, https://veryutils.com/demo/online-excel/?file=https://veryutils.com/demo/online-excel/samples/test.xls
Open an Excel XLSX document online, https://veryutils.com/demo/online-excel/?file=https://veryutils.com/demo/online-excel/samples/test.xlsx
✅ Conclusion
VeryUtils JavaScript Spreadsheet HTML5 Excel Viewer is a must-have tool for web developers who need to integrate Excel functionality into their web applications. Its powerful features, high performance, and cross-platform compatibility make it an ideal choice for any project that requires robust spreadsheet capabilities. With its seamless data binding, rich formatting options, and interactive features, this component is designed to meet the needs of modern web development, ensuring that your applications are both powerful and user-friendly.
If you're looking to elevate your web application with advanced spreadsheet capabilities, consider integrating VeryUtils JavaScript Spreadsheet HTML5 Excel Viewer today. It's the ultimate solution for developers who demand high performance, flexibility, and an intuitive user experience.
0 notes
Text
C++ Development Services

C++ Development Services C++ is the simplest yet very powerful language. It is one of the most well-known languages in the programming world which is utilized for multi-gadget and multi-stage application improvement. Regardless of whether you need to convey incredible client experience or high-performing backend frameworks, C++ development services always works best by all accounts. C++ language balances the time with the quality, which is the reason it is generally utilized for building efficient high-performance applications. C++ computer programs are mostly centered on code well-being and high convenience. This programming language can be utilized for the improvement of serious portable applications (iOS or Android) as well as modern desktop software such as Windows, Mac OS X, or Linux, etc. You should be pondering about the improvement of administrations and their executions. There are huge amounts of alternatives accessible in the market, where you can get each one of those administrations, however, you need to be mindful about your prerequisites At Oditek Solutions, we can help you with all conceivable C++ advancement benefits along with solid accomplice to give you top-notch full-cycle C++ development administrations, which will be impeccably fitting into your prerequisites. What Oditek Offers! We deliver creative and productive arrangements as per your particular needs and necessities. These are some glimpses of the C++ development services that we provide-
Custom C++ application development Our C++ advancement group makes clean code, utilizing the best programming practices and C++ norms, and conveys custom arrangements that consistently have market achievement. We uphold you at each phase of item improvement
C++ innovation Our specialists will help you from the earliest starting point of our joint effort. We measure your solicitation as quickly as time permits, at that point offer free counsel just as undertaking investigation and gauge.
Dedicated C++ engineers for hire We offer individual C++ designers or a dedicated C++ team to improve or manage your product development needs.
Overhauling of existing C++ application The C++ advancement group at OdiTek can decipher source code, make structure upgrades, modernize your current program, and sort out programming re-designing and re-factoring.
QA and testing administrations for C++ applications Our accomplished QA group has different sorts of testing, for example, Functional Testing, Unit Testing, Performance Testing, Integration Testing, and significantly more to guarantee quick, adaptable, and productive programming.
C++ application backing and support Our master group gives on-going client assistance and programming item backing to drive first-class client experience.
C++ application upgrade and improvement We, at Oditek, will help you develop your existing C++ application by providing client-side structures to ensure optimum productivity.
Native C++ application improvement Our C++ advancement group makes programming for any OS (Windows and Linux) easier. Apart from all these C++ Development services, we also provide Cross-Platform C++ Development. We make superior cross-stage uses of any intricacy for work area, portable, and installed OS. Our cross-stage arrangements remain profoundly usable and compelling. With a cross-stage arrangement, you will have the likelihood to draw in more clients and win the market. Cross-Platform C++ Development Services Right now applications available can run on a wide range of stages. So you need to face to keep up various code bases. Cross-platform development is that you just need to keep up one code base and it deals with all frameworks. The objective is to fabricate a C/C++ development run on various stages, such as Android, iOS, Mac OS, Windows, and Linux. Apart from this, you can also take the help of Visual Studio or Eclipse IDE. However, Visual Studio isn’t only for Windows C and C++ development any longer. Challenges
While opting for cross-platform C++ development services you may face certain challenges in the above areas. If you will have the option to defeat these difficulties, cross-platform C++ development will be productive to your association. C++ Development Services for Android Since the Android, GUI framework deals with Dalvik VM/Android Runtime; it bolsters essentially Java byte codes to run. So it’s a significant troublesome undertaking to actualize C++ for Android except if you want to compose the full application in C++, at that point you should produce the same byte code that these Virtual machines can comprehend or compose. You can also write your own Java utilizing C++ so that you can fulfill your craving for C++ for Android. Or then again you can just utilize Java/Kotlin to make GUI and still, you can compose your center rationale in C++ and use NDK + Java to make a total Android App. OdiTek’s C++ Services Offerings Full-cycle C, C++ software development services from Oditek are tailored to specific requirements. Whether you are looking to develop, upgrade, modernize or support and maintain C, C++ based applications and product solutions, OdiTek’s development team has over 15 years of experience to efficiently assist you no matter what environments or development platforms you are using.
Custom Software and Application development
Maintenance and support of new or legacy applications developed in C, C# or C++
Development and optimization of high-performing software or product solutions
Cross-Platform Application development
C or C++ Server-Side Software development
Hardware-specific software solutions
Extensions, 3rd parties integrations and Plugins Conclusion C++ development Services aren’t just a simple task endeavor, at least at such a point of time when you are aware of the rapidly developing technology. You have to be very careful before choosing the right alternative for your business. We had been working for more than a decade in designing, constructing, and deploying high-performance software systems based on C++. Reach out to us today, if you have any product development or maintenance needs! To Know More About C++ Service Check Our Website:- OdiTek
0 notes
Text
Like... I tell people that if they want the "It just works" experience, they should install Linux mint and move on with their life.
Now you no longer need to check the news if windows have snuck another thing that spies on you into your PC and you now need to manually turn it off. ( If Linux distro did that it would not have any users 12 months later... so they don't) .
There is no longer ads you risk clicking on by default embedded into your OS and programs. You cannot click on anything bad that can fuck up your machine ( User space protects ) because... it is YOUR computer. It is insane that this level of "don't have to worry. You are safe" is a feature on Linux... that should be a basic thing for every OS...
There is no obfuscation. Anything you want to see, change or control, you can. Everything is made to show you, the user, as clearly as possible what is going on. And if you don't like something, you can change it. 100% of the time. You do not have to hope that a UX designer remembered to give you settings and Daddy Microsoft allows you to do it.
When something is hard to see,understand or change in Linux, it is because it is a complex difficult thing. It is NEVER because a dude gets a salary for optimizing obfuscating how things work.
And it is not MAGIC. People who design and manage linux distroes are not a special race of humans with better ehtics and design skills than the lesser folk of windows and mac
You know what it is? Healthy competition. That thing so many people are in favor for in theory but not in practice.
It is because open source means the distros that get popular is THE ONES THAT THE USERS LIKE THE MOST.
And not just the Linux distro. Every tool. Every functionality. Every program and library. If the users want to use a competitor, they just can.
Like... my sibling in christ... stop begging Microsoft to fix visual studio so everything does not break if a file or folder have a space in it.
It have been 28 years. It is never happening.
Get ovet to Linux. Stop begging for features in Windows. In linux you DEMAND them. In linux you get them.
Because in Linux we BUILD them.
"I like windows. It just works."
No Jim.
No the fuck it doesn't.
272 notes
·
View notes
Text
How to Download Ample Metal Hellrazer

Discover the power of heavy metal with the Ample Metal Hellrazer, a virtual instrument designed to bring the intense sound of a Schecter Hellraiser nine-string guitar directly into your studio. Perfect for genres like Metalcore, Progressive Metal, and Djent, this plugin delivers unparalleled sound quality and performance features. Here’s a comprehensive guide on how to download and get started with Ample Metal Hellrazer.
Step-by-Step Guide to Download Ample Metal Hellrazer
System Requirements
Before diving into the download process, ensure your system meets the necessary requirements:
Windows: Windows 7/8/10, 64-bit only
Mac: OS 10.9 or higher
Supported Formats: VST2, VST3, AU, AAX, and Standalone
Hardware: 10 GB Hard Disk, Intel i5 or higher
Download and Installation
Visit the Official Website: Navigate to the Ample Metal Hellrazer download page.
Select Your Platform: Choose the appropriate version for your operating system (Windows or Mac).
Download the Installer: Click on the download link to start the process.
Run the Installer: Once downloaded, run the installer file and follow the on-screen instructions.
Activate Your Software: After installation, open the plugin in your DAW or as a standalone application and enter your activation code if required.
Key Features of Ample Metal Hellrazer
Sampling and Articulations
Size: 5.8 GB of bridge pickup sample libraries
Modes: Stereo and Mono
Articulations: Sustain, Hammer On & Pull Off, Legato Slide, Palm Mute, and more
With 9 different articulations and legato at random lengths and pitches, Ample Metal Hellrazer offers an authentic playing experience.
Advanced Technology
AI Generator for Metal Riffs: Create complex riffs with ease using the new AI generator.
Preset Manager: Easily organize and access your favorite sounds.
CPC (Customized Parameters Control): Control any parameter via MIDI CC or automation.
Poly Legato and Slide Smoother: Achieve fluid transitions between notes.
AMP Simulator
Experience the built-in AMP system, featuring 6 classic models including:
Metal Double (Mesa Boogie Dual)
Metal Treble (Mesa Boogie Triple)
Lead 800 (Marshall JCM800)
Each cabinet offers 8 mic options for precise sound customization, including U87, C414, and SM57.
Riffer
The Riffer tool allows you to:
String Roll Editor: Detailed display of fingering, articulation, and more.
Dice - Random Riff Generator: Generate new riffs with a single click.
MIDI Tools: Includes features like fixed velocity and length legato.
FX Section
8-Band EQ: Intuitive control and real-time visualization.
2-Line Compressor: Visualize input/output signals with RMS & Peak detection modes.
6-Tap Echo: Adjust parameters of 6 echo points individually.
IR Reverb: Choose from Room, Studio, Hall, and Larger Hall types.
Tab Reader
Load and play various guitar tablature file formats directly within your DAW. Export tabs as audio files for easy integration into your projects.
Final Thoughts
Ample Metal Hellrazer is a must-have for metal enthusiasts and producers looking to incorporate authentic Schecter Hellraiser sounds into their music. With its extensive feature set and high-quality samples, this plugin is poised to elevate your production game.
For more details and to download Ample Metal Hellrazer, visit kalaplugins.com. Start creating epic metal tracks today!
1 note
·
View note
Text
Starting with Go Development: Setting Up, Writing Your First Program, and Tools

Starting with Go Development: Setting Up, Writing Your First Program, and Tools
Embarking on a journey into a new programming language, starting a go project is both exhilarating and challenging. In this comprehensive guide, we will delve into the world of Go (or Golang), renowned for its simplicity, performance, and efficiency. Our focus will be on mastering the essentials, from setting up your Go development environment to writing your inaugural program, and getting acquainted with powerful development tools.
Setting Up Your Go Environment: Every successful venture into a new programming language begins with setting up the development environment. Fortunately, Go streamlines this process. Whether you are a seasoned Go developer or a newcomer, the importance of having the latest Go development tools cannot be overstated.
Installation: Navigate to the official [Go website](https://golang.org/dl) and download the latest version tailored for your platform. Mac and Windows users can simplify the process further using package managers like Homebrew or Chocolatey.
Validation: Post-installation, validate your setup by opening a terminal or command prompt and typing:
$ go version This command should display the installed Go version. If not, a revisit to the installation steps is in order. Your First Go Program: With your environment set up, let’s embark on the journey of writing your first Go program and starting a go project. We’ll guide you through creating a simple “Hello, World!” program, breaking down the basic structure of a Go file. We’ll cover crucial elements like package declaration, imports, and the main function.
package main
import “fmt”
func main() { fmt.Println(“Hello, world!”) } Go Modules: The concept of Go modules will be introduced, illustrating how to initialize a module for your project using the `go mod init` command. This sets the groundwork for managing dependencies and versioning in your Go projects and starting a go project
$ go mod init hello_world go: creating new go.mod: module hello_world Code Formatting with go fmt: We’ll explore the significance of consistent code formatting and introduce the `go fmt` command. This powerful tool automatically formats your code according to Go’s style conventions, enhancing readability and maintainability. func main() { fmt.Println(“Hello, world!”) } Linting with go vet: A discussion on the `go vet` command will follow, highlighting its role in identifying potential errors in your code that might slip through during compilation. We’ll emphasize the importance of maintaining high code quality.
Choosing Your Development Tools: While a basic text editor and the command line suffice for smaller projects, larger endeavors benefit from robust development tools. We’ll delve into popular Go Integrated Development Environments (IDEs) such as Visual Studio Code and GoLand, exploring their features, including code completion, syntax highlighting, and debugging capabilities.
The Go Playground: The Go Playground, a web-based tool for experimenting with Go code snippets, will be introduced. Its utility for quick code trials and code sharing without local installations will be emphasized.
Makefiles and Automation: For larger projects, automation becomes paramount. We’ll introduce Makefiles as a means to automate common tasks such as formatting, linting, and building Go programs. A step-by-step guide to creating a basic Makefile and its practical applications will be provided.
Go Compatibility Promise: Ensuring backward compatibility is a high priority for Go. We’ll explain the Go Compatibility Promise, assuring developers that programs compiled with different Go versions can coexist seamlessly. This commitment aims to avoid breaking changes in language or standard library.
Staying Up-to-Date: The importance of keeping your Go tools up-to-date will be highlighted. Guidance on updating Go on different platforms, including Mac, Windows, Linux, and BSD, will be provided to ensure developers have access to the latest features and bug fixes.
Exercises: The blog will conclude with a set of engaging exercises designed to reinforce the concepts covered. Readers will be encouraged to run the “Hello, World!” program on The Go Playground, enhance the Makefile with a ‘clean’ target, and experiment with code formatting. This hands-on approach ensures a practical understanding and application of the discussed topics.
Conclusion: In this expansive guide, we’ve covered the fundamental steps of setting up your Go development environment, writing your first program, and introducing you to essential tools. Whether you’re a novice or experienced developer, mastering these basics is a crucial step towards becoming proficient in Go development. Stay tuned for the next chapter, where we’ll explore Go’s built-in types and delve deeper into the language’s features. Happy coding!
0 notes