#LatestData
Explore tagged Tumblr posts
Visit Tumblr Blog
Explore Tumblr blogs with no restrictions, modern design and the best experience.
Last Seen Tumblr Blogs


Fun Fact
When “GIF” was named word of the year in 2012, Oxford Dictionaries U.S.A. credited Tumblr for pushing the word.
Text
#Costway#CostwayDeals#ProductReview#CostwayReview#CostwayProducts#LatestData#CustomerFeedback#CostwayAnalysis#CostwaySales#CostwayOffers#CostwayShopping#CostwayFinds#CostwayDiscounts#ProductAnalysis#CostwayFeedback#CostwayProductsReview#CostwayDealsReview#CostwayUpdate#CustomerReviews#CostwayProductsAnalysis#CostwayData#CostwayShoppingDeals#CostwayProductOffers#CostwayReviewAnalysis#CostwayFeedbackReview#CostwayCustomerInsights#CostwayDealsAnalysis#CostwayProductData#CostwayReviewInsights#CostwayDealsUpdate
0 notes
Text
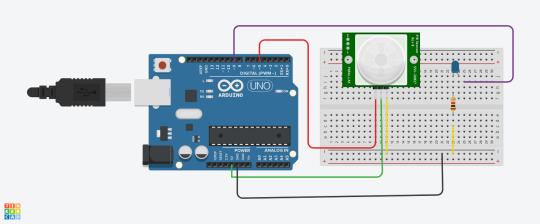
Midterm Project: The Video Game Controller
Introduction: The game initially was supposed to be a game where the objective is to catch water in a bucket for a town experiencing a drought
Sensor Rationale: My sensor was the PIR motion sensor, the rationale was to resemble a VR game where the user would be controlling the direction of the bucket depending on which sensor they activated
Controller Design & Construction: To set up two PIR motion sensors with my Arduino and breadboard, I started by gathering everything I needed: an Arduino board, two PIR sensors (like the HC-SR501), a breadboard, and some jumper wires. Each PIR sensor has three pins (VCC for power, GND for ground, and OUT for the signal). Since the sensor pins are small and not ideal for directly plugging into a breadboard, I decided to solder jumper wires directly to the pins. I soldered one wire to each pin and then I plugged them into the breadboard . I connected both VCC wires to the 5V pin on the Arduino and both GND wires to the Arduino’s GND pin. Then, I connected the OUT wire from the first PIR sensor to digital pin 7 and the OUT wire from the second sensor to digital pin 4.
Arduino Code :
const int pirPin1 = 5; // First PIR sensor connected to pin 7
const int pirPin2 = 4; // Second PIR sensor connected to pin 8
int pirState1 = LOW; // State of PIR sensor 1
int pirState2 = LOW; // State of PIR sensor 2
int lastPirState1 = LOW; // Last state of PIR sensor 1
int lastPirState2 = LOW; // Last state of PIR sensor 2
void setup() {
pinMode(pirPin1, INPUT); // Set PIR sensor 1 pin as input
pinMode(pirPin2, INPUT); // Set PIR sensor 2 pin as input
Serial.begin(9600); // Start serial communication at 9600 baud rate
}
void loop() {
pirState1 = digitalRead(pirPin1); // Read state of PIR sensor 1
pirState2 = digitalRead(pirPin2); // Read state of PIR sensor 2
Serial.print(pirState1);
Serial.print (",");
Serial.println(pirState2);
// Save the current state as the last state for the next loop
lastPirState1 = pirState1;
lastPirState2 = pirState2;
// Delay between readings to stabilize sensor input
}
P5.js Game Code (Well-Commented):
let serial; let latestData = "waiting for data"; // To hold the PIR sensor data
// Game variables let basketX, basketY, basketWidth, basketHeight; let fallingRaindrops = []; let score = 0;
let cloudPositions = []; // Store cloud positions for moving clouds
let targetX = 0; // Target x position for sensor 1 (smooth movement) let targetSpeed1 = 0.1; // Smooth speed for sensor 1 (change this value for more smoothness) let targetSpeed2 = 2; // Slower speed for sensor 2 (change this value for slower movement)
function setup() { createCanvas(windowWidth, windowHeight);
// Initialize the serial object for Arduino serial = new p5.SerialPort();
// List all available serial ports serial.list();
// Open the serial port (replace 'COM5' with your correct port) serial.open('COM5');
// Register event handlers for serial communication serial.on('connected', serverConnected); serial.on('list', gotList); serial.on('data', gotData); serial.on('error', gotError); serial.on('open', gotOpen); serial.on('close', gotClose);
// Set initial values for the basket (bucket) basketX = width / 2; basketY = height - 50; basketWidth = 100; basketHeight = 40;
// Initial raindrop setup setInterval(generateRaindrop, 1000); // Add a new raindrop every second
// Initialize cloud positions for (let i = 0; i < 5; i++) { cloudPositions.push({ x: random(width), y: random(height / 2), // Clouds stay at the top part of the screen speed: random(0.5, 1.5) }); } }
function serverConnected() { print("Connected to Server"); }
function gotList(thelist) { print("List of Serial Ports:"); for (let i = 0; i < thelist.length; i++) { print(i + " " + thelist[i]); } }
function gotOpen() { print("Serial Port is Open"); }
function gotClose() { print("Serial Port is Closed"); latestData = "Serial Port is Closed"; }
function gotError(theerror) { print(theerror); }
function gotData() { let currentString = serial.readLine(); // Read incoming data from the serial port if (currentString) { currentString = currentString.trim(); // Trim the string properly if (currentString) { console.log("Received data:", currentString); // Debug: show received data latestData = currentString; // Update the latest data received ("0,0", "1,0", "0,1", "1,1") } } }
function draw() { // Draw the background as a cloudy town drawCloudyTownBackground();
// Draw the bucket (using a rounded rectangle and an ellipse for the base) fill(255, 0, 0); noStroke();
// Draw the bottom of the bucket as a half ellipse arc(basketX + basketWidth / 2, basketY + basketHeight / 2, basketWidth, basketHeight, 0, PI, CHORD);
// Draw the top of the bucket as a rectangle (body) rect(basketX, basketY - basketHeight / 2, basketWidth, basketHeight / 2);
// Update basket movement based on PIR sensor input updateMovement();
// Draw and update raindrops for (let i = fallingRaindrops.length - 1; i >= 0; i--) { let raindrop = fallingRaindrops[i]; fill(0, 0, 255); // Draw the raindrop as an ellipse with more vertical elongation ellipse(raindrop.x, raindrop.y, raindrop.sizeX, raindrop.sizeY); raindrop.y += raindrop.speed; // Make the raindrop fall// Check if the raindrop hits the bucket if (raindrop.y + raindrop.sizeY / 2 >= basketY && raindrop.x > basketX && raindrop.x < basketX + basketWidth) { score++; // Increment score when a raindrop is caught fallingRaindrops.splice(i, 1); // Remove the raindrop after it is caught } // If the raindrop falls out of the screen, remove it if (raindrop.y > height) { fallingRaindrops.splice(i, 1); }
}
// Display score fill(0); textSize(24); text("Score: " + score, 10, 30); }
// Function to update movement based on PIR sensor data function updateMovement() { if (latestData) { // Parse the latest data to get pirState1 and pirState2 let states = latestData.split(","); if (states.length < 2) return; // Ensure there are two elements in the arraylet pirState1 = int(states[0].trim()); // First PIR sensor state let pirState2 = int(states[1].trim()); // Second PIR sensor state // Debugging output to confirm sensor values console.log("1", pirState1, "2", pirState2); // Update basket movement based on sensor states if (pirState1 === 1) { // Move basket to the right if motion is detected on sensor 1 basketX += 10; } if (pirState2 === 1) { // Move basket to the left if motion is detected on sensor 2 basketX -= 10; } // Prevent the basket from moving off the canvas basketX = constrain(basketX, 0, width - basketWidth);
} }
// Function to generate a falling raindrop at a random x position function generateRaindrop() { let raindrop = { x: random(width), y: 0, // Start from the top sizeX: random(10, 15), // Random width for raindrop sizeY: random(20, 40), // Random height for raindrop (more elongated) speed: random(3, 6) // Falling speed }; fallingRaindrops.push(raindrop); }
// Function to draw a cloudy town background function drawCloudyTownBackground() { // Draw sky background(135, 206, 235); // Light blue sky color
// Draw the clouds for (let i = 0; i < cloudPositions.length; i++) { let cloud = cloudPositions[i]; fill(255, 255, 255, 180); // White, semi-transparent clouds noStroke(); ellipse(cloud.x, cloud.y, 200, 80); // Big cloud ellipse(cloud.x + 60, cloud.y - 20, 150, 60); // Smaller cloud part ellipse(cloud.x - 60, cloud.y - 20, 150, 60); // Smaller cloud part cloud.x += cloud.speed; // Move the cloud// If the cloud goes off the screen, reset its position if (cloud.x > width + 100) { cloud.x = -100; }
}
// Draw the city skyline (simple buildings) fill(50, 50, 50); // Dark gray for buildings rect(0, height - 150, 100, 150); // Building 1 rect(150, height - 200, 80, 200); // Building 2 rect(250, height - 180, 100, 180); // Building 3 rect(400, height - 250, 120, 250); // Building 4 rect(550, height - 160, 90, 160); // Building 5 }
Communication Protocol Details: This p5.js code connects to an Arduino using a serial port to receive live data, like numbers from sensors. It uses the p5.SerialPort() library to open the connection (on COM5) and listen for different events, like when the connection is opened, closed, or when new data arrives. When the Arduino sends data, the program reads it as a line of text, removes any extra spaces, and splits the text into two values using a comma. These values are saved as value0 and value1, which can be used in the draw() function to control what’s shown on the screen—like the position or behavior of shapes. This setup lets the webpage respond to what the Arduino senses in real time.
User Instructions: Each motion sensor determines if the bucket moves left, right, or remains stagnant. Using the left sensor, move your hand in front of it to move the bucket to the left. Using the right sensor, move your hand in front of it to move the bucket to the right. If both sensors are activated at the same time, the bucket will stay in the place it is in until one sensor halts detection.
Challenges & Solutions: Challenges included setting up the sensor and activating it. The PIR motion sensors are sensitive so trying to get them to turn off and on was a difficult task. However, I managed to tweak the settings to make the time and sensitivity low. However, that also made the sensor delayed, resulting in the reaction time glitchy in the game.
Future Enhancements: Soldering from the beginning and making sure my code is as simple as possible would help me in the future. I think also changing the game could make more sense for the sensor.
Conclusion: I learned a lot in the end, and even used AI to help me with code and wiring. Next time, I hope to use my skills to develop more complex code for p5.js and Arduino so the sensor can be used for a variety of games.
Link to video game:
0 notes
Text
Lab 5: Arduino and P5.js :)
The objective of this lab was to establish serial communication between an Arduino and a P5.js sketch using the P5.SerialControl library. The goal was to read analog input from a potentiometer (or other sensor) and use this data to manipulate a sound parameter in P5.js. This experiment introduces the concept of serial communication and demonstrates how real-world input can create interactive experiences in a digital environment. The materials used were Arduino Uno Hardware , Breadboard, Jumper wires, Potentiometer (10kΩ) Arduino IDE software & P5.js web editor and installed P5.SerialControl library for P5.js (Darwin version).
Descriptive Circuit Overview:
As said above, the circuit consisted of an Arduino Uno, a 10kΩ potentiometer, and a serial connection to a P5.js sketch. The potentiometer is wired with:
The Potentiometer placed in the middle of the bread board.
Ground and power wires connected across the bottom edge of the breadboard.
The middle pin connected to A1 (analog input pin on the Arduino).
One outer pin connected to 5V power in the Arduino.
The other outer pin connected to ground (GND) in the Arduino.
This setup allows the potentiometer to function as a voltage divider. When the potentiometer is turned, the resistance changes, changing the voltage received by the Arduino’s analog input pin. The Arduino was able to read this voltage using the analogRead() command, converted it into a numerical value (range: 0 to 1023), and sent this data to the P5.js sketch over the serial communicator (P5.js Serial.Control).
Schematic:

Code Explanation Overview-Arduino:
The Arduino code initializes one analog pin, A1, to read input from the potentiometer. The values are then sent via the Serial.print() function in a comma-separated format, allowing P5.js to parse them correctly.
Pin Setup: The potentiometer’s pin is set as an input using pinMode(sensorPin, INPUT).
Analog Reading: The values A1 are continuously read using analogRead(sensorPin).
Serial Communication: The values are sent over the serial port using Serial.println(sensorValue);. The comma serves as a delimiter to separate multiple values.
This ensures that the final P5.js sketch can properly interpret and map the incoming data, which would be displayed in the serial console/monitor of the Arduino Uno, Serial Controller, and P5.js web editor console. In other words, the serial controller allows the code to be communicated from the Arduino software to the P5.js. The code is below:
int sensorValue = 0;
int sensorPin = A1;
void setup() {
// put your setup code here, to run once:
pinMode(sensorPin, INPUT);
Serial.begin(9600);
}
void loop() {
// put your main code here, to run repeatedly:
sensorValue = analogRead(sensorPin);
Serial.println(sensorValue);
}
Code Explanation Overview-P5.js:
The P5.js sketch establishes serial communication with the Arduino and reads the sensor data to control a visual representation through the resistance of the potentiometer.
Serial Communication Setup: The script initializes a serial connection using serial = new p5.SerialPort();, lists available ports, and attempts to open the correct one.
Data Reception: The function serial.on('data', gotData); listens for incoming serial data and stores it in a variable.
Data to Visuals: The sensor values are used to control the size of a circle on the canvas (circle(20,20,latestData);) in function draw().
Display of Values: The latest received data is displayed on the screen using text(latestData, 10, 10).
The code is below:
let serial; let latestData = "waiting for data";
function setup() { createCanvas(windowWidth, windowHeight);
serial = new p5.SerialPort();
serial.list(); serial.open('/dev/tty.usbmodem1301');
serial.on('connected', serverConnected);
serial.on('list', gotList);
serial.on('data', gotData);
serial.on('error', gotError);
serial.on('open', gotOpen);
serial.on('close', gotClose); }
function serverConnected() { print("Connected to Server"); }
function gotList(thelist) { print("List of Serial Ports:");
for (let i = 0; i < thelist.length; i++) { print(i + " " + thelist[i]); } }
function gotOpen() { print("Serial Port is Open"); }
function gotClose(){ print("Serial Port is Closed"); latestData = "Serial Port is Closed"; }
function gotError(theerror) { print(theerror); }
function gotData() { let currentString = serial.readLine(); trim(currentString); if (!currentString) return; console.log(currentString); latestData = currentString;
}
function draw() { background(255,255,latestData); fill(0,0,0); text(latestData, 10, 10);
fill(5,200,5); circle (20, 20 latestData);
// Polling method /* if (serial.available() > 0) { let data = serial.read(); ellipse(50,50,data,data); } */ }
Lastly, into the P5.js helm library file of the sketch, we put this P5.js Port Control Script link library in it as well:
<script language="javascript" type="text/javascript" src="https://cdn.jsdelivr.net/npm/[email protected]/lib/p5.serialport.js"></script>
Observations/Analysis:
When manipulating the potentiometer, the values ranged from 0 to 1023 (Arduino’s 10-bit ADC resolution). These values were mapped in P5.js to control the size of the circle in real-time, and went further to change the background color as well. The movement of the shape corresponded smoothly to changes in sensor input, proving the effectiveness of serial communication.
If we had applied the data to sound manipulation, the potentiometer’s values could have been mapped to control frequency, volume, or panning. The map() function would be used to scale the 0-1023 range into an appropriate audio parameter range in P5.js.
A demo video of the outcome is below:
Challenges and Troubleshooting:
Some challenges encountered included:
Serial Port Connection Issues: Initially, P5.js could not detect the correct serial port. This was resolved by having manually specifying the port (serial.open('/dev/tty.usbmodem1301');) in the script. This required a lot of troubleshooting code and hardware at first.
Conclusion:
This lab demonstrated how Arduino and P5.js can communicate through serial data, allowing physical input to control digital outputs. The way. that the potentiometer was able to change the size of the circle, isthe same way it can be used to turn vilume up and down on a device. Understanding serial communication opens up possibilities for interactive installations, such as motion-sensitive visuals or audio-controlled audio experiences. This aspect introduces new ways to map sensor input to audio-visual feedback, an essential skill in creative coding and physical computing.
In the future, this technique could be expanded by integrating multiple sensors and including the synthesis of sound assets to creat an immersive experience.
...Or it could be used in part to make a DIY iPod.
xx
0 notes
Text
Just How Accurate Are Rapid Antigen Tests? Two Testing Experts Explain The Latest Data
As of May 2022, the U.S. is experiencing another uptick in the number of COVID-19 cases. High rates of infection in Europe and Asia, along with the continued emergence of new sub-variants, such as omicron BA.4 and BA.5, raise concerns that another surge could be on the way. Even though demand for COVID-19 tests greatly overwhelmed supply earlier in the pandemic, rapid home tests are more…
View On WordPress
#AC Wellneess#Accurate#Antigen#Experts#explain#health updates#latest health news#LatestData#Rapid#Testing#Tests
0 notes
Text
My original idea was to play multiple tv advertisements in 3D cubes with the potentiometer being used to control how fast the cube spins. It’s an adjacent piece to a series of work I’ve been doing about the overproduction of stimulation in our digital Information Age. Controlling the chaotic nature of information seemed fitting.
I took an existing p5 example and edited the cube to 400x 400 pixels to take up the whole screen and erased the code for the image. Then I added my video file in mp4 format to the sketch. From here out, I followed the instructions of connecting the serial port and adding the code to make the latestData function as my data instead of mouse X.
1 note
·
View note
Text
Final Fantasy 14 Mac Download
Users interested in installing the Mac version of FINAL FANTASY XIV can download it here.
Final Fantasy For Mac
Final Fantasy 14 Mac Download Free
Download Final Fantasy 14 For Mac
Final Fantasy 14 Mac Download Latest
Final Fantasy 14 Mac Download Gratis
Buy Final Fantasy XIV: Shadowbringers - Standard Edition for Mac Game Download with fast shipping and top-rated customer service. Once you know, you Newegg! Click the 'Download' button to begin. Double-click the file (FINALFANTASYXIVONLINEx64.dmg) once the download is complete. Follow the on-screen instructions and drag the FINAL FANTASY XIV ONLINE icon into the Applications folder. FINAL FANTASY XIV will then be installed in the Applications folder, and the launcher icon will appear on the.

Minimum System Requirements
Review the system requirements for the Mac version of FINAL FANTASY XIV.
Final Fantasy For Mac
Installation
Click the 'Download' button to begin.
Double-click the file (FINAL_FANTASY_XIV_ONLINE_x64.dmg) once the download is complete. Follow the on-screen instructions and drag the FINAL FANTASY XIV ONLINE icon into the Applications folder.
FINAL FANTASY XIV will then be installed in the Applications folder, and the launcher icon will appear on the desktop. * The game requires at least 60GB of free space on the destination hard drive. * You will need administration privileges to install the application.
For Users of the 32-bit Application
To carry over settings from the 32-bit application, you need to upload your settings using the Server Backup option, which can be found in the character selection screen.
Back Up Character Settings
Final Fantasy 14 Mac Download Free
Save a backup of local character settings, HUD layout, hotbars, gear sets, and more to the server. * Item sort settings and inventory location data will not be saved.

Data to Be Saved:

Character Configuration
Log Filters
HUD Layout
Log Text Colors
Hotbars and Cross Hotbars
Character-specific Macros
Gear Sets
Social Data (Friend Group Names, Contact Lists, etc.)
Keybinds
Miscellaneous Data (Triple Triad, LoVM, etc.)
Back Up Client Settings
Download Final Fantasy 14 For Mac
Save a backup of local system settings for UI, sound, user macros, and more to the server. * Display resolution, graphics quality, input device, and other settings dependent on current play environment will not be saved.
Final Fantasy 14 Mac Download Latest
Data to Be Saved:
Final Fantasy 14 Mac Download Gratis
Display Settings
Accessibility Settings
Sound Settings
Shared Macros
Input Device Settings
Miscellaneous Data (Cutscene Settings)
0 notes
Text
PCOM week6 - P5+Arduino
vimeo
Potentiometer + p5js test
Code
let serial; let latestData = "waiting for data";
function setup() { createCanvas(windowWidth, windowHeight); serial = new p5.SerialPort();
serial.list(); serial.open('/dev/tty.usbmodem14601');
serial.on('connected', serverConnected);
serial.on('list', gotList);
serial.on('data', gotData);
serial.on('error', gotError);
serial.on('open', gotOpen);
serial.on('close', gotClose); }
function gotData() { let currentString = serial.readLine(); trim(currentString); if (!currentString) return; latestData = currentString; }
function draw() { let mappedPot = map(latestData, 0, 1023, 0, 255); background(0,mappedPot,0);
}
0 notes