#Lead Battery Terminal Connectors
Explore tagged Tumblr posts
Visit Tumblr Blog
Explore Tumblr blogs with no restrictions, modern design and the best experience.
Last Seen Tumblr Blogs


Fun Fact
28.6 is the average number of monthly visits per US mobile user.
Text
How can I tell if my headlight is blown?
You can diagnose a blown headlight using these steps, ranging from simple visual checks to electrical diagnostics. Here's how to confirm:
Basic Visual Inspection (Daytime)
Check for Darkness:
🔦 Turn on headlights and walk in front of your car. A blown bulb won't glow at all. Cracked/Hazed Housing:
💨 Foggy lenses or cracks scatter light, mimicking a blown bulb. Clean or restore lenses. Blackened Bulb:
⚫ Remove the bulb (cool first!). If the glass is darkened or the filament is broken, it's dead.
Electrical Tests (If No Light)
Test 1: Swap the Bulb Move the suspected blown bulb to the working side's socket.
Result:
✅ Glows = Original socket/fuse is faulty. ❌ No glow = Bulb is blown.
Test 2: Check Socket Voltage Tool Steps
Multimeter 1. Set to DC 20V. 2. Insert red probe into socket terminal, black to chassis ground. 3. Turn lights on. 💡 Reading: 12-14.5V = Socket good (bulb blown). 0V = Wiring/fuse issue.
Test 3: Fuse Check Locate headlight fuse (consult manual).
Look for broken filament or test continuity with a multimeter.
Common Failure Patterns
Symptom Likely Cause One headlight completely dead ✅ Blown bulb 🚫 Faulty socket/ground Both headlights out ❌ Blown fuse 🔌 Relay failure ⚡ Wiring short Headlight dim/flickering 🔋 Weak battery/alternator 💧 Moisture in socket
Bulb-Specific Signs
Halogen: Broken filament inside, blackened glass.
HID: No blue/purple ignition glow, pinkish tint = Failure.
LED: Darkened diodes, no light despite power.
Critical Safety Notes ⚠️ Wear gloves: Skin oils on halogen bulbs cause hotspots that lead to early failure.
⚡ Disconnect battery: Before handling wiring to prevent shorts.
🔧 Never force bulbs: Twisted connectors cause socket damage.
Troubleshooting Flowchart
graph TD A[Headlight Not Working] --> B{Any light?} -->No C[Test fuse/relay]
-->Dim/Flickering D[Check voltage at socket]
-->Fuse good E[Test bulb in working socket]
-->Still dead F[Replace bulb]
-->Works G[Inspect socket wiring]
-->Low voltage H[Test alternator/battery]
-->Fluctuating I[Check ground connection]
If all tests point to a good bulb and power supply, suspect:
Body control module (BCM) glitch (requires OBD2 scan)
Headlight relay (swap with identical relay like horn)
Damaged harness (trace wires for corrosion/pinches)
Replace blown bulbs in pairs to maintain balanced light output. If issues persist after replacement, focus on moisture intrusion or vibration damage as explored in our prior discussion. 🛠️

#led lights#car lights#led car light#youtube#led auto light#led headlights#led light#led headlight bulbs#ledlighting#young artist#race cars#cars#electric cars#classic cars#car#carlos sainz#porsche#truck#automobile#lamborghini#bmw#headlight bulb#headlamps#headlight restoration#headlamp#headlight#older vehicles#autonomous vehicle headlights#vehicle#overtake another vehicle
3 notes
·
View notes
Text
Trusted Copper Strips Manufacturers in India: Precision and Quality by KWM India
Copper Strips Manufacturers in India: Consistent Quality from KWM India
Copper remains a vital material in numerous industrial and electrical applications due to its superior conductivity, flexibility, and corrosion resistance. Among its most practical forms are copper strips, which are used across a broad range of industries. When looking for dependable copper strip manufacturers in India, KWM India is a name that stands out for its commitment to quality, customization, and timely delivery.
What Are Copper Strips?
Copper strips are flat, narrow pieces of copper used in:
Electrical busbars and switchboards
Transformer windings and earthing systems
Connectors in automotive and electronic industries
Heat exchangers and industrial machinery
Decorative and architectural elements
Their high thermal and electrical conductivity, along with their excellent workability, make copper strips indispensable in technical and manufacturing sectors.
KWM India: Leading Manufacturer of Copper Strips
KWM India has established itself as a leading manufacturer and supplier of high-quality copper strips in India. The company’s modern production units, expert engineering team, and strict quality assurance processes ensure every product meets the highest standards.
Key Features of KWM India’s Copper Strips:
High Electrical Conductivity – Suitable for power and electronic applications Precision Thickness & Width – Ideal for automated and industrial processing Custom Dimensions Available – Manufactured to client specifications Oxidation and Corrosion Resistant – Reliable even in harsh environments Excellent Surface Finish – Consistent quality for visual and technical uses
Applications Across Industries
KWM India supplies copper strips to a wide range of sectors:
Electrical & Electronics – Busbars, terminals, PCB components
Automotive – Battery connections, EV components
Renewable Energy – Solar panel and wind power systems
Industrial Machinery – Conductive and structural applications
Construction & Architecture – Earth strips and decorative elements
Why Choose KWM India?
Advanced Machinery & Infrastructure
Rigorous Quality Control at Every Stage
Custom Manufacturing to Match Project Requirements
Timely Delivery Across India
Sustainable and Responsible Manufacturing
Conclusion
As one of the most reliable copper strip manufacturers in India, KWM India delivers products that are engineered for performance, precision, and longevity. Whether you’re a supplier, OEM, or infrastructure developer, you can count on KWM India to meet your copper strip requirements with excellence.
Get in touch with KWM India today to request a quote, sample, or more details about our copper strip products.
Visit:- https://www.kmwindia.com/copper-strips.html
0 notes
Text
Troubleshooting Common Issues with International Truck Parts

When it comes to maintaining commercial heavy-duty trucks, international truck parts play a critical role in ensuring optimal performance and longevity. These parts are specifically designed to withstand the rigorous demands of the trucking industry, but like any mechanical components, they are prone to wear and occasional failure. Understanding how to troubleshoot common issues related to these parts can save truck owners and fleet managers time and money while preventing downtime on the road.
Identifying the Most Frequent Problems with International Truck Parts
Heavy-duty trucks face harsh working conditions, making parts susceptible to damage and malfunction. Common issues with international truck parts include wear and tear on the suspension system, brake problems, and electrical failures. For instance, worn-out suspension components can lead to poor handling and uneven tire wear, impacting safety and fuel efficiency. Similarly, brake issues such as worn pads or leaking air lines can compromise stopping power. Electrical components, including sensors and wiring, may cause erratic engine behavior or failure to start if not properly maintained.
Diagnosing and Fixing Suspension and Brake Issues
To address suspension problems, start by inspecting shock absorbers, bushings, and springs for signs of damage or fatigue. Regular lubrication and timely replacement of worn parts can prevent costly repairs. When dealing with brakes, check for air leaks in the braking system and ensure that brake pads have sufficient thickness. Air brake systems require particular attention, as leaks or faulty valves can reduce braking efficiency. Testing air pressure and conducting visual inspections are effective ways to troubleshoot these issues. Implementing a routine maintenance schedule focused on these components will enhance reliability and safety.
Electrical Troubleshooting Tips for Heavy-Duty Truck Parts
Electrical issues with international truck parts often manifest as dashboard warning lights, intermittent starting problems, or inconsistent engine performance. Begin troubleshooting by scanning diagnostic codes using specialized tools, which can pinpoint faulty sensors or circuits. Inspect wiring harnesses for damage or corrosion, especially in connectors exposed to the elements. Ensuring battery terminals are clean and secure also helps maintain electrical integrity. In some cases, replacing a single sensor or fuse resolves the issue, but thorough testing is necessary to avoid overlooking underlying problems.
Conclusion:
Troubleshooting common issues with international truck parts requires a systematic approach that includes regular inspections, timely repairs, and preventative care. By understanding the symptoms and causes of typical failures in suspension, brakes, and electrical systems, trucking professionals can reduce downtime and extend the life of their commercial heavy-duty trucks. Investing effort in maintenance not only improves safety but also optimizes operational efficiency, making it a vital part of any trucking operation.
0 notes
Text
Your Local Source for Quality Automotive Accessories in Eglinton & Kelso
When it comes to maintaining your vehicle's performance, having the right automotive accessories is essential — especially for drivers in Eglinton and Kelso. At Bathurst Batteries, we specialize in high-quality battery accessories that support both everyday driving and off-road adventures.
Our range includes essential components such as:
Battery terminals and clamps
Battery trays and hold-downs
Connectors, leads, and fuses
Isolators, chargers, and more
These accessories are vital for ensuring safe battery installation, efficient power distribution, and long-term vehicle reliability. Whether you're a DIY mechanic, a 4WD enthusiast, or managing a fleet, our products are designed to meet your needs.
We proudly serve the Bathurst region, including Kelso and Eglinton, with expert advice and friendly service. Explore our full range of battery accessories online today.
0 notes
Text
From Ferrules to Fork Lugs: Your Guide to Copper Connectors - Chetna Engineering
In India's rapidly advancing industrial landscape, the demand for reliable and efficient electrical connections is paramount. Copper connectors—such as Copper Ferrules, Copper Inline Connectors, Copper Ring Lugs, Ring Type Lugs, Fork Type Lugs, and Insulated Cable Lugs—play a crucial role in ensuring the safety and performance of electrical systems.
Chetna Engineering, based in Nashik, Maharashtra, stands out as a leading manufacturer and supplier of these essential components, catering to diverse industries across the nation.
Understanding Copper Ferrules:
Copper Ferrules are cylindrical connectors used to terminate stranded wires, preventing fraying and ensuring a secure connection.
Key Features:
Made from high-conductivity copper for optimal electrical performance.
Available in both insulated and non-insulated variants.
Designed to accommodate various wire sizes.
Applications:
Control panels and switchgear assemblies.
Industrial machinery wiring.
Automotive electrical systems.
Chetna Engineering offers a comprehensive range of Copper Ferrules, ensuring durability and compliance with international standards.
The Role of Copper Inline Connectors:
Copper Inline Connectors are essential for joining two conductors end-to-end, maintaining electrical continuity without the need for soldering.
Advantages:
Facilitate quick and secure connections.
Reduce installation time and labor costs.
Ensure consistent electrical conductivity.
Common Uses:
Power distribution networks.
Renewable energy installations.
Telecommunication systems.
With a focus on quality, Chetna Engineering manufactures Copper Inline Connectors that meet the rigorous demands of various industrial applications.
Exploring Copper Ring Lugs and Ring Type Lugs:
Copper Ring Lugs and Ring Type Lugs are designed to connect wires to a stud or screw, providing a secure and vibration-resistant connection.
Benefits:
Offer a permanent and robust connection.
Suitable for high-vibration environments.
Available in various sizes to match different bolt diameters.
Typical Applications:
Electrical panels and distribution boards.
Automotive battery connections.
Heavy machinery wiring.(Chetna Engg)
Chetna Engineering's Copper Ring Lugs and Ring Type Lugs are crafted with precision, ensuring reliability in critical applications.
Advantages of Fork Type Lugs:
Fork Type Lugs, also known as spade lugs, feature an open-ended design that allows for easy installation and removal without completely removing the screw or bolt.
Key Features:
Simplify maintenance and inspections.
Ideal for applications requiring frequent disconnections.
Available in insulated and non-insulated forms.
Applications:
Control wiring in automation systems.
Terminal blocks in electrical panels.
Consumer electronics.
Chetna Engineering provides a diverse selection of Fork Type Lugs, catering to various industry needs with a commitment to quality and performance.
Importance of Insulated Cable Lugs:
Insulated Cable Lugs are designed with a protective covering to prevent accidental contact with live wires, enhancing safety during installation and operation.
Advantages:
Reduce the risk of electrical shocks.
Prevent short circuits caused by accidental contact.
Color-coded insulation for easy identification.
Common Applications:
Residential and commercial electrical installations.
Control panels and switchgear.
Renewable energy systems.
Chetna Engineering's range of Insulated Cable Lugs ensures compliance with safety standards, providing peace of mind in various electrical setups.
Choosing the Right Copper Connector for Your Needs:
Selecting the appropriate copper connector is crucial for the efficiency and safety of electrical systems. Consider the following factors:
Application Requirements: Determine the specific needs of your project, such as current load, environmental conditions, and mechanical stress.
Connector Type:
Copper Ferrules: Ideal for terminating stranded wires.
Copper Inline Connectors: Suitable for joining conductors end-to-end.
Copper Ring Lugs/Ring Type Lugs: Best for secure, permanent connections.
Fork Type Lugs: Perfect for applications requiring frequent disconnections.
Insulated Cable Lugs: Essential for enhanced safety in exposed environments.
Size and Compatibility:
Ensure the connector matches the wire size and terminal specifications.
Quality and Standards:
Opt for connectors that comply with industry standards and are manufactured by reputable companies like Chetna Engineering.
Partnering with Chetna Engineering for Reliable Copper Connectors
With over three decades of experience, Chetna Engineering has established itself as a trusted name in the manufacturing of high-quality copper connectors. Their extensive product range includes Copper Ferrules, Copper Inline Connectors, Copper Ring Lugs, Ring Type Lugs, Fork Type Lugs, and Insulated Cable Lugs, all designed to meet the diverse needs of India's industrial sector.
Why Choose Chetna Engineering?
Commitment to quality and adherence to international standards.
Customized solutions tailored to specific client requirements.
Prompt and reliable customer service.
For more information or to request a product brochure, visit Chetna Engineering's official website
#Copper Ferrules#Copper Inline Connectors#Copper Ring Lugs#Ring Type Lugs#Fork Type Lugs#Insulated Cable Lugs#Chetna Engineering
0 notes
Text
how to wire an exit sign
Exit signs are critical safety features in buildings, guiding occupants to safety during emergencies such as fires, power outages, or other disasters. Properly wiring an exit sign ensures it remains illuminated and functional, even when primary power fails. A malfunctioning exit sign due to incorrect wiring can lead to confusion, panic, or injuries in high-stress situations. This article provides a detailed guide on how to wire an exit sign, along with essential tips for installation and compliance with safety standards.
How to Wire an Exit Sign: Step-by-Step Instructions
Wiring an exit sign requires attention to detail and adherence to electrical codes. Here’s a structured approach to ensure a safe and effective installation:
1.Gather Tools and Materials
Before starting, collect the necessary tools: a voltage tester, wire strippers, screwdrivers, electrical tape, wire connectors, and the exit sign itself. Ensure the exit sign is compatible with your building’s electrical system (e.g., 120V AC or battery-backed models).
2.Turn Off the Power
Locate the circuit breaker controlling the area where the exit sign will be installed. Shut off the power to avoid electric shock. Use a voltage tester to confirm the circuit is dead before proceeding.
3.Mount the Exit Sign
Secure the exit sign to the wall or ceiling using the provided hardware. Ensure it is positioned at the correct height (typically 7–8 feet above the floor) and angle for maximum visibility.
4.Connect the Wiring
AC-Powered Exit Signs:
For hardwired models, strip the insulation from the building’s electrical wires (black, white, and ground). Connect the black (hot) wire to the black terminal on the exit sign, the white (neutral) wire to the white terminal, and the ground wire to the green or bare copper terminal. Secure connections with wire nuts and wrap them in electrical tape.
Battery-Backed Exit Signs:
These signs often include a rechargeable battery. Connect the AC power wires as above, ensuring the battery charger is properly integrated. The battery will automatically activate during power failures.
5.Test the Exit Sign
Restore power and verify the exit sign illuminates. Check for flickering lights or error indicators. For battery-backed models, simulate a power outage to ensure the battery activates.
6.Secure the Wiring
Use cable clamps to secure wires inside the junction box. Tuck excess wiring neatly to prevent damage. Replace the cover plate and tighten screws.
Key Considerations When Setting Up an Exit Sign
Compliance with Codes: Always follow local building codes and NFPA 101 (Life Safety Code) regulations. Exit signs must meet specific brightness, color (typically red or green), and placement requirements.
Maintenance: Regularly test the exit sign’s functionality, especially the battery backup. Replace bulbs or batteries as needed.
Environmental Factors: Avoid installing exit signs in areas prone to moisture, extreme temperatures, or physical damage. Use weatherproof models for outdoor use.
Accessibility: Ensure the exit sign is unobstructed and visible from all directions. Avoid placing it behind doors, curtains, or decorations.
Dual-Power Options: Consider exit signs with both AC power and battery backup for reliability. Some models also include emergency lighting features.
Conclusion: Ensuring Safety Through Proper Wiring
Wiring an exit sign correctly is a straightforward yet vital task that directly impacts building safety. By following the steps outlined above—from gathering tools to testing the installation—you can ensure your exit sign remains operational during emergencies. Remember, compliance with codes and regular maintenance are equally important to keep the exit sign functioning as intended. Whether you’re a building manager, contractor, or DIY enthusiast, prioritizing accuracy in wiring an exit sign safeguards lives and upholds legal standards. Always consult a professional electrician if unsure about any step in the process. With the right approach, your exit sign will serve as a reliable beacon of safety for years to come.
0 notes
Text

⚠️ 𝗔𝗽𝗽𝗹𝗲 𝗟𝗮𝗽𝘁𝗼𝗽 𝗖𝗼𝗿𝗿𝗼𝘀𝗶𝗼𝗻 𝗜𝘀𝘀𝘂𝗲𝘀? 𝗪𝗲’𝘃𝗲 𝗚𝗼𝘁 𝘁𝗵𝗲 𝗦𝗼𝗹𝘂𝘁𝗶𝗼𝗻!
Has your Apple laptop been exposed to moisture, causing corrosion and damage? Don’t let corrosion ruin your device. At 𝗥𝗮𝗺𝗶𝗻𝗳𝗼𝘁𝗲𝗰𝗵 𝗟𝗮𝗽𝘁𝗼𝗽 𝗦𝗲𝗿𝘃𝗶𝗰𝗲 𝗖𝗵𝗲𝗻𝗻𝗮𝗶 𝗣𝘃𝘁 𝗟𝘁𝗱-𝗩𝗶𝗹𝗹𝗶𝘃𝗮𝗸𝗸𝗮𝗺, we specialize in repairing corrosion-related issues to restore your laptop’s functionality.
🔧 𝗖𝗼𝗺𝗺𝗼𝗻 𝗖𝗼𝗿𝗿𝗼𝘀𝗶𝗼𝗻 𝗜𝘀𝘀𝘂𝗲𝘀:
Motherboard Corrosion: Damaged circuits leading to performance issues or complete failure
Port and Connector Damage: Corroded charging ports, USB ports, or other connectors
Battery Corrosion: Leaking or corroded battery terminals affecting power delivery
Keypad and Trackpad Issues: Unresponsive or malfunctioning input devices due to corrosion
💻 𝗢𝘂𝗿 𝗘𝘅𝗽𝗲𝗿𝘁 𝗖𝗼𝗿𝗿𝗼𝘀𝗶𝗼𝗻 𝗥𝗲𝗽𝗮𝗶𝗿 𝗦𝗲𝗿𝘃𝗶𝗰𝗲𝘀 𝗜𝗻𝗰𝗹𝘂𝗱𝗲:
Thorough Inspection and Diagnosis
Cleaning and Removing Corrosion
Component Repair or Replacement
Preventative Measures to Protect Against Future Corrosion
Full System Testing to Ensure Complete Functionality
💡 𝗪𝗵𝘆 𝗖𝗵𝗼𝗼𝘀𝗲 𝗥𝗮𝗺𝗶𝗻𝗳𝗼𝘁𝗲𝗰𝗵 𝗟𝗮𝗽𝘁𝗼𝗽 𝗦𝗲𝗿𝘃𝗶𝗰𝗲 𝗖𝗵𝗲𝗻𝗻𝗮𝗶 𝗣𝘃𝘁 𝗟𝘁𝗱-𝗩𝗶𝗹𝗹𝗶𝘃𝗮𝗸𝗸𝗮𝗺?
Experienced Technicians: Expertise in handling Apple laptop corrosion repairs
Genuine Parts: Use of original Apple components for reliable repairs
Fast and Efficient Service: Quick turnaround to get your laptop back in action
Customer Satisfaction: Dedicated to delivering top-quality service
📌 𝗥𝗮𝗺𝗶𝗻𝗳𝗼𝘁𝗲𝗰𝗵 𝗟𝗮𝗽𝘁𝗼𝗽 𝗦𝗲𝗿𝘃𝗶𝗰𝗲 𝗖𝗵𝗲𝗻𝗻��𝗶 𝗣𝘃𝘁 𝗟𝘁𝗱-𝗩𝗶𝗹𝗹𝗶𝘃𝗮𝗸𝗸𝗮𝗺
No.72/1, 200 Feet 1st Floor Innering Road Thathankuppam Villivakkam chennai 600049
Land Mark : Korattur North Signal
📞 Mobile : 07448744841
0 notes
Text
The Practical Challenges and Solutions of Deutsch Connector Pin Removal
In any professional-grade electrical system, secure and weatherproof connections are critical. Deutsch connectors are widely used in vehicles and industrial machinery due to their durability and ability to protect sensitive wiring from moisture, dirt, and vibration. However, servicing these connectors often requires precision and care, especially when it comes to disassembly. This is where understanding the correct process of Deutsch Connector Pin Removal becomes indispensable for technicians and maintenance crews.
One of the main challenges in working with Deutsch connectors is removing pins or terminals without causing damage to either the connector housing or the wires themselves. Attempting to remove a pin without the proper tool or technique can result in bent terminals, compromised seals, or even complete connector failure. This not only leads to downtime but can also escalate maintenance costs if new components are required.
By mastering the correct removal process, professionals can ensure quicker repairs and more reliable reassembly. Specialized pin extraction tools are designed to slide effortlessly into the connector to release locking mechanisms without damaging internal components. These tools often come in kits that cater to a variety of Deutsch connector sizes and types, ensuring that technicians can work efficiently across different systems.
Understanding the technique for Deutsch Connector Pin Removal is more than just a maintenance step—it’s a skill that reflects professionalism, technical competence, and an emphasis on preserving the integrity of the vehicle's electrical system. As vehicles become more advanced and reliant on electronic components, this knowledge becomes even more valuable.
The Role of Led Side Light Bulbs in Enhancing Vehicle Awareness
Another vital component in modern vehicle lighting systems is the Led Side Light Bulbs. These compact yet powerful lighting units serve a crucial role in improving vehicle visibility from the side, especially during low-light conditions or when turning. Unlike standard incandescent bulbs, LED variants offer superior brightness, longer life, and faster response times—all of which are critical in improving road safety.
Properly functioning side lights are essential for larger vehicles like lorries, trailers, and vans. They help indicate the full dimensions of the vehicle to other drivers, especially at night or in poor weather. This added awareness significantly reduces the chances of side-impact collisions and helps guide traffic safely around wider or slower-moving vehicles.
Moreover, Led Side Light Bulbs consume less energy, which reduces strain on the vehicle’s electrical system and battery. Their resistance to shock and vibration makes them ideal for heavy-duty applications, ensuring consistent performance even in rugged terrains or during continuous operation. In some vehicles, these bulbs are also integrated into the aesthetic design, contributing to a professional and polished appearance that aligns with company branding.
With regulations in many regions requiring side lighting on commercial and agricultural vehicles, upgrading to reliable LED versions ensures compliance while simultaneously boosting safety. The consistency and clarity offered by LED side lights represent an important step forward in vehicle design, reinforcing how small components can play a big role in preventing accidents.
Synergizing Lighting and Electrical Maintenance for Vehicle Optimization
The interplay between high-performance lighting and reliable electrical systems cannot be overstated. While features like Work Strobe Lights and Led Side Light Bulbs ensure safety and compliance, maintaining the integrity of their wiring and connectors is just as important. A powerful light is only as effective as its power source and connection reliability.
A common scenario faced by field technicians involves troubleshooting faulty lights or intermittent signal failures. In many cases, the issue traces back to a loose or corroded connection inside a sealed harness. This is where skills such as Deutsch Connector Pin Removal become crucial. Being able to isolate and replace a faulty terminal efficiently ensures minimal downtime and preserves the vehicle’s operational readiness.
Fleet managers and operators should take a holistic approach by pairing upgraded lighting with standardized maintenance procedures. Regular inspections of wiring harnesses, moisture seals, and terminal connections, along with timely replacement of worn-out Led Side Light Bulbs, help keep systems running at peak performance. This synergy enhances both operational safety and the longevity of vehicle components, creating a more dependable and efficient work environment.
How LED Innovations Are Transforming the Vehicle Lighting Landscape
Over the last decade, LED technology has revolutionized the vehicle lighting industry. Its widespread adoption across personal, commercial, and industrial applications is a testament to its many benefits. LEDs consume less power, offer longer service lives, and provide brighter, more focused illumination compared to older technologies. Innovations in housing design, thermal management, and light pattern control have made LEDs the standard in professional lighting solutions.
From Work Strobe Lights that increase situational awareness on job sites to Led Side Light Bulbs that provide crucial side visibility, LEDs have replaced less reliable and more power-hungry alternatives. In fact, one of the major factors behind the popularity of LED-based strobe and side lighting is their minimal maintenance requirements. Once installed, they require little attention, freeing up time and resources for more critical tasks.
The integration of LED lighting into vehicles has also introduced smart controls and sensors. Lights can now respond dynamically to vehicle movement, ambient lighting conditions, or even GPS input. This level of intelligence in lighting design continues to push the boundaries of safety, efficiency, and adaptability across multiple industries.
Common Misconceptions About Vehicle Lighting Maintenance
Despite the clear advantages of modern lighting systems, several misconceptions still persist, particularly around maintenance and compatibility. Some believe that replacing standard bulbs with LED alternatives will require major rewiring or technical modifications. In reality, most LED solutions are designed to be plug-and-play, especially with the right knowledge and tools, such as those used in Deutsch Connector Pin Removal procedures.
Others assume that LED lighting systems are prone to overheating or early failure. While this may have been a concern in the early days of LED adoption, today's models are equipped with advanced thermal management systems that dissipate heat effectively. When installed correctly and used within their design parameters, LEDs consistently outperform older technologies both in lifespan and performance.
Routine checks and preventative maintenance play a significant role in ensuring reliability. Replacing aging Led Side Light Bulbs before failure, inspecting wiring for signs of fatigue, and correctly handling electrical connectors are all part of an effective maintenance plan. These proactive steps dispel the myth that vehicle lighting is a ‘set-it-and-forget-it’ component and instead emphasize the importance of regular care.
Preparing Your Fleet for the Future with Smart Lighting and Maintenance Practices
With growing demands on fleet efficiency and tighter safety regulations, the future of vehicle lighting lies in smart systems and integrated maintenance strategies. Businesses that prioritize upgrading to intelligent LED lighting while also training personnel in effective maintenance skills—such as Deutsch Connector Pin Removal—are better positioned to thrive in a competitive market.
Planning for the future means choosing products that are not only high-performing but also adaptable and serviceable. Installing reliable Work Strobe Lights and Led Side Light Bulbs is only the first step. Ensuring that these systems remain functional over the long term requires a deeper understanding of electrical systems, proper tooling, and a commitment to routine inspection.
The move toward electrification and automation in vehicle technologies makes these practices even more vital. From fleet management systems that monitor lighting status to onboard diagnostics that report faults in real-time, the integration of lighting into broader vehicle control systems represents a major shift in how vehicles are built and maintained.
Final Thoughts
The advancement of vehicle lighting technology and electrical connectivity has created new opportunities for safety, efficiency, and professionalism across all sectors. Tools and solutions like Work Strobe Lights, Deutsch Connector Pin Removal, and Led Side Light Bulbs are no longer optional add-ons—they are integral components of a modern, high-functioning vehicle.
Investing in high-quality lighting enhances not only the visibility and safety of your fleet but also your team’s ability to maintain that system effectively. Knowledge, proper equipment, and strategic planning ensure that your vehicles remain operational, compliant, and equipped to handle the challenges of any environment.
As industries continue to evolve, adopting forward-thinking technologies and practices becomes a key differentiator. With the right combination of advanced lighting solutions and professional maintenance skills, vehicle operators can light the way to a brighter, safer, and more efficient future.
0 notes
Text
How To Connect 12V Solar Inverter To Solar Panel?
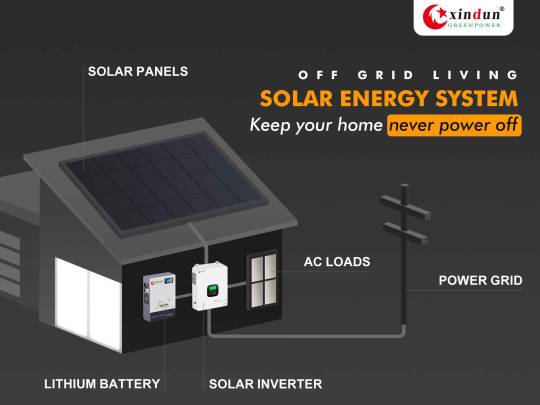
12V stands for 12 volts, which means there is a 12 volt voltage difference when current flows between two points. The main function of solar inverter is to convert the DC power generated by solar panels into AC power for use by home appliances. Usually, 12V solar inverter is suitable for small power devices such as lamps, fans, and rice cookers. However, many users are not clear about how to properly connect the inverter to the solar panel after purchasing it. Next, Xindun will give you a detailed introduction to the correct installation steps of the solar panel system:
Solar panel system components include:
1. 12V solar inverter
2. 12V solar panel, which needs to be compatible with the solar panel system
3. 12V battery for storing the electricity generated during the day
4. Solar charge controller, which regulates the voltage and current to protect the battery from overcharging or over-discharging
5. Wires and connectors are perfect for connection and hooking
6. Multimeter provides readings and ensures the safety and compatibility of the connection
7. Circuit breaker or fuse for overcurrent protection
Installation and connection steps:
1. Solar panel installation
Mount the solar panel where the sun shines. Adjust the inclination according to the local latitude to ensure maximum light absorption.
2. Connect the solar panel to the solar controller
Use a cable with suitable cross-section to connect the positive and negative poles of the solar panel to the PV input port of the solar controller respectively. The controller is responsible for regulating the DC generated by the sun to avoid overcharging the battery.
3. Connect the solar controller to the battery
Connect the battery output port of the controller to the corresponding positive and negative poles of the 12V battery. Please ensure the connection polarity is correct and use the appropriate wire diameter to avoid excessive voltage drop.
It is recommended to connect a circuit breaker in series between the controller and the battery to prevent accidental short circuit or reverse connection of the battery.
4. Connect the battery to the inverter
Connect the DC output of the battery to the input terminal of the 12V inverter. Be sure to use a fuse or circuit breaker to quickly disconnect the power supply in the event of a short circuit or abnormal load.
The inverter should be placed in a well-ventilated location to avoid reduced conversion efficiency or automatic shutdown due to excessive temperature.
5. Test the connection
Avoid damage to the equipment due to installation errors. Use a multimeter to test the voltage readings one by one to ensure that the voltages between the components match and the polarity is correct.
6. Load connection
Finally, plug the AC load that needs to be powered into the AC output socket of the inverter. A complete 12V solar power supply system has been built, which can stably provide stable power to your appliances.
Notes:
1. Ensure that the controller, battery, and inverter are powered off before wiring.
2. Use the correct wire gauge to avoid overheating or excessive voltage drop.
3. Maintain a good ventilation environment.
4. Check the connection points regularly to prevent oxidation or looseness leading to poor contact.
5. Fuse protection to prevent overcurrent, overvoltage and other faults from damaging the system.
The solar inverters provided by Xindun Power include 12V, 24V, 48V, 96V, 192V, and 384V rated voltages, which can adapt to different power requirements, and have built-in intelligent temperature control, overload protection and other functions. It is the best choice for small and medium-sized solar projects, homes, and off-grid systems.
1 note
·
View note
Text
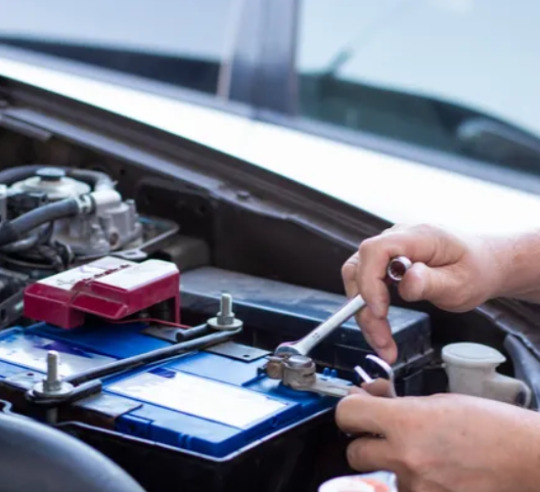
The Unsung Hero of Electrical Maintenance: Understanding Battery Clamp Grease
In the intricate world of automotive and electrical system maintenance, some essential products often go unnoticed despite their critical importance. One such product is battery clamp grease—a specialized formulation that plays a key role in preserving and protecting battery terminals and electrical connections. While this grease may appear to be a minor addition to your vehicle's care routine, it serves as a powerful defense against corrosion, voltage drop, and power loss, ensuring that the heart of your vehicle—the battery—functions with maximum efficiency.
As vehicle technology evolves and electrical systems become more complex and sensitive, the need for reliable contact protection becomes even more essential. In this blog, we’ll explore everything you need to know about battery clamp grease, how it works, why it's important, and why choosing a high-quality product makes a world of difference. For Indian automotive professionals and vehicle owners, Safety Impexin proudly brings superior-grade battery clamp grease products that meet international performance standards.
What Is Battery Clamp Grease and Why Is It Important?
Battery clamp grease is a dielectric lubricant specifically designed for use on battery terminals, clamps, and electrical connectors. Its primary function is to create a protective barrier between metal surfaces, preventing the buildup of oxidation and corrosion that often results from exposure to moisture, road salt, acid vapors, and other environmental factors.
Corrosion at battery terminals can lead to poor electrical conductivity, which affects the ability of the battery to deliver consistent voltage. Over time, this can result in starting problems, erratic performance of electronic systems, and even premature battery failure. By applying battery clamp grease, you ensure long-term protection, reduce maintenance issues, and optimize energy transfer throughout the system.
How Battery Clamp Grease Works
The composition of battery clamp grease includes thick base oils blended with anti-oxidation and anti-corrosion additives. This formulation is non-conductive and moisture-resistant, forming an insulating layer that seals the terminal interface without disrupting the electrical path inside the clamp itself.
When applied properly, battery clamp grease remains in place, resisting washout from rain, engine heat, or car washes. It doesn’t interfere with electrical flow because it’s designed to coat the surrounding metal surfaces without penetrating the contact point where the actual current passes through. This helps maintain the integrity of the terminal connection while keeping contaminants at bay.
Battery Clamp Grease in Extreme Conditions
Modern vehicles operate in highly variable environments, from the scorching heat of city traffic to the dampness of monsoons and the dust of rural roads. These extremes can accelerate wear and corrosion, especially in exposed electrical areas. In such conditions, battery clamp grease offers an added layer of security that standard contact sprays or water-resistant lubricants cannot provide.
High-quality battery clamp grease is engineered to withstand wide temperature fluctuations without hardening or dripping. It remains stable and functional in freezing winter starts and under-hood heat during summer drives. This thermal stability ensures your battery connections are protected year-round, no matter the climate.
Performance Benefits Beyond Protection
The primary goal of battery clamp grease is corrosion prevention, but its benefits extend much further. A clean, protected terminal maintains better conductivity, reducing the likelihood of voltage drop and energy loss. This means more reliable engine starts, steadier power to in-car electronics, and fewer unexpected breakdowns.
Furthermore, battery clamp grease helps avoid the inconvenience and costs associated with corroded terminals, such as having to clean or replace battery cables or dealing with dead batteries. A simple application during routine maintenance can save time, extend battery life, and reduce the need for emergency repairs.
Choosing the Right Battery Clamp Grease
As with all automotive products, not all battery clamp greases are created equal. The best greases are those that combine long-lasting durability with non-conductive properties, effective sealing against moisture, and compatibility with automotive metals such as copper, aluminum, and steel. Avoid generic petroleum greases, as they can degrade rubber and plastic components and may not withstand high-temperature conditions.
Professional-grade battery clamp grease available through Safety Impexin meets strict formulation standards and provides consistent protection under all operating environments. Sourced from top international manufacturers, these products are tested to deliver optimal results for automotive, marine, and industrial battery systems.
Application Best Practices
Applying battery clamp grease is a simple process that pays major dividends. Begin by disconnecting the battery terminals and thoroughly cleaning both the clamps and posts with a battery brush or contact cleaner. Once the surfaces are clean and dry, apply a thin, even coat of battery clamp grease to the outside of the terminal post and the inner surface of the clamp.
Avoid applying the grease directly to the contact point where metal-to-metal electrical flow occurs. Instead, focus on sealing the surrounding area to prevent moisture and contaminants from creeping in. Once the grease is applied, reconnect the terminals and ensure they are securely tightened. Periodic inspection can help ensure the coating remains intact and protective.
Versatility Across Vehicle Types
Battery clamp grease is not just for passenger cars. Its use is equally critical in motorcycles, commercial trucks, agricultural equipment, boats, and even solar and backup power systems. Any application involving battery connections benefits from the protective properties of this grease.
In two-wheelers, battery terminals are often exposed to rain and vibration, which can lead to quick degradation of contact points. In commercial vehicles and industrial machinery, heavy-duty electrical loads make it even more important to maintain reliable connections. A single application of high-quality battery clamp grease provides peace of mind across all these use cases.
Why Automotive Professionals Trust Safety Impexin
As India’s leading provider of advanced automotive maintenance products, Safety Impexin brings trusted global brands and high-performance formulations to both service professionals and end users. With a reputation built on authenticity, technical support, and timely delivery, Safety Impexin ensures that customers receive only the finest quality greases and lubricants for every automotive application.
When it comes to electrical connection care, Safety Impexin offers premium-grade battery clamp grease that has been tried, tested, and proven to deliver superior results. Whether you’re a workshop owner, fleet operator, or passionate DIYer, the right product is always within reach through their professional network.
Customer Confidence and Long-Term Value
For many drivers, battery maintenance is often overlooked until a problem arises. However, consistent care with battery clamp grease creates a long-term impact on performance and reliability. Users who have incorporated this into their regular maintenance routines report fewer issues, smoother starts, and extended battery life.
With the wide availability of premium battery clamp grease through Safety Impexin, customers no longer need to settle for inferior alternatives. They can now confidently maintain their electrical systems, knowing they are using a product trusted by professionals worldwide.
Conclusion: Protecting Power, Preventing Problems
In summary, battery clamp grease is one of the simplest yet most effective tools in maintaining a vehicle’s electrical integrity. It shields crucial connections from environmental damage, preserves conductivity, and reduces the likelihood of unexpected failures. Its value extends far beyond the surface, providing deep protection where it matters most.
Choosing the right battery clamp grease and applying it correctly ensures that your vehicle’s power system remains efficient and trouble-free. With the support and expertise of Safety Impexin, you have access to world-class products designed to meet the highest standards of performance and protection.
For a small investment of time and care, battery clamp grease delivers unmatched returns in reliability, peace of mind, and vehicle health. Experience the benefits today with high-quality options available exclusively through Safety Impexin.
0 notes
Text
Why do my headlights go dim when I step on the brake?
The dimming of your headlights when you press the brake pedal is typically caused by an electrical system imbalance or component failure. Here’s a breakdown of the likely causes and solutions, based on your scenario:
1. Overloaded Electrical Circuit
Why it happens: When you press the brake pedal, the brake lights draw additional power from the vehicle’s electrical system. If the alternator or battery is weak, this sudden load can cause a voltage drop, dimming other lights like headlights. • Example: A failing alternator might produce <13V at idle, struggling to power both headlights and brake lights simultaneously.
Test: • Measure battery voltage with the engine running: ◦ Normal: 13.5–14.5V (idle and driving). ◦ Weak alternator: Voltage drops below 13V when brakes are applied.
2. Faulty Ground Connections or Wiring
Poor grounding in the headlight or brake light circuit can create resistance, leading to voltage drops when the brake lights activate. • Example: Corroded battery terminals or loose alternator wiring.
Test: • Inspect ground points near the headlights and brake lights. • Check for voltage drop between the battery and headlight connectors (should be <0.5V).
3. Aging Battery or Alternator
Weak battery: A battery nearing the end of its life (2–5 years) may fail to stabilize voltage during high-demand scenarios like braking.
Failing alternator: If the alternator’s voltage regulator malfunctions, it can’t maintain consistent power output, especially under load.
Test: • Battery voltage with engine off: <12.4V indicates a weak battery. • Alternator output at 2,000 RPM: <13.5V signals alternator failure.
4. Incorrect Bulb Types or Retrofit Issues
LED vs. halogen: Aftermarket LED headlights or brake lights might conflict with the vehicle’s electrical system if not installed with proper resistors or relays. • Example: LED brake lights drawing less power could cause voltage fluctuations if the system expects halogen-level resistance.
Fix: Use CANbus-compatible LEDs or install relays to stabilize the circuit.
5. Faulty Brake Light Switch or Sensor
E-brake sensor interference: In some vehicles (e.g., 2003 Ford Escape), a malfunctioning electronic parking brake sensor may erroneously signal the headlights to dim when the brake pedal is pressed. • Symptom: Headlights flicker or dim briefly when adjusting the parking brake.
Fix: Replace the brake light switch or inspect wiring connected to the parking brake sensor.
Diagnostic Steps
Check alternator and battery health with a multimeter.
Clean electrical connections (battery terminals, headlight grounds).
Test brake light circuit load: Swap incandescent brake bulbs for LEDs to reduce power draw.
Inspect headlight relay and fuse for corrosion or damage.
Cost Estimates
Alternator replacement: $300–$800.
Battery replacement: $100–$250.
Brake light switch repair: $50–$150.
Bottom Line: Dimming headlights during braking often point to an overtaxed electrical system. Start with simple fixes like cleaning connections or testing the battery. If unresolved, focus on the alternator or circuit upgrades. Ignoring this issue risks complete electrical failure or safety hazards.

#led lights#car lights#led car light#youtube#led auto light#led headlights#led light#led headlight bulbs#ledlighting#young artist#car culture#cars#race cars#classic cars#car#coupe#suv#convertible#chevrolet#supercar#car light#brake lights#brakes#light#headlamp#headlight bulb#headlamps#headlight#aftermarket new lamp#car lamp
3 notes
·
View notes
Text
Cable Lugs Manufacturer in India: Powering the Nation with Reliable Connections

In a world that runs on electricity, secure and efficient connections are everything. Whether you're building power distribution panels, wiring industrial equipment, or installing home automation systems, you need one component that can make or break your setup — cable lugs. These small yet mighty connectors ensure seamless current flow and long-lasting electrical performance.
In this article, we’ll explore the role of a Cable Lugs Manufacturer in India, the importance of quality lugs, and why leading companies like Amiable Impex have become a trusted name in the electrical connectivity space.
What Are Cable Lugs?
Cable lugs, also known as cable terminals, are devices used to securely connect cables to electrical appliances, other cables, surfaces, or mechanisms. Made typically from copper, aluminum, or bi-metallic materials, cable lugs ensure safe and effective current transfer from the cable to the connected device.
They come in various shapes and sizes depending on the application — ring-type, pin-type, U-type, tubular lugs, and more. Whether crimped or bolted, the quality of the lug is critical in minimizing resistance and maximizing safety.
Why Choosing the Right Cable Lugs Matters
Electrical failures are often the result of poor connections — something easily preventable with high-quality lugs. Poorly manufactured or incompatible lugs can cause overheating, short circuits, and even fires.
That’s why selecting the right Cable Lugs Manufacturer in India is crucial. An experienced manufacturer ensures:
High conductivity through pure-grade materials
Strong mechanical strength for secure grip
Resistance to corrosion and temperature variations
Precision dimensions for a perfect fit
Compliance with international safety standards
India, with its booming infrastructure and energy sector, has emerged as a hub for cable lug manufacturing. However, not all manufacturers are created equal.
Growing Demand for Cable Lugs in India
India’s rapid industrialization and electrification of remote areas have significantly increased the need for reliable cable connectivity products. From smart cities and data centers to railways and renewable energy plants, every project needs robust electrical infrastructure.
As such, the demand for a trusted Cable Lugs Manufacturer in India has skyrocketed. With safety, durability, and quality being top priorities, electrical contractors and project engineers are turning to experienced brands that can deliver dependable solutions.
Applications of Cable Lugs
Cable lugs are an essential component across various industries and sectors:
Power Generation & Distribution: Ensuring secure cable terminations in substations and transformers
Telecommunications: Used in towers, switches, and signal systems
Railways & Metro Projects: For control panels, signaling systems, and traction networks
Oil & Gas Industries: Suitable for harsh environments with high safety demands
Automotive & Aerospace: Lightweight, high-performance lugs for modern vehicles
Renewable Energy Projects: Connecting solar panels, inverters, and batteries
Buildings & Infrastructure: From residential wiring to large commercial buildings
Wherever there's electricity, there's a cable lug doing the heavy lifting behind the scenes.
Why Amiable Impex is a Leading Cable Lugs Manufacturer in India
Among the many manufacturers in the country, Amiable Impex has made a mark with its commitment to quality, innovation, and customer satisfaction. With years of industry experience, Amiable Impex is recognized as one of the top Cable Lugs Manufacturer in India for a wide range of applications.
What Sets Amiable Impex Apart?
High-Quality Materials: Use of 99.9% pure electrolytic copper or aluminum for superior conductivity
Precision Manufacturing: State-of-the-art machines ensure accurate dimensions and smooth finishing
Wide Product Range: Ring-type, pin-type, bimetallic, tubular, compression lugs, and more
Customization: Tailor-made lugs as per client requirements for voltage, cable size, and application
Compliance: Products meet IS, DIN, BS, and other global standards
Global Reach: Supplying to over 40 countries across industrial, defense, and infrastructure sectors
How Are Cable Lugs Manufactured?
As a top Cable Lugs Manufacturer in India, Amiable Impex follows a detailed production process to ensure product consistency and performance.
Raw Material Selection: Only the highest quality copper and aluminum are sourced.
Cutting & Forming: Precision machinery cuts and forms the lug bodies.
Annealing: To ensure flexibility and prevent cracking during installation.
Surface Treatment: Bright tin plating for corrosion resistance and improved conductivity.
Quality Testing: Each batch undergoes electrical and mechanical testing.
The entire process is handled under strict quality control to deliver lugs that meet the most demanding standards.
Safety and Standards Matter
In the electrical industry, safety is not negotiable. Faulty or substandard lugs can result in fire hazards or equipment damage. Reputable manufacturers like Amiable Impex not only meet but exceed the required safety and performance benchmarks.
Every lug is designed for optimal crimping, voltage rating, and temperature resistance, ensuring the best results in real-world conditions.
Exothermic Welding and Cable Lugs – The Perfect Match
For critical installations, especially in grounding systems, Exothermic Welding is often used to join cable lugs and conductors. This welding process ensures a permanent molecular bond that is superior to mechanical or crimp connections.
Being an established Exothermic Welding Powder Manufacturer, Amiable Impex provides complete solutions — from lugs to welding kits — ensuring total compatibility and installation reliability.
Factors to Consider When Choosing a Cable Lugs Manufacturer in India
Selecting the right supplier is about more than just price. Here’s what to look for:
Experience: Long-standing manufacturers understand industry challenges.
Material Quality: Purity of copper/aluminum affects performance and safety.
Product Variety: A wide range means better customization and availability.
Testing & Certification: Every batch should undergo quality testing.
Delivery Capability: On-time delivery is crucial for project timelines.
After-Sales Support: Trusted brands like Amiable Impex offer ongoing technical support.
Sustainability in Manufacturing
Modern industries are placing a strong emphasis on eco-friendly manufacturing. Leading Cable Lugs Manufacturer in India like Amiable Impex adopt sustainable practices — including efficient energy use, minimal waste generation, and recyclable materials — without compromising product quality.
This not only helps the environment but also aligns with green building certifications and sustainable infrastructure initiatives.
India’s Position as a Global Export Hub
India is not only meeting domestic demand but also supplying cable lugs to major international markets. Thanks to technological advancements, skilled labor, and export-friendly policies, Indian manufacturers are becoming global leaders in electrical connectivity.
Amiable Impex, with its strong logistics network and export experience, is a shining example of how Indian manufacturers are setting new benchmarks in quality and reliability.
Thermit Welding and Electrical Terminations
In projects that demand high-voltage connections or specialized rail and grounding work, Thermit Welding is still relevant. A company that offers both cable lugs and thermit welding materials provides a one-stop solution. As a trusted Thermit Welding Manufacturer, Amiable Impex offers compatibility, safety, and technical support across products.
Final Thoughts: Choose the Right Partner for Your Connectivity Needs
From small residential setups to mega infrastructure projects, cable lugs are the unsung heroes that keep our electrical systems running safely. Choosing the right Cable Lugs Manufacturer in India is a decision that affects the performance, durability, and safety of your entire electrical system.
With a reputation built on quality, innovation, and global trust, Amiable Impex is the name to rely on.
Contact Amiable Impex Today!
Looking for a reliable Cable Lugs Manufacturer in India? Partner with Amiable Impex for a full range of high-quality cable lugs, grounding solutions, and exothermic welding kits.
🌐 Website:amiableimpex.com
Amiable Impex — Your Trusted Partner in Powering Safe Connections.
0 notes
Text
Leading Copper Strips Manufacturers in India: Discover Excellence with KWM India
Copper strips are an essential component in multiple industries, from power distribution to electronics, HVAC systems, and even renewable energy. With India being a key player in the global copper market, it's important to recognize manufacturers who combine quality, precision, and innovation. Among these, KWM India has carved out a distinct identity as a top copper strip manufacturer in India, known for its technical expertise and customer-centric approach.
Why Copper Strips Matter
Copper strips are widely used for their outstanding electrical conductivity, corrosion resistance, and flexibility. They are found in:
Electrical transformers and switchgear
Busbars and control panels
Earthing systems
Heat exchangers
Battery connectors and terminals
Their reliability and performance are crucial, which is why choosing the right manufacturer is vital.
KWM India: Trusted Name in Copper Strip Manufacturing
With years of experience and a reputation for quality, KWM India has become one of the most trusted copper strip manufacturers in India. The company supplies copper strips that meet both domestic and international standards, serving industries with precision-engineered solutions.
Key Features of KWM India's Copper Strips
High Conductivity: KWM India's copper strips are made from high-purity copper (up to 99.9%), ensuring optimal conductivity and performance.
Tight Tolerances & Custom Sizes: Whether you need thin, narrow strips or wide, heavy-duty ones, KWM India offers complete customization to meet your technical requirements.
Superior Surface Finish: With advanced rolling and annealing processes, the copper strips feature excellent surface finish and uniformity.
Corrosion Resistance: Ideal for long-term applications, especially in electrical and industrial setups where corrosion protection is key.
Eco-Friendly Manufacturing: KWM India follows sustainable production practices, including recycling and efficient energy use.
Industries Served
Power Generation & Distribution
Electrical & Electronics
Renewable Energy (Solar/Wind)
Automotive & EVs
HVAC & Refrigeration Systems
Global Reach & Standards Compliance
KWM India’s copper strips are not just used across India but are also exported to the Middle East, Europe, and Southeast Asia. All products conform to global standards like IS, ASTM, and DIN, making KWM India a reliable export partner.
Why Choose KWM India?
Decades of manufacturing experience
Cutting-edge machinery & testing labs
Dedicated R&D and technical support
Reliable delivery and customer support
ISO-certified processes and systems
Conclusion
For industries that demand precision, conductivity, and durability, copper strips are non-negotiable components. When quality matters most, KWM India stands out as a premier copper strip manufacturer in India, delivering tailor-made solutions backed by experience and engineering excellence.
Whether you’re a manufacturer, contractor, or trader looking for high-performance copper strips, KWM India is a partner you can trust.
Visit:- https://www.kmwindia.com/copper-strips.html
0 notes
Text
How to Clean Golf Cart Battery Terminals (Prevent Corrosion & Extend Life)
A few months ago, I noticed my golf cart wasn’t running as smoothly as it used to. The acceleration felt sluggish, and sometimes it even hesitated before moving. At first, I thought it was just an aging battery issue—until I popped the seat open and saw the horror: thick, crusty, blue-green corrosion all over the battery terminals.
I had no idea that something as simple as dirty terminals could cause such performance issues. After some research (and a few failed attempts), I finally figured out the right way to clean golf cart battery terminals properly. Not only did my cart start running like new, but I also learned how to prevent future corrosion.
If you’re dealing with the same problem, don’t worry—I’ve got you covered. In this guide, I’ll walk you through the safest, most effective way to clean your golf cart battery terminals, prevent corrosion, and extend the life of your batteries.
Why Cleaning Golf Cart Battery Terminals Is Important
Golf cart batteries are the heart of your vehicle’s electrical system. Over time, battery terminals accumulate corrosion—a mix of acid residue, dirt, and oxidation. If left unchecked, this buildup can:
Reduce conductivity, leading to poor performance and voltage drops.
Cause overheating, damaging the battery and cables.
Shorten battery life, forcing premature replacements.
Increase resistance, making the cart sluggish or unresponsive.
Regular cleaning ensures optimal power flow and prevents costly repairs.
What You’ll Need to Clean Golf Cart Battery Terminals
Before starting, gather these supplies:
Baking soda & water (for neutralizing acid)
Wire brush or battery terminal cleaner
Wrench or pliers (to loosen terminals)
Protective gloves & goggles (safety first!)
Petroleum jelly or anti-corrosion spray (for prevention)
Clean cloth or rag
Avoid using harsh chemicals or metal scrapers, as they can damage the terminals.
Step-by-Step Guide to Cleaning Golf Cart Battery Terminals
Step 1: Safety First – Disconnect the Batteries
Turn off the golf cart and remove the key.
Always disconnect the negative terminal first (black cable) to avoid short circuits.
Then, remove the positive terminal (red cable).
Step 2: Inspect for Corrosion & Damage
Check for:
White, green, or blue crusty deposits
Loose or frayed cables
Cracked or leaking batteries
If cables are damaged, they may need replacement.
Step 3: Neutralize Battery Acid with Baking Soda Solution
Mix 1 tablespoon of baking soda with 1 cup of warm water.
Dip an old toothbrush or rag into the solution and scrub the terminals.
The mixture will fizz as it neutralizes acid—this is normal.
Step 4: Scrub the Terminals & Cable Ends
Use a wire brush or battery terminal cleaner to remove stubborn corrosion.
Clean both the battery posts and the inside of cable connectors.
Wipe away residue with a clean, damp cloth.
Step 5: Reconnect the Terminals & Apply Anti-Corrosion Protection
Reattach the positive terminal first, then the negative terminal.
Tighten securely to ensure a good connection.
Apply petroleum jelly or anti-corrosion spray to prevent future buildup.
How to Prevent Golf Cart Battery Corrosion
Regular Inspections – Check terminals every 1-2 months.
Keep Batteries Dry – Moisture accelerates corrosion.
Use Anti-Corrosion Pads or Sprays – These create a protective barrier.
Avoid Overcharging – Use a smart charger to prevent excess acid buildup.
Tighten Connections – Loose terminals increase resistance and heat.
FAQs About Cleaning Golf Cart Battery Terminals
1. How often should I clean my golf cart battery terminals?
Every 3-6 months, or whenever you notice corrosion.
2. Can I use Coca-Cola to clean battery terminals?
Yes, Coke’s acidity can dissolve corrosion, but baking soda is safer and more effective.
3. What happens if I don’t clean the terminals?
Corrosion increases resistance, reduces battery life, and can cause electrical failures.
4. Can corroded terminals drain my battery?
Yes, poor connections lead to power loss and inefficient charging.
5. Is WD-40 good for battery terminals?
WD-40 can help clean corrosion, but always follow up with an anti-corrosion spray.
Final Thoughts
Cleaning golf cart battery terminals is a simple yet crucial maintenance task. By following these steps, you’ll ensure better performance, longer battery life, and fewer electrical issues.
The first time I cleaned my terminals, I was amazed at the difference—my golf cart ran smoother, held a charge longer, and even seemed faster! Now, I make it a habit to check and clean them regularly.
If you’ve been ignoring those crusty terminals, don’t wait—grab your tools and give your golf cart the care it deserves. Your batteries (and your wallet) will thank you!
Did you find this guide helpful? Share your experience or questions in the comments below! 🚗⚡
0 notes
Text
Save Your Home from Power Cuts with a Sine Wave Inverter Kit
Power cuts are frustrating. One minute everything’s fine, and the next, the fan stops, lights go out, and appliances turn off. These blackouts can be more than just annoying. They can cause discomfort, delay important tasks, or even damage your electronics. But don’t worry. There’s a smart solution – a sine wave inverter kit. Organisations such as Microtek deliver these kits, which are created for both commercial and residential areas. If you’ve not come across it or aren’t aware of how it functions, don’t fear. This article will walk you through everything in simple and uncomplicated language.
What is a Sine Wave Inverter Kit?
Let’s start with the basics of this Best Inverter.
A sine wave inverter kit is a power backup system.
It gives your home electricity when the main power supply goes out.
It uses a battery to store power.
It changes battery power (DC) into the same kind of electricity (AC) you get from the power grid.
That means your home appliances keep working even during a blackout.
What’s Inside a Sine Wave Inverter Kit?
A standard sine wave inverter kit usually includes the following:
Inverter (This is the main unit that alters energy)
Battery (It stores up all the power)
Battery cables and connectors
Trolley or cabinet (This is completely optional)
User manual
Some inverter kits may also include fuses or safety switches.
How Does It Work?
The process is simple and smart.
Your main power is ON: The battery inside the kit gets charged.
Power goes OFF: The inverter instantly starts giving power from the battery.
Power comes back: The inverter stops using the battery and starts charging it again.
All of this happens in just seconds. You may not even notice the switch.
Benefits of Using a Sine Wave Inverter Kit
Let’s talk about what you really get from this system:
1. Comfort During Power Cuts
No more sweating during hot summer outages
You can watch TV or charge phones even when the lights are gone
2. Protects Expensive Devices
Smooth power means no damage to electronics
Safer for gadgets like routers, computers, and TVs
3. Low Noise Operation
No buzzing or humming sounds
Quiet and peaceful, even at night
4. Saves Money in the Long Run
Appliances last longer
Battery life is better with smooth charging and discharging
No fuel cost like generators
5. Easy to Use
Plug-and-play system
Comes with a display or indicators to show battery level, load, etc.
Auto switch from mains to battery and back
Things to Consider Before Buying
Now that you know the benefits, let’s see what to check before buying a kit.
1. Power Requirement
Add up the power of appliances you want to run
Multiply this with how many hours you want to use them
This gives you the load size and backup time you need.
2. Inverter Capacity
Inverters come in different sizes like 600 VA, 900 VA, 1500 VA, etc.
More VA means more power output
Choose one that matches your needs, with a little extra for safety
3. Battery Type and Size
Bigger batteries give longer backup
Types include lead-acid, tubular, and lithium
Tubular batteries are the most common and work well for homes
4. Brand and Warranty
Always go with trusted brands
Look for a 2–3 year warranty on the inverter and battery
Make sure service support is available near you
5. Display and Alerts
Some inverters show useful info like battery level, charging status, etc.
Others beep when the battery is low or the system is overloaded
How to Use It Safely?
Safety is very important. Here are some quick tips:
Keep the inverter in a dry, cool place
Don’t keep it too close to walls (for airflow)
Never overload the system
Turn it off if there’s a fault
Keep children away from the battery
Check battery water levels every few months (if using lead acid)
Clean the battery terminals to avoid rust
Service the system once a year
Picking the Sine Wave Inverters from Microtek
If you’re wondering which brand to trust, Microtek is one of the best in the business. We offer high-quality sine wave inverters and kits for homes, offices, and even commercial spaces. Our products are known for their durability, smooth performance, and smart features. We also offer solar-ready inverter kits, which means you can easily add solar panels later if you want. With a strong service network and long warranty, we will give you complete peace of mind.
Conclusion
Power cuts are a part of life in many places. But that doesn’t mean you have to suffer. A sine wave inverter kit is a simple, smart solution to keep your home running smoothly even when the lights go out. It protects your appliances. It gives you peace and comfort. And it’s easy to install and use. Just make sure you choose the right size and a trusted brand. If you want a system that’s reliable and made for everyday use, choose Microtek. Their inverter kits are trusted by millions of households. Whether you live in a city or a small town, Microtek has a power backup solution just for you. Live smarter. Stay powered. Let Microtek light up your home, even during a blackout.
0 notes
Text
How Various Weather Conditions Affect Your Car Battery
Your car battery plays a crucial role in powering essential vehicle systems, from starting the engine to running electronic accessories. But no matter how reliable your battery is, it's still vulnerable to the environment around it. Weather conditions—both hot and cold—can significantly affect your battery's performance and lifespan. Whether you're dealing with freezing winters or sweltering summers, understanding how climate impacts your battery can help prevent unexpected breakdowns. That’s especially true for drivers needing Battery Replacement in Newark, DE, where seasonal temperature shifts can be drastic.
Let’s explore how different weather conditions influence your car battery and what you can do to protect it.
Cold Weather and Battery Power
Winter weather is notorious for causing battery problems. As temperatures drop, the chemical reactions inside your battery slow down, which reduces its ability to hold and deliver power. A battery that performs perfectly in moderate conditions might struggle to turn over the engine when it's freezing outside.
Cold cranking amps (CCA) become especially important in winter. This measurement tells you how well your battery can start an engine in low temperatures. If your battery is aging or wasn’t designed for harsh winters, you may find your car reluctant—or even unable—to start in the morning.
Additionally, increased use of heaters, defrosters, and headlights during shorter daylight hours can put more strain on the battery. It’s important to regularly check battery voltage and connections during the colder months.
Heat and Battery Wear
While winter may take the blame for sudden breakdowns, summer heat is equally damaging—just in a different way. High temperatures accelerate the chemical reactions inside the battery, which can lead to overcharging and increased evaporation of the battery fluid. This causes internal components to corrode faster and shortens the overall life of the battery.
Even though your battery may seem to function fine during warm months, the long-term damage from heat exposure becomes apparent when temperatures fall again. That’s why some battery failures attributed to winter actually begin with summer heat damage.
To minimize heat-related wear, park in shaded areas whenever possible, and ensure your battery is mounted securely and has proper insulation.
Humidity and Corrosion
Regions with high humidity levels can create additional problems for car batteries. Moisture in the air encourages corrosion on battery terminals and connectors, which impedes the flow of electricity and can lead to starting problems.
Corrosion can also affect sensors and electrical wiring connected to the battery, increasing the likelihood of false readings or malfunctions. Regularly inspecting and cleaning your battery terminals can prevent these issues. Applying a protective coating or using corrosion-resistant washers can also help.
Rain and Electrical Vulnerability
While car batteries are designed to resist water to some extent, heavy rain and flooding can still pose risks���especially if your car has existing electrical issues or damaged battery casing. Water exposure can short-circuit components, drain the battery faster, or even pose safety hazards in extreme cases.
After driving through flooded areas or heavy rain, it’s a good idea to check under the hood for any signs of moisture infiltration. Make sure the battery housing and wires are dry and undamaged.
Seasonal Transitions and Battery Testing
The transition from one season to another is a key time to assess the health of your battery. Whether going from winter to spring or summer to fall, these changes can expose existing battery weaknesses. Testing your battery before extreme weather hits can help you avoid sudden failures.
Most automotive service centers can check battery voltage, fluid levels, and performance in minutes. If your battery is more than three years old, or if you notice slower engine cranking or dimming lights, consider testing it more frequently.
Maintenance Tips for All Seasons
Protecting your battery year-round requires a bit of preventive maintenance. Here are a few universal tips:
Keep it clean: Dirt and corrosion can discharge your battery over time. Clean the terminals regularly.
Drive regularly: Short trips don’t give your alternator enough time to recharge the battery. Drive for at least 15–20 minutes at a time when possible.
Check the voltage: A fully charged battery should read about 12.6 volts. Use a voltmeter or have it tested at a service center.
Secure the battery: Vibration can damage battery plates. Make sure it’s tightly fastened in place.
By following these tips, you can extend your battery’s life and avoid surprises—no matter what the forecast says.
Conclusion
Weather plays a larger role in battery health than many drivers realize. From freezing cold to scorching heat, each condition presents unique challenges that can affect performance and lifespan. For those dealing with seasonal extremes or frequent temperature changes, especially drivers needing Battery Replacement in Newark, DE, proactive care is essential. Regular inspections, proper maintenance, and timely replacements ensure you’re never left stranded. Trust in local professionals who offer reliable Battery Replacement Services to keep your vehicle running smoothly—rain or shine.
0 notes